Eldes ET08 User manual

COMMUNICATOR
ET08 / ET081
Copyright ©“ELDES UAB”, 2011. All rights reserved.
It is strictly forbidden to copy and distribute information in this document or pass to a third party without an advanced written authorization from
“ELDES UAB”. “ELDES UAB”reserves the right to update or modify this document and/or related products without a warning. Hereby, ELDES UAB
declares that this communicator ET08 / ET081 is in compliance with the essential requirements and other relevant provisions of Directive 1999/5/EC.
The declaration of conformity may be consulted at www.eldes.lt
User Manual v1.2
Safety instructions
Please read and follow these safety guidelines in order to maintain safety of operators and people around:
• GSM communicator ET08 / ET081 (further referenced as system or device) contains a radio transceiver operating in
GSM850/900/1800/1900 bands.
• DO NOT use the system where it can interfere with other devices and cause any potential danger.
• DO NOT use the system with medical devices if this is required in the manual of the medical device.
• DO NOT use the system in hazardous environment.
• DO NOT expose the system to high humidity, chemical environment or mechanical impacts.
• DO NOT attempt to personally repair the system.
• System labelling sticker is at the bottom of the device.
System ET08 / ET081 is a device mounted in limited access areas. Any system repairs must be done only by qualied, safety
aware personnel.
Mains power must be disconnected before any installation or tuning work starts. The system installation or maintenance
must not be done during stormy conditions.
The system must be powered by main 10-24V 300mA power supply which must be approved by LST EN 60950-1 stan-300mA power supply which must be approved by LST EN 60950-1 stan-
dard and be easily accessible.
Any additional devices linked to the system ET08 / ET081 (computer, sensors, relays etc.) must be approved by LST EN 60950-
1 standard.
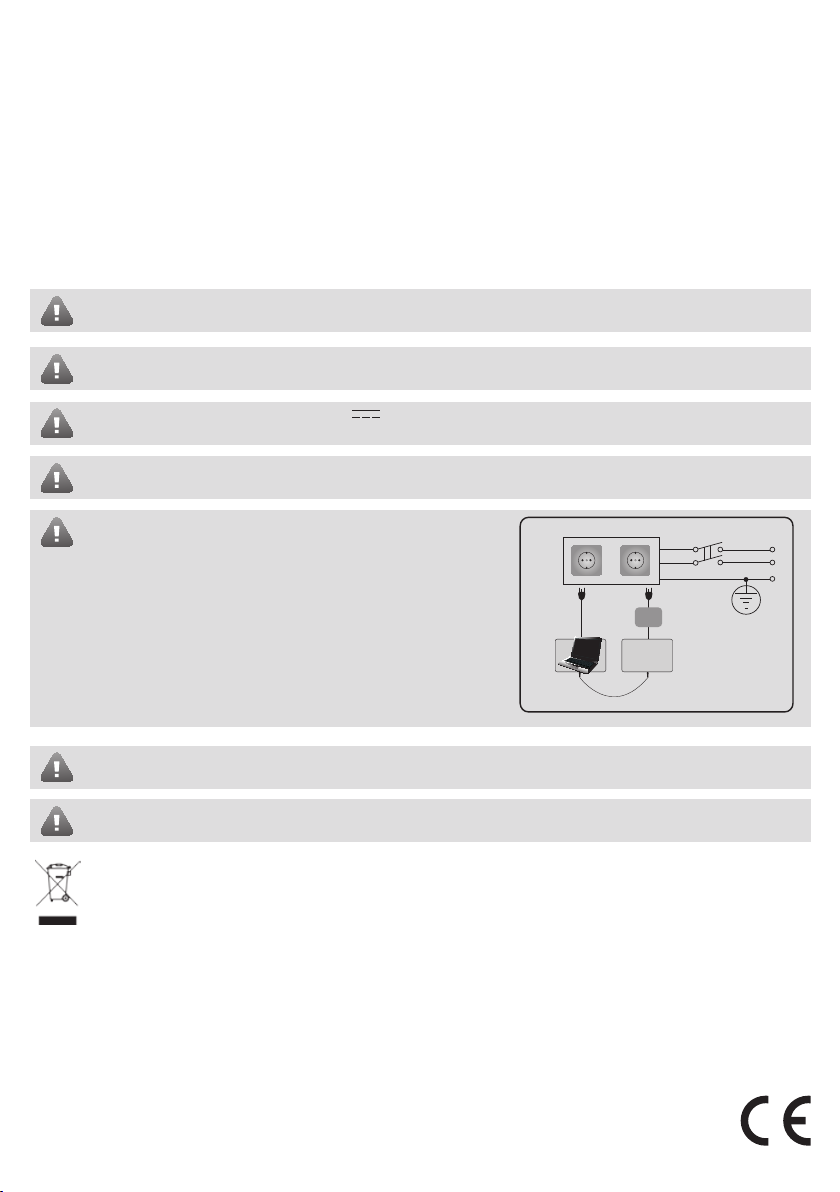
External power supply can be connected to AC mains only inside ins-
tallation room with automatic 2-pole circuit breaker capable of discon-
necting circuit in the event of short circuit or over-current condition.
Open circuit breaker must have a gap between connections of more
than 3mm and the disconnection current is 5A.
Fuse F1 model - miniSMDC 500mA. Blown fuse cannot be replaced by the user and the replacement fuses have to be exactly
the same as indicated by the manufacturer.
The device is fully turned o by disconnecting 2-pole switch o device of the external power supply or any other linked
device that the system ET08 / ET081 is powered from.
The WEEE (Waste Electrical and Electronic Equipment) marking on this product (see left) or its documentation indicates that in the EU
the product must not be disposed of together with household waste.
Phase
AC 230V
50 Hz/DC 24V
USB cable
Null
ET08/
ET081
PE

Limited Liability
The buyer must agree that the system will redu-
ce the risk of re, theft, burglary or other dangers
but does not guarantee against such events. “EL-
DES UAB” will not take any responsibility regarding
personal, property or revenue loss while using the
system. “ELDES UAB” responsibility according to
local laws does not exceed value of the purchased
system. “ELDES UAB” is not aliated with GSM ope-
rators providing cellular services, therefore is not
responsible for network services, coverage or its
operation.
Manufacturer Warranty
The system carries a 24-month warranty by the
manufacturer “ELDES UAB”.
Warranty period starts from the day the system
has been purchased by the end user. The warranty
is valid only if the system has been used as inten-
ded, following all guidelines listed in the manual
and within specied operating conditions. Receipt
with purchase date must be kept as a proof.
The warranty is voided if the system has been
exposed to mechanical impacts, chemicals, high
humidity, uids, corrosive and hazardous environ-
ment or other force majeure factors.
Package Content
1. System ET08 / ET081...........................................1 pcs
2. ET08 / ET081 user manual ................................1 pcs
3. GSM antenna.........................................................1 pcs
4. Jumpers..................................................................4 pcs.
5. Fastening holders ...............................................4 pcs.
About User Manual
This document describes communicator ET08 /
ET081, its operation and installation. It is very im-
portant to read User Manual before start using the
system.
CONTENTS
1. General Information..................................................................... 4
1.1 Operation Description ...............................................................................4
2. Technical Specications .............................................................. 5
2.1 Electrical & Mechanical Specications .................................................5
2.2 Main Unit, Connector, Pin & LED Functionality.................................5
2.2.1 Main Unit Functionality..........................................................................6
2.2.2 Connector Functionality........................................................................6
2.2.3 Pin Functionality.......................................................................................6
2.2.4 LED Functionality .....................................................................................6
2.3 Connection Circuit ......................................................................................7
3. Installation.................................................................................... 8
4. Communication Modes................................................................ 9
4.1 Communication Mode 1. Data Transmission from Alarm
System to Monitoring Station via GSM Audio Channel ............9
4.2 Communication Mode 2. Data Transmission from Alarm
System to Preset User (-s) by SMS. ................................................... 10
4.3 Communication Mode 3. Data Transmission
from Alarm System to Monitoring Station via GSM
Audio Channel and SMS Messages to Preset User (-s)............. 11
4.4 Communication Mode 4. Data Transmission from
Alarm System to Monitoring Station via GPRS Network.........12
4.5 Communication Mode 5. Data Transmission
from Alarm System to Monitoring Station via PSTN
using GSM Audio Channel as Backup Connection .................... 13
4.6 Communication Mode 6. Data Transmission
from Alarm System to Monitoring Station via PSTN
using SMS Messages as Backup Connection ...............................14
4.7 Communication Mode 7. Data Transmission
from Alarm System to Monitoring Station via PSTN
using GSM Audio Channel as Backup Connection
and SMS Messages to Preset User (-s).............................................15
4.8 Communication Mode 8. Data Transmission
from Alarm System to Monitoring Station via PSTN
using GPRS Network as Backup Connection................................ 16
4.9 Communication Mode 9. Data Transmission from Alarm
System to Monitoring Station via PSTN through PBX
using GSM Audio Channel as Backup Connection .................... 17
4.10 Communication Mode 10. Data Transmission from Alarm
System to Monitoring Station via PSTN through PBX
using SMS Messages as Backup Connection ...............................18
4.11 Communication Mode 11. Data Transmission
from Alarm System to Monitoring Station via PSTN
through PBX using GSM Audio Channel as a Backup
Connection and SMS Messages to Preset User (-s)....................19
4.12 Communication Mode 12. Data Transmission from
Alarm System to Monitoring Station via PSTN through
PBX using GPRS Network as Backup Connection....................... 20
5. SMS Commands* ........................................................................22
6. Appendix ..................................................................................24
6.1 Restoring Default Parameters ............................................................ 24
6.2 Upgrading Firmware................................................................................24
6.3 ELDES Conguration Tool Software...................................................24
6.4 Technical Support.....................................................................................25

4
1. General Information
Communicator ET08 / ET081 is a device for transmitting data from alarm system to monitoring station via:
• GSM audio channel;
• GSM audio channel and/or to users via SMS message;
• Telehone landline (PSTN);
• GPRS network.
The system can be used in the following applications:
• Property security.
• GSM network backup for PSTN.
1.1 Operation Description
ET08 / ET081 communicator acts as a gateway between the alarm system and monitoring station providing a dial tone and fully
replacing the landline (PSTN). The communicator noties monitoring station (ET081 ONLY) and/or the preset user by SMS message
in case PSTN is unavailable, has been cut o or disconnected by PSTN provider. ET08 / ET081 supports only outgoing calls. DTMF
number dialing mode in alarm system must be enabled.
ET08 / ET081 can detect temporary service suspension by the service provider for technical or billing reasons even if a dial tone is
still present (optional feature).
ET08 / ET081 features several communication ways between alarm system and monitoring station via:
1. GSM audio channel;
2. PSTN using GSM audio channel as backup connection;
3. SMS messages to preset users;
4. PSTN using GSM audio channel as backup connection with data duplication to preset users via SMS;
5. GPRS network.
6. PSTN using GPRS network as backup connection.
Please, refer to chapter 4. Communication Modes for more details.
The system ET08 / ET081 has 1 digital input (normally open) for sensor connection. The open collector output allows to connect
and control 1 electronic appliance on receipt of the correct SMS text message from one of the preset phone numbers. This feature
provides control over heating, lighting, gates, blinds etc.
ELDES Conguration Tool software is used to congure the system to operate in one of its communication modes, providing data
transmission either via SMS text message or via GPRS. The device has to be connected to the computer using a USB cable. Please,
refer to software‘s HELP section for more details.
USER MANUAL ELDES ET08 / ET081 V1.2 5
2. Technical Specications
2.1 Electrical & Mechanical Specications
Power Supply 10-24V 300mA max
Current Used in Standby Mode 120mA max
GSM Modem Frequency 850/900/1800/1900 MHz
Supported Protocols Contact ID, 4+2**
Maximum Number of Users to whom SMS Messages are De-
livered
5
Number of “Low” Level (Negative) Digital Inputs* 1
Allowable Input Values* Voltage: 0... 1.45V; current: 0.8... 0.6mA
Input Type NO (normally open)
Number of Outputs* 1
Output Circuit* Open collector output. Output is pulled to COM when turned
on.
Maximum Allowed Output Values* Voltage: 30V ; current: 50 mA
Dimensions 130 x 73 mm
Operating temperature range -20...+55oC
Generated Phone Line Voltage 18 V
Generated Phone Line Current 25 mA
Generated Phone Line Impedance 600
Dial Tone Frequency of Generated Phone line 350 Hz
* only in ET081
** 4+2 protocol operates in communication mode 1, 5 and 9 ONLY (via GSM audio channel).
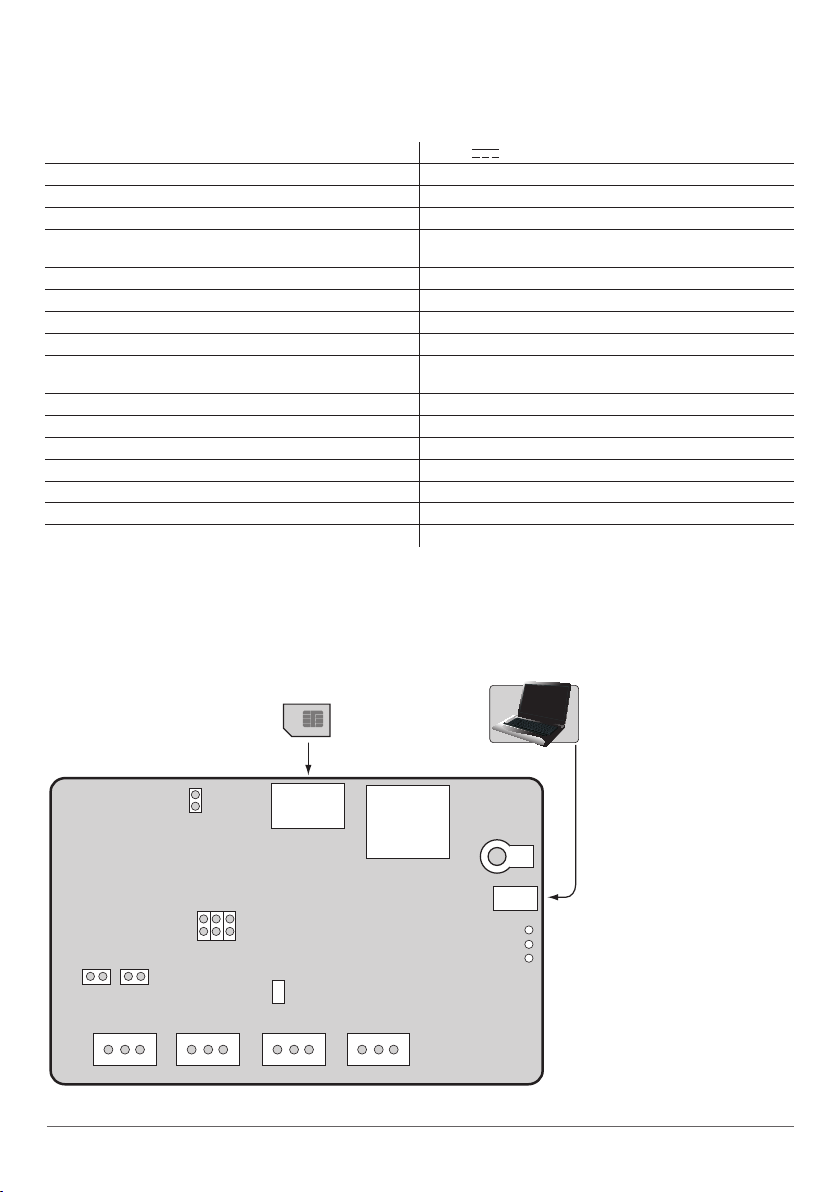
2.2 Main Unit, Connector, Pin & LED Functionality
GSM
MODEM
INFO
STATUS
GSM
USB
DEFAULT
F1
L1 L2 L3 L4 RING TIP C1 N.C.DC+ COM Z1 N.C.
MODE
SET
B1 B2
For congurations
PROG
SIM CARD
ANT
Fig. No 1
This manual suits for next models
1
Table of contents
Other Eldes Cell Phone manuals


