Electra Roman Blinds Instruction sheet

How to install,
programme and
operate your blind
electrablinds.co.uk
Electra
Roman
Blinds
Ref 09/20

Contents
The contents of your order
Blind fitting and position
Roman Blind Installation and removal
Battery pack installation & power up
Power up & testing -
without a control
Operation
Adjusting the upper & lower stop positions
Add/delete controls
Multi channel programming
Reset and reprogramme procedure
General Maintenance & Cleaning
Charging & troubleshooting -Page 15
-Page 14
-Page 12-13
-Page 11
-Page 10
-Page 9
-Page 8
-Page 7
-Page 6
-Page 5
-Page 4
-Page 3

Power supply
Rechargeable Li-ion Battery
Pack
The contents of your order
Each blind ordered will have
the following components:
Battery charger (if ordered)
3
Roman Blind Controls
If you ordered a control with
your blind(s), then it will be
one of the following:
Smart Home Options
If you ordered one of our
smart home options with
your blind(s), then it will be
one of the following:
Blind up to 1.2m wide:
2 brackets
Blind > 1.2m up to
1.8M wide: 3 brackets
Blind over 1.8m wide:
4 brackets
2 x raw plugs + screws
per bracket.
5-Channel
Wall Switch
Single-Channel
4-channel Wall Switch
Light sensor
Light &
temperature
sensor
1-channel or
6-channel
timer
Connexoon
hub for
app
control
Set of brackets

Fitting your blind inside the window recess
Firstly decide whether to face fix or top fix your blind.
We recommend you top fix your blind within the recess if:
•you have uPVC window frame
•there are obstructions like handles
We recommend you face fix your blind if:
•you want to fit the brackets directly to the window
frame
When deciding on the position the brackets, make sure that you allow enough space for the blind to clear window
handles while the blind is travelling down.
Fitting your blind outside the window recess
Follow the measurement steps below to centre your Roman blind in the
middle of your window:
To work out C:
1) Measure the width of the window (measurement B).
Write down the measurement.
2) Measure the width of the blind (measurement A).
Write down the measurement.
3) Take measurement B away from measurement A
and divide the answer by 2 to get measurement C.
BCC
Blind fitting & position
A
4

Roman blind installation
Bracket fitting options
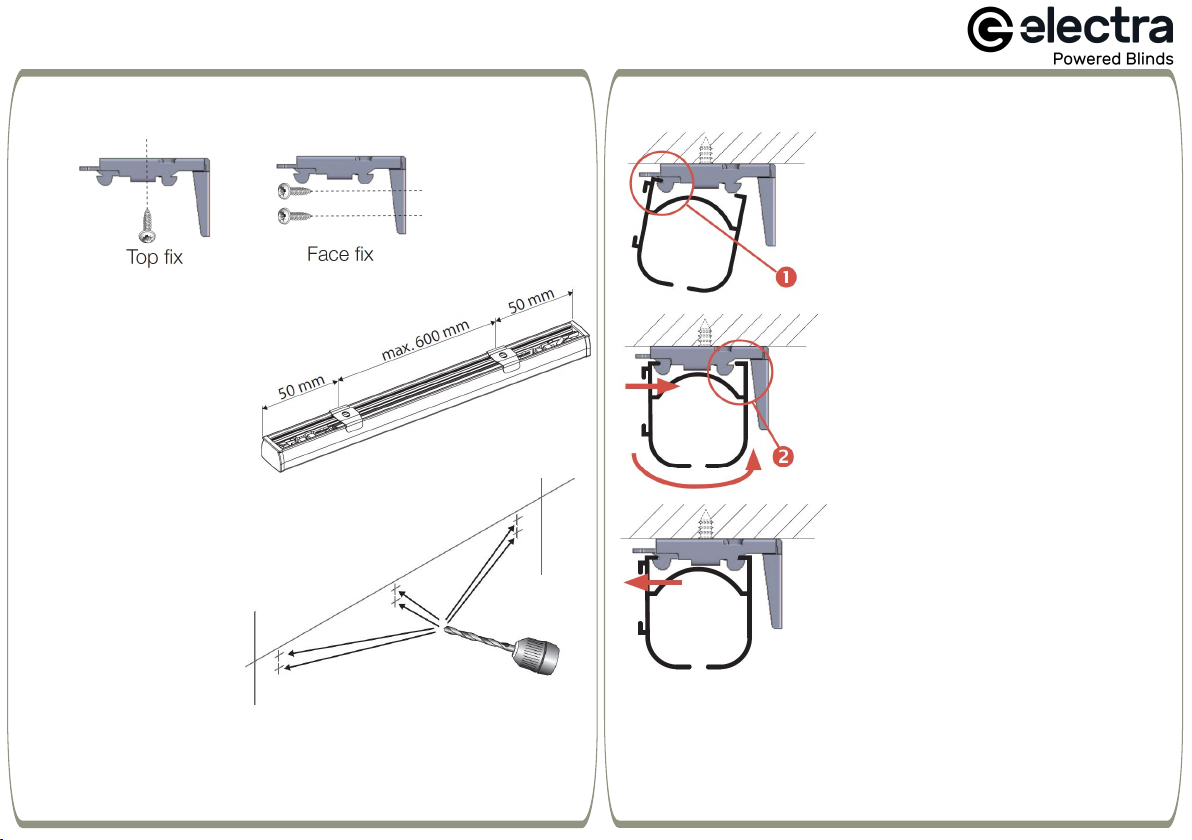
The brackets can be fitted in the following ways:
Marking the bracket positions
Position the brackets in
place at the correct position
for the blind and mark
the fixing points per
bracket.
Marking/drilling the bracket positions
Fix the brackets in using suitable
fixings.
Mounting the Roman blind
While tilting the blind headrail at
a slight angle, locate the fabric
side horizontal groove that runs
along the top section of the
headrail into the front hook of
the bracket (fig 1).
Push the front of the headrail in
to compress the bracket springs
and rotate the headrail up to
locate the horizontal groove
situated at the rear of the
headrail until it clicks into place
(fig 2).
Allow the spring to release and
secure the headrail in place.
Removing the blind - Start at one end of the blind and:
1) Push the headrail in to compress the bracket spring.
2) Tilt the headrail down at the rear and unhook the headrail
from the rear secction of the bracket.
3) Repeat ensuring that the headrail is adequately supported.
5
Electra Top Tip!
If securing the brackets to plaster,
stone, brick, etc., drill the holes at the marked
positions using a 5.5mm masonry drill bit, then use
the wall plugs and screws supplied to fix the brackets.

Battery pack installation
6
7
Decide where you want the battery to sit and check that the battery is close enough to connect to the motor
supply cable. Position and mark the square mounting clips. Fix using the screws provided and suitable fixings.
Push the external battery into mounted clips.
Power up & testing
Before we dispatch your blind, we test it to ensure it's operating correctly. We also set the upper and lower stop
positions based on your individual window height measurement.
Lastly, your remote control
or wall switch will be
paired
to your motor so you're ready to go!
Once your blind is fixed securely in place, you
are ready to connect your battery pack to
your blind.
Take the motor supply cable and connect the
long plug into the long socket of the battery
pack. You can then tuck any excess cables
away behind the blind.
If you didn't order a control with your blind follow
the instructions on the next page
If you didn't order a control with your blind follow
the instructions on the next page.
If you ordered a control with your blind
follow the operation instructions on page 8.

7
Power up & testing-
blind supplied without a control
New blind - Existing Remote control/wall switch
Before you begin
The following instructions are relevant if you already have a remote control/wall switch and selected 'no control needed'
when ordering your Electra blind. The blind supplied has been set up with the up and down stop position preset for your
convenience.
Pairing your remote control/wall switch to your blind
STEP 1: Initiate programming.
Press both up and down
buttons together briefly and
let go - the blind will "jiggle".
A jiggle is a brief up and down
motion
.
STEP 2: Pair the control. Press
and hold the programming
button* on the back of the
your handset or wall switch
until the blind jiggles. Your
control is now paired to the
blind motor.
Electra Top Tip!
If you have
a 5 channel
handset, make sure
you select the channel
the blind is to operate
in before pressing the
program button.
*How to locate the programming button on your
control:
Single
channel
and 5-
channel
remote
Wall
switch

General control
We have programmed your blind to automatically stop at preset upper and lower stop positions. It couldn't be simpler- just
press the Up or Down button until the blind starts moving and your blind will move in the respective direction until it reaches
the preset stop position, where it will stop automatically. You can stop the blind at any point between the preset stop positions
by pressing the middle ‘my’ button.
Lowering the blind
Press the down button briefly to
send the blind to the lower stop
position.
Raising the blind
Press the up button briefly to
send the blind to the upper stop
position.
Stopping the blind
Press the 'My' button briefly to
stop the blind at an intermediate
position.
8
Operation
Operating your Roman Blind

Adjusting the upper & lower stop positions
2. Press and hold the
Up and Down buttons
until the blind jiggles.
3. Adjust to the desired
upper/lower stop
position using either
the Up or Down button.
4. Press and hold the
'my' button until the
blind jiggles.
1a. Adjust upper stop position -
press the up button and send the
blind to the current upper stop
position.
1b. Adjust lower stop position -
press the down button and send
the blind to the current lower stop
position.
9
Setting
Use either Up or Down to operate the blind and press 'my' to stop
at the desired intermediate position.
Once the desired intermediate position is reached, press and hold
the 'my' button until the blind jiggles (approx 5 secs). The 'my'
position has now been set.
Using the 'my' position
Send the blind to the 'my' position by pressing
'my' from ANY position (the blind must be
stationary prior to activating the 'my' position
function).
Delete the ‘my’ position
Send the blind to the 'my' position, then press
and hold 'my' until the blind jiggles (approx. 5
secs). The 'my' position has now been deleted.
Using the ‘my’ position (intermediate position)
The 'my' position is a memorised intermediate position between the
upper and lower stop positions. You can set this anywhere you want and
send the blind to it at the touch of the 'my' button.

14 10
Step 1 - Take a handset or wall
switch that is already
programmed to the blind
motor.
Step 2 - Press and hold the
program button of the
handset or wall switch until
the blind jiggles (approx
2-3 secs).
Step 3 - Press the program
button again to unpair the
control.
Add/delete controls
Delete a control
Control already paired to the
blind
Add a control
Control to add to the blind
memory
Step 1 - Press the program
button on your handset or
wall switch that already
controls the blind for about
2 seconds until the blind
jiggles. If using a 4 channel
handset, make sure you
have the right channel
selected.
Step 2- Press and hold the
program button of the new
handset or wall switch until
the blind jiggles (approx 1
sec).
Or Or

All 4 lights will
light up when
the fifth
channel is
selected
This is your
channel
selector
button. Press
this repeatedly
to change
between
channels.
Your 5-Channel
remote control
Assigning additional channels with a 5-channel control
Example: Two blinds with independent control on channels 1 (blind 1) &
2 (blind 2) - set up the blinds for group control so that when
you press channel 3, blinds 1 & 2 will operate together).
Step 1 - Select Channel 1 which operates blind 1.
Step 2 - Using a paperclip, press and hold the program
button on the rear of the handset until blind 1 jiggles
(approx 2-3 secs).
Step 3 - Select Channel 3 on the controller.
Step 4 - Press the program button on the rear of the
handset until blind 1 jiggles (approx 1 sec). Channel 3 will
now operate blind 1.
Step 5 - Select Channel 2 which operates blind 2.
Step 6 - Press and hold the program button on the
rear of the handset until blind 2 jiggles (approx 2-3 secs).
Step 7 - Select Channel 3 on the handset.
Step 8 - Press the program button on the
rear of the handset until blind 2 jiggles (approx 1 sec).
Channel 3 will now operate blind 2.
When all programming steps have been completed, Channel 3 will operate blinds 1 & 2 together. All
other blinds should be disconnected from their respective power while programming is in progress.
While programming, the blind should not be inactive for longer than 2 minutes or the motor will exit
the programming mode.
Multi-channel programming
11

STEP 3 - To reverse
the direction of the
motor, press and hold
the 'my' button for
approx 2 seconds
until the blind jiggles.
Reprogramme
STEP 1 -Press and hold
simultaneously the Up
and Down buttons for
approx 5 seconds until the
blind jiggles.
Reset and reprogramme procedure
Before you begin - Disconnect the power to all other powered blinds while programming.
Reset
STEP 1 - Disconnect the battery pack.
STEP 2 - Remove the blind and the battery pack from their mounting brackets and lay out on a table.
STEP 3- Reconnect the battery pack.
STEP 4 - Initiate reset - Take a paper clip and press and press the reset button in the recessed hole
beside where the power cables enter the motor. Hold until the blind jiggles 3 times (approx 12 secs). All
settings are deleted and the motor has been reset.
12
STEP 2 - Press the
down button. Does
the blind move down?
YES- the blind moves down
while pressing the down
button - Go to step 4.
NO - the blind moves up
while pressing the down
button - continue to step 3.
Press with a paperclip
for approx 12 secs
STEP 5 - Disconnect the battery pack.
STEP 6- Refit the blind and battery pack.
STEP 7 - Reconnect the battery pack, then follow the
reprogramme steps below.

Reset procedure continued
STEP 4: Use the up
button to move the
blind until it reaches
the upper limit position.
Press and hold the 'my'
and down buttons until
the blind starts to
move down.
Stop the blind at the
desired lower limit
position (adjust with
the up and down
buttons if required).
STEP 5: Press and hold
the 'my' and up button
until the blind starts to
move up.
The blind will
automatically stop at
the up position.
Press and hold the
'my' button until the
blind jiggles to
confirm the limit
settings.
Step 6: Press the program
button on your remote
control or wall switch until
the blind jiggles.
OR
13
The limits have
been recorded.

General Maintenance Of Your Blinds
In a normal household environment, your blinds will need little maintenance.
All components should operate smoothly under normal use. Should pulleys or motor brackets develop a squeak in
operation, lubricate with a silicon based spray. Do not use an oil based lubricant (such as WD40) as the oil may mark the
fabric or cause dirt to adhere to cords and fabric.
Blinds in areas of consistently high levels of humidity or damp conditions will be susceptible to mould marks forming due
to the high levels of moisture present facilitating its growth. Blinds at windows prone to consistent condensation are
particularly susceptible to mould growth. Such windows should be ventilated to clear condensation and minimise the
opportunity for mould growth.
• All blinds should be operated with care.
• Your guarantee does not cover accidental damage, damage caused by rough use or damp conditions.
Cleaning Your Roman Blinds
To lightly clean your blinds, simply dust with a feather duster or the brush
nozzle of your vacuum cleaner. More persistent marks may be removed using a
sponge with warm water and a mild detergent.
For a deeper clean, the fabric of the blinds can be removed and dry cleaned.
To remove the fabric, first unclip the cord rings from the cord ring feet on the
rear of the blind. The fabric can then be removed by detaching the Velcro strip
on the headrail. Remove the stiffening rods at each fold and the bottom bar
from its pocket at the base of the blind. The fabric is then ready for dry
cleaning. Simply reverse this process to refit the blind.
14

General Maintenance continued
It is important that nothing is allowed to obstruct your Electra Roman blind when moving. Should the blind be lowered onto
an obstruction, such as an ornament on a window sill, the blind will be impeded but the motor will carry on turning and the lift
cords may become entangled in the headrail. Repairs required for cords that have become entangled in the headrail are not
covered by guarantee.
Should the blind be lowered onto an obstruction first remove the obstruction and allow the blind to hang freely. Gently tug
the bottom bar to pull through cord that has unwound within the headrail. The bottom bar should be level. The blind may
now be retracted.
Charging your blind
When the battery pack requires recharging, the blind will begin to move slowly in operation. To recharge the battery pack, plug
the charger into a plug socket and connect the charger cable into the small socket on the end of the Roman external battery
pack.
Please note: the power cable from the battery is for connection to the blind only. Connecting the cable to the charger will
result in battery damage. Please consult the labels on the battery pack for more information. The battery pack will be fully
recharged after 4 hours. If it is more convenient, the external battery pack can be disconnected from the blind and removed
from mounting clips to charge.
Remote Control, Wall Switch, Timer & Sensor batteries: Electra controls are battery powered and will require replacing
periodically. Refer to the instructions supplied with the individual controls for details of the battery type and replacement.
•Issue: Blind is moving slowly
Solution: The battery pack requires recharging.
•Issue: Blind is not responding
Solutions: Check the battery pack is connected securely. Check the battery pack is charged by re charging for 4 hours.
Replace the battery in the remote control or wall switch. 15
Trouble Shooting

electrablinds.co.uk
Table of contents
Other Electra Window Blind manuals
Popular Window Blind manuals by other brands

Draper
Draper FlexShade C MO Series Installation & operation instructions

Levolor
Levolor Real Wood Blind Series Installation operation care

CHERUBINI
CHERUBINI Wave Wire instructions

MHZ
MHZ SKALAR MINI installation instructions

IKEA
IKEA FYRTUR 100 manual

Isotra
Isotra TITAN 90 Operating and maintenance instructions