Element POS80D User manual

Desktop POS Printer
POS80D
User Manual

POS80D User Manual
2
REVISION RECORDS
REV.
DATE
DESCRIPTION
Drawn
Checked
Approved
1.0
2017.05.15
1. First edition
Wu Zhenrong
Yang Kaiqu
Lin Yang
1.1
2017.11.15
1. Update chapter 2
2. Delete the contents of Paper
Installation (Upward Paper-out
Direction)
3. Update chapter 4.1.2
Yan Xiaomei
Lin Yang
Lin Yang
1.2
2018.2.10
1. Update chapter 2.2
2. Add the contents of
“Bluetooth/WiFi Settings” in chapter
4.6
Yan Xiaomei
Lin Yang
Lin Yang
1.3
2019.10.30
1. Update chapter 2.2
2. Update chapter 4.1.2
Wang Yuxiang
Huang
Huimin
Lin Yang
1.4
2020.01.08
1. Update “Printer Specification”
(P6/7)
Wang Yuxiang
Huang
Huimin
Lin Yang

POS80D User Manual
3
Content
Statement............................................................................................................................................... 1
Important Safety Instructions.................................................................................................................2
1 OVERVIEW........................................................................................................................................... 3
1.1 Introductions............................................................................................................................ 3
1.2 The Main Features....................................................................................................................3
2 GETTING STARTED............................................................................................................................... 4
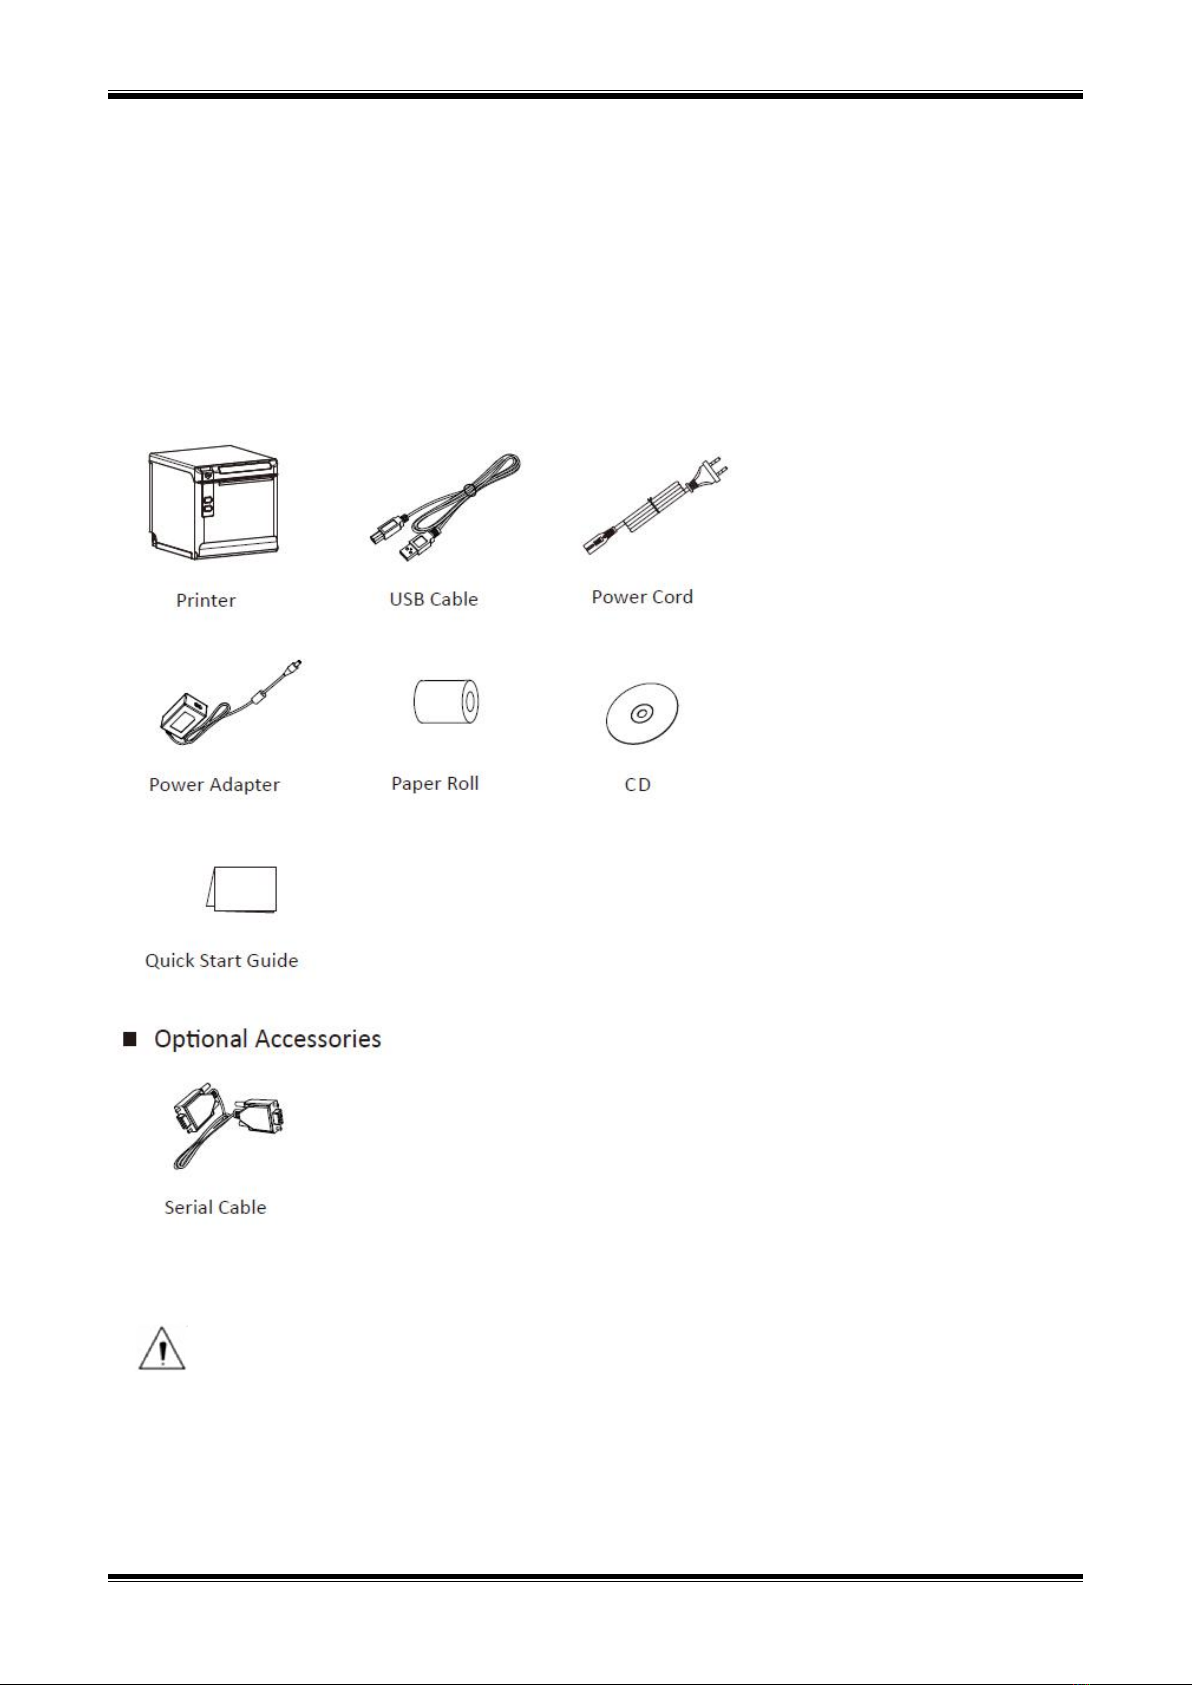
2.1 Packing List............................................................................................................................... 4
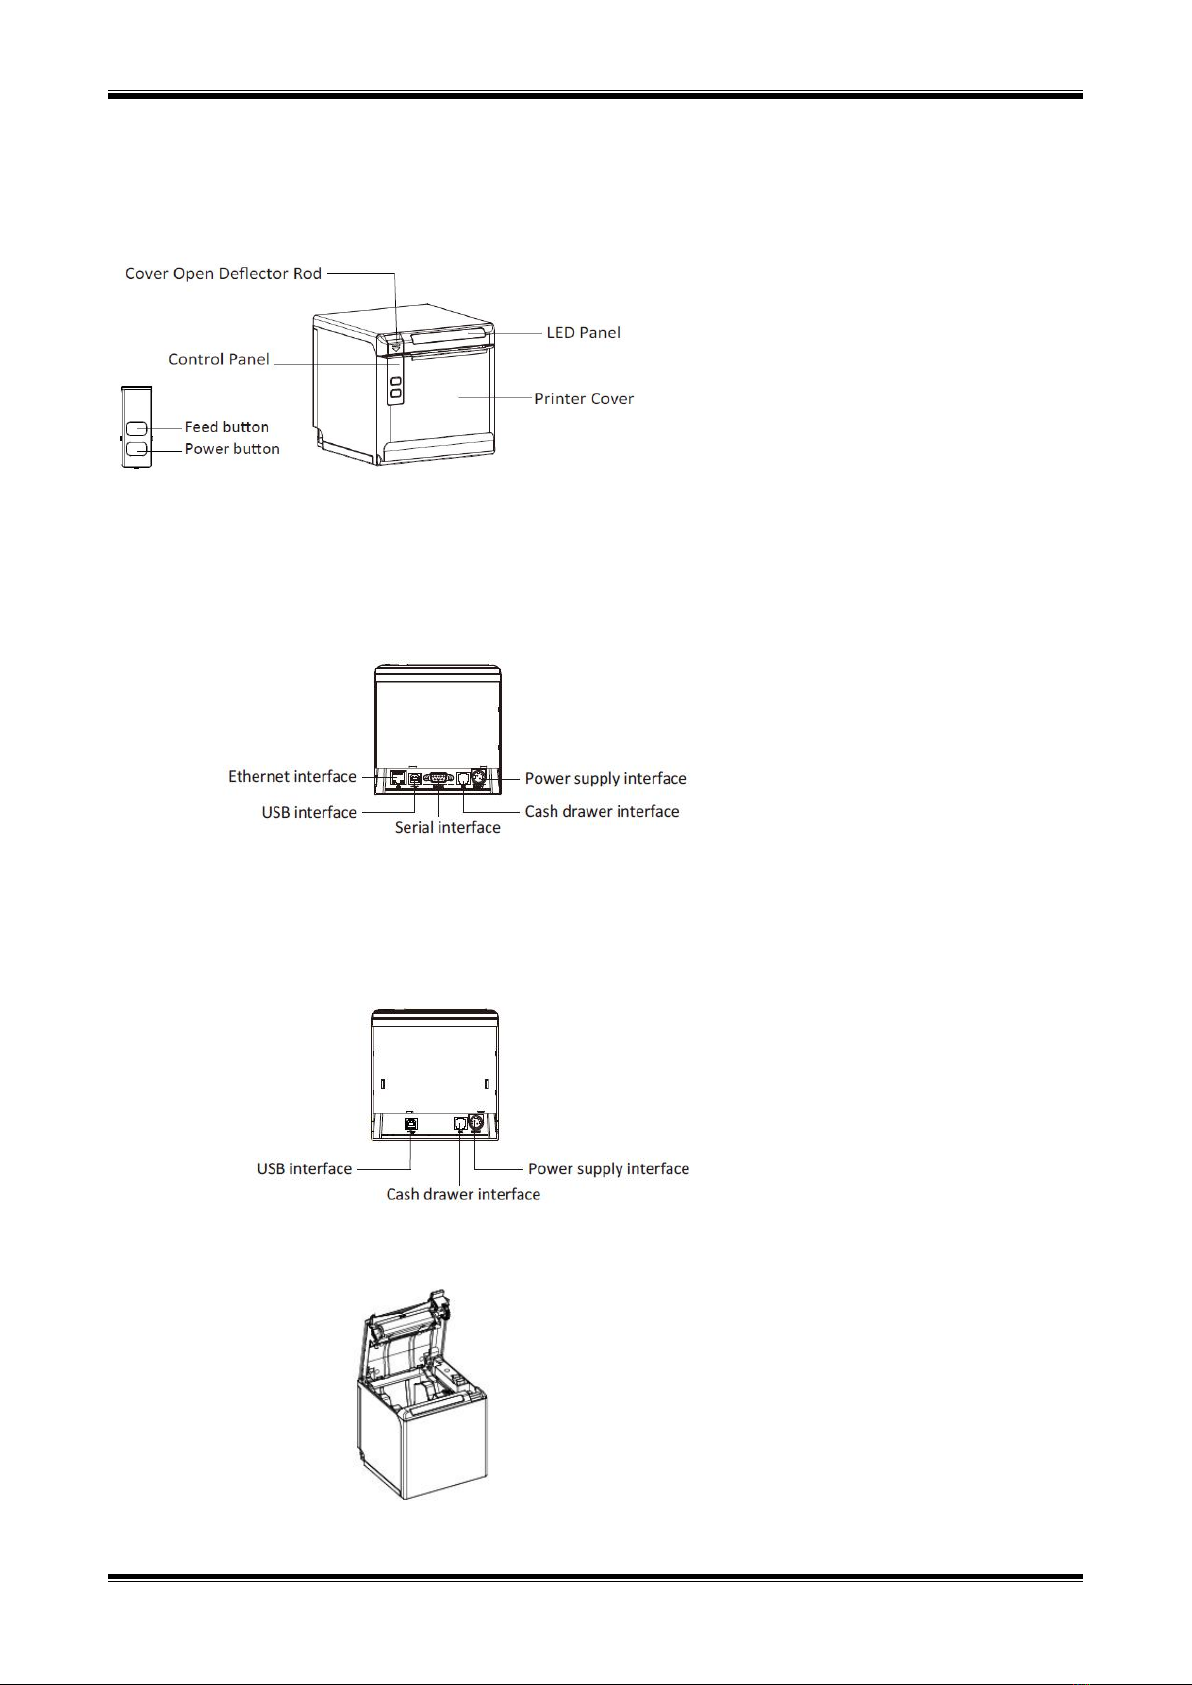
2.2 Appearance and Components.................................................................................................. 5
3 SPECIFICATION..................................................................................................................................... 6
3.1 Printer Specification................................................................................................................. 6
3.2 Printing Media Specification.................................................................................................... 8
3.2.1 Continuous Thermal Paper Specification...................................................................... 8
3.2.2 Notices...........................................................................................................................8
3.3 Printing and Cutting Position....................................................................................................9
3.3.1 Printing position............................................................................................................ 9
3.3.2 Cutting Position............................................................................................................. 9
4 INSTALLATION AND USAGE................................................................................................................10
4.1 Media Loading........................................................................................................................ 10
4.1.1 Paper Confirmation..................................................................................................... 10
4.1.2 Paper Installation (Forward Paper-out Direction)....................................................... 10
4.2 LED Indication and Beeper..................................................................................................... 12
4.3 Power Connection.................................................................................................................. 13
4.4 Interface Cable Connection.................................................................................................... 14
4.5 Cash Drawer Connection........................................................................................................ 14
4.6 Bluetooth/Wi-Fi Settings........................................................................................................ 15
4.6.1 Bluetooth Settings....................................................................................................... 15
4.6.2 Wi-Fi Settings...............................................................................................................15
4.7 Print Test.................................................................................................................................15
4.7.1 Print Self-Test...............................................................................................................15
4.7.2 Printing of Windows Driver Program.......................................................................... 15
5 INTERFACES........................................................................................................................................16
5.1 USB......................................................................................................................................... 16
5.2 Serial Interface........................................................................................................................16
5.3 Ethernet Interface.................................................................................................................. 17
5.4 Cash Drawer Interface............................................................................................................ 17
5.5 Power Supply Interface.......................................................................................................... 18
6 TROUBLESHOOTING.......................................................................................................................... 19
6.1 Printer Not Working............................................................................................................... 19
6.2 LED Indicator and Beeper....................................................................................................... 19
6.3 Troubles Occur During Printing.............................................................................................. 19
6.4 Problems Emerge During The Paper Cutting......................................................................... 20
6.5 Removing Jammed Paper.......................................................................................................20
7 PRINTER CLEANING AND MAINTENANCE......................................................................................... 21
7.1 Cleaning Head.........................................................................................................................21
7.2 Cleaning Sensors, Roller and/or Paper Path...........................................................................21

POS80D User Manual
1
Statement
Copyright
This manual is printed in 2020.
Version 1.4 .
Warnings
This must be complied with in order to avoid any damage to the human body and to the
equipment.
This is showing the important information and tips for the printer operating.
Note:
Due to continuous update of product, please take in kind of real machine, such as accessories,
programs etc.

POS80D User Manual
2
Important Safety Instructions
1. Safety Warning
Warnings: The print head will become very hot during printing; avoid contact with the print
head after printing has finished.
Warnings: Do not touch the printer head and connector in case static damage the printer
head.
2. Instructions
Carefully read the installation and operating instructions provided with the printer before starting
up your printer.
1) Place the printer on a flat and stable surface.
2) Leave enough space around printer for operation and maintenance.
3) Do not place the printer on or near a heat source.
4) Do not use the printer near water. Never spill liquid into the printer.
5) Do not expose the printer to high temperatures, direct sunlight or dust.
6) Protect the printer from shock, impact and vibration.
7) Be certain the power source is within the voltage rating and frequency listed for the printer.
8) Switch off the printer power supply when won’t use it for a long time.
9) Do not place the power cord where it can be stepped on. If the power cord becomes
damaged or frayed, replace it immediately.
10) To ensure the print quality and reliability, you are suggested to use the recommended paper
or the same quality paper.
11) Please switch off the power supply when connect/disconnect all the ports or it will cause
damage to the printer control circuit.
12) Never carry out maintenance or repair work yourself. Always contact a qualified service
technician.
13) Keep this User Manual in a place which is easily accessible at all times.

POS80D User Manual
3
1 OVERVIEW
1.1 Introductions
POS80D is a thermal receipt printer, featured by high print quality, high print speed, high stability,
etc. It can be used in commercial POS system, food industry and occasions which need real-time
field print receipts.
POS80D can connect with other equipment through serial/USB/Ethernet/Wi-Fi/Bluetooth interfaces.
And the printer drivers are available for the WINDOWS XP/WINDOWS 7/WINDOWS 8/WINDOWS
10/Linux operating system.
1.2 The Main Features
1) Low noise
2) High print speed
3) Easy paper loading
4) Support page mode printing
5) Compatible with various width paper
6) Cash drawer interface
7) Communication interfaces optional

POS80D User Manual
4
2 GETTING STARTED
2.1 Packing List
After receiving your printer, please check for possible shipping damage:
1) Inspect the outside of both the box and the printer for possible damage.
2) Check whether you have received the following accessories together with the printer, if there is
any items missing, please contact your local dealer.
Notes:
1) The Power adapter and power cord vary by region.
2) Items in the package are dependent on the actual order.

POS80D User Manual
5
2.2 Appearance and Components
Front
Rear
Model 1: The printer without Bluetooth/Wi-Fi module
Inside
Model 2: The printer with Bluetooth/Wi-Fi module

POS80D User Manual
6
3 SPECIFICATION
3.1 Printer Specification
Table3-1 General Specification
(1/2)
Item
Parameter
Printing
Parameter
Printing Method
Direct thermal line printing
Resolution
203DPI,8dots/mm
Printing Width
72mm
Print Speed
Max. 260mm/s
Interface
Default: USB, Cash drawer,
Optional: Serial, Ethernet, Wi-Fi & Bluetooth
Print density
Adjustable from level 1 to level 4
Page Mode
Support
Memory
RAM
2MB
Flash
4MB
Fonts
Chinese
GBK 24×24
Alphanumeric
ASCⅡ9×17,12×24.
User-defined
Support
Code page
PC437(std.Europe), Katakana, PC850(Multilingual), PC860(Portuguese),
PC863(Canadian), PC865(Nordic), PC857(Turkish), PC737(Greek),
ISO08859-7(Greek), WPC1252, PC866(Cyrillic #2), PC852(Latin 2),
PC858(Euro), KU42(Thai), TIS11(Thai), TIS18(Thai), PC720(Arabic),
WPC775(Baltic Rim), PC855(Cyrillic), PC862(Hebrew), PC864(Arabic),
ISO8859-2(Latin2), ISO8859-15(Latin9), WPC1250(Latin 2),
WPC1251(Cyrillic), WPC1253(Greek), WPC1254(Turkish),
WPC1255(Hebrew), WPC1256(Arabic),
WPC1257(Baltic Rim), WPC1258(Vietnamese), MIK(Cyrillic),
PC755(Latin 2), Iran, Iran II, Latvian, ISO-8859-1(WestEur),
ISO-8859-3(Latin 3), ISO-8859-4(Baltic), ISO-8859-5(Cyrillic),
ISO-8859-6(Arabic), ISO-8859-8(Hebrew), ISO-8859-9(Turkish), PC856,
PC3848(ABICOMP), MONGOLIAN, VISCII
Barcode
1D
UPC-A, UPC-E, EAN8, EAN13, CODE39, ITF, CODEBAR, CODE128, CODE93
2D
PDF417, QR code
Graphics
Support varied density bitmap and download bitmap printing
Max size of each bitmap is 40K, the total size of bitmap is 256k.
Detection
Sensors
Paper out detection, Cover open detection
LED
Indicator
Power LED
Blue
Error LED
Red
Paper LED
Orange

POS80D User Manual
7
Table3-1 General Specification(Continued)
(2/2)
Item
Parameter
Power
Supply
Input
AC100V-240V
Output
DC24V, 2.5A
Paper
Paper type
Thermal Paper
Paper width
0
1
58
mm/
0
1
80
mm
Paper
thickness
0.056~0.13mm
Roll paper
diameter
Max. OD ф83mm
Paper load
Easy-loading structure of forward open cover or upward open cover
Paper cut
Partial cut / full cut
Physical
Spec.
Operating
condition
0℃~50℃,20%~85%RH
Storage
condition
-20℃~70℃,5%~95%RH
Dimensions
137.3(L)*132(W)*130.5(H)mm
Weight
1.33kg
Command
ESC/POS
Software
Driver
Windows2000/XP/Vista/Win7/Win8/Win10/POSReady/Linux CUPS/OPOS/
JavaPOS
SDK
WinCE, Win Mobile, Android, iOS

POS80D User Manual
8
3.2 Printing Media Specification
3.2.1 Continuous Thermal Paper Specification
Paper Type : Specified Thermal Paper
Paper Width :
0
1
58
mm/
0
1
80
mm
Paper Outer Diameter : Max. 83 mm
Paper Thickness : 0.056 ~0.13m
Paper Type
Manufacturer
FD210, PD150R, PD160R
OJI Paper CO.,LTD.
3.2.2 Notices
Notes:
1) Please use the recommended thermal paper or same quality paper, otherwise it will influence
the printing quality and decrease the thermal printer head life;
2) Don’t stick the paper on the roll paper mandril;
3) If the thermal paper is polluted by chemical or oil, the thermal paper heat sensibility
decreases, which will influence the printing quality;
4) Don’t use finger nail or hard articles to touch the surface of thermal paper, otherwise it will
cause color fading;
5) When the environment temperature is higher than 70°C, the thermal paper color will fade, so
pay attention to the influence of temperature, humidity and sunlight.

POS80D User Manual
9
3.3 Printing and Cutting Position
3.3.1 Printing position
0
1 -
80
mm Print Paper
0
1 -
58
mm Print Paper
3.3.2 Cutting Position
Type
Paper Cutting Position(L1)
POS80D
11.6mm

POS80D User Manual
10
4 INSTALLATION AND USAGE
4.1 Media Loading
4.1.1 Paper Confirmation
1) When using 80mm(width) roll paper, take down the paper guide of both sides.
2) When using 58mm(width) roll paper, insert the paper guide to each side.
Note: Roll paper should be placed in the middle.
4.1.2 Paper Installation (Forward Paper-out Direction)
1) Pull the deflector rod to open the printer cover.
2) In the correct direction of the roll paper, insert the paper.

POS80D User Manual
11
3) Pull out some roll paper, and close the printer cover.
4) Tear the extra paper in the direction of printer.
Notes:
1) According to the paper size to adjust the paper guide;
2) Make sure the paper inside is at tight status, or it will cause paper jam or other trouble.

POS80D User Manual
12
4.2 LED Indication and Beeper
Function specification of indicated light and beeper.
Name
Status
Specification
POWER LED
(Blue)
ON
The printer works well
OFF
The printer does not work
ERROR LED
(Red)
Flashing
The printer is in an error state
OFF
The printer is in an normal state
PAPER LED
(Orange)
ON
The printer is in paper end state
OFF
The printer is in an normal state
Notes:
The printer use a thermistor to detect the temperature of the print head. If the temperature of
print head is more than 65° C, printer will send a warning. If the temperature of print head is
more than 80° C, printer will stop working until the temperature is less then 60° C.
Description
POWER
LED
ERROR
LED
PAPER
LED
Beeper
Open the cover of
printer
ON
ON
ON
“Beep, Beep—, Beep”
Full of paper
ON
OFF
OFF
Silent
No paper
ON
ON
ON
“Beep Beep Beep”.
Cutter jam
ON
Flash
OFF
”Beep—,Beep—”

POS80D User Manual
13
4.3 Power Connection
1) Connect power adapter to printer;
2) Connect power adapter to power cord;
3) Plug the other side of power cord into the socket outlet.
Pay attention about disconnecting or connecting the power adapter at right method, or it’s easy to
cause damage.
When pull out the adapter, please pinch the shell of power adapter and pull the switch up, when
the switch is fully open, pull out the power adapter.
Don’t pull the plug hard by squeezing at any other place of power adapter. Because it is difficult to
pull it out and easy to damage the cable.

POS80D User Manual
14
Notes:
1) Please only use the power adapter recommended by supplier or equivalent products;
2) When disconnecting the power adapter plug, handheld plug connector housing, and avoid
pulling the cable directly;
3) Avoid dragging the power adapter cable, otherwise it will damage the cables, causing fire and
shock;
4) Avoid putting power adapter around a heating device, otherwise the cable may melt, causing
fire and shock;
5) If you do not use the printer in a long time, disconnect the power supply of printer power
adapter.
4.4 Interface Cable Connection
1) Make sure the printer's power switch is turned off;
2) Put the interface cable into the matched interface and fixed with screws (or spring) on the plug;
3) Connect the other end of the interface cable to the host device.
4.5 Cash Drawer Connection
1) Make sure the printer's power switch is turned off;
2) Connect the cash drawer cable into the cash drawer interface on the rear of the printer.
Warning:
Cash drawer interface can only be connected to a voltage of 24V cash drawer device (can’t
connect to the phone line, etc.)

POS80D User Manual
15
4.6 Bluetooth/Wi-Fi Settings
4.6.1 Bluetooth Settings
Default name: BT Printer
Default password: 0000 or 1234
Please refer to the Bluetooth Connection Manual for details
4.6.2 Wi-Fi Settings
Printer factory default Wi-Fi mode is AP mode with IP address “192.168.1.1”and SSID
“POS_WIFI”. After the PC or mobile phone is connected with printer successfully, users can set
the parameters through the below link:
Link:http://192.168.1.1/
Access password: 12345678
Please refer to the Wi-Fi Operation Manual for details
4.7 Print Test
4.7.1 Print Self-Test
The self-test checks the printer’s current settings, status and whether the printer has any problem.
1)Make sure the power is connected and paper is loaded properly.
2)Make sure the printer is off and top cover is closed properly.
3)Press the paper feed button and power button simultaneously to turn the printer on. The printer
is ready to receive data as soon as it completes the self-test.
4.7.2 Printing of Windows Driver Program
1)Install the Windows Driver program. (Please refer to the Windows Driver Manual)
2)Please set the “Interface” as the type you use.
3)Use the Windows Driver Program to print out the “Print Test Page”.

POS80D User Manual
16
5 INTERFACES
POS80D supports cash drawer interface and many other various communication interfaces, such as
Serial interface, USB interface, Ethernet interface, Wi-Fi and Bluetooth interfaces.
5.1 USB
Figure 5-1
PIN
SIGNAL NAME
1
VBUS
2
D-
3
D+
4
GND
5.2 Serial Interface
Figure 5-2
PIN
SIGNAL NAME
1
-
2
TXD
3
RXD
4
-
5
GND
6
RTS
7
CTS
8
RTS
9
-

POS80D User Manual
17
5.3 Ethernet Interface
PIN NO.
Signal Name
1
TX+
2
TX-
3
RX+
4
-
5
-
6
RX-
7
-
8
-
Note: The printer is equipped with an Ethernet interface, and use the network connection
router, switch and other network communication equipment which meet RJ45 interface standard.
When connecting directly with PC, it is suggested that the cross network line in accordance with
RJ45 interface standard should be adopted.
5.4 Cash Drawer Interface
Figure 5-4
PIN NO.
Signal Name
1
FG
2
Drawer 1
3
DRSW
4
VDR
5
Drawer 2
6
GND
Electrical characteristics
Driving voltage:DC 24 V
Driving current:Maximum 0.8 A ( In 510 ms)
Drawer check signal:“L” = 0~0.5 V “H” = 3~5 V
Table of contents
Other Element Printer manuals

Element
Element RW873 User manual

Element
Element RW60 User manual

Element
Element RW-337D User manual

Element
Element RW-337D User manual

Element
Element RW973 Installation and operation manual

Element
Element RW873 User manual

Element
Element RW973 User manual

Element
Element RW80L User manual

Element
Element RW-337D User manual

Element
Element RW973 Mk2 User manual