Elmo DVR V5.01 User manual

ELMO DVR User Manual v5.01
XML to PDF by RenderX XEP XSL-FO Formatter, visit us at http://www.renderx.com/

ELMO DVR User Manual v5.01
Copyright ©2007 ELMO USA CORP.
All rights reserved. No part of this manual may be reproduced or transmitted in any form or by any means, electronic or mechanical, including photocopying, recording, or by any information storage or retrieval
system, without the prior written permission of the copyright owner and the publisher.
XML to PDF by RenderX XEP XSL-FO Formatter, visit us at http://www.renderx.com/

Table of Contents
ELMO DVR Server ............................................................................................................................................ 1
1. Introduction ...................................................................................................................................... 2
1.1. Welcome ............................................................................................................................... 2
1.2. Important changes to ELMO DVR, v.5.01 .............................................................................................. 2
1.3. Limited Warranty ....................................................................................................................... 2
1.4. General ................................................................................................................................. 3
1.5. Precautions ............................................................................................................................. 3
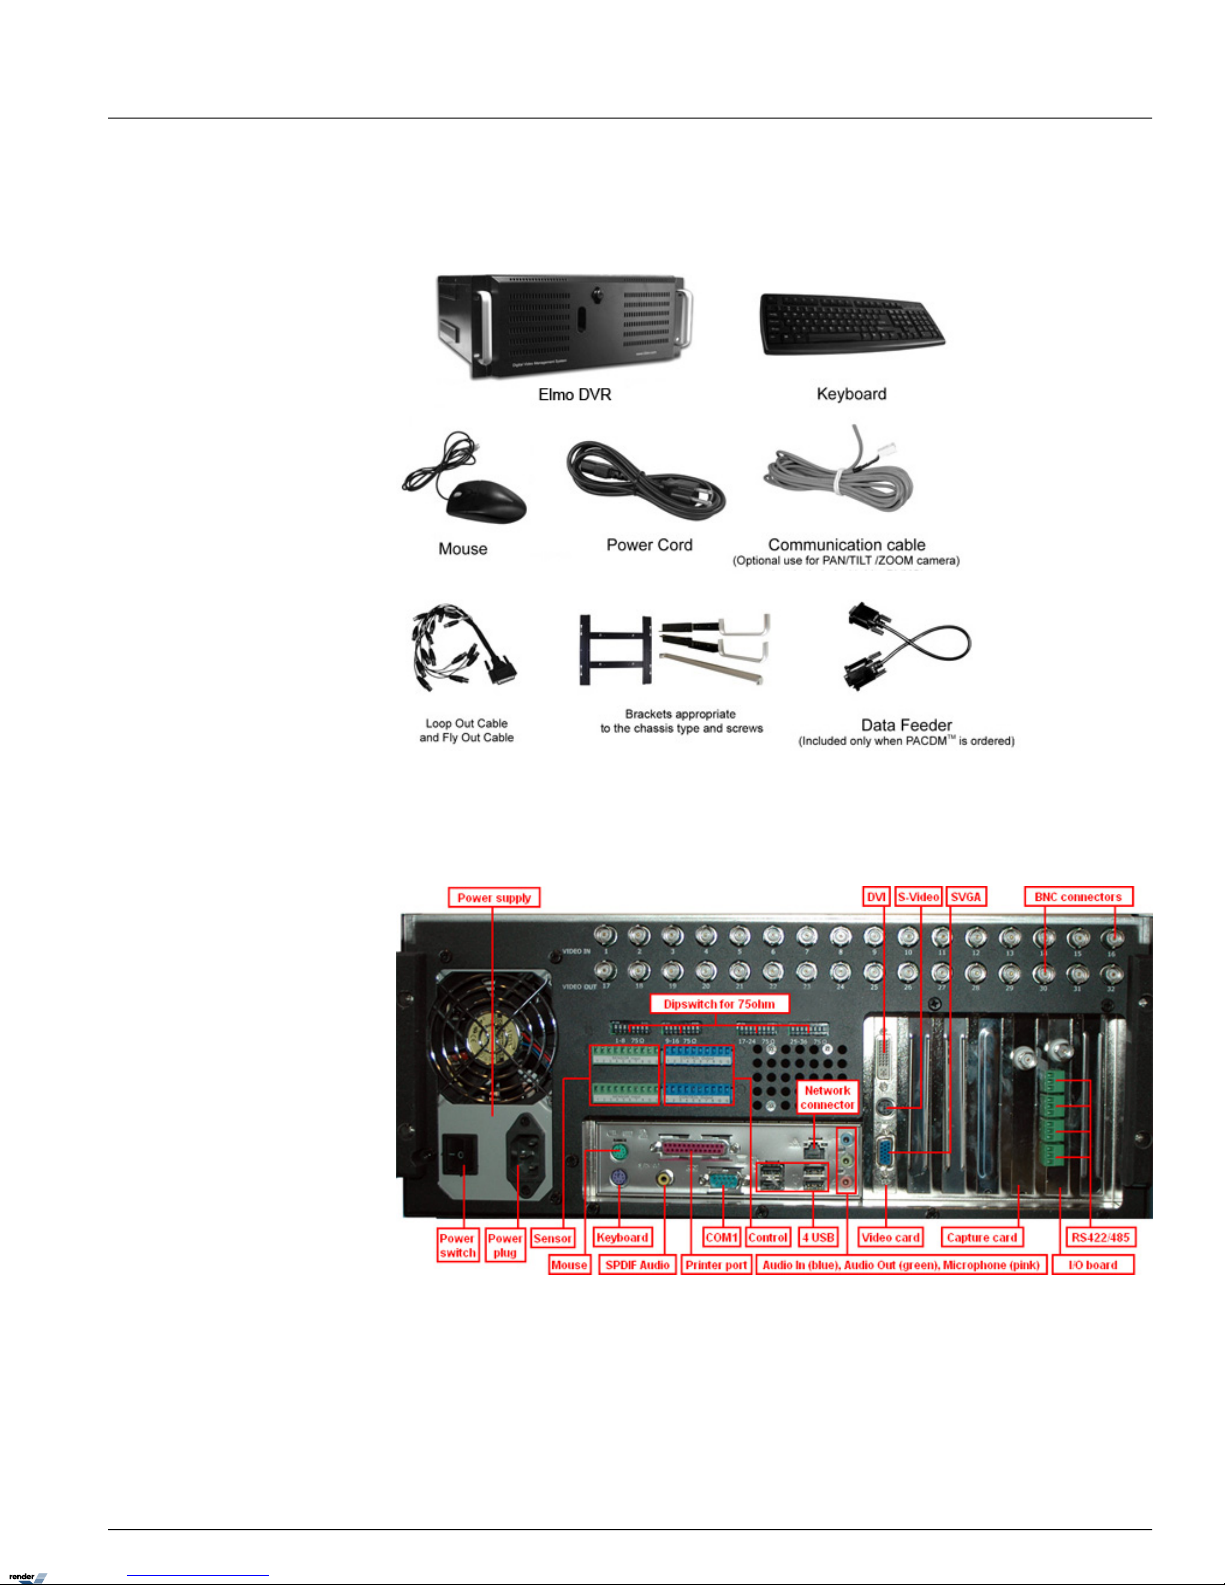
1.6. Unpacking .............................................................................................................................. 3
1.7. ELMO DVR Back View .................................................................................................................. 4
2. Starting ELMO DVR Server ....................................................................................................................... 5
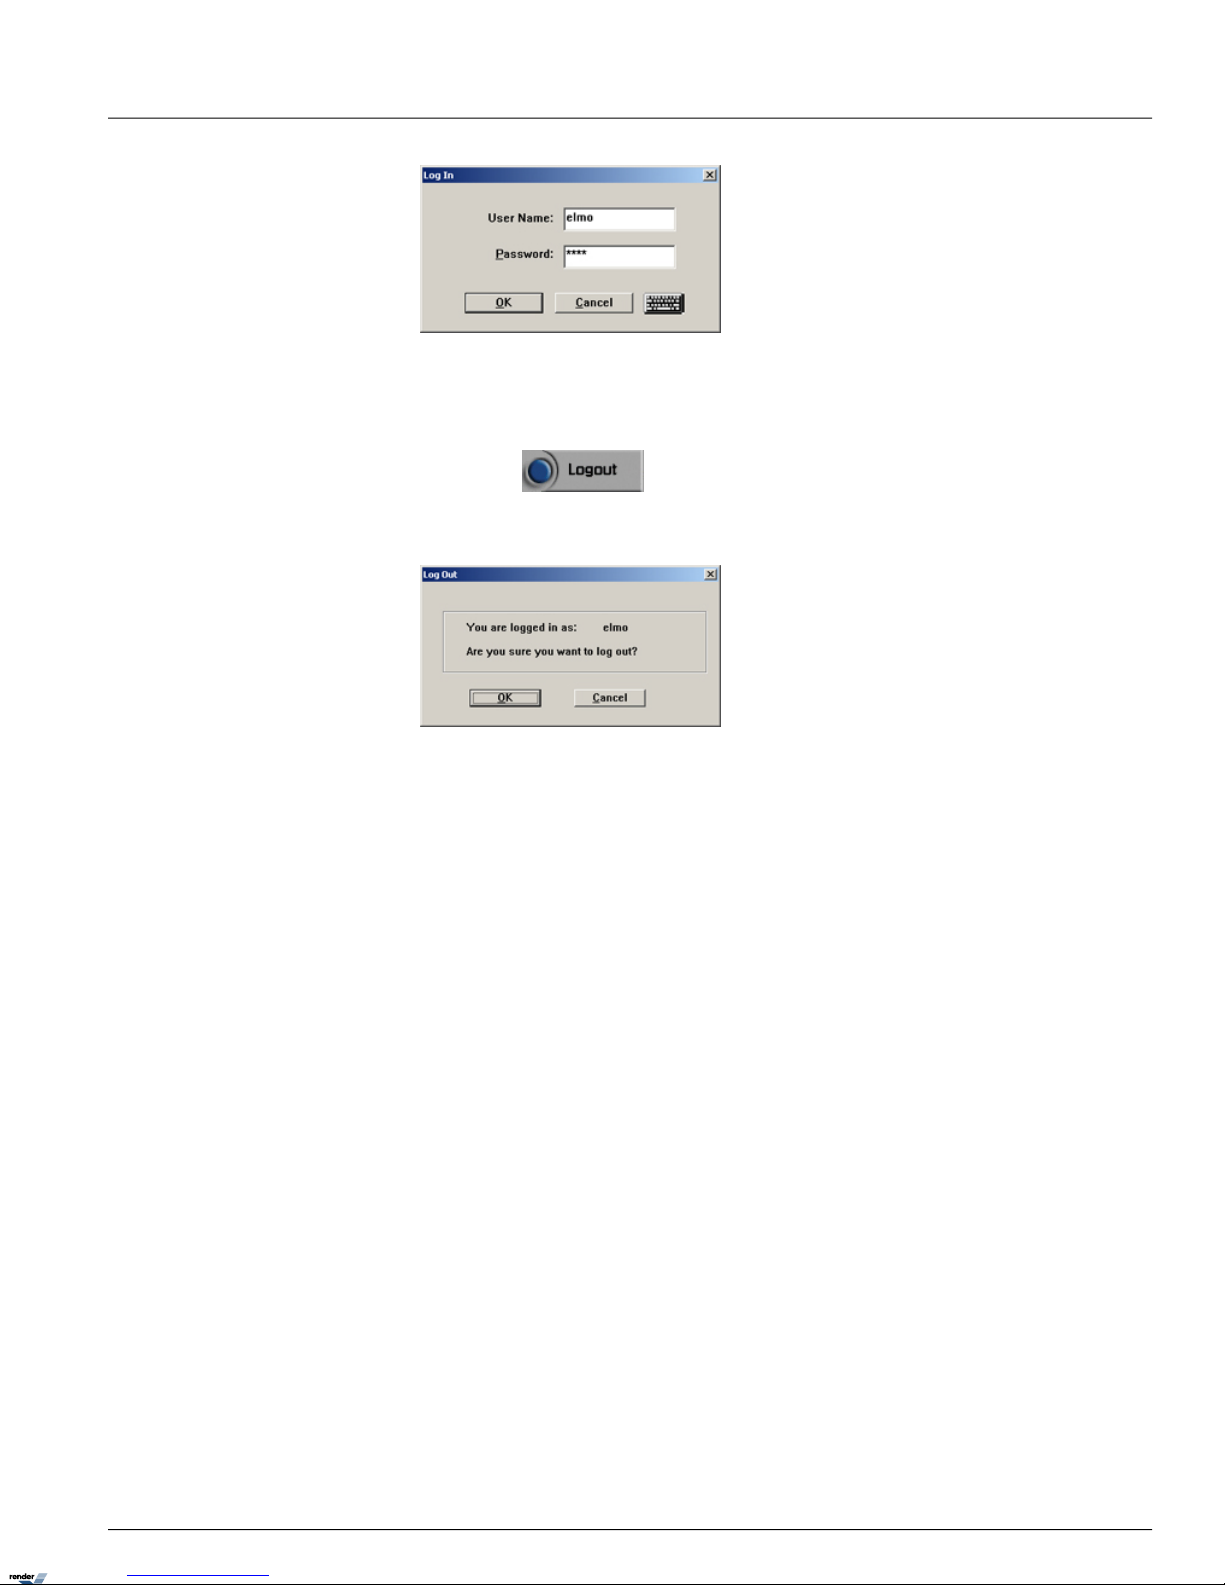
2.1. Logging In/Out .......................................................................................................................... 5
2.2. ELMO DVR Server Main Screen ........................................................................................................ 6
2.3. PTZ mode .............................................................................................................................. 9
3. Configuring ELMO DVR Server .................................................................................................................. 13
3.1. Hardware Setup - Camera Setup ..................................................................................................... 13
3.2. Hardware Setup - Sensor Setup ...................................................................................................... 14
3.3. Hardware Setup - Control Setup ...................................................................................................... 16
3.4. Hardware Setup - External Monitor Setup ............................................................................................ 17
3.5. The Preset Touring & Alarm/Preset Setup ............................................................................................ 18
3.6. Motion Setup ......................................................................................................................... 19
3.7. Schedule Setup - Simple Mode ....................................................................................................... 24
3.8. Schedule Setup - Advanced Mode .................................................................................................... 26
3.9. Screen Division ........................................................................................................................ 27
3.10. Communication Setup ............................................................................................................... 28
3.11. Server Information ................................................................................................................... 29
3.12. Password Setup ..................................................................................................................... 35
3.13. Audio Settings ....................................................................................................................... 38
3.14. System Setup ........................................................................................................................ 39
3.15. Storage Structure Setup ............................................................................................................. 48
3.16. E-Map Setup ......................................................................................................................... 51
3.17. View Log Records ................................................................................................................... 58
3.18. Email Setup .......................................................................................................................... 59
3.19. Intelli-Guard™ ....................................................................................................................... 62
3.20. Virtual Ruler ......................................................................................................................... 68
3.21. Intelli-Zone™ ......................................................................................................................... 71
3.22. Motion Tracking ..................................................................................................................... 73
3.23. VideoLogix™ Setup .................................................................................................................. 74
3.24. Snapshot Setup ...................................................................................................................... 82
4. Search on ELMO DVR Server ................................................................................................................... 86
4.1. Time Panel ............................................................................................................................ 87
4.2. Tools Panel ............................................................................................................................ 90
4.3. Video Recording Playback ............................................................................................................. 91
4.4. Snapshot Function .................................................................................................................... 91
4.5. Panorama Function ................................................................................................................... 92
4.6. Image Zoom In/Zoom Out ............................................................................................................. 93
4.7. Using Bookmark ...................................................................................................................... 94
4.8. Advanced Search Panel ............................................................................................................... 94
4.9. Image Settings Panel ................................................................................................................. 99
Backup on ELMO DVR Server ............................................................................................................................ 101
1. Quick CD Backup .............................................................................................................................. 102
2. Manual Backup ................................................................................................................................ 104
XML to PDF by RenderX XEP XSL-FO Formatter, visit us at http://www.renderx.com/

2.1. Snapshot Backup .................................................................................................................... 104
2.2. Encrypted Backup ................................................................................................................... 107
2.3. AVI Backup .......................................................................................................................... 110
2.4. Email Backup ........................................................................................................................ 113
3. Multi-CD Backup ............................................................................................................................... 117
ELMO DVR Remote ....................................................................................................................................... 118
1. Starting ELMO DVR Remote ................................................................................................................... 119
1.1. Logging In ........................................................................................................................... 119
1.2. Creating New Remote Site Connection .............................................................................................. 120
1.3. Main Screen ......................................................................................................................... 123
1.4. Connecting to the Remote Site ...................................................................................................... 126
1.5. Viewing the cameras on the connected remote site ................................................................................. 127
1.6. Using Multi-Site tool ................................................................................................................. 128
1.7. Disconnecting from the Remote Site ................................................................................................ 129
2. Configuring ELMO DVR Remote ............................................................................................................... 130
2.1. About ELMO DVR Remote ........................................................................................................... 130
2.2. Configuration Setup ................................................................................................................. 130
2.3. Communication Setup ............................................................................................................... 132
2.4. Other Setup .......................................................................................................................... 133
3. Search on ELMO DVR Remote ................................................................................................................. 134
3.1. Local Backup Search Categories ..................................................................................................... 134
3.2. Local Search on ELMO DVR Remote ................................................................................................ 135
3.3. Search Window in the Local mode .................................................................................................. 135
3.4. Searching a Connected Remote Site ................................................................................................ 137
Backup on ELMO DVR Remote ........................................................................................................................... 139
1. Automatic Backup ............................................................................................................................. 140
2. Manual Backup ................................................................................................................................ 141
2.1. Snapshot Backup .................................................................................................................... 141
2.2. Encrypted Backup ................................................................................................................... 142
2.3. AVI Backup .......................................................................................................................... 143
PACDM™ Integration ..................................................................................................................................... 147
1. Setting up Text Overlay ........................................................................................................................ 148
ivELMO DVR User Manual v5.01
ELMO DVR User Manual v5.01
XML to PDF by RenderX XEP XSL-FO Formatter, visit us at http://www.renderx.com/

ELMO DVR Server
XML to PDF by RenderX XEP XSL-FO Formatter, visit us at http://www.renderx.com/

1. Introduction
1.1. Welcome
Thank you for purchasing our ELMO X-Series Digital Video Recorder (DVR). ELMO is a registered trademark of ELMO USA
CORP.
This manual will guide you through the usage of ELMO DVR Server and ELMO DVR Remote software. If you have any
questions or concerns, please visit our website at http://www.elmousa.com or contact our technical support team.
1.2. Important changes to ELMO DVR, v.5.01
Please note that the video recordings made with earlier versions of ELMO DVR Server will not be displayed on the ELMO
DVR Server v.5.01. The ELMO DVR Server v.5.01 is only available with the hardware upgrade.
Notice that the systems supporting ELMO DVR Server v.5.01 do not have physical watchdog cable as all the circuitry is
built-in within the system. The built-in watchdog function works the same way as the physical watchdog cable and can
be turned ON/OFF with the switch or button (depending on the chassis model).
1.3. Limited Warranty
ELMO USA CORP. warrants this product to be in compliance with its own plans and specifications, and to be free from
defects in materials and workmanship under normal use and service for all parts, excluding the Hard Drives, for a period
(or the equivalent) of three (3) years after the original purchase date. During this period, ELMO USA CORP. will replace
parts at no charge; however, labor costs will be charged after one (1) year.
Hard Drive: Parts + Labor = 1 year warranty
Other Parts: Parts + Labor = 1st year only*
Parts: 2nd and 3rd year only
* N.B.: Compact (CP) units are warranted for only one (1) year, parts and labor.
This warranty excludes costs for initial technical adjustments (setup) which are the responsibility of the dealer from whom
you purchased the unit. It also excludes damages due to misuse or neglect. Damages resulting from electrostatic discharge
(ESD) will not be warranted. This warranty does not cover damages beyond ELMO USA CORP.'s control. In no event
shall ELMO USA CORP. be liable for any direct, indirect or consequential damages, loss of anticipated profits, loss of time
or any other losses incurred by the buyer in connection with the purchase, installation, operation or failure of this product.
We, ELMO and its agents, are not responsible for viruses. Users should install anti-virus software on their ELMO DVR at
their own risk. For more details on the limitations of this warranty, contact your distributor.
**For technical assistance, please call: 1-877-877-7241
To obtain service, please follow these steps:
1. Arrange for delivery of your equipment to: ELMO USA CORP., 1478 Old Country Road,
Plainview, New York, 11803, USA.
2. All shipments should be shipped prepaid, insured and properly packaged (preferably in the original packaging) and
accompanied by a letter outlining the defect.
3. Supply your warranty registration, bill of sale, or other evidence of purchase date.
2ELMO DVR User Manual v5.01
IntroductionELMO DVR Server
XML to PDF by RenderX XEP XSL-FO Formatter, visit us at http://www.renderx.com/

NOTE: The ELMO DVR must be used with an Uninterruptible Power Supply
(rated at a minimum of 500 watts), with range protection. Failure to do so will
void all warranties!
1.4. General
This product is the product of ELMO USA CORP. advanced technology and has passed extensive reliability and compatib-
ility tests. Copyright of this manual belongs to ELMO USA CORP., and may not be reprinted or reproduced without prior
written permission. If you need to modify or repair your system, we recommend that you contact a certified ELMO
Dealer/Installer. Otherwise, the system warranty will be voided. Should you have any problems or questions with our
product, contact your local ELMO Dealer/Installer. This product is certified for domestic and industrial use: uTUVc certified
for Europe, and UL certified for the USA.
1.5. Precautions
Please, do not install additional software on our system to be used as a personal
computer. Doing so will jeopardize the performance of the ELMO DVR Server and may even result in a system crash.
When selecting a storage location for the system, be sure to avoid:
• excessive heat, such as direct sunlight or heating appliances
• moisture, dust, and smoke
• magnetic fields or electrical waves
• temperatures below 5° Celsius or 41° Fahrenheit
• any obstructions to system ventilation holes
Before installing this system, always ensure the:
• power source is located within 3 feet or 1 meter of the UPS
• power is switched off (**Do not plug the DVR unit in.)
• system and its connecting cables have sufficient space
• system is placed on an even surface
• system is situated far from electronic equipment such as microwaves, radios, fridge compressors, or any type of
wireless equipment such as a telephones or cell phones)
• system is at room temperature (18° - 25° Celsius or 64.4° - 77° Fahrenheit)
1.6. Unpacking
To unpack the ELMO DVR, follow these steps:
1. Place the box on a flat, clean surface.
2. Remove the box by pulling and lifting the system up with both hands.
3. Place the system down carefully.
3ELMO DVR User Manual v5.01
GeneralELMO DVR Server
XML to PDF by RenderX XEP XSL-FO Formatter, visit us at http://www.renderx.com/

4. Read the User Manual thoroughly before installing the system.
5. Make sure all the parts listed below have been included:
1.7. ELMO DVR Back View
The following diagram displays the back of the ELMO DVR:
4ELMO DVR User Manual v5.01
ELMO DVR Back ViewELMO DVR Server
XML to PDF by RenderX XEP XSL-FO Formatter, visit us at http://www.renderx.com/

2. Starting ELMO DVR Server
The ELMO DVR Server is the professional intelligent and innovative software application that offers the user a variety of
controls and settings that make the experience with ELMO DVR effortless and efficient.
Usually the ELMO DVR Server starts automatically; if it doesn't, click the ELMO Server icon on
the Desktop.
With Windows 2000™ and Windows XP™, virtual keyboard can be used to enter information. Click the
keyboard icon located on the lower right-hand side of the main screen.
2.1. Logging In/Out
After installation, ELMO DVR automatically creates an administrative account (elmo). It is recommended to change the
password for this account or to create at least one other Master User account to set up accounts for other users. It is
advisable to reserve the master user option for technicians only. Only the master users have access to the ELMO DVR
Desktop and can create other master users.
See Password Setup for more information.
In case if the username and/or password were lost, contact the local dealer for information on how to reset them.
To log into the ELMO DVR Server, do the following:
1.
Click Login
2. The Log In window will appear on the screen
3. If logging in for the first time, enter elmo for User Name and elmo for Password. Or log in with the name and
password assigned by system administrator. Use the virtual keyboard if necessary.
5ELMO DVR User Manual v5.01
Starting ELMO DVR ServerELMO DVR Server
XML to PDF by RenderX XEP XSL-FO Formatter, visit us at http://www.renderx.com/

4. Click the OK or press Enter to continue
To log out of the ELMO DVR Server, do the following:
1.
Click Logout
2. The confirmation window will be displayed. Click OK to log out.
Related Topics: Password Setup
2.2. ELMO DVR Server Main Screen
Main Screen contains the following areas:
13. Sensor/Control panel7. Search1. About
14. Exit8. Setup2. Help
15. Snapshot Button9. Panic3. Server Location
16. Rotate Cameras10. PAC4. Server ID
17. Full Screen11. Storage/Hard Drive Meter5. Date and Time
18. Screen Division Buttons12. Camera panel6. Login/Logout
6ELMO DVR User Manual v5.01
ELMO DVR Server Main ScreenELMO DVR Server
XML to PDF by RenderX XEP XSL-FO Formatter, visit us at http://www.renderx.com/

ELMO DVR Server Main Screen Features:
About - Displays the ELMO license agreement and the version of the ELMO DVR Server software
installed. Click I Accept to close.
Help – Displays the help menu window. The major help topics are available.
Location – displays the customer name for Server location.
Server ID – displays the Server ID. This information is necessary to connect to the Server
remotely.
Date and Time – displays the current date and time. This information is acquired from the
Windows OS. If date/time is not correct, access the Desktop (Master users press Alt + Shift
+ Ctrl + F4) and double-click the Windows time display in the right-hand corner. Set the
appropriate time, click Apply and restart the ELMO DVR.
7ELMO DVR User Manual v5.01
ELMO DVR Server Main ScreenELMO DVR Server
XML to PDF by RenderX XEP XSL-FO Formatter, visit us at http://www.renderx.com/

Login/Logout – in order to access the ELMO DVR Server Setup, search or view the cameras
Note
Only the users logged-in as the master users
can access the Desktop.
or access PACDM™ the user must first log in.
Search – displays the ELMO DVR Server Search window, which permits camera playback and
search, image editing and printing, file backup by time/date/camera, object search, etc.
Setup – displays the ELMO DVR Server Setup menu
Panic – the Panic button acts as an Active Sensor Backup. When Panic is clicked or the sensor
is activated the system will backup the 5 prior minutes of encrypted video onto a CD. The post-
activation length of recording is configured by the user in the System Setup menu.
PAC – brings up PACDM™ software for generating reports and P.O.S. or Card Access transactions
Note
If no SPK key, the demo version of
PACDM™ software will be displayed.
searching.
Total Space (Storage/Hard Drive Meter) – Displays the total space available on
the hard drive. Also displays the amount of remaining free hard drive space available for video
recording. When no empty space is remaining, ELMO DVR Server goes into the Overwrite mode
and the word "Recycling" is displayed on the Total Space meter.
Note
To exit the software without shutting down,
master users should press
Alt+Ctrl+Shift+F4.
Camera panel
Camera panel indicates the ELMO DVR recording activity. Highlighted camera numbers represent currently recording
cameras. In the example below, cameras 1 and 2 are currently recording.
Sensor and Control panel
The Sensor/Control panel activates selected controls and displays sensor status. Selected controls and triggered sensors
are highlighted on Sensor/Control panel. In the example above, Sensors 7-8 are triggered and Controls 3-4 are activated.
Control acts as a relay and can be controlled by a user (turned on/off) from the Sensor/Control panel (authorized users
only). Sensor works as a switch and cannot be manually controlled from the main screen.
Screen Division
The Screen Division buttons allow for customization of the main screen appearance. When a specific Screen Division is
chosen, the corresponding amount of cameras will be displayed on the main screen. Important: The first available
8ELMO DVR User Manual v5.01
ELMO DVR Server Main ScreenELMO DVR Server
XML to PDF by RenderX XEP XSL-FO Formatter, visit us at http://www.renderx.com/

cameras will be displayed. E.g. If the ELMO DVR has 12 available cameras and the 9-cameras screen division is selected,
Cameras 1-9 will be displayed on the main screen in a 9-cameras screen division. Screen Division button settings can be
customized in the Screen Division Setup to display the selected cameras instead of the first available cameras. E.g. The
4-cameras Screen Division button can be customized to display Cameras 2, 8, 10 and 11 instead of Cameras 1-4.
The Screen Division buttons change on cursor-over and when clicked. The red Screen Division button is the one currently
activated
Displays the first 4 available cameras in a 4-cameras Screen division on the Main Display
Screen. Click again to display next 4 cameras
Displays the first 6 available cameras in a 6-cameras Screen division on the Main Display
Screen
Displays the first 9 available cameras in a 9-cameras Screen division on the Main Display
Screen
Displays the first 10 available cameras in a 10-cameras Screen division on the Main
Display Screen
Displays the first 13 available cameras in 13-cameras Screen division on the Main
Display Screen
Displays the first 16 available cameras in a 16-cameras Screen division on the Main
Display Screen
Rotate Cameras - This button continuously rotates cameras in the quad screen
division (4-cameras screen division) in a sequence (1-4, 5-8, 9-12, 13-16, 17-20, 21-
24, 25-28, 29-32 (if applicable)). To stop camera rotation, click the desired Screen
Division button or click Rotate Cameras again to deactivate it.
Full Screen - This button displays a single camera or chosen screen division
without any menu bars (no interface shown). Right-click to exit the full-screen mode.
Snapshot - This button allows taking a snapshot of each connected camera in the
Live mode. Ensure that the Display Snapshot Button checkbox is checked
off in the Server Information setup tab and the Snapshot Setup tab are properly con-
figured. If the Snapshot Setup is not configured, the Snapshot button will become in-
active.
Related Topics: Screen Division | Server Information | Password Setup | Snapshot Setup
2.3. PTZ mode
The remote control feature of the PTZ camera, controlled by a user through ELMO software, is one of the camera’s main
advantages. Ensure that the PTZ function in the Hardware Setup menu is enabled and that the correct brand and make
of PTZ camera is chosen from the list.
To access the PTZ mode, do the following:
1. Locate a PTZ camera in the main ELMO DVR Server window
2. Click on the image. The PTZ window will be displayed.
PTZ cameras can be controlled from:
1. ELMO DVR Server (authorized users only)
2. ELMO DVR Remote (authorized users only)
9ELMO DVR User Manual v5.01
PTZ modeELMO DVR Server
XML to PDF by RenderX XEP XSL-FO Formatter, visit us at http://www.renderx.com/

3. ELMO Websecurity
In the PTZ window the user can:
1. change the pan-tilt settings
2. zoom in and out
3. focus the image
4. configure the presets and the preset touring
The PTZ window can be controlled with:
1. The PTZ window buttons
2. The Mouse in-cameo function. To do so, point towards the desired direction with the mouse cursor, click and hold
left mouse button
3. The Keyboard Num Pad arrow buttons (4 and 6 for Pan; 2 and 8 for Tilt; - and + for Zoom in/out functions)
The main areas of the PTZ mode window are:
1. About - Same as in the main screen
2. Help - Same as in the main screen
3. Server Location - Same as in the main screen
4. Server ID - Same as in the main screen
5. Date and Time - Same as in the main screen
6. PTZ Camera Menu
7. Pan/Tilt Speed
8. Pan/Tilt Setup
9. Focus
10. Zoom
11. Close – Exits the PTZ Mode
12. Preset Touring
13. Preset Setup
14. Snapshot Button - Same as in the main screen
15. Rotate Cameras - Same as in the main screen
16. Full Screen - Same as in the main screen
17. Screen Division - Same as in the main screen
10ELMO DVR User Manual v5.01
PTZ modeELMO DVR Server
XML to PDF by RenderX XEP XSL-FO Formatter, visit us at http://www.renderx.com/

PTZ Camera Menu - this area is specific to each PTZ camera. The OSD button for Speed
dome camera will be replaced by AUX (Auxiliary) button for other supported PTZ camera models.
This function allows changing the camera settings remotely through the software, as opposed to
adjusting settings manually on the mounted camera.
Pan/Tilt Speed – this is the speed of the camera response to the user input. Increase the
Pan/Tilt speed for the PT camera to move faster. Increase or decrease Pan/Tilt speed by clicking
the arrows.
Pan/Tilt Setup – adjust camera Pan-Tilt position by clicking the arrows up and down for Tilt;
left and right for Pan.
Focus - Focus the image by clicking + and - signs
Zoom - Zoom the PTZ camera in and out by clicking + and - signs
Preset Touring - this setup allows for the configuration of the presets used by the Preset
Touring function.
Preset Setup - this menu allows for the set up of up to 10 presets for
each PTZ camera. A preset is the unique combination of Pan, Tilt and Zoom
values for each camera that gets recorded and stored by the ELMO DVR Server.
After the preset is programmed, only one button has to be clicked to position
the camera in the specific direction and/or zoom in/out instantly. The presets
11ELMO DVR User Manual v5.01
PTZ modeELMO DVR Server
XML to PDF by RenderX XEP XSL-FO Formatter, visit us at http://www.renderx.com/

configured in this menu are also used by Intelli-Zone™ and the Preset Touring
function.
To configure the presets for a PTZ camera, do the following:
1. Enter the PTZ mode by clicking on the PTZ camera on the main screen.
2. Locate the Preset menu in the bottom of the screen:
3. Click Get Preset. The button will become Set Preset
4. Program the desired Preset (see instructions below).
Note
PTZ function has to be enabled and Camera
ID has to be assigned for all PTZ cameras
in Hardware Setup.
5. AFTER programming the preset, click the Preset number (1-10). The preset gets recorded once the preset number
is clicked.
6. Repeat Steps 4-5 to configure all presets.
7. Exit PTZ mode
Program the desired Preset with the PTZ window buttons:
1. Adjust camera Pan-Tilt position by clicking the arrows up and down for Tilt; left and right for Pan.
2. Increase/Decrease Pan/Tilt speed by clicking the arrows. The higher the speed, the faster the PTZ camera will move
in response to the user command.
3. Focus and Zoom in/out by clicking +and -signs
OR
Program the desired Preset with the in-cameo PTZ function:
1. Point with a mouse cursor in the desired direction. An arrow will appear.
2. Hold down the left mouse button, the camera will move in the desired direction.
3. Focus and Zoom in/out with the Focus and Zoom buttons on the right side of the window.
OR
Program the desired Preset with keyboard:
Use Num Pad arrow buttons (4 and 6 for Pan; 2 and 8 for Tilt; - and + for Zoom in/out functions)
Related Topics: Camera Setup | Preset Touring | Intelli-Zone™
12ELMO DVR User Manual v5.01
PTZ modeELMO DVR Server
XML to PDF by RenderX XEP XSL-FO Formatter, visit us at http://www.renderx.com/

3. Configuring ELMO DVR Server
ELMO DVR Server Setup. Save and Close buttons.
Every ELMO DVR Server Setup page has Save and Close buttons:
The Setup tabs that require user input have a Virtual Keyboard button:
Click Save before closing the Setup window or accessing a different Setup tab in order to save any changes made.
OR
Click Close to exit without saving.
When trying to change the Setup tab or close Setup without saving, a confirmation window will appear:
Click Yes to save the changes. Click No to exit without saving. Click Cancel to continue editing setup settings.
3.1. Hardware Setup - Camera Setup
3.1.1. Overview
Camera Setup allows:
1. Assigning a numerical camera ID number to each selected camera
2. Associating Sensor(s) with selected cameras
3. Configuring selected cameras to record based on motion that occurred on associated camera(s)
4. Choosing the PTZ camera type
5. Setting up an auto pan for selected cameras
3.1.2. Creating/Modifying Camera Settings
Camera Setup
13ELMO DVR User Manual v5.01
Configuring ELMO DVR ServerELMO DVR Server
XML to PDF by RenderX XEP XSL-FO Formatter, visit us at http://www.renderx.com/

To setup all connected cameras, do the following:
1. Check the Enable checkbox for all connected cameras. The numbers correspond with the physical BNC connectors
in the back of the DVR.
Note
This feature is NOT available on ELMO DVR
Remote.
2. Assign a Camera ID to any camera that can be controlled by a user - a P/T camera. Cam IDs are assigned in order
to distinguish between the different P/T cameras connected to the same parallel connection. Most Speed Domes have
their Cam ID assigned by dip-switches in the back of the camera. Fixed cameras do not have a Cam. ID.
Note
The BNC connector number does not have
to match the Cam. ID number.
3. Label the cameras for easy identification (e.g. Front Door)
4. Enter the Sensor number to be associated with the specific camera. If the specific sensor is triggered, that camera
will begin recording (see Sensor Setup, Schedule Setup). In the above example, if Sensor 2 is triggered, Camera 1
(Front Door) will start recording.
5. In the Motion field associate the current camera with one or more cameras. When motion is detected on an asso-
ciated camera(s), the current camera will start recording. Motion detection has to be configured and Schedule Setup
has to be set to Motion recording for the associated camera(s). (see Motion Setup, Schedule Setup). In the above
example, if the motion occurs on Camera 3 (Back Door), Camera 1 (Front Door) and 4 (Warehouse) will begin recording.
6. Check the P/T/Z (Pan-Tilt-Zoom) checkbox for cameras supporting the P/T feature
Note
This feature is NOT available on ELMO DVR
Remote.
7. Choose the correct camera make and model (Type) for the PTZ cameras from the list provided
8. Check the Auto-Pan (A/P) checkbox for the installed PTZ cameras. This feature allows the PTZ camera to return
to the programmed auto pan after a user adjusts the PTZ settings remotely and exits the program without returning
to the original settings.
9. Assign Dwell Time for the A/P setting. This is the time that will pass before the Auto-Pan (A/P) will be activated.
In the above example, Camera 1 will return to the original pan after 20 seconds.
Related Topics: PTZ mode | Sensor Setup | External Monitor | Motion Detection | Schedule Setup | Screen
Division | Password Setup
3.2. Hardware Setup - Sensor Setup
3.2.1. Overview
In the Sensor Setup the user can configure the connected sensors. Sensors are set as NC or NO (NC = Normally Closed;
NO = Normally Open).
An NC sensor is any sensor with an electrical circuit closed by default.
E.g. - a sensor on a closed door. When the door is opened, the electrical circuit is broken and the sensor is triggered.
14ELMO DVR User Manual v5.01
Hardware Setup - Sensor SetupELMO DVR Server
XML to PDF by RenderX XEP XSL-FO Formatter, visit us at http://www.renderx.com/

An NO sensor is any sensor with electrical circuit open by default. E.g. - the light in a refrigerator. The light is off by
default. When the refrigerator door is opened the circuit is closed and thus the sensor is triggered and the light goes on.
3.2.2. Creating/Modifying Sensor Settings
To configure the available sensors, do the following:
1. Enable all connected sensors
2. Choose NC or NO depending on the type of the sensor
3. Choose which WAV file will play when the Sensor is triggered. Type in the WAV file name in the field provided. The
WAV files are stored in the C:\ELMO_Server\WAV folder.
4. Choose Enable Alarm to have the chosen custom alarm sound every time the sensor is triggered
OR
Choose Disable Alarm to disable the custom alarm. The internal speaker alarm will sound instead.
5. Set the Post Recording time between 1 and 60 s. In this example, the camera(s) will record for 60 seconds after the
Sensor is activated or after the detected motion stops.
Note
Motion and Schedule Setups must be con-
figured.
To customize the Alarm for Sensor activation, do the following:
1. Record the sound file in the WAV format
2. Save the file in the C:\ELMO_Server\WAV folder
3. In the Sensor Setup, type the WAV- source file name with the file extension in the Sound File field. In the above
example, the customized WAV files are chosen for Sensors 1-5.
15ELMO DVR User Manual v5.01
Hardware Setup - Sensor SetupELMO DVR Server
XML to PDF by RenderX XEP XSL-FO Formatter, visit us at http://www.renderx.com/

Related Topics: Camera Setup | Control Setup | Preset Touring | Schedule Setup | Communication Setup |
Server Information | System Setup | E-Map Setup | Email Setup
3.3. Hardware Setup - Control Setup
3.3.1. Overview
Control settings are applicable only if controls are available and are being used.
Active Time
Active Time refers to the designated time when the control is active (is on). The default setting is 00:00-00:00,
which means the control is always off. The control will be continuously on, if the Active Time is set to 00:00 -
24:00. During the Active Time, the control cannot be turned off from the main screen. Outside of the Active Time,
the control can be activated by sensor, or manually from the main screen.
Dwell Time
Dwell Time is the time that the control will stay turned on when it is sensor-triggered. This does not apply if the control
is turned on manually from the main screen. In other words, if the control is turned on manually from the main screen,
it will stay on until manually disabled by the user. Dwell time also does not apply during the Active Time, when the control
is continuously on.
3.3.2. Creating or Modifying Control Settings
To configure the available controls, do the following:
1. Check the Enable checkbox for all installed controls
2. Give each control a descriptive Name.
16ELMO DVR User Manual v5.01
Hardware Setup - Control SetupELMO DVR Server
XML to PDF by RenderX XEP XSL-FO Formatter, visit us at http://www.renderx.com/
Table of contents
Other Elmo DVR manuals

Elmo
Elmo EDR-X109 Compact User manual

Elmo
Elmo EDR-X04 User manual

Elmo
Elmo EDR-X1 Troubleshooting guide

Elmo
Elmo EDVR-120 User manual

Elmo
Elmo ProVidient EMR-16 User manual

Elmo
Elmo EDR-X109 Compact User manual

Elmo
Elmo ProVidient EMR-16 User manual

Elmo
Elmo EDR-X116 User manual

Elmo
Elmo EDR-X1 User manual

Elmo
Elmo SUV-CAM BWV User manual