Endless Pools E2000 User manual

E2000 Fitness Systems
OWNER'S MANUAL 50HZ
by Endless Pools®

OWNER’S MANUAL
This Owner’s Manual will acquaint you with the operation and general maintenance of your new fitness system. We suggest
that you take some time to carefully review all sections. Please keep this manual available for reference.
If you have questions about any aspect of your fitness system’s set-up, operation or maintenance, contact your authorized
ENDLESS POOLS dealership. They are trained professionals who are familiar with the product, as well as new fitness
system ownership concerns. Their expertise will facilitate the enjoyment of your new fitness system.
The serial number/identification label is located within the equipment compartment of your fitness system. The serial
number should also be documented on the delivery receipt from your dealer.
IMPORTANT: Watkins Manufacturing Corporation reserves the right to change specifications, or design, without notification
and without incurring any obligation.
DATE PURCHASED: ___________________________________
DATE INSTALLED: _____________________________________
DEALER: ____________________________________________
ADDRESS: ___________________________________________
TELEPHONE: _________________________________________
MODEL/SERIAL NUMBER: ______________________________
COVER SERIAL NUMBER: ______________________________
In most cities and counties, permits will be required for the installation of electrical circuits or the construction of exterior surfaces (decks and
gazebos). In addition, some communities have adopted residential barrier codes which may require fencing and/or self-closing gates on the property
to prevent unsupervised access to the fitness system by children. As a general practice, your local Building Department will inform you of any
applicable barrier requirements at the time a permit is obtained for the installation of an electrical circuit. Your ENDLESS POOLS dealer can provide
information on which permits may be required.
WELCOME
Watkins Manufacturing Corporation congratulates you on your decision to enjoy the finest fitness
system available. Welcome to the growing family of fitness systems by ENDLESS POOLS owners.

TABLE OF CONTENTS
SAFETY INFORMATION
IMPORTANT SAFETY INSTRUCTIONS .............................. 1
IMPORTANT FITNESS SYSTEM INSTRUCTIONS............ 3
SITE REQUIREMENTS
INDOOR CONSIDERATIONS ............................................... 4
OUTDOOR CONSIDERATIONS........................................... 4
ELECTRICAL REQUIREMENTS .......................................... 4
DECK INSTALLATION............................................................ 5
DELIVERY ACCESS .............................................................. 5
E2000 MODEL ........................................................................ 6
ELECTRICAL REQUIREMENTS
SINGLE PHASE WIRING....................................................... 7
3 PHASE WIRING .................................................................. 8
EQUIPMENT COMPARTMENT ............................................ 9
DOOR PANEL REMOVE & REPLACE................................. 9
GETTING STARTED
MAIN FITNESS SYSTEM FEATURES ............................... 10
ADDITIONAL FITNESS SYSTEM FEATURES.................. 10
HYDROMASSAGE JETS..................................................... 11
WATERFALL VALVE............................................................. 11
AIR CONTROLS ................................................................... 11
SWIM MACHINE-HYDRAULIC ........................................... 11
QUICK START-UP INSTRUCTIONS .................................. 12
OPERATING INSTRUCTIONS
SWIM SIDE CONTROL PANEL........................................... 14
SETTINGS............................................................................. 14
AUDIO IN.STREAM 2 (OPTIONAL).................................... 16
TEMPERATURE CONTROL .............................................. 16
LIGHT CONTROL................................................................. 16
WI-FI IN.TOUCH (OPTIONAL) ........................................... 17
ALL OFF / MEMORY ON ..................................................... 17
SPA SIDE CONTROL PANEL.............................................. 17
SETTINGS............................................................................ 17
INVERT SCREEN ................................................................ 19
TEMPERATURE CONTROL .............................................. 19
JETS CONTROL................................................................... 20
LIGHT CONTROL................................................................. 20
FILTER CYCLES................................................................... 20
ALL OFF / MEMORY ON ..................................................... 20
WI-FI IN.TOUCH™(OPTIONAL) ....................................... 20
SMART WINTER MODE ..................................................... 20
WATER QUALITY AND MAINTENANCE
BASIC INFORMATION......................................................... 21
CHEMICAL SAFETY ........................................................... 21
HOW TO ADD CHEMICALS
TO THE WATER.................................................................... 21
FUNDAMENTALS OF
WATER MAINTENANCE ..................................................... 21
THE ENDLESS POOLS WATER MAINTENANCE
PROGRAM............................................................................ 22
VACATION WATER CARE INSTRUCTIONS..................... 24
GLOSSARY........................................................................... 24
CARE AND MAINTENANCE
FILTER MAINTENANCE ...................................................... 25
SWIM SIDE FILTER CARTRIDGE REMOVAL AND
CLEANING INSTRUCTIONS .............................................. 25
SPA SIDE FILTER CARTRIDGE REMOVAL
INSTRUCTIONS ................................................................... 26
DRAINING YOUR
FITNESS SYSTEM ....................................26
PREVENTION OF FREEZING ............................................ 26
WINTERIZING YOUR FITNESS SYSTEM ........................ 26
CARE OF THE EXTERIOR.................................................. 27
SERVICE INFORMATION
GENERAL INFORMATION .................................................. 28
GFCI AND HIGH LIMIT THERMOSTAT.............................. 28
MISCELLANEOUS SERVICE INFORMATION.................. 28
ACTS INVALIDATING WARRANTY.................................... 28
DISCLAIMERS...................................................................... 29
WATKINS CUSTOMER SERVICE...................................... 29
TROUBLESHOOTING ......................................................... 29

Page 1
Safety Information
Safety InformatIon
IMPORTANT SAFETY
INSTRUCTIONS
(READ AND FOLLOW ALL
INSTRUCTIONS)
AVOIDING THE RISK TO CHILDREN
DANGER - RISK OF CHILD DROWNING
Extreme caution must be exercised to prevent unauthorized access by
children. To avoid accidents, ensure that children cannot use a fitness
system unless they are supervised at all times.
WARNING
To reduce the risk of injury, do not permit children to use this fitness
system unless they are closely supervised at all times.
• To reduce the risk of injury, lower water temperatures are
recommended for young children. Children are especially sensitive to
hot water.
• The fitness system should not be used by persons (including
children) with reduced physical, sensory or mental capabilities, or
lack of experience and knowledge, unless they receive supervision or
training.
DO:
• Make sure you always lock any child resistant locks after using the
fitness system for your children’s safety.
• Test the water temperature with your hand before allowing children to
enter the fitness system to be sure that it’s comfortable.
• Remind children that wet surfaces can be very slippery. Make sure
that children are careful when entering or exiting the fitness system.
DON'T:
• Allow children to climb onto a fitness system cover.
• Allow children to have unsupervised access to the fitness system.
AVOIDING THE RISK OF
ELECTROCUTION
DANGER - RISK OF ELECTROCUTION
• Connect only to a grounded source.
• Do not bury the power cord. A buried power cord may result in death,
or serious personal injury due to electrocution if direct burial-type cable
is not used, or if improper digging occurs.
• A ground terminal (pressure wire connector) is provided on the control
box inside the unit to permit connection of a minimum 8 mm²
solid copper bonding conductor between this point and any metal
equipment, metal water pipe, metal enclosures of electrical equipment,
or conduit within 1.5 m (5 feet) of the unit as needed to comply with
local requirements.
• Do not connect any auxiliary components (for example, cable,
additional speakers, headphones, additional audio components) to the
audio system unless approved by Watkins Manufacturing Corporation
• Do not self service the audio component by opening or removing
fitness system door panel as this may expose dangerous voltage or
other risk of injury. Refer all servicing to qualified service personnel.
• Do not attach an external antennae to a fitness system audio system
unless installed by a licensed electrician in accordance with your
National Electric Code.
WARNING
• To reduce the risk of electrical shock, replace a damaged cord
immediately. Failure to do so may result in death or serious personal
injury due to electrocution.
• In order to avoid a hazard due to inadvertent resetting of the thermal
cut-out, this fitness system must not be supplied through an external
switching device, such as a timer, or connected to a circuit that is
regularly switched on and off by the utility.
• Always test the Ground Fault Circuit Interrupter (GFCI) before each
use of the spa. If the GFCI does not perform properly, a ground current
is flowing indication the possibility of electric shock. Disconnect power
to the fitness system until the fault has been identified and corrected.
• NOTE: Failure to wait 30 seconds before resetting the GFCI may
cause the fitness system to not work properly, if this happens, repeat
the GFCI test procedure.
• Your fitness system must be supplied by a ground fault circuit
interrupter - residual current device (RCD) - with a tripping rating not
exceeding 30 mA in an electrical subpanel.
DANGER - RISK OF ELECTRICAL SHOCK
• Install at least 1.5 m (5 feet) from all metal surfaces. A fitness system
may be installed within 1.5 m (5 feet) of a metal surface if each metal
surface is permanently connected by a minimum 10 mm² solid copper
conductor attached to the wire ground connector in the junction box
that is provided for this purpose if in accordance with your National
Electrical Codes.
• Install your fitness system in such a way that drainage is away from
the electrical compartment and from all electrical components.
• Do not permit any electrical appliances, such as a light, telephone,
radio, or television within 1.5 m (5 feet) of a fitness system. Failure to
maintain a safe distance may result in death, or serious personal injury
due to electrocution, if the appliance should fall into the fitness system.
DO:
• Be sure your fitness system is connected to the power supply correctly
- use a licensed electrical contractor.
• Disconnect the fitness system from the power supply before draining
the fitness system or servicing the electrical components.
• Test the Ground Fault Circuit Interrupter(s) before each use.
• Replace audio components only with identical components (if your
fitness system is equipped with an audio component).
NO DIVING
Danger: Diving may result
in serious injury or death.

Page 2 Safety Information
DON'T:
• Use the fitness system with the equipment compartment door
removed.
• Place electrical appliances within 1.5 m (5 feet) of the fitness system.
• Use an extension cord to connect the fitness system to its power
source. The cord may not be properly grounded and the connection is
a shock hazard. An extension cord may cause a voltage drop, which
will cause overheating of the jet pump motor and motor damage.
• Attempt to open the electrical control box. There are no user serviceable
parts inside.
RISKS TO AVOID
DANGER - RISK OF INJURY
• To reduce the risk of injury to persons, DO NOT remove suction fittings
(filter standpipes) located in the filter compartment.
• The suction fittings in the
fitness system
are sized to match the
specific water flow created by the pump. Never replace a suction fitting
with one rated less than the flow rate marked on the original suction
fitting.
• There is a danger of slipping and falling. Remember that wet surfaces
can be very slippery. Take care when entering or exiting the
fitness
system
.
• Never operate
fitness system
if the suction fittings are broken or
missing.
• People with infectious diseases should not use the
fitness system
.
• Keep any loose articles of clothing, long hair, or hanging jewelry away
from rotating jets or other moving components. Long hair should be
tied up or placed under a bathing cap.
• Safe water temperature for aquatic exercise is approximately
29.5°C (85°F).
• DO NOT use this
fitness system
alone.
INCREASED SIDE EFFECTS OF MEDICATION
• The use of drugs or alcohol may cause unconsciousness with the
possibility of drowning.
• Persons using medications should consult a physician before using
a
fitness system
; some medication may cause a user to become
drowsy, while other medication may affect heart rate, blood pressure,
and circulation.
• Persons taking medications which induce drowsiness, such as
tranquilizers, antihistamines, or anticoagulants should not use the
fitness system
.
HEALTH PROBLEMS AFFECTED BY FITNESS
SYSTEM USE
• Pregnant women should consult a physician before using
fitness
system
.
• Persons suffering from obesity, or with a medical history of heart
disease, low or high blood pressure, circulatory system problems, or
diabetes should consult a physician before using
fitness system
.
UNCLEAN WATER
• Keep the water clean and sanitized with correct chemical care. The
recommended levels for your ENDLESS POOLS
fitness system
are:
Free Available Chlorine:
1.0-5.0 ppm
Total Alkalinity:
80-120 ppm
Water pH:
7.2-7.8
Calcium Hardness:
50-150 ppm
• Refer to Water Quality and Maintenance section for complete
instructions.
IMPORTANT: Turn on the swim machine for a least ten minutes after
adding ANY
fitness system
water chemicals into the swim area.
Clean the filter cartridges monthly to remove debris and mineral buildup
which may affect the performance of the hydromassage jets, limit the
flow, or trip the high limit thermostat, which will turn off the entire
fitness
system
.
AVOIDING THE RISK OF HYPERTHERMIA
Prolonged immersion in hot water can result in HYPERTHERMIA, a
dangerous condition which occurs when the internal temperature of
the body reaches a level above normal 37°C (98.6°F). The symptoms
of hyperthermia include unawareness of impending hazard, failure to
perceive heat, failure to recognize the need to exit the
fitness system
,
physical inability to exit the
fitness system
, fetal damage in pregnant
women, and unconsciousness resulting in a danger of drowning.
WARNING
The use of alcohol, drugs, or medication can greatly increase the risk of
fatal hyperthermia in
fitness system
s.
TO REDUCE THE RISK OF INJURY
• The water in the
fitness system
should never exceed 40°C (104°F).
Water temperatures between 26°C and 40°C (79°F and 104°F) are
considered safe for a healthy adult. The lower water temperatures
are recommended for extended use (exceeding ten minutes) and for
young children. Extended use can cause hyperthermia.
• Pregnant or possibly pregnant women should limit
fitness system
water temperatures to 29.5°C (85°F consult a physician prior to using
this product. Failure to do so may result in permanent injury to your
baby.
• Do not use
fitness system
having water temperatures over 36°C
(100°F) immediately following strenuous exercise.
• Keep all breakables, especially glass, away from this
fitness system
.
• Never insert any objects into any openings.
• Keep all chemicals away from children and pets.
• DO NOT stack chemicals on top of one another.
• NEVER MIX CHEMICALS.
• Sanitizing chemicals must be stored separately from balancing
chemicals.

Page 3Safety Information
AVOIDING THE RISK OF SKIN BURNS
• To reduce the risk of injury, before entering a
fitness system
the user
should measure the water temperature with an accurate thermometer.
• Test the water with your hand before entering the
fitness system
to be
sure it’s comfortable.
SAFETY SIGN
Each ENDLESS POOLS
fitness system
is shipped with a SAFETY
SIGN in the owner’s package. The sign, which is required as a condition
of Product Listing, should be permanently installed where it is visible to
the users of the
fitness system
. To obtain additional SAFETY SIGNS,
contact your ENDLESS POOLS dealer. Safety labels that are affixed to
the shell are intended to be permanent and should not be removed.
Each ENDLESS POOLS
fitness system
is shipped with a
OPTIONAL TREADMILL SAFETY INFORMATION
WARNING:
• Consult a physician before you start an exercise program. Stop
exercising if you feel pain or tightness in your chest, become short of
breath, or feel faint. Contact your doctor before you use the machine
again.
• This machine contains moving parts. Do not wear loose clothing or
jewelry.
• Do not put fingers or other objects into moving parts of the exercise
equipment.
• Use caution while participating in other activities while walking on your
treadmill; such as watching television, reading, etc. These distractions
may cause you to lose balance or stray from walking in the center of
the belt; which may result in serious injury.
WARNING: TO AVOID THE RISK OF INJURY
• Pregnant women should always consult a physician prior to starting
an exercise program.
• NEVER operate this treadmill without reading and completely
understanding the results of any operational change you request from
the controller.
• Treadmill must be installed on a smooth and level surface.
• NEVER leave an operating treadmill unattended.
• NEVER mount or dismount the treadmill while the belt is moving.
• Hydraulic treadmills start at a very low speed and it is unnecessary to
straddle the belt during startup. Simply standing on the belt during this
slow acceleration is the proper way to start using this product.
• Always hold on to a handrail or grab bar while making control
changes.
• Never drop or insert any object into any openings.
• Children must be supervised while using this machine.
• The moving parts and other features of the machine can be
dangerous to children.
• Before each use, examine this machine for damage or signs of wear.
Do not use this product if found in this condition. Call Customer
Service for repair information.
IMPORTANT
FITNESS SYSTEM
INSTRUCTIONS
The following contains important
fitness system
information, and we
strongly encourage you to read and apply them.
DO:
• Follow the
fitness system
Care and Maintenance recommendations
stated in this manual.
• Use only approved accessories and recommended
fitness system
chemicals and cleaners.
DON'T:
• Leave the
fitness system
exposed to the sun without water or a cover
in place. Exposure to direct sunlight can cause solar distress of the
shell material.
• Roll or slide the
fitness system
on its side. This will damage the siding.
• Lift or drag the vinyl cover by using the cover lock straps; always lift or
carry the cover by using the handles.
• Attempt to open the electrical control box. There are no user
serviceable parts inside. Opening of the control box by the
fitness
system
owner will void the warranty. If you have an operational
problem, carefully go through the steps outlined in the Troubleshooting
section. If you are not able to resolve the problem, contact your
authorized ENDLESS POOLS dealer. Many problems can easily be
diagnosed over the telephone by an Authorized Service Technician.
FITNESS SYSTEM SHELL
Your
fitness system
has an acrylic shell. Stains and dirt generally
will not adhere to your
fitness system
’s surface. A soft rag should
easily remove most dirt. Most household chemicals are harmful to your
fitness system
’s shell (see below for detailed information on cleaning
agents). Always rinse off any
fitness system
shell cleaning agent with
fresh water.
IMPORTANT:
1. The following products are the ONLY approved cleaning agents
for your
fitness system
shell: plain water or Soft Scrub®. The use
of alcohol or any other household cleaner other than those listed to
clean the
fitness system
shell surface is NOT recommended. DO
NOT use any cleaning products containing abrasives or solvents
since they may damage the shell surface, specifically: Simple
Green®, Windex®or spa Mitt. NEVER USE HARSH CHEMICALS!
Damage to the shell by use of harsh chemicals is not covered under
the warranty. Always rinse off any
fitness system
shell cleaning
agent with fresh water.
2. Iron and copper in the water can stain the
fitness system
shell if
allowed to go unchecked. Ask your ENDLESS POOLS dealer about
a Stain and Scale Inhibitor to use if your
fitness system
has a high
concentration of dissolved minerals.
3. Keep all cleaners out of the reach of children and use care when
applying.
SAVE THESE INSTRUCTIONS

Page 4
SAVE THESE INSTRUCTIONS
Site Requirements
SIte requIrementS
Your
fitness system
must be installed on a smooth and level surface
that can support 980 kg/m².
If a new slab is poured, consult your local electrical codes regarding
grounding and bonding. Local code may require a bonding wire to be
attached to the reinforcing bar or wire mesh that is embedded in the
concrete. If new concrete is being poured, this is the ideal time to install
the conduit for the incoming electrical supply.
Even if a new pad has been poured, it is essential that the system site
is level and planar. There is a simple way to ensure that this is the case.
First, draw a chalk outline of the footprint of your
fitness system
. Place
a six-foot level along and around the footprint of the system. Verify that
there are no gaps between the level and floor. Next pour water inside
of the chalk footprint. Verify that the water does not puddle inside the
footprint.
Should there a be a gap or should the water puddle inside the footprint,
call your ENDLESS POOLS dealer prior to continuing to discuss the
best way to resolve this situation.
INDOOR CONSIDERATIONS
• Local electrical and plumbing codes.
• Ventilation fans and/or dehumidifiers should be provided to handle
the humidity developed by your
fitness system
. Walls, ceiling and
wood trim should be water resistant, also.
• Chemicals will vaporize from the water and may cause an odor
and possibly corrosion to certain home hardware. Never store
chemicals inside the
fitness system
cabinet.
• During the normal use of the
fitness system
, water will escape
the vessel. Never place on or over any materials, which may be
damaged by this water or the chemicals within the water. Keep
damageable materials far enough away to avoid water damage,
even if the
fitness system
should lose all its water.
• Consider and prepare for the unlikely event of rapid drainage. If
placement of the
fitness system
is permanent, you may wish to
provide floor drains to accommodate draining, etc. Always leave
room all around the
fitness system
for easy access in case
repairs are necessary.
• Consider and prepare for the unlikely event of removal.
• Do not set
fitness system
on finished floor without a waterproof
barrier protection underneath.
• The
fitness system
should be close to a source of water.
• Be sure that the location you choose is stable. It must be able
to support the weight of the
fitness system
when it is filled with
water, plus the weight of the occupants. The
fitness system
may
weigh up to 11,720 kg (25,815 lbs) when it is filled with water.
• Do not use the
fitness system
above a finished living area due to
the risk of water damage.
• The
fitness system
is not designed for in-floor installation.
However, it is compatible with a deck system that is built flush with
the bar top, provided you leave access for service.
• Be sure to note any other considerations, such as aesthetics or
privacy concerns, that may affect the safety or enjoyment of using
the
fitness system
.
OUTDOOR CONSIDERATIONS
• Local electrical and plumbing codes.
• Consider local codes pertaining to fencing, enclosures, walls,
electrical and plumbing. You will need to ensure that your
fitness
system
is an adequate distance from power lines, both above
ground and underground. Your
fitness system
will also need to be
child proofed.
• View from house for aesthetics and supervisory needs.
• Distance from house for wintertime soaking.
• Nighttime lighting.
• Consider sunlight exposure, views, access, property lines, lighting,
wind direction, shielding, septic tanks, plants, and trees when
determining your location. Chemicals in the
fitness system
water
may splash damaging nearby plant life.
• Area for placement of support equipment where adequate space
will be needed to gain access to components for maintenance and
general servicing.
• Be sure to note any other considerations, such as aesthetics or
privacy concerns, that may affect the safety or enjoyment of using
the
fitness system
.
• Provide adequate drainage away from the equipment and
adequate elevation to allow draining by siphon, if should be
required.
• Place the
fitness system
on a firm, level surface that will not shift.
ELECTRICAL REQUIREMENTS
1. The
fitness system
should have access to a power source
capable of supplying 220-240 volts AC power for single phase
models.
For 3 phase models the system has both 3 phase and single
equipment. 3 phase (L-L) 380 - 415 VAC & single phase (L-N) 220-
240 VAC required (380-415V, 3N~, 24A, 50Hz).
2. It must be wired directly into a grounded circuit with a ground fault
circuit interrupter (GFCI). No other appliances should be on the
same circuit.
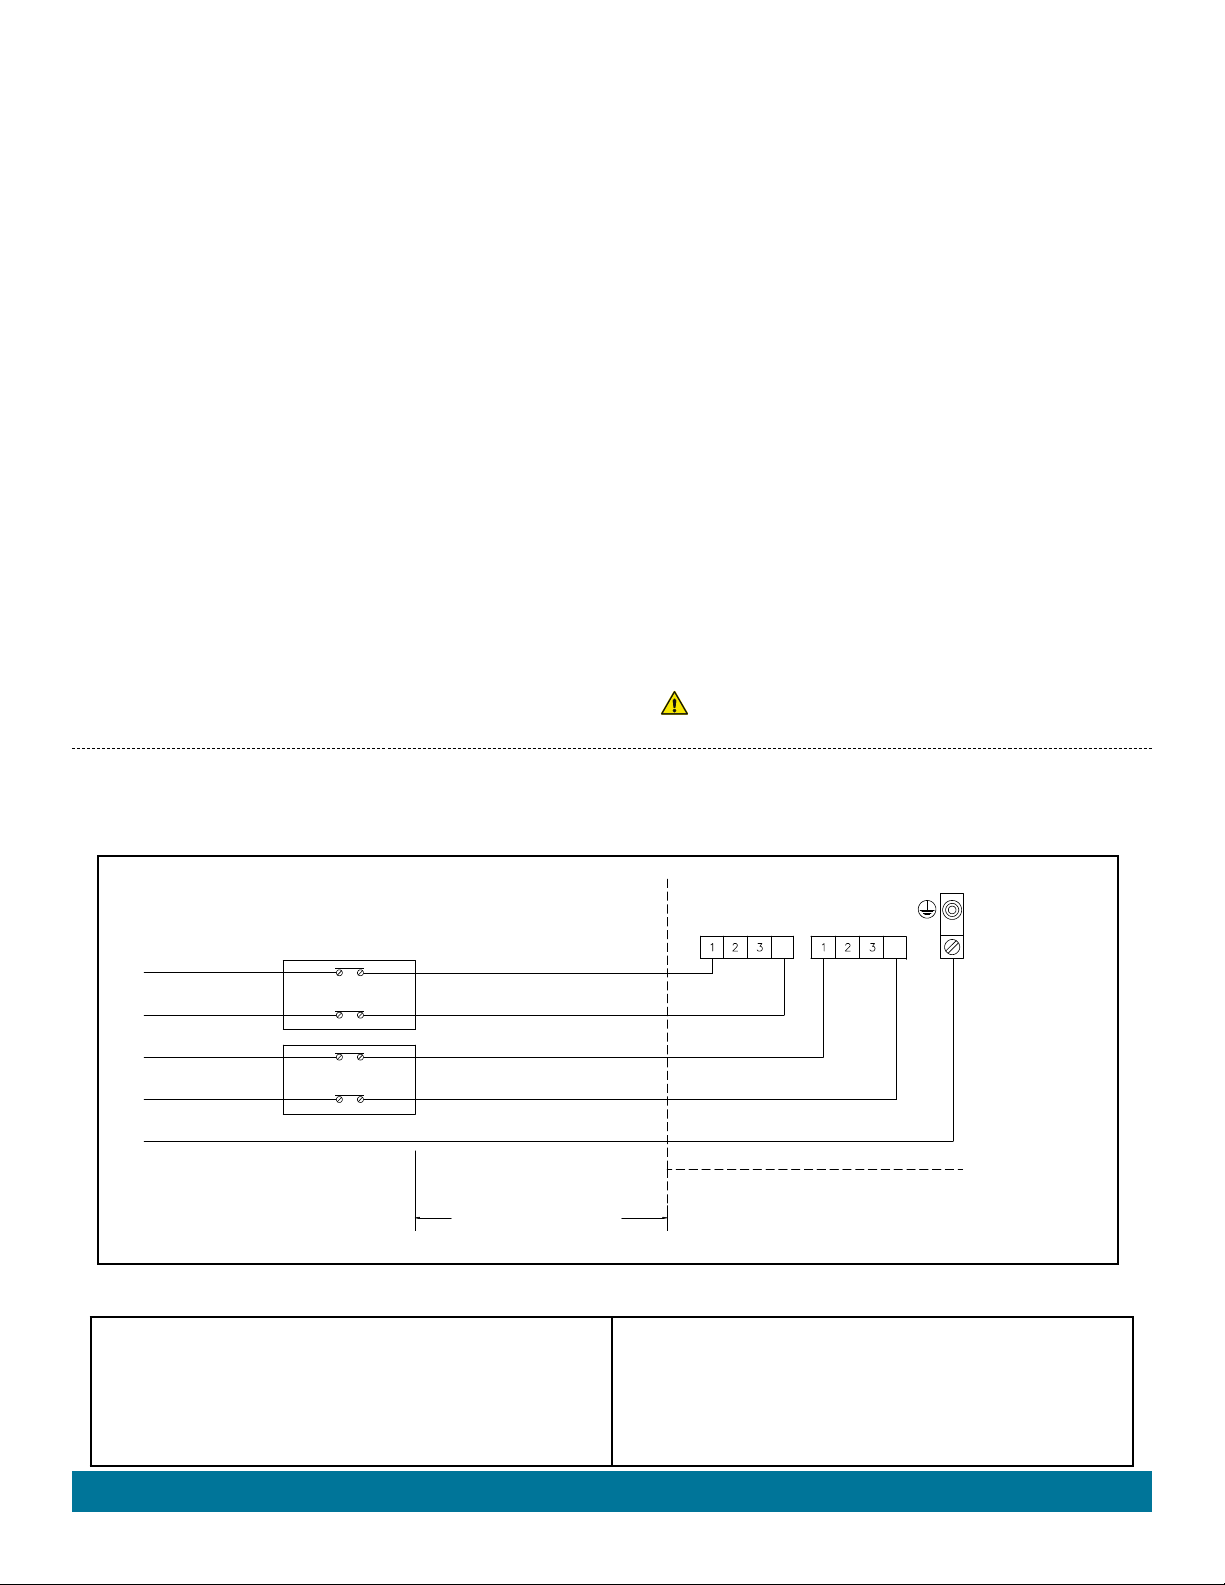
3. Location of electrical supply 220-240 / 380-415 volt systems
require hard wire installed from the main electrical source, to
the sub panel, then to the
fitness system
terminal block.
All
equipment must be ground fault circuit protected (NOT SUPPLIED).
All electrical wiring must comply with the national electric code.
4. Locations at least 1.5 m (5 feet) from all metal surfaces. A
fitness
system
may be installed within 1.5 m (5 feet) of metals surfaces
providing each metal surface is permanently connected by a no.
8.4 mm² (8 awg) copper conductor attached to the bonding wire
connector on the heater provided for this purpose. All installations
must comply with your national electric codes.

Page 5
DECK INSTALLATION
To be certain your deck can support your system you must know
the deck’s maximum load capacity. Consult a qualified building
contractor or structural engineer before you place the system on
an elevated deck. To find the weight of your system, its contents and
occupants, refer to the System Specification chart. This weight per
square meter must not exceed the structure’s rated capacity, or serious
structural damage could result.
DELIVERY ACCESS
It may be necessary to remove a gate, part of a fence, or other movable
obstructions in order to move the system to its installation site. Your site
will determine what equipment is necessary to move your system to its final
location. A roll back truck with a tilt bed is a good option if your site can be
accessed by an across road vehicle. When a small reach is needed for the
final placement of your system, a boom truck is ideal. A telehandler vehicle
can off load, traverse property and place your system in a more challenging
situation or terrain. When access to your site is limited a crane may be used
to lift your system over obstructions for precise placement.
The
fitness
system delivery personnel will supervise the crane delivery
and complete the system installation. NOTE: If your system delivery
requires the use of a crane, you may be required to pay for its services
at the completion of the delivery.
How is your width & height clearance?
Check all gates
Protruding electric meters
Gas Meters
A/C units
Do you have sufficient
overhead clearance?
Check low roof eaves,
overhanging branches,
rain gutters
Is the path clear?
Move away branches, dog
house, firewood, etc.
If there is a 90º turn, can we
clear it? (the fitness system will
not bend)
No more than 6 consecutive
stairs without a landing to
accommodate the fitness
system
Site Requirements

Page 6 Site Requirements
E2000 MODEL
NOTE:ENDLESS POOLS requires that the E2000 Model be installed on a minimum 15 cm thick reinforced concrete pad or structurally sound deck able to support the “dead
weight” found in the specification chart on the back page.
WARNING:The E2000 Model must not be shimmed in any manner.
10 cm
226 cm
606 cm
*147 cm
33 cm
15 cm
267 cm
251 cm
DOOR SIDE
4.5 cm
ELECTRICAL CUTOUT
SPA DRAIN
TOP VIEW OF BASE
SWIM DRAIN
4.5 cm
ELECTRICAL CUTOUT

Page 7
electrIcal requIrementS
IMPORTANT
: Fill the
fitness system
with water before turning on the power.
Your ENDLESS POOLS
fitness system
has been carefully designed to
give you maximum safety against electrical shock. Connecting the
fitness
system
to an improperly wired circuit will negate many of the
fitness
system
’s safety features. Improper wiring may also cause electrocution,
risk of fire, and other risks of injuries. Please read and follow the electrical
installation requirements and instructions completely!
IMPORTANT: If your single phase fitness system has a treadmill and you
would like to upgrade to a 72 amp system contact your ENDLESS POOLS
fitness system dealer for wiring instructions.
SINGLE PHASE WIRING
220-240 VOLT PERMANENTLY CONNECTED
ENDLESS POOLS
fitness system
s must be wired in accordance with all
applicable local electrical codes. All electrical work should be done by an
experienced, licensed electrician. We recommend the use of appropriate
electrical conduit, fittings, and wire for all circuits.
The diagram below illustrates how to wire the
fitness system
model:
• The
fitness system
requires an electrical service using two 24 amp
GFCI/RCD breakers.
• Disconnect switches with at least 3 mm separation between contacts
must be used for all electrical circuits to the
fitness system
.
• Mount the subpanel in the vicinity of the
fitness system
, but not closer
than 1.5 m (5 feet)
away.
Your
fitness system
, must be supplied by a
ground fault circuit interrupter - residual current device (RCD) - with a
tripping rating not exceeding 30 mA in an electrical subpanel.
• Open
fitness system
by removing the 4 screws holding the vertical
T-spacer to the left of the equipment compartment (see Door Panel
Removal and Replace Instruction on the following page). Insert
power wires into
fitness system
from either the back side towards
the bottom or the back of fitness system, you will find a plastic cap
attached to wall.
• Insert power wires into
fitness system
from either side towards the
bottom, you will find a plastic cap attached to wall.
• Once your
fitness system
has been filled with water, turn it on
and test all of the circuit breakers.
IMPORTANT: If breaker immediately trips, verify that the wires are
correctly connected. Breaker should be tested prior to each use. Here’s
how:
1. Push the “TEST” button on each GFCI breaker - residual current
device (RCD), and observe it click OFF.
2. Wait 30 seconds, then push the breaker switch to the OFF (down)
position (to ensure that it has completely disengaged), then push
the breaker switch to the ON (up) position. If you don't wait 30
seconds, the
fitness system
’s power indicator may continue to
blink – try again.
If any of the GFCI/RCD breakers fails to operate in this manner, your
fitness system
may have an electrical malfunction, and you may be at
risk of electrical shock. Turn off all circuits and do not use the
fitness
system
until the problem has been corrected by an authorized service
agent.
WARNING: Removing, or bypassing any GFCI/RCD breaker will
result in an unsafe
fitness system
and will void the warranty.
IMPORTANT: If you ever need to move or relocate your ENDLESS POOLS fitness system, it is essential that you understand and apply these
installation requirements. Your ENDLESS POOLS fitness system has been carefully engineered to provide maximum safety against electric shock.
Remember, connecting the fitness system to an improperly wired circuit will negate many of its safety features.
NOTE: Long wiring runs may require larger-gauge wire than stated.
CAUTIONS
USE COPPER CONDUCTORS ONLY.
USE SUPPLY WIRES SUITABLE FOR 75°C/167°F.
DISCONNECT ALL SUPPLY CONNECTIONS BEFORE SERVICING.
CONNECT ONLY TO A CIRCUIT PROTECTED BY A CLASS A
GROUND-FAULT INTERRUPTER.
THESE FITNESS SYSTEMS ARE INTENDED FOR USE WITH GFCI
SUBPANEL PROVIDED.
INCORRECT WIRING WILL DAMAGE CIRCUIT BOARDS.
REFER TO THE WIRING INSTRUCTIONS INCLUDED WITH THE
SUB-PANEL FOR DETAILED WIRING INSTRUCTIONS.
220-240 VAC, 50Hz,
48A,
MORE THAN 152 cm
THE SUB-PANEL MUST
BE WITHIN SIGHT OF THE
FITNESS SYSTEM
DO NOT EXCEED 1525 cm
6.0 mm²
FITNESS SYSTEM JUNCTION BOX
MAIN INPUT
GFCI BREAKER
24A AMP
L1, HOT
L2, HOT
N2, NEUTRAL,
GROUND, 16.0 mm²
CIRCUIT 1 CIRCUIT 2
GND
N, NEUTRAL
6.0 mm²
6.0 mm²
6.0 mm²
6.0 mm²
L1, HOT
L2, HOT
N2, NEUTRAL,
N, NEUTRAL
6.0 mm²
6.0 mm²
6.0 mm² GFCI BREAKER
24A AMP
INPUT 1
INPUT 2
Electrical Requirements
N N

Page 8 Electrical Requirements
FIELD WIRING
INPUT 1
L1, HOT, 6.0 mm²
GFCI BREAKER
24A AMP
L2, HOT, 6.0 mm²
L3, HOT, 6.0 mm²
N, NEUTRAL, 6.0 mm²
L1, HOT, 6.0 mm²
L2, HOT, 6.0 mm²
L3, HOT, 6.0 mm²
GROUND 16.0 mm²
MAIN INPUT
CIRCUIT 1 CIRCUIT 2
JUNCTION BOX
380-415V, 3N~, 24A, 50Hz,
3 PHASE
24A/PHASE 50HZ
GND
MORE THAN 152 cm
THE SUB-PANEL MUST BE WITHIN
SIGHT OF THE FITNESS SYSTEM
DO NOT EXCEED 1525 cm
FACTORY INSTALLED JUMPERS
(DO NOT REMOVE)
3 PHASE WIRING
380-415V, 3N~, 24A, 50Hz,
VAC
PERMANENTLY CONNECTED
ENDLESS POOLS
fitness system
s must be wired in accordance with
all applicable local electrical codes. All electrical work should be done
by an experienced, licensed electrician. We recommend the use of
appropriate electrical conduit, fittings, and wire for all circuits.
The diagram below illustrates how to wire the
fitness system
model:
• The
fitness system
requires an electrical service using a 24 amp 3
phase GFCI/RCD breaker.
• Disconnect switches with at least 3 mm separation between
contacts must be used for all electrical circuits to the
fitness
system
.
• Mount the subpanel in the vicinity of the
fitness system
, but not
closer than 1.5 m (5 feet)
away.
Your
fitness system
, must be
supplied by a ground fault circuit interrupter - residual current device
(RCD) - with a tripping rating not exceeding 30 mA in an electrical
subpanel.
• Open the
fitness system
by removing the 4 screws holding the
vertical T-spacer located in the center of the equipment compartment
(back side of
fitness system
). Slide panel towards center, raise
panel, pull bottom out, lower, disconnect light wires on both side and
remove, repeat for other panel.
• Insert power wires into
fitness system
from either side towards the
bottom, you will find a plastic cap attached to wall.
• Once your
fitness system
has been filled with water, turn it on and
test all of the circuit breakers.
• Verify Phase rotation is correct for input.
IMPORTANT: If breaker immediately trips, verify that the wires are
correctly connected. Breaker should be tested prior to each use. Here’s
how:
1. Push the “TEST” button on each GFCI breaker - residual current
device (RCD), and observe it click OFF.
2. Wait 30 seconds, then push the breaker switch to the OFF (down)
position (to ensure that it has completely disengaged), then push
the breaker switch to the ON (up) position. If you don't wait 30
seconds, the
fitness system
’s power indicator may continue to
blink – try again.
If the GFCI/RCD breaker fails to operate in this manner, your
fitness
system
may have an electrical malfunction, and you may be at risk of
electrical shock. Turn off all circuits and do not use the
fitness system
until the problem has been corrected by an authorized service agent.
WARNING: Removing, or bypassing any GFCI/RCD breaker will
result in an unsafe
fitness system
and will void the warranty.
CAUTIONS
USE COPPER CONDUCTORS ONLY.
USE SUPPLY WIRES SUITABLE FOR 75°C/167°F.
DISCONNECT ALL SUPPLY CONNECTIONS BEFORE SERVICING.
CONNECT ONLY TO A CIRCUIT PROTECTED BY A CLASS A
GROUND-FAULT INTERRUPTER.
THESE FITNESS SYSTEMS ARE INTENDED FOR USE WITH GFCI
SUBPANEL PROVIDED.
INCORRECT WIRING WILL DAMAGE CIRCUIT BOARDS.
REFER TO THE WIRING INSTRUCTIONS INCLUDED WITH THE
SUB-PANEL FOR DETAILED WIRING INSTRUCTIONS.
IMPORTANT: If you ever need to move or relocate your ENDLESS POOLS fitness system, it is essential that you understand and apply these
installation requirements. Your ENDLESS POOLS fitness system has been carefully engineered to provide maximum safety against electric shock.
Remember, connecting the fitness system to an improperly wired circuit will negate many of its safety features.
NOTE: Long wiring runs may require larger-gauge wire.
N, NEUTRAL, 6.0 mm²

EQUIPMENT COMPARTMENT
The illustrations below are to be used as a reference only (your
fitness system
may look different). The equipment compartment is located below and to the
right of the control panels (spa side of the
fitness system
).
1. Hydromassage Jets pump
2. Circulation Pump Spa Side
3. Circulation Pump Swim Side
4. Control Box & Heater Spa Side
5. Control Box & Heater Swim Side
6. Bonding terminal
7. Swim Machine Hydraulic Unit
(smaller than illustrated)
8. Treadmill Hydraulic Unit (Optional
tandem unit used for both 7 & 8)
9. Junction Box
10. UVC Ozone Swim Side
11. Bluetooth Music (optional)
12. Subwoofer (optional)
13. Wi-Fi (optional)(2x)
14. Dual Output Power Supply for External.
lights
15. Ozone Unit Spa Side
7
9
3
4
5
6
8 1
Page 9
Electrical Requirements
2
DOOR PANEL REMOVE & REPLACE
REMOVE
1. Locate the vertical T-spacer to the left of the equipment compartment (back, control panel side of
fitness system
).
2. Remove the 4 screws (using an 8 mm (5/16") socket) holding the T-spacer then remove the T-spacer. Loosen the 4 screws on
the right side corner spacer but do not remove.
3. Lift panel and slide left until panel is no longer behind corner.
4. While holding panel, first pull panel up then pull bottom away from ENDLESS
POOLS fitness system, lower panel and set on ground.
Disconnect light bar wires
from each side of panel and remove.
REPLACE
1. Reconnect light bar wires.
2. Raise panel making sure it goes behind the bar top and rest on bottom frame.
3. Slide panel to the right behind corner.
4. Attach T-spacer back in place using 4 screws and tighten the 4 screws on the right
corner to complete the installation.
10
11
12
1
6
13
1415

Page 10
GettInG Started
MAIN FITNESS SYSTEM FEATURES
13) Swim Side Speaker
(Optional)
14) Spa Side Speaker
(Optional)
15) Suction Screen
16) Water feature
17) Ozone Jet
18) Heater Return
19) Grab Rails
20) Filter Compartment
21) Points of light
22) Row Bar Anchor
23) Tether Anchor
ADDITIONAL FITNESS SYSTEM FEATURES
Getting Started
Your fitness system may look slightly different than the illustration
1 ) Two control panels are used to provides a quick
visual check of the
fitness system
’s status and
allows the user to set different functions in both the
swim and spa sides.
2) The Air Valve allows you to add air to your spa
side hydromassage jets.
3) Spa side Water Feature Levers adjust the amount
of water that flows from the water features. Jet pump
1 must be on for water feature to work.
4) Swim side Water Feature Levers adjust the
amount of water that flows from the water features.
5) The Large Hydromassage jets provide a unique,
pulsating massage on the spa side.
6) The Midsize Directional Hydromassage jets,
with eyeball nozzles, deliver a direct, more focused
massage on the spa side.
7) The Midsize rotational Hydromassage jets,
provide a rotating massage on the spa side.
8) The Mini Hydromassage jets feature a direct
more focused massage on the spa side.
9) The Hydraulic Swim Machine uses a remote
control to adjust the speed of the current on the swim
side.
10) The Hydraulic Treadmill (Optional) uses a
remote control to adjust the speed of the treadmill on
the swim side.
11) Pillow (spa side)
12) Main Swim Light (swim side)
13
1
2
4
56
10
11
12
8
14
19
9
18
7
16
21
22
1
20
17
16
3
15
17
19
22
23
20 20
16 18

HYDROMASSAGE JETS
LARGE HYDROMASSAGE Jets - This jet provides a unique, pulsating
massage. The water flow is adjustable in that it can be turned from low
to high (by rotating the jet faceplate ¼ turn).
MIDSIZE DIRECTIONAL JET - These jets allow you to redirect the
jet stream by changing the position of the nozzle. The water flow is
adjustable in that it can be turned from low to high (by rotating the jet
faceplate ¼ turn)
MIDSIZE ROTATIONAL JET - These jets provide a rotating massage
pattern. The water flow is adjustable in that it can be turned from low to
high (by rotating the jet faceplate ¼ turn)
Mini JET - These jets deliver a direct, more focused massage. The
water flow is adjustable in that it can be turned from low to high (by
rotating the jet faceplate ¼ turn)
WATERFALL VALVE
Your fitness system is equipped with
three waterfalls, two in the swim side
and one in the spa side. The left
illustrated valve is used in the swim
side. The flow is regulated by turning
the waterfall valves in either direction.
Jet pump 1 must be on for waterfall to run on spa side.
AIR CONTROLS
Your fitness system is equipped with two air valves. The
air valves will add or remove air to the hydromassage jet
system. Rotate valve to see which hydromassage jets are
affected.
SWIM MACHINE-HYDRAULIC
SWIM MACHINE OPERATION - Two remote controls have been
provided with your system and have
been packaged in the owner's packet
inside the equipment compartment
labeled Swim Current.
The swim machine is turned on
through the use of the remote control, which
also adjusts the speed of the current faster or
slower. When changing speed, you must press
and hold the buttons on the remote, then wait
a few seconds for the current to adjust. Upon initial start-up you will
find that the unit has been set to its lowest speed; which is a barely
perceptible current. You will need to press and HOLD the FASTER
button to increase the speed. Our standard pool’s top speed is roughly
equivalent to a 1:14/100 meters (1:08 100 yard) pace a speed for expert
swimmers only. Set the water speed at a comfortable level for your
needs. Remotes are waterproof but can not be submerged.
IMPORTANT: Starting up the swim machine will automatically turn OFF
the hydromassage jet system if ON, once swim machine is turned OFF
the hydormassage jet system will turn back ON.
To stop swimming, simply press the on/off button on the remote. If left
running, the power unit will turn off automatically after thirty minutes
and can be restarted by pressing the on/off button again. Once you
have found an optimal speed for yourself, you may leave the system
at that setting. The controller for the swim machine is designed with a
“ramp-up” feature which forces the swim machine to start slowly, but will
increase to the last setting at which someone swam.
When you are first learning to swim in the swim current, it is often useful
to allow yourself to drift back to the rear of the pool. Let your feet rest
on the rear seat and then swim forward into position. By starting from
the back, you can get a feel for just how much room you have. When
swimming, center your outstretched arm about one foot from the front grill
.
TREADMILL-HYDRAULIC (OPTIONAL)
TREADMILL OPERATION - Two remote controls have been provided
with your system and have been packaged in the owner's packet inside
the equipment compartment. These
remotes are identical to the swim machine
remotes but are labeled Treadmill.
Upon initial start-up you will find that unit
has been set to its lowest speed. You will
need to press and HOLD the FASTER
button to increase the speed.
The treadmill is turned on through the use of a remote control, which
also adjusts the speed of the treadmill faster or slower. When changing
speed, you must press and hold the buttons on the remote, then wait a
few seconds for the treadmill to adjust. Set the speed at a comfortable
level for your needs.
Remotes are waterproof but can not be submerged.
To turn off the treadmill, simply press the on/off button on the remote. If
left running, the power unit will turn off automatically after
thirty minutes and can be restarted by pressing the on/off button
again. The treadmill will always default to the slowest speed when
turned on.
When you are first learning to use the treadmill in conjunction with the
swim machine, it is best to start at the lowest speeds for both the swim
machine and treadmill. The added resistance the swim machine offers
may allow for a slower treadmill speed then initially thought.
IMPORTANT: Do not use treadmill when circulation pump is OFF.
Page 11Getting Started

Page 12 Getting Started
PACE DISPLAY (OPTIONAL)
SWIM PACE DISPLAY - For any ENDLESS POOLS’ product that
generates a swim current the default setting
for the display is 100 meters (100 yard) pace
(shown as minutes:seconds). This indicates
the water flow equivalent of swimming 100
meters (100 yards) in a traditional lap pool in
the indicated amount of time. Swim current
units can also be for a 100 meter pace. As the current speed is
increased, the value the display reads goes down, since the faster you
swim the less time it takes to swim 100 meters (100 yards). Any Pace
Display can be set for a percentage of 2-100.
TREADMILL PACE DISPLAY - For the optional hydraulic treadmill the
default setting for the display is miles per hour.
The pace can be also be converted to display
kilometers per hour. Unlike a swim current
display, as the speed of the treadmill is
increased, the value on the display will also
increase. Any Pace Display can be set for a
percentage of 2-100.
QUICK START-UP INSTRUCTIONS
BEFORE YOU FILL YOUR
FITNESS SYSTEM
Make sure your fitness system has been properly installed per all local
codes, including the location of the fitness system, the foundation of the
fitness system, as well as the electrical installation of the fitness system.
DO:
• Know which water treatment system you will be using and make sure
you have necessary chemicals available. Read all of the instructions
that come with the system.
• Have 5-way Test Strips Available.
• Have pH/Alkalinity Up & Down available.
• Know the Hardness of your water, contact your dealer to help you
with this information. See Water Quality and Maintenance for more
information.
• Purchase the Clean Screen™pre-filter to remove unwanted
contaminants from the tap water. This is recommended, not required.
DON'T:
• Fill the fitness system with hot water or cold water with cold water
temperature below 10º C (50º F)! Tripping of the high-limit thermostat
may result causing your fitness system to stop functioning.
START-UP
Your ENDLESS POOLS fitness system has been thoroughly tested
during the manufacturing process to ensure reliability and long-term
customer satisfaction. A small amount of water may have remained in
the plumbing after testing and, as a result, may have spotted the fitness
system shell or the fitness system siding prior to delivery. Before filling
the fitness system, wipe the fitness system shell clean with a soft rag.
The following instructions must be read and followed exactly to ensure
a successful start-up or refill.
CAUTIONS
• DO NOT CONNECT POWER TO AN EMPTY fitness system. Power
to the fitness system automatically activates critical components within
the fitness system, such as controls, heaters, and other systems. If
power is supplied to these components prior to both swim side and
spa side being filled, the components will be damaged, and this may
result in a non-warranty component failure.
• DO NOT use your fitness system after filling until all of the steps listed
below are completed.
• DO NOT add chlorine if treating your fitness system with
polyhexamethylene biguanide (Biguanide, PHMB, eg. BaquaSpa®)
sanitizer.
• DO NOT use a salt-generated chlorine system, this will damage
components and is not covered under your warranty.
• Before filling your fitness system for the first time, remove the
equipment compartment door and check to ensure that the unions on
either side of the pump(s) and heater are hand-tight and the slide
valves are open.
1. CLOSE DRAIN, remove the filter compartment grill skimmer
tray and one filter (pg. 24). Fill your swim side through the filter
compartment using the CleanScreen™pre-filter (optional from
dealer) that attaches to your garden hose. The water level of your
swim side should be maintained at a level 6" (15 cm) below the top
or to the top of the swim machine grate. Reinstall the filter, skimmer
tray, and grill once the swim side is filled.
Fill your spa side through the filter compartment (lift filter basket up
and out first) using the CLEANSCREEN pre-filter (optional from
dealer) that attaches to your garden hose. The water level of your
spa side should be maintained at 2.5 cm (1") above the highest jet.
IMPORTANT: Watkins Manufacturing Corporation does not
recommend that the fitness system be filled with “softened” water,
as this may damage the fitness system’s equipment.
2. AFTER THE FITNESS SYSTEM HAS BEEN FILLED with water
and the equipment compartment door is secured, power must be
applied to the fitness system.
• FIRST activate power to the subpanel from the main house panel.
• NEXT open the door of the electrical subpanel and reset the
GFCI breakers.
• FINALLY, close and secure the subpanel door.

Page 13
3. TO CHECK THE OPERATION OF THE HYDROMASSAGE JET
SYSTEM IN SPA and to purge any remaining air from the system
complete the following steps:
• Press the jets buttons on spa side control panel placing all
hydromassage jets on.
• Once the jet system is fully operational (as indicated by strong,
non-surging jets), priming of the
spa side
is complete.
• To turn off the jets, press the jets
button on the spa side control
panel
.
• If you do not feel a steady stream of water from your jets, refer
to the instructions for priming the pump in the
fitness system
TROUBLESHOOTING section.
4. SET THE TEMPERATURE CONTROL to the desired temperature
between 15°C (59°F) and 40°C (104°F) on both the swim side and
the spa side control panels, then place the fitness system cover
on the fitness system and allow the water temperature to stabilize
approximately 0.5°C (1°F) per hour. Make sure you secure the cover
in place. Periodically check the fitness system water temperature.
When the water temperature reaches desired temperature, proceed
to the next step. The fitness system temperature is pre-programmed
to reach 29.5°C (85°F) on the swim side and 38.0°C (100°F) on the
spa side. You may change the water temperature by pressing the
button on each control panel to raise the temperature, or lower
temperature by pressing the ▼button.
5. USING A TEST STRIP AND APPLICABLE CHEMICALS adjust
Total Alkalinity (TA) to 80-120 ppm, Calcium Hardness (CH) to
50-150 ppm, then fitness system water pH to between 7.2 and 7.8.
These procedures are listed in the “Water Quality and Maintenance”
section.
OPERATION NOTE: Adjusting the Total Alkalinity as the first step
is important, as out-of balance TA will affect your ability to adjust the
pH correctly and will prevent the sanitizer from operating effectively.
IMPORTANT: Activate the swim machine by using the blue swim
machine remote and increase speed to at least 50% before adding
chemicals. Disperse the chemicals in the swim area away from the
walls.
6. SUPERCHLORINATE THE FITNESS SYSTEM WATER by adding
1½ teaspoons of chlorine (sodium dichlor) per 950 liters
(250 gallons) of water while running the swim machine above 50%
for 10 minutes in the swim side. Disperse the chemicals in the swim
area away from the walls. Add into filter area on the spa side while
running both jets for 10 minutes.
7. TEST THE FITNESS SYSTEM WATER FOR CHLORINE
RESIDUAL. If the residual is between 1 and 5 ppm on the test
strips, go on to the next step. If the residual is less than 1 ppm,
activate the swim machine (on swim side) above 50% for another
10 minutes and add more chlorine as needed, or if needed activate
the jets on the spa side and run both jets for 10 minutes.
WARNING:High sanitizer levels can cause discomfort to the user’s
eyes, lungs and skin. Always allow the sanitizer level to fall to the
recommended range before using the fitness system.
8. RECHECK the Total Alkalinity (TA) 80-120 ppm, Calcium Hardness
(CH) 50-150 ppm, and the pH must be between 7.2 and 7.8.
The
fitness system
is ready for use when the
fitness system
water
has circulated and the bromine level remains between 1 and 2 ppm
or chlorine level remains between 1 and 5 ppm.
Getting Started

Page 14
operatInG InStructIonS
The fitness system has two control panels, one controls the large
swim side and the other controls the smaller spa side.
SWIM SIDE CONTROL PANEL
The swim side control panel provides a bright, full color display, and
intuitive user experience, while its screen’s high resolution brings
fitness
system
user interfaces to a new level. Loaded with a large amount of
memory and a powerful on-board processor creating seamless graphic
interface that
fitness system
users have been waiting for.
SWIM SIDE CONTROL PANEL
FUNCTIONS
When the screen is off, press any button to turn the control panel screen
on and display the home screen. After 30 minutes of inactivity the screen
will shut off.
The function description of the buttons below will only work from the
Home screen. Once the swim side control panel is placed in a submenu
the selection lights next to the buttons will light up to indicate which
buttons may be selected for a specific screen function.
SETTINGS
One press of the (Settings button) from the home page gives you
access to a menu to manage the settings of your
fitness system
where
you will find:
• Water care
• Audio (optional)
• Maintenance
• Date and time
• Keypad Settings
• Miscellaneous
• Electrical configuration
• Factory reset
• About
Use the or buttons to move up and down in the list. To select an
option, press the lit button beside the desired highlighted option.
IMPORTANT: At any point you can press the (Settings button) to
return to the home screen or (top left button) to go back.
WATER CARE / HEATER SETTINGS
The Water Care section will help you set
up your ideal heater settings in the swim
area. Choose from Away from Home,
Beginner, Energy Savings, Super Energy
Savings, and Weekender, depending on
your needs.
Use (middle left) button to choose
your setting. A green check mark will
appear on the selected icon to confirm.
When in Economy mode, the heating set point will be reduced by 11°C
(20°F), which means that the heating system will not come on during
the set time unless the temperature falls 11°C (20°F) below the fitness
system's set temperature.
Because the swim side uses a 24 hour circulation pump and there are no
other jet pumps used on the swim side the Purge Time is not applicable.
WATER CARE MODES
Away from home:
In this mode the swim side will always be in economy mode;
the set point will be reduced by 11°C (20°F).
Beginner:
The swim side will never be in economy mode.
Energy Savings:
The swim side will be in economy mode during the peak hours
of the day and resume normal mode on the weekend.
Super Energy:
The swim side will always be in economy mode during peak
hours, every day of the week.
Weekender:
The swim side will be in economy mode from Monday to
Friday, and will run normally on the weekend.
MODIFYING SCHEDULES
To modify a Water Care category, use
the (middle right) lit button, to
open the selected Water Care menu.
The menu screen is divided into two
settings, Economy and Filter cycle with
Economy being first. Set or change the
Day, Start and Stop time if desired to
keep the heater off (Economy mode).
Since there are no jet pumps used in the swim side there is No need to
make any adjustments to the Purge time.
You can add schedules by scrolling down to Add, and selecting by
using the (middle left) lit button.
To delete a highlighted schedule,
press (top right) lit button.
You can modify the schedules by
selecting (middle left) lit button
and adjusting the schedule using
the or buttons. Press
(middle left) lit button to move
between parameters.
Settings
Audio
Selection
Button
Selection Lights
Selection
Button
Selection Button All Off/Memory On
Up/
Temperature
Down/
Temperature
External
Lights
Internal Lights
Operating Instructions

Page 15
You have several possibilities for
the schedule (Mon-Fri, weekend,
every day, or single days). The
schedules will be repeated every
week. Once you have set the
schedule, use (top left) lit
button to go back. Ensure that
you have selected the desired
Water Care option in the main Water Care menu.
MAINTENANCE
From the Settings page you can
access the Maintenance menu,
which gives you access to the
following options:
• Maintenance reminders
• Standby
• Error log
Use the or buttons to make a selection, and (middle left) lit
button to select.
MAINTENANCE REMINDERS
The control panel will remind you of
maintenance required in your
swim
area
, like rinsing or cleaning the
filter. Each task has its own duration,
based on normal use.
The Maintenance reminders menu
allows you to verify the time left
before maintenance is required, as
well as to reset the time once a task is completed.
Use the or buttons to move through the list.
To reset a task select it by pressing the (middle left) lit button, then
confirm by pressing the lit button next to confirm when prompted. Once
you have confirmed the task will be reset.
STANDBY
The Standby mode allows you to service
your swim side. Pump will stop for 30
minutes, and automatically restart after
this time. Press (middle left) lit
button to activate Standby mode.
Once Standby mode has been activated
a screen will appear to show that pumps
are stopped. The normal page will
return at the end of maintenance.
Press on the button next to cancel to leave Standby mode and restart the
swim area
.
ERROR LOG
In this section you can see errors
that have been archived by the
system. Use the or buttons
to move through the list. Errors are
archived chronologically, from most
recent to oldest (top to bottom).
The Error log page shows the error
code, the date of the error, and the
time. To see more details on an error select it with (middle left) lit
button. A screen will appear with more information on the selected error.
For more information, see the Error messages section. To clear the Error
To clear the Error a Factory Reset is required.
DATE AND TIME
Here you can adjust the time format,
change the year, date, and time.
Use the or buttons to choose
the setting that you want to adjust,
and select it by pressing
(middle left) lit button.
Use the or buttons to change
the parameters, and (middle
left) lit button to move between
parameters. Press (top left) lit button to take you back to the main
Settings menu.
KEYPAD SETTINGS
In this section, you can change the
temperature unit, language, display
orientation, rim control panel light
color, and lock the control panel.
Use the or buttons to
choose the setting that you want to
adjust. Select it by pressing the
(middle left) lit button then use the or buttons again to change the
setting.
When you change the display orientation, the contextual options and
or
buttons adjust to the chosen orientation. The Audio and Setting
buttons remain unchanged, as well as the jets and lights buttons in the
home page.
Security settings allow you a Partial (Temperature) lock or Full (entire
control panel) lock. Select Security screen by pressing the
(middle
left) lit button then use the or buttons to change to Full, Partial or
Unlock. Press
(top left) lit button to display an information screen
telling you to
press and hold button for 5 seconds to lock.
To unlock Full, press and hold button for 5 seconds.
MISCELLANEOUS
In this section, you can turn the
Warm weather mode ON or OFF.
When ON the circulation pump
will shut OFF whenever the water
temperature gets 1°C (2°F) above
the set point. Because of the swim
area's large body of water it is
recommended to keep the Warm
weather mode OFF.
Press the (middle left) lit button, then use the or buttons to
change the Warm weather mode.
IMPORTANT: Do not use treadmill (optional) when circulation pump is OFF.
ELECTRICAL CONFIGURATION
Please do not make changes to this screen!
ABOUT
This section shows information about
the control panel software number, and
the revision numbers of the different
components of your system.
Operating Instructions

Page 16
AUDIO IN.STREAM 2 (OPTIONAL)
If your
fitness system
has the optional in.stream 2 Bluetooth
w/subwoofer system. The following screens and functions will be
available on the swim area control panel:
AUDIO
The swim side control panel is used with the in.stream 2 audio
system. The Audio screen in the Settings menu gives you the option to
disconnect your Bluetooth enabled
device, adjust the Fader, Balance
or Sub Woofer.
Use the or buttons to scroll
to desired option, press
(middle left) lit button to select the
function. Press the or
buttons to change parameters.
Press (top left) lit button to take
you back to the main Settings menu.
IN.STREAM 2 FUNCTIONS
Press the button in the home screen to access your audio system.
If you are using a device with Bluetooth technology, it must be connected
for functions to work.
Please note that the Play/Pause and Change Track functions apply to
devices using Bluetooth technology only, and will NOT work when AUX
is selected as the source.
Turning power on/off
Press the (top right) lit button to start the audio on or off process.
Selecting the source
Press the (top left) lit
button to select a source using
Bluetooth wireless technology
or AUX (aux is not available at
time of publication). Selection
will be indicated below In.
stream 2.
Pairing Bluetooth
Audio Power must be on. Go to the Bluetooth settings on your device
and find in.stream 2 and press to connect. Enter pin 5555 and press pair
to sync your device. NOTE: Only one device at a time can be synced.
Play/Pause audio
Press the Play/Pause (middle right) lit button to start or pause the
audio. Press (middle left) lit button to mute or enable sound.
Adjusting the volume
Press the or buttons to increase or decrease the volume
illustrated by the slider bar.
Changing tracks
Use the Last Track and Next Track (lower left) lit button or
(lower right) lit button to change tracks.
TEMPERATURE CONTROL
The set temperature range is from 15°C to 40°C (59°F to 104°F). (The
water temperature of any
fitness system
may rise or lower slightly
depending on the current use and condition of your
fitness system
and
on outside temperatures.)
The set temperature of the
swim side
water will automatically be 29.5°C
(85°F) the first time power is applied. This is the setting programmed at
the factory. After the
fitness system
has been set up and used, the last
temperature value set by the user will be stored in memory. If power is
disconnected from the
fitness system
, it will automatically revert to the last
set temperature when power is reapplied.
To display the set temperature of the
fitness system
:
Press the or buttons on the control panel in the home screen.
To increase the set
temperature of the
fitness
system
:
Press the button in the
home screen. The set point
will appear in blue. After 3
seconds without any change
to the set temperature value,
the current water temperature
will reappear in white.
To decrease the set temperature of the
fitness system
:
Press the button in the home screen. The set point will appear in blue.
After 3 seconds without any change to the set temperature value, the
current water temperature will reappear in white.
LIGHT CONTROL
All
fitness systems
are equipped with a lighting system. This system
includes a main interior light inside the swim side, interior points of lights
located throughout the
swim
side
,
as well as exterior lights around the
entire fitness system.
Press the (middle right) button
(when in the home screen) to activate
the exterior lights and center light icon.
Press a second time to turn exterior
lights and center icon light off.
Press the (lower right) button
(when in the home screen) to activate
all interior swim side lights and right
light icon. Press a second time to shut
all interior swim side lights and right icon light off, when turning back on
after several seconds the same light mode will appear.
Every time the light is turned off and on quickly a new light mode will
appear.
The sequence is as follows: White, Aqua, Magenta, Azure, Amber,
Emerald, Ruby, color wheel with abrupt color changes, slow full color
wheel and fast full color wheel.
NOTE: If left on, the lights will automatically turn off after 4 hours of
operation.WI-FI In.touch (optional)
Operating Instructions

WI-FI IN.TOUCH (OPTIONAL)
If your
swim side
is equipped with the Wi-Fi in.touch module you will be
able to use the internet or your home Wi-Fi network to control you
swim
side
by downloading an App to your favorite devices.
See Wi-Fi in the spa side Settings section to connect your
swim side
to
your home Wi-Fi network.
For instruction on how to download the App to your device search "gecko
in.touch" in your App store. For more instructions go online to the in.touch
setup guide:
http://www.geckoalliance.com/Documents/intouch_
setupguide_d_en.pdf
ALL OFF / MEMORY ON
Press the (top right) button
when in the home screen to turn the
lights that are on OFF. It will not turn
the music system off.
If you press this button again before
pressing the light button it will bring
up the last settings before shutting
off.
NOTE: The color of the lights will however advance to the next
sequence.
SPA SIDE CONTROL PANEL
The spa side control panel provides a bright, full color display, and
intuitive user experience, while its screen’s high resolution brings
fitness
system
user interfaces to a new level. Loaded with a large amount of
memory and a powerful on-board processor creating seamless graphic
interface that
fitness system
users have been waiting for.
SPA SIDE CONTROL PANEL FUNCTIONS
When the screen is off, press any button to turn the spa side control
panel screen on and display the home screen. After 30 minutes of
inactivity the screen will shut off.
The function description of the buttons below will only work from the
Home screen. Once the swim side control panel is placed in a submenu
the selection lights next to the buttons will light up to indicate which
buttons may be selected for a specific screen function.
SETTINGS
One press of the (Settings button) from the home page gives you
access to a menu to manage the settings of your
fitness system
where
you will find:
• Water care
• Maintenance
• Date and time
• Keypad Settings
• Miscellaneous
• Wi-Fi (optional)
• Electrical configuration
• Factory reset
• About
Use the or buttons to move up and down in the list. To select an
option, press the lit button beside the desired highlighted option.
IMPORTANT: At any point you can press the (Settings button) to
return to the home screen or top left button (hydromassage jets) to go
back.
WATER CARE
The Water Care section will help you
set up your ideal filtration and heating
settings. Choose from Away from Home,
Beginner, Energy Savings, Super Energy
Savings, and Weekender, depending on
your needs..
Use (middle left) button to choose
your setting. A green check mark will
appear on the selected icon to confirm.
When in Economy mode, the heating set point will be reduced by 20°F
(11°C), which means that the heating system will not come on during
the set time unless the temperature falls 20°F (11°C) below the set
temperature.
The filtration schedule shown on the screen will apply to the spa side
circulation pump.
Page 17
Operating Instructions
Hydromassage Jets
Settings
Hydromassage
Jets
Selection Lights
Selection
Button
Selection Button
All Off/
Memory On
Up/
Temperature
Down/
Temperature
Spa Lights
Invert
Screen
This manual suits for next models
1
Table of contents
Other Endless Pools Fitness Equipment manuals