Eonon D1301 User manual

Model:D1301
D1301
Front Rear Audio Video Sys Exit


Thank you for buying this product, please read through these operating instructions,
so you will know how to operate your model properly. after you have finished reading
the instructions, put them away in a safe place for future reference .
NOTE: Due to the continuous product improvement, specifications and design are
subject to change without prior notice.
CONTENTS
IMPORTANT: Please adjust screen to make the touching effect function best when
you initiate the unit for the first time.
For the details, please refer to the operation at Page 15.
PRECAUTIONS
FRONT PANEL
BASIC OPERATION
REMOTE CONTROL
RADIO OPERATION
SYSTEM SETUP
CABLE CONNECTION
ACCESSORIES
INSTALLATION
TROUBLE SHOOTING
SPECIFICATION
MP3 OPERATION
SYSTEM MENU
BLUETOOTH OPERATION
TV OPERATION
3
5
20
16
21
DVD/VCD/CD OPERATION 28
31
39
41
44
43
43
36
7
24
27
IPOD OPERATION 38
3

PRECAUTIONS
The unit is designed for 12VDC,negative ground operation system only.
Before installing the unit, make sure your vehicle is connected to DC12V
negative ground system.
Be sure to connect the color coded leads according to the diagram.Incorrect
,
connections may cause the unit to malfunction or damage the vehicle s
electrical system.
Be sure to connect the speaker (-) leads to the speaker (-) terminal.
Never connect the left and right channel speaker cables each other or to the
vehicle body.
Make sure all the connections are completely correct before turning on your unit.
When replacing the fuse(s), the re-placement must be of the same amperage
as shown on the fuse holder.
Do not block vents or radiator panels. Blocking them will causeheat to build up
inside and mayresult in fire.
After completing the installation and beginning to play the unit (including replacing
the battery),please remove the guard against theft front-panel at first, and then
press RESET button on the base with pointed object (such as ball-point pen) to
set the unit to initial status.
IMPORTANT: Please adjust screen to make the touching effect function best
when you initiate the unit for the first time.
(For the details, please refer to the operation at Page 15.)
Notes on Installation
4

This unit can play the following discs only:
F
PRECAUTIONS
*Do not attempt to modify the unit, modifying the unit may cause an accident.
*Stop the vehicle before carrying out any operation that could interfere with your driving.
*Do not work in extremely high or low temperature. Be sure the temperature inside the
vehicle is between +60 C and -10 C before turning on your unit .
*To enjoy optimum sound and images while playing, handle the discs as follows:
Handle the disc by its edge to keep the disc clean, and do not touch the surface.
Do not use your CDs with paste residue or ink attached.
Do not use CDs with labels or stickers attached, which may leave a sticky residue
while beginning to peel off. (Shown as the picture)
Clean the discs with an optional cleaning cloth. Wipe each disc from the center out.
(Shown as the picture)
Type of disc
12cm
VIDEO
DVD
Label on the disc Recorded material Size of disc
Sound and moving
pictures
VCD
MP3
12cm
CD 12cm
NOTE: The unit is compatible with VCD1.0/2.0/3.0 version and DVCD disc.
12cm
Sound and moving
pictures
Sound only
Sound only
TM
5

FRONT PANEL
1
2
3
45
6
78
11
10
9
12
13
16
15
MENU
TILT
191818
17
IR
A/V IN
14
TA
SRC
REL
DN
UP
VOL
A/V IN
PTY AF OPEN
BAND/
IR
POWER
MIC
DISP
MUTE
6

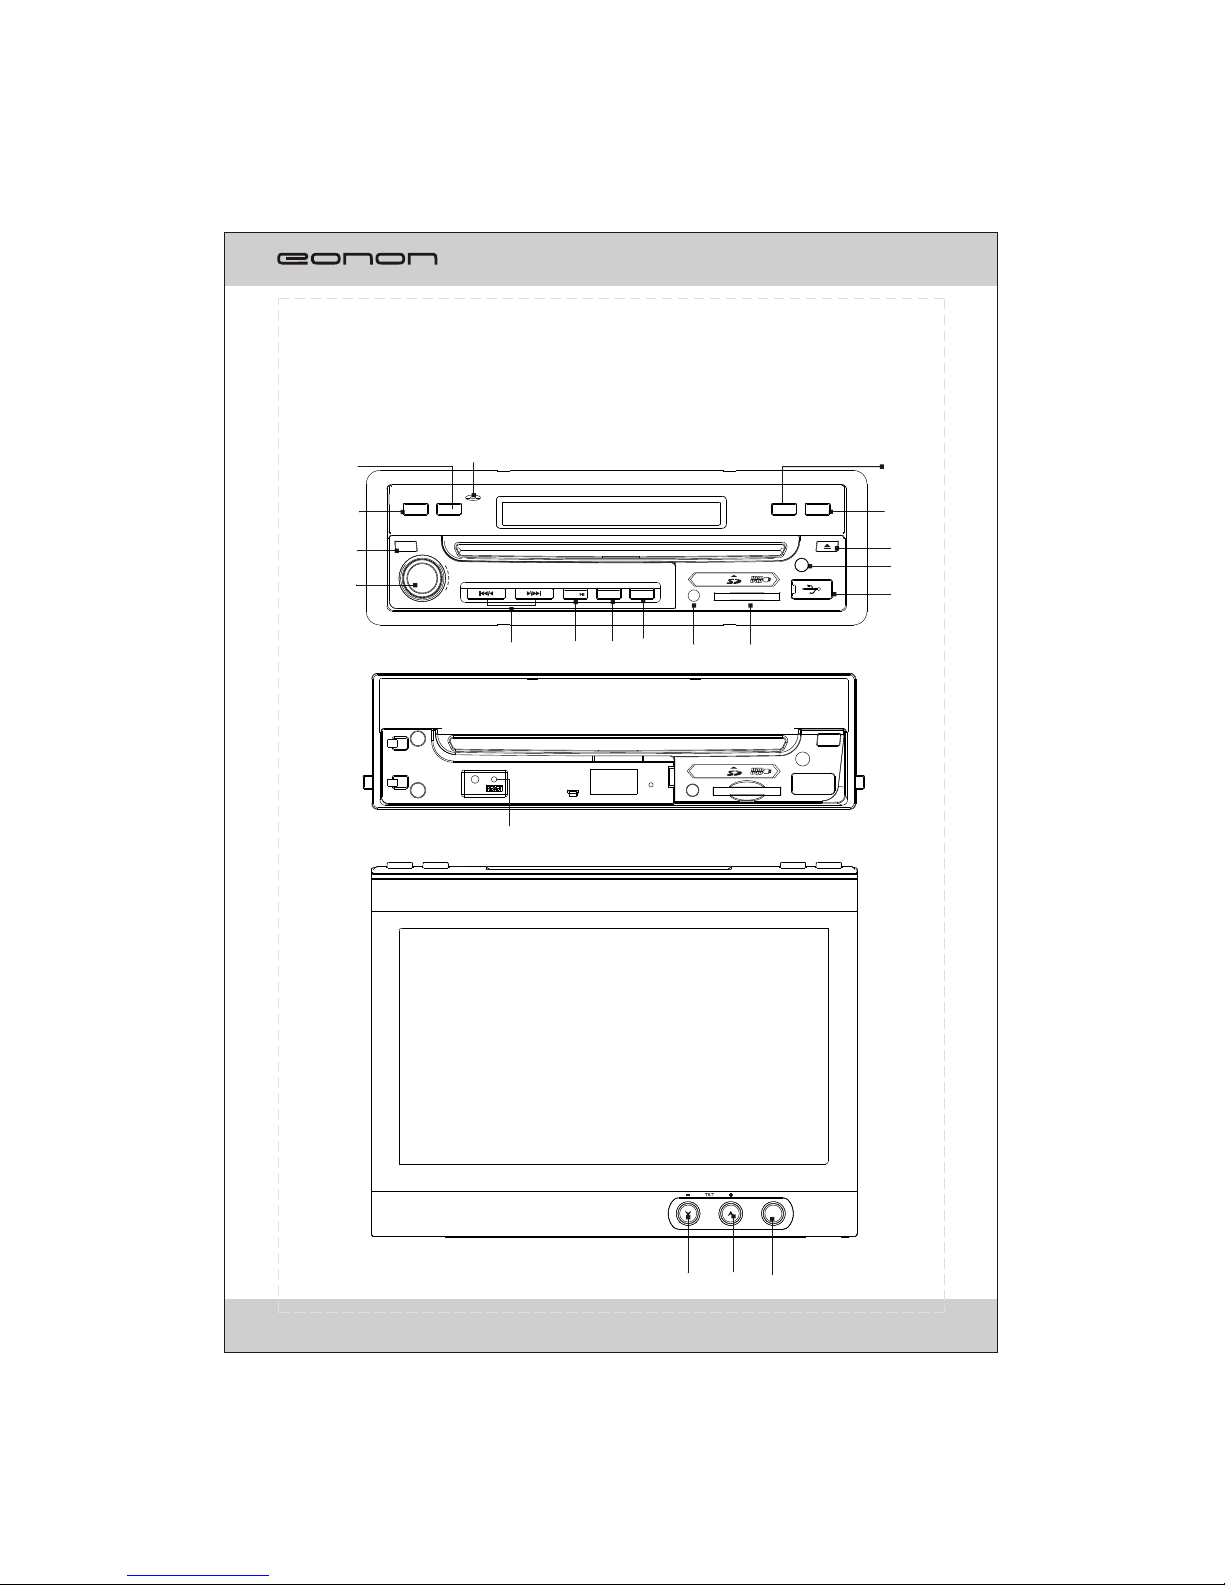
1.REL:Press to open the guardagainst theft front-panel.
2.VOL:Rotate VOL button clock wiseto increase the volume level; and rotate VOL
button anticlockwise to decreasethe volume level.
Press the button to select one of the audio control:L-front/R-front/L-rear/R-rear/Subwoof
/Bass/Middle/Treble/TILT/Volume.
Rotate the button to adjust the selecteditem
3. / / / :In radio mode, long press switches to manual seek station .
Short press switches to automatic.
In playback mode, short press to select previous or next track or chapter.
Long press will perform fast reverse or fast forward.
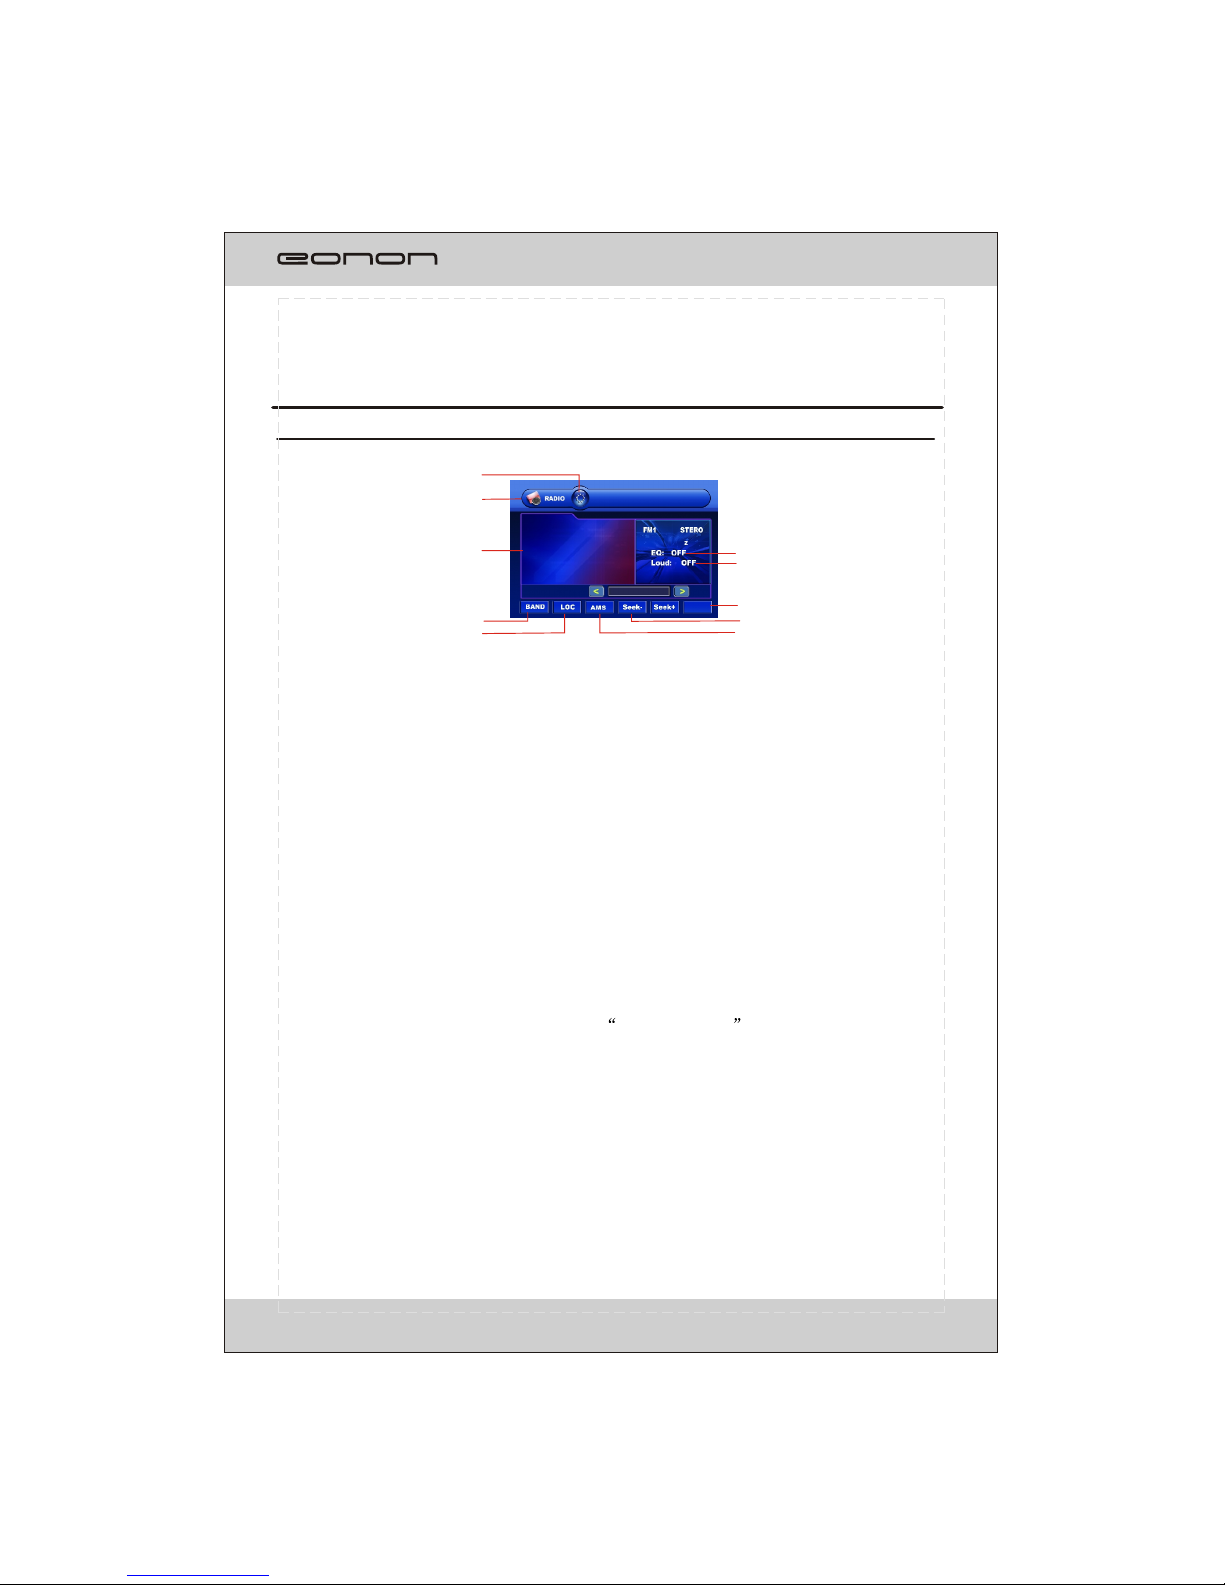
4. /BAND: Press to pause or play playback mode.
In radio mode, press to change current band.
5.SRC: Press to switch sources.
6.POWER/MUTE:Press to turn on the unit, press and hold the button for 1 second or longer to
turn off the unit. In power on, press to shut off the sound output, press it again to resume
previous sound.
7.A/V IN: Insert the A/V cord, then press PWR/SRC button to selectAUX1 source.
8.SD slot: Insert SD card, the unit will play the files of SD card automatically.
NOTE: Once the SD card could not eject automatically after pressing, just pull it out manually .
9.USB slot: Insert USB device, the unit will play the files of USB automatically.
10. IR window
11. :Short press to eject a disc.
12. OPEN: Press to open or close the TFT panel.
13. DISP/AF: in radio mode, press to turn the AF function on/offpress and hold to display
the current time ,source of the front and rear display and media (Disc,USB,SD)available.
14. MIC
15. TA: In radio mode, press to turn the TA function on /off
16. PTY: press to switch PTY program type
17. RESET: press to return to the initialization
18. / (TILT):Press to set the angle of TFT panel.
19. MENU:In DVD mode, press to display DVD SETUP menu;
Long press or press in other mode to display SYSTEM SETUP menu.
7
FRONT PANEL

SYSTEM MENU
The users can perform operationby touching screen directly.
Radio Operation
1. BACKLIGHT
Turn on /off the backlight.
(The function can be used to change the screen brightness while travelling at night)
2. SOURCE
To display the SOURCE screen
3.Station preset button
To display the preset station list
(touch one of the station preset button to recall the radio which stored on the position;
long touch to save the current frequency into the station)
4.BAND
To switch bands.
5.LOC
To select strong or weak stations reception
6.EQ
To select a preset equalizer mode.
7.LOUD
To switch LOUD control function on/off
8.PAGE 1
To switch to RDS operation page.(Refer to RDS Opetation for detail)
9.SEEK-/SEEK+
To seek a station automatically,
To seek a station manually(long touch).
10.AMS
To browse preset stations.
To search and store stations automatically(long touch).
8
Page1
1
6
7
4
5
9
10
8
3
2
1: 65.00M 2: 67.10M
4: 72.50M
6: 65.00M5: 74.00M
3: 70.40M
65.00MHz

RDS Operation
EON:OFF REG:OFF
PTY:NONE
RT:
PS:
PTY:
65.00MHz
TA AF PTY Page2
Seek- Seek+
1
2
3
4
5
1.TA
To turn on /off TA function
2.AF
To turn on /off AF function
3.PTY
To switch RDS program type
4.Page2
To switch to radio operation page.
5.SEEK-/SEEK+
To seek a station automatically.
To seek a station manually(long touch).
EON(Enhanced Other Networks)
ON: Active the EON function, the receiver automatically tunes in the station that broadcasts
the traffic information when it occurs, After broadcasted ,the unit will automatically return
to the original source play before the traffic information broadcast began.
OFF: Deactive the EON function
REG(Regional)
ON: Active the REG function, the unit automatically keeps receiving the related RDS
station.
OFF: Deactive the REG function
In DVD mode, the touching screen display as following after touching at random position.
Multi-- Player Operation
PLAY PAUSE STOP PREV NEXT MENU
4
1
2 5
3
9

Bluetooth Operation
Hands-free phone Operation
1
2
3
4
6
7
8
9
5
1.
to display the Bluetooth main screen
2.
To display the phone book screen
3.
To display the Bluetooth steup screen
4.
To display the source selection screen
5.dial number list
6.
To dial a call
7.
To clear the inputted telephone number
8.
To hang up a call
9.
To transfer calling audio output mode
1.PLAY
To start the playback.
2.PAUSE
To pause the playback.
3.STOP
To stop playing, touch twice to stop
5.PREV/NEXT
To select previous/next chapter or tracks.
completely.
4.MENU
To display the DVD SETUP screen.
7
NOTE:Touching the left middle position twice to display the TITLE MENU selection screen,
touching the right middle position twice to display the ROOT MENU selection screen, ouching
the right top position to display the number keyboard. You can select chapter(track) by
pressing the touchable screen or the RC.
10

8
The touching button(from5 to 7) are available if the A2PD function is activated
1.
To display a telephone number list of the received calls
2.
To display a telephone number list of the
3.
To display a telephone number list of the received but you missed
4.
To change the list page
dialed calls
1.
To connect the Bluetooth deviece
2.
to pair up the Bluetooth device.
3.
To disconnect the Bluetooth device
4.
To reset the unit if there is something wrong with the Bluetooth function.
5.
Playback/pause
6.
To stop playback
7.
To find the begin of the last or next track
8.
To adjust the volume
1
2
3
4
5
6
7
8
The Bluetooth Setup screen
The phone book screen
4
1
3
2
11

9
Setup Operation
TOUCH ON THE TOP LEFT POSITION TO ENTER SOURCE INTERFACE.
The unit will return to previous mode display screen if any operation is not perform in 5 s.
1.channel preset button
To display the preset channel list
Touch any one of the list to watch the TV which stored on the position
Touch and hold any one of the list to stored the current channel frequency on the position
2.CH-/CH+
To switch the preset channel list downward or upward.
3.AMS
To search and store channels automatically
4.PAL-I
To switch output system
5.Ant-1
To switch the receiving antenna
6.SYS
To display the system setup screen.
7.SEEK-/SEEK+
To seek a channel automatically
To seek a channel manually(long touch)
TV Operation
TV
0: 44.25 1: 55.75
2: 63.75
4: 44.25
3: 77.25
5: 115.25
PAL-I
Ant-1 CH:0
44.25Mz
CH- CH+ AMS SYS
Seek- Seek+
1
2
3 7
6
4
5
6
5
4
1
2
3
Front Rear Audio Video Sys Exit
12

Front Rear Audio Video Sys Exit
10
*
*If another monitor(rear)is connected to the unit,image/audio of the rear
monitor can be changed from the unit,so you can enjoy separate image/audio
in the rearseats.
* The unit will output corresponding source sound through REAR-VIDEO-OUT
or DUAL-AUDIO-OUT
It is unavailable in AUX or TV mode.
1.Front
To display the source selection screen.
Touch the item to select source displayed on the unit screen.
2.Rear
To select a source which display on the rear monitor
3.Audio
Touch on the AUDIO button and the screen will display as following:
Volume
L-front
R-front
Front Rear Audio Video SYS Exit
In this menu, there are items of Volume, L-front,R-fornt, L-rear, R-rear , Subwoof, Bass,
Middle and Treble can be adjusted. Touch on the button to adjust each item and
touch on button to turn pages and select the item listed above.
Front Rear Audio Video Sys Exit
13

Front Rear Audio Video SYS
Bass freq
Middle freq
Treble freq
Exit
11
4.Video
Press on the VIDEO button and the screen will display as following:
Front Rear Audio Video SYS Exit
Bright
HUE
Contrast
Sharp
In this menu, there are items of Bright, Hue, Contrast, Sharp can be adjusted.
Touch on the item that need adjusted then touch on the button to adjust.
5.SYSTEM
To display the system setup screen.Refer to system setup operation for detail
6.EXIT
To return to current source screen.
Key Beep
Turn on/off the sound guide function
ON:activate the sound guide mode
OFF:deactivate the sound guide mode.
The sound guide beep will not be produced when a button on the unit is pressed.
Local Area
Touch the provided option to change the radio frequency for different country.
SYSTEM SETUP OPERATION
Clock Sys
Set the time display mode(12H/24H)
Exit
Switch page button
Front Rear Audio Video Sys
Clock Adjust
Night Lum
Touch Adjust
Front Rear Audio Video SYS Exit
Clock Sys
Key Beep
Local Area
Touch the provided option to adjust the bass freq middle freq treble freq.
14

12
Front Rear Audio Video SYS
Subwoof freq
BassQ factor
MidQ factor
Exit
Touch the provided option to change the subwoof ,the bass and middle quality factor.
Front Rear Audio Video Sys
Clock Adjust
Night Lum
Touch Adjust
Exit
Clock Adjust
Adjust the time by touch
To select item your want to set(hour minute second)
To change the display number
Night Lum (dimmer)--in half-night mode
The function to select the backlight brightness.(normal status's 20%,40%,60%,80% )
Touch Adjust
When the display position on the screen and the touch position on the touch panel not
match, or using the product at first time, the adjustment becomes necessary.
Accurately touch the mark provided in the screen for more than 2 seconds until the
adjust succeed is displayed .
X < - press it
15

REMOTE CONTROL
1.PWR/ 2. EQ/ 3. ANGLE/AMS 4. SUB-T/LOC
5. PROG/A-B 6. OSD/ 7. GOTO/ 8. MENU
9. 10. RPT 11.
12. ZOOM/AF 13.
[ / ][ / ][ / / / ]/ENTER /PTY
SRC/IR-SW 14. VOL-/SEL/VOL+ 15.
16. LOUD/ 17. 0-9 Number button 18. CLEAR 19. 20. TITLE
21. 22. BAND/P/N 23. SETUP 24. AUDIO/ST 25. RDM/TA
1 15
16
19
20
18
17
21
22
23
2
4
6
5
14
8
9
10
3
12
11 24
25
13
7
PTY AF TA
16

15
REMOTE CONTROL
Installing the battery
Slide the tray out on the back of the remote control and insert the battery with the plus
(+)and minus(-)poles pointing in the proper direction.
Use and care of the remote control
Point the remote control in the direction of the front panel to operate to use it.
Notes:
Using batteries improperly can cause them to explode. Take note of the following points:
* Keep the battery out of the reach of children. Should the battery be swallowed,
immediately consult a doctor.
* Use one CR2025(3V)lithium battery.
* Remove the battery if the remote control is not to be used for a month or longer.
* Do not short-circuit, disassemble or heat batteries.
* Do not dispose of batteries into fire or flames.
* Dispose of spent batteries properly.
* Do not let the remote control fall onto the floor, where it may become jammed under the
brake or accelerator pedals.
17

REMOTE CONTROL
16
1POWER/
ress to mute the device. Press it again to resume previous sound level.
2EQ/
Press to select the corresponding preset modes to adjust the sound quality.
In bluetooth mode, press this button to dial up a call.
3ANGLE/AMS
Press to change the viewing angle in DVD mode;
4SUB-T/LOC
In DVD playback mode, press to change the subtitle language;In radio mode, press to
select strong or weak station reception.
5PROG/A-B
In DVD/VCD/CD mode, press to set the program order to play;In mode, press
and hold to play the section of selected chapter/track repeatedly .
6OSD/
In playback mode, press to display the playback information;
7GOTO/ #
In DVD mode, press the button and the cursor button to select TITLE CHAPTER
REPEAT TIME DISP.Then press
ENTER button to set the value.
In VCD mode, press GOTO button and cursor button to select TRACK DISC TIME
TRACK TIME REPEAT TIME DISP.Then press ENTER button to set.
8MENU
9[ / ][ / ][ / / / ]/ENTER
In playback mode perform [fast reverse/fast forward][previous track/next track]
[upwards/downwards/leftwards/rightwards]; press ENTER to validate.
10 RPT
In playback mode, press to select a repeat mode.
Press the button to turn on the unit;Press and hold for 1second or longer to turn off the
unit. In power on,p
In radio mode, press to browse each
stored station .Long press to scan and store station automatically.
In TV mode, long press the button to scan and store channel automatically, press it again
to stop scanning.
In other mode, press to
display the current time, the set source output through the front and rear display, the
current available drive.(Disc/SD/USB);In bluetooth mode, press to function as button
on your mobile phone functions .
AUDIO SUBTITLE ANGLE TT TIME CH TIME
In CD/MP3 mode, press GOTO button to select "Disc Go To:_ _ _" "Track Go To _:_ _:_ _"
"Select Track:_ _:xx". Then press 0-9 number buttons to set the track you want.
In bluetooth mode, press this button to function as # button on your mobile phone
functions .
In radio mode ,press the button and the number button to set the frequency.
In TV mode ,press the button and the number button to select a channel
playback
Press to return to the root menu in DVD mode.
In radio mode,press to switch between radio main screen and RDS screen.
18

17
11 /PTY
In radio mode, press this button to switch to RDS program type.
In DVD/VCD mode, press to play slowly
12 ZOOM/AF
In radio mode, press this button to function AF on/off.
In DVD/VCD mode, press to increase or decrease the picture in size.
13 SRC/IR-SW
P Press and hold this button to
14 VOL-/SEL/VOL+
Press VOL-/VOL+ to adjust volume.
15
Press to eject a disc
16 LOUD/
Press this button to activate LOUD function.
In bluetooth mode, press this button to hand down your calling.
17 (0-9)NUMBER BUTTON
In radio(TV) mode,
In DVD/VCD/CD mode,press to select any chapter or track directly.
In bluetooth mode ,press to input the telephone number.
18 CLEAR
19
Press to pause playing and press again to resume playing.
20 TITLE
22 BAND/P/N
In radio mode,press to select bands.
In DVD/VCD mode,press P/N button to select PAL AUTO or NTSC.
23 SETUP
In playback mode, short press to display DVD setting, long press in DVD mode and
press in other modes will display system settings.
24 AUDIO/ST
In DVD mode, press to change the audio language.
In VCD mode ,press to change the channel mode.
In radio mode, press to select stereo or mono reception.
25 RDM/TA
In radio mode, press this button to function TA o/off.
In playback mode, press to play tracks in a random order.
ress the button repeatedly to switch sources. change
the IR to control front or rear source.(*It is disable when rear source shut off.)
Then press VOL+/- to adjust each item.
press the number button to select a corresponding preset station
(channel)
Press the button to clear the erroneous number what you import.
In DVD mode, press the button to return the title menu.
In VCD mode, press this button to turn on/off PBC function.
21
Press to stop playback.
Press SEL to select one of the control item:L-front/R-front/L-rear/R-rear/Subwoof/Bass/
Middle/Treble/Angle/Volume.
19

18
ROCK
POP CLASSIC
EQ OFF
¼òµ¥¹ÊÕÏÅųýÖ¸ÄÏ
1.Reset the Unit
Operating the unit for the first time or after replacing the car battery, you must reset the u
nit. Press RESET button on the head unit with a pointed object, (such as a ballpoint
pen) to set the unit to initial status.
*This function can only be operated by the head unit.
2.Turning the Unit On/Off
Press PWR/ button on the remote control to turn on the unit. N unit ON, when insert
a disc, the unit will automatically start playing. Long press it to turn off the unit completely.
Pressing POWER/MUTE button on the front panel also performs the same operation.
Note:
After the unit is off, the volume level is memorized during the area between 0 and 30.
If it is set less than 6, it will resume to 6; if the set volume level is higher than 30,
it will resume to 30; if it is between 6 and 30, it still stores in the status which you set.
3.Volume Control
Press VOL+ button on the remote control to increase the sound level and press VOL-
button on the remote control to decrease the sound level.
Press (VOL+ or VOL-) on the front panel also performs the same operation.
4.Setting the Sound Characteristics
Repeatedly press SEL button or press SEL button on the remote control to select the
desired mode in the following order:
Note:
* After selecting the desired mode, you can adjust the current level by press the-/+ button
or pressing VOL-/VOL+ buttons on the remote control.
,
* If you don t adjust VOL button in 3 seconds after selecting the desired mode, the
function will be cancel.
5.Mute Function
6.EQ Setting
While listening to the popular music, classic music or rock music, you can select the
corresponding preset modes to adjust the sound quality perfectly by using EQ button on
the remote control. Repeatedly pressing EQ button to choose the following modes in turn:
after adjusting the Angle item, the unit will memorize the angle of the panel.
Press PWR/ button to shut off the sound output. MUTE will be displayed on the
screen Press it again to resume to previous volume level.
Press PWR/MUTE button on the panel also performs the same operation.
BASIC OPERATION
Volume
Subwoof
Angle
L-front R-front L-rear R-rear
BassMiddle
Treble
20
Table of contents
Other Eonon Car Receiver manuals