Eonon G2226 User manual

Model: G2226
www.eonon.com
User Manual
Please read this manual before using and
save this manual for future reference.

1401
CONTENTS
NOTE
instructions will not enjoy the warranty.
2. To drive safely and avoid break the traffic rules, do not watch program and operate the unit while
driving.
3. To avoid short circuit, please do not exposure the device to rain.
4. To avoid short circuit, please do not put in the device or any metal objects left behind.
5. Not open the machine for maintenance by yourself, please go to the professional repair service
station for repairing.
6. When the engine is turned off, please do not use the car audio a long time, otherwise the battery
may run out.
7. Do not insert anything to the device’s vent and other openings.
8. Damage to the screen carefully! Do not use sharp objects push, rub, Stroke the screen.
1. Please read the instructions before using the unit, the damage caused by not following the
Click the display position of year/ month/day/hour/minute to reset the current parameters.
●
Set in the time interface touch 12HR/24HR icon to switch between clock modes.
●
Time setup
Touch [Time] icon in the main interface to enter into the calendar setup interface.
Trouble shooting
PROBLEM CAUSE CORRECT ACTION
Cannot power
on
After ignition
switchoff, setting
information all
lose
Poor
performance of
radio station
Connot load
disk
Cannot play
disc
Cannot switch
language/
subtitle
No image
Cannot watch
image during
driving
Check whether power fuse melt or not
Some factors cause MPU wrong
operation
Change battery or fuse
Weak signal
There is a disk inside
Disc is scratched
Put wrong side of disc into the unit
Lens has dirty
There is only one language/subtitle in
disc
Other factors cause MPU wrong
operation
It’s not allowed to watch image during
driving
Change fuse same as the old one
Press [RES] button on the panel by
penpoint, then, power on
Reset information and save
Move the car to another place, then
research
Eject disk, then, slot in new disc.
Change new disc
Slot in the disk with sign side up
Clean lens by lens clean disc
If disc is not with multi-language/
subtitle, it cannot switch language/
subtitle
Press [RES] button on the panel by
penpoint, then, power on
Park the car in a safe place, put the
car stall in “ P ” postion, pull up the
hand brake
02
03
05
05
05
06
07
08
09
10
11
12
12
13
14
Panel Function
Remote controller operation
Turn on/off Host
Access main interface
U Disc/SD Card function operation
Radio Function Operation
Disc Function Operation
Bluetooth Function Operation
External input operation (Optional)
IPOD Function operation
Analog TV function operation
GPS Navigation Function Operation
Other functions
Access setup interface
Trouble shooting

0213
Panel Function
1. SRC button
Press this button shortly to power on, press this button longer to power off. In normal situation, press
SOURCE button can return to the main menu.
2. MUTE button
Press the button to close volume output, re-press it to resume previous volume level.
3.VOL-/+ button
Press this button to reduce/increase the volume.
4. UP button
Press this button to make the LCD monitor up.
5. DN button
Press this button make the LCD monitor down.
6.NAVI button
Press the button to enter into/exit navigation interface.
7.
Press the button to eject disc.
8.RESET
Press this button can back to default mode.
9.USB slot
Connect the USB memory to this socket, and the unit can play music format files supported by this
unit in the USB memory.
10.IR
To receive infrared signals from the remote control matched with the unit.
11.AUX IN
External audio input socket.
12. MIC
Bluetooth microphone input port.
Access setup interface
Click [Setup] icon on main interface to access setup interface. Touch each function icon to enter into
the corresponding function operation.
Foreground/background Setup
You can enable background mode by foreground/background setup. When the unit is connected with
background device, you can enable background mode of the unit to play audio and video files. At the
Set interface Touch [Foreground/background] icon, Enter into foreground/background setup interface.
Only in radio/bluetooth/navigation mode can background mode be enabled.
Sound Setup
Touch [Sound Setup] icon to enter sound setup interface.
Sound effect setup: select general, pop, classic or rock, you can adjust to the best audio effect
according to your preferences.
System volume: adjust volume level of the whole unit.
Bluetooth volume: adjust volume level of bluetooth mode.
Navigation volume: adjust volume level of navigation mode.
Reverse volume: adjust volume level of reverse mode.
Screen click sound: select to turn screen click sound on/off. After click sound is turned off, there is
no beep sound when you touch the screen.
Loudness: Select the turn on/off loudness function.
Tweeter/woofer/subwoofer: adjust volume level of tweeter/woofer/subwoofer.
Left front speaker attenuate: adjust volume level of left front speaker.
Right front speaker attenuate: adjust volume level of right front speaker.
Left rear speaker attenuate: adjust volume level of left rear speaker.
Right rear speaker attenuate: adjust volume level of right rear speaker.
Navigation Path Setup
Navigation path is already set when you buy the product. Do not enter into the navigation setup
interface to change path arbitrarily. Otherwise you may cause navigation program abnormal.
Language Setup
During use, you can select your familiar language to display menu by language setup.
At the language set interface click appropriate language icon, the selected language will be
displayed as the menu language.
Radio Area Setup
You need to select your radio area before you use radio function.
Backlight
Via backlight setup interface, you can manually adjust the display screen brightness according to the
intensity of light of the environment to achieve satisfactory effect.
Touch Screen Calibration
If errors occur in touch position, you can calibrate touch coordinates.
Enter touch calibration interface, Use a touch pen to click the central area of symbol “+”, calibrate the
screen in the moving sequence of the central area of “+”. After calibration is completed, system will
automatically save data and exit the screen.
Steering Wheel Setup
You can also perform control to the unit by the steering wheel of the car. Connect the positive and
negative terminal of the car SWC cable with the positive and negative terminal of the SWC cable of
the unit respectively. Click buttons on the steering wheel one by one and keep a record of relevant
sequences. Click appropriate function setup to save the settings.

1203
Remote controller operation
6. SEEK
In playback mode, short press the button to select
the previous/next file; long press the button to fast
forward/backward play. In radio mode, short press
the button to fine tune and search for station
manually. Long press the button to scan station
automatically. Under analog TV status, short press
the button to fine tune and search for station
manually; long press the button to scan channel
automatically.
7. VOL
Press the button to increase/decrease the volume.
8. SEL---sound feature
Repeat to press the button to select sound feature.
9. LOUD/ equal loudness compensation/
hang up
Press the button to turn the LOUD function on/off.
When the unit supports bluetooth function, press
the button to hang up a call after a call is finished.
10. BAND/P/N
In radio mode, press the button to switch the band.
Under playback and TV status, press the button to
switch the system.
11. LOC/RDM
In radio mode, press the button to switch between
local/distant. In playback mode, press the button
to start random play.
12. STOP
Press the button once to pause, press it twice to
completely stop.
13. Play/pause
Press the button to switch between play and
pause; under stop status, press the button to start
playback.
14. ST/PROGstereo/programmed playback
In radio mode, press the button to select stereo
or mono station; in playback status, work with
number buttons to start programmed playback.
1. PWR
Press the button to turn power on/off.
2. MUTE
Press the button to turn the volume output on/off,
repress it to resume previous volume level.
3. NAVI
Press the button to enter/exit the navigation
interface.
Short press the button to switch the mode. Long
press the button to switch between foreground/
background controls for the remote controller.
Only effective when the background mode is
enabled.
5. EQ/ preset equalizer select/answer
Press the button to select different sound effect
mode. When the unit supports bluetooth
function, press the button can answer a call.
4. SOURCE/IR-SW---mode switch
GPS Navigation Function Operation
1. Navigation Function Operation
For detailed operation of navigation function, see “Navigation Operation Manual”.
2. Receiving signal error
When the satellite signals can be normally received, the error of standard GPS shall be about 7
meters. Driving on parallel sections, there shall be error even the product has auto-correct function.
The normal receiving of satellite signals shall be affected and cause error in following environment:
In tune Among tall buildings At the boulevard
The antenna is sheltered Underground parking Overpass or viaduct
Other functions
Rearview function
In any running state, the video signal can switch to reverse video state when reversing the car, and
the system shall return to its initial running state after reversing the car.
Reverse field simulation Rearview backup image
Warning
Do not rely on CCD system completely, please make sure your car is safe by your eyes
during driving. Back rearview system only assists in driving. As the distance range of
rearview system is limited, completely relying on the rearview system during driving may
cause accidents.

04
11
15. 0-10+---number button
In radio mode, press number buttons to select to
play pre-stored stations; long press the number
button (1-6) to store the current frequency in the
pre-stored position. In playback mode, press
number buttons to directly select songs and
chapters. In analog TV mode, press number
button (1-9) to select station.
16. AMS/RPT
Long press the button to search for station
automatically. In radio mode, press the button to
browse memory stations; in playback status,
press the button to select repeat to play mode.
17. TITLE
In DVD mode, press the button to return to the
top menu of the disc.
18. AUDIO
In DVD mode, press the button to switch the
dialogue language of the played program. Under
VCD status, press the button to select L/R
channel/stereo.
19. GOTO---play time setup
Under playback status, after the button is
pressed, work with number buttons to select
track/time play.
20. SUB-T
In DVD mode, press the button to switch subtitle
language.
21. PBC
In VCD mode, press the button to display all
tracks menu of the disc, work with a number
button to select a track. In DVD mode, press the
button to return to the root menu.
22. Enter
In DVD mode, press the button to move the
cursor up/down/left/right to select an item in the
system setup menu, and press the ENTER
button to confirm the selected item.
23. SLOW
Under playback status, press the button to start
slow forward playback.
24. ANGLE
In DVD mode, press the button to change the
shooting angle of the played program.
25. SETUP
In play DVD mode, first press the STOP button,
then press the SETUP button to choose different
set items.
26. OSD
Press the button to display title, chapter, playing
time and remaining time.
27. ZOOM
Under VCD/DVD reading status, press the button
to zoom the image in/out.
28. MENU
Press the button to switch between the main
interface and the current mode.
Battery Change
If the remote controller operates only over
shorter distances or does not operate at all,
replace the battery with a new one, and
confirm polarities before you change the battery.
One hand press stopper, then pull out battery.
Put battery into battery holder.
Put the holder into the remote controller.
1. Enter / Exit
Touch [TV] icon in the main interface to enter the TV
playback interface.
2. Search & save channel
(1) Auto search & save channel
You may need to search for station first before you use TV.
Touch [AMS] button in the interface to automatically start
searching for TV channels within the scope of all the TV
channels, effective TV channels searched will be automatically memorized in the preset channels in
ascending order. During search, retouch [AMS] button to stop searching.
(2) Manual search channel
Hold [SEEK+]/[SEEK-] button on display screen for 2 seconds or more to automatically search for
effective stations in the frequency ascending/descending direction.
3. Select channel and play
Touch [CH-] and [CH+] button on display screen to select the next/previous saved channel to play.
4. Audio format conversion
Touch screen [TV SYS] button to switch the TV audio formats, the following order:
PAL I → NTSC → SECAM - DK → SECAM-BG → PAL-DK → PAL-M → PAL-N → PAL-BG
If abnormal sound appears, that may be because the sound system setup is wrong, you need to
reset it. (Sound system adopted in China: Mainland areas except Shenzhen etc.“I” other areas:
“DK”; Hong Kong: “I” Users should pay special attention to this.)
5. Adjust the volume
Touch interface icon, adjust the volume size.
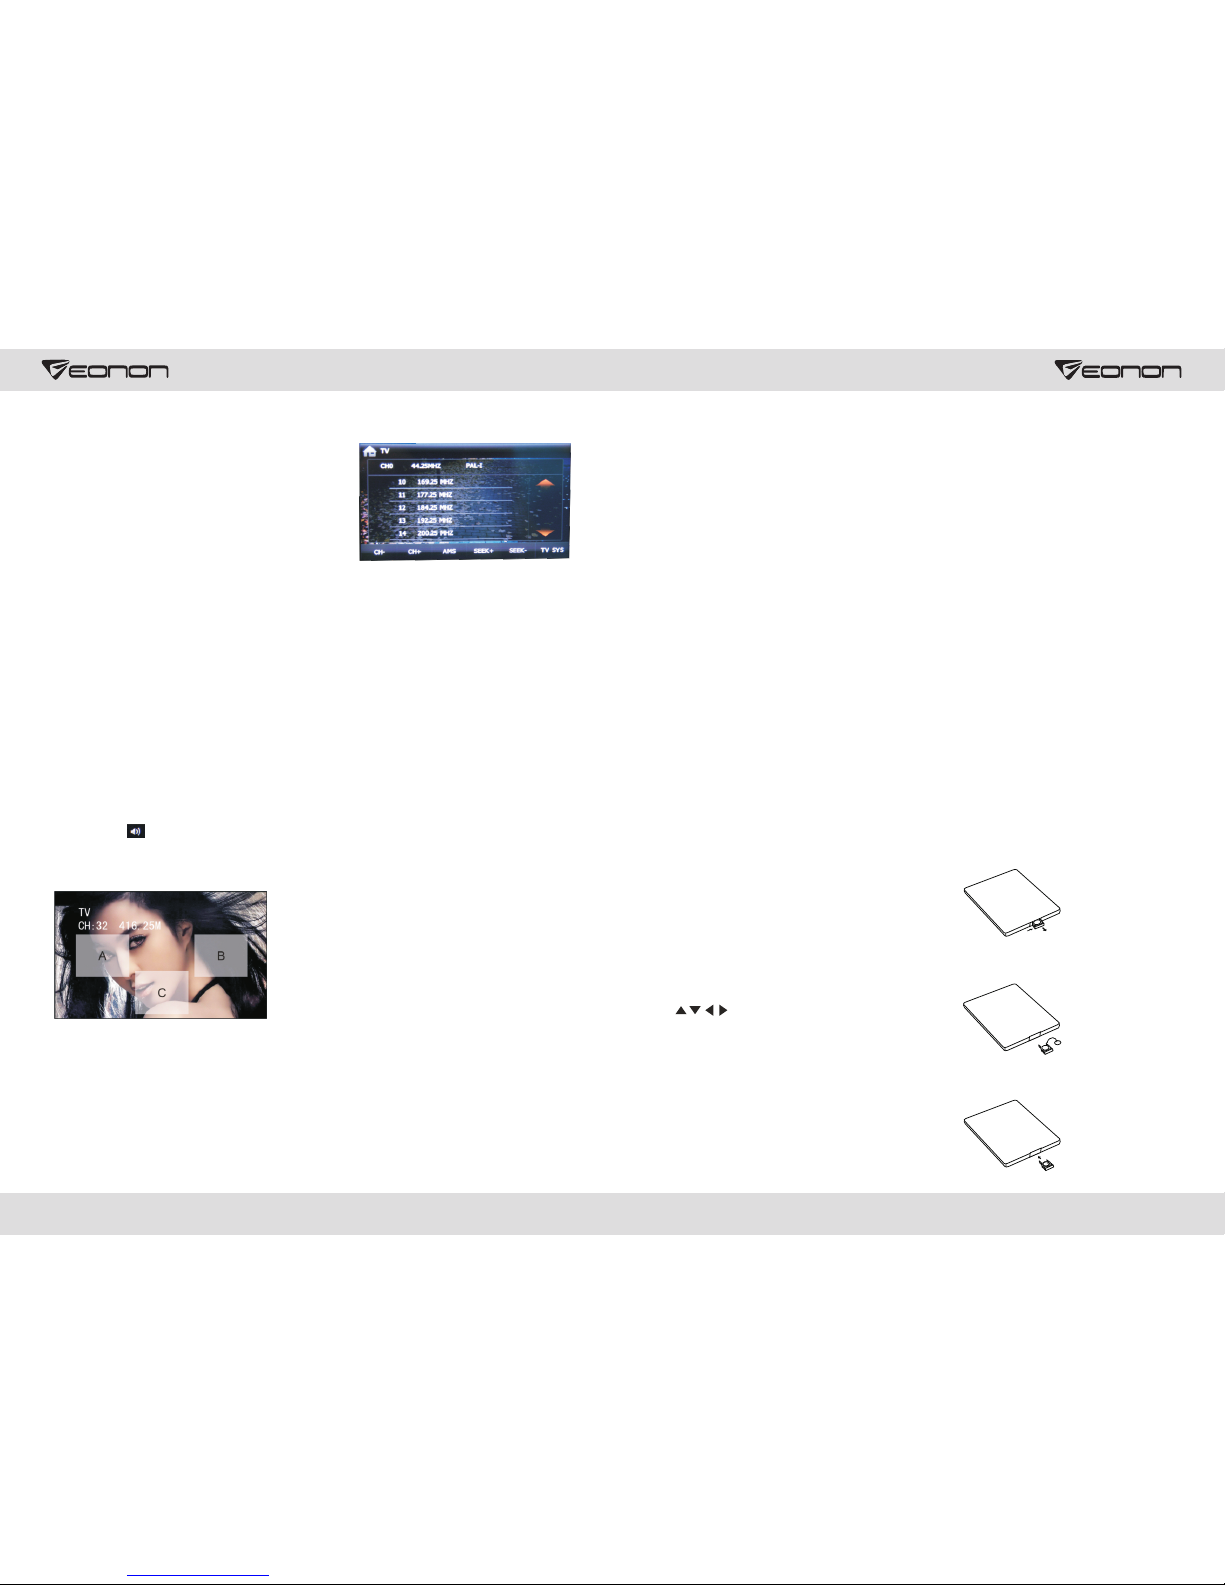
6. Full-screen playback
Touch Radio icon, automatically after 3 seconds to switch to full-screen playback mode, as shown below:
Analog TV function operation
Touch A area - on a radio station;
Touch B area - the next station;
Touch C area - to return a small screen mode.

10
05
123456
7
8
910
Touch the menu definition:
①.
②. Previous song
③. Next song
④. Display ID3 track information (As shown below)
Play/Pause
⑤.
track using the numeric keypad to play.
Numeric keypad: Click the button to pop-up numeric keypad (As shown below), you can select a
⑥.
the screen to the home directory folder, press the button again to return the current playback status.
⑦. Turn on
⑧. Page down
⑨. Repeat / Repeat all
⑩. View playback on / off
Back to Main Menu / Back to the current state of play: During playback, press the button to switch
Turn on/off Host
When the ignition switch is put in ACC or ON position, Press [ ] button on the front panel to turn on
the unit. After the host starts, hold [ ] button for 3 seconds , the host will turn off.
Access main interface
In boot-up state, press /SRC/MENU button on the panel to switch to main interface.
Touch
page. Touch the icon does not go into a long free mobile icon location. Touch the icons to enter the
corresponding functions. Touch in two different interface style to switch between.
Rear view function menu (optional)
When the machine has a menu function, rear view, in the main screen, click icon to enter the menu
after reversing interface.
U Disc/SD Card function operation
When there is a USB device/SD card connected, the unit can conduct the playback of audio/video
image files in the USB device/SD card.
Insert/eject SD card
1. Insert a SD card recorded with media information into the SD card slot in the unit correctly until it
is locked.
2. When pulling out the SD card, exit SD card playing state first, then press the SD card and it shall
pop up after unlocking.
Insert/Eject USB storage device
1. Connect a U disc recorded with media information to the unit by a USB connecting cable.
2. When there is a need to eject the USB device, exit the USB device playback screen first, and then
take out the device.
Note: When the unit has front USB, only one of them.
icon or at the touch pen / finger gently sliding the screen to switch the main menu
IPOD Function operation
When the unit is connected with IPOD, In the main interface Touch [IPOD] icon to enter the IPOD
interface:

0609
play/pause stop
Radio Function Operation
Touch [RADIO] icon in the main interface to enter into the
radio interface.
Search/store station
1. Auto search and store station
(1) Touch [ ] icon in the radio interface on the panel
to search for station automatically. During search, the
searched stations will be stored automatically.
(2) During search, retouch [ ] icon to stop auto searching.
2. Manual search and store station
(1) Finger / touch pen drag of high radio frequency scale can be achieved manually search for radio
stations. During search, after a station is searched, the unit will stop searching automatically and
play the searched station radio.
(2) Directly touch[ / ] icon in the radio interface to fine-tune station frequency.
(3) After a station is searched, (such as: 88.15MHZ), long press any position in the pre-stored station
list in the radio main interface, the searched station will be stored in the selected position.
(4) FM band can save 18 stations (FM1/FM2/FM3 can each save 6), AM band can save 12 stations
(AM1/AM2 can each save 6).
(5) During search, the unit will automatically stop searching after it has searched for all stations
through once.
Select station/band switch/switch between LOC/DX
(1) Directly touch any station in the pre-stored station list in radio interface to play the selected
station.
(2) Touch [ ] button in radio interface to switch band among FM1, FM2, FM3, AM1 and AM2.
(3) Touch [ ] icon to switch search mode between LOC and DX. When LOC function is turned on,
only those radio stations with strong signals and good reception can be received; When DX function
is turned on, distant weak radio signals can be received.
RDS function
RDS provides a series of information (such as traffic information and station name), and can
automatically switch to a station with strong signals and carries the same program.
RDS data contains the following contents:
P1---program identification TA---traffic announcement PS---program service name
PTY---program type name AF---alternative frequencies EON---enhanced other network
TP---traffic program
Touch the upper right corner [RDS] radio interface icon,
enter the RDS interface:
Function Operation
① TA ( Receive traffic information )
ON: When the traffic station is turned on, the radio will
automatically search for traffic stations. After a station is
searched, screen displays “TP”. Only when traffic
information is broadcasted can it be received, after traffic
information is completed, the radio will automatically switch to the previous mode.
OFF: Repress [TA] button to close TA function. In other modes, traffic announcement will
automatically switch to radio mode, after the traffic announcement is completed, it will automatically
switch to the previous mode.
Phonebook
After the cellphone gets connected to the unit, you can read records in the phonebook of your
cellphone and store information in the phonebook of the unit.
( Note: Some phones may not support the phone book.)
Call records
Recent dialed calls, received calls and missed calls can be saved in call records.
Select missed/dialed/
received calls
Clear all
Bluetooth music playback
Bluetooth player can play music files in cellphone via wireless audio device on condition that the
cellphone supports relevant bluetooth protocol. After bluetooth device gets connected to the unit,
audio system will automatically link with the paired cellphone. In some cases, you need to enable
the playback of audio files by phone keypad due to different phone models.
the previous/next song
External input operation (Optional)
external audio input jack. Touch [Input] icon on main interface to access external input interface.
Connect the video input plug with external video input jack, and connect the audio input plug with

Dial
Call records
Phonebook
Music playback
Switch
002 Big big world
001 \
003 My Heart
001 My Heart 1.MP3
002 My Heart 1.MP3
003 My Heart 1.MP3
004 My Heart 1.MP3
005 My Heart 1.MP3
08
07
settings
② AF
Touch the button to turn the AF function on/off. AF function is turned on, When the received station
signals become weak, the radio will automatically fine-tune to other frequencies. When receiving an
emergency announcing, the screen will display warning message “ALARM“.
③ EON
ON: Open EON function, another AF list is received.
OFF: Close EON function.
④ REG
ON: Open REG function, only local RDS stations can be received.
OFF: Close REG function.
Disc Function Operation
Play/eject disc
Insert the disc into the disc slot with the printing surface up, system will detect the disc and
automatically take it in to read and play.
Click button on the panel to eject the disc.
If a disc has not been took away 15 seconds after it is ejected, system will automatically take in the
disc but not play.
Note: Do not insert two discs or more.
Playback Menu
During playback of disc, touch the middle lower area of the screen to pop up the touch menu,
operate the touch menu to perform various playback controls.
Note: Touch the top left corner of the screen to return to the main interface.
Play/pause Stop
The songprevious/next
Fast /backward forward
Repeat/Repeat all discs
Bluetooth Function Operation
The system provides bluetooth hands free communication function, if your cellphone supports
bluetooth function, you can establish a point-to-point connection between your cellphone and the
system. The system can also achieve the dialing, answering function, A2DP, the function of
phonebook on the screen.
Pair/link
The first time you pair your cellphone with the unit, the procedures below should be followed:
① Turn the bluetooth function of your cellphone on.
②The cell phone searches for bluetooth device and connect.
③A prompt is displayed on the screen of the phone, to accept pair, enter the same numeric code on
the phone (0000) and press [OK] button.
④ After the pair is completed, the name of the connected cellphone is displayed on the screen.
⑤ After recharged, the bluetooth system will automatically get connect to the lastly disconnected
cellphone.
MP3/WMA format disc playback
Put the MP3/WMA disc in DVD player, after the disc is read, system enters into the interface as is
shown below:
The upper-right corner of the touch interface to exit the DVD interface and return to the main menu.
DVD/VCD disc playback
When there is a disc in the unit, touch [DVD] icon in the main interface, system enters into disc
reading status. When the disc does not have play menu, system will automatically read the disc and
directly play; when the disc has play menu, system displays DVD menu, you can touch appropriate
options on the screen to access the corresponding items.
CD Disc Playback
When there is a disc in the unit, touch [DVD] icon in the main interface, system enters into disc
reading status. After disc format is read, the screen will display the CD playback interface, system
will automatically read the disc contents and display on the screen, You can directly click song name
to select and play, you can also click the numeric keypad button and enter song number to selected
your favorite song to play.
Touch the file name icon and the song to read and play. Touch [ ] [ ] to select the previous/next
file.
Playback control function keys and DVD Play control keys are functioning.
After the successful pair, the bluetooth that indicates connecting status will be lighted, otherwise, it
will appear dimmed.
Touch [Disconnect] to disconnect the current connection; after disconnected。
Touch [Connect] to connect the disconnected bluetooth device.
Touch [Reset] icon to clear all pair records.
Bluetooth Interface Function Introduction
Table of contents
Other Eonon Car Receiver manuals