Eonon G1306 User manual
Model:G1306
G1306
MUTMUT
SRC/NAV
BAND/
AUX A/V IN

Thank you for buying this product, please read through these operating instructions,
so you will know how to operate your model properly. After you have finished reading
the instructions, put them away in a safe place for future reference .
NOTE: Due to the continuous product improvement, specifications and design are
subject to change without prior notice.
CONTENTS
IMPORTANT: Please adjust screen to make the touching effect function best when
you initiate the unit for the first time.
For the details, please refer to the operation at Page 9.
PRECAUTIONS
FRONT PANEL
BASIC OPERATION
REMOTE CONTROL
RADIO OPERATION
SYSTEM SETUP
CABLE CONNECTION
ACCESSORIES
INSTALLATION
TROUBLE SHOOTING
SPECIFICATION
MP3 OPERATION
SYSTEM MENU
TV OPERATION
2
4
17
13
18
DVD/VCD/CD OPERATION 25
28
37
39
42
41
41
33
6
23
1
BLUETOOTH OPERATION 20
NAVIGATION OPERATION 35

PRECAUTIONS
1. Be sure to connect the color coded leads according to the diagram. Incorrect connections
may cause the unit to malfunction or damage the vehicle, s electrical system.
2. Be sure to connect the speaker (-) leads to the speaker (-) terminal.
Never connect the left and right channel speaker cables each other or to the vehicle body.
3.Make sure all the connections are completely correct before turning on your unit.
4. When replacing the fuse(s), the replacement must be of the same amperage as shown
on the fuse holder.
5. Do not block vents or radiator panels.doing so many cause heat to build upinside and may
result in fire.
6 After completing the installation and beginning to play the unit (including replacing the
battery),please press RESET button on the front panel with pointed object (such as ballpoint
pen) to set the unit to initial status.
Replacing the Fuse
Make sure the amperage matches the specified value when replacing the fuses. If the fuse
is blown, check the power connection and replace with a new one. If the same problem
occurs, lt would be subjected to the malfunction in-house.In such cases, please consult the
nearest service dealer.
WARNING:
Never use the fuse with the rated amperage more than that supplied to your unit, other wise
lt will damage the unit.
4
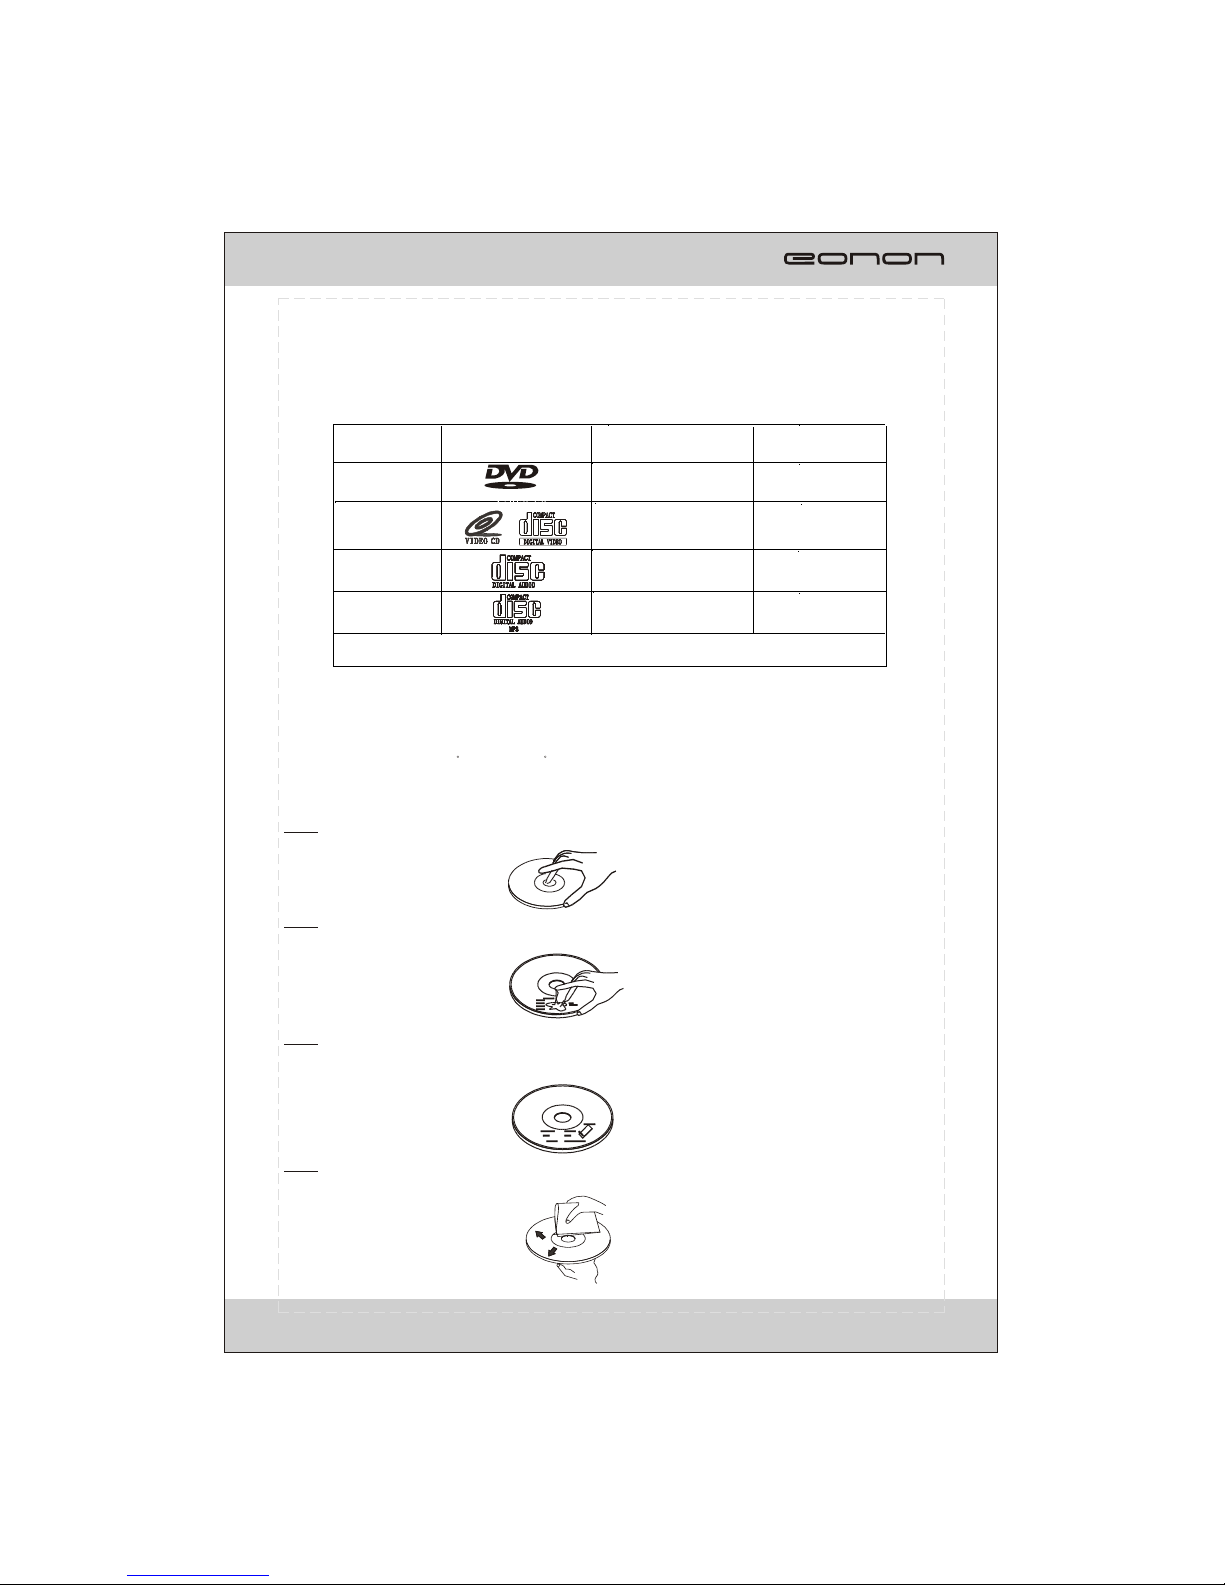
This unit can play the following discs only:
F
PRECAUTIONS
*Do not attempt to modify the unit, modifying the unit may cause an accident.
*Stop the vehicle before carrying out any operation that could interfere with your driving.
*Do not work in extremely high or low temperature. Be sure the temperature inside the
vehicle is between +60 C and -10 C before turning on your unit .
*To enjoy optimum sound and images while playing, handle the discs as follows:
Handle the disc by its edge to keep the disc clean, and do not touch the surface.
Do not use your CDs with paste residue or ink attached.
Do not use CDs with labels or stickers attached, which may leave a sticky residue
while beginning to peel off. (Shown as the picture)
Clean the discs with an optional cleaning cloth. Wipe each disc from the center out.
(Shown as the picture)
Type of disc
12cm
VIDEO
DVD
Label on the disc Recorded material Size of disc
Sound and moving
pictures
VCD
MP3
12cm
CD 12cm
NOTE: The unit is compatible with VCD1.0/2.0/3.0 version and DVCD disc.
12cm
Sound and moving
pictures
Sound only
Sound only
TM
3
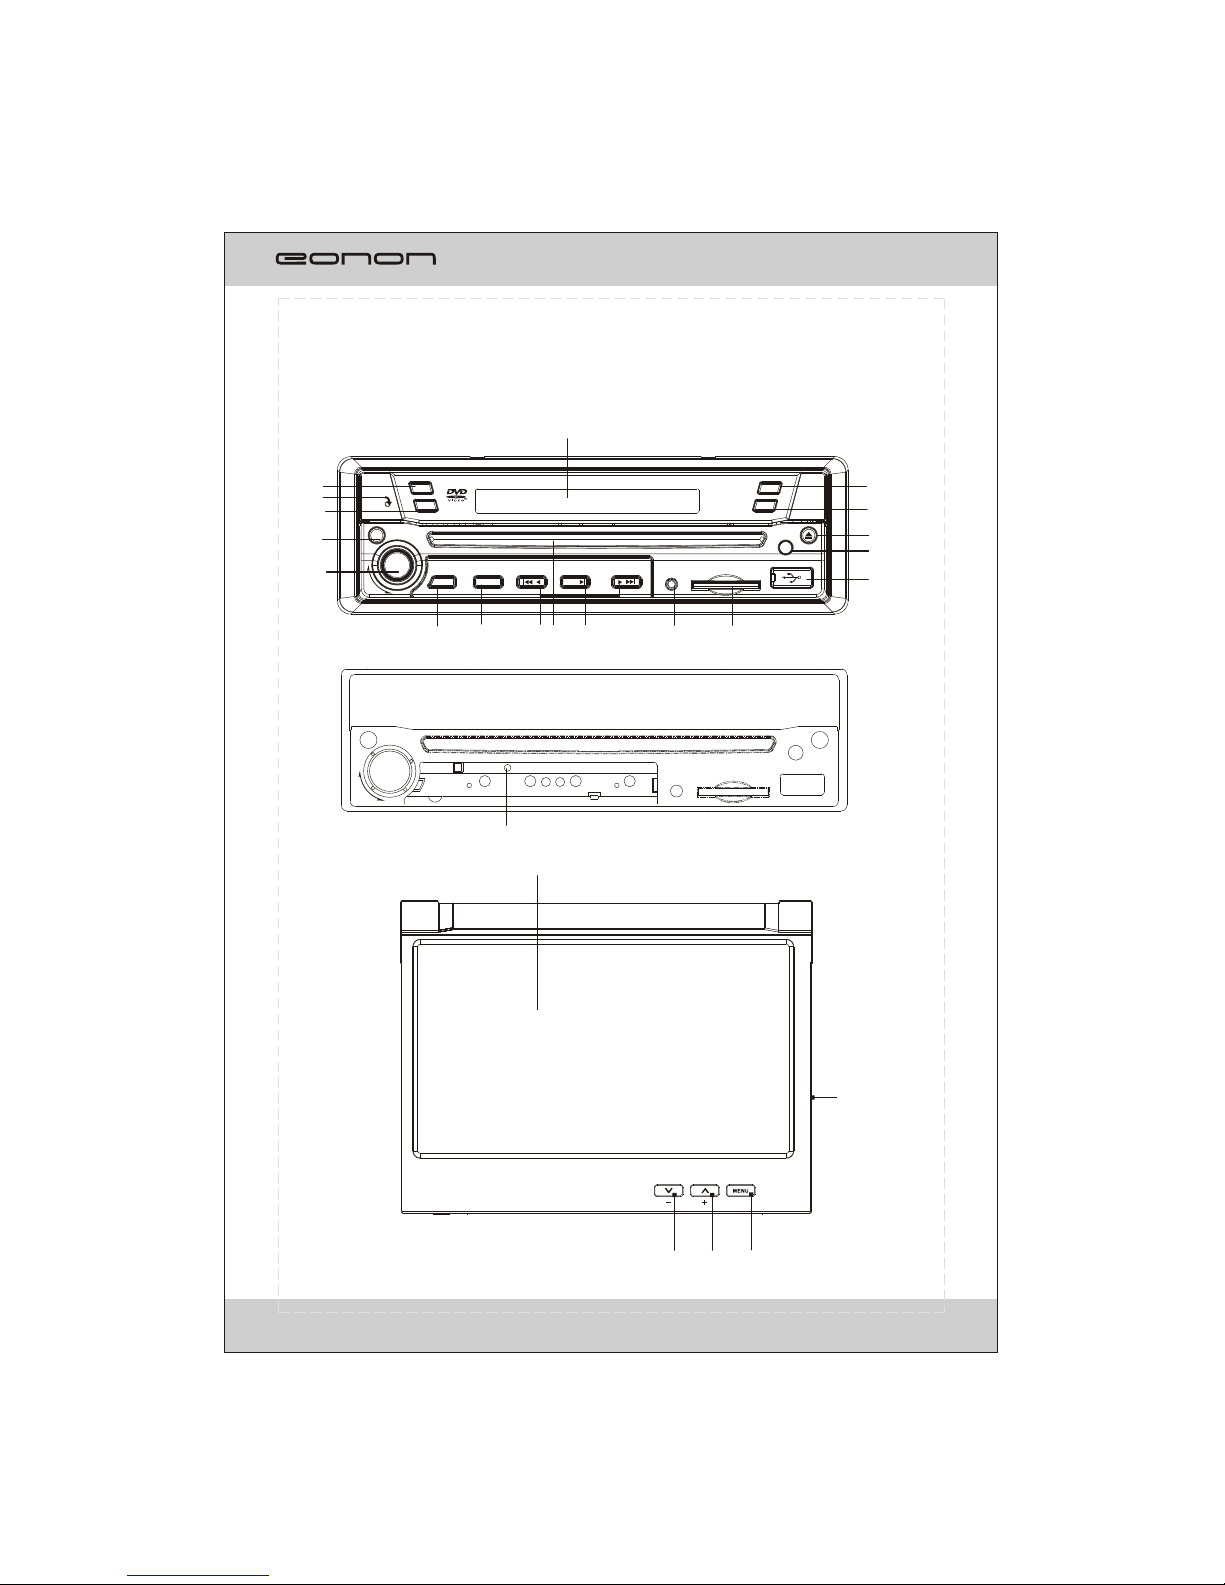
FRONT PANEL
4
21
3
4
5
67
8
9 10
1211
2
1
13
16
15
14
21
20
17
18
22
TILT
OPEN
AF
TA
PTY
VOL
PWR
REL SRC/NAV
AUX A/V IN
IR
MUT
DN
UP
/
BAND/
/
19
PWR
IR
VOL
DN
UP
AUX A/V IN
23
FRONT PANEL
1. TA: Press thisbutton to turnon/off TA function.
2. MIC
3. PTY: Press thisbutton to selectone of theprogram type inRDS mode.
4. PWR/MUT
Press the buttonto turn onthe unit, pressand hold thebutton for 1sto turn off the unit.
When the unitis switched on,press the buttonto shut off the soundoutput.
Press it againto resume previoussound level.
5. VOL
Adjust the volumeby rotating theknob clockwise orcounterclockwise.
Press this buttonbriefly to startthe system setup.
6. REL: Press thisbutton to openthe front panel.
7. SRC/NAV
Press this buttonto select oneof the sources.
Press and holdthis button toenter navigation mode.
8.
In radio(TV) mode,press one ofthese buttons toseek a station(channel)automatically.
Hold down oneof the buttonsto seek astation(channel) manually.
In DVD/USB/CARD modepress the buttonsto select theprevious or nextfile.
Hold down thebutton for 2sto fast forwardor fast backward.
9. DISC Loading Slot
10.BAND/ >II
In radio mode,press this buttonto select thebands.
In play mode,press this buttonto pause orresume playback.
11. AUX A/V IN
Connect theAV cable (supplied) to your external AV device, then press the SRC button to
switch toAV1 mode.
12.SD slot
Insert an SD/MMCcard, the unit will play the files from SD/MMC card automatically.
13.LCD display
14.OPEN: Press thisbutton to open or close the TFT display.
15. AF
Press this buttonto turn on/off TA function.
Press and hold the button todisplay the current time, sources of front and rear displays and
medias (Disc, USB,SD) available.
16.
Press the buttonto eject adisc when it is loaded into the unit.
17. IR WINDOW
18. USB port
Insert USB device,the unit will play the files from USB automatically.
19.RESET : Using asharp object such as a pencil to reset the unit.
20. TFT display
21. TILT /
Press button to adjustthe angle of TFT display.
22. MENU
In DVD mode,press the button to display the DVD SETUP menu. Press and hold the button
to display theSYSTEM SETUP menu.
In other modes,press the button to display the SYSTEM SETUP menu.
Note:
When the SDcard could not eject automatically after pressing, it is suggested to take it out manually.
/
/
23. GPS SDcard slot
Press and holdit to forceejecting a discwhen the systemis accidentally frozen.
5

MENU SYSTEM
The users can perform operation by touching screen directly.
RADIO OPERATION
1. CURRENT STATUS
2/10. < / >
To switch bands.
3.Station preset button
To display the preset station list
(touch one of the station preset button to recall the radio which stored on the position;
long touch to save the current frequency into the station)
4.AMS
To browse preset stations.
To search and store stations automatically(long touch).
5/6. >> / <<
To seek a station automatically.
7/8. < / >
To seek a station manually.
9. RDS
To go to RDS operation
11. BACK
To be back to display the SOURCE screen
12. MUTE
To shut off the audio output and touch again to resume.
13/15. +/-
To increase or decrease the volume.
14. Volume bar
16. BAND AND PRESET STATION DISPLAY
6
87.50MHz
FM1 P6
6 7 9
10
8
1
4
3
2
5
11
1214
16 13
15
1
2
3
4
5 6
87.50MHz
FM1 P1
MENU SYSTEM
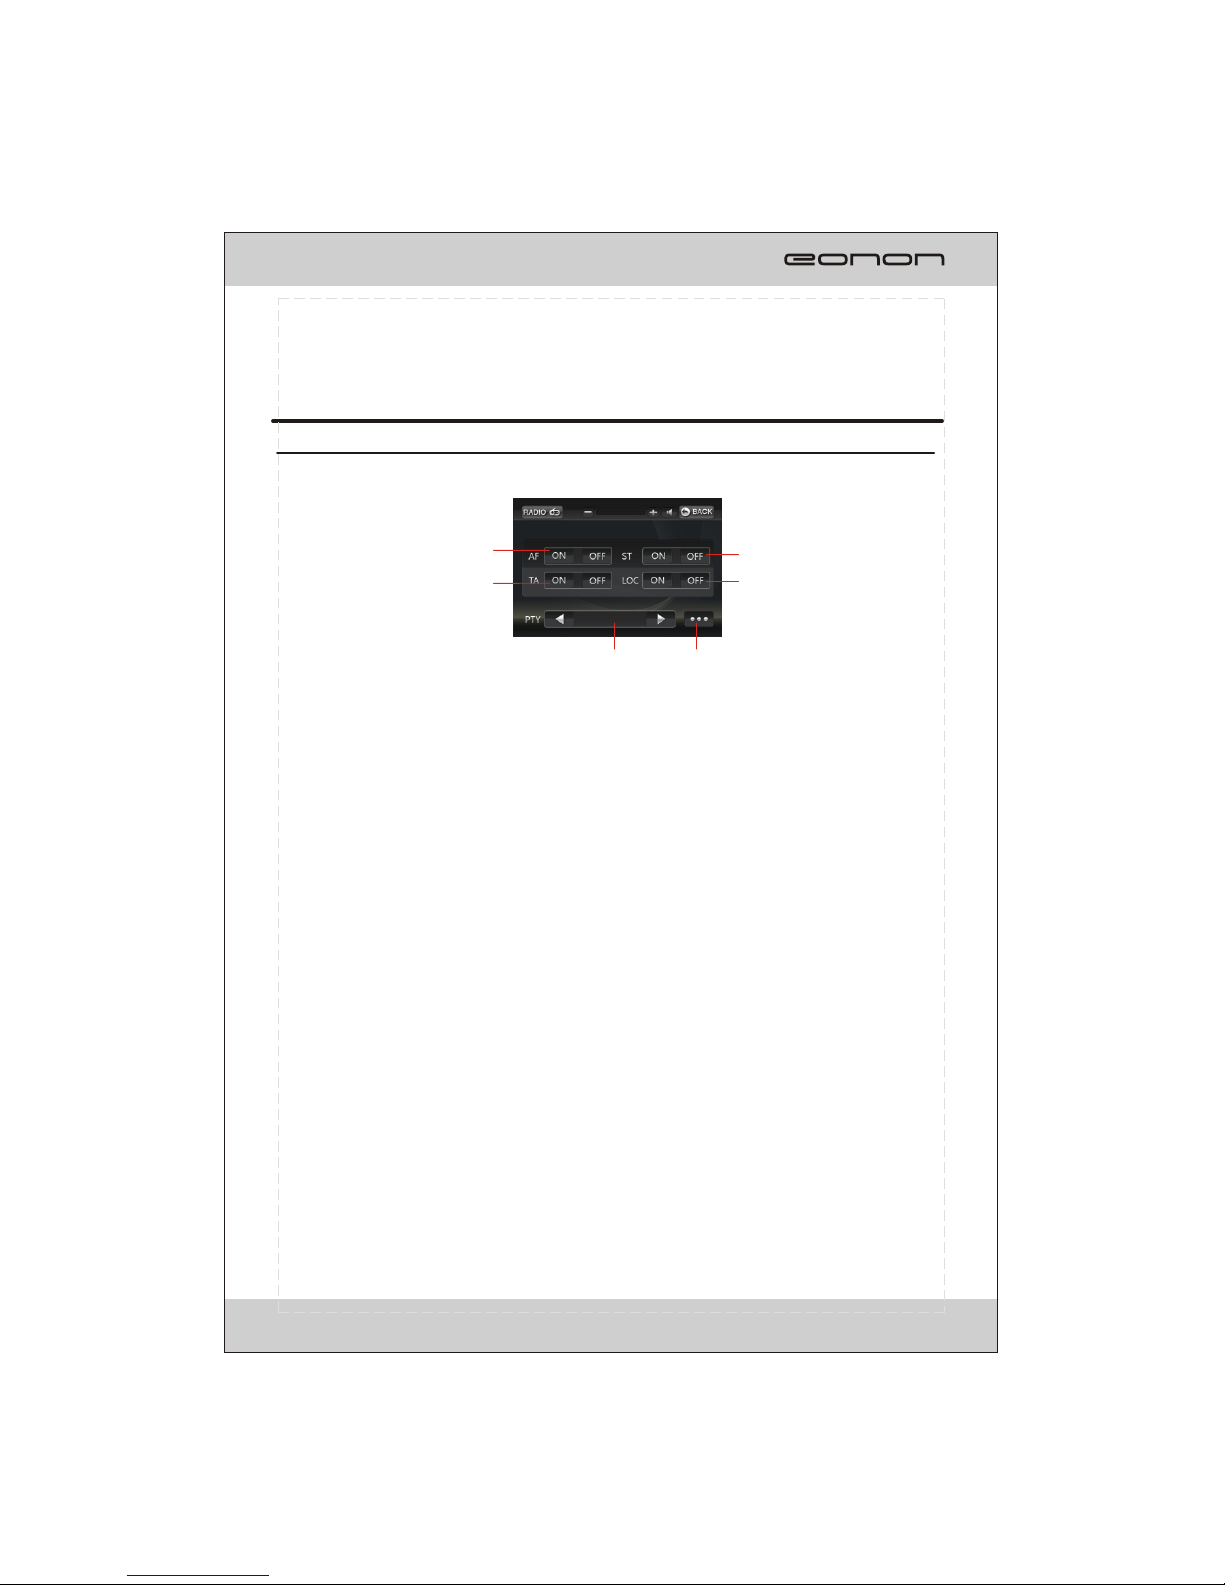
RDS OPERATION
7
1.AF
ON: To turn on AF function.
OFF: To turn off AF function.
2.TA
ON: To turn on TA function.
OFF: To turn off TA function.
3.ST
ON: To turn on STEREO function.
OFF: To turn on MONO function.
4.LOC
ON: To tune in local area.
OFF: To tune in local and distant area.
5.PTY
To select one of the program types.
6.RADIO
To go to radio operation.

1815 16 19
17 20
11
8 9 12
10 13 14
In DVD/VCD mode, the touch screen displays as following after tapping at random position.
MULTI-- PLAYER OPERATION
8
1.
To start/pause the playback.
2.
To stop playing, touch twice to stop
To select previous/next chapter or track.
5/6.
To play in fast rewind or fast forwards mode.
7/14/20.
To select more items.
8.
To play in random order.
9.
To select one of the repeat modes.
10.OSD
T
11.SUB-T.
To select the subtitle type if the DVD supports.
12.
DVD supports.
DVD supports.
completely.
3/4.
o select title elapsed, title remain, chapter elapsed, chapter remain, display off.
MENU
To display the DVD SETUP screen.
13.TITLE
To display the title menu.
15.ANGLE
To change the DVD viewing angle if the
16. ZOOM
To change the DVD viewing scale if the
17.PBC
To display the PBC menu in VCD mode.
18.P/N
T
19.A-B
To play the selectedA-B section.
o select PAL ,AUTO or NTSC system
NOTE: Touch the left middle position twice to display the TITLE MENU selection screen, touch the
right middle position twice to display the ROOT MENU selection screen, touching the right top
position to display the number keyboard.
You can select chapter(track) by press the touchable screen or the RC.
4
1 2 5
3 67
Fig.1 Fig.2 Fig.3
MENU SYSTEM
Table of contents
Other Eonon Car Receiver manuals


