manuals.online logo
Brands
  1. Home
  2. •
  3. Brands
  4. •
  5. Epson
  6. •
  7. Printer
  8. •
  9. Epson XP-4100 User manual

Epson XP-4100 User manual

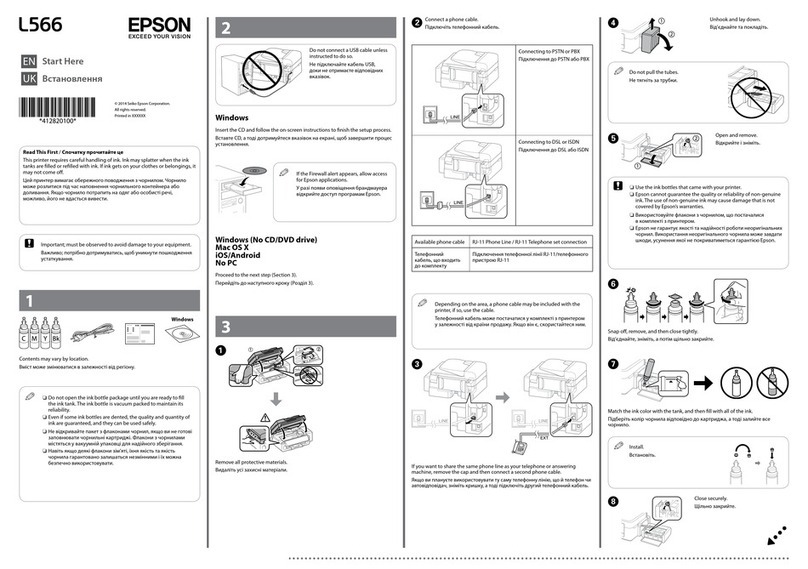
Start Here
9 Follow the on-screen instructions to adjust the print
quality of your product.
Note:
• You need to load paper before you can adjust the print quality.
See “Load paper” below for details.
• Select Adjust Later if you want to adjust the print quality later.
For more information, see the online User’s Guide.
4Load paper
See the online User’s Guide for information about loading
capacity, available paper types and sizes, and loading
envelopes.
1 Make sure the product is not charging. Then flip the
feeder guard forward, raise the paper support, and tilt it
backwards slightly.
2 Slide the edge guides all the way out.
3 Load paper, glossy or printable side up and short edge
first, in the middle of the rear paper feed slot.
4 Slide the edge guides against the paper, but not too
tightly.
5 Pull out the output tray.
6 Follow the instructions on the LCD screen to select your
paper settings.
IMPORTANT: Before using this product, make sure you read
these instructions and the safety instructions in the online
User’s Guide.
Note: This printer is designed for use with Epson®cartridges only, not
third-party cartridges or ink. For important ink information, visit
www.epson.com/epsonink (U.S.) or www.epson.ca/epsonink (Canada)
or see your printer box.
1Unpack
Note: Do not open ink cartridge packages until you are ready to install
the ink. Cartridges are vacuum packed to maintain reliability.
1 Remove all protective materials from the product.
2 Lift up the scanner unit until it locks into place and
remove all protective materials from inside the product.
Caution: Do not touch the flat white cable.
3 Lift the scanner unit up slightly and lower it. When
the scanner unit catches, lift it up again and lower it
completely.
2Turn on and configure
1 Connect the power cord to the back of the product and to
an electrical outlet.
Caution: Do not connect to your computer yet.
2 Raise the control panel and turn on the product.
3 Press or to select your language, then press OK.
Note: You can change the language later using the product’s
control panel. For more information, see the online User’s Guide.
3Install ink cartridges
Caution: Keep ink cartridges out of the reach of children and do not
drink the ink.
Note: The included initial cartridges are designed for reliable printer
setup and cannot be used as replacement cartridges or resold. After
setup, the remaining ink is available for printing.
1 Lift up the scanner unit until it locks into place.
2 Gently shake the black ink cartridge.
Note: Do not shake the other ink cartridges.
3 Unpack the ink cartridges.
4 Remove only the yellow tape from each ink cartridge.
Caution: Do not remove any other labels or seals, or ink will
leak. Do not touch the green chip on the cartridge.
5 Insert the cartridge in the holder for each color. Press each
cartridge down until it clicks. Make sure all cartridges are
pushed down into place.
6 Lift the scanner unit up slightly and lower it. When
the scanner unit catches, lift it up again and lower it
completely.
7 Press OK to start charging the ink delivery system.
8 The printer starts charging the ink. Ink charging takes
approximately 6 minutes. When you see a completion
message on the printer’s LCD screen, charging is
complete.
Caution: Don’t turn off the printer or raise the scanner unit while
it is charging or you’ll waste ink.
Note: As part of setup, your product’s serial number will be sent
to a secure Epson server so that you can be eligible to participate
in programs we may offer from time to time, including the Epson
ink replenishment program. You will have a separate opportunity
to consent to participating in such programs.
XP-4100/XP-4105
• Print from wherever you are, next to your printer or remotely,
with Epson Connect™ and Google Cloud Print™. Learn
more at www.epson.com/connect (U.S.) or
www.epson.ca/connect (Canada).
• Use voice-activated assistants to print a variety of creative
and everyday items from your Epson product. Simply add
your product to an Epson Connect account, then link the
account to a voice-activated assistant. See
www.epson.com/voice (U.S.) or
www.epson.ca/voice (Canada) for more information.
* May require the Epson Print Enabler or Mopria Print Service app from
Google Play™.
Any problems?
Network setup was unsuccessful.
• Make sure you select the right network name (SSID).
• Restart your router (turn it off and then on), then try to
connect to it again.
• The printer can only connect to a network that supports
2.4 GHz connections. If your router offers both 2.4 GHz and
5 GHz connections, make sure the 2.4 GHz connection is
enabled.
• If you see a firewall alert message, click Unblock or Allow
to let setup continue.
• If your network has security enabled, make sure you enter
your network password (WEP key or WPA passphrase)
correctly. Be sure to enter your password in the correct
case.
Select to enter uppercase letters or select AB1# for
numbers or symbols.
There are lines or incorrect colors in my printouts.
Run a nozzle check to see if there are any gaps in the printout.
Then clean the print head, if necessary. See the online User’s
Guide for more information.
The product’s screen is dark.
Make sure your product is turned on, and press any button to
wake it from sleep mode.
Setup is unable to find my printer after connecting it
with a USB cable.
Make sure the printer is turned on and that it is securely
connected as shown:
EPSON and Claria are registered trademarks, EPSON Exceed Your Vision is a registered
logomark, and Epson Connect is a trademark of Seiko Epson Corporation.
Designed for Excellence is a trademark of Epson America, Inc.
Mac is a trademark of Apple Inc., registered in the U.S. and other countries.
Windows is a registered trademark of Microsoft Corporation in the United States and/or other
countries.
Android, Google Cloud Print, Chromebook, and Google Play are trademarks of Google LLC.
General Notice: Other product names used herein are for identication purposes only and may
be trademarks of their respective owners. Epson disclaims any and all rights in those marks.
This information is subject to change without notice.
© 2018 Epson America, Inc., 12/18
Printed in XXXXXX CPD-56913
5Install software
Note:
• If you are using a Mac or your computer does not have a CD/DVD
drive, an Internet connection is required to obtain the product
software.
• To print from a Chromebook™, go to
www.epson.com/support/gcp (U.S.) or
www.epson.ca/support/gcp (Canada) for instructions.
Firmware Update Notice: Epson periodically provides firmware
updates to address issues of security, performance, minor bug fixes
and ensure your printer functions as designed. Your printer was
designed to work only with genuine Epson ink cartridges, therefore
some updates may affect the functionality of third-party ink.
1 Make sure the product is NOT CONNECTED to your
computer.
Windows®: If you see a Found New Hardware screen, click
Cancel and disconnect the USB cable.
2 Insert the product CD (Windows only) or download and
run your product’s software package. For the latest
software, visit:
XP-4100
www.epson.com/support/xp4100 (U.S.)
www.epson.ca/support/xp4100 (Canada)
XP-4105
www.epson.com/support/xp4105 (U.S.)
www.epson.ca/support/xp4105 (Canada)
3 Follow the instructions on the computer screen to run the
setup program.
4 When you see the Select Your Connection screen, select
one of the following and follow the on-screen instructions:
• Wireless connection
In most cases, the software installer automatically
attempts to set up your wireless connection. If setup
is unsuccessful, you may need to enter your network
name (SSID) and password.
• Direct USB connection
Make sure you have a USB cable (not included).
Mobile and voice-activated
printing
• Print directly from your iOS device. Simply connect your
printer and device to the same network and tap the action
icon to select the print option.
• Print directly from your Android™ (v4.4 or later) devices*.
Simply connect your printer and device to the same network
and tap the menu icon to select the print option.
Any questions?
Quick Guide
Basic information and troubleshooting.
User’s Guide
Windows: Click the icon on your desktop or Apps screen to
access the online User’s Guide.
Mac: Click the icon in Applications/Epson Software/Guide to
access the online User’s Guide.
If you don’t have a User’s Guide icon, go to the Epson website,
as described below.
Support
Visit www.epson.com/support (U.S.) or
www.epson.ca/support (Canada) and search for your product
to download drivers, view manuals, get FAQs, or contact
Epson.
Call (562) 276-4382 (U.S.) or (905) 709-3839 (Canada), 6 am to
8 pm, Pacific Time, Monday through Friday, and 7 am to 4 pm,
Pacific Time, Saturday. Days and hours of support are subject
to change without notice. Toll or long distance charges may
apply.
Recycling
Epson offers a recycling program for end of life hardware and
ink cartridges. Please go to www.epson.com/recycle (U.S.)
or www.epson.ca/recycle (Canada) for information on how to
return your products for proper disposal.
Need paper and ink?
Ensure brilliant results with Epson specialty
and plain papers, engineered specifically for
Epson printers. Find Epson paper and Epson
Genuine Ink at www.epson.com (U.S. sales)
or www.epson.ca (Canadian sales) and at
Epson authorized resellers. Call
800-GO-EPSON (800-463-7766).
XP-4100/XP-4105 replacement ink cartridges
Color Standard-capacity High-capacity
Black 212 212XL
Cyan 212 212XL
Magenta 212 212XL
Yellow 212 212XL


This manual suits for next models

1

Other Epson Printer manuals

Epson Apex 80 User manual

Epson

Epson Apex 80 User manual

Epson WF-M5899 User manual

Epson

Epson WF-M5899 User manual

Epson 4800 - Stylus Pro ColorBurst Edition Color Inkjet... Quick guide

Epson

Epson 4800 - Stylus Pro ColorBurst Edition Color Inkjet... Quick guide

Epson Stylus C82 User manual

Epson

Epson Stylus C82 User manual

Epson R1800 - Stylus Photo Color Inkjet Printer User manual

Epson

Epson R1800 - Stylus Photo Color Inkjet Printer User manual

Epson PM-400 User manual

Epson

Epson PM-400 User manual

Epson TM-T88IIP User manual

Epson

Epson TM-T88IIP User manual

Epson Stylus Pro 9700 Series User manual

Epson

Epson Stylus Pro 9700 Series User manual

Epson SureColor T3170 User manual

Epson

Epson SureColor T3170 User manual

Epson SC-F2150 User manual

Epson

Epson SC-F2150 User manual

Epson Stylus Photo PX730WD Assembly instructions

Epson

Epson Stylus Photo PX730WD Assembly instructions

Epson L4160 series User manual

Epson

Epson L4160 series User manual

Epson Stylus Office BX305F Assembly instructions

Epson

Epson Stylus Office BX305F Assembly instructions

Epson TM U295 - B/W Dot-matrix Printer User manual

Epson

Epson TM U295 - B/W Dot-matrix Printer User manual

Epson Stylus C42UX User manual

Epson

Epson Stylus C42UX User manual

Epson TM-U950P - B/W Dot-matrix Printer User manual

Epson

Epson TM-U950P - B/W Dot-matrix Printer User manual

Epson Stylus Office BX305FW Plus Assembly instructions

Epson

Epson Stylus Office BX305FW Plus Assembly instructions

Epson Stylus Photo - Ink Jet Printer User manual

Epson

Epson Stylus Photo - Ink Jet Printer User manual

Epson SureColor SC-T7000 User manual

Epson

Epson SureColor SC-T7000 User manual

Epson DS-560 Installation and maintenance instructions

Epson

Epson DS-560 Installation and maintenance instructions

Epson Stylus Photo 825 User manual

Epson

Epson Stylus Photo 825 User manual

Epson Stylus Pro 9500 Engine User guide

Epson

Epson Stylus Pro 9500 Engine User guide

Epson LQ-1070+ Installation and operation manual

Epson

Epson LQ-1070+ Installation and operation manual

Epson OT-CU40 User manual

Epson

Epson OT-CU40 User manual

Popular Printer manuals by other brands

Ricoh RCP40 operating instructions

Ricoh

Ricoh RCP40 operating instructions

Jolimark DP750 user manual

Jolimark

Jolimark DP750 user manual

TSC PEX-1120 Series Service manual

TSC

TSC PEX-1120 Series Service manual

Xerox B310 user guide

Xerox

Xerox B310 user guide

Datecs PP-60 user manual

Datecs

Datecs PP-60 user manual

SEWOO SLK-T32EB Series user manual

SEWOO

SEWOO SLK-T32EB Series user manual

burroughs AP 9208 Programming reference manual

burroughs

burroughs AP 9208 Programming reference manual

Ricoh Aficio MP W3600 operating instructions

Ricoh

Ricoh Aficio MP W3600 operating instructions

Intermec 3440 user manual

Intermec

Intermec 3440 user manual

Pandigital M1 Setup Instruction

Pandigital

Pandigital M1 Setup Instruction

Microcom 485TC Operator's manual

Microcom

Microcom 485TC Operator's manual

Novexx Solutions AP 5.4 user manual

Novexx Solutions

Novexx Solutions AP 5.4 user manual

Brother MFC-J805DW reference guide

Brother

Brother MFC-J805DW reference guide

Star Micronics NP-226 Product specifications

Star Micronics

Star Micronics NP-226 Product specifications

Brother PJ-722 Online user's guide

Brother

Brother PJ-722 Online user's guide

Tally T9114 Installation and programming guide

Tally

Tally T9114 Installation and programming guide

Full Spectrum Laser MUSE FIBER GALVO 2 user manual

Full Spectrum Laser

Full Spectrum Laser MUSE FIBER GALVO 2 user manual

Kyocera ECOSYS FS-1370DN Operation guide

Kyocera

Kyocera ECOSYS FS-1370DN Operation guide

manuals.online logo
manuals.online logoBrands
  • About & Mission
  • Contact us
  • Privacy Policy
  • Terms and Conditions

Copyright 2025 Manuals.Online. All Rights Reserved.