Epson SOLAR Series Guide

Watch Movement Specification and Drawing
SOLAR SERIES
Cal. VS76A
Movement Size
Casing Diameter
Height
Running Time
12’’’
Ø
27.0mm
4.40mm
Approx. 6 months

Date: 24/Sep./'19
Cal. VS76A
Items Rev. Page
Features 01 1
Specifications 02 2
Appearance 02 3
Casing 01 4
Hand fitting 02 5
Hand setting stem 01 6
Dial 01 7
Solar cell unit 01 8
Attention-01 02 9-01
Attention-02 02 9-02
Attention-03 01 9-03
Operation-01 01 10-01
Operation-02 01 10-02

Date :
1.Solar-powered watch
2. Eliminating the need for battery replacement
3. You can use the dial which light transmittance is more than 30%
It is possible to assemble the dial which transmits light on the solar cell.
It enabled to cover the solar cell color, and you can design variety colors of dials.
4. Running time
Expected running time from full charge to stoppage will be around 6 months.
5. Power depletion warning function
The two-second intervals movement of the second hand is a signal of energy depletion.
The watch continuous running time after two-second intervals movement is approximately 1 week.
6. Over charge prevent function is equipped
7. Structure of the separated parts
If the secondary battery is charged more than predetermined voltage, over charge prevent function is
operated to prevent the secondary battery deterioration and breakage.
This watch is a solar-powered watch containing a solar cell underneath the dial to convert any form of
light into '' electrical energy'' and store the power in a secondary battery.
Cal. VS76A Features 24/Apr./'15
Rev. : 01
Unlike conventional quartz watches, this watch does not use a silver oxide battery, thus eliminating the
need for battery replacement.
Solar cell unit
Solar cell lead terminal
Movement
Hand setting stem
Solar cell
Dial support ring
Secondary battery unit
Untransparent plate
P. 1

Date :
1. MOVEMENT DIMENSIONS
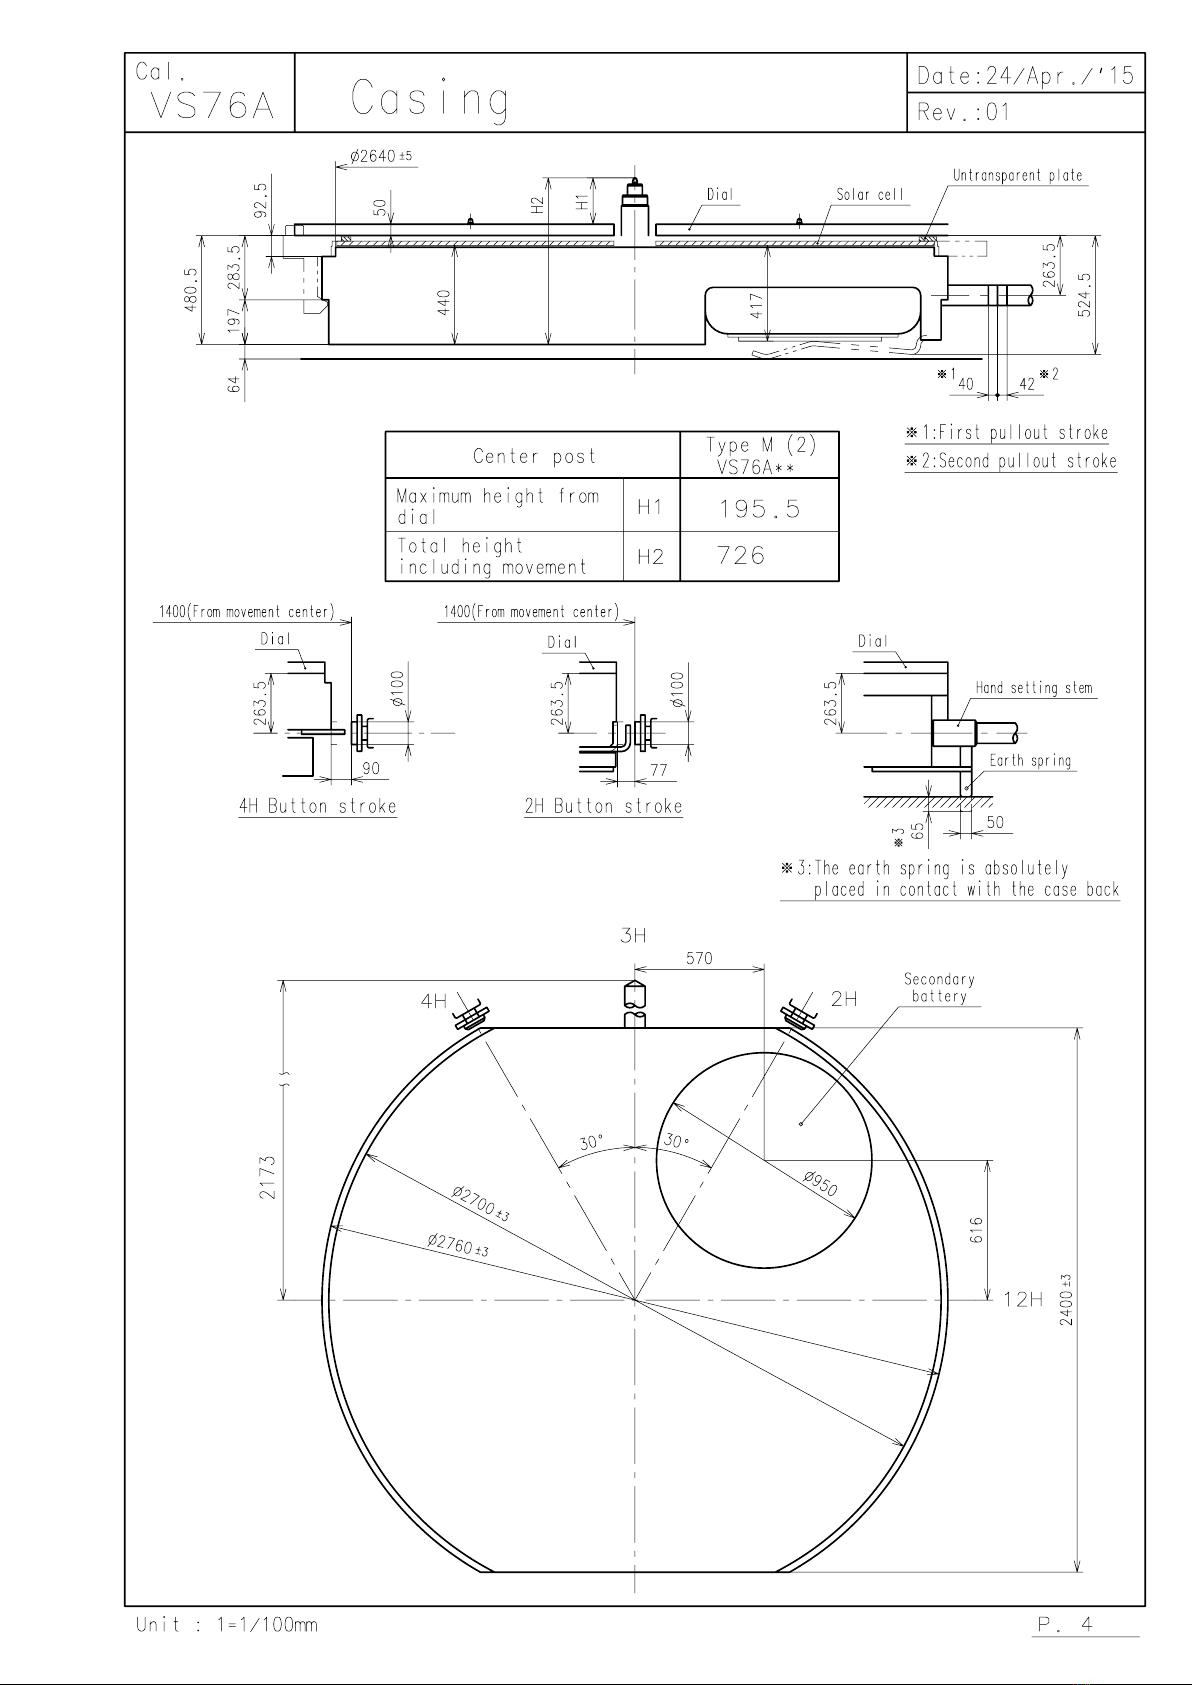
Outside diameter φ27.60mm(12H-6H) ×24.00mm(3H-9H)
Casing diameter φ27.00mm(12H-6H)
Total height 4.4mm
2. TIME STANDARD
Type of quartz oscillator Tuning fork
Frequency of quartz oscillator 32,768 Hz
Accuracy ±20 seconds per month (on wrist)
Operating temperature range −5℃to +50℃
Regulation device Nil (Pre-adjusted)
3. INDICATOR / FUNCTIONS
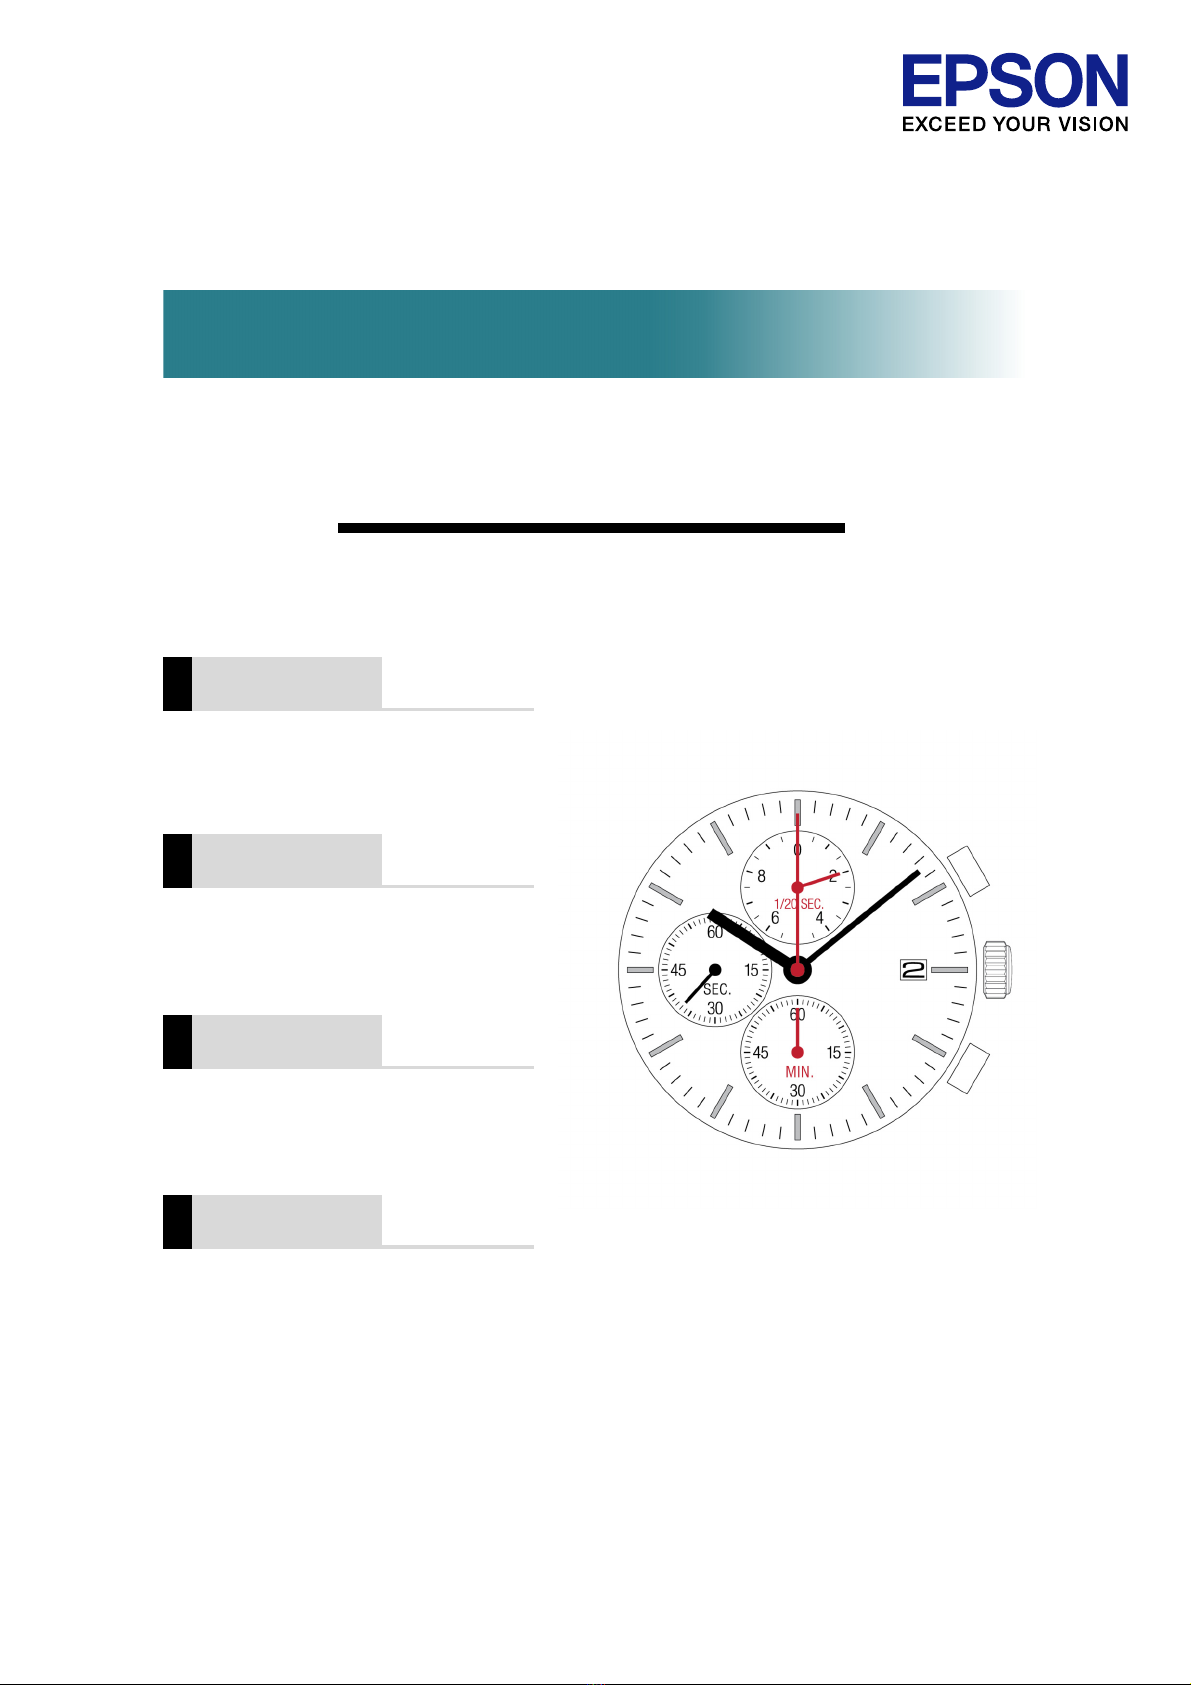
3 Hands Hour / Minute / Second chronograph (Center)
Small hands Minute chronograph (6H) / Small second (9H)
1/20 second chronograph (12H)
Calendar Instant setting device for date calendar
Reset switch
Power depletion warning function (BLD)
(Second hand moves at 2-second intervals when voltage is 1.2V)
Chronograph
Running time Approx. 6 months (After fully charged)
4. FEATURES
Jewels 0 Jewels
Anti-magnetism Over 1600A/m (Direct current magnetic field)
Driving current consumption Approx. 0.65μA (1.35V , Chronograph non-operates)
Operation stopping voltage 1.0V
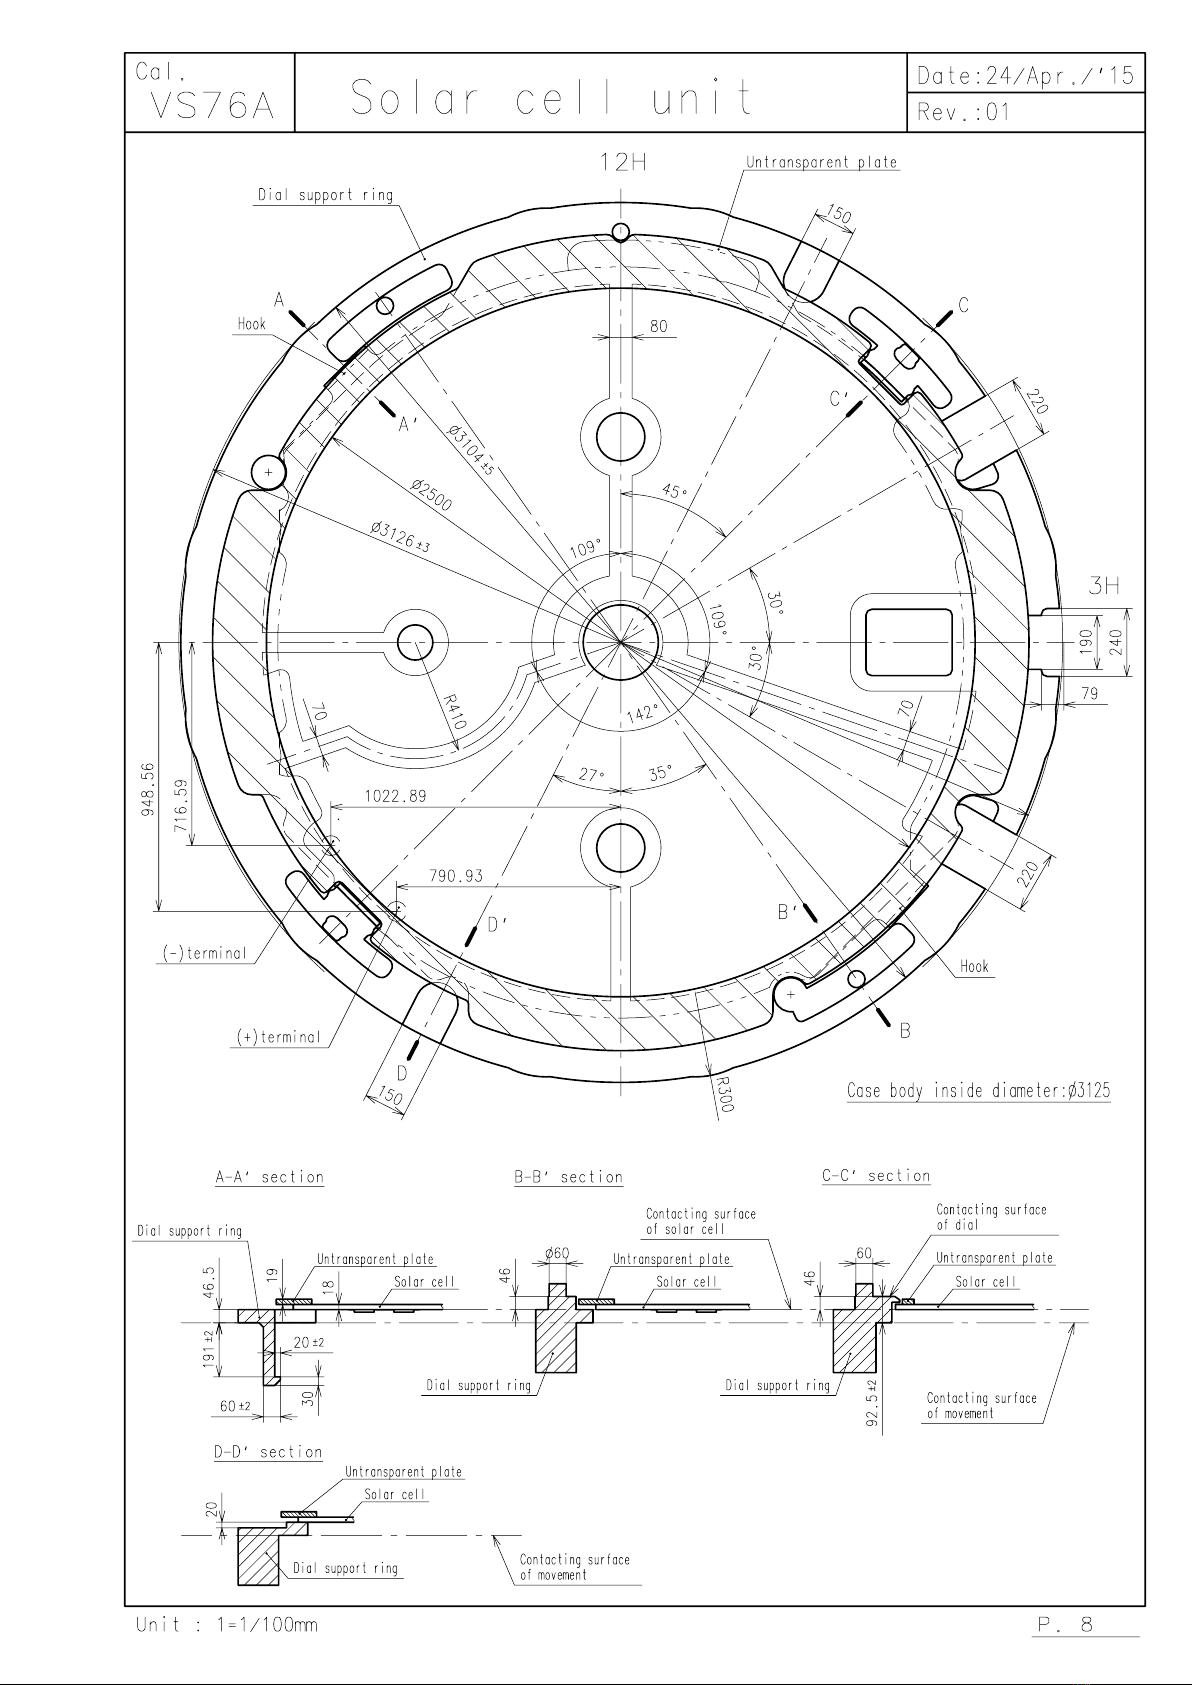
Solar cell type Amorphous silicon solar cell
Maximum unbalance of hands Small second hand : 0.03μN・m
Minute chronograph hand : 0.03μN・m
1/20 second chronograph hand : 0.03μN・m
Second chronograph hand : 0.06μN・m
Minute hand : 0.70μN・m
Moment of inertia Second chronograph hand : less than 0.12μg・m²
5. SECONDARY BATTERY
Type Titanium-lithium-ion secondary battery
Size φ9.5 ×t 2.05 mm
Capacity 5mAh
Nominal voltage 1.5V
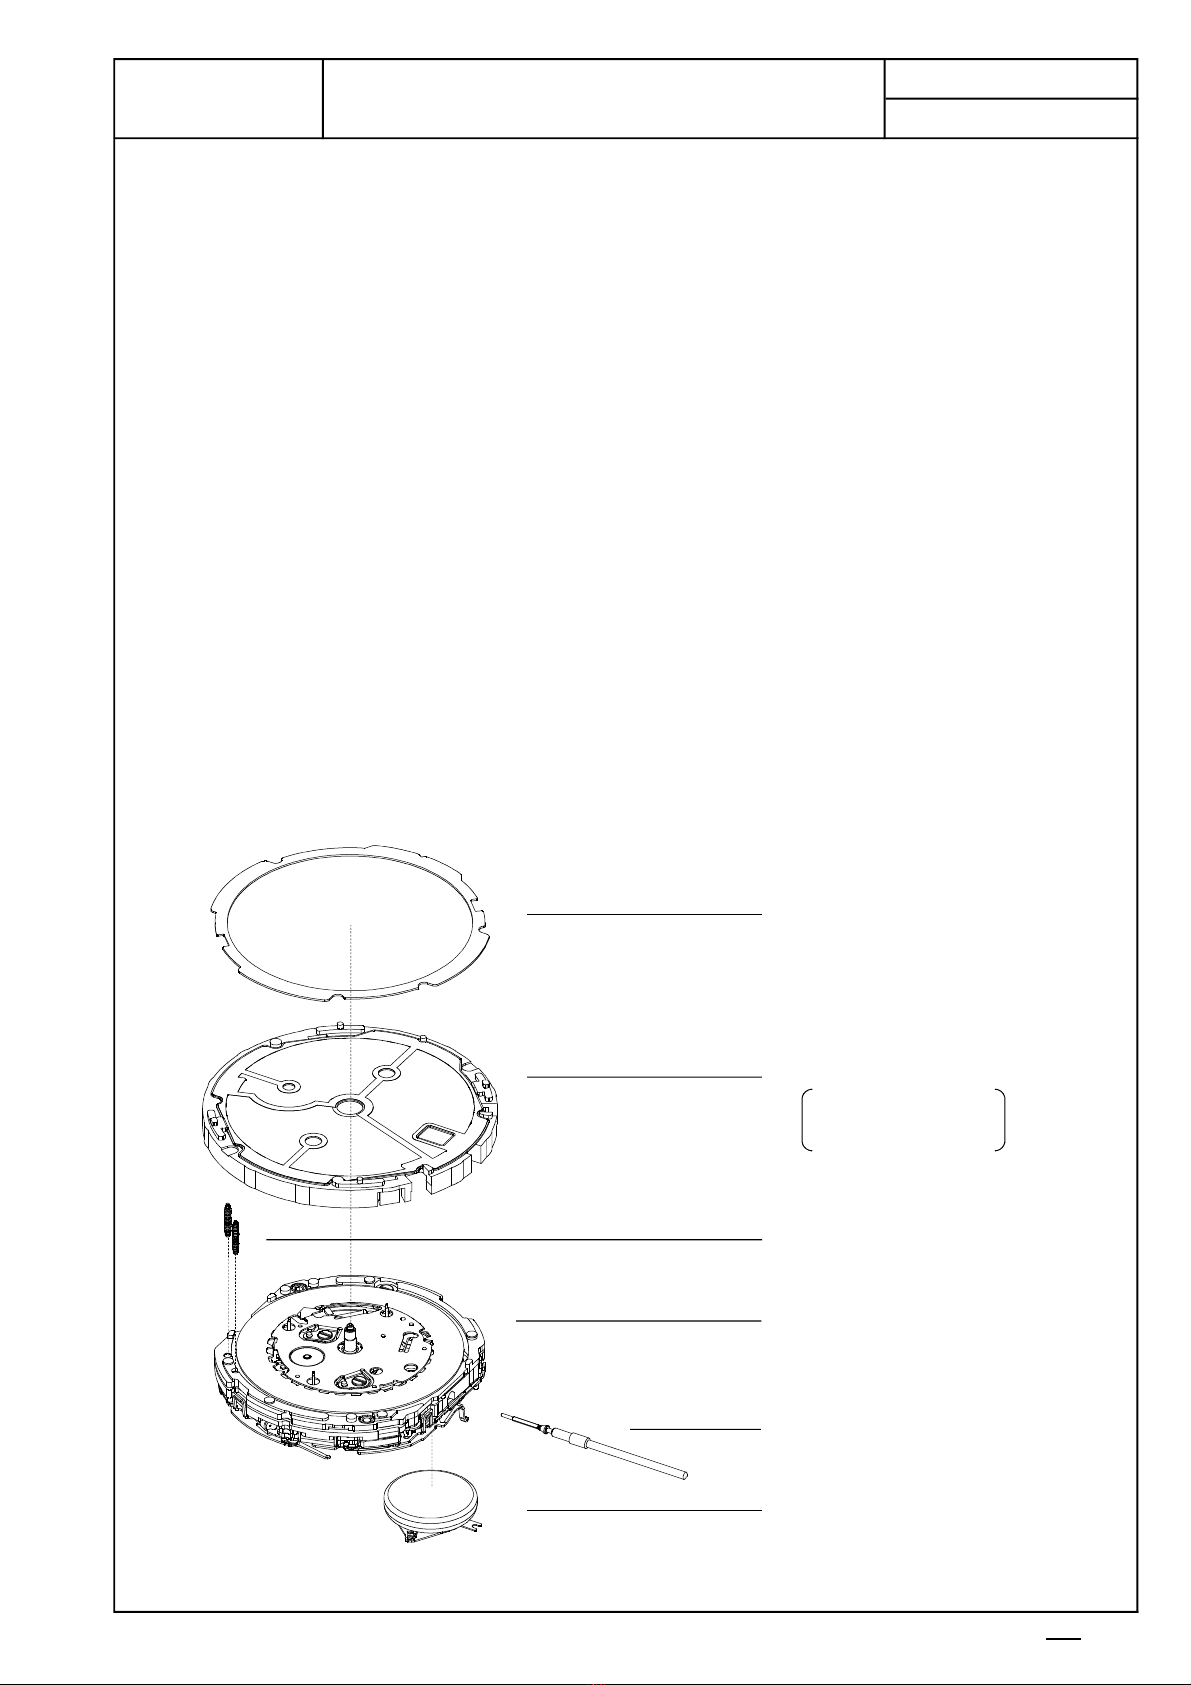
6. SEPARATED PARTS (Parts code)
Hand setting stem
0351587
Secondary battery unit
302334T
Solar cell unit
4020551
Solar cell lead terminal (2 pcs)
4281516
Untransparent plate 4453500
7. TEST OF ACCURACY
Equipment to be used SEIKO quartz tester QT-99
Greiner quartz timer-C , Witschi Q-tester 4000
Duration of measurement 10 seconds
Microphone to be used Electromagnetic detection type
All specifications are subject to change without notice.
Solar Analog Quartz 12''' Center Second Chronograph Movement
Cal.
Rev. : 02
1/Sep./'15
VS76A Specifications
The chronograph can measure up to 60 minutes in 1/20 second
increments.
P. 2


Date :
1. Attention for solar cell unit
Pay attention not to touch and scratch the surface of the solar cell.
2. Dial transparency rate
Keep the transparency rate of the dial more than 30%.
(Effective aperture is φ27mm)
Each elements of solar cell must be kept the transparency rate.
3. The
g
uideline of char
g
in
g
time is as in below
(Dial transparency rate = 30%)
Illumination
(Lx) Source of light Environment
A
(Approx.
Hours)
C
(Approx.
Minutes)
700 Inside the office -90
3,000 30W 20cm 65 20
10,000 Cloudy 18 6
100,000 Fine weather 5 2
Condition A : Time required for full charge
Condition B : Time required for steady operation
Condition C : Time to charge 1 day of power
4. How to set the secondar
y
batter
y
unit
・Please set the exclusive secondary battery unit.
(The secondary battery is Titanium-lithium-ion battery without any environmentally harmful substances.)
・Please install the plus part of the secondary battery towards inside of the watch.
・
・Secondary battery unit guide must be connected to "Guide pole". (Refer to the Fig.[1] in below.)
・
・
5. To do s
y
stem reset
・System-reset and adjusting the polarity of each step rotors is required as below after installing
secondary battery unit.
Short the circuit pattern “AC” to the secondary battery clamp for more than 2 seconds.
Short the circuit pattern “B” to the secondary battery clamp for more than 2 seconds at 2nd click.
A fluorescent lamp
Sun light
When installing or changing the secondary battery unit, it is recommended to remove three secondary
battery clamp screws first, then remove the secondary battery clamp not to damage the movement
parts.
If you install the secondary battery unit without removing the secondary battery clamp, please install
the secondary battery unit from [→] direction as illustrated below Fig.[1].
Check whether the secondary battery lead plate is surely connected to the secondary battery minus
pattern.
Install the secondary battery unit under the circuit block cover as illustrated below Fig.[1] and Fig.[2].
Cal.
VS76A
Attention-01
24/Sep./'19
Rev. : 02
B
(Approx.
Hours)
1
2.5
8
35
Fig.[2] A section
Fig.[1
B
A
Guide pole
Secondary battery minus pattern
Secondary battery clamp
P. 9-01

Date :
6. How to remove the setting stem
・
・Please do not transform the Earth spring.
7. Attention of casing part structure
・
・Use the metal case to prevent from the movement mal-function by static electricity.
・
8.How to set the hands
・
・Do not turn the hand forcibly.
9.How to remove the hands
・When removing the hands, use exclusive fork-shaped tools.
・Do not remove the dial under the condition that any hands are set.
10. Caution
11. How to set the solar cell lead terminal
Please set 2pcs of solar cell lead terminals in accordance with this illustration.
As to the solar cell lead terminal shape, there is no distinction between upper and lower.
12. How to set the solar cell unit
Push above part of each hook on the solar cell unit into main plate certainly.
Use the specified dial support ring to prevent rotation of the movement inside of the case in order to
stabilize the button operation.
Refer to the [Solar cell unit] page instruction as to the shape and tolerance.
Each hand moves at step interval. Set the each hand at correct position according to the scale on the
dial in order not to make a mistake in reading time.
When charging the watch, do not place it too close to fluorescent lamp or other light sources as the
watch temperature will become extremely high, causing damage to the parts inside the watch.
When removing the setting stem, pull out the crown at 1st click position and then remove the setting
stem while pressing the hollow portion of setting lever by tweezers. (Refer to the Fig.[3].)
Cal.
VS76A
Attention-02
24/Sep./'19
Rev. : 02
The center wheel have a safety stopper structure to prevent the minute hand from being pressed too
much. However pay attention to the contact between hour hand and minute hand.
Earth spring
Fig.[3] Crown pulled out at 1st click
P. 9-02

Date :
13.How to set the dial
The dial is held by the four guide poles on the solar cell unit.
14.System reset as complete watch
System-reset(Refer to Operation-01[*1].) is required in case of below,
― after replacement of secondary battery unit.
― malfunction or abnormal operation when an error occurs
Cal.
VS76A
Attention-03
24/Sep./'19
Rev. : 01
※It is necessary to set the "0" position after system-reset, because "0" position of small hands may
slip off.
P. 9-03

Date :
0 click 1st click
Crown Free Turn clockwise for date
change
2H button Chronograph Start/Stop
Restart
Chronograph Start/Stop
Restart
4H button
Chronograph Reset
Split
Split release
Chronograph Reset
Split
Split release
[*1] How to set the "0" position / System-reset (Crown position : 2nd click)
How to set the "0" position.
Pull crown out to the 2nd click position.
↓
Press 2H button for 2 seconds.
↓
Press 4H button repeatedly to set it to "0" position.
↓
Press 2H button for 2 seconds.
↓
Press 4H button repeatedly to set it to "0" position.
↓
Press 2H button for 2 seconds.
↓
Press 4H button repeatedly to set it to "0" position.
↓
Push crown back to normal position.
System-reset
Pull crown out to the 2nd click position.
↓
Press 2H and 4H buttons at the same time for longer than 2 seconds.
It is necessary to set the "0" position after system-reset.
Cal. Operation-01
24/Apr./'15
Rev. : 01
VS76A
Second chronograph hand turns a full round and can now be
set to correct "0" position.
Minute chronograph hand turns a full round and can now be
set to correct "0" position.
Press 2H button for 2 seconds here will allow you to resume the procedure again as
indicated by the arrow if necessary.
[*1]
2nd click
Time setting
[*1]
Crown position
1/20 second chronograph hand turns a full round and can
now be set to correct "0" position.
0 ® 1 ® 2
2H button
4H button
Minute hand
Second chronograph hand 1/20 second chronograph hand
Crown
Hour hand
Small second hand
Minute chronograph hand
P.10-01

Date :
Chronograph function
・The chronograph can measure up to 60 minutes in 1/20 second increments.
・
・When the measurement reaches 60 minutes, the chronograph automatically stops counting.
Standard measurement
Accumulated elapsed time measurement
Split time measurement
After the chronograph is started or restarted or split time is released, 1/20 second chronograph hand
moves about 1 minute and automatically stops at the "0" position.
When the measurement is stopped or split time is measured, it moves to indicate the elapsed 1/20
seconds.
Cal. Operation-02
24/Apr./'15
Rev. : 01
VS76A
Restart and stop of the chronograph
can be repeated by pressing 2H button.
Measurement and release of split time
can be repeated by pressing 4H button.
Start Stop Reset
2H button 2H button 4H button
Start Stop Restart
2H button 2H button 2H button 2H button 4H button
Start Split Split release
2H button 4H button 4H button 2H button 4H button
Stop Reset
ResetStop
P.10-02
Other manuals for SOLAR Series
8
This manual suits for next models
1
Table of contents
Other Epson Watch manuals

Epson
Epson SF-510 User manual

Epson
Epson ProSense 17 User manual

Epson
Epson SOLAR Series Guide

Epson
Epson SOLAR VS54A User manual

Epson
Epson VR43B User manual

Epson
Epson TRUME ME25 User manual

Epson
Epson ProSense J-367 User manual

Epson
Epson SOLAR Series Guide

Epson
Epson AP002 User manual

Epson
Epson ProSense 347 User manual

Epson
Epson YM26A Guide

Epson
Epson Runsense SF-110 User manual

Epson
Epson VS42A User manual

Epson
Epson ProSense 17 User manual

Epson
Epson SOLAR Series User manual

Epson
Epson YM82A Guide

Epson
Epson SF-510 User manual

Epson
Epson SOLAR Series User manual

Epson
Epson ProSense 17 User manual

Epson
Epson Runsense SF-810 User manual