Model without [BIRTHDAY/DEMO]
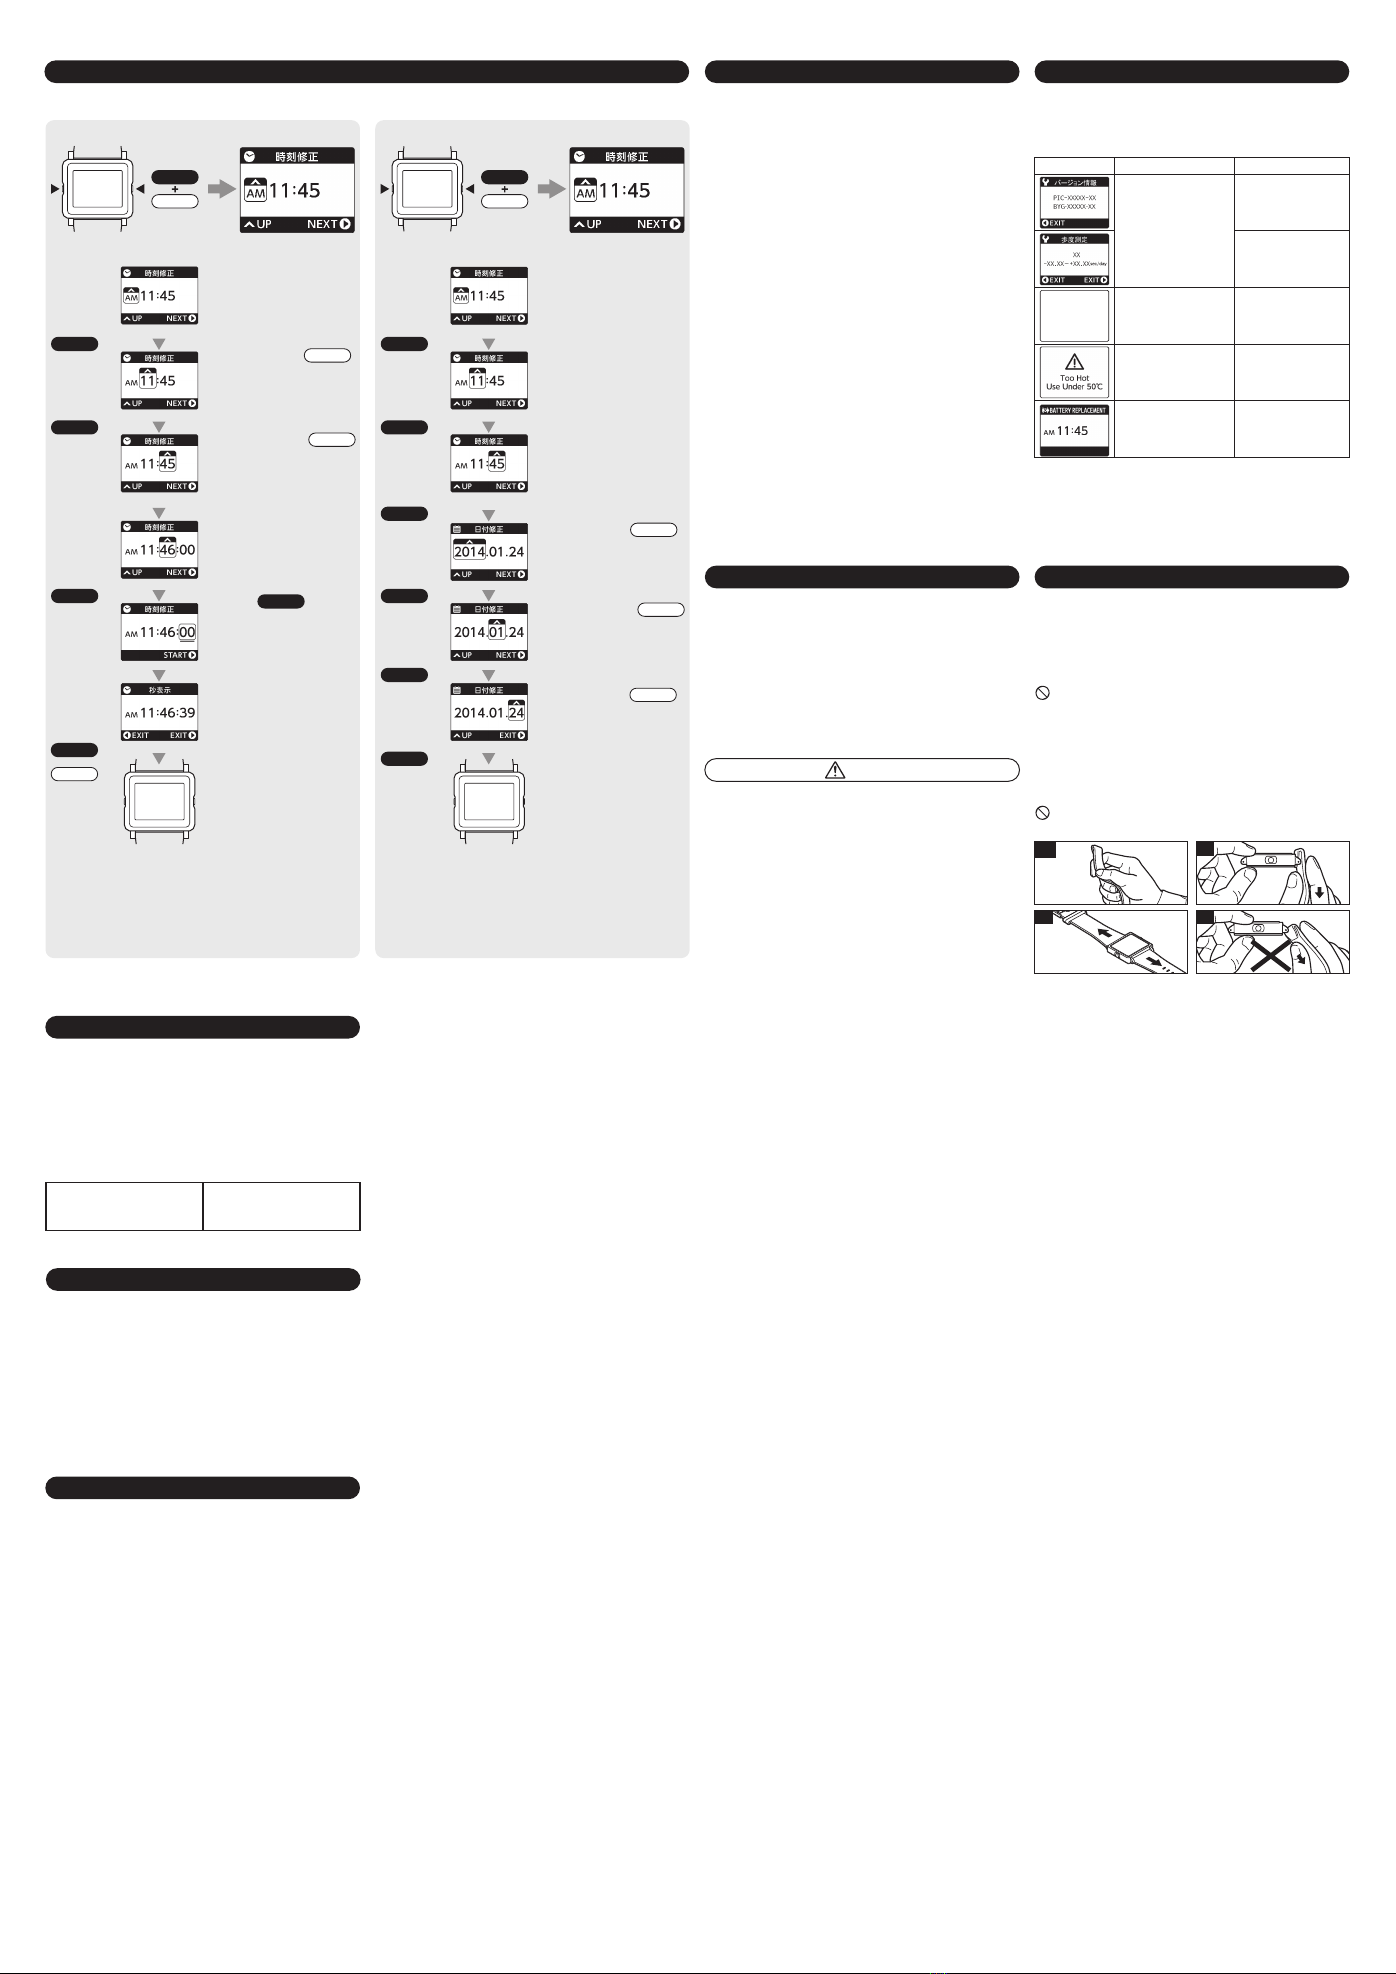
How to set the time and calendar
Pressor
Press
Button A
Press
Button A
Press
Button A
Button A
Button B
Press
Button A
Press
Button A
Press
Button A
Press
Button A
Press
Button A
Press
Button A
1. Time setting 2. Calendar setting (year, month, date)
Button A
Button B
Press both buttons
simultaneously
(for 1 second).
Button A
Button B
Press both buttons
simultaneously
(for 1 second).
(1)Select the 24H indication (AM
or PM) by the button B.
(1)
The display enters the 24H
indication (AM. PM) setting
mode.
(2)
The display enters the hour
setting mode.
*
Press and hold down the button B
to advance the hour by 6 hours.
(3)
The display enters the
minute setting mode.
* Press and hold down the button
B to advance the minute by 10
minutes.
(2)Set the hours by the.
*
Press and hold down the button B
to advance the hour by 6 hours.
(3)Set the minutesby the.
*
Press and hold down the button B
to advance the minute by 10
minutes.
*
When the button B is pressed to
change the minute, the second
will be set to “00”.
(
4)Press the
simultaneously with the time
signal.
*
The second will be displayed.
(5)The display returns to time
display.
*
To move on to calendar setting,
follow the procedures in “2.
Calendar setting (year, month,
date).”
Button A
Button B
Button B
(4)Set the year by the .
*
Press and hold down the button B
to advance the year by 10 years.
When the year reaches 2062, it
returns to the default value.
Button B
(5)Set the monthbythe .
*
Press and hold down the button B
to advance the month by 6
months.
(6)Set the date by the .
*
Press and hold down the button B
to advance the date by 10 days.
(7)The display returns to time
display.
*
After pressing the button A, the
display does not return to the
previous setting mode.
Button B
Button B
Care after use
Do not leave moisture, sweat and dirt on this product for a long time.
After use, wipe the body with a wet towel wrung tightly and let it dry naturally.
Moisture, sweat, and dirt may cause product failure.
Do not wash this product with organic solvents such as benzine, thinner,
alcohol, and detergent. Otherwise, it may cause deterioration.
Leather band
- A leather band is susceptible to early deterioration from moisture and sweat.
Wipe off moisture and sweat as soon as possible by gently blotting with a
soft dry hygroscopic cloth.
* If the band is left wet, discoloration or change of color may occur.
* Do not expose this product to direct sunlight for a long time.
* Refrain from wearing this product while bathing, swimming, and when
working with water.
- A leather band may deteriorate gradually even if it is not used.
- It is recommended to replace the leather band early if it has deteriorated.
Battery incorporated in product body
- You cannot replace the battery incorporated in the product body by yourself.
- To replace the battery, contact our support center to request it. We will
replace the battery for a fee.
- The battery incorporated in the product you purchased is set for inspection
before factory shipping. The product may run short of power before the
specified battery life expires.
After-sale service
- For repair and inspection of this product, consult our support center.
- Basically, parts for repair of this product are retained for six years after
discontinuation of manufacturing.
Maintenance
Electrophoresis display (EPD)
Caution
•Switching of display
- An electrophoresis display has the characteristic that the display switches
more slowly than a liquid crystal panel. At a low temperature, the display
switches even more slowly.
- Conduct operation after the display switches completely.
•Highlighting operation of display
- It is not a failure if the display of time, etc., is highlighted once a minute at the
time of mode switching, etc. (It is an operation to maintain the display
quality.)
•Display at a high temperature
- Be careful so that the product does not become too hot.
- If the temperature of this product becomes 50 °Cormore, the display
disappears. If you press either of the buttons, a message “Too Hot Use Under
50°C” appears.
•Display at a low temperature
- The lower the temperature is, the paler the display becomes. In this case, put
the product in a warm place and wait until the display returns to time display.
*This electrophoresis display (EPD) may become difficult to read with
decreased contrast if you use it for a long period of time. Contact our
support center for replacement. We will replace the display for a fee.
Troubleshooting
In case of the following display status
When the display status becomes as follows, refer to corresponding guidance.
System reset
If this product operates incorrectly, press and hold down both buttons A and B
for 20 seconds. The system is reset when the buttons are released and the
display enters the time setting mode about three seconds later.
The Smart Canvas band is a band that you can enjoy changing easily
whenever you want.
•How to remove the band
Hold down the side of the attaching part of the band with your finger and
push up the band vertically to remove it.
Note that the band cannot be removed if you hold down the folded part
with your finger.
•How to attach the band
(1) Push up the folded part of the attaching part of the band lightly with your
finger.
(2) Hang the end on the spring rod and pull down the band vertically.
(3) Check if the band is attached firmly by pulling it in the direction shown in
the figure.
(4) If you pull it at a slant, the folded part is opened and will not be closed.
Be sure to pull it straight down.
Display Contents Do as follows
These are not failures.
They are displays for
maintenance.
Press the button B. The
display returns to the
original display.
Leave as it is and wait for a
while until the display
returns to time display.
The temperature of the body
is low.
Put the body in a warm
place and wait for a while
until the display returns to
time display.
Put the body in a cool place
and wait for a while until
the display returns to time
display.
Consult our support center.
When you press the button, a
message “Too Hot Use Under 50°C”
is displayed. -> The temperature of
the body is 50°C or more.
This is not a failure.
It is a display to warn that the
product is running short of
battery power.
*1
4
2
3
1
The display
becomes paler
Smart Canvas band
Access to dedicated website
Guarantee
•MyEPSON
This is a membership information providing service for those who are
interested in EPSON, regardless whether they use EPSON products or not. We
deliver the latest recommended information that is exactly for you and help you
to use the printer in a more enjoyable manner. User registration after purchase
of the product is also easy. Now, make access immediately for membership
registration.
Reply to simple questions to register
•Guarantee for purchase on website
The purchase date in the guarantee is the shipping date on the invoice
enclosed at the time of shipping of the product. Be sure to attach the invoice to
the certificate of guarantee and keep it with care.
•Items to be guaranteed
- Product body (glass, case, interior parts)
*The band is out of the scope of guarantee.
•Guarantee period
One year from the purchase date.
Access on the Internet! http://myepson.jp/
Specifications
1. Frequency of crystal oscillator 32,768 Hz (Hz = Cycles per second)
2. Accuracy Monthly rate within 20 seconds
(If the watch is worn on the wrist within a temperature range between 5°C and 35°C.)
3. Operational temperature range Between -5°C and + 50°C
(Between 0°C and + 50°C for display function)
4. Display medium Active Matrix Electrophoretic Display
5. Power source Small lithium battery 1 piece
6. Battery life Approximately three years
(Actual battery life may vary depending on use conditions.)
*1“Replace Battery” is displayed depending on the model.


