ESENE ES320 User manual
www.escene.ru
Escene Communication
1
1
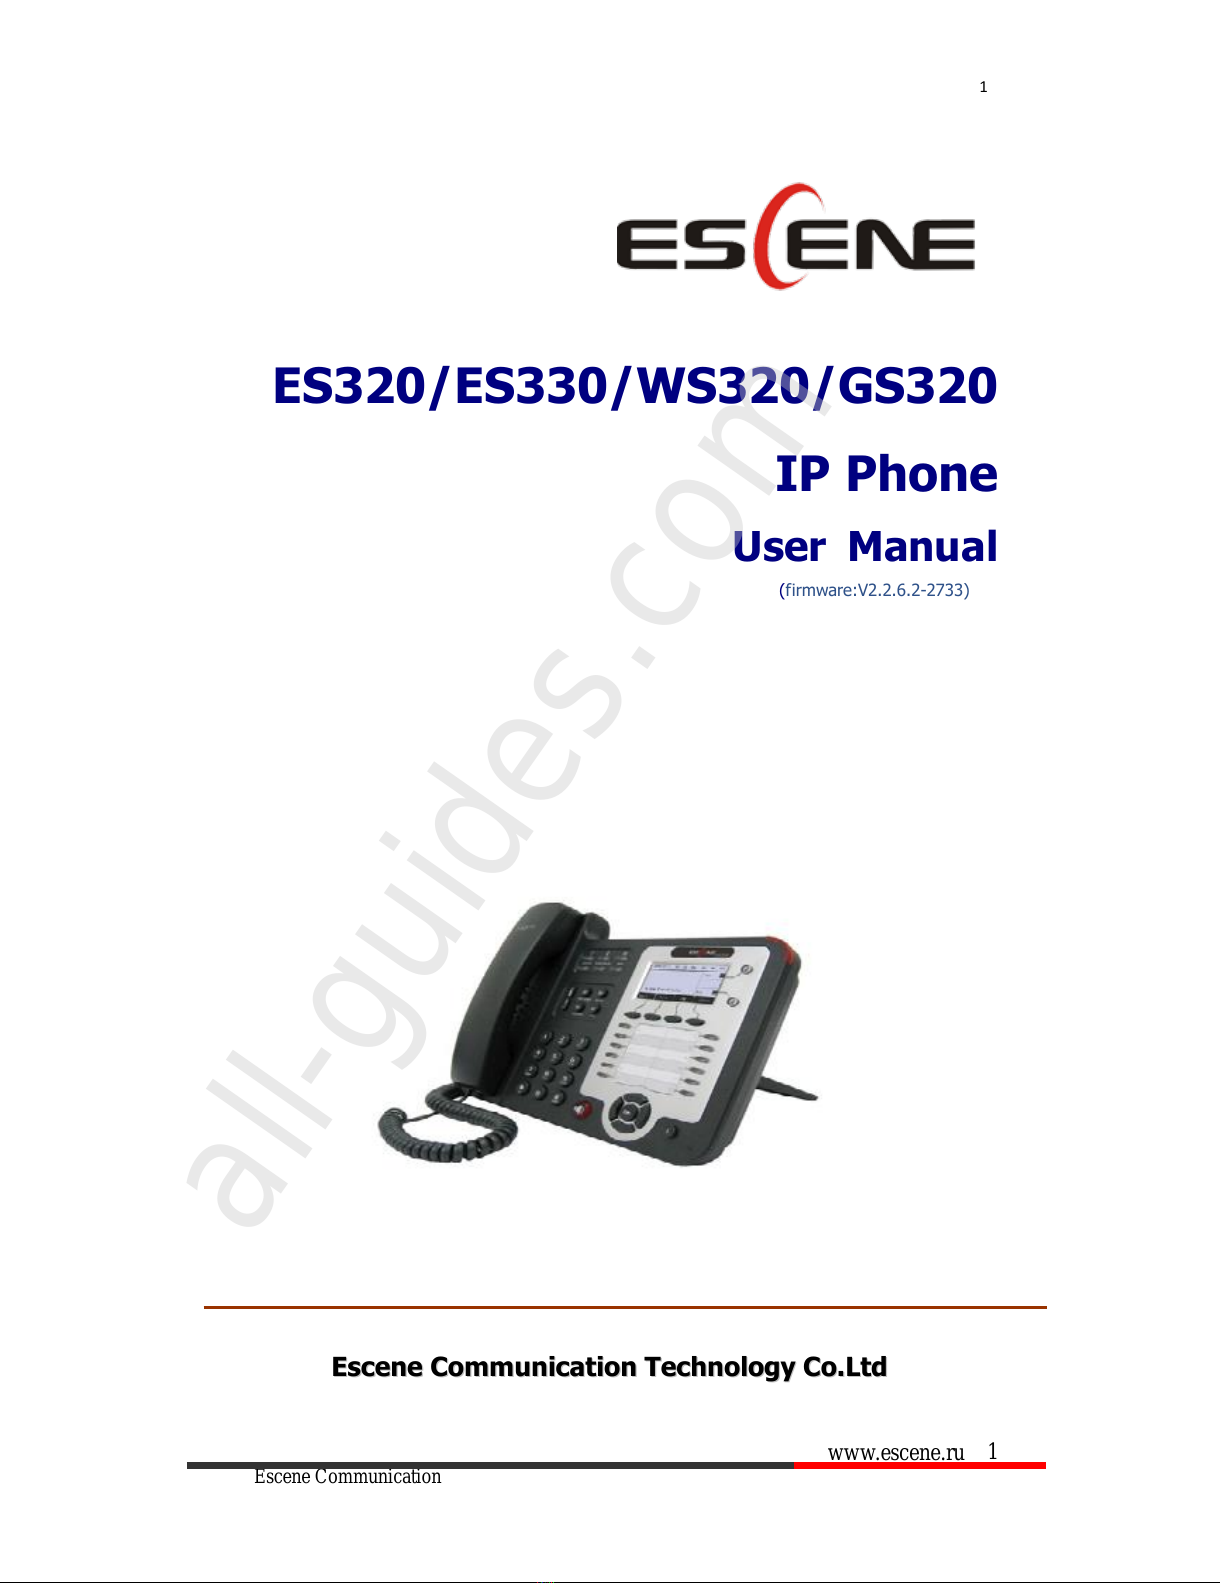
ES320/ES330/WS320/GS320
IP Phone
User Manual
(firmware:V2.2.6.2-2733)
E
Es
sc
ce
en
ne
e
C
Co
om
mm
mu
un
ni
ic
ca
at
ti
io
on
n
T
Te
ec
ch
hn
no
ol
lo
og
gy
y
C
Co
o.
.L
Lt
td
d
All manuals and user guides at all-guides.com
all-guides.com
www.escene.ru
Escene Communication
2
2
Tables of Contents
1.Getting Started .....................................................................................................4
About...............................................................................................................4
Illustrate...........................................................................................................4
Feature Highlights: ............................................................................................4
Technical Features .............................................................................................4
2.Connecting Your Phone..........................................................................................7
3.Phone overview ....................................................................................................9
Understanding Buttons and Hardware..................................................................9
Understanding Phone Screen Features...............................................................13
4.Basic Call Handling ..............................................................................................14
Placing a Call ..................................................................................................14
Answering a Call..............................................................................................15
Ending a Call...................................................................................................16
Using Hold and Resume (Switch Calling Line) .....................................................16
Transferring Calls.............................................................................................17
Using Mute .....................................................................................................18
Do Not Disturb ................................................................................................18
3-way Conference............................................................................................19
Expansion Installation(only ES330 has this item).......................................................19
Expansion Settings(only ES330 has this item) ...........................................................20
Time&Date............................................................................................................20
VOIP Call Forwarding .............................................................................................21
5.Advanced Call Handling .......................................................................................22
Speed Dialing..................................................................................................22
Using the phone book ......................................................................................22
Using Call Logs................................................................................................26
6.Keypad Instruction ..............................................................................................27
Language .......................................................................................................27
SIP Account Settings........................................................................................27
Network Setting ..............................................................................................29
Load default settings .......................................................................................29
Customizing Rings and Volume .........................................................................30
WIFI setting(only WS320 has this item).............................................................31
View status.....................................................................................................31
Diagnose ........................................................................................................32
7.Web Settings ......................................................................................................33
Config Guide...................................................................................................33
WIFI Setting(only WS320 has this item ) ...........................................................35
WIFI Status(only WS320 has this item ).............................................................36
Network .........................................................................................................36
SISIP AcP Account...........................................................................................38
SIP Account ....................................................................................................38
All manuals and user guides at all-guides.com

www.escene.ru
Escene Communication
3
3
SIP Account ....................................................................................................38
SIP Account ....................................................................................................38
Programmable Keys .........................................................................................39
Expansion Module ...........................................................................................40
Audio .............................................................................................................40
PhoneBook .....................................................................................................42
Group ......................................................................................................42
Contact....................................................................................................42
LDAP .......................................................................................................43
BanList ....................................................................................................44
Enterprise Phonebook................................................................................45
Advance .........................................................................................................45
Phone Setting...........................................................................................45
VLAN Setting ............................................................................................47
VPN Setting..............................................................................................47
BLF setting...............................................................................................48
Trusted Certs............................................................................................49
Dial Plan ..................................................................................................50
Global SIP ................................................................................................51
PasswordPhone Maintenance............................................................................51
Log..........................................................................................................51
Default Setting..........................................................................................52
Auto Provision ..........................................................................................53
FTP Upgrade ............................................................................................54
TFTP Upgrade ..........................................................................................55
HTTP Upgrade ..........................................................................................56
Reboot.....................................................................................................57
Phone Status ..................................................................................................58
System info.....................................................................................................58
About.............................................................................................................59
Appendix:.....................................................................................................60
All manuals and user guides at all-guides.com

www.escene.ru
Escene Communication
4
4
1.Getting Started
About
ES320P/ES330 is a small-screen-based IP phone in Sayhi IP phone series, it has fashion
and technological appearance, excellent voice quality, and powerful features, and it is a
new generation of intelligent phones to replace of the traditional desktop office terminals,
It accomplished the powerful telephony features by cooperating with the communications
platform,. such as the call transfer, hotline, three-party conference calling, speed dial, voice
mail, Do Not Disturb, etc.
Illustrate
Firstly, before you use this user manual ,please check the below illustrate carefully.
This user manual is common use in ES330、WS320、DS320、GS320.please check the
differwnt.
ES330 is different from ES320 :ES330 support expansion ,but ES320 don’t support it.
It can up to 6 EMS32 programmable key modules
WS 320 is wifi phone ,it has wifi module, it is the different from ES320,but the function
is the same . WS320 IP Phone support 2 accounts registering and 2 calls management.
DS320 series is Dual Model IP phone , and support PSTN and VOIP , DS3X2 P IP Phone
support 2 accounts registering and 2 calls management.
GS320 has a gbps network port. It is a supper rate phone .
Feature Highlights:
128*64 Pixel LCD with Support Chinese display
HD Voice: HD Codec
2 VoIP accounts
Enterprise Phone Book
12 programmable hard keys and support BLF
Support Plug and Play
Support PoE and AC power adapter
Technical Features
Item
ES320/ES330/WS320/DS3X2/GS320
Screen
Grayscale LCD with background light
All manuals and user guides at all-guides.com

www.escene.ru
Escene Communication
5
5
128*64 pixel
Line
2
Function
Keys
4 Soft keys,2 Line keys(dual-color LED)
6 Navigation keys(arrow button, OK button, C button)
Volume adjust, Hands-free, Mute, Headset, Message,
Menu, Directory, Service, Hold, Redial, Conference, Transfer
VoIP
Protocol
SIP 2.0
Network
Protocol
HTTP, BOOTP, TFTP, *IEEE 802.1Q, *IEEE 802.1X
Codec
G.723.1, G.729 A, G.711 A/U, G.722
QoS
TOS, Jiffer Buffer, VAD, CNG, G.168 (32ms)
Network
2*RJ45 10/100M Ethernet interfaces(LAN/PC)
IP Assignment: Static IP or DHCP
VPN(L2TP)
DNS Clients (Primary and Secondary)
Conversation
Mode
Handset, Headset or Hand-free Mode,
Call center headset and 3.5mm headset supported
9-levels volume adjustment
Call
Processing
Call Sharing/Bridged Lines
Line Status Indicator(dual color LED)
Multi Account
Call Waiting, Call Queuing, Line Switching
Call Forward, Call Transfer, Call Holding, Call Pickup,
Callback One Key Dial, Redial
Phone directory speed dial, Call record direct dial
3-way conference
DnD
Voice mail, Voice Prompt, Voice Message
BLF
Expansion
Interface
EXT: ESM32 programmable key module
SOR: FXS, FXO, Record
USB
Security
User Authentication for configuration pages
Signaling encryption
Media encryption
Application
*Public phone directory
Private phone directory
*PnP (Plug & Play)
Power
Supply
Power adapter: AC 100-240V input and DC 12V/1A output
PoE (IEEE 802.af)
All manuals and user guides at all-guides.com

www.escene.ru
Escene Communication
6
6
Specification
Storage Temperature: 0℃-60℃
Operating Humidity: 10%-90%
Size 254mm*205mm*87mm
All manuals and user guides at all-guides.com
all-guides.com

www.escene.ru
Escene Communication
7
7
2.Connecting Your Phone
Your system administrator will likely connect your new SayHi
ES320/ES330/WS320/DS3X2/GS320 IP Phone to the corporate IP telephony network. If
that is not the case, refer to the graphic and table below to connect your phone.
1) Open the box ES320/ES330/WS320/DS3X2/GS320 IP Phone; carefully check the
packing list, Packing List as follows:
Item
Counts
IP Phone
1
Handset
1
Handset Cord
1
Power adapter
1
RJ45 cable
1
CD
1
Quick Installation
1
Quick User Guide
1
Product
certification
1
2) As shown in figure 2.1 and figure 2.2, Please plug Handset Cord into RJ11
interface(IP Phone and Handset), RJ45 cable into the LAN interface;IP Phone will
automatically start if IP Phone with POE function.
3) The phone must work together with power adapter without POE support.
4) Connect your computer to PC interface of the phone with cable.
* More detailed description please refers to the
3.Phone overview-Understanding
phone buttons and hardware
.
Figure 2.1 Interfaces of SayHi ES320/ES330/WS320/DS3X2/GS320
All manuals and user guides at all-guides.com
www.escene.ru
Escene Communication
8
8
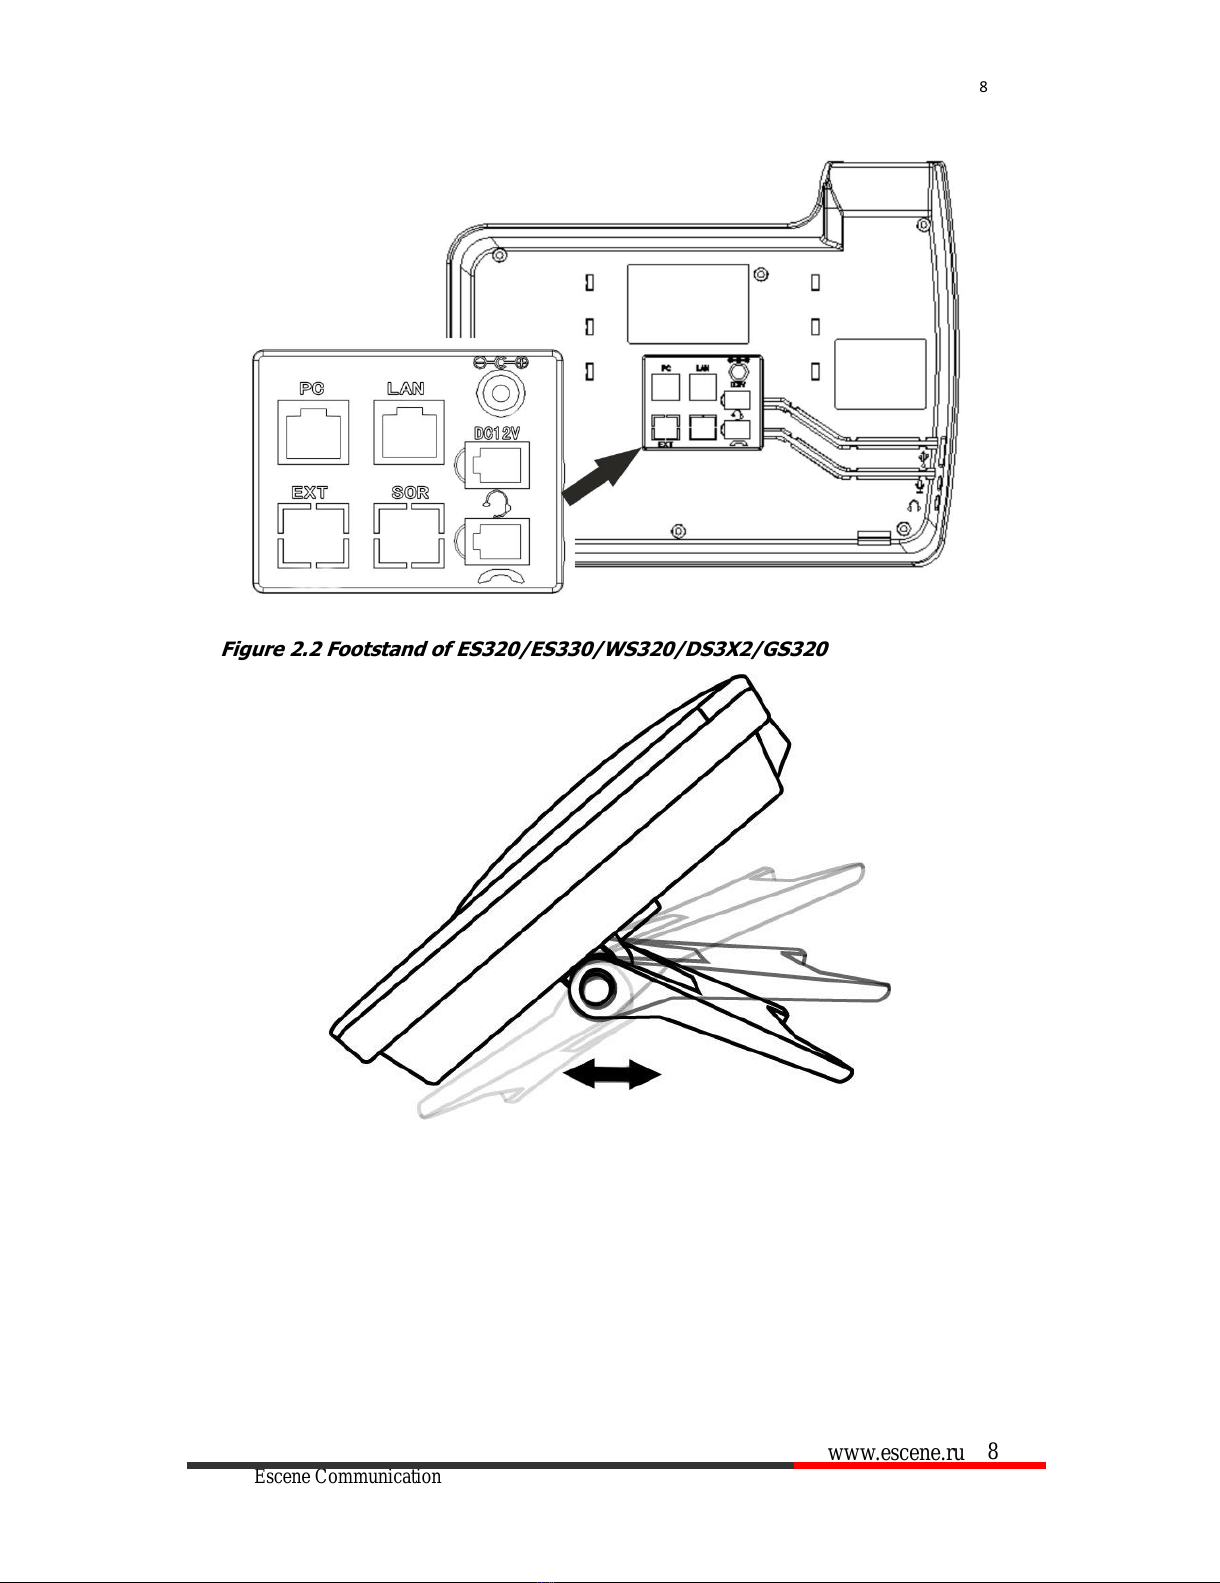
Figure 2.2 Footstand of ES320/ES330/WS320/DS3X2/GS320
All manuals and user guides at all-guides.com

www.escene.ru
Escene Communication
9
9
3.Phone overview
Understanding Buttons and Hardware
From figure 3.1 to figure 3.2, you can understand buttons and hardware about SayHi
ES320/ES330/WS320/DS3X2/GS320
Figure 3.1 Buttons and Hardware of SayHi
ES320/ES330/WS320/DS3X2/GS320
Nu
m
Buttons
Description
1
Headset button: Toggles the headset on or off.
Red means the feature is enabled.
2
Mute button: Toggles the Mute feature on or off.
Red means the feature is enabled.
All manuals and user guides at all-guides.com
www.escene.ru
Escene Communication
10
10
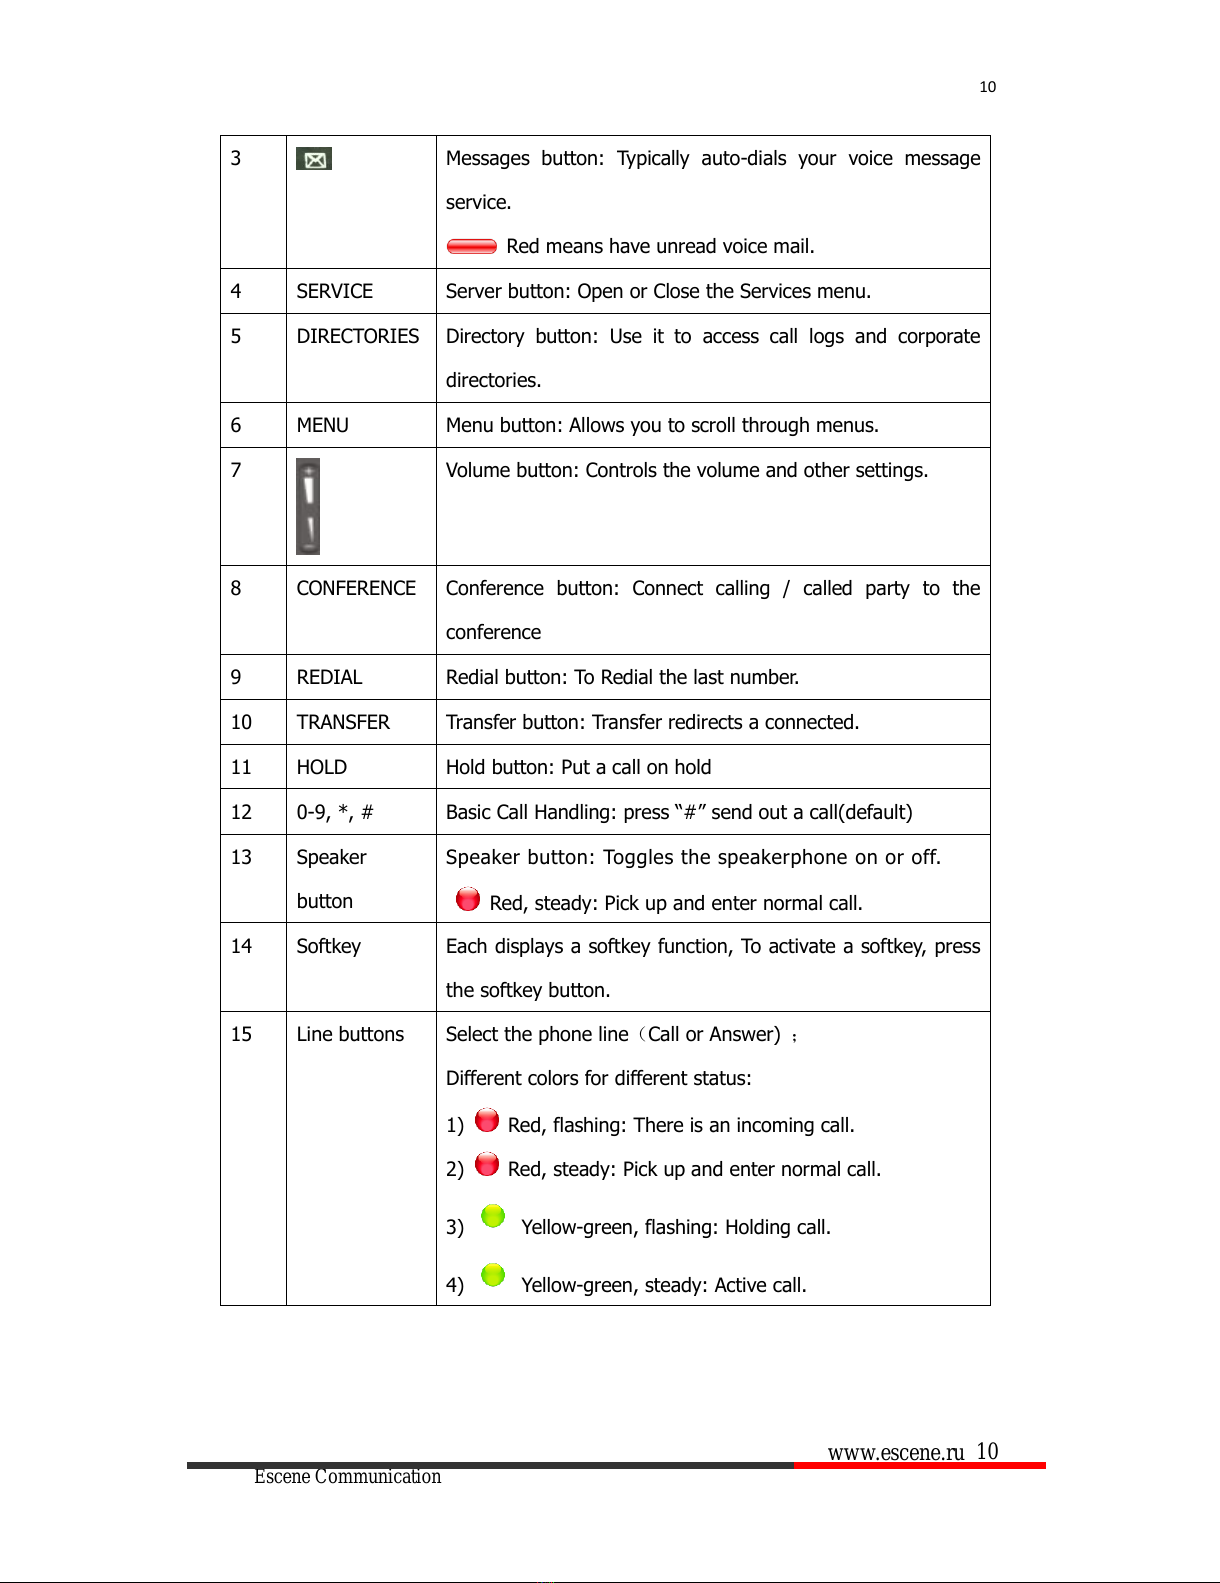
3
Messages button: Typically auto-dials your voice message
service.
Red means have unread voice mail.
4
SERVICE
Server button: Open or Close the Services menu.
5
DIRECTORIES
Directory button: Use it to access call logs and corporate
directories.
6
MENU
Menu button: Allows you to scroll through menus.
7
Volume button: Controls the volume and other settings.
8
CONFERENCE
Conference button: Connect calling / called party to the
conference
9
REDIAL
Redial button: To Redial the last number.
10
TRANSFER
Transfer button: Transfer redirects a connected.
11
HOLD
Hold button: Put a call on hold
12
0-9, *, #
Basic Call Handling: press “#”send out a call(default)
13
Speaker
button
Speaker button: Toggles the speakerphone on or off.
Red, steady: Pick up and enter normal call.
14
Softkey
Each displays a softkey function, To activate a softkey, press
the softkey button.
15
Line buttons
Select the phone line(Call or Answer) ;
Different colors for different status:
1) Red, flashing: There is an incoming call.
2) Red, steady: Pick up and enter normal call.
3) Yellow-green, flashing: Holding call.
4) Yellow-green, steady: Active call.
All manuals and user guides at all-guides.com
www.escene.ru
Escene Communication
11
11
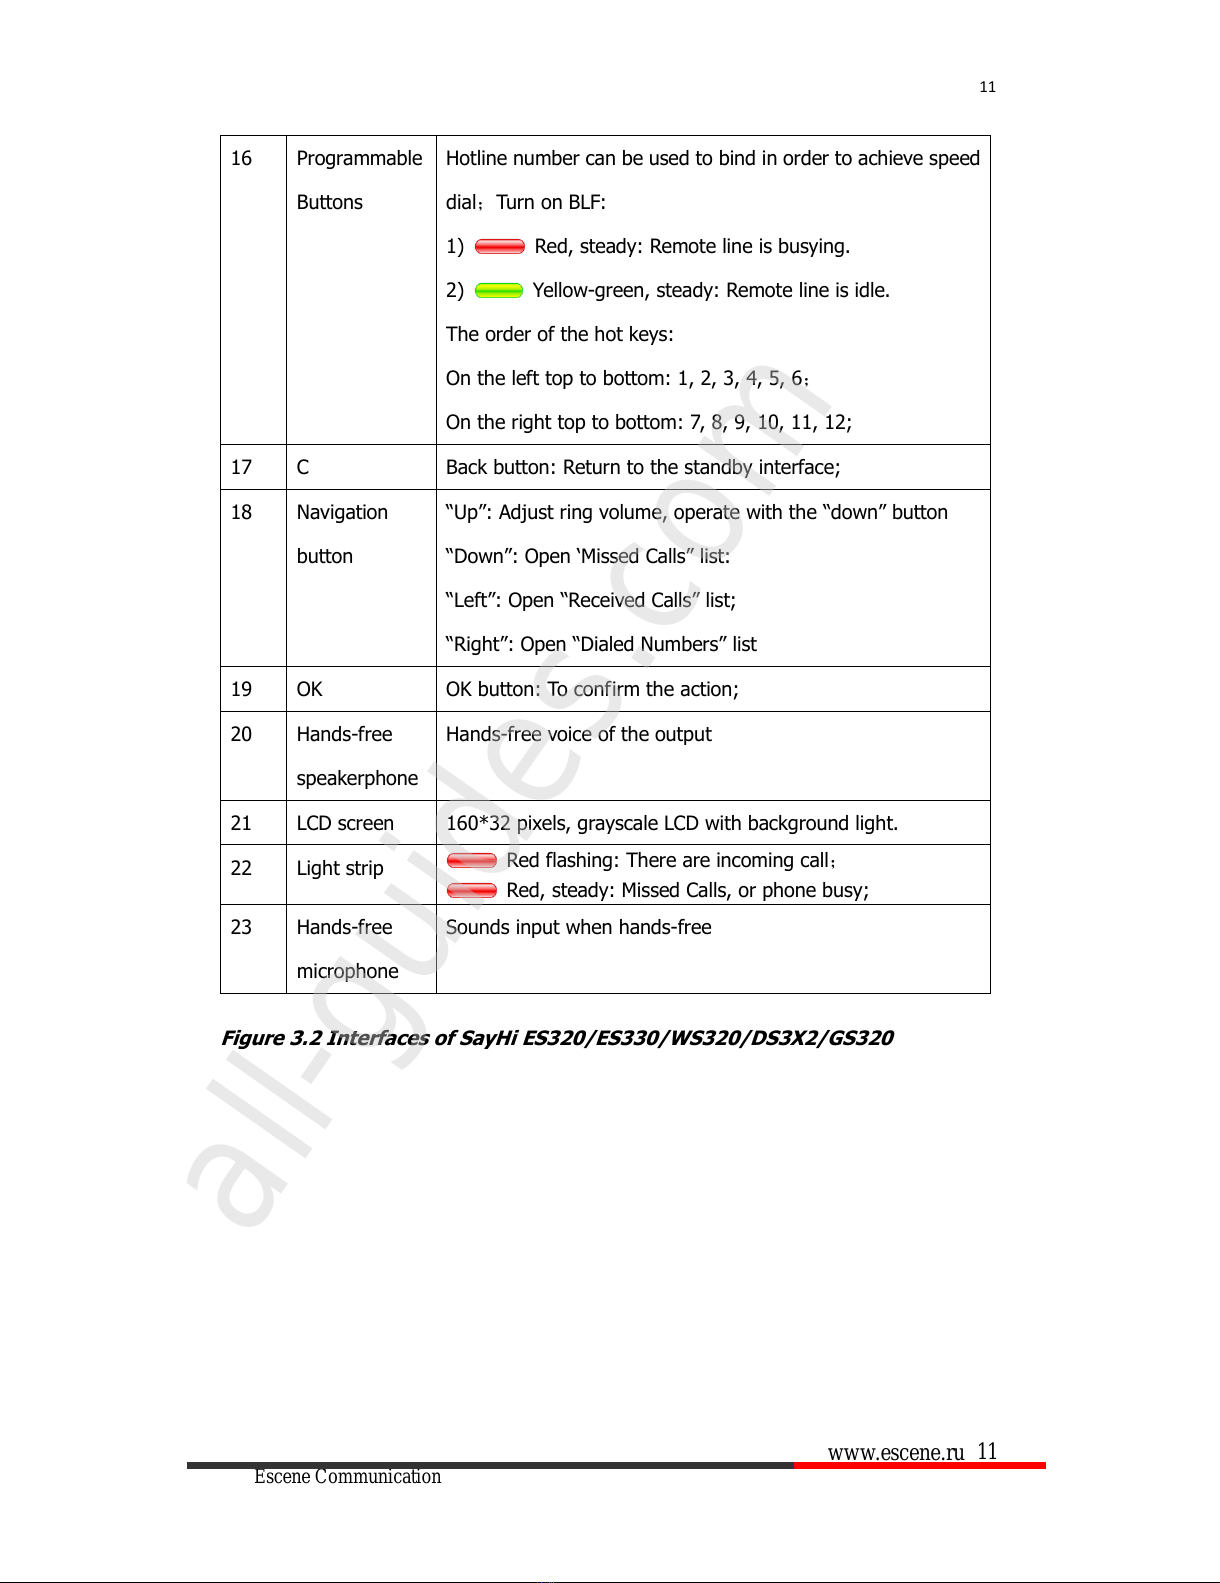
16
Programmable
Buttons
Hotline number can be used to bind in order to achieve speed
dial;Turn on BLF:
1) Red, steady: Remote line is busying.
2) Yellow-green, steady: Remote line is idle.
The order of the hot keys:
On the left top to bottom: 1, 2, 3, 4, 5, 6;
On the right top to bottom: 7, 8, 9, 10, 11, 12;
17
C
Back button: Return to the standby interface;
18
Navigation
button
“Up”: Adjust ring volume, operate with the “down”button
“Down”: Open ‘Missed Calls”list:
“Left”: Open “Received Calls”list;
“Right”: Open “Dialed Numbers”list
19
OK
OK button: To confirm the action;
20
Hands-free
speakerphone
Hands-free voice of the output
21
LCD screen
160*32 pixels, grayscale LCD with background light.
22
Light strip
Red flashing: There are incoming call;
Red, steady: Missed Calls, or phone busy;
23
Hands-free
microphone
Sounds input when hands-free
Figure 3.2 Interfaces of SayHi ES320/ES330/WS320/DS3X2/GS320
All manuals and user guides at all-guides.com
all-guides.com
www.escene.ru
Escene Communication
12
12
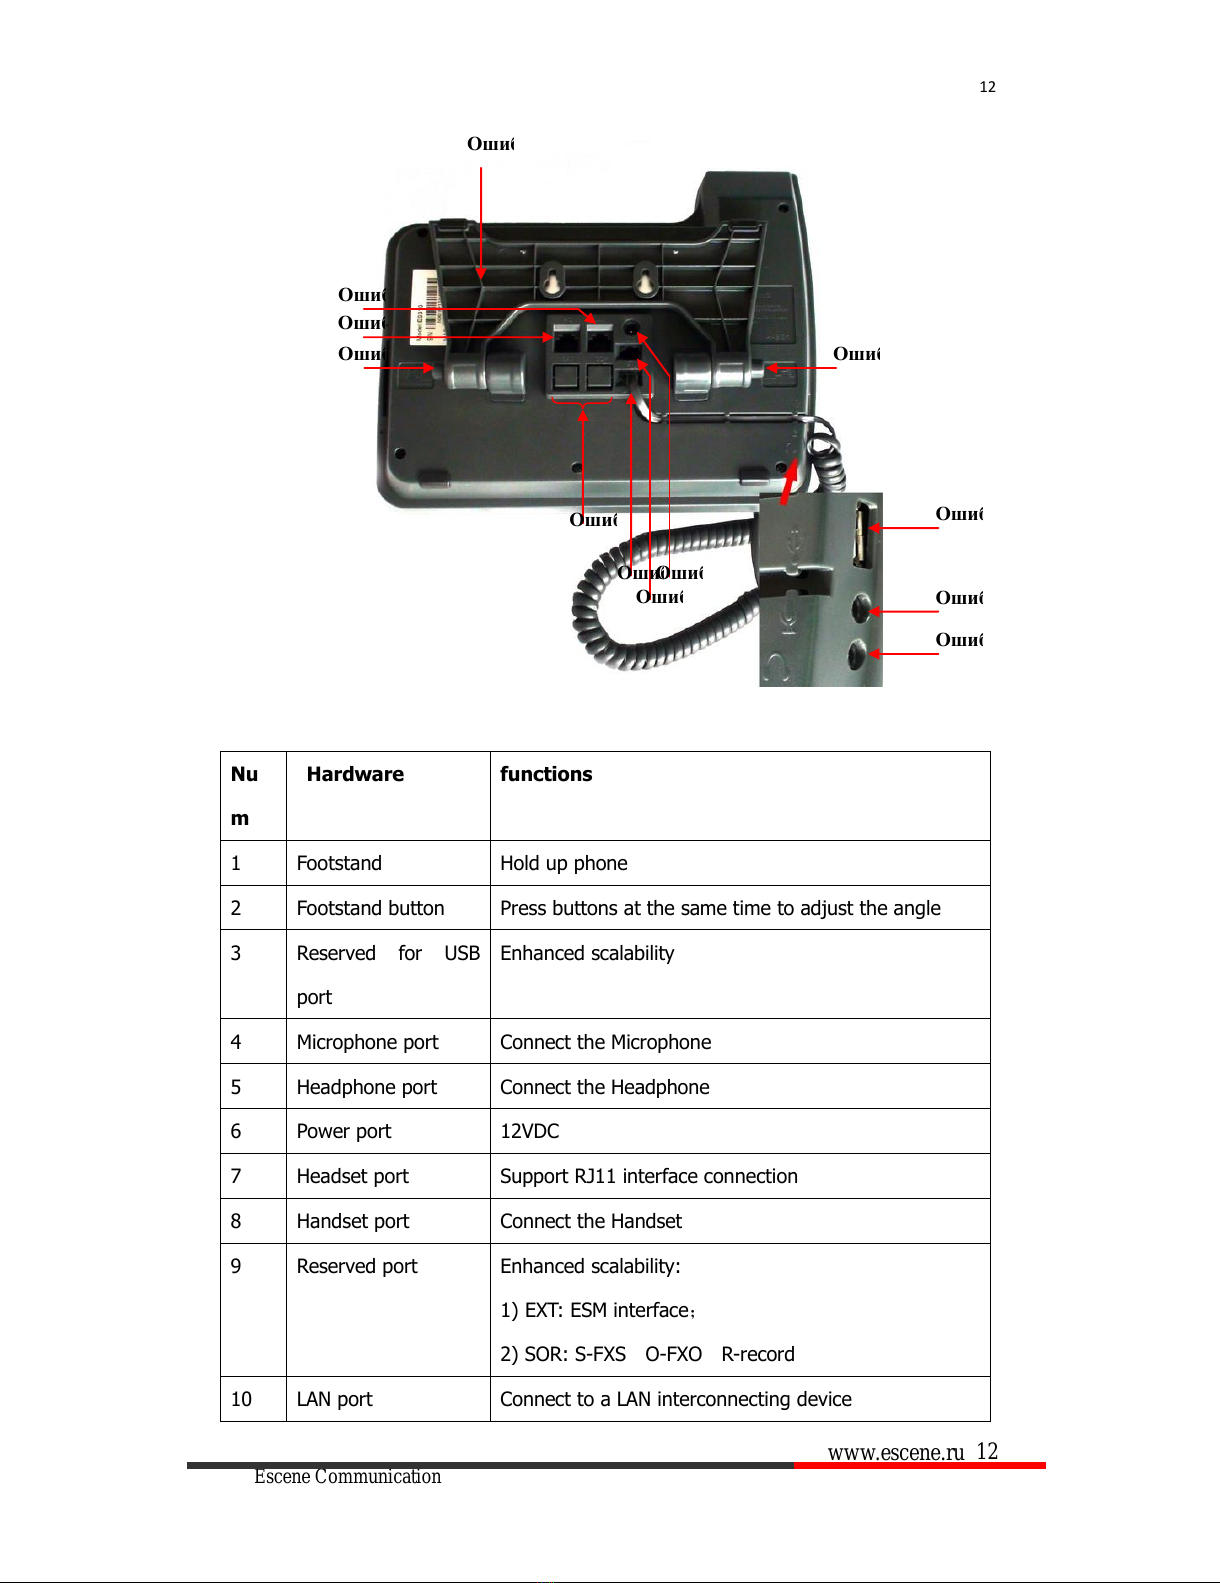
Nu
m
Hardware
functions
1
Footstand
Hold up phone
2
Footstand button
Press buttons at the same time to adjust the angle
3
Reserved for USB
port
Enhanced scalability
4
Microphone port
Connect the Microphone
5
Headphone port
Connect the Headphone
6
Power port
12VDC
7
Headset port
Support RJ11 interface connection
8
Handset port
Connect the Handset
9
Reserved port
Enhanced scalability:
1) EXT: ESM interface;
2) SOR: S-FXS O-FXO R-record
10
LAN port
Connect to a LAN interconnecting device
Ошибка!
Ошибка!
Ошибка!
Ошибка!
Ошибка!
Ошибка!
Ошибка!
Ошибка!
Ошибка!
Ошибка!
Ошибка!
Ошибка!
All manuals and user guides at all-guides.com
www.escene.ru
Escene Communication
13
13
11
PC port
Connect to a local PC
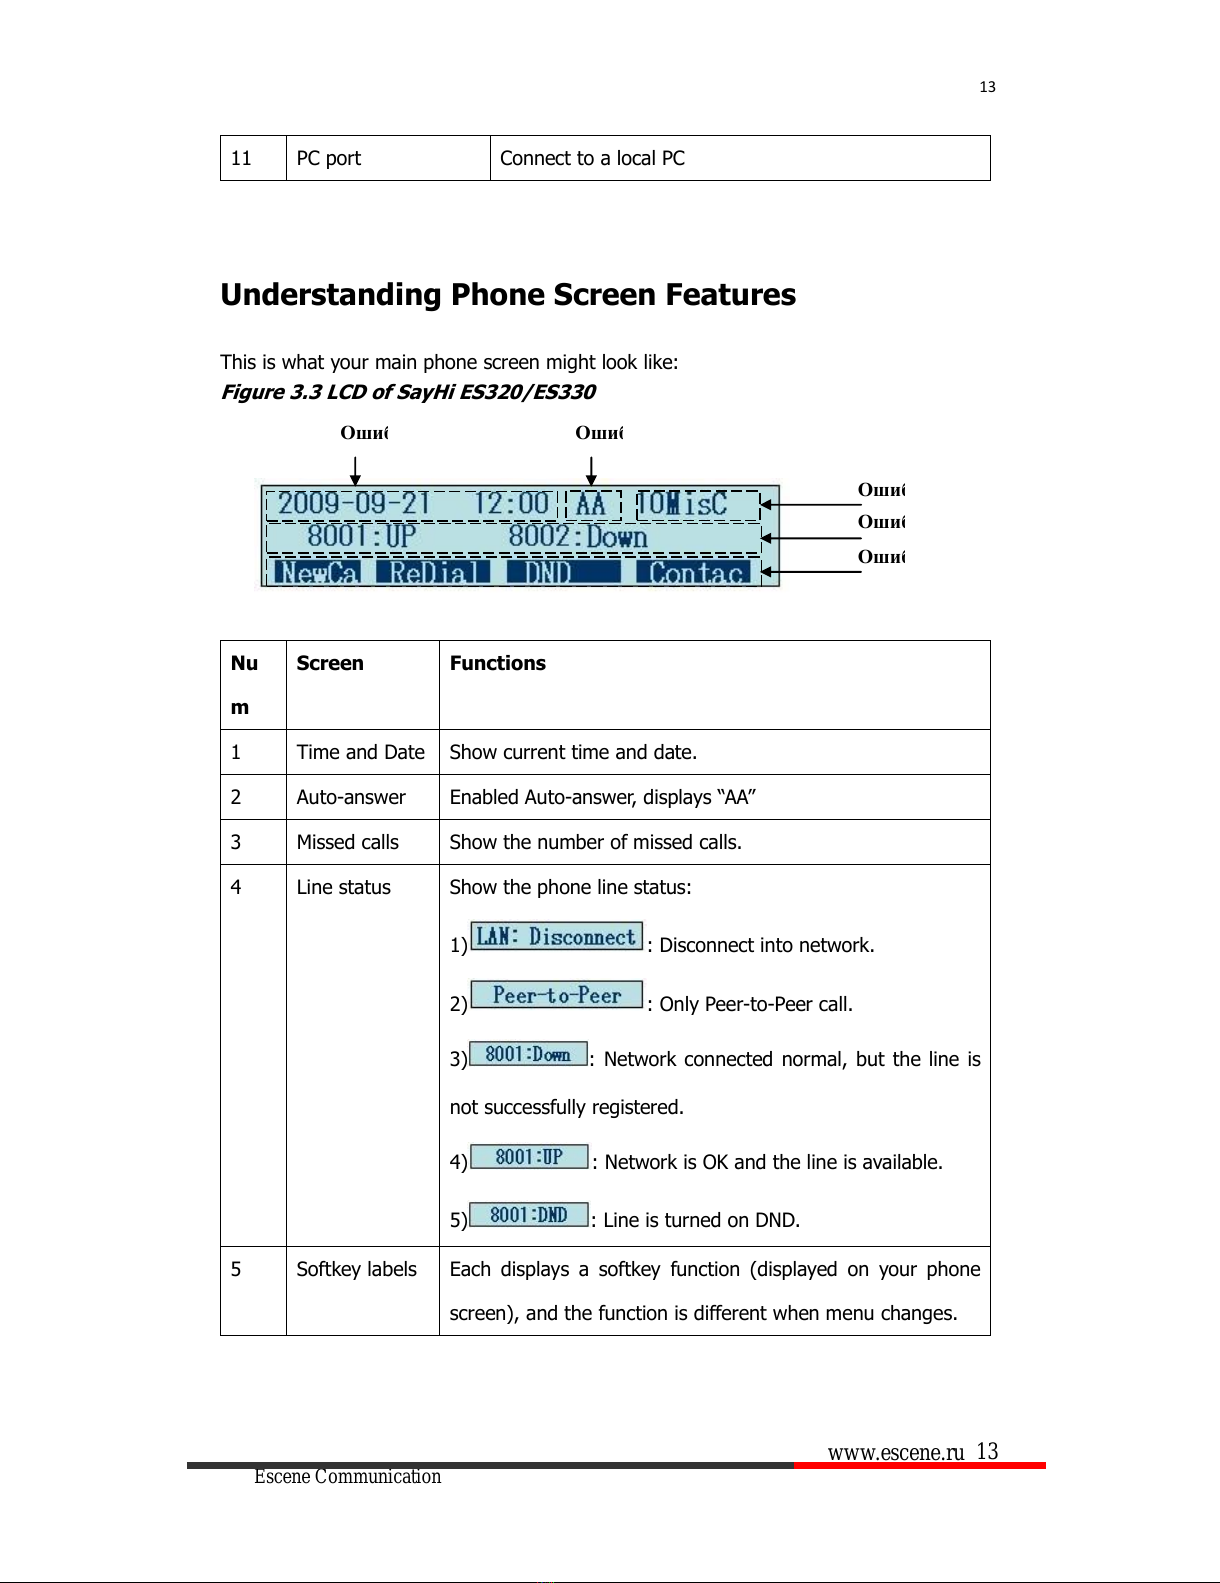
Understanding Phone Screen Features
This is what your main phone screen might look like:
Figure 3.3 LCD of SayHi ES320/ES330
Nu
m
Screen
Functions
1
Time and Date
Show current time and date.
2
Auto-answer
Enabled Auto-answer, displays “AA”
3
Missed calls
Show the number of missed calls.
4
Line status
Show the phone line status:
1) : Disconnect into network.
2) : Only Peer-to-Peer call.
3) : Network connected normal, but the line is
not successfully registered.
4) : Network is OK and the line is available.
5) : Line is turned on DND.
5
Softkey labels
Each displays a softkey function (displayed on your phone
screen), and the function is different when menu changes.
Ошибка!
Ошибка!
Ошибка!
Ошибка!
Ошибка!
All manuals and user guides at all-guides.com
www.escene.ru
Escene Communication
14
14
4.Basic Call Handling
You can perform basic call-handling tasks using a range of features and services. Feature
availability can vary; see your system administrator for more information.
Note: The bold type of the following text and following a “button” in table signifies the
phone's button (for example, OK button), and the signifies softkey.
Placing a Call
Here are some easy ways to place a call on SayHi ES320 IP Phone:
If you want to...
Then...
Place a call using the
handset
Pick up the handset
--1) You can hear the dial
tone;
--2) The first line light is ;
--3) Enter a number;
--4) Press ‘#’button(default) ,
-or press ;
-or wait 5s (default), then it
send the number
automatically.
Place a call using a
speakerphone
Press Speaker,
or Programmable
buttons
or
Place a call using a
headset
Put on your headset and
active Headset button, and
then do as using
speakerphone
Redial
--Press REDIAL button to dial the last number
-or press Navigation button-Right > “Dialed number”,
select a number, and press or OK button.
All manuals and user guides at all-guides.com
www.escene.ru
Escene Communication
15
15
Dial from a call log
--1) Press MENU or OK button >“Call history”, you can select
“Missed calls”, “Received calls”and “Dialed numbers”,
- or press Navigation button (in Standby interface) > select
“Missed calls” (down), “Received calls” (left)and “Dialed
numbers” (right));
--2) Then press OK button or .
Place a call while
Another call is active
--1) Press Hold button or ;
--2) Enter a number;
--3) Press ‘#’button (default) ;
-or press to send the number.
Tips
• You can dial on-hook, without a dial tone (pre-dial). To pre-dial, enter a number, and
then go off-hook by lifting the handset or pressing , Headset or Speaker button.
• If you make a mistake while dialing, press Cbutton to erase digits.
Answering a Call
You can answer a call by simply lifting the handset, or you can use other options if they are
available on SayHi ES320.
If you want
to...
Then...
Answer with a
handset
--1) Your phone ring;
--2) Line button of the
ringing line is Red and
flashing, Light strip is
Red and flashing;
--Pick up the handset
Answer with the
speakerphone
(Non-headset
mode)
--Press Speaker button
-or press the flashing Line
button,
-or press
Answer with the
a headset
--Put on headset, press Headset
button so that the status light is
Red , and then do as using
speakerphone
All manuals and user guides at all-guides.com
www.escene.ru
Escene Communication
16
16
Switch from a
connected Call to
answer a ringing
call
--1) Another Line button is Red and flashing, Light strip is
Red and flashing;
--2) Press the flashing Line button to answer (at this time, the
original call will be hold.)
Auto-answer
--1) Press MENU or OK button > “Function setting”> “Auto
answer”;
--2) Select “Enable”;
--3) Your phone answers incoming calls automatically after a few
rings.
Ending a Call
To end a call, hang up. Here are some more details.
If you want to...
Then...
Hang up while using the
Handset
--Return the handset to its cradle,
-or press
Hang up while using the
Speakerphone
--Press Speaker button that is Red ,
-or press Line button for the appropriate line,
-or press
Hang up while using the
Headset
--Press Handset button, (Do not keep the headset mode) ,
-or press (keep the headset mode)
Hang up one call, but
preserve another call on
the other line
--Press ,
-or refer to the above three methods
Using Hold and Resume (Switch Calling Line)
You can hold and resume calls. You can take a call in one line at anytime, and the other
All manuals and user guides at all-guides.com
all-guides.com
www.escene.ru
Escene Communication
17
17
lines would be hold. As a result of that, you can switch different calling line on our phone.
If you want to...
Then...
Put a call on hold
--Press HOLD button,
-or press
Hold a line and switch to
another line
Press another Line button for the appropriate line
Resume a call on current
line
--Press Line button,
Release a call on
different line
Select the line want to release hold, press the line, so
recovery;
Tips
•Engaging the Hold feature typically generates music or a beeping tone.
•A held call is indicated by the Yellow-green and flashing Line button.
Transferring Calls
Transfer redirects a connected call. The target is the number to which you want to transfer
the call.
If you want to...
Then...
Talk to the transfer
recipient before
transferring a call
(consult transfer)
--1) Press TRANSFER button or press ;
--2) Enter number;
--3) press “#”(default) ,
-or press then transfer the call,
-or wait five seconds(default)then transfer the call
Transferred to idle
lines or other
numbers without
talking to the
transfer recipient
(Blind transfer)
--1) Press TRANSFER button or ;
--2) Press ;
--3) Enter number;
--4) Press “#”(default)
-or press , then transfer the call;
-or wait five seconds(default)then transfer the call
All manuals and user guides at all-guides.com
www.escene.ru
Escene Communication
18
18
Blind transfer to the
held line
--1) Press TRANSFER button or press ;
--2) Press the Line button of held line
Using Mute
With Mute enabled, you can hear other parties on a call but they cannot hear you. You can
use mute in conjunction with the handset, speakerphone, or a headset。
If you want to...
Then...
Toggle Mute on
Press Mute button, then the button is Red
Toggle Mute off
Press Mute button, then the button light off
Do Not Disturb
You can use the Do Not Disturb(DND) feature to block incoming calls on your phone with a
busy tone(Can also be set to their voice mail or other extension numbers, etc.).
If you want to...
Then...
Enable global DND
--1) Press ;
--2) All enabled line on the phone would changes to
status.
Enable DND on a
single line
Press MENU or OK button > “Function setting”> “DND”>
(select line) “Enable”
Disable DND
--Global DND enabled, press to disable global DND;
--Line DND enabled, press twice ,
-or press MENU or OK button > “Function setting”>
“DND”>(select line) “Disable”
All manuals and user guides at all-guides.com

www.escene.ru
Escene Communication
19
19
3-way Conference
You can establish a three-party conference, during the conversation three phone parties
can communicate with each other.
If you want to...
Then...
Invite the transfer
recipient into a
conference in a
transferring
--1) When the transfer recipient answer the call, press
CONFERCENCE button or on your phone;
--2) Then the held one, transfer recipient and you will be into a
conference, and the LCD will display
status.
Invite the third party
into a conference in
a active call
--1) Press CONFERENCE button or in an active call;
--2) Enter the third party number;
--3) After connected the third party, press CONFERENCE
button or again
establish a
conference with held
line
--1) when one phone line is holding on and the other line is
busy;
--2) Press CONFERENCE button,
-or Press Soft key
--3) press the held line's programmable button, the 3-way
Conference will establish.
Expansion Installation(only ES330 has this
item)
If you want to...
Then...
Expansion
installation
--1) Press MENU or OK button > “Function setting”>
“expansion installation”,
--2) if you want to install expansion, please according to tips to
do ,after you install ,press”finish”.
All manuals and user guides at all-guides.com

www.escene.ru
Escene Communication
20
20
Expansion Settings(only ES330 has this item)
If you want to...
Then...
Expansion setting
--1) Press MENU or OK button > “Function setting” >
“expansion installation”,
--2) choose which you want to set “expansion”
--3)choose which you want to set “ programmable keys “
--4)you can set :
Mode:Speed Dial、Asterisk BLF、Speed Dial Prefix、BLA、
DTMF
Account :choose account which you want to set
Name:give it a name which you want
Number: set your expansion number
Time&Date
If you want to...
Then...
Time&Date
--1) Press MENU or OK button > “Function setting”>
“time&date”,
--2)you can select :
SNTP: select “enable ”to set parameter: time 、server 、
daylight
SIP server: select “enable ”to set parameter: root can
modify date .
manual Settings: select “enable ”to set parameter: date
and time
All manuals and user guides at all-guides.com
This manual suits for next models
4
Table of contents
Other ESENE IP Phone manuals

ESENE
ESENE ES620-PEGv4 Instruction manual

ESENE
ESENE ES220 User manual

ESENE
ESENE HS118v2 User manual

ESENE
ESENE ES680-PEG User manual

ESENE
ESENE WS620E User manual

ESENE
ESENE Say Hi ES6 Series User manual

ESENE
ESENE ES380 User manual

ESENE
ESENE SayHi 320 Seris User manual

ESENE
ESENE SayHi 6xx Series User manual

ESENE
ESENE WS330-PEGV4 User manual


