ESENE ES680-PEG User manual

www.escene.cn/en
ESCENE Communication Limited.
ESCENE Office IP Phone
Office IP Phone ES680-PEG
User Manual
www.escene.cn/en Version:V1.0.0 丨Data:2017-06

www.escene.cn/en
ESCENE Communication Limited.
ESCENE Office IP Phone
Copyright and Disclaimer
Copyright
Any enterprises or individuals cannot extract, copy and spread in any form of this document without our written
permission .In accordance with the law, copying includes translating the document into other languages or conversing into
other formats. When this document is transmitted in network media, escene Limited Ltd allows downloading or printing for
private use. Any parts of the document are not allowed to be modified or used for commercial purposes. escene Limited Ltd
will not assume any responsibility for the injuries and losses caused by any unauthorized modification or conversion of the
document.
Declaration
Information regarding this guide is subject to change without any notice.
This manual provides accurate statement, information and recommendation to the largest extent, but will not guarantee any
express or implies. Users should take full responsibility for the application of products. escene Limited Ltd will not make any
guarantee for this manual, including but not limited to warranties for implies merchantability and particular purposes.
escene Limited Ltd does not assume any responsibility for indirect or consequential loss caused by the misuse of this
manual.
About this manual
Thank you for choosing Office IP Phone ES680-PEG.This IP Phone is specially designed for the user under the Office with
fashionable appearance and complete functions. This manual aims to help you quickly use Office IP Phone ES680-PEG.
Before use, please read the packing list and safety notes section of this manual ,communicate with the system
administrator to confirm if the current network environment can meet the requirements of configuring the Phone. If this is
your first time to use Office IP Phone ES680-PEG, we recommend that you should read the quick operation guide and
product technical manual. The document can be downloaded from the following website: http://www.escene.cn/en.
This document updated and revised by Nolto informatics and telecommunications, Escene Turkey distributor
(www.nolto.com) at June 2020.
Summary
Copyright and Disclaimer.......................................................................................................................2
1. Getting Started ....................................................................................................................................5
1.1 About...................................................................................................................................................5
1.2 Feature Highlights...............................................................................................................................5
2. Set up the Phone.................................................................................................................................5
3. Phone User Interface ..........................................................................................................................9
3.1 Hardware Component Instructions......................................................................................................9
3.2 Phone Screen Display Features........................................................................................................10
3.3 Basic Network Settings .....................................................................................................................12
3.4 SIPAccount Settings.........................................................................................................................13
3.5 Basic Features. .................................................................................................................................14
3.5.1 Making a Call..................................................................................................................................14

www.escene.cn/en
ESCENE Communication Limited.
ESCENE Office IP Phone
3.5.2 Anonymous Call .............................................................................................................................14
3.5.3 Redial.............................................................................................................................................14
3.5.4 Call Log..........................................................................................................................................15
3.5.5 Making Calls to Contact .................................................................................................................15
3.5.6 Multi-lines to Answer the Call .........................................................................................................15
3.5.7 Auto-Answer...................................................................................................................................15
3.5.8 Ending a Call..................................................................................................................................16
3.5.9 Using Hold and Recover (Switch Calling Line)...............................................................................16
3.5.10 Transferring Calls.........................................................................................................................16
3.5.11 Using Mute ...................................................................................................................................17
3.5.12 Do Not Disturb..............................................................................................................................17
3.5.13 3-way Conference........................................................................................................................17
3.5.14 Voice Mail.....................................................................................................................................18
3.5.15 MPL..............................................................................................................................................18
3.6 Advanced Settings.............................................................................................................................19
3.6.1 Using the phone book ....................................................................................................................19
3.6.2 Using Call Logs..............................................................................................................................21
3.6.3 Peer-to-Peer...................................................................................................................................22
3.7 Keypad Setting..................................................................................................................................22
3.7.1 Language Setting...........................................................................................................................22
3.7.2 Message.........................................................................................................................................22
3.7.3 Time & Date....................................................................................................................................22
3.7.4 Ring Tone and Volume Setting.......................................................................................................23
3.7.5 Searching Phone Book...................................................................................................................23
3.7.6 Cannot Set the Features with Keypad............................................................................................24
4. WEB User Interface...........................................................................................................................24
4.1 Network.............................................................................................................................................25
4.1.1 Wi-Fi Setting...................................................................................................................................25
5 SIP Account ........................................................................................................................................31
5.1Basic ..................................................................................................................................................31
5.2 Advanced ..........................................................................................................................................33
6 DSS Keys............................................................................................................................................35
6.1 Paperless Program keys ...................................................................................................................35
6.2 Line Keys ..........................................................................................................................................36
6.3 Function Keys....................................................................................................................................36
6.4 Soft Key.............................................................................................................................................37
7 Settings...............................................................................................................................................38
7.1 Basic .................................................................................................................................................38
7.2 Features............................................................................................................................................39
7.3 Time Settings ....................................................................................................................................42
7.4 Keyboard Lock ..................................................................................................................................43
7.5 VoIP Call Forwarding.........................................................................................................................43
7.6 Remote Control.................................................................................................................................43
7.7 Action URL ........................................................................................................................................44

www.escene.cn/en
ESCENE Communication Limited.
ESCENE Office IP Phone
7.8 EP+...................................................................................................................................................44
7.9 Audio.................................................................................................................................................45
7.10 Ring.................................................................................................................................................46
7.10 Dial Plan..........................................................................................................................................47
7.11 BLF Setting......................................................................................................................................48
7.12 TR069 .............................................................................................................................................50
7.13 MPL.................................................................................................................................................50
8 Phone Book..........................................................................................................................................50
8.1 Contact..............................................................................................................................................51
8.2 Group................................................................................................................................................51
8.3 LDAP.................................................................................................................................................52
8.4 Blacklist.............................................................................................................................................53
8.5 Phone Call Info..................................................................................................................................54
9 Maintenance .......................................................................................................................................54
9.1 HTTP Upgrade..................................................................................................................................55
9.2 FTP Upgrade.....................................................................................................................................55
9.3 TFTP Upgrade...................................................................................................................................56
9.4 Auto Provisioning...............................................................................................................................57
9.5 Log....................................................................................................................................................59
9.5 Local Log...........................................................................................................................................60
Check the log file on the local. ................................................................................................................60
9.6 Default Settings.................................................................................................................................60
9.7 Reboot...............................................................................................................................................60
10 Security.............................................................................................................................................60
10.1 Password .......................................................................................................................................60
10.2 Trusted Certificates .........................................................................................................................61
10.3 IP Strategy.......................................................................................................................................61
11 WEB Other Settings or Information - Appendix.............................................................................61
11.1 Logout .............................................................................................................................................61
11.2 Note Tips .........................................................................................................................................61

www.escene.cn/en
ESCENE Communication Limited.
ESCENE Office IP Phone
1. Getting Started
1.1 About
Escene ES680-PEG is a feature-added IP Phone. Using 4.5’480x854 pixel color backlight screen and except normal
features of a 8 lines HD IP Phone, after connection through bluetooth, MPL feature will allow you to use handset or speaker
to answer the call for cell phone, you can even transfer the call to IPPBX. Of cause, you can also use it to talk with the third
party UC client like Microsoft LYNC, Skype, Whatsapp. The convenient power-charing stand provides you nice experience
when you use it for a video conference call. It comes with an EP+ communication APP which can all you use the cell phone
to make an IP Phone call, switching talking, etc.
NOTE: Only U6S model support MPL feature.
1.2 Feature Highlights
a) Multi-Language
The LCD display supports Multi-Language.
b) HD Voice
Special voice processing technology, high-fidelity voice quality, HD encoding, HD Handset, ensure clear, realistic smooth
communication.
c) Senior Calling Ability
8 lines with double color(GREEN & RED) LEDs, Synchronously control or manage 8 calls, Call queue, Switch
between lines. Multi-parties conference, call transfer.
d) All kinds of Phone Book
It supports XML Personal Phone Book\LDAP\Enterprise Phone Book etc. This feature satisfies customer's
phone book requirements.
e) Support HTTP\TFTP\FTP\Auto-Provision.
f) 2 gigabit Ethernet ports, built-in POE,built-in bluetooth.
g) Multi-angle adjustable bracket.
h) Up to 80 programmable keys, (8 lines+ 72 paperless programmable keys).
i) MPL&EP+ Support external APPLE/Android mobile phone.
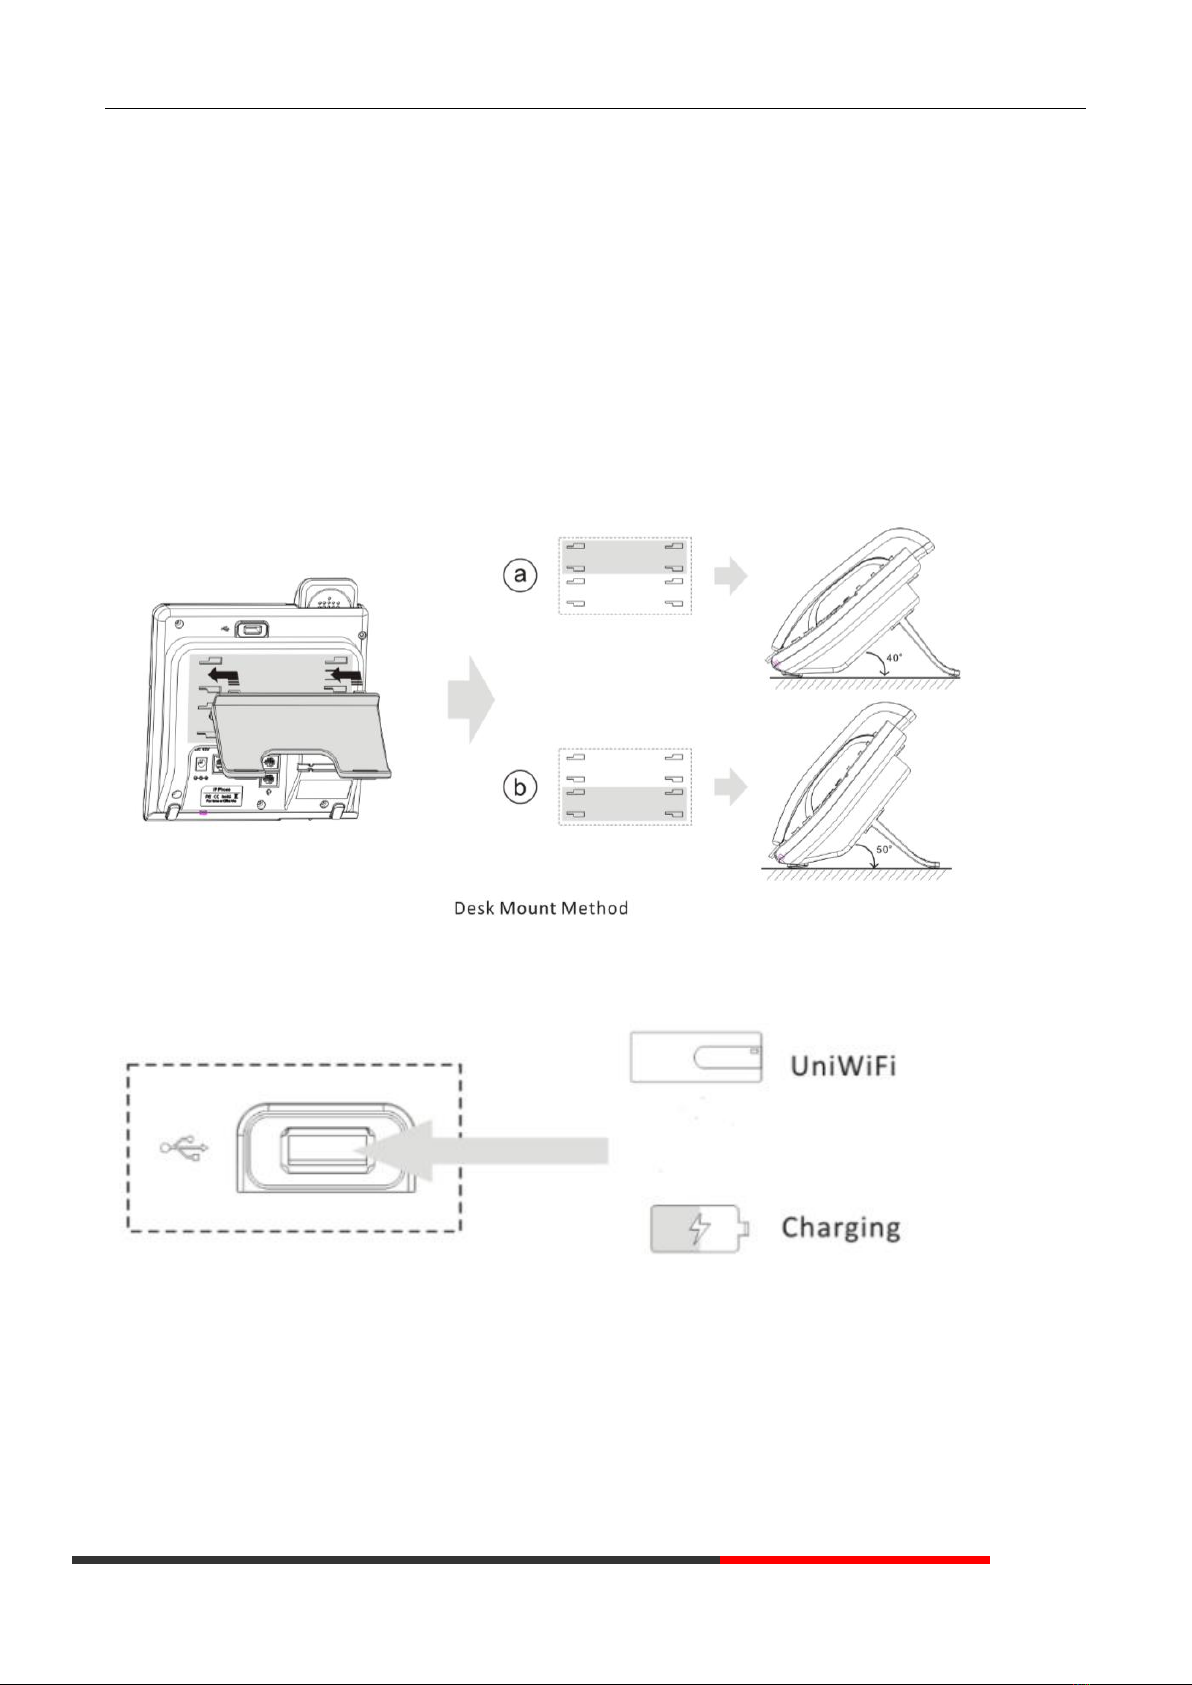
j) 2 built-in USB interface, USB1 support external UniWIFI / UniBT adapter. USB2(near EXT port) only for
charging.
k) Support EHS and EXT support connect USM18-LCD expansion module.
2. Set up the Phone
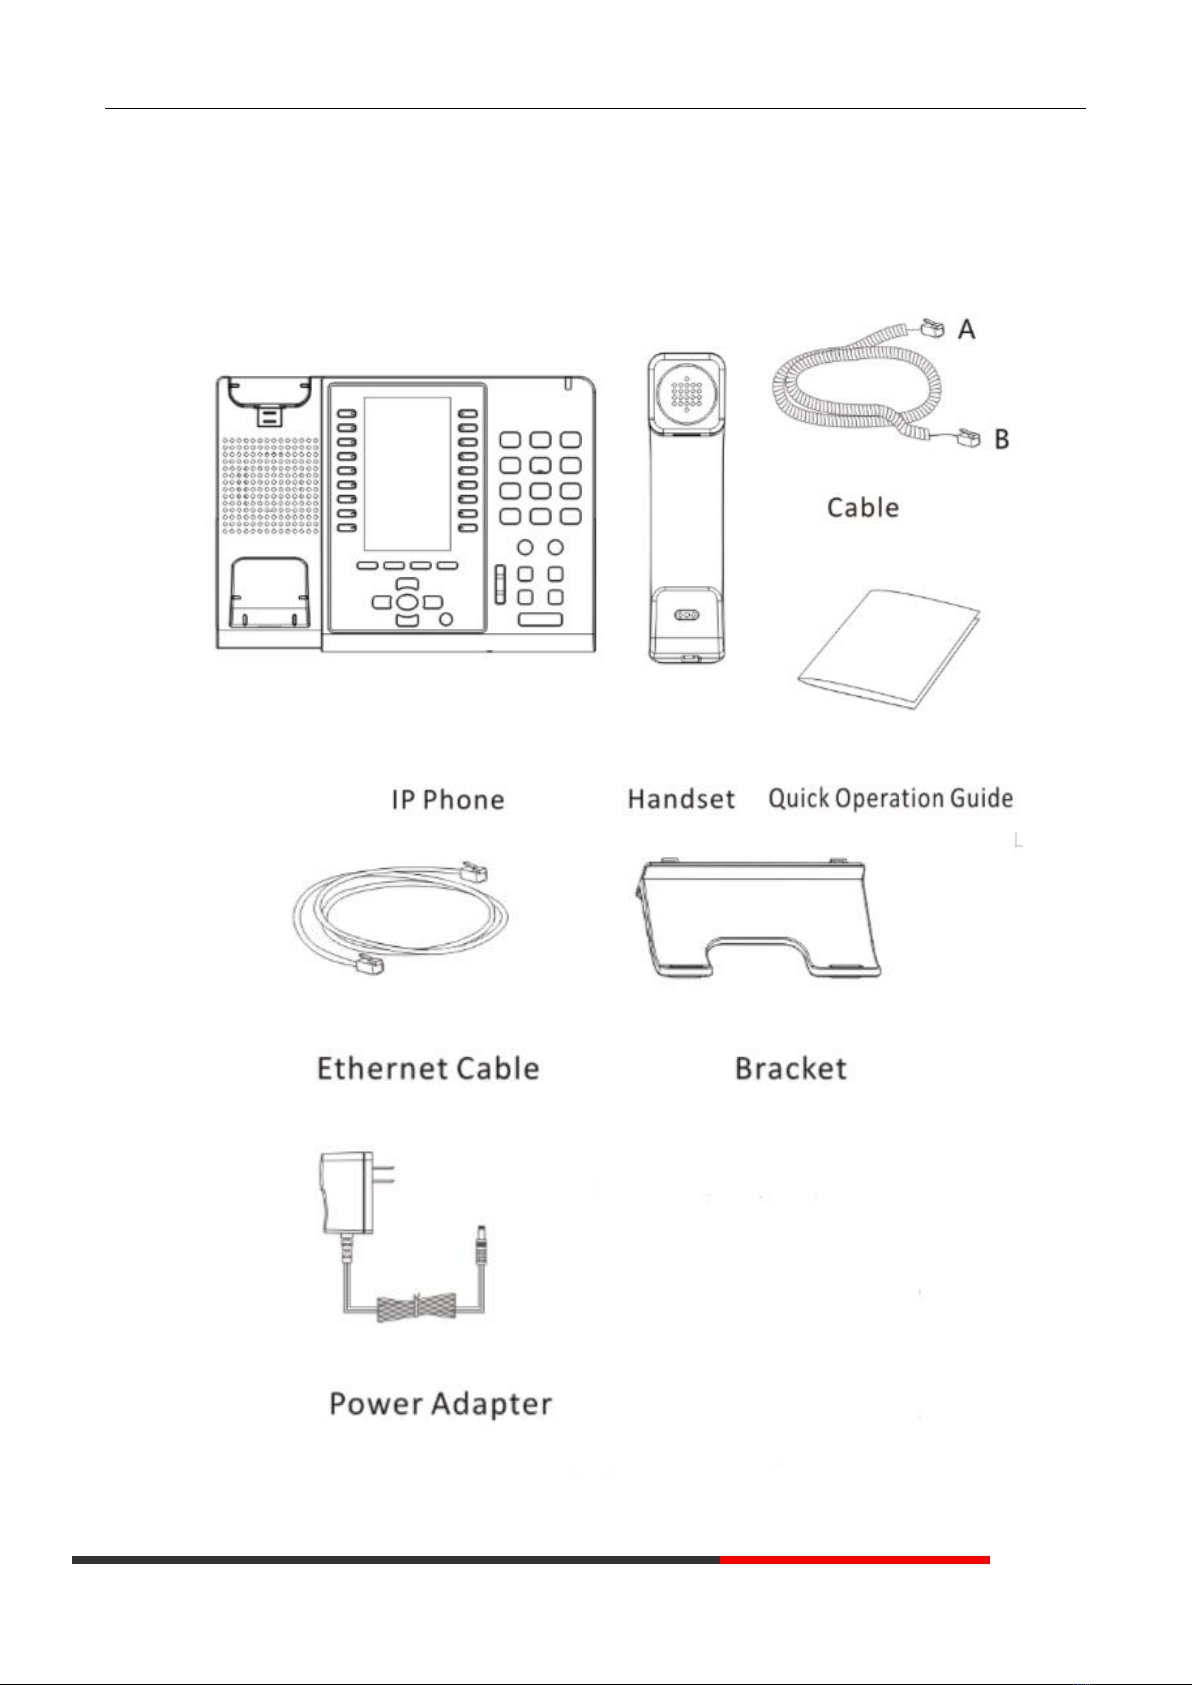
a) Packing List:
Check the packing list before installation, if you find anything missing, contact your system administrator.
⚫1*ES680-PEG IP Phone
⚫1*Handset
www.escene.cn/en
ESCENE Communication Limited.
ESCENE Office IP Phone
⚫1*Handset Cable
⚫1*Ethernet Cable
⚫1*Quick Operation Guide
⚫1*Power Adapter
⚫1*Bracket
www.escene.cn/en
ESCENE Communication Limited.
ESCENE Office IP Phone
NOTE: The cable install method is short A connect the handset, longer B connect the IP Phone.
b) Phone Installation:
This section introduces how to install the phone with the components in the packing list:
⚫Adjust the Bracket
⚫Connect the Handset and optional Headset
⚫Connect the Network and Power
Adjust the Bracket
Pls follow the following picture to let the bracket adjust to safety
Connect the Handset and optional Headset

www.escene.cn/en
ESCENE Communication Limited.
ESCENE Office IP Phone
Connect the Network and Power
You have two options for power supply. Your system administrator will advise you which one to use.
⚫AC power adapter
⚫POE(Power over Ethernet) IEEE802.3af
⚫USB(Standard 0.5A)
Note: If inline power (PoE:Power over Ethernet) is provided, you don’t need to connect the power adapter. Make sure
www.escene.cn/en
ESCENE Communication Limited.
ESCENE Office IP Phone
the Ethernet cable and hub/switch are PoE compliant; The EXT port can also be used to connect the expansion
module ESM18-LCD.
3. Phone User Interface
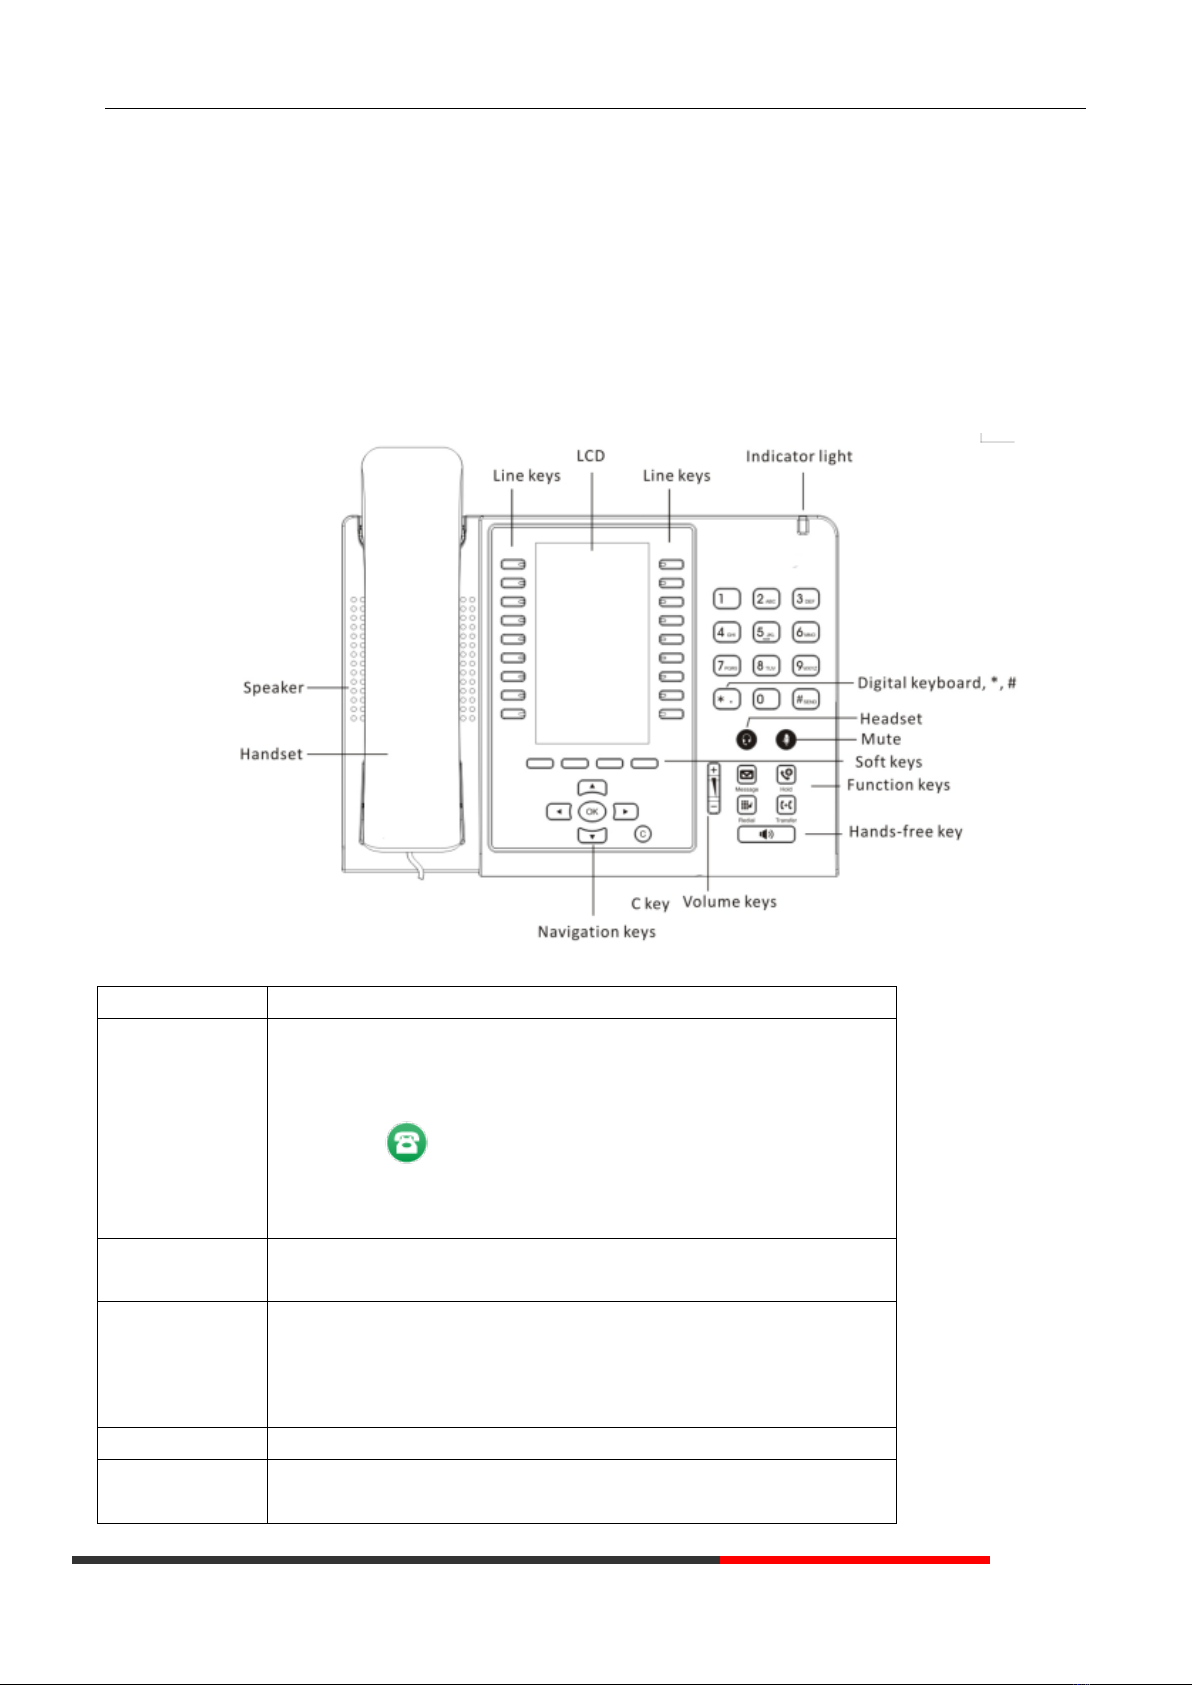
3.1 Hardware Component Instructions
The main hardware components of the ES680-PEG IP Phone are the LCD screen and the keypad.
Hardware component instructions of the ES680-PEG IP Phone are:
ITEM
DESCRIPTION
LCD Screen
Displayed information about calls, messages, soft keys, time, date and other
relevant data:
• Call information — caller ID, call duration
• Icons (e.g. )
• Missed calls or second incoming caller's information
•Time and date
Light Status
White-Flashing: There is an incoming call or be Hold.
White-Steady: Hook-off. or be in an usual conversation.
Line Key
Green-Steady: There is a conversation making on the line
Red-Flashing: There is call coming in
Green-Flashing: The line is on hold
Dark: Accounts are idle
Soft Key
Labels automatically to identity their context-sensitive features
Navigation Key
Scroll through the displayed information, and in the idle feature:
UP: Open the "All CONTACT LOG"

www.escene.cn/en
ESCENE Communication Limited.
ESCENE Office IP Phone
DOWN: Open the "MISSED CALL"
RIGHT: Open the "RECEIVED CALL"
LEFT: Open the "DAIL CALL"
OK Key
Confirm the action
C Key
Cancels actions or rejects an incoming call, and the other feature:
In the idle: Open the "Phone Status".
Diagnosis: Press and hold 3 second to open "Hardware Diagnosis".
MUTE: "MUTE" feature is enabled if you press it while the conversation
making on the phone.
Functions Key
Message\Redial\Transfer\Hold
Speaker Key
Toggles the hands-free speaker phone mode.
Mic
Voice input
Volume Key
Adjusts the volume of the handset, headset, speaker and ringer
Keypad
Provides the digits, letters and special characters in context-sensitive
applications.
Headset Key
Toggles and indicates the headset mode.
3.2 Phone Screen Display Features
If the phone has successfully started up and after using, the idle LCD display will show information as below:

www.escene.cn/en
ESCENE Communication Limited.
ESCENE Office IP Phone
ITEM
DESCRIPTION
1
TIME & DATE
TIME & DATE display in the middle of the screen.
2
Auto-Answer icon
Enable this feature, it will display "AA" at the top right corner.
3
Missed Call
Missed Call under the TIME in the middle of screen
4
Line Status
There are four status as below:
a. LAN:Disconnect :Disconnect the network
b. :Account failed to register
c. :Account successfully registered
d. :Account successfully registered and DND feature is enabled. The
DND icon also will display at the top right corner.
5
Soft Key Area
Labels automatically to identity their context-sensitive features

www.escene.cn/en
ESCENE Communication Limited.
ESCENE Office IP Phone
6
Screen Icon
The Screen Top Icon from left to right is:
: Handset Hand on status
:Speaker Hand on status
:Headset Hand on status
:Call MUTE
:Missed Call
:Call Forward
:Text Message
:Keypad Lock
:Network is unavailable
3.3 Basic Network Settings
The phone supports Three Modes of Network Setting. Include Wi-Fi Setting\Static IP\DHCP.
Wi-Fi Setting
Note: This feature must be work with UniWIFI device. More about this, pls contact your system administrator.
In order to more easily and quickly implement Wi-Fi series phone deployment, we provide EWFC(Enhanced WIFI Fast
Connection) technology to implement automatic connection between the 5.8G Wi-Fi phone and AP-3.
Note: This feature must be work with AP-3 device. More about this, pls contact your system administrator.
①When the AP-3 is set up wireless parameters by the administrator, you can long press "ok" to enter the password to
connect it.
②If you don’t use EWFC rapid deployment, you canAccording to the normal method for manual connection and settings
as following:
Feature
Operating Steps
Wi-Fi
Press OK or MENU> System Settings> Advanced Settings> Password(Default is
Empty)> Network> Wi-Fi Setting
⚫Press Wi-Fi Setting to login in to the menu
⚫Select "Wi-Fi", and choose “enable”
⚫Press "Save" key
⚫Select “Hotspot List”
⚫Press "Enter" key

www.escene.cn/en
ESCENE Communication Limited.
ESCENE Office IP Phone
⚫Select the hotspot which you want to connect
⚫Enter “Password”
⚫Press "OK" key to make it work
DHCP Setting
Feature
Operating Steps
DHCP
Press OK or MENU> System Settings> Advanced Settings> Password(Default is
Empty)> Network> IP Setting
⚫Press IP Setting to login in to the menu
⚫Select "DHCP" mode
⚫Press "Enter" key
⚫Set the DNS\web port\telnet port
⚫Press "Save" key to make it work
⚫Tips "Network is changed, press OK reboot "
Static IP Setting
Feature
Operating Steps
Static IP
Press OK or MENU> System Settings> Advanced Settings> Password(Default is
Empty)> Network> IP Setting
⚫Press IP Setting to login in to the menu
⚫Select "Static" mode
⚫Press "Enter" key
⚫Set the IP\Mask\GW\DNS\web port\telnet port
⚫Press "Save" key to make it work
⚫Tips "Network is changed, press OK reboot "
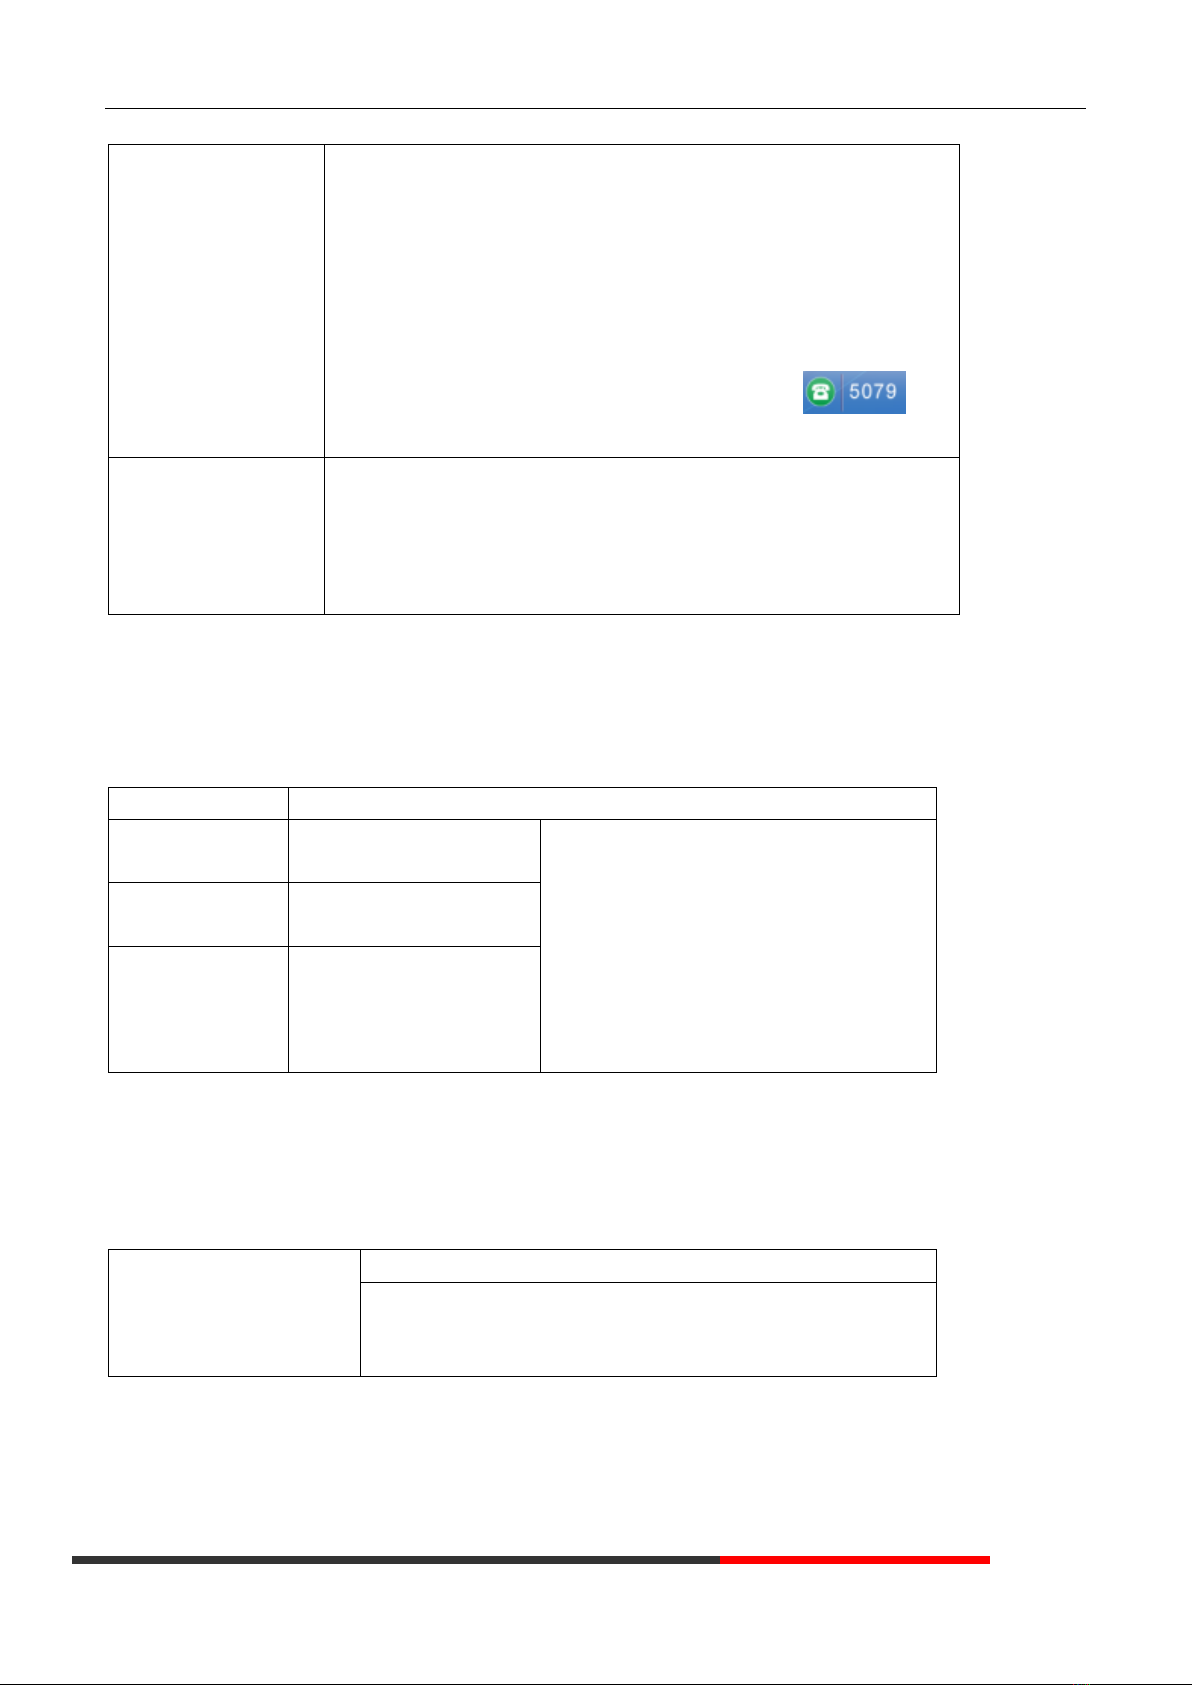
3.4 SIP Account Settings
ES680-PEG IP phone makes calls based on sip accounts, It can support Single account or Multi-account, Each account
can be configured to the different SIP server.
If you want to…
Then...
Create an SIP account
1) Select “System setting” > “Advanced setting”;
2) Enter the password required(The default is empty) ;
3) Select “SIP” > “Account sip”;
4) Select one of the account you want to setting, you can configure the
following parameters
-Enable account*: Select Enable
-Line Keys Use: Default is 1
-Description: description of this account
-Display Name: The name displayed on the screen
-Authentication user: the Authenticated users are matched with the SIP
server.(The default With the same account)
-Account*: the account matches with the SIP server.(extension number)
www.escene.cn/en
ESCENE Communication Limited.
ESCENE Office IP Phone
-User pass word*: the user password matches with the SIP server
-SIP Server*: The primary SIP server, all calls through this server
-Out Bound Server: The out bound SIP server
-STUN Type: Enable/Disable STUN feature
-STUN: Input STUN URL
-Auto Answer: Enable/Disable this account auto answer feature
* Note: When you finish the setting, you can press Save to make it work, and
then you can see the status icon in the LCD idle. The
parameters with the * mark must be set.
Disable sip account
1) Select “System setting” > “Advanced setting”;
2) Enter the password required(The default is empty) ;
3) Select “SIP” > “Account sip”;
4) Select “Enable account” > “Disable”;
5) Select “Save” to saves settings
3.5 Basic Features.
3.5.1 Making a Call
Here are some easy ways to place a call on SayHi IP Phone:
If you want to...
Then…
Place a call using
the handset
Pick up the handset
1) You can hear dial tone;
2) Enter a number;
3) Press #button (default),
-or wait 5s (default), then it send the number
automatically.
Place a call using a
speakerphone
Press Speaker button
Place a call using a
headset
Put on your headset, active
Headset button so that the
status light is Red, and then
do as using speakerphone
3.5.2 Anonymous Call
You can use anonymous call feature to block the identity and phone number from showing up to the called party when you
call someone. E.g, you want to call to consult some of the services, but you don't want to be harassed.
Enable Anonymous Call
Press OK or MENU> Function Setting> Anonymous
Press Enter or OK button ,
-You can select which Account want to use, enable/disable this
feature and enable/disable reject anonymous
3.5.3 Redial
To redial the last placed call from your phone
www.escene.cn/en
ESCENE Communication Limited.
ESCENE Office IP Phone
Redial
Press REDIAL button to dial the last number
-or press Navigation button-Left > “Dialed number”, select a number,
and press
3.5.4 Call Log
Dial from a call log
1) Press MENU or OK button >“Call history”, you can select "All Calls",
“Missed calls”, “Received calls” and “Dialed numbers”,
- or press Navigation button (in Standby interface) > select "All
Calls"(up) “Missed calls”(down), “Received calls”(left)and “Dialed
numbers” (right)
2) Then press button.
NOTE: You also can press the "log" to login this menu when in the
idle.
3.5.5 Making Calls to Contact
You can also dial a contact from the Personal Phone Book.
Placing Calls to
Contacts
1) Press MENU or OK button >“Phone Book”, you can select "Personal
Phone Book", “Enterprise Phone Book”, “LDAP” and “Black List”,
- or press Navigation button (in Standby interface) > select the desired
contact.
2) Then press button.
NOTE: You also can press the "DIR" to login this menu when in the
idle.
3.5.6 Multi-lines to Answer the Call
Multi-lines to Answer the
Call
1) Another Line button is Red and flashing, Light strip is Red and flashing;
2) Press the flashing Line button to answer (at this time, the original call
will be hold.)
3.5.7 Auto-Answer
You can set the phone and let it auto-answer the coming call.
Auto-Answer the
Coming Call
1) Enable the Auto-Answer feature.
2) Auto-Answer mode you can set in the MENU>Function Setting> Auto
Answer >Device
⚫Speaker
⚫Handset
⚫Headset
www.escene.cn/en
ESCENE Communication Limited.
ESCENE Office IP Phone
When you use the Handset mode, at this time you need to hands up the
handset and then it can work at this status.
3)Filter Groups
Auto-answer the coming call in this special groups.
3.5.8 Ending a Call
To end a call, hang up. Here are some more details.
Hang up while using the
Handset
Return the handset to its cradle,
-or press End
Hang up while using the
Speakerphone
Press Speaker button,
-or press Line button for the appropriate line,
-or press End
Hang up while using the
Headset
Press Handset button, (Do not keep the headset mode) ,
-or press End (keep the headset mode)
Hang up one call, but
preserve another call on the
other line
Press End,
-or refer to the above three methods
3.5.9 Using Hold and Recover (Switch Calling Line)
You can hold and resume calls. You can take a call in one line at anytime, and the other lines would be hold. As a result of
that, you can switch different calling line on our phone.
If you want to...
Then...
Put a call on hold
Press HOLD button,
-or press soft key
Hold a line and switch to
another line
Press another Line button for the appropriate line
Resume a call on current
line
Press Line button,
Release a call on different
line
Select the line want to release hold, press the line, so recovery;
NOTES
•Engaging the Hold feature typically generates music or a beeping tone.
• A held call is indicated by the green and flashing Line button or Hold in the LCD.
3.5.10 Transferring Calls
Transfer redirects a connected call. The target is the number to which you want to transfer the call.
Talk to the transfer
recipient before
transferring a call
(consult transfer)
1) Press TRANSFER button or press XFER;
2) Enter number;
3) press “#”(default) ,
-or press then transfer the call,

www.escene.cn/en
ESCENE Communication Limited.
ESCENE Office IP Phone
-or wait five seconds(default)then transfer the call
Transferred to idle lines
or other numbers
without talking to the
transfer recipient
(Blind transfer)
1) Press TRANSFER button or XFER;
2) Press ;
3) Enter number;
4) Press “#”(default)
-or press , then transfer the call;
-or wait five seconds(default)then transfer the call
Blind transfer to the
held line
1) Press TRANSFER button or press XFER;
2) Press the Line button of held line
3.5.11 Using Mute
With Mute enabled, you can hear other parties on a call but they cannot hear you. You can use mute in conjunction with the
handset, speakerphone, or a headset。
Toggle Mute on
Press C button, then the screen top and left will have a MUTE icon
Toggle Mute off
Press C button again, then the button light off
3.5.12 Do Not Disturb
You can use the Do Not Disturb(DND) feature to block incoming calls on your phone with a busy tone(Can also be set to
their voice mail or other extension numbers, etc.).
Enable global DND
1) Press DND;
2) All enabled line on the phone would changes to status. and the
icon is .
Enable DND on a single
line
Press MENU or OK button > “Function setting” > “DND” > (select line)
“Enable”
Disable DND
Global DND enabled, press to disable global DND;
Line DND enabled, press twice ,
-or press MENU or OK button > “Function setting” > “DND” >(select line)
“Disable”
3.5.13 3-way Conference
You can enable a three-party conference, during the conversation three phone parties can communicate with every party.
If you want to...
Then...
Invite the transfer
recipient into a
conference in a
transferring
1) When the transfer recipient answer the call, press "CONF" soft key on
your phone;
2) Then the held one, transfer recipient and you will be into a conference,
and the LCD will display Conference :0:0:10 status.
Invite the third party into
a conference in a active
1) Press "CONF" soft key in an active call;
2) Enter the third party number;
www.escene.cn/en
ESCENE Communication Limited.
ESCENE Office IP Phone
call
3) After connected the third party, press "CONF" soft key again
establish a conference
with held line
1) when one phone line is holding on and the other line is busy;
2) Press "CONF" Soft key
3)Press the held line's programmable button, the 3-way Conference is
enable.
3.5.14 Voice Mail
When the Phone get a voice mail from server..
Voice Mail
1)Press the Voice Mail button
2)Enter the User Password
3)It will login into the voice mail server. You need to follow the IVR to do it.
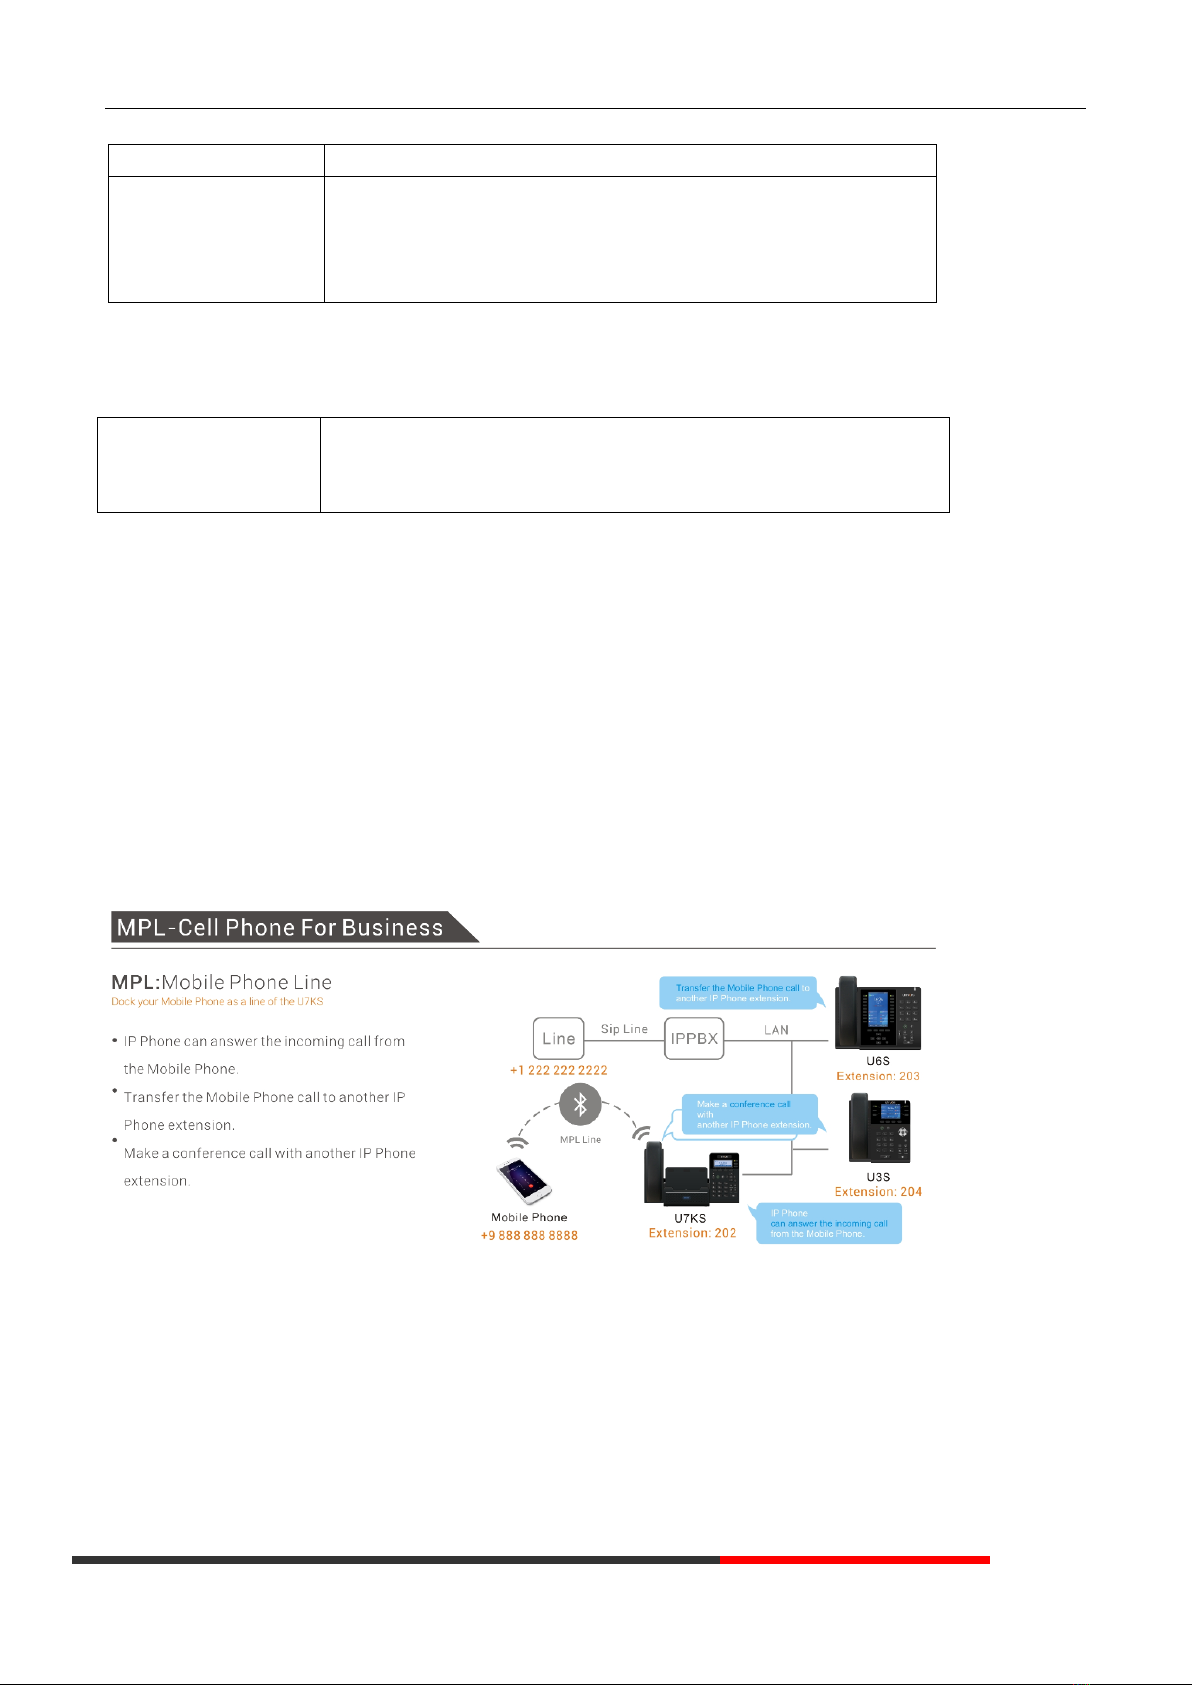
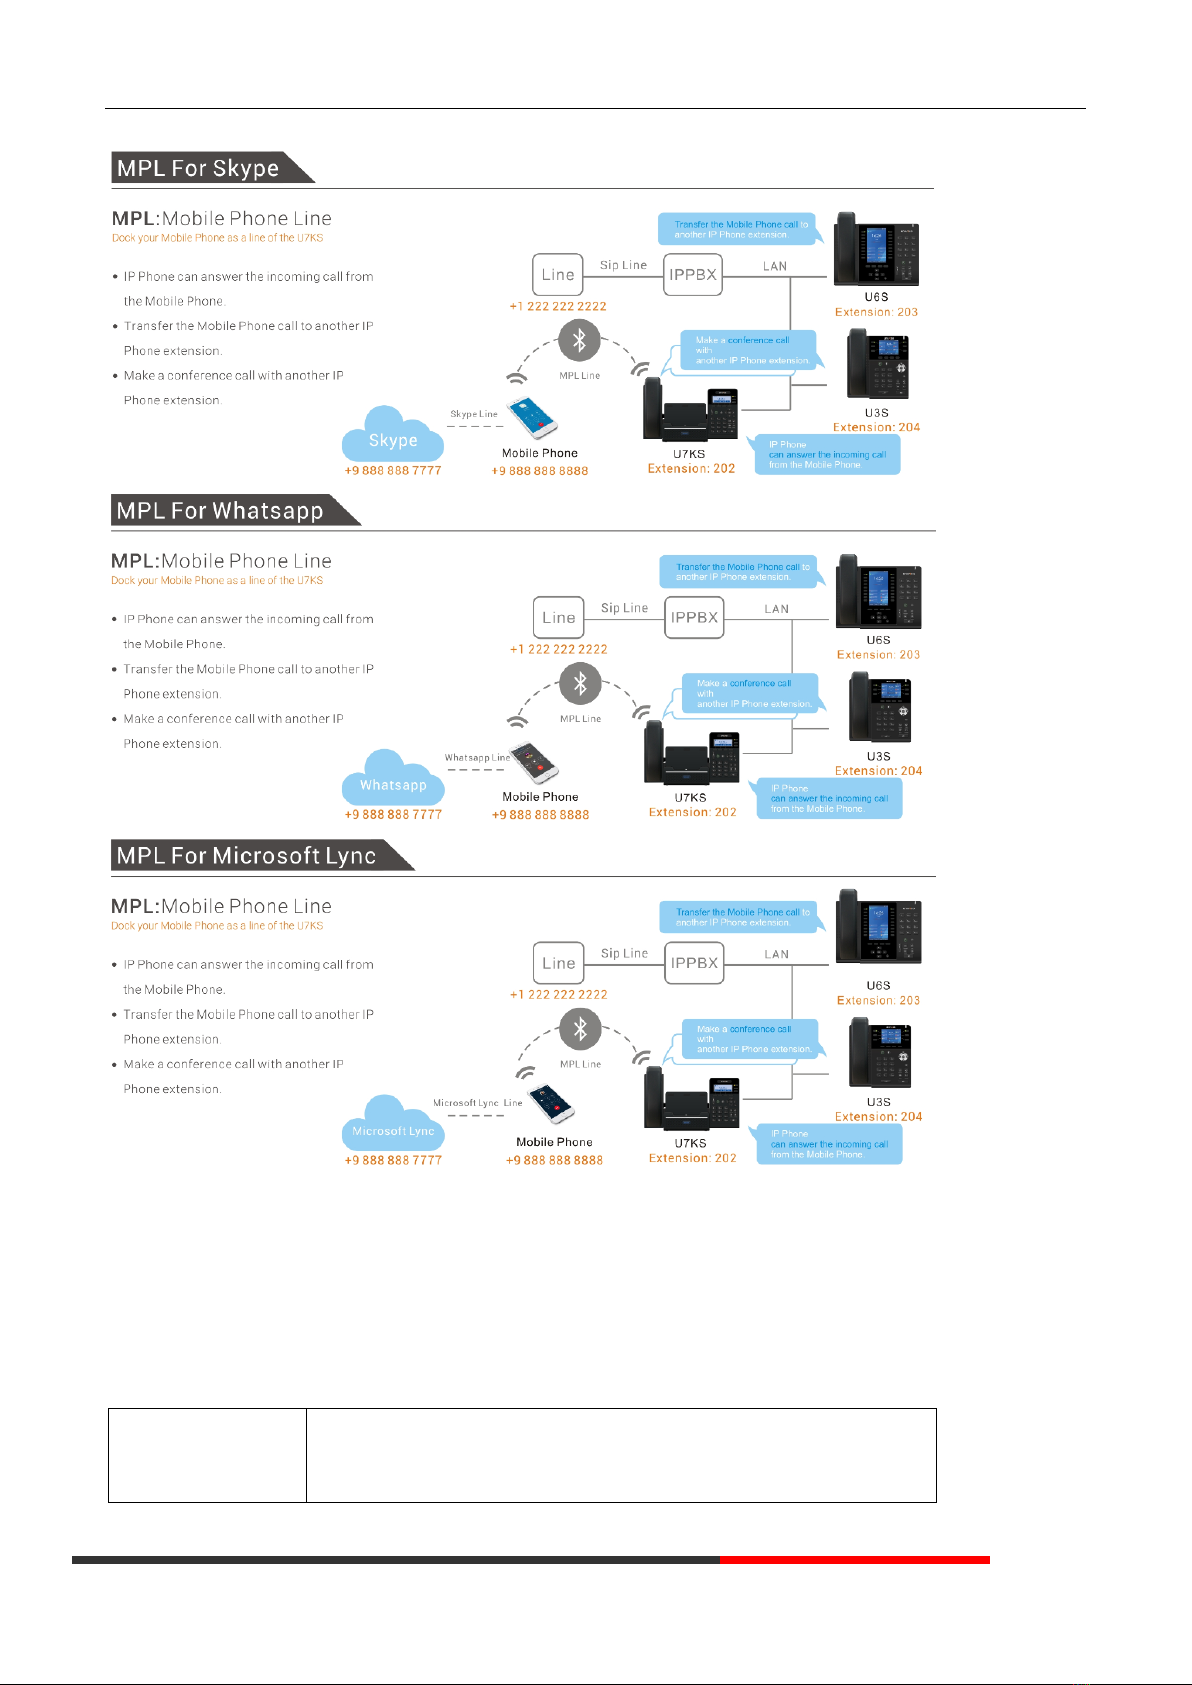
3.5.15 MPL
MPL(Mobile Phone Line), dock your mobile phone as a line.
Step1: Enable/disable MPL, press Menu(OK) > System Settings >Advanced Settings(Default password is empty, press O
K button to enter) >MPL .
Step2: Change the SIP line account model as ”MPL”.Press the Menu(OK) > System Settings > Advanced Settings(Default
password is empty, press OK button to enter) > SIP > SIPAccounts, press OK button to submit the changes.
Step3: Turn on your mobile phone’s Bluetooth feature. Find the Bluetooth list, e.g. “016B0A-U6S” and make connection.
And then you can use MPL line to make a call or conference or transfer.
MPLApplication Examples
www.escene.cn/en
ESCENE Communication Limited.
ESCENE Office IP Phone
3.6 Advanced Settings
3.6.1 Using the phone book
Enterprise Phone Book
Search the Contacts
from Enterprise
Phone Book
1) Press DIR in the idle status,
-or press "MENU" or "OK" button > “Phone book”>“Enterprise Phone
Book”,

www.escene.cn/en
ESCENE Communication Limited.
ESCENE Office IP Phone
2) Select “Enterprise Phone Book”, press "OK" button;
3) Press "Find" and input the name who you want to search.
Call the Contact from
Enterprise Phone
Book
1) Press "DIR" in the idle,
-or press "MENU" or "OK" button > “Phone book”>“Enterprise Phone
Book”,
2) Select “Enterprise Phone Book”, press "OK" button;
3) Press "Find" and input the name who you want to search.
4) When you search the person, you can dial it.
Personal Phone Book
Add Contacts
1) Press Phone Book,
-or press "MENU" button > “Phone book”>“Personal phone book>View
All”,
-or press "OK" button > “Phone book”>“Personal phone book>View All”;
2) Select “Add contact”, press "OK" button;
3) Use the navigation keys to select content, press "OK" button to set and
modify:
-Name: set the name of contact,
-Office Number: Setting the contact Office Number
-Mobile Phone Number: Setting the contact Mobile Phone Number
-Others Number: Setting the contact Others Number
-SIP Account: Setting the contact call SIP account
-Group: the contacts be divided into different user’s groups
4) Press "Save" soft key to complete
Add group
1) Press "DIR" soft key,
-or press "MENU" button > “Phone book”>“Personal phone book>View
All”,
-or press "OK" button > “Phone book”>“Personal phone book>View All”;
2) Select the “add group” then press OK button;
3) Use the navigation keys to select content, press OK button to set and
modify:
-Group name: name of the group
4) Press "Save "soft key to complete
Modify group
1) Press "DIR" soft key,
-or press "MENU" button > “Phone book”>“Personal phone book>View
All”,
-or press "OK" button > “Phone book”>“Personal phone book>View All”;
2) Select the “Modify group” then press "OK" button ;
3) Select the group you want to modify, press the "OK" button to set and
modify, press "Save" to save the change
Delete group
1) Press "DIR" soft key,
-or press "MENU" button > “Phone book”>“Personal phone book>View
Table of contents
Other ESENE IP Phone manuals

ESENE
ESENE Sayhi 2 Series User manual

ESENE
ESENE Say Hi ES6 Series User manual

ESENE
ESENE SayHi 320 Seris User manual

ESENE
ESENE WS330-PEGV4 User manual

ESENE
ESENE ES620-PEGv4 Instruction manual

ESENE
ESENE ES220 User manual

ESENE
ESENE SayHi 6xx Series User manual

ESENE
ESENE ES380 User manual

ESENE
ESENE HS118v2 User manual

ESENE
ESENE WS620E User manual


