Essilor Instruments AKR 800 User manual

USER MANUAL

CONTENTS
I. INTRODUCTION 4
II. SUPPLY PACKAGE 6
1. Unpacking and storage 7
2. List of accessories 7
III. GENERAL DESCRIPTION 8
1. Intended use 9
a. Intended purpose 9
b. Indications for use 9
c. Expected clinical benefit 9
d. Intended population 9
e. Intended users 9
2. Device description 9
a. Main unit 9
b. Operations on control panel 10
3. Description of LCD touch panel 11
a. Measurement mode 11
b. Measurement mode - P.K 12
c. Measurement mode - R-SMP 13
d. Measurement mode - WTW 14
e. Measurement mode - Accommodation 15
f. Measurement mode - Retro Illumination 16
4. Measurement and analysis result 16
a. Printer output content 16
b. Description of report output 18
IV. INSTALLATION / CONNECTION 19
1. Installation of the device 20
a. Connection of power cord 20
b. Connection of external input/ output terminal 20
c. Setting of printer paper 21
d. Return from sleep mode 22
2. Turning ON/OFF 22
a. Turning ON 22
b. Turning OFF 23
3. Connection to other instruments 23
V. USE OF THE DEVICE 24
1. Flow operation 25
2. Setting of patient information 26
3. Preparation of examinee 27
4. Alignment and Measurement 27
5. Confirmation of measurement result 30
6. Print out and external output of measurement result 30
7. Measurement of the other eye 31
8. Operation after measurement 31
9. Optional function measurement method 32
a. P.K 32
b. R-SMP 35
c. WTW 38
USER MANUAL > CONTENTS
AKR800 - Auto Kerato Refractometer > V4 - 05-2022 - CE0459 2

d. Accommodation 40
e. Retro Illumination 42
VI. SETTING OF FUNCTION ON [SETUP] SCREEN 45
1. Operation Procedure on [Setup] screen 46
2. List of setup items 46
3. [Setup] screen - [Measure] tab 47
a. [Setup] screen - [Measure 1] 47
b. [Setup] screen - [Measure 2] 48
4. [Setup] screen - [Option] tab 49
5. [Setup] screen - [Export] tab 51
a. [Shared folder] - [Setting] screen 52
b. [Network] - [Setting] screen 52
6. [Setup] screen - [Print] tab 53
7. [Setup] screen - [Print/Export] tab 55
VII. ERROR DISPLAY 56
VIII. SAFETY CONSIDERATION 60
1. Symbols 61
a. On the document 61
b. On the device and packaging 61
2. Precautions for use 62
3. Contraindication 63
4. Side effects 63
5. Exclusion of liability clause 63
6. Power Source 63
7. Precautions regarding IT Network 64
8. Electromagnetic compatibility 64
a. Electromagnetic emissions 65
b. Magnetic and electromagnetic immunity 65
c. Radiofrequency wireless communications 66
IX. TROUBLESHOOTING 68
X. MAINTENANCE 70
1. Storage and handling condition 71
2. Cleaning 71
a. Cleaning of headrest and chinrest 71
b. Cleaning of external cover 71
c. Cleaning of LCD touch panel 72
d. Cleaning of measurement window glass 72
3. Periodical inspection and maintenance 72
4. Disassembly of the product and transport 72
a. Conveyance 73
b. Replacement of fuse 73
c. Refill of chinrest liner 73
5. Disposal 74
XI. SPECIFICATIONS 75
1. Technical data 76
2. Connectivity to other devices 77
3. It requirements 77
XII. QR CODE 78
USER MANUAL > CONTENTS
3AKR800 - Auto Kerato Refractometer > V4 - 05-2022 - CE0459

I. INTRODUCTION

The latest version of this user manual is available on a web space.
To access other available languages, please scan the QR code available at the end of this user manual > QR Code
Chapter (p.78).
For a safer, more effective use, follow the instructions outlined in this manual.
Copyright © 2022 Essilor - Original manual All rights reserved.
All reproduction of the content of this document, whether in part or as a whole, for the purpose of its publication or dissemination
by any means and in any format whatsoever, even free of charge, is strictly prohibited without Essilor's prior written consent
USER MANUAL > INTRODUCTION
5AKR800 - Auto Kerato Refractometer > V4 - 05-2022 - CE0459

II. SUPPLY PACKAGE

1. Unpacking and storage
Do not store the product:
Where dust accumulates
Where water may get on the unit
Where temperature and humidity are out of the specified ranges
Where sunlight directly contacts
Unstable and high place
2. List of accessories
While unpacking, check that the following standard accessories are included.
Extra care should be taken for storage of a model eye. Avoid where the lens of the model eye may be damaged as well
as any dusty or humid/steamy environments.
Store the printer papers at a site without direct sunlight, high temperature and high humidity where because they are
thermal paper.
Use only the accessories specified by us.
Please purchase these accessories from the distributors as necessary.
Use of the accessory (power cord) other than specified below may adversely affect other instruments and/or
cause malfunction of this device.
The product or the system should not be used adjacent to or stacked with other equipment. If adjacent or stacked
use is necessary, the product or the system should be observed to verify normal operation in the configuration in
which it will be used.
The use of the accessory, transducer or cable with the product or the system other than those specified may
result in increased emission or decreased immunity of the product or the system.
Do not use equipment that emits electromagnetic waves within 30 cm (12 inch) of any part of the product or the
system. It can result in reduced performance.
Operation manual: x1
Model Eye: x1. With a contact lens holder. A sticker indicating the diopter value is affixed.
Power Cord: x1 (2.5m)
Printer Paper: x3. Width: 57mm. 2 are in the box and 1 is installed in the device.
Fuse: 2. T2A L 250V
Chinrest Liner: x1 box. 1,000 sheets
Chinrest Liner Pin: x2
Dust Cover: x1
Cable to be used
Name Model No. Length
Power cord KP4819YKS31A or equivalent 2.5 m
USER MANUAL > SUPPLY PACKAGE
7AKR800 - Auto Kerato Refractometer > V4 - 05-2022 - CE0459

III. GENERAL DESCRIPTION

1. Intended use
a. Intended purpose
This product aims to objectively measure the refractive power of the eye and to measure the corneal curvature radius.
b. Indications for use
This product is intended to be used to provide measurements (objective refraction errors and radius of curvature of the eye) that
will allow the practitioner to prescribe a corrective solution such a spectacle lenses or contact lenses.
It also allows the practitioner to explore the crystalline lens opacity and to assess the patient's eye strain.
c. Expected clinical benefit
This section is not applicable.
d. Intended population
Child and adult.
The patients examined using this device are required the followings:
To maintain a sitting posture and ;
To answer questions from an examiner such as a doctor and an optometrist.
e. Intended users
This device is intended for eye care professionals use only.
2. Device description
a. Main unit
1. Eye mark
2. LAN connector
3. UAB-A connector
4. Serial communication port
5. Power switch
6. Printer
7. Power indicator
8. Control panel
1. Optical unit head
2. Chinrest*
3. Headrest*
USER MANUAL > GENERAL DESCRIPTION
9AKR800 - Auto Kerato Refractometer > V4 - 05-2022 - CE0459
*
Applied part
b. Operations on control panel
The measurement result and setting conditions, as well as observation image, are displayed.
Do not use something sharp such as a ballpoint pen to operate the control panel.
It can result in breakage of the control panel.
Do not point more than 1 point at the same time on the control panel.
Do not press the control panel strongly otherwise the measurement unit is moved and it results in miss to capture
the image. Operate the touch panel with appropriate handling.
Tapping ⇒ Used for selection.
Press the screen lightly.
Holding down ⇒ Used for keep driving.
(Driving of chinrest and optical head)
Hold down the screen lightly.
USER MANUAL > GENERAL DESCRIPTION
AKR800 - Auto Kerato Refractometer > V4 - 05-2022 - CE0459 10

3. Description of LCD touch panel
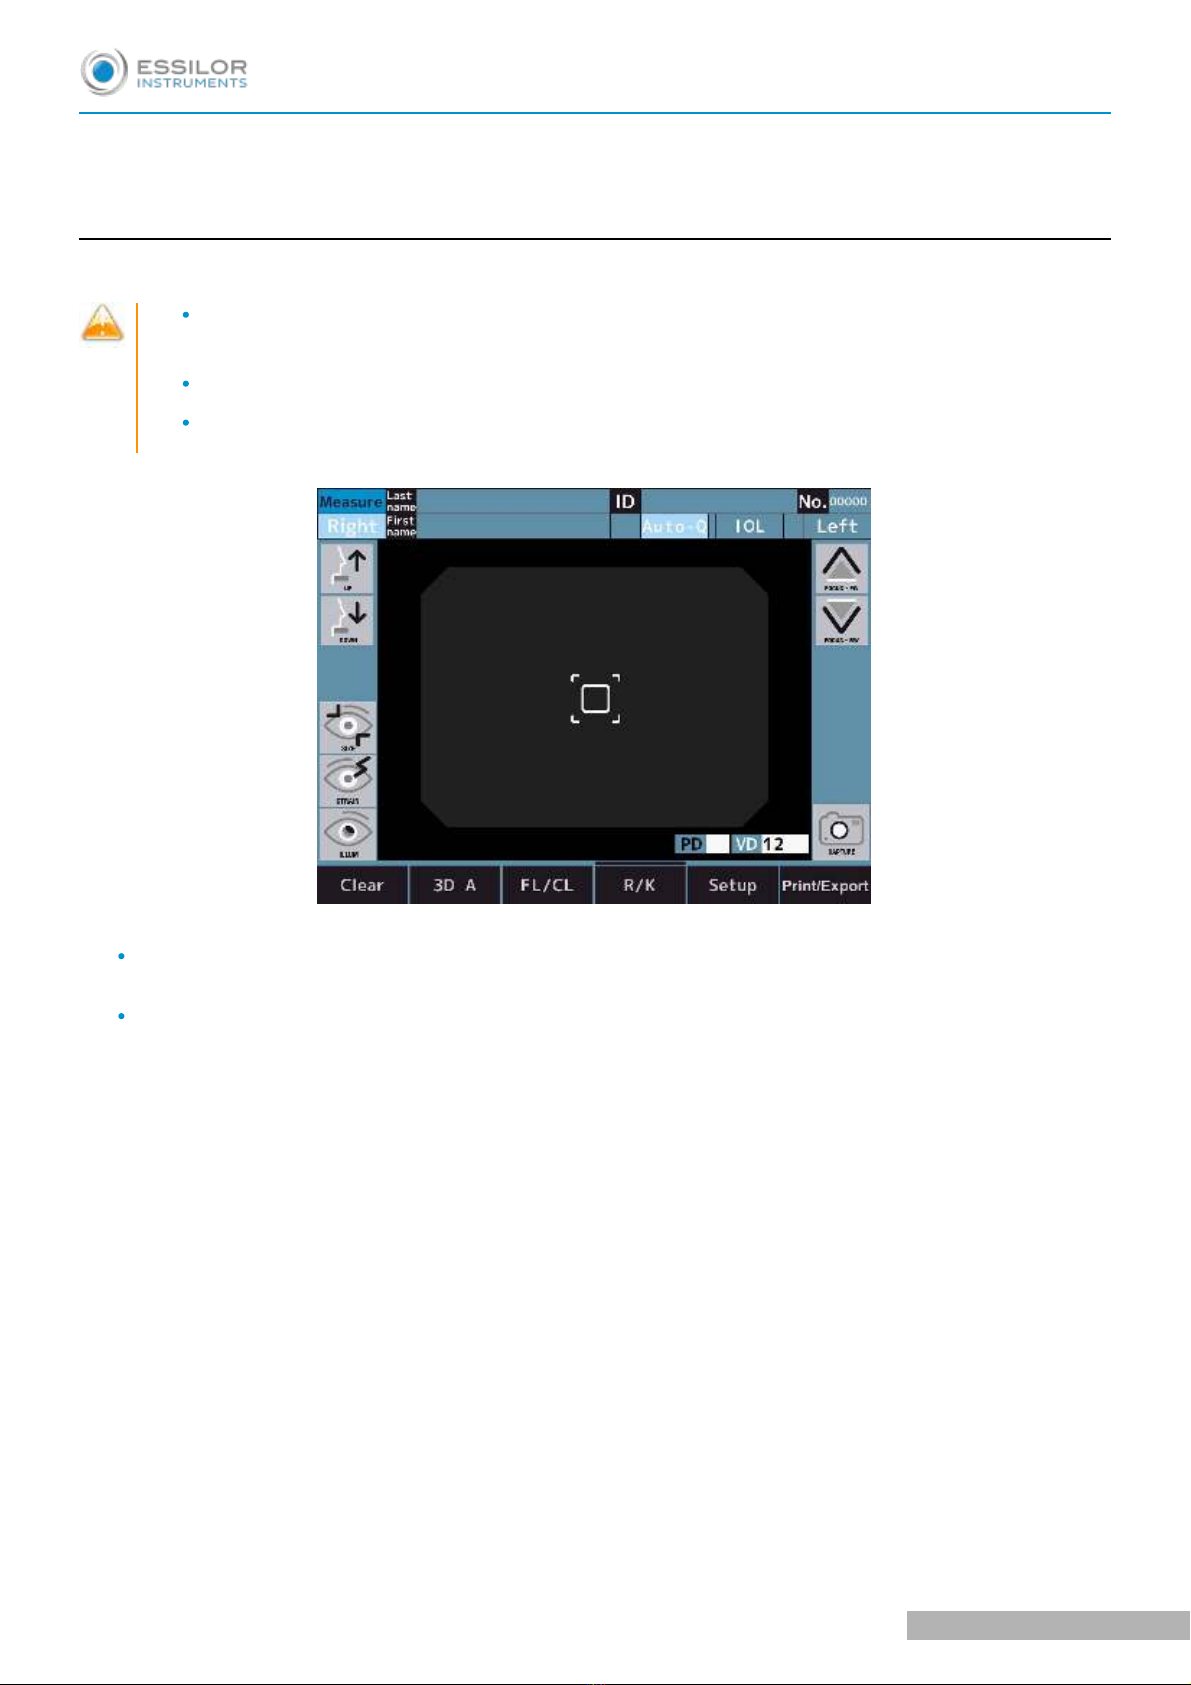
a. Measurement mode
1. Name of screen (measurement mode)
2. R switch
: Select either left or right eye. The optical head moves to the direction of the selected eye by tapping these buttons.
The [Right] and [Left] buttons are in light blue while they are selected.
3.Patient information input switch
: Input the last name (up to 32 letters), first name (up to 32 letters) and patient ID (up to 13 letters).
4.Measurement start method switch
: Select the measurement start method.
5.[IOL] switch
: Select the IOL measurement mode.
6.No. Switch
: The No. is displayed.
7.L switch
: Select either left or right eye. The optical head moves to the direction of the selected eye by tapping these buttons.
The [Right] and [Left] buttons are in light blue while they are selected.
8.Optical head back-and-forth motion switch
: The optical head moves back and forth to a subject's eye.
9.Measurement switch
: Measurement will be started.
10.VD switch
: Select the vertex distance.
*FL mode only
It can be switched between 0, 10, 12, 13.5 and 15mm.
11.PD switch
Pupil distance indication
12.Print switch
: The displayed measurement result is output.
USER MANUAL > GENERAL DESCRIPTION
11 AKR800 - Auto Kerato Refractometer > V4 - 05-2022 - CE0459

13. Setup switch
: Switch to the setup screen.
14.Measurement mode switch
: Select the measurement mode. It is :
1. Refractive & keratometry continuous measurement
2. Refractive measurement
3. Keratometry measurement
4. Peripheral kerato measurement
5. R-SMP measurement
15.Cornea top distance switch
: Switch the corneal vertex distance (frame value/ contact value).
16. Alignment mode switch
: Switch the auto-alignment operation.
17.[Clear] switch
: All of the measurement values are cleared.
18.Retro illumination mode transition switch
: Select the Retro Illumination mode.
19.Accommodation measurement mode transition switch
: Select the Accommodation mode.
20. Corneal diameter measurement mode transition switch
: Select the WTW mode.
21.Chinrest vertical motion switch
: The chinrest moves up and down.
b. Measurement mode - P.K
1. P.K. measurement method switch
: Select the measurement method.
2. Target selecting switch
: Select P.K target.
USER MANUAL > GENERAL DESCRIPTION
AKR800 - Auto Kerato Refractometer > V4 - 05-2022 - CE0459 12

Display current measurement area.
3. Measurement switch
: Measurement will be started.
c. Measurement mode - R-SMP
1. Target light status display
: Displays the status of the target light.
2.Graph switch
: Enlarge the graph of right eye data.
: Enlarge the graph of left eye data.
: Enlarge the graph of the currently selected eye data.
3.Magnification switch
: Enlarge the graph of right eye (right side of the screen) and left eye (left side of the screen) data.
4.Measurement switch
: Measurement will be started.
USER MANUAL > GENERAL DESCRIPTION
13 AKR800 - Auto Kerato Refractometer > V4 - 05-2022 - CE0459
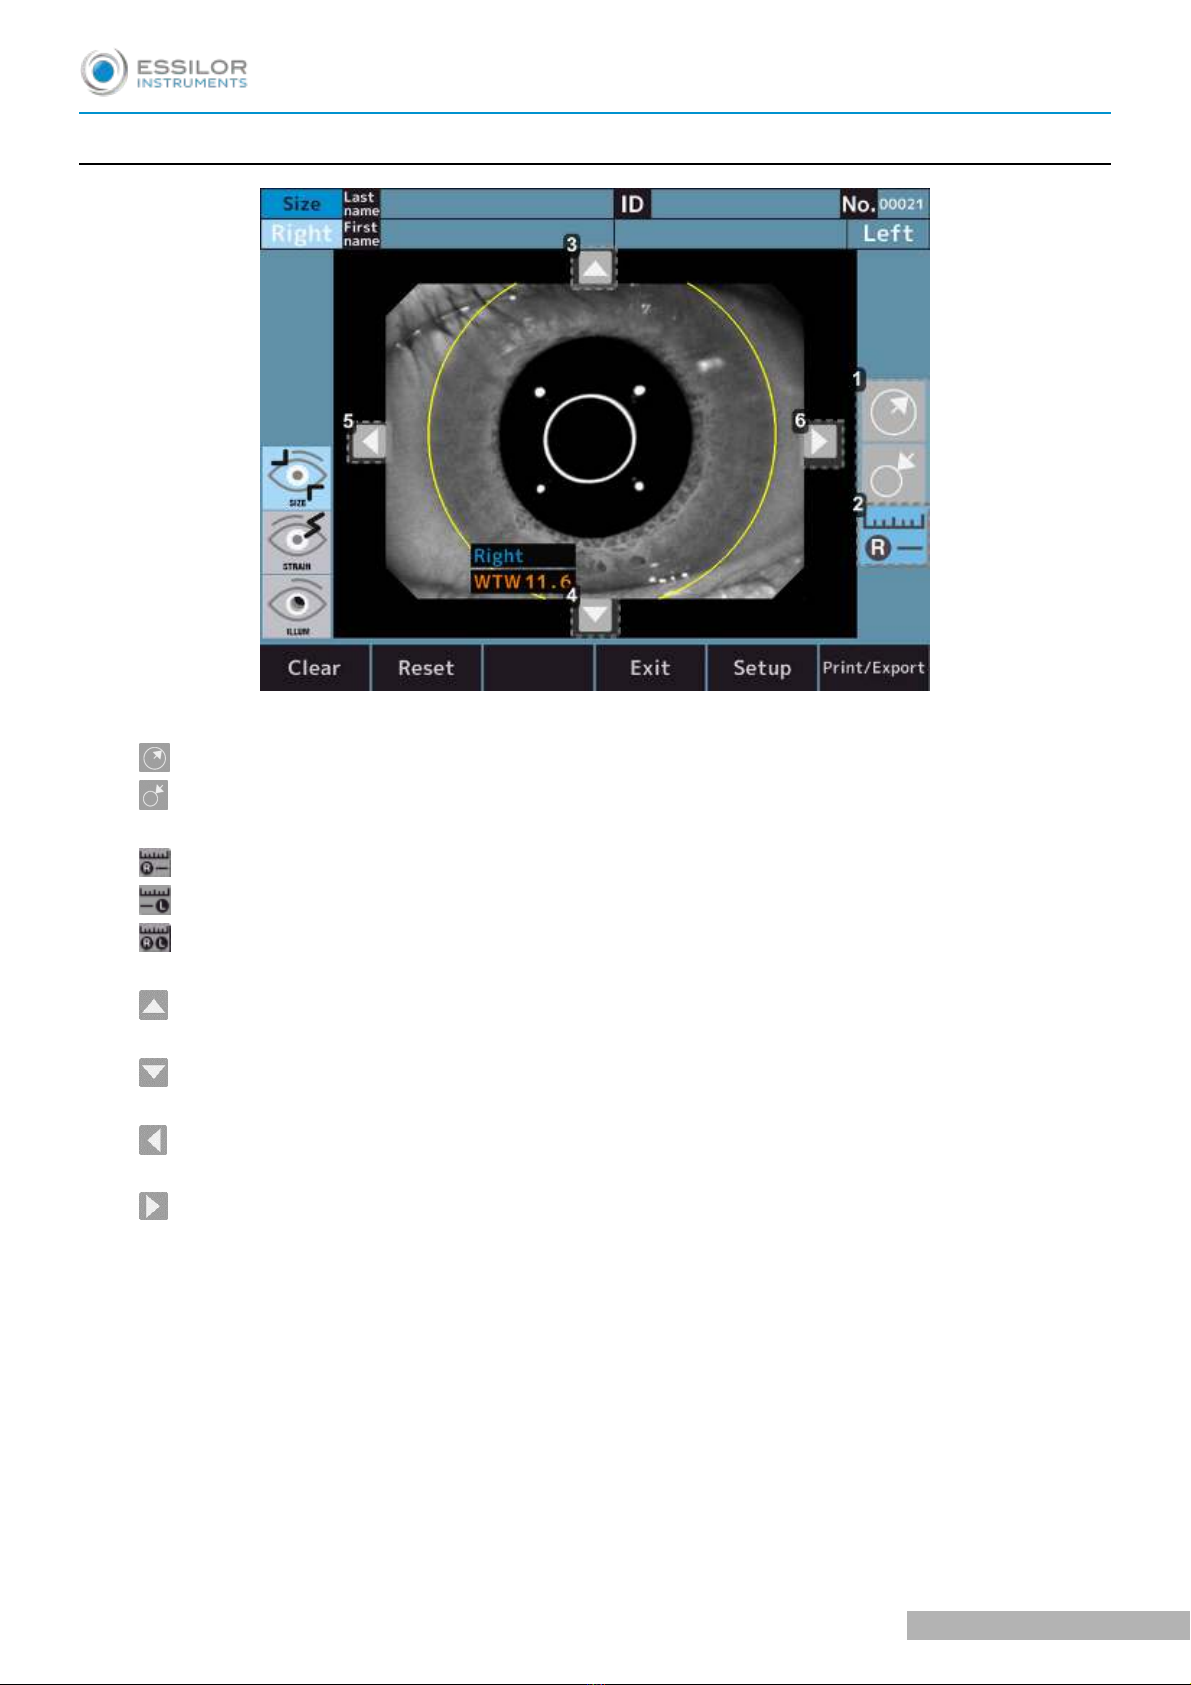
d. Measurement mode - WTW
1. Circle size adjustment switch
: Enlarges the size of the circle that serves as a reference for measuring the diameter of the cornea.
: Reduces the size of the circle that serves as the standard for measuring the diameter of the cornea.
2. Measurement switch
: Switch to measurement mode of right eye corneal diameter.
: Switch to measurement mode of left eye corneal diameter.
: Switch to measurement mode of the currently selected eye corneal diameter.
3. Circle position adjustment switch - Up
: Move up the position of the reference circle to measure the diameter of the cornea.
4.Circle position adjustment switch - Down
: Move down the position of the reference circle to measure the diameter of the cornea.
5.Circle position adjustment switch - Left
: Move the position of the reference circle to the left to measure the diameter of the cornea.
6.Circle position adjustment switch - Right
: Move the position of the reference circle to the right to measure the diameter of the cornea.
USER MANUAL > GENERAL DESCRIPTION
AKR800 - Auto Kerato Refractometer > V4 - 05-2022 - CE0459 14

e. Measurement mode - Accommodation
1. Alignment switch
: Re-alignment before moving the target.
: It does not perform re-alignment.
2.Number of measurements switch
: It is possible to set the number of measurements to 3 times.
: It is possible to set the number of measurements to 5 times.
3.Error switch
: If measurement error occurs 3 or 5 times, it stops halfway. And when touch the measurement start switch after re-
alignment, it starts from target position where error occurred.
: If measurement error occurs 3 or 5 times, it moves to the next target position.
4. Graph switch
: Enlarge the graph of right eye data.
: Enlarge the graph of left eye data.
: Enlarge the graph of the currently selected eye data.
5.Measurement switch
: Measurement will be started.
6. Graph switch
: Enlarge the graph of right eye (right side of the screen) and left eye (left side of the screen) data.
USER MANUAL > GENERAL DESCRIPTION
15 AKR800 - Auto Kerato Refractometer > V4 - 05-2022 - CE0459

f. Measurement mode - Retro Illumination
1. Auto gain On/Off switch
: Perform the auto gain.
: It does not perform the auto gain.
2.LED light quantity adjustment switch
: It is possible to adjust the brightness of the image.
3. Image icon
: Enter the right eye capture image observe screen.
: Enter the left eye capture image observe screen.
: Enter the currently selected eye capture image observe screen.
4.Measurement switch
: Measurement will be started.
5.Mode selector switch
: Mode to perform alignment.
6.Mode retro-image switch
: Mode to observe retro-image.
4. Measurement and analysis result
a. Printer output content
The measurement and analysis result can be printed out by pressing the output switch on the measure/analysis screen.
USER MANUAL > GENERAL DESCRIPTION
AKR800 - Auto Kerato Refractometer > V4 - 05-2022 - CE0459 16
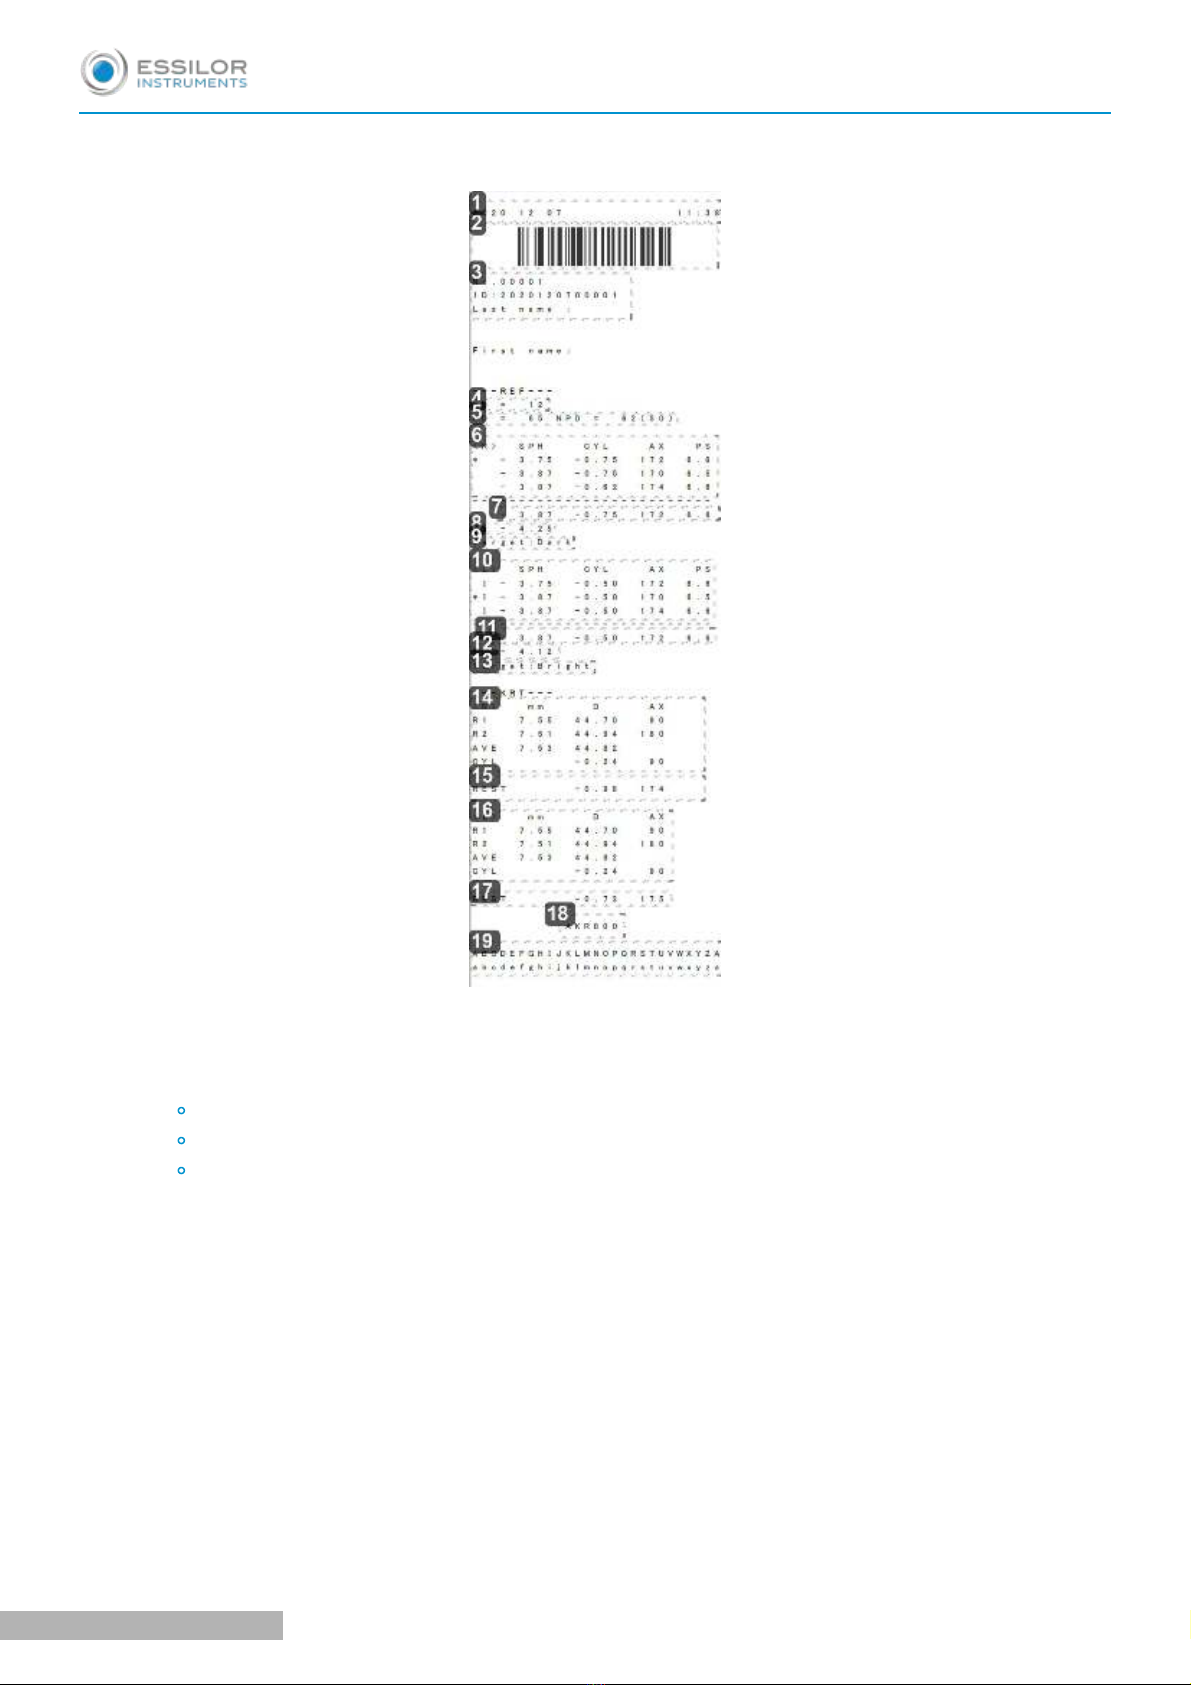
When print [REF/KRT] is set to [All/Eco]:
Sample of Printout
1. Date and time
2. Patient ID barcode
3. Patient information
No.
Patient ID
Examinee's name
4. Vertex distance
5.Pupil distance/PD for near vision
6.Refractive data - Right
7. Optimum value - Right
Indicated when each eye is measured more than three times.
8.Spherical equivalent - Right
9.Target value - Right
This is the setting value for [Target] on the [Setup] screen when measuring the pupil diameter.
10.Refractive data - Left
11. Optimum value - Left
12.Spherical equivalent - Left
13.Target value - Left
USER MANUAL > GENERAL DESCRIPTION
17 AKR800 - Auto Kerato Refractometer > V4 - 05-2022 - CE0459
14. Keratometry data - Right
15.Residual astigmatism - Right
16. Keratometry data - Left
17. Residual astigmatism - Left
18.Product name
19.Message area
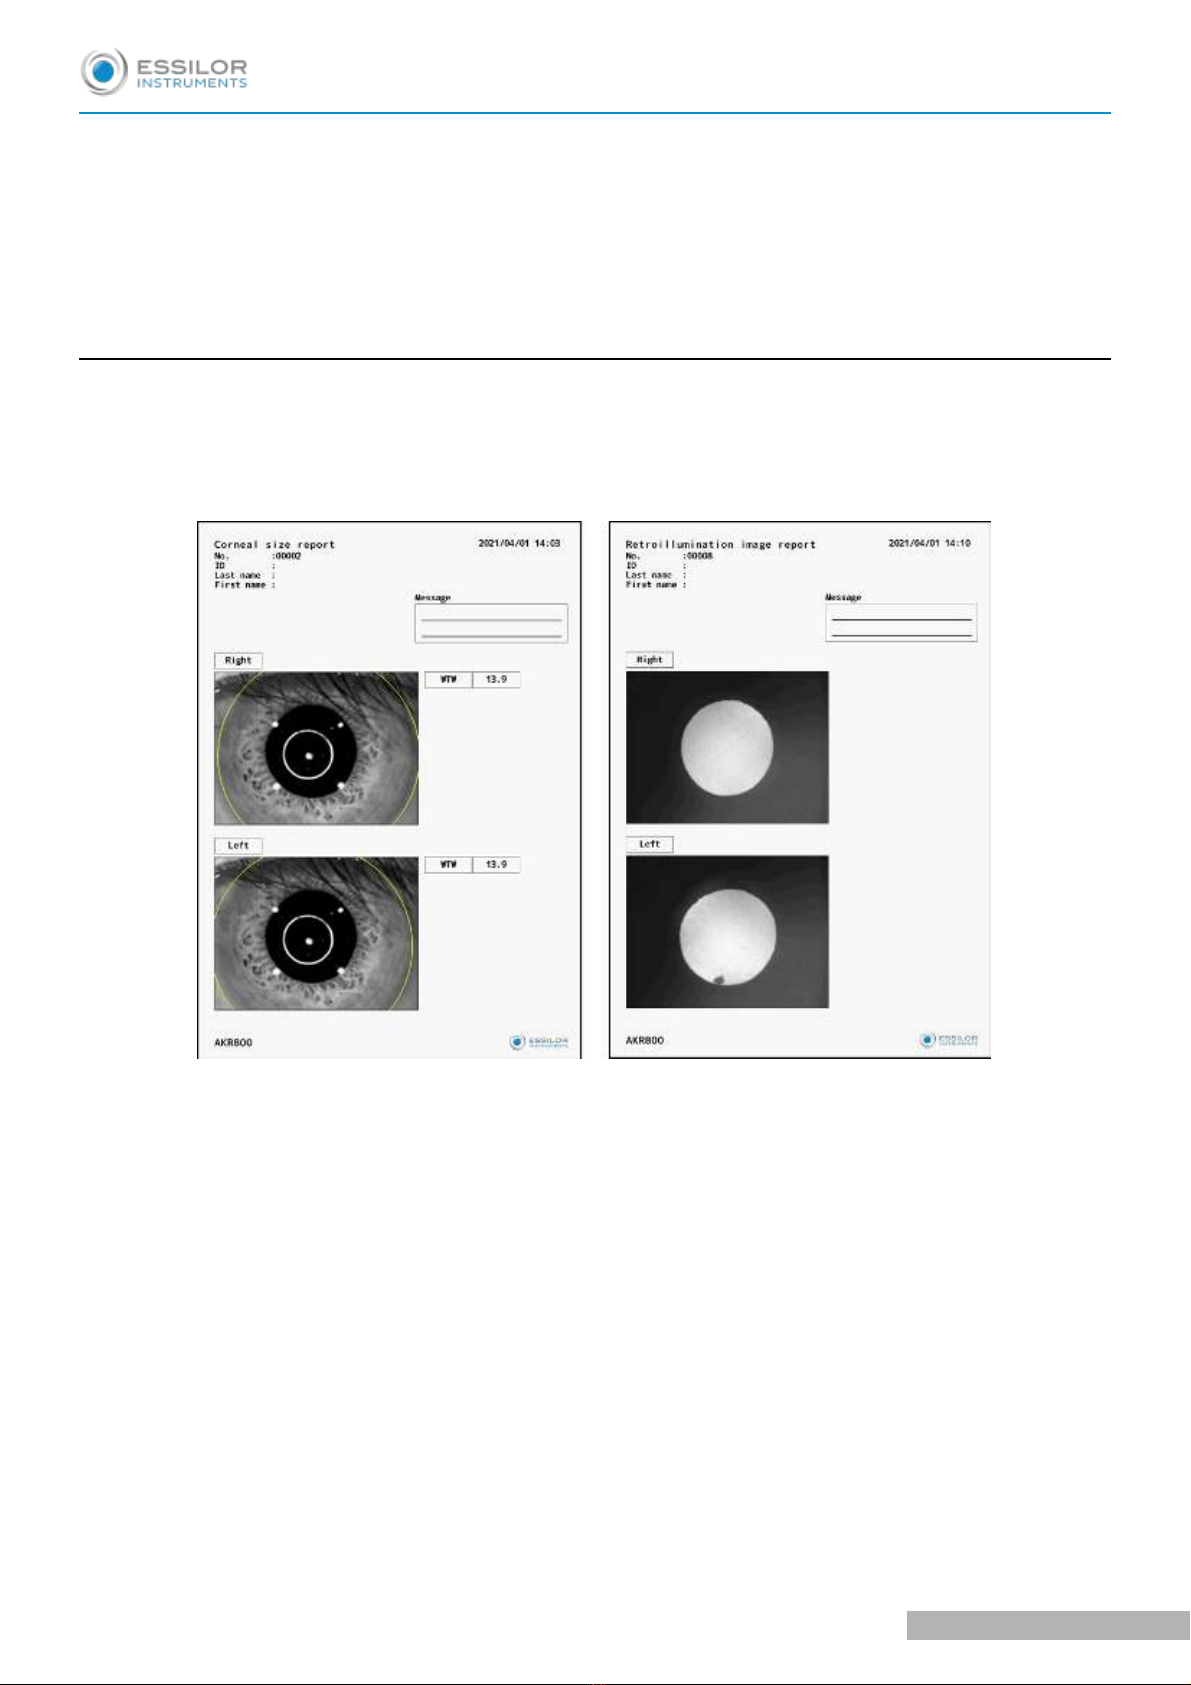
b. Description of report output
The measurement result can be output to the USB memory or PC in the format of the report by pressing the output switch on the
measure/analysis screen if each setting is set on the Export tab of the setup screen.
In the format of the report, the corneal size, retroillumination image, accommodation value, and R-SMP measurement are output.
Sample of report
USER MANUAL > GENERAL DESCRIPTION
AKR800 - Auto Kerato Refractometer > V4 - 05-2022 - CE0459 18

IV. INSTALLATION / CONNECTION

1
2
3
1
1. Installation of the device
Do not install unstable place such as incline.
Otherwise you may drop down the device and get injured.
When install on the optical bench.be careful not to catch a finger of examinee. You may get injured.
Conduct the installation with unplug the power cord. Otherwise you may drop down the device and get injured.
Keep it away from the place where chemicals are stored or gas generates.
Keep it away from the sites which may experience strong vibrations or sudden shocks.
a. Connection of power cord
Confirm that the power switch of the main unit is OFF.
Attach the power cord to the power inlet.
Connect the power cord with protective earth to the three-core socket with grounding.
Do not use power strip or extension cord.
To avoid fire or electric shock at the time of electric leakage, connect the power cord with protective earth to the three-
core socket with grounding.
Do not touch the power plug with wet hands. It can result in electrical shock.
Use this device with correct source voltage. If the source voltage is not correct, it can result in malfunction or fire.
If the power cord is broken (cut, damage on coating, etc.), replace it with the new one. Follow all the precautions.
Keep the power cord clean from dust, oil, etc. It can result in malfunction or fire if the terminal unit is not clean.
If the power cord gets hot when using the device, check if the terminal unit is clean. If it is clean, replace it with the
new one. It can result in fire or injury if you keep using it.
Hold the plug unit when plugging the power cord in and out. It can result in breakage if handling the cord roughly.
Plug out the power cord when the device is not used for a long time.
b. Connection of external input/ output terminal
Do not touch the external connection terminal and an examinee at the same time. It can result in electric shock.
The instruments which are connected to this device should comply with the safety standard of IEC60601-1 or
IEC60950. Also, the instruments should be grounded, or a separator should be used for connection.
Use the shielded wire for the connection cable to protect the output data from noise.
Data Output
This device can be connected to the PC or refractor and so on through RS-232C or LAN. The data can be output to the USB
memory through USB-A.
Connect the connecting cord to the external input/ output terminal of the device.
With:
1: Terminal for RS-232C output
USER MANUAL > INSTALLATION / CONNECTION
AKR800 - Auto Kerato Refractometer > V4 - 05-2022 - CE0459 20
Table of contents
Other Essilor Instruments Medical Equipment manuals

Essilor Instruments
Essilor Instruments APH 550 User manual

Essilor Instruments
Essilor Instruments Retina 550 User manual

Essilor Instruments
Essilor Instruments VISION-R 700 User manual

Essilor Instruments
Essilor Instruments Mr Blue 2.0 Sun and Sport Edition User manual

Essilor Instruments
Essilor Instruments Vision-C 600 User manual

Essilor Instruments
Essilor Instruments Vision-R 800 User manual

Essilor Instruments
Essilor Instruments DELTA User manual

Essilor Instruments
Essilor Instruments Retina 800 User manual

Essilor Instruments
Essilor Instruments EyeViz 300 User manual

Essilor Instruments
Essilor Instruments VISIOSMART 500 User manual


