ESX Vision Naviceiver VN735 VO-P6C User manual

VN735 VO-P6C
V1. 1
OWNER‘S
MANUAL

2
Windows is a registered trademark of Microsoft Corporation in the United States and other countries. iPod and iPhone are trademarks of Apple Inc.. The Bluetooth word
mark is registered trademark owned by Bluetooth SIG, Inc. Other trademarks, trade names or brands are the property of their respective owners.
* depending on vehicle
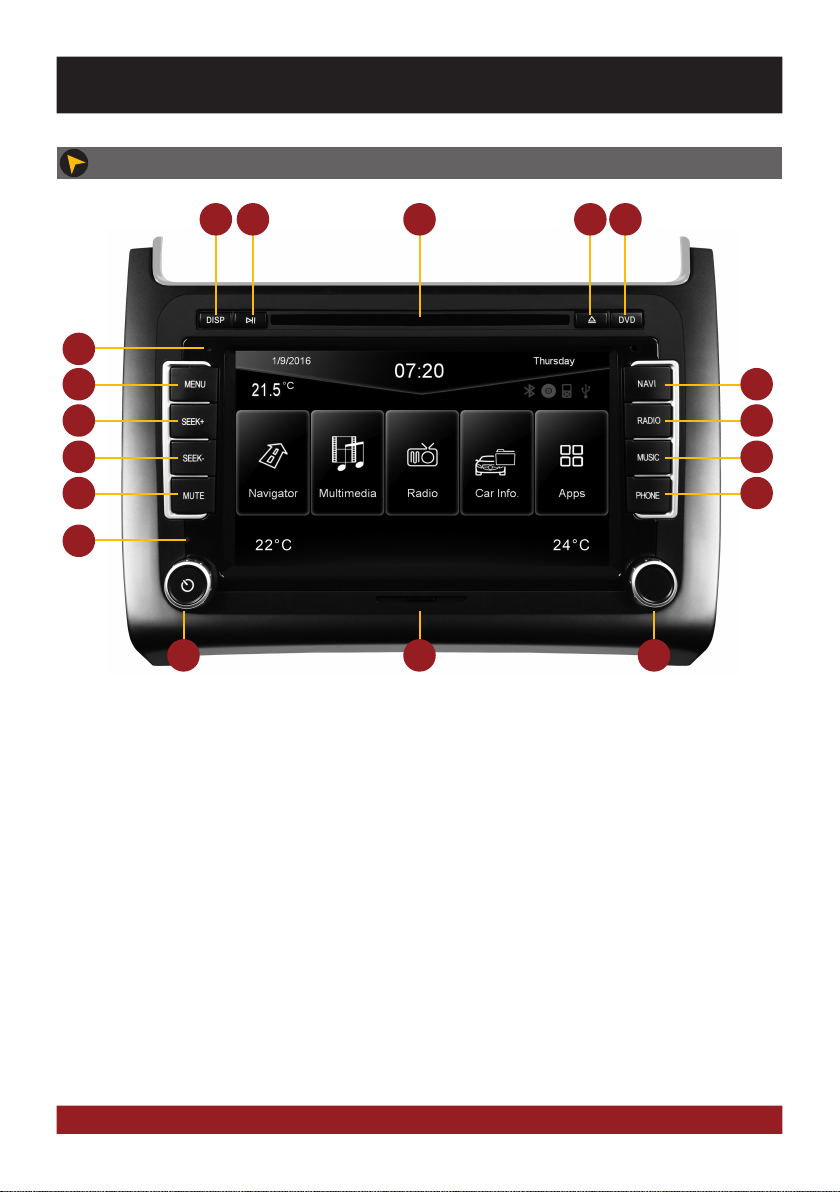
Features
• iGo Primo, 3D navigation software with TMC on 8GB SD card, 46 countries including Turkey with Points of Interests display and search function,
3D building views, TTS voice output, warnings, over 25 system and prompt languages Latest Map Guarantee (30 days) after activation via
www.naviextras.com.
• Integrated TMC receiver to avoid traffic jams and disabilities (dynamic route guidance), TMCpro optional
• High-resolution 17.8 cm (7“) LCD touchscreen display with 800 x 480 pixels
• Advanced i35 operating system based on Microsoft Windows CE 6
• MTK Dual Core Cortex A9+A11 800 MHz CPU, 256MB DDR3 RAM, 256MB NAND Flash RAM
• Audio amplifier with 4 x 50 Watts max.
• Pre-amplifier outputs Subwoofer/Center/2 x Front/2 x Rear
• DSP-Audioprocessor with 10-Band-Equalizer and 5.1 Surround-Sound
• Bluetooth™ hands free, phone book synchronization and A2DP audio streaming
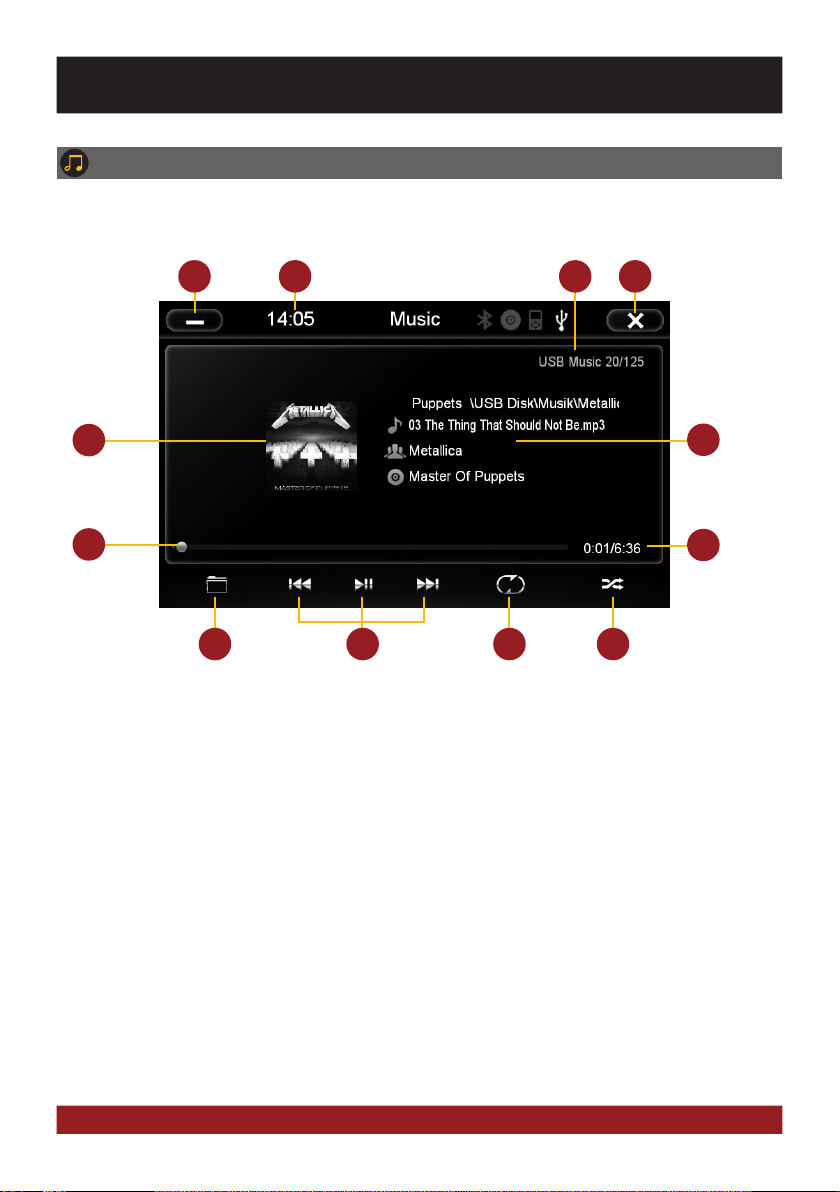
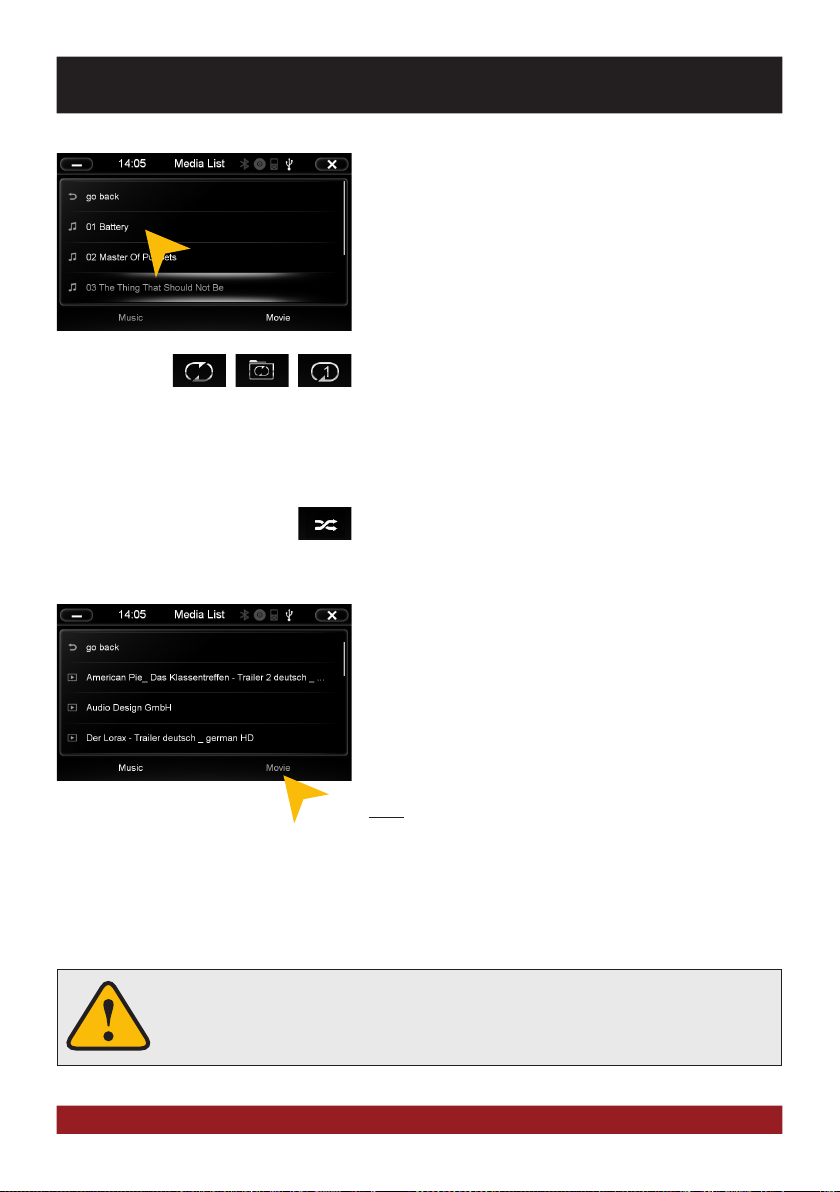
• Media playback (MP3/WMA/MPEG4/MPEG1/2/WMV/AVI/DivX/FLAC etc.), supports FullHD 1080p (1920 x 1080) playback
• Quick-Boot (approx. 10 seconds)
• Support ACC Logic: the device can be operated up to 30 minutes without ignition
• DVD-Player (DVD, DVD-R/RW, DVD+R/RW, VCD, CD, CD-Text, CD-R/RW, MP3)
• Radio AM/FM with RDS function (supports Europe, North America, Asia)
• Virtual Disk to convert audio CDs into MP3 format
• E-LINK mirror function with compatible Android smart phones
• Quick Charge USB function with up to 2.1A charge current
• Voice control (except navigation)
• Custom design function (wallpaper, startup logo, menu), several design themes (skins) for customizing the user interface
• Individually adjustable pre-channel volume for each application
• File manager with an open file structure, photo slide show
• MicroSD card slot and USB port with copy function
• Integration of external applications (Compatible with Windows CE 6)
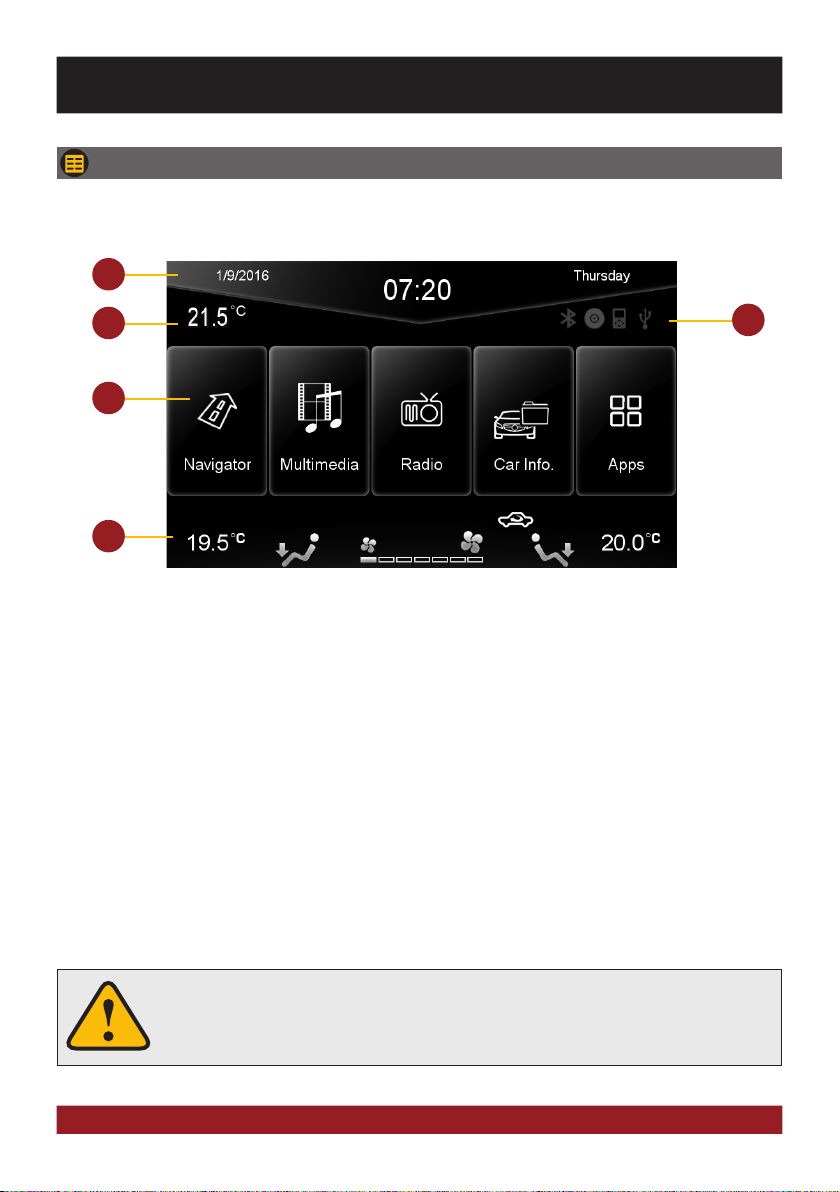
• Date/time function, 12/24 hrs. display
• 3 x Audio/Video output
• 2 x Audio/Video input
• Front and rear camera inputs
• Supports original factory AUX-In and USB-Port
• Supports 2D-/3D navigation maps with TMCpro function
• Supports external TV or radio receivers (DVB-T, DAB, etc.)
• Supports iPod / iPhone™ with ID3 tag display via USB (compatible with iPhone 5/6), with media library, cover display and ID3 Tag display
• Supports original hands-free microphone*
• Supports original multi-function steering wheel
• Supports original rear view camera incl. guiding lines*
• Supports original multi-function display (MFA)-, optical parking system (OPS)- and A/C display (Climatronic)*
• Vehicle settings such as illumination, A/C profile, central locking system, windshield wipers, parking assistant and tire pressure monitoring system
can be adjusted or controlled by the device.
INTRODUCTION
Always follow the instructions in this manual before using the device. Please keep this manual easily
accessible in the vehicle for future reference.
Compatibility (Status September 2016)
Volkswagen Polo 6C (since 04/2014) with original radio „Composition Touch“ or „Composition Colour“.
Not compatible with original radio „Composition Media“ and „Discover Media“
Certain vehicle features and functions are depending on the equipment.
IMPORTANT NOTE FOR YOUR VEHICLE‘S SERVICE STATION
After installation of the ESX Naviceiver inside the vehicle, the device is not recognized as the original radio and
causes an error message in the fault memory of the vehicle (depending on the vehicle, for example „Infotainment
CAN, no communication“). This error message is normal in connection with our ESX device and can not be deleted.

3
INDEX
Safety Information...................................................................................................................................4
Basic functions........................................................................................................................................6
Operating elements .................................................................................................................................................................6
Main menu..............................................................................................................................................................................7
Navigation...............................................................................................................................................................................8
Multimedia player....................................................................................................................................................................9
Radio.....................................................................................................................................................................................11
Car Information .....................................................................................................................................................................14
Application ............................................................................................................................................................................16
– Vehicle Setting....................................................................................................................................................................17
– Bluetooth™ .......................................................................................................................................................................18
– DVD (DVD/CD-Player) .........................................................................................................................................................21
– LinkPod..............................................................................................................................................................................22
– AV/TV .................................................................................................................................................................................23
– Quick Charge .....................................................................................................................................................................23
– A2DP..................................................................................................................................................................................24
– Files ...................................................................................................................................................................................25
– Virtual Disk.........................................................................................................................................................................26
– E-Link ................................................................................................................................................................................28
– Option ................................................................................................................................................................................30
– Audio..................................................................................................................................................................................36
Custom settings.....................................................................................................................................39
Menu assignments ................................................................................................................................................................39
Wallpaper..............................................................................................................................................................................40
Start logo ..............................................................................................................................................................................41
Additional functions ..............................................................................................................................42
Infrared remote control..........................................................................................................................................................42
Multifunction steering wheel..................................................................................................................................................43
Multifunction display .............................................................................................................................................................43
Limited media playback.........................................................................................................................................................43
Optional rearview camera......................................................................................................................................................44
Optical parking system (OPS).................................................................................................................................................44
Troubleshooting .....................................................................................................................................46
General notes.........................................................................................................................................50

4
SAFETY INFORMATION
• In general, the assembly and installation of the device must be performed by a trained and technically skilled
specialists, as the installation and connection of the device requires complex knowledge.
• This device is only suitable for the operation in a vehicle with an on-board voltage of 12 volts, negative
ground.
• Improper installation or use may void the warranty.
• Note any time the traffic regulations of the country in which the device is operated.
• Please ensure, that with the engine turned off the vehicle‘s battery does not discharge fully. The device is
another electrical consumer which must be operated with the engine running, other-wise the vehicle‘s bat-
tery will be discharged and the vehicle can not be started.
• Set the volume of the device only as loud, that you are still be able to hear warning signals (e.g. police sirens)
and traffic noise inside the vehicle.
• Operate the device as driver only if it‘s absolutely necessary and in the driving safety is not compromised.
The same stands for looking at the screen. If necessary, better park your vehicle at a safe and appropriate
location.
• The traffic rules of the EU prohibit to view moving pictures or movies while driving, if the screen of the
device is installed within sight of the driver, as he may be distracted. View the screen as driver only for the
navigation function, and then only briefly that you will not be distracted. Note at any time the local traffic
regulations. In an accident, regress claims could be made by the car insurance company.
• This device is not a substitute for your personal judgment or perception. All suggested routes from the
navigation system should never be taken as a reason to disregard the local traffic rules. Your personal as-
sessment of traffic or your knowledge of safe driving practices is paramount. Always match your driving
with the current traffic situation.
• Do not follow the suggested routes, if the navigation system instructs you to take an unsafe or illegal way,
puts you in an unsafe situation, or directs you into an area which you consider unsafe.
• If problems occur while driving, park the vehicle in a safe and appropriate place to continue before you
operate.

5
SAFETY INFORMATION
This symbol indicates important information and instructions in this manual, which
serve to improve traffic safety and operability of the device.
• The device supports only DVD/CD standard disk size of diameter with 12 cm. Do not attempt to insert disks
with a different size or any other object into the disk slot. Be sure to load only one disk at the same time.
• Please use only the included original accessories. Ensure a sufficient mounting of the device by using the
included installation accessories, as in the event of an accident enormous accelerations may occur. Poorly
installed devices and equipment in accidents could represent a severe risk to the driver and the other pas-
sengers of the vehicle.
• Note under all circumstances the regulations and advice of the vehicle manufacturer and do not make any
modifications to the vehicle, which could interfere with safe driving. Please treat all parts of the device and
the components of your vehicle always with caution.
• Please avoid short circuits and make sure that no metal objects can get inside the device. Also make sure
that all connections are properly connected and avoid the interchanging of the polarity of all connections.
Complete the installation only while the ignition is turned off.
• In the event of a defect or malfunction, do not attempt to repair it by yourself or open the device, this is
dangerous and could cause injury or damage to the equipment or vehicle.A repair should be done by trained
and authorized personnel only. The device uses a Class 1 laser to read the disk. Eye contact with a laser is
very dangerous to the human eye.
• If you connect an external device, you should first read the instruction manual of the external device and
make sure that it is compatible. Avoid connecting an incompatible external device.
• If you install external applications onto the operating system of the device or operate files, make sure that
they are „virus free“ and compatible with Windows CE 6. Otherwise there is a risk that the operating system
no longer works properly and must be reinstalled.
• Do not damage or scratch the screen with sharp objects. Do not operate the screen with hard objects.
• Please refer the notes in chapter GENERAL NOTES on page 50

6
OPERATING ELEMENTS
16 1817
1 2 3 4 5
8
10
12
14
7
9
11
13
1. Turn the display on / off.
2. Start or pause the media playback.
3. Slot for CD/DVD disks (Ø 12 cm).
4. Eject the inserted CD/DVD.
5. Open the DVD/CD player menu.
6. Internal Bluetooth microphone
7. Open the main menu.
8. Open the navigation system.
9. Skip to the next track/title/station/chapter.
10. Open the radio mode (short push) or open the
DAB+ radio (push and hold, if connected).
11. Skip to the previous track/title/station/chapter.
12. Open the multimedia player.
13. Activation of the voice control (short push) or to
activate or deactivate the mute function
(push and hold)
14. Open the phone mode.
15. Reset button.
16. Mute (short push) or the device switches to
stand-by (push and hold - no audio, display
darkens, running navigation stops, Bluetooth
connection interrupts).
Volume controller (rotate).
17. MicroSD card slot.
18. Controller knob for selecting or switching
in the user menus.
Push knob to open the audio settings.
15
6
BASIC FUNCTIONS

7
MAIN MENU
After power on, the device starts with the main menu. By pressing the „MENU“ button on the device,
you can always get to the main menu too.
3
1
2
1. Depending on the selected design theme (Skin), the current date and time will be displayed here.
2. Depending on the selected design theme (Skin), the current exterior temperature in ° Celsius will be
displayed here.
3. The four function icons are (depending on the skin) is highlighted in white and thus activated when the
corresponding function is in use, such as „Bluetooth connection“, „CD / DVD in the drive“, „iPod con-
nection“ or „USB connection“.
4. The main menu displays five to eight key panels, which open the selected application or lead to the
regarding sub menu.
5. In chapter „CUSTOM SETTINGS“, section „Menu assignments“ (Pg. 39) shows how to customize and
arrange the key panels.
6. Depending on the selected design theme (Skin), the currently air-conditioning settings for the driver and
co-driver will be displayed separately for the (depending on model).
4
5
Basically, the device can operate several applications simultaneously. But if too
many extensive applications running at the same time, it can slow the operation
(not responding to your input) or even crash the system.
BASIC FUNCTIONS

8
BASIC FUNCTIONS
Tap on „SD“ and then select the software on
the MicroSD card with a double click. This
navigation software is starting as soon as
you tap on „Navigation“ in the main or push
the „NAVI“ buttons on the device.
Note: If you have accidentally changed the
path and want to use the original ESX iGO
software, the path must be always „\Storage
Card\NaviOne\Navione.exe“.
Please refer to the separate manual for the navigation software.
The device provides the ability to use any navigation software (Windows CE 6.0 compatible). Patch the naviga-
tion software (on MicroSD card) with the device as follows:
NAVIGATION
Open the navigation application by tapping „Navigator“ in the main menu or by pressing the „NAVI“
button on the device.
The unit receives GPS satellite signals automatically. In poor weather conditions or
for example while passing a tunnel, these signals may be disturbed. This could lead
to a malfunction of the GPS positioning.
Tap on „System“.Tap on „Option“.
Tap on „Browse“.

9
56
8
9
43
10
21
7
1211
BASIC FUNCTIONS
MULTIMEDIA PLAYER
Open the multimedia player (source selection via USB or SD) by tapping „Multimedia“ in the main
menu or by pressing the „MUSIC“ button on the device. Refer to page 21 for CD Audio playback.
1. Tap here to enter the main menu without inter-
rupting the playback of the current title.
2. Current time.
3. Source information and track number.
4. Tap here to exit the application, the playback
will be interrupted.
5. ID3-Tag album cover of the current audio file.
6. Title/artist/album information.
7. Progress bar of the currently playing audio file.
With the displacement of the knob you can
jump to another point in the track.
8. Elapsed time and the total time of the track.
9. Tap here to open folder list or to change the
play mode (music or video).
10. Playback controls for audio player
- Play previous track
- Start or pause playback
- Play next track
11. Repeat function
- Repeat all titles
- Repeat only the current folder
- Repeat single track
12. Tap here to start random playback

10
FOLDER PLAYBACK
Tap on the folder icon in the multimedia menu on the bottom left
(see page 9, #9) and the currently playing folder appears. Now
you can scroll through the list and select another song by taping
directly or with „go back“ to a higher directory level to open an-
other another folder. Tap on the desired file and its playback starts
immediately. Close this menu on the top left with „X“ to go back to
the multimedia player menu.
REPEAT FUNCTION
Symbol 1: When the last song has been played within a folder,
the playback will continue to the next folder. After the last song,
playback starts again from the beginning.
Symbol 2: The current folder is repeated
Symbol 3: A single track is repeated
RANDOM PLAY
To shuffle all tracks or all tracks within a folder (if a folder was
previously selected).
MOVIE PLAYBACK
Select the folder icon and then „Movie“ on the bottom right. Now
all movie files of the connected media are displayed. Are these
located in several folders, you can switch to a different directory
with „go back“ like in the music player. The „Repeat Function“ and
„Random Play“ have the same function as in the music player.Tap
during the full screen playback shortly at any point on the screen
to open playback options.
Note: The playback of a movie file is only possible if the hand
brake is closed.
If the playback does not start (a USB stick can not be detected or the source selec-
tion is not working as expected) close the multimedia player with „X“ top right
(page 9, # 4) and restart it.
BASIC FUNCTIONS

11
BASIC FUNCTIONS
7
13
4 65
14
21
15
12
9
3
8
10
11
1. Tap here to enter the main menu without inter-
rupting the radio playback.
2. Current time.
3. Displays the current frequency band and the
current station frequency, tap here for directly
quick tuning.
4. PTY category of the current station.
5. Signal strength of the current station.
6. Tap here to exit the application, the playback
will be interrupted.
7. RDS name of the current station.
8. Fine adjustment of the frequency, Arrow left for
downward, arrow right upwards.
9. RDS (AF, TA, PTY) features.
10. RDS information of the current station.
11. With the arrows you can quick-start the search
for a station from the current frequency up or
down.
12. Station presets.
13. Press „Scan“ about 2 seconds to start the
automatic radio station search. Then up to 32
currently available stations will be stored in all
four the station presets.
Note: All previously stored stations will be
erased and overwrote.
A quick tap on the icon enables a jump to the
next available station.
14. Tap here to the open the different preset pages,
with 8 station presets each.
15. Tap here to open the settings.
RADIO
Open the radio application by tapping „Radio“ in the main menu or by pressing the „RADIO“ button
on the device.

12
BASIC FUNCTIONS
Settings and station presets
Tap on the „gear“ icon to open the settings and then:
„Rename Station“ to rename the current radio station.
„Delete Station“ to delete the current radio station from the
presets.
„Delete All Stations“ to delete all radio stations from the pre-
sets.
„Local Setting“ to open the settings for the local radio fre-
quency standards.
„Audio“ to open the audio settings. Refer to the instructions in
section „Audio“ in the „APPS“ menu.
REG OFF and REG ON switches the RDS function „REGIONAL“
on or off. If the menu shows „REG OFF“, the regional function
is activated.
“EON ON” or “EON OFF” to switch the “Enhanced Other Net-
works (EON)” on or off. This feature allows you to receive traffic
information (TA), even if the currently selected channel does
not have a TA program.
„Mono“, to switch off the „stereo“-mode manually on weak
radio stations.
Rename Station:
Tap on the white input box to change the radio station name by
using the screen keyboard.
Tap on „Name as freq.“ to set the frequency as radio station
name.
Confirm your entry with „OK“ or tap „Cancel“ to exit the menu
without changes.
Local Setting:
Choose e.g. EUROPE from the list of local radio frequency stan-
dards.
Confirm your entry with „OK“ or tap „Cancel“ to exit the menu
without changes.
After you change the settings, restart the radio application.

13
BASIC FUNCTIONS
RDS functions
This device supports RDS (Radio Data System) in the frequency range 87.5 - 107.9 MHz FM. The follow-
ing RDS functions are only available if they are supported by the selected radio station.
AF (Alternative Frequency)
The AF function enables the automatic switching of the receiv-
ing frequency when leaving the reception range of a transmitter.
The device then checks the reception quality and automatically
switches to a different frequency, when the same program in
another reception area is also available. This is done automati-
cally, without the user is notice anything.
TA (Traffic Announcement)
The TA function enables the interruption of the media playback
(audio player, CD, DVD, etc.) for traffic announcements. After
the announcement, the previous media playback starts again.
PTY (Program Type)
The PTY function is a classification of radio stations in different
categories. Each program of a RDS radio station is classified
categorically.
After you have selected a category, the unit automatically
searches for the next matching radio station in this category.
During the „Automatic scan“ only programs will be found, that
match to the chosen category. If you no longer want this func-
tion, select the category „None“.

14
IMPORTANT NOTE: The “Car Info.” menu is only available in the Skin “ESX POLO” (See pg. 30). Other, subse-
quently installed skins may not support this feature.
Car Infoformation
The app „Car Info.“ shows various important vehicle information. The menu consists of three sub-
menus:
To enter one of the submenus below tap the desired panels.
In the submenu „Conv.consumers“ shows how the operation
of the air conditioning has an effect on the vehicle‘s fuel con-
sumption in liters per 100 kilometers.
In the submenu „Driving data“ the already traveled kilometers
will be displayed such as the average speed, maximum speed
and the total travel time as well as the vehicle‘s fuel consump-
tion in liters per 100 kilometers.
Chose with the arrows top left and right between „Since
start“-, „Since refueling“- and „Long-term“-display.
Convenience consumers
Driving data
BASIC FUNCTIONS

15
BASIC FUNCTIONS
Vehicle status
In the submenu „Vehicle status“ you can to switch between
„Vehicle Status“ and „Tire Pressure Monitoring System“ (if
present) by using the arrows on top left and right.
Both displays show vehicle-relevant information is if action is
needed.
Tap on „Start-Stop“ to open the Start-Stop menu.
Here you can see the sub-menu „Tire-pressure Monitoring
System“. Press „SET“ after you have the tire pressure of all
four wheels checked and adjusted correctly.
Here you find information about the status of the „start-stop
system“ as well as information about the vehicle.

16
APPS
Open the application menu by tapping on „Apps“ in the main menu.
The device offers a variety of applications that can be used as described below. Some of these func-
tions require the appropriate accessories.
1 2
10
3
11
4
12
5
76
89
In Chapter „CUSTOM SETTINGS“, section „Menu assignments“ (Pg. 39) shows how to customize and
arrange the key panels.
1. Tap here to switch off the display. To switch on
the display again, tap onto the screen.
2. Tap here to open the LinkPod menu, if an
iPod/iPhone is connected with the device.
3. Tap here to open the AV/TV menu.
4. Tap here to open menu „Vehicle Setting“.
5. Tap here to go back to the main menu.
6. Tap here to open the Bluetooth™ menu.
7. Tap here to open the VirtualDisk menu.
8. Tap here to start the A2DP audio streaming.
9. Tap here to open the option menu.
10. Tap here to open the E-Link menu.
11. Tap here to open the Quick Charge menu.
12. Tap here to open the file manager.
BASIC FUNCTIONS

17
NOTE: The „Vehicle Setting“ can only be selected when the
ignition is on.
Certain menu options only work if permitted by the vehicle
equipment or if they exists at all (e.g. ambient light).
The selected function is not always working the same way than
the original system, e.g. the ambient light changes only when
all doors are closed.
IMPORTANT NOTE: The “Vehicle Setting” menu is only available in the Skin “ESX POLO” (See pg. 30). Other,
subsequently installed skins may not support this feature.
Scroll through the various menu options and tap the desired
function to display its sub-menu.
In the corresponding sub-menus different values can be ad-
justed or a function can be turned on or off.
However, the function is always depending on the vehicle
equipment.
VEHICLE SETTING
Open the vehicle setting menu by tapping on „Vehicle Setting“ in the main menu. The appearance is
based on the original menu.
BASIC FUNCTIONS

18
Sollte ein Mobiltelefon per Bluetooth mit dem Gerät verbunden sein, hat dieses Pri-
orität sollte ein Anruf erfolgen und schaltet während des Telefonats die Medienwie-
dergabe (Radio, Audio, DVD etc.) stumm.
The paired mobile phone has always priority and a phone call mutes always the cur-
rently playback of media (navigation, radio, audio, DVD, etc.). This applies both for
incoming calls as well as outgoing calls.
Select your device from the device list in the phone and enter the PIN code 1234. Alternatively, you can also
search your mobile phone under „Devices“ and connect to the device. Once you have connected your phone
to the device, the pairing starts automatically as soon as the two devices are within range. Leave Bluetooth
activated on the mobile phone. If a mobile phone has already been added to the list of Bluetooth devices, you
can also manually pair the devices. The range for a satisfactory connection is about 10 m.
To disconnect the two Bluetooth devices,
tap on „Devices“.
At first pair the devices, if necessary refer to the manual of your
mobile phone. Open the „Settings“ menu on your mobile phone
and open the Bluetooth settings.
Turn on Bluetooth and then search for compatible devices. The
Bluetooth name of the device will be displayed.
PAIRING
Choose the mobile phone from the list and tap „Dis-
connect“ or quit the Bluetooth connection on your
phone.
Alternatively, the phone can also be deleted from the list, but after that, the automatic pairing is disabled and
the mobile phone must be re-paired with the device. To delete the mobile phone from the list, select the name
and press „Delete“. This is only possible if the devices are not currently paired.
DISCONNECT
BLUETOOTH™
Open the Bluetooth™ application by tapping „Bluetooth™“ in the main menu or by pressing the
„PHONE“ button on the device.
BASIC FUNCTIONS

19
BASIC FUNCTIONS
Once your mobile phone has been connected via Bluetooth to the device, the synchronization of your contacts
and call history starts automatically.
CONTACTS AND CALL HISTORY
Tap on „Contacts“.
Tap on the white search field to search for
a contact, by typing its name on the screen
keyboard.
Tap on „History“.
Tap on „Missed“ to display the missed
phone calls.
Tap on „Received“ to display the already re-
ceived phone calls.
Tap on a name to start a phone call.

20
BASIC FUNCTIONS
Tap on „Dialled“ to display the already trans-
acted phone calls.
KEYPAD
Tap on „Keypad“ to enter phone numbers manually. Then
enter the desired number and then tap the green phone icon
to start dialing. Tap the red phone icon to end the phone call.
You can dial with the paired mobile phone, but this is not rec-
ommended while driving and may be illegal in your country.
To synchronize your contacts and call history
tap on „Sync. Now“.
Other manuals for Vision Naviceiver VN735 VO-P6C
1
Table of contents
Other ESX Car Navigation System manuals

ESX
ESX VISION ANDROID Series User manual

ESX
ESX VISION VNC1045-DBJ User manual

ESX
ESX VN710 KI-SORENTO User manual

ESX
ESX VNS830 SK-OC3 User manual

ESX
ESX VISION VNC1045-DBJ User manual

ESX
ESX VN830 User manual

ESX
ESX VISION ANDROID Series User manual

ESX
ESX VN710 CV-AVEO User manual

ESX
ESX VN720 KI-SPORTAGE User manual

ESX
ESX VN710 KI-CEED User manual