ETM ETM770 User manual

Quick Start Guide
ETM 770
INTRODUCTION
FEATURES
NETWORK COVERAGE
ACCESSORIES WANT A VIDEO USER GUIDE?
Buttons/Navigation
On/Off/Restart
Welcome to your ETM Product
CELLULAR SIGNAL
ANALYZER
• Determine the best operator
• Check signal strength & coverage
• Send measured data to server
• 2G/3G/4G or 2G/LTE Cat M1/LTE Cat NB2 coverage
• Monochrome OLED display
• Rechargeable battery
• Mini USB for programming and charging
• Includes antenna, hard case and charger
There is an ETM770 user guide available on
Youtube, use the link or scan the QR code to watch:
https://youtu.be/1PLVtn6GDLs
• Check working IP connection
• Select the best antenna
• Check parameters like Lac, cell
Get started: This guide helps with initial product setup. Need more?
Find additional product information by simply scanning the QR code.
Support: ETM offers multiple support
options to help you get the most out of your
product. You can go onto etmpacific.com.au
or e-mail support@etmpacific.com.au.
If urgent, please call us using the numbers
below
ETM770 is a handheld signal analyzer for cellular 2G/3G/4G
or 2G/Cat M1/Cat NB2 network measurements.
Common applications include:
ETM Pacific Pty Ltd (APAC)
Suite 20, 273 Alfred Street,
North Sydney NSW 2060, Australia
Tel: +61 (0)2 9956 7377 E-mail: sales@etmpacific.com.au
www.etmpacific.com.au
Model ETM770-LTE ETM770-IoT
Part.no 20543 20591
Module Cinterion PLS62-W Quectel BG95-M3
3G 800/850/900/
AWS/1800/1900/2100 Mhz
(B1/B2/B4/B5/B8/B9/B19)
-
-
2G 850/900/1800/1900MHz 850/900/1800/1900MHz
LTE 4G
Cat M1
Cat NB2
OK Button Action button/Forward navigation
Used for Navigation
Hold power button (3s)
Hold power button more than (5s)
Option 1:
Hold Arrow Up & Arrow Down (5s)
Option 2:
Navigate System > Restart Device
Used for navigation
Backwards button
Arrow Up
Arrow Down
Turn off
Sleep mode
Restart Device
700/800/850/900/
AWS/1800/1900/2100/2600 MHz
(B1/B2/B3/B4/B5/B7/B8/
B12/B18/B19/B20/B28)
B1/B2/B3/B4/B5/B8/B12/
B13/B18/B19/B20/B25/
B26/B27/B28/B66/B85
-B1/B2/B3/B4/B5/B8/B12/
B13/B18/B19/B20/B25/
B28/B66/B71/B85
-
GNSS -GPS/GLONASS/BeiDou/
Galileo/QZSS
SIM
AUX Antenna
Mini USB Primary
Antenna
Carrying case
USB to Mini USB
Adapter
Antenna
Power Adapter
3. SYSTEM 4. CONFIGURING THE ETM770
4. CellNET ETM PRODUCTS
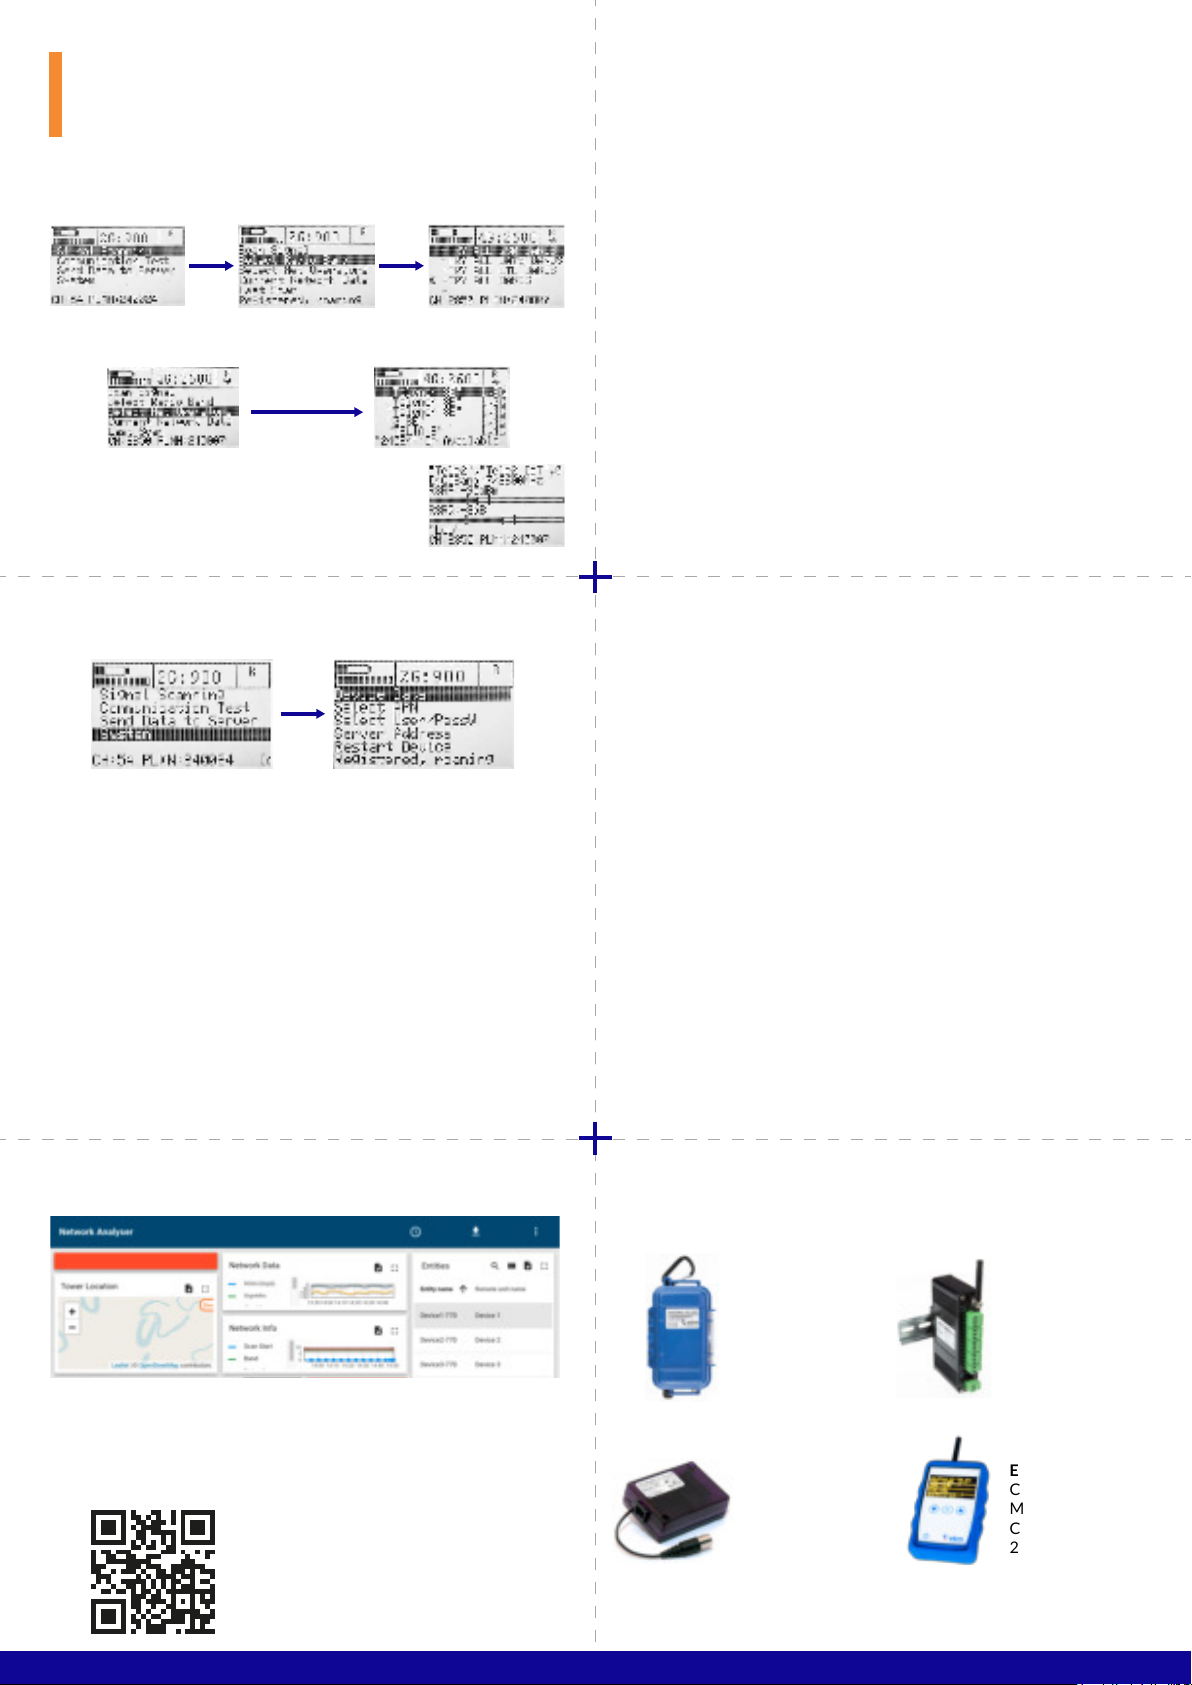
1. SCANNING A SIGNAL
SEND DATA TO SERVER
COMMUNICATION TEST
SIGNAL ANALYSIS EXPLANATION
SMS COMMANDS
2. ADDITIONAL FUNCTIONS
Getting Started
Using the ETM770
• Log in using the provided login credentials
• Manage your account, units and organisation in the settings.
• Under settings > configuration choose which data you want to be presented
• Enjoy your ETM product
To access the ETM IoT Cloud Dashboard,
please visit the website or scan
the QR Code.
1. Choose the radio band/bands that you wish to scan.
1. Navigate main menu > Send Data to Server > Send Last Scan
2. To change the IP-Address for sending, please see
”4. Configuring the ETM770”
1. Navigate main menu > Communication Test > PING ”IP-Adress”
2. This will send three tests to the selected server. It shows
”success” or ”fail”. Ping round trip time in milliseconds.
3. To change the PING address, please see ”4. Configuring the ETM770”
An easy way to configure the ETM770 unit is by using SMS Commands. Simply
send an SMS with the following syntaxes to the device’s cellular number.
When it comes to configuring the ETM770 there are two options:
1. Using the Configuration Tool to configure with a computer via the
provided USB Cable. Please see ETM770 User Guide available on our
website etmpacific.com.au
2. Configuring the unit wirelessly using the SMS commands:
RSSI (dBm) Recieved Signal Strength Indicator
RSRP (dBm) Reference Signal Recieved Power
RSRQ (dB) Reference Signal Recieved Quality
SINR (dB) Signal to Interference plus Noise Ratio
Change PING address
Example
Change APN list
Example
Change User/password
Example
Change server address
Example
ET-IP3=”IP Address”:”Port”
ET-IP3=8.8.8.8:80 (Google’s server)
DeltaBlue
Outdoor and
battery-powered
remote monitoring,
alarming & logging
solution
DeltaBlack
Industrial cellular
remote monitoring,
alarming & logging
solution
ETM-Purple
Intelligent cellular
2G/3G/4G
with ”last gasp”
ETM-770
Cellular Network
Monitoring tool
Cat M1/Cat NB2
2G/3G/4G
ETSAPN=”List position”, ”APN name”
ETSAPN=1, m2m.tele2.com
ETSUP=”List position”, ”Username”, ”Password”
ETSUP=1,username1,password1
ET-IP1=”IP Address”:”Port”
ET-IP1=54.77.219.177:7162 (EWO server)
Device Data
Page 1: SIM card number, software version, hardware number, IMEI number
Page 2: Date/time, internal temperature, supply voltage, battery voltage
Select APN
Select which APN you wish to use for uploading scanned data to a server
Select User/PassW
Some APNs require username/password. Add and select the right user
in this tab.
Server Address
Displays the added server adresses and ports
Restart Device
Restart the device without using the buttons.
2. Search and select a network operator that is using one or more
of your selected radio bands.
3. When radio bands and network operator is
selected, you can proceed to scan a signal by
navigating to ”Scan Signal”
Other manuals for ETM770
2
This manual suits for next models
4
Other ETM Measuring Instrument manuals


Popular Measuring Instrument manuals by other brands


Electro-Metrics
Electro-Metrics PCL-30 instruction manual

Rae
Rae VRAE PGM-7800 Operation and maintenance manual

RKI Instruments
RKI Instruments GX-6000 Operator's manual

Vega
Vega VEGAFLEX 86 operating instructions

ICM Controls
ICM Controls ICM450 Installation, operation & application guide

Ele
Ele 45-9300 operating instructions


