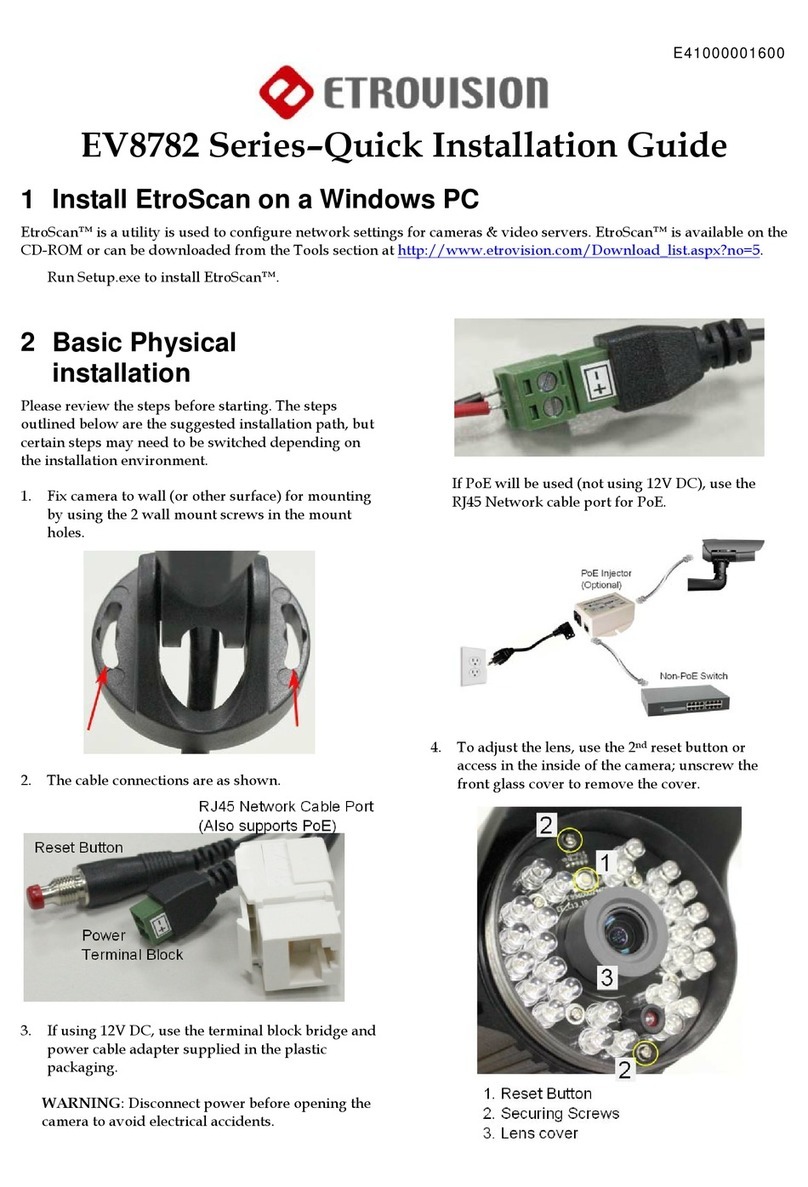
EtroVISION EV6250A Series User manual

EV6250A Series
Speed Dome IP Camera
Installation Guide – Version 6.3

About This Guide
Model
•EV6250A-[B, C, D]
•EV6250A-[E, F, G]
Before Using the EV6250A
Check the PC requirements
Review the OS platform requirements
Read an special and import precautionary information
Having basic knowledge of network setup and configuration will be helpful
Important Announcements
NO E: his icon represents a tip for operation.
CAU ION: his icon stands for an action that could affect an operation or
mildly impair the system.
WARNING: his icon indicates an action that will likely impair the system.
Disclaimer
© 2007 Etrovision echnology. All rights reserved.
Information contained in this document may be superseded by updates. No
representation or warranty is given and no liability is assumed by Etrovision
echnology with respect to the accuracy or use of the information, or infringement of
patents or other intellectual property rights. No licenses are conveyed, implicitly or
otherwise, under any intellectual property rights.

1
PRODUCT OVERVIEW....................................................................1
1.1 Product Specifications................................................................................. 1
1.2 Dual Streaming Capabilities ........................................................................ 2
1.3 Package Checklist....................................................................................... 2
1.4 Product CD.................................................................................................. 2
1.5 Language Support....................................................................................... 2
1.6 Physical Connections.................................................................................. 3
EV6250A-[B, C, D] ...................................................................................... 3
EV6250A-[E, F, G]....................................................................................... 4
2
USING THE EV6250A FOR THE FIRST TIME .................................5
2.1 Initial Requirements..................................................................................... 5
Software Requirements............................................................................... 5
Install EtroScan™........................................................................................ 5
2.2 Physical IP Camera Connections................................................................ 6
Connect to the Network............................................................................... 6
Connect Digital I/O ...................................................................................... 6
Connect Audio I/O....................................................................................... 6
Connect Video Out...................................................................................... 6
Power on IP Camera................................................................................... 6
2.3 Initial Network Configuration ....................................................................... 6
Factory IP Address...................................................................................... 6
Alter the Network Domain ........................................................................... 7
Using EtroScan™........................................................................................ 7
Change Network Setting via EtroScan™..................................................... 9
2.4 Access the IP Camera Web Interface ....................................................... 11
3
CAMERA LED INDICATORS .........................................................14
1
1 PRODUCT OVERVIEW
1.1 Product Specifications
Models EV6250A-Bx EV6250A-Cx EV6250A-Dx
Sensor SONY 1/4” EX-VIEW CCD
Resolution 480 TV Lines
Lens =4.1mm(wide) - 73.8mm(tele), F1.4 to F3.0
=3.5mm
(wide)
-
91mm(tele),
F1.6 to F3.8
Min Illumination
1.0 Lux 0.01 Lux
Day & Night N/A Built-in IR-Cut
Video & Audio Compression
Format M-JPEG, MPEG-4, H.264 Format Selectable
Frame Rate Up to 30 ps (NTSC) / 25 ps (PAL) @ D1 resolution
Audio 2-way
IP Networ
Ethernet 10/100 Base-T
Protocol TCP/IP, DHCP, PPPoE, HTTP, DDNS, NTP, FTP, SMTP, UDP, RTP, RTSP, 3GPP, UPnP
I/O Connector
Network 1 X RJ-45 ( emale type)
Power 1 X DC jack ( emale type)
Alarm In / Out 1 X Digital Input / 1 X Digital Output
Audio 1 X Audio In / 1 X Audio Out
Video 1 X Video Out
Pan/Tilt/Zoom
Pan / Tilt 360° Continuous Pan Rotation / 90° Scan Range / 180° Auto Flip
Zoom 72X (18xOptical, 4xDigital) 216X (18xOpti., 12xDigital)
312X (26xOpti., 12xDigital)
Power & ME Info.
Power 12VDC / 2.42 A
Weight & Other ~ 7Kg with Weather-proo Outdoor Housing
Management & Support
Integration EtroSDK3.0 support
Models EV6250A-Ex EV6250A-Fx EV6250A-Gx
Sensor SONY 1/4” EX-VIEW CCD SONY 1/4” super HAD CCD
SONY 1/4” EX-VIEW CCD
Resolution 530 TVL 540 TVL
Lens
=3.4mm(wide)
-
122.4 mm(tele),
F1.6 to F4.5
=3.25
mm(wide)
-
88
mm
(tele),
F1.5 to F3.8
=3.5mm(wide) to
129
mm(tele),
F1.6 to F3.8
Min Illumination
Day mode: 0.01 Lux
B/W mode: 0.7 Lux
Day mode: 0.003 Lux
B/W mode: 0.0001 Lux
Video & Audio Compression
Format M-JPEG, MPEG-4, H.264 Format Selectable
Frame Rate Up to 30 ps (NTSC) / 25 ps (PAL) @ D1 resolution
Audio 1-way
IP Networ
Ethernet 10/100 Base-T
Protocol TCP/IP, DHCP, PPPoE, HTTP, DDNS, NTP, FTP, SMTP, UDP, RTP, RTSP, 3GPP, UPnP
I/O Connector
Network 1 X RJ-45 ( emale type)
Power Indoor type: 1 X DC jack
Outdoor type: 1 x AC power in
Alarm In / Out 1 X Digital Input / 1 X Digital Output
Audio 1 X Audio In
Video 1 X Video Out
Pan/Tilt/Zoom
Pan / Tilt 360° Continuous Pan Rotation / 90° Scan Range / 180° Auto Flip
Zoom 432X (36xOpti., 12xDigital) 270X (27xOpti., 10xDigital)
444X (37xOpti., 12xDigital)
Power & ME Info.
Power Indoor type: 110 -240 VAC
Outdoor type: 110VAC or 220 VAC
Weight & Other Outdoor: ~17.7Kg / Indoor: ~ 7Kg
Management & Support
Integration EtroSDK3.0 support

2
1.2 Dual Streaming Capabilities
he EV6250A Series supports dual streams simultaneously.
Combination options include:
Stream 1
Stream 2
H.264
M
-
JPEG
H.264
MPEG
-
4
H.264
H.264
M
-
JPEG
MPEG
-
4
M
-
JPEG
H.264
M
-
JPEG
M
-
JPEG
MPEG
-
4
H.264
MPEG
-
4
M
-
JPEG
MPEG
-
4
MPEG
-
4
If users assign the same stream format for both Stream1 and 2, the image
may be unable to achieve real-time performance. his is a system limitation.
1.3 Package Checklist
he EV6250A-[B, C, D] packaging will include the following materials.
•Power Adapter x 1
•Combo cable
•Product CD x 1
Please see the EV6250A Assembly Guide for information on physical assembly
and installation procedures.
1.4 Product CD
he product CD contains
•EtroStation™3.0 NVR management software
•16CH Live View/Recording/4CH Playback
•User’s Manual
1.5 Language Support
•English

3
•Chinese ( raditional)
•Chinese (Simplified)
•Japanese
•French
•Polish
1.6 Physical Connections
EV6250A-[B, C, D]
1. Digital I/O Connector
2. Power Line Connector
3. Audio Line Input
4. Video Output BNC Connector
5. Audio Line Output
6. RJ-45 Ethernet Port

4
EV6250A-[E, F, G]

5
2 USING THE EV6250A FOR THE FIRST TIME
2.1 Initial Requirements
Software Requirements
Installation and configuration require the following:
•Microsoft Windows 2000 or XP Operating System
•Microsoft Internet Explorer version 6 or higher
Other browsers (i.e. Mozilla Firefox) are not currently supported.
Install EtroScan™
EtroScan™ is a utility is used to configure network settings for IP cameras and
other devices (i.e. NVR). EtroScan™ is available via two methods.
Install EtroStation™ 3.0
EtroStation™ 3.0 includes the EtroScan™ utility. EtroStation™ is on the product
CD that accompanies the EV6250A. Please refer to the EtroStation™
documentation for installation instructions.
Download from Etrovision’s Website
EtroScan™ can also be downloaded from Etrovision’s website. It is available in
the Software ools section of the Download area,
http://www.etrovision.com/Download_list.aspx?no=5.
After downloading the archived file, extract the contents and run Setup.exe to
install EtroScan.

6
2.2 Physical IP Camera Connections
Connect to the Network
Connect the EV6250A to network hub/switch via a standard CA 5 Ethernet
cable with an RJ-45 connector. Please note that the PC must be on the same
network domain as the IP camera.
Connect Digital I/O
For digital I/O functionality, connect the corresponding devices with the IP
camera using the digital I/O terminal. ake care to properly align the terminals
when connecting.
Connect Audio I/O
For audio I/O functionality, connect the audio input and output cables.
Video flicker may occur when enabling/disenabling audio in and audio out. his
situation normally only lasts for a second.
Connect Video Out
If using a video server, connect the video output of your camera with video in of
the video server using a standard 75Ω coaxial cable with BNC type connector.
Power on IP Camera
Connect the power adapter to the IP camera’s power connector cable. he
adapter should be connected to 110v~22OV AC socket. here is no power button
on the camera, so connecting/disconnecting the power adapter will
start/shutdown the IP camera.
2.3 Initial Network Configuration
Factory IP Address
Below are the initial factory IP address settings for the IP camera:
IP Address 192.168.1.2
Subnet Mask 255.255.255.0
Gateway 192.168.1.1
Restoring the factory default settings will reset the network settings to the factory
IP address settings (see the “Factory Default” section for more information).

7
Alter the Network Domain
o use the IP camera’s USB port for the initial network configuration, please
refer to the section “EtroLink™ Config Port”.
Alter the IP address of the PC to the same network domain of IP camera’s initial
IP address, 192.168.1.2.
Here is an example of PC network settings used to configure the IP camera.
Using EtroScan™
EtroScan™ allows users to easily find an IP camera and configure the settings.
After installing EtroStation™, EtroScan™ can be accessed via the MS Start button.
Select EtroScan from the start menu to start.

8
Press the Scan button to list the IP and MAC address list for IP cameras on the
network. o refresh the list, press the Clear Table button and press Scan again.
A new IP camera will display the factory IP address, 192.168.1.2. However, if
multiple new devices are present on the network, then multiple instances of
192.168.1.2 will be listed.

9
o identify a specific IP camera, use the MAC address which is located on the
bottom of the camera. Below is an example of the label displaying the MAC
address.
Please note that a completed RMA (Return Merchandise Authorization)
form must contain the serial number of the product. For more information, please
refer to our website.
Change Network Setting via EtroScan™
Using EtroScan™ there are two ways to modify the network settings.
1. Double click on a specific IP address; the setting page will be displayed.
2. Click Change Setting… button at the bottom of the screen.
Either method will display the network settings configuration.

10
After altering the IP camera network settings, click Apply to apply the changes.
A prompt for the administrator authentication will be displayed:
he default password for the administrator account (root) is pass. Enter the
default password and click OK to confirm the changes.
he default password should be changed later after the initial configuration
setup. his can be done via the web interface (see the Settings page “Account”
section for more information on changing the root password).
After applying the new network settings, the IP camera will reboot; this process
takes about 45 seconds. he IP camera’s Power LED light will blink during the
reboot process; the light will become stable once reboot is complete.
Exit the “Setting Page” by clicking Close, and wait for the reboot to complete.
After rebooting, press Scan to verify the new IP address. If using DHCP, then the
MAC address may be necessary to accurately identify a specific camera.
“DOUBLE Right Click Function”: Double right click on a specific IP address
on the list to quickly open the Live View browser page.
Press Exit to quit EtroScan™.

11
2.4 Access the IP Camera Web Interface
MS Internet Explorer is used to access and configure the IP camera. When
accessing an IP camera using the web interface for the first time, some
configuration for ActiveX controls may be required.
1. Open the IE browser
2. ype in the IP address of the IP camera
3. Enter the administrator username and password:
User name: root
Default password: pass
Press OK button to access to the Live View web page.
Usernames and passwords are case sensitive.
he administrator password should be changed after installation is
complete. Please refer to the User Manual for more information.
Upon login, the error “ActiveX control failed to load (OCX)” may be encountered.

12
he error indicates the browser requires adding certain ActiveX controls for the
viewer to work.
Near the top of the browser page is a message regarding an add-on to run. he
request is highlighted below in blue.
Clicking on the add-on message will bring up options; choose Run Add-on to
add.
A confirmation message box will be displayed; choose Run.
Wait for the add-on to complete and the page to attempt reloading.
Most likely other ActiveX controls will be required. Repeat the above procedure
of adding ActiveX controls until the no other add-on requests are displayed and
the Live View page loads without error.

13

14
3 CAMERA LED INDICATORS
he IP camera back (or combo cable if an outdoor or dome camera) has 3 LED
indicators which display the camera state or activities.
•Red: the power LED
•Green: network connection LED
•Orange: network transmission LED
he table below highlights various camera states and corresponding Power LED
indicators.
CAMERA STATE Power LED
Booting Blinking light
Camera operational Stable light*
Connected to the network Stable light*
Upgrading irmware Blinking light
Firmware upgrade completed Stable light*
Rebooting Blinking light
Other manuals for EV6250A Series
2
Table of contents
Other EtroVISION IP Camera manuals

EtroVISION
EtroVISION EV6356A User manual

EtroVISION
EtroVISION EV6150A-BI User manual

EtroVISION
EtroVISION EV6552A User manual

EtroVISION
EtroVISION 1080p/5M series User manual

EtroVISION
EtroVISION EtroScan EV8782 Series User manual

EtroVISION
EtroVISION EV6250A Series User manual

EtroVISION
EtroVISION EV6150A User manual

EtroVISION
EtroVISION EV6250A Series User manual

EtroVISION
EtroVISION EV8180A User manual

EtroVISION
EtroVISION EV8150A User manual