EUFY RoboVac 30C User manual

T2118 51005001159 V01
Owner’s Manual
RoboVac 30C (T2118)

06 07
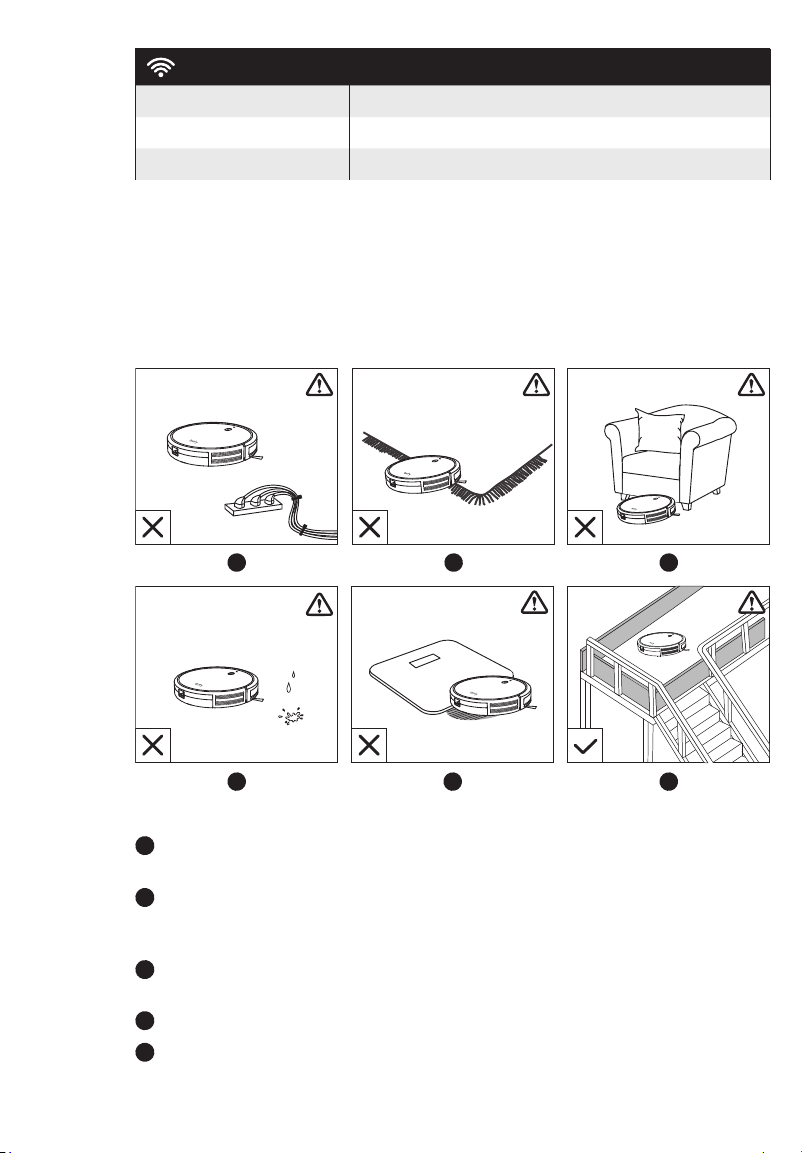
de portée. Si l’appareil passe par-dessus un câble et l’entraîne avec lui, cela risque de
causer des chutes d’objets.
• Si la pièce à nettoyer a un balcon, une barrière physique doit être placée afin
d’empêcher l’accès au balcon et d’assurer une utilisation sûre.
• Ne pas placer d’objet sur l’appareil.
• Rester conscient que l'appareil se déplace seul. Faire attention à ne pas marcher sur
l’appareil par inadvertance.
• Ne pas utiliser dans des endroits disposant de prises de courant exposées sur le sol.
• Ne pas exposer les composants électroniques de cet appareil, de sa batterie, ou de
la station de recharge intégrée. Il n'y a pas de pièces réparables par l'utilisateur.
• Ne pas utiliser sur un sol inachevé, non scellé, ciré ou accidenté au risque
d'endommager le sol ou l'appareil. Utiliser uniquement sur des surfaces dures ou sur
des tapis à poils courts.
• Cet appareil a été conçu pour être utilisé sur les sols sans les abîmer. Nous vous
recommandons tout de même de tester l'appareil sur une petite zone pour vérifier
l'absence d'éraflures.
Avertissement
Ce symbole présent sur le produit ou la boîte signifie que le produit ne doit
pas être jeté avec les déchets ménagers, mais doit être déposé dans un centre
de collecte approprié pour recyclage. Une mise au rebut et un recyclage
adéquats permettent de protéger les ressources naturelles, la santé humaine
et l’environnement. Pour plus d’informations sur l’élimination et le recyclage
de ce produit, contactez votre mairie, votre service de ramassage des ordures
ou le magasin où vous avez acheté ce produit.
Déclaration d'Industrie Canada
Le présent appareil est conforme aux CNR d'Industrie Canada applicables aux appareils
radio exempts de licence. L'exploitation est autorisée aux deux conditions suivantes
: (1) l'appareil ne doit pas produire de brouillage, et (2) l'utilisateur de l'appareil doit
accepter tout brouillage radioélectrique subi, même si le brouillage est susceptible d'en
compromettre le fonctionnement.
Notes sur les marques déposées
• Amazon, Echo, Alexa et tous les logos connexes sont des marques déposées
d’Amazon.com, Inc. ou de ses sociétés affiliées.
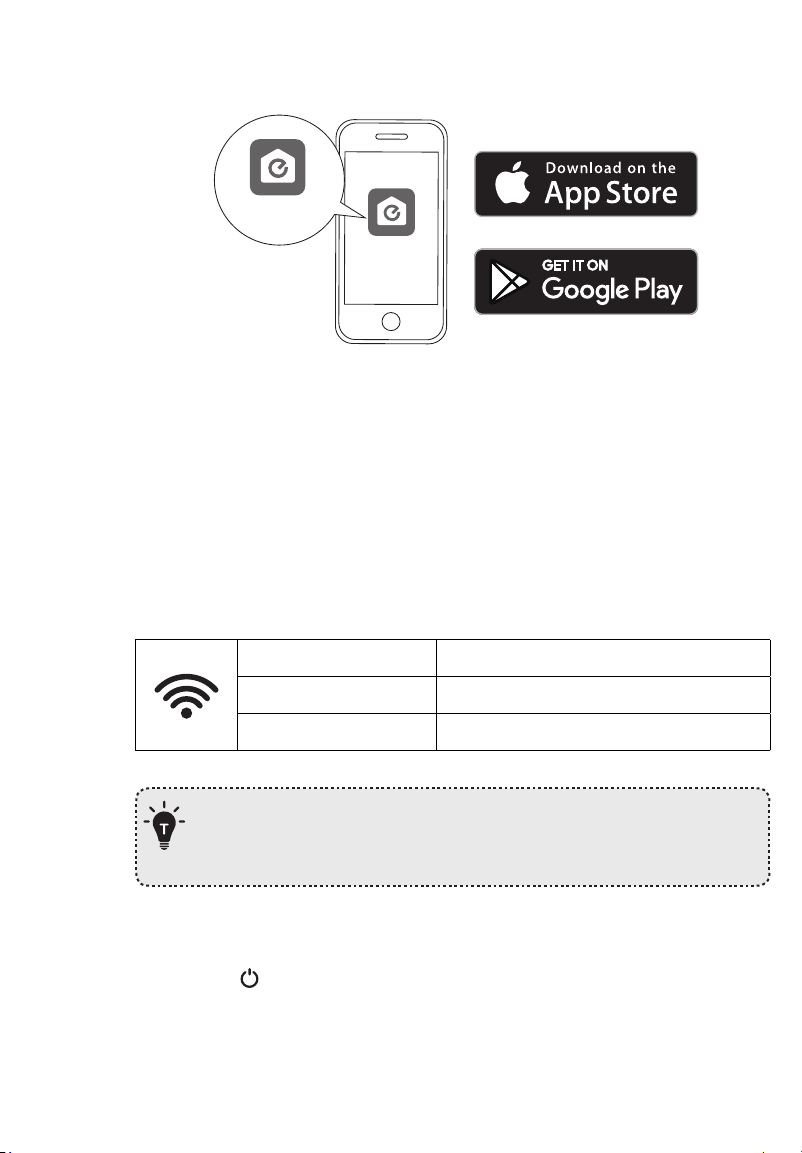
• Apple et le logo Apple sont des marques commerciales d’Apple Inc., enregistrées
aux États-Unis et dans d’autres pays. App Store est une marque de service d’Apple
Inc., enregistrée aux États-Unis et dans d’autres pays.
• Google Play et le logo Google Play sont des marques déposées de Google Inc.
• Google Home est une marque déposée de Google Inc.
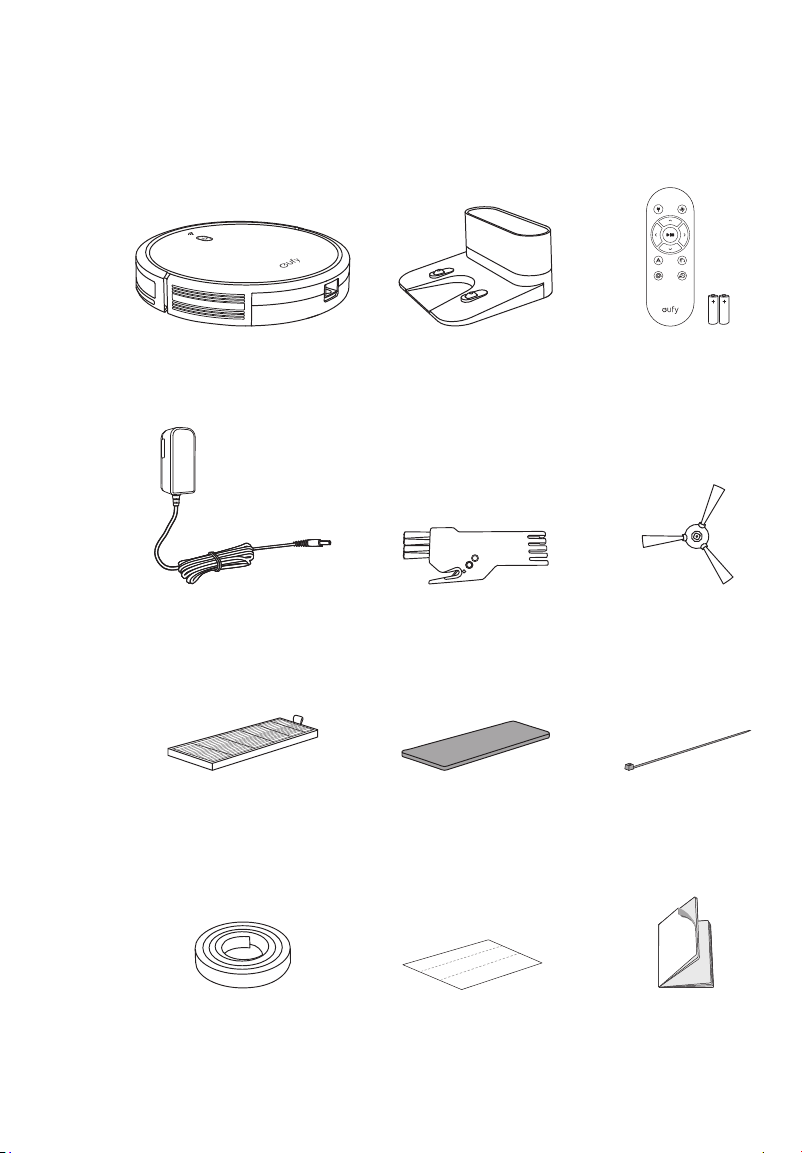
About Your RoboVac
What's In the Box
Additional
High-Performance
Filter
Additional
Foam Filter
Power Adapter Cleaning Tool Side Brushes (x4)
RoboVac 30C Charging Base Remote Control
(AAA Battery x2)
Cable Ties (x5)
Owner’s Manual &
Other Documents
Adhesive Tapes (x4)Boundary Strips
6.6 ft/2 m Length
(x2)

08 09
RoboVac Anatomy
Top & Side
Infrared sensor
Auto cleaning Start/Stop button
Wi-Fi status light
Bumper
Dust collector
Dust collector release button
Bottom
Dust collector
Charging contact pins
Battery compartment
Side brushes
Wheels
Brush guard
Rolling brush
Main power switch (On/O)
Drop sensors
Swivel wheel
Hall sensors
Dust Collector
High-performance filter
Foam filter
Pre-filter
Suction Inlet
Suction inlet
Dust collector
Charging Base
Status light
Power cord storage
compartment
Power socket
Charging contact pins

10 11
Remote Control
12
3
5
4
6
78
Return RoboVac to Charging Base
Adjust suction power level in Auto and Quick
Cleaning modes
Start Auto cleaning / Stop cleaning
Control cleaning direction manually
Start Auto cleaning
Start Edge cleaning
Start Spot cleaning
Start Quick cleaning
Install 2 AAA batteries before using the remote control for the first time. Make sure
the positive and negative ends are facing the correct polarity direction as marked in
the battery compartment.
LED Indication
You can see the status of RoboVac from the LED indicators.
(Power Status Light) Status
Breathing orange Charging
Solid blue Standby / Cleaning / Fully charged
Solid orange Low power and returning to Charging Base
O
• RoboVac is off.
• To conserve power, the light automatically turns off
when RoboVac is not docked to the Charging Base
and has been inactive for 1 minute.
Flashing / Solid red + Beeping
RoboVac has an error.
Refer to the “Troubleshooting>Error Tone” section in this
manual for solutions.
(Wi-Fi Status Light) Status
Slowly flashing blue Waiting for connection
Rapidly flashing blue Connecting with your wireless router
Solid blue Connected to your wireless router
Using Your RoboVac
Important Tips Before Use
abc
def
a
Remove power cords and small objects from the floor that may entangle RoboVac. You
can use the supplied cable ties to organize your wires and power cords.
b
Fold tasseled edges of area rugs underneath to prevent tangling RoboVac. Avoid
cleaning very dark-colored high-pile rugs or rugs thicker than 1.02 in/26 mm as they
may cause RoboVac to malfunction.
c
Keep RoboVac away from spaces lower than 2.87 in/73 mm to prevent RoboVac from
getting stuck. If necessary, place a physical barrier to block off the problem areas.
d
Keep RoboVac away from wet areas.
e
RoboVac may climb on top of objects less than 0.63 in/16 mm in height. Remove these
objects if possible.

12 13
f
Anti-drop sensors prevent RoboVac from tumbling down stairs and steep drops. They
may work less effectively if dirty or used on reflective/very dark-colored floors. It is
recommended to apply the Boundary Strip(s) to block off areas where RoboVac may fall.
Place physical barriers or Boundary Strips in front of fireplaces and areas that
may cause damage to RoboVac if entered.
Preparation
Install the side brushes before use.
Turn on the main power switch on the bottom of RoboVac.
Remove the sticker next to the power switch, and the foam blocks beside the
bumper before use.
Place the Charging Base on a hard, level surface and against a wall.
Remove objects within 3 ft/1 m of the left and right side and within 6 ft/2 m of the
front of the Charging Base.
Connect the round connector of the adapter into the power socket on the Charging
Base and the other end into a wall outlet.
• When the Charging Base connects to AC power, the LED indicator on the
Charging Base is SOLID WHITE.
- Install the Charging Base in a location that RoboVac
can easily access. It is recommended to place the
Charging Base against a wall, and on a hard-level
surface rather than on rugs or carpets.
- Always keep the Charging Base plugged in, otherwise
RoboVac will not automatically return to it.
T
- Install the Charging Base in a location that RoboVac
can easily access. It is recommended to place the
Charging Base against a wall, and on a hard-level
surface rather than on rugs or carpets.
- Always keep the Charging Base plugged in, otherwise
RoboVac will not automatically return to it.
Charge Your RoboVac
• RoboVac has a pre-installed rechargeable battery that has to be fully charged before
use.
• RoboVac returns to the Charging Base at the end of a cleaning cycle or when its
battery is running low.

14 15
Method 1: Attach RoboVac to the Charging Base by aligning its charging pins with the
charging pins on the base.
Method 2: Press on the remote control to return RoboVac to the Charging Base.
Turn off the main power switch if RoboVac will not be used for a long period of
time. To preserve the battery’s lifespan, recharge at least once every 6 months.
Use Your RoboVac with the EufyHome App
To enjoy all available features, it is recommended to control your RoboVac via the
EufyHome app.
Before you start, make sure that:
• Your smartphone or tablet is connected to a Wi-Fi network.
• Your smartphone or tablet is running iOS 8.0 (or above) or Android 4.4 (or above).
• The 2.4GHz band wireless signal is enabled on your wireless router.
• The Wi-Fi status light on RoboVac is slowly flashing blue.
• RoboVac is attached to the Charging Base to ensure it has enough power during
setup.
EufyHome
EufyHome
1. Download the EufyHome app from the App Store (iOS devices) or Google Play (Android
devices).
2. Open the app and create a user account.
3 Tap the “+” icon in the top right corner to add RoboVac to your EufyHome account.
4. Follow the instructions in the app to set up the Wi-Fi connection.
- After connecting successfully, you can control RoboVac via the app.
- With the app, you can select a cleaning mode, set the time, schedule a cleaning, view
the system status, receive notifications and access additional features.
Wi-Fi Status Light
Slowly flashing blue Waiting for connection
Rapidly flashing blue Connecting with your wireless router
Solid blue Connected to your wireless router
- If you have any problems during the Wi-Fi setup process, refer to the “Troubleshooting >
Wi-Fi connection” section in this Manual.
- If RoboVac gets stuck in any space, tap Find My Robot in the app to find the machine.
This function is available in the app only.
Reset the Wi-Fi Connection
Press and hold on RoboVac for 10 seconds to reset the Wi-Fi connection if necessary.
- You will hear a beep when the Wi-Fi connection has been reset and the Wi-Fi status light
will slowly flash blue. Now you can follow the Wi-Fi instructions in the EufyHome app to
set up the Wi-Fi connection.

16 17
Schedule Cleaning
With the EufyHome app, you can schedule RoboVac to start cleaning at a particular time.
• You can set the time and customize the cleaning schedules from Sunday to
Saturday on the EufyHome app. This function is available in the app only.
Start / Stop Cleaning
• Make sure the main power switch on the bottom of RoboVac is turned on before use.
• You can also start or stop cleaning via the EufyHome app.
1. Press on RoboVac or / on the remote control to start cleaning in Auto Mode.
2. Press on RoboVac or on the remote control to stop cleaning.
Select a Cleaning Mode
You can also select a cleaning mode via the EufyHome app.
1. Auto cleaning
RoboVac optimizes its cleaning path by selecting different cleaning modes automatically
until cleaning is complete. This is the most commonly used cleaning mode.
Press on RoboVac or / on the remote control to start cleaning in Auto Mode.
- RoboVac will return to the Charging Base automatically when the battery level becomes
low or when RoboVac finishes cleaning.
- By default, RoboVac starts in Auto cleaning mode when it is turned on.
BoostIQ™ Feature
When the BoostIQ™ feature is enabled, RoboVac will automatically increase the suction
power if it detects stronger power is needed to ensure the best clean. BoostIQ™ is ideal for
cleaning thicker carpets and hard-to-sweep messes, which will reduce the total cleaning
time, but increase the noise level. If the vacuuming noise caused by BoostIQ™ disturbs you,
you can disable this feature. This feature only works in Auto and Quick cleaning modes.
In Auto or Quick cleaning mode, press on the remote control repeatedly to adjust the
suction power level.
• The corresponding icon is displayed on the remote control.
Suction Power Level Beeps
Standard power
BoostIQ™
(Default, automatically switches between Standard and Enhanced power)
Maximum power
When RoboVac starts cleaning in Auto or Quick mode the next time, it will clean
according to the suction power level you previously selected.

18 19
2. Spot cleaning
RoboVac intensively cleans a specific area in a spiral pattern, useful if there is a
concentrated area of dust or debris. In Spot mode, RoboVac will stop cleaning after 2
minutes.
Press on the remote control to start cleaning in Spot Mode.
3. Edge cleaning
RoboVac reduces its speed when it detects a wall and then follows the wall to ensure the
edge is cleaned thoroughly. In Edge mode, RoboVac will clean for 20 minutes and return to
the Charging Base.
Press on the remote control to start cleaning in Edge Mode.
4. Quick cleaning
RoboVac will automatically stop cleaning after 30 minutes and return to the Charging Base
in this mode. If any small room or area needs to be cleaned, it is recommended to select
this mode to save time and power.
Press on the remote control to start quick cleaning mode.
5. Manual cleaning
You can direct RoboVac to clean a particular area by using the directional buttons on the
remote control.
Move backward
Turn left
Turn right
Move forward

20 21
Use the Boundary Strip
With the Boundary Strip, you can keep RoboVac away from any area or item you do not
want RoboVac to clean. RoboVac will recognize the Boundary Strip and will not cross into
the blocked-off area.
1. Identify the area or item you do not want RoboVac to get close to.
2. If necessary, use scissors to cut the Boundary Strip to a shorter length. Be sure to
correctly measure the length before cutting.
3. Apply the supplied strips of adhesive tape to lay the Boundary Strip flat on the floor.
Make sure the strip is placed FLAT on the floor or under an area rug.
1
2
- If the Boundary Strip is rolled up, remove and then re-apply on the floor with
adhesive tape. Otherwise the Boundary Strip may not work well.
- Make sure the Boundary Strip is placed on the same surface plane RoboVac is
used on.
- Be careful not to damage the floor when using adhesive tape. It is not
recommended for use on carpets.
- Keep the Boundary Strip away from objects that emit excessive heat.
Use Your RoboVac with Amazon Alexa /
the Google Assistant
Amazon Alexa or the Google Assistant is a smart voice control device that enables you to
control RoboVac with your voice.
Before you start, make sure that:
• RoboVac is attached to the Charging Base to ensure there is enough power.
• RoboVac is connected with the EufyHome app.
• You have an Alexa-enabled device (i.e. eufy Genie, Amazon Echo, Echo Dot and
Amazon Tap, Echo Show, Echo Spot) or a device enabled with the Google Assistant
(i.e. Google Home, Google Home Mini). These devices are sold separately.
• The Amazon Alexa app or Google Home app is already installed on your smart
device, and you have created an account.
To control RoboVac with Amazon Alexa
Open the Amazon Alexa app and select “Skills” from the menu.
On the Skills screen, search for “EufyHome - RoboVac”.
Once you have found the “EufyHome - RoboVac” skill, tap Enable.
Login with your EufyHome account so that Alexa can control your RoboVac.
Say simple commands to Alexa.
Alexa, ask RoboVac
to stop cleaning.
Alexa, ask RoboVac
to start cleaning.
Alexa, ask RoboVac to go
home.
Alexa, ask RoboVac to
find my robot.

22 23
To control RoboVac with the Google Assistant
RoboVac now works with the Google Assistant on devices like the Google Home.
Open the Google Home app.
Say “Ok Google, talk to RoboVac” to the Google Assistant-enabled device to initiate
the Google action for RoboVac.
Follow the instructions in the Google Home app to authorize the Google Assistant
with your EufyHome account.
To control RoboVac with your voice, say simple commands to Google Assistant.
Ok Google, ask RoboVac
to stop cleaning.
Ok Google, ask RoboVac
to start cleaning.
Ok Google, ask RoboVac to
go home.
Ok Google, ask RoboVac to
find my robot.
- For more information about how RoboVac works with Amazon Alexa / the Google
Assistant, visit https://www.eufylife.com and go to PRODUCTS>Cleaning>RoboVac 30C
for details.
Cleaning and Maintenance
For optimal performance, follow the instructions below to clean and maintain RoboVac
regularly. The cleaning/replacement frequency will depend on your usage habits of
RoboVac.
Recommended cleaning/replacement frequency
RoboVac Part Cleaning Frequency Replacement Frequency
Dust Collector After each use -
Filters Once every week Every 2 months
Rolling Brush Once every week Every 6-12 months
Side Brushes Once every month Every 3-6 months (or when visibly worn)
Brush Guard Once every month Every 3-6 months (or when the silicone
rubber strip on the brush guard becomes
visibly worn)
Sensors Once every month -
Charging Pins Once every month -
Swivel Wheel Once every month -
Clean the Dust Collector and Filters
Press the dust collector release button to pull the dust collector out.
Open and empty the dust collector.
2
1
Remove the pre-filter by pulling the hooks as shown.

24 25
Take out the foam filter and high-performance filter.
Clean the dust collector and filters with a vacuum cleaner or a cleaning brush.
Put the filters and pre-filter back together in the dust collector.
Push the dust collector back into the main unit.
You can wash the dust collector, pre-filter and foam filter with water. Be sure to
air-dry them thoroughly before reassembling. Do not wash the high-performance
filter with water, as it may damage the filter and reduce the suction power.
Clean the Rolling Brush
Pull on the release tabs to unlock the brush guard as shown.
Lift the rolling brush to remove.
Clean the rolling brush with the provided cleaning tool or a vacuum cleaner.
Reinstall the rolling brush by inserting the fixed protruding end first and then clicking
into place.
Press down to snap the brush guard into place.
1
4
2
5
3
Clean the Side Brushes
Foreign substances, such as hair, can easily get tangled in the side brushes, and dirt may
adhere to them. Be sure to clean them regularly.
Remove the side brushes.
Carefully unwind and pull off any hair or string that is wrapped between the main unit
and the side brushes.
Use a cloth dampened with warm water to remove dust from the brushes or to gently
reshape them.
Other manuals for RoboVac 30C
2
Table of contents
Other EUFY Vacuum Cleaner manuals

EUFY
EUFY HomeVac S11 Lite User manual

EUFY
EUFY RoboVac 11S User manual

EUFY
EUFY RoboVac LR30 Hybrid+ User manual

EUFY
EUFY HomeVac H11 User manual

EUFY
EUFY RoboVac User manual

EUFY
EUFY RobVac G20 Hybrid User manual

EUFY
EUFY T2108 User manual

EUFY
EUFY RoboVac L35 Hybrid Series Installation guide

EUFY
EUFY RoboVac User manual

EUFY
EUFY T2501 User manual

EUFY
EUFY ROBOVAC 20 User manual

EUFY
EUFY X9Pro User manual

EUFY
EUFY X9Pro User manual

EUFY
EUFY RoboVac L35 Hybrid+ User manual

EUFY
EUFY RoboVac G30 User manual

EUFY
EUFY T2103 User manual

EUFY
EUFY CLEAN RoboVac 11S User manual

EUFY
EUFY HomeVac H20 User manual

EUFY
EUFY ROBOVAC 20 User manual

EUFY
EUFY RoboVac L70 Hybrid User manual