EUFY RoboVac LR30 Hybrid+ User manual

Quick Start Guide
RoboVac
Gufa
de lnicio Rapido

Vacuuming
1 2
,------------------------------------------------------------------------------------------,
: , 1 ,
Remove
the
foam
blocks
beside
the
bumper
before
use.
:
-,-
If
you
cannot
remove
the
objects
surrounding
the
auto emptystation,
check
whether
RoboVac
can
return
: without
assistance;
if
not,
contact
eufy
Customer
Service
for
help
.
'·•--------------------------······---------------------------------------------------------
3 = 4
\ '
'
'
,
--------------------------
--------------
--,
---------------------------------------------
, ' , "
• Always
keep
the
auto
empty
station
plugged
in
,
otherwise
RoboVac
will not automatically
return.
•
When
the
auto empty station
is
connected
to
AC
power,
the
LED
on
the
auto empty
station
is
solid
blue.
'
. '
'·•-------------
-- -------------------------
5
EufyHo
m,
~
GETITON
~•
Google
Play
0
-------
--
Fully
charge
RoboVac
before
use
.
The
LED
on
RoboVac
will
pulse
blue
while
charging
,
and
will
be
solid
blue
when
fully
charged.
,_
·----------------------------------------·
7 0
~
.
'
:
_,,•
,_
Download
the
EufyHome
app and
follow
the
in-app instruc
tions
to
c
omplete
the
Wi-Fi
connection.
You
:
: will
then
be
able
to
control
RoboVac
via
this
app.
Refer
to
the
"
Use
Your
RoboVac
with
the
EufyHome
:
: App"
section
in
the
Owner's
Manual for
details.
:
' ,
,
___________
------------------------------------------------------------------------------
1
3
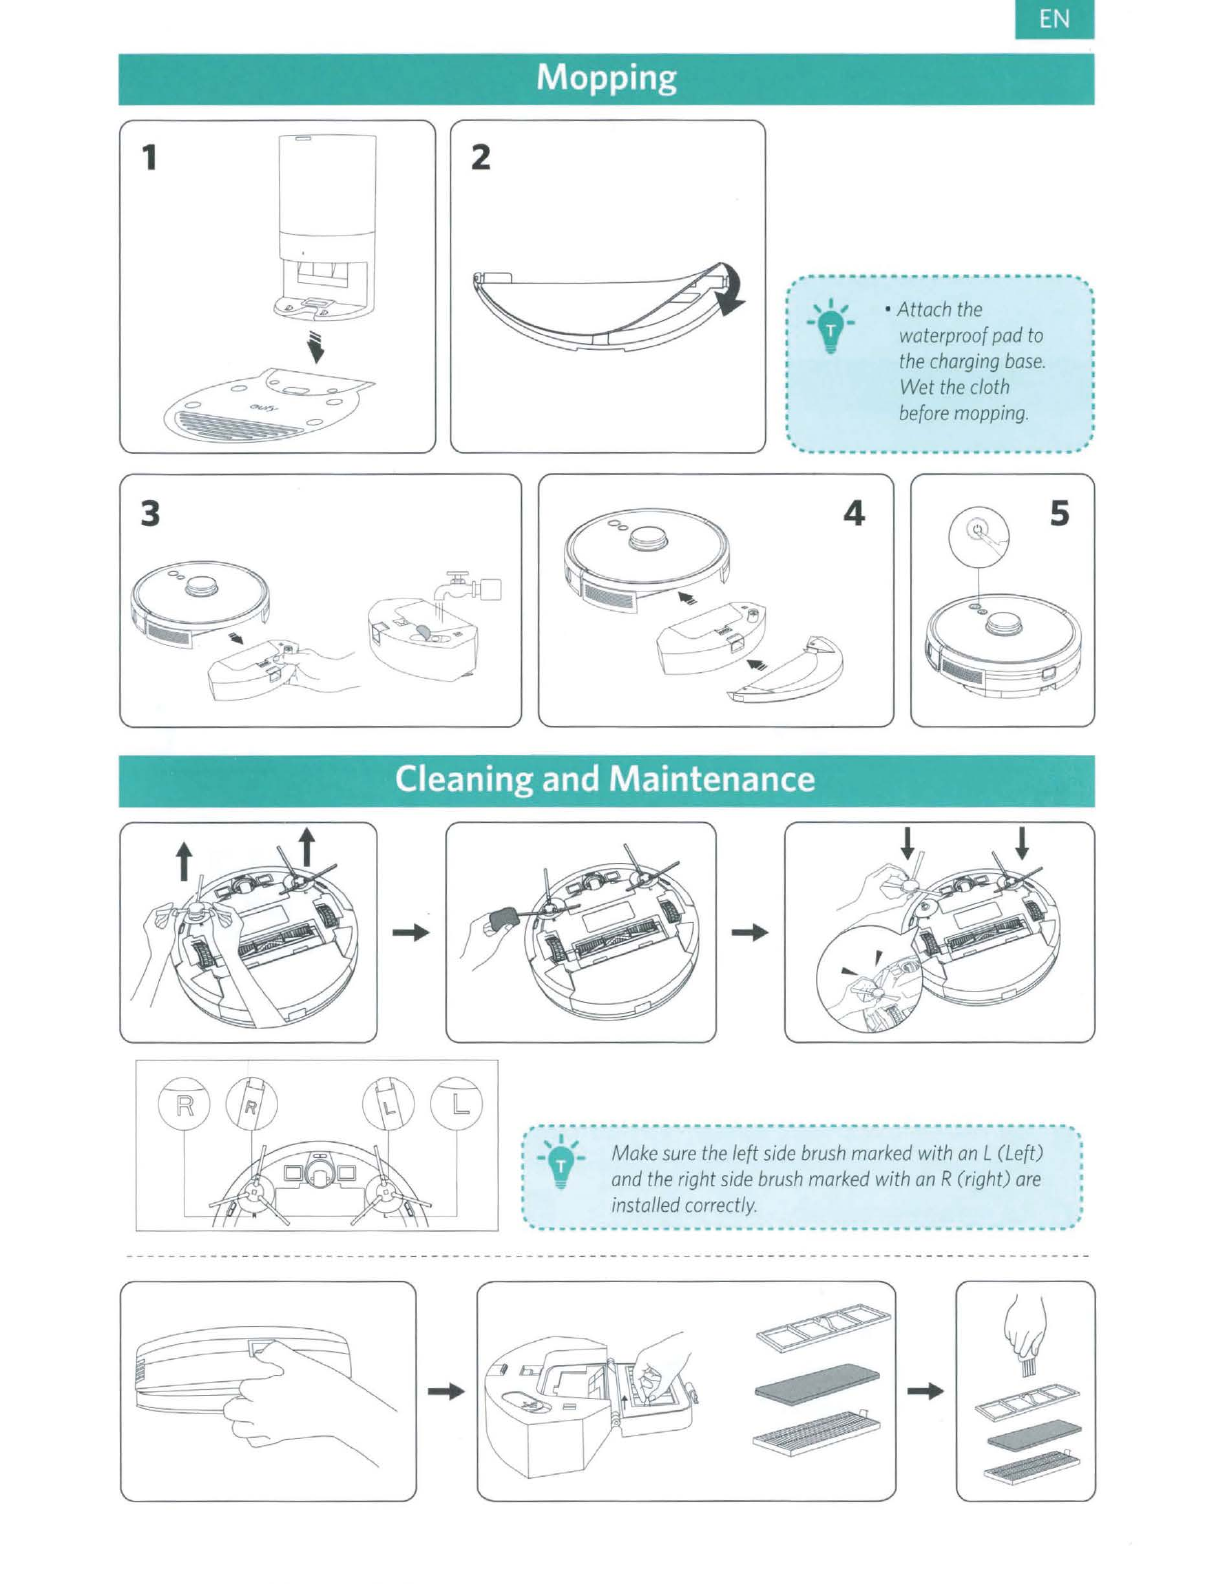
Mopping
2
Mill
#----------------------------,
. .
: , 1 , •
Attach
the
'
:
-,-
waterproof
pad
to
the
charging
base.
Wet
the
cloth
before
mopping.
Cleaning and Maintenance
➔
•
:,•
•~
,,-
i
:_-
--
~~k;
:ure
;h
·e-
l~ft
-
:i~e
~rus; ~;r~ed
-
~i~~
~n
L
(Left;
· -••
and
the
right
side
brush
marked
with
an
R
(right)
are
installed
correctly.
,
. .
--------------
------------------------------------·
➔

-
s::.
0
(J
=0=
(J
O
s::.
Important Tips
When
using for the first tim
e,
follow RoboVac
to
observe and resolve any problems that may occur.
A B C
D E
A Remove power cords and small objects from the floor that may entangle RoboVac.
B Fold tasseled edges of rugs underneath to prevent tangling RoboVac. Avoid cleaning dark-colored
high-pile rugs
or
rugs thicker than 1.02
in
/ 26
mm
as
they may cause RoboVac to malfunction.
C It
is
strongly recommended
to
set a No-Go
zo
ne or a virtual boundary in the EufyHome app in front
of
fireplac
es
and certain areas (i.e. air vents) that may cause damage to RoboVac if entered.
D Keep RoboVac away from wet areas duringcleaning.
E RoboVac may climb on top
of
objects less than 0.79
in
/
20
mm
in height. Remove these objects
if
possible.
f Anti-drop sensors will prevent RoboVac from tumbling down stairs and steep drops in most cases.
Sensors are less effective if
dirty
or
used on carpeted / reflective / dark-colored floors. It
is
recommended to place physical barriers or set a No-Go zone / a virtual boundary in the EufyHome
app
to
block
off
areas where RoboVac may
fal
l.

0ufy
For
FAQs and more information, please visit:
www.eufylife.com
T2181/T2182 51005003332
V01

RoboVac
LR30
Hybrid+
Owner's
Manual

Table
of
Contents
02
ImportantSafety Instructions
09
About Your RoboVac
What's
in
the
Box
RoboVac
Anatomy
LED
Indication
Map
Navigation and
Management
15
Using Your RoboVac
-Important
Tips Before Use
Preparation
Use
the
Auto
Empty
Station
Use Your RoboVac
with
the
EufyHome
App
Start/
Stop Cleaning
Select a Cleaning
Mode
Select a Suction Power Level
Use
Mopping
System
Use Your RoboVac
with
Amazon
Alexa/
the
Google
Assistant
Enable/
Disable
the
Child Safety Lock
29
Cleaning and Maintenance
Clean
the
Dust
Box,
Water
Tank, and Filter
Clean
the
Rolling Brush
Clean
the
Side Brushes
Replace
the
Side Brushes
Clean
the
Sensors and Charging Pins
Clean
the
Swivel
Wheel
Clean
the
Mopping
Cloth
Replace
the
Dust
Bag
38
Troubleshooting
Voice
Alert
42
Sp~cifications
43
Customer Service
Thank
you
for purchasing
RoboVac.
Carefully
read
all
the instructions below
before using this
device,
and
keep
this
manual
for future
reference
.
EN
01

Important Safety Instructions
To
reduce the risk
of
injury or damage, keep these instructions
at hand when setting up, using, and maintaining this device.
WARNING
SYMBOLS
USED
l Ii\ This
is
the safety alert symbol. This symbol alerts
you
to
!
ill
potential hazards that could result
in
property damage
l and/orserious bodily harm ordeath.
'
• This device can be used
by
children aged
from
8
years and above and persons
with
reduced physical,
sensory
or
mental capabilities
or
lack
of
experience
and knowledge
if
they
have been given supervision
or
instruction
concerning use
of
this
device in a safe
way
and understand
the
hazards involved.
• Children should be supervised
to
ensure
they
do
not
play
with
this
device.
• Cleaning and maintenance shall
not
be
performed
by
children
without
adult
supervision.
• This device
is
only
to
be used
with
the
power
supply
unit
provided.
• Before cleaning
or
maintaining
this
device,
the
plug
must
be removed
from
the
outlet.
.,.
• The
battery
in
this
device should
only
be replaced
by
a
skilled professional.
• Before removing
the
battery, disconnect
the
device
from
its
power
supply.
• The
battery
must
be removed before
this
device is
disposed of.
To
remove
the
battery, first
unscrew
the
screws on
the
bottom,
then remove
the
back cover.
Remove
the
battery
by disconnecting
the
quick
connector.
• The used
battery
should be placed in a sealed plastic bag
and disposed
of
safely according
to
local
environmental
regulations.
02EN
• The external flexible cable or cord
of
the power supply
unit
cannot be replaced;
if
the cord
is
damaged, the
power supply
unit
should be disposed of.
• This device is for indoor use only.
• This device is
not
a toy. Do
not
sit
or
stand on this device.
Small children and pets should be supervised when this
device is operating.
• Store and operate
this
device in room temperature
environments only.
•
Do
not
use
this
device
to
pick up anything
that
is burning
or
smoking.
• Do
not
use
this
device
to
clean up spills
of
bleach, paint,
chemicals,
or
anything wet.
..
• Before using
this
device, pick up objects like
clothing
and
loose paper. Lift up cords for blinds or curtains.
Move
power cords and sharp, pointed,
or
fragile objects
out
of
the way. If this device passes over a
power
cord and
drags it,
an
object could be pulled
off
a table
or
shelf.
• If the room
to
be cleaned has a balcony, a physical barrier
should be used
to
prevent access
to
the balcony and
to
ensure safe operation.
• Do
not
place anything on
top
of
this device.
•
Be
aware
that
this device moves around on its own.
Take care when walking in the area where this device is
operating
to
avoid stepping on it.
•
Do
not
operate_this device in areas
with
exposed
electrical outlets on
the
floor.
• Do
not
expose the electronics
of
this device, its battery,
or
the auto
empty
station. There are no user-serviceable
parts inside.
• Do
not
use
this
device on
an
unfinished, unsealed, waxed
or
rough floor. It
may
result in damage
to
the
floor
and
this device. Use only on hard
floor
surfaces
or
low-pile
carpets, and
not
on carpets
with
tasseled edges
or
loose
threads.
EN03
• This device has been designed
to
be used on floors
without
scratching them.
We
still
recommend
that
you
test
this
device on a small area
of
the
room
to
be cleaned
to
ensure no scratches are made before cleaning
the
whole
room.
•
Only
use
attachments
recommended
or
described in
this
manual.
• Do
not
handle
the
device
or
plug
with
wet
hands.
• Ensure
that
the
dust
bag
and/or
filters are
correctly
in-
place before use.
• Do
not
use a
battery
pack
or
device
that
is damaged
or
modified. Damaged
or
modified
batteries
may
exhibit
unpredictable behavior resulting in fire, explosion,
or
risk
of
injury.
•
Do
not
expose
the
battery
pack
or
device
to
fire
or
excessive heat. Exposure
to
fire
or
temperatures
above
130°C
/
266
°F
may
cause an explosion.
•
Do
not
modify
or
attempt
to
repair
the
device
or
the
battery
pack (as applicable), except
as
indicated in the_
instructions
for
use and care.
• Follow all charging
instructions
and
do
not
charge
the
battery
pack
or
device
outside
of
the
temperature
range
specified in
the
instructions. Charging
improperly
or
at
temperatures
outside
of
the
specified range
may
damage
the
battery
and increase
the
risk
of
fire.
• The laser distance sensor
of
this
devic.t;
meets
the
standards
for
Class I Laser Products in
IEC
60825-1:2014
and
will
not
generate hazardous laser radiation.
04EN
Notice
-This
symbol
on
the
device
or
its packaging
indicates:
Do
not
dispose
of
electrical appliances
as
unsorted
municipal
waste; use separate collection facilities.
Contact
your
local
authority
for
information
regarding
the
collection systems available. If
electrical appliances are disposed
of
in landfills
or
dumps,
hazardous substances can leak
into
the
groundwater
and
get
into
the
food chain,
damaging
your
health and well-being.
When
replacing old
appliances
with
new
ones,
the
retailer is legally
obliged
to
take back.your old appliance
for
disposal
at
least free
of
charge.
FCC
Statement
This device
complies
with
Part
15
of
the
FCC
Rules.
Operation
is subject
to
the
following
two
conditions:
(1) This device
may
not
cause
harmful
interference, and
(2)
this
device
must
accept any interference received,
including
interference
that
may
cause undesired operation.
Warning: Changes
or
modifications
not
expressly
approved
by
the
party
responsible
for
compliance
could
void
the
user's
authority
to
operate
the
equipment.
Note: This
equipment
has been tested and found
to
comply
with
the
limits
for
a Class Bdigital device,
pursuant
to
Part
15
of
the
FCC
Rules. These
limits
are
designed
to
provide reasonable
protection
against
harmful
interference in a residential installation.
This
equipment
generates, uses, and can radiate radio
frequency
energy and,
if
not
installed and used in
accordance
with
the
instructions,
may
cause
harmful
ENOS

interference
to
radio communications. However, there is
no guarantee
that
interference will
not
occur
in a particular
installation. If this
equipment
does cause harmful
interference
to
radio
or
television reception,
which
can
be
determined
by
turning
the
equipment
off
and on,
the
user is encouraged
to
try
to
correct
the
interference by
one
or
more
of
the
following
measures: (1) Reorient
or
relocate
the
receiving antenna.
(2)
Increase
the
separation
between
the
equipment
and receiver.
(3)
Connect
the
equipment
into
an
outlet
on a circuit different
from
that
to
which
the
receiver is connected.
(4)
Consult
the
dealer
or
an experienced
radio/
TV
technician
for
help.
The
following
importer
is
the
responsible
party
(for
FCC
matters
only).
Company Name: POWER MOBILE
LIFE,
LLC
Address:
400
108th
Ave NE Ste
400,
Bellevue,
WA
98004-5541
Telephone:+
1
(800)
988
7973
RF
Exposure
Compliance
Statement
This
equipment
complies
with
FCC/IC radiation exposure
..
limits
set
forth
for
an
uncontrolled environment. This
equipment
should be installed and operated
with
a
minimum
distance
of
20
cm
between
the
radiator and
your
body.
ISED
Compliance
Statement
This device contains licence-exempt
transmitter(s)/
receiver(s)
that
comply
with
Innovation, Science and
Economic Development Canada's licence-exempt
RSS(s).
Operation
is
subject
to
the following
two
conditions:
1.
This device may
not
cause interference.
2.
This device
must
accept any interference, including
06EN

interference
that
may
cause undesired operation
of
the
device.
Declaration
of
Conformity
This product complies
with
the radio interference
requirements
of
the European Community. Hereby,
Anker
Innovations Limited declares
that
the radio
equipment
type
T2181
is in compliance
with
Directive
2014/53/EU.
The
full
text
of the
EU
declaration
of
conformity
is available
at the
following
website:
https://support.eufylife.com/s/
articleRecommend?type=DownLoad.
Maximum
output
power:
18
dBm (For EU)
Frequency band: 2.4G
band
(2.4000GHz
-
2.4835GHz)
GB
Declaration
of
Conformity
Hereby, Anker Innovations Limited declares
that
the product
type
T2181
is in compliance
with
Radio
Equipment Regulations 2017 and The Restriction of
the Use
of
Certain Hazardous Substances in Electrical
and Electronic Equipment Regulations 2012. The full
text
of
the
GB
declaration of
conformity
is
available at
the
following
website:
https://support.eufylife.com/s/
articleRecommend?type=DownLoad.
The following
importer
is the responsible party
(contract
for
EU
and UK matters)
Anker
Technology
(UK)
Ltd
Suite
B,
Fairgate House,
205
Kings
Road,
Tyseley,
Birmingham,
B11
2AA,
United Kingdom
Anker
Innovations Deutschland
GmbH
Georg-Muche-Strasse
3,
80807
Munich,
Germany
Anker
Innovations Limited
Room 1318-19,
Hollywood
Plaza, 610 Nathan
Road,
Mongkok, Kowloon, Hong Kong
EN07
Trademark
Notice
• Amazon, Echo, Alexa and all related logos are
trademarks
of
Amazon.com, Inc.
or
its affiliates.
•
Apple
and the
Apple
logo are trademarks
of
Apple
Inc.,
registered in
the
U.S.
and
other
countries.
App
Store is
a service
mark
of
Apple
Inc., registered in
the
U.S
. and
other
countries.
• Google Play and
the
Google Play logo are trademarks
of
Google Inc.
• Google
Home
is a
trademark
of
Google Inc.
...
OSEN
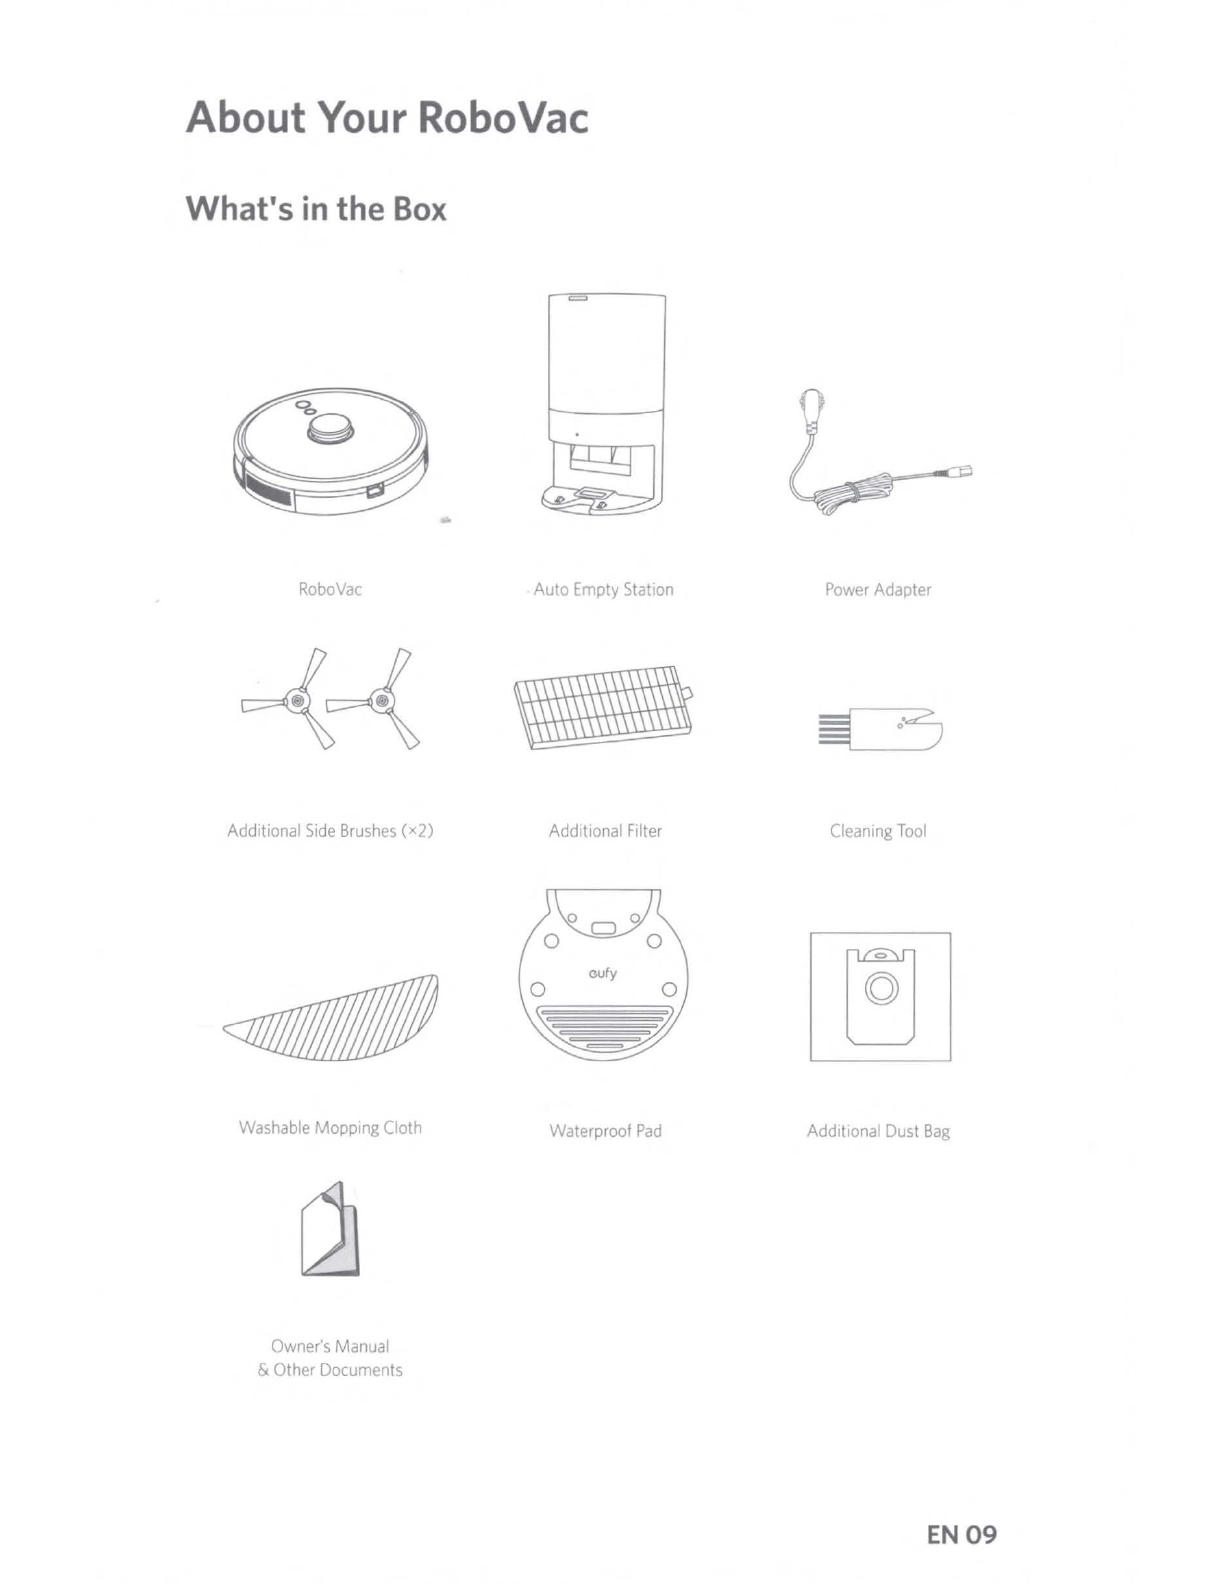
AboutYourRoboVac
What's
in the
Box
RoboVac
Additional
Side
Brushes
(x2)
Washable
Mopping Cloth
[dJ
Owner's
Manual
& Other Documents
Auto
Empty
Station
Additional
Filter
0ufy
0 0
%J2£t19
Waterproof
Pad
Power
Adapter
Cleaning
Tool
Additional Dust
Bag
EN09

RoboVac Anatomy
A.Top
B.
Side
Dust box and water
tank (2-in-1)
--+~'<--
Dust box and water
--P~
:-
-.....
tank release button
0
•.
Press
to
start
or
pause cleaning.
Press and hold for 3 seconds
to
turn
on
or
off.
O•Press
to
return
to
the
auto
empty
station
or
pause.
• Press and hold for 3 seconds
to
enable/
disable the
child safety lock.
Laser distance sensor (LDS)
00
Press and hold
both
buttons
for 3 seconds
to
reset
Wi-Fi
connection.
\!./'"'---
Infrared sensor
Bumper
~Moppiog
modal,
Force
shutdown button
10
EN

C. Bottom
Drop sensor
Chargingcontact pins
---~
..------
Chargingcontact pins
~---
Right side brush
----r----.
Drop sensor
--+-irrr
IP"i---1-f>-..J---
Wheels
Brush guard
Rolling brush
D. Dust
Box
and
Water
Tank (2-in-1)
Dust box
Filter cover
Watertank
Foam filter
f-7~==:Jp=tAtf
-Charging
Release
button Water inlet Water inlet
cover
contact
pins
EN
11

E.
Mopping
Module
~----
Washable mopping cloth
"'1:J__L
_______
---:77
---.L-.'~---
Cloth attachment area
F.
Suction Inlet
Suction inlet
Suction inlet
12
EN

G. Auto Empty Station
Dust bag
Dust
bag handle
~~'------
Exhaust vent
1:~.
EN
13
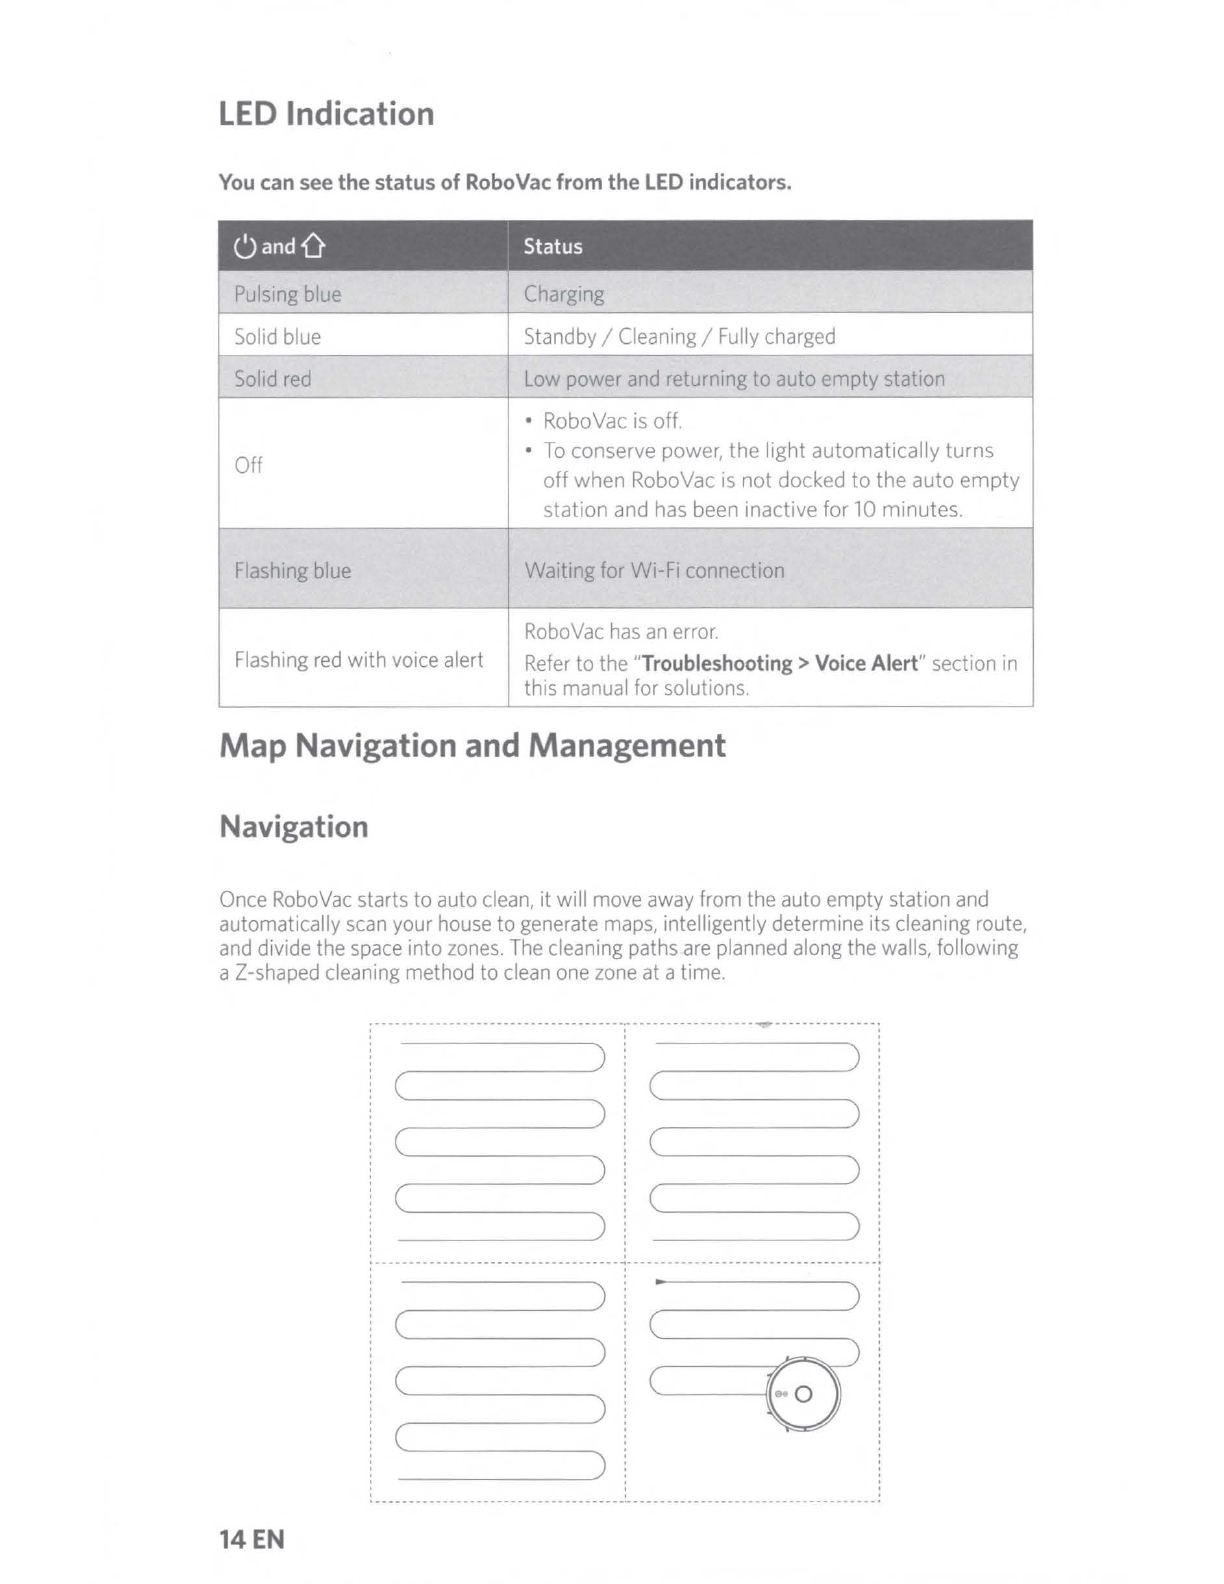
LED
Indication
You
can
see
the status of
RoboVac
from the
LED
indicators.
(Jand0
Status
Pu
l
sing
blue
Charging
Solid
blue
Standby/Cleaning/
Fully
charged
Solid
red
Low
power
and
returning to auto empty station
•
RoboVac
is
off.
Off •
To
conserve power, the light automatically turns
off when
RoboVac
is
not docked to the auto empty
station
and
has
been
inactive for 10 minutes.
Flashing
bl
ue
Waitingfor Wi-
Fi
connection
RoboVac
has
an
error.
Flashing
red
with
voice
alert
Refer
to the "Troubleshooting>
Voice
Alert"section
in
this
manual
for solutions.
Map
Navigation and Management
Navigation
Once
RoboVac
starts to auto
clean,
it will
move
away
from the auto empty station
and
automatically
scan
your
house
to generate
maps,
intelligent
ly
determine its
cleaning
route,
and
divide the
space
into
zones.
The
cleaning
paths
are
pl
anned
along the
walls,
fo
llowing
a
Z-shaped
cleaning method to
clean
one
zone
at
ati
me.
-- ----------------------------------.- ------------------------------------
14EN
Other manuals for RoboVac LR30 Hybrid+
2
Table of contents
Other EUFY Vacuum Cleaner manuals

EUFY
EUFY RoboVac L35 Hybrid+ User manual

EUFY
EUFY RoboVac X8 Hybrid User manual

EUFY
EUFY RoboVac 35C User manual

EUFY
EUFY RoboVac R500 User manual

EUFY
EUFY X9Pro User manual

EUFY
EUFY RoboVac 30C User manual

EUFY
EUFY T2193 User manual

EUFY
EUFY T2103 User manual

EUFY
EUFY RoboVac G20 User manual

EUFY
EUFY RoboVac 11 User manual

EUFY
EUFY RoboVac T2253 User manual

EUFY
EUFY HOMEVAC T2401 User manual

EUFY
EUFY RoboVac 25C User manual

EUFY
EUFY RoboVac User manual

EUFY
EUFY RoboVac User manual

EUFY
EUFY RobVac G20 Hybrid User manual

EUFY
EUFY RoboVac R550C User manual

EUFY
EUFY RoboVac 30 User manual

EUFY
EUFY RoboVac L70 Hybrid User manual

EUFY
EUFY RoboVac 11c+ User manual


