Eurochron EUS 95 User manual

BEDIENUNGSANLEITUNG
Best.-Nr. 672628 / Version 01/12
FUNK-WANDUHR SPIEGELGLAS EUS 95
BESTIMMUNGSGEMÄSSE VERWENDUNG
Das Produkt dient zur Anzeige der Uhrzeit, der Kalenderdaten und der Innentem-
peratur.
Mittels eines eingebauten DCF-Empfängers wird die Uhrzeit automatisch eingestellt.
Die Sicherheitshinweise und alle anderen Informationen dieser Bedienungsanlei-
tung sind unbedingt zu beachten.
Das Produkt entspricht den gesetzlichen, nationalen und europäischen Anforderun-
gen. Alle enthaltenen Firmennamen und Produktbezeichnungen sind Warenzeichen
der jeweiligen Inhaber. Alle Rechte vorbehalten.
LIEFERUMFANG
-
Funk-Wanduhr
-
Bedienungsanleitung
SICHERHEITSHINWEISE
Lesen Sie bitte vor Inbetriebnahme die komplette Anleitung durch,
sie enthält wichtige Hinweise zum korrekten Betrieb. Bei Schäden, die
durch Nichtbeachten dieser Bedienungsanleitung verursacht werden,
erlischt die Gewährleistung/Garantie! Für Folgeschäden übernehmen
wir keine Haftung!
Bei Sach- oder Personenschäden, die durch unsachgemäße Handhabung
oder Nichtbeachten der Sicherheitshinweise verursacht werden, über-
nehmen wir keine Haftung! In solchen Fällen erlischt die Gewährleis-
tung/Garantie.
-
Aus Sicherheitsgründen ist das eigenmächtige Umbauen und/oder Verändern
des Produktes nicht gestattet. Zerlegen Sie es niemals.
-
Das Produkt ist ausschließlich zum Betrieb in trockenen Innenräumen geeignet,
es darf nicht feucht oder nass werden.
-
Dieses Produkt ist kein Spielzeug und gehört nicht in Kinderhände. Betreiben
Sie das Produkt nur außerhalb der Reichweite von Kindern; das Produkt enthält
verschluckbare Kleinteile sowie Batterien.
-
Wenn das Produkt von einem kalten in einen warmen Raum gebracht wird, kann
Kondenswasser entstehen. Lassen Sie es deshalb zuerst auf Zimmertemperatur
kommen, bevor Sie es verwenden.
-
Lassen Sie das Verpackungsmaterial nicht achtlos liegen, dieses könnte für
Kinder zu einem gefährlichen Spielzeug werden.
-
Gehen Sie vorsichtig mit dem Produkt um, durch Stöße, Schläge oder dem Fall
aus bereits geringer Höhe wird es beschädigt.
BATTERIE UND AKKU-HINWEISE
-
Batterien/Akkus gehören nicht in Kinderhände.
-
Lassen Sie Batterien/Akkus nicht offen herumliegen, es besteht die Gefahr, dass
diese von Kindern oder Haustieren verschluckt werden. Suchen Sie im Falle eines
Verschluckens sofort einen Arzt auf.
-
Ausgelaufene oder beschädigte Batterien/Akkus können bei Berührung mit der
Haut Verätzungen verursachen, benutzen Sie deshalb in diesem Fall geeignete
Schutzhandschuhe.
-
Batterien/Akkus dürfen nicht kurzgeschlossen, zerlegt oder ins Feuer geworfen
werden. Es besteht Explosionsgefahr!
-
Herkömmliche nicht wiederaufladbare Batterien dürfen nicht aufgeladen
werden, Explosionsgefahr! Laden Sie ausschließlich dafür vorgesehene Akkus,
benutzen Sie ein geeignetes Ladegerät.
-
Achten Sie beim Einlegen der Batterien/Akkus auf die richtige Polung (Plus/+
und Minus/- beachten).
EINZELTEILE UND BEDIENELEMENTE
(1) Taste + (4) Taste RESET
(2) Taste SET/WAVE (5) Batteriefach
(3) Taste -
BATTERIEN/AKKUS EINLEGEN/WECHSELN
-
Klappen Sie den Standfuss auf der Rückseite des Gehäuses auf.
-
Öffnen Sie das Batteriefach (5) und legen Sie zwei neue Batterien vom Typ AA/
Mignon polungsrichtig ein. Die korrekte Polung ist im Batteriefach angegeben.
-
Verschließen Sie das Batteriefach wieder.
-
Ein Batteriewechsel ist erforderlich, wenn der Displaykontrast nachlässt oder
das Display nicht mehr arbeitet.
Wenn nach dem Einlegen der Batterien keine Displayanzeige erscheint,
drücken Sie die Taste RESET (4) mit einem spitzen Gegenstand (z.B. mit
einer aufgebogenen Heftklammer). Sollte danach immer noch keine Display-
anzeige zu sehen sein, sind die Batterien entladen. Bitte wechseln Sie sie
dann, wie oben beschrieben.
Die Verwendung von Akkus ist möglich. Durch die geringere Betriebsspan-
nung (Akku = 1,2 V, Batterie = 1,5 V) und die geringere Kapazität verkürzt
sich jedoch die Betriebsdauer.
ERSTINBETRIEBNAHME
-
Kurz nach dem Einlegen der Batterien erfolgt der erste Empfangsversuch für das
DCF-Signal. Das Empfangssymbol erscheint rechts unten im Display und nach
erfolgreichem DCF-Empfang wird die korrekte Uhrzeit angezeigt.
Die Erkennung des DCF-Signals und dessen Auswertung kann einige Minuten
dauern. Bewegen Sie die Uhr in dieser Zeit nicht. Betätigen Sie keine Taste!
Ein schlechter Empfang ist zu erwarten z.B. bei metallbedampften Isolier-
glasfenstern, Stahlbetonbauweise, beschichteten Spezialtapeten, in der
Nähe von elektronischen Geräten oder in Kellerräumen.
Falls nach 10 Minuten nicht die aktuelle Uhrzeit angezeigt wird, verändern
Sie die Position der Uhr und starten Sie einen manuellen Empfangsversuch
(siehe nächstes Kapitel).
Hierdurch wird ein erneuter Empfangsversuch gestartet.
Die Empfangsversuche für die tägliche automatische Synchronisierung mit der DCF-
Zeit werden mehrfach am Tag durchgeführt. Ein erfolgreicher Empfangsversuch pro
Tag genügt, um die Abweichung auf unter einer Sekunde zu halten.
Das DCF-Signal wird von einem Sender in Main-
flingen (nahe Frankfurt am Main) ausgesendet.
Dessen Reichweite beträgt bis zu 1500km, bei ide-
alen Empfangsbedingungen sogar bis zu 2000km.
Das DCF-Signal beinhaltet unter anderem die ge-
naue Uhrzeit (Abweichung theoretisch 1 Sekunde
in einer Million Jahre!) und das Datum.
Selbstverständlich entfällt auch das umständliche
manuelle Einstellen der Sommer- und Winterzeit.

Diese Bedienungsanleitung ist eine Publikation der Conrad Electronic SE, Klaus-Conrad-Str. 1,
D-92240 Hirschau (www.conrad.com). Alle Rechte einschließlich Übersetzung vorbehalten.
Reproduktionen jeder Art, z. B. Fotokopie, Mikroverfilmung, oder die Erfassung in elektronischen
Datenverarbeitungsanlagen, bedürfen der schriftlichen Genehmigung des Herausgebers. Nach-
druck, auch auszugsweise, verboten. Diese Bedienungsanleitung entspricht dem technischen
Stand bei Drucklegung. Änderung in Technik und Ausstattung vorbehalten.
© Copyright 2012 by Conrad Electronic SE.
DCF-EMPFANGSVERSUCH DURCHFÜHREN
-
Um eine manuelle Suche nach dem DCF-Signal durchzuführen (z.B. wenn Sie den
Funk-Wecker an einen anderen Ort gebracht haben), drücken Sie die Taste SET/
WAVE (2) kurz.
-
Hierdurch wird ein neuer Empfangsversuch gestartet. Warten Sie dann wieder
wie oben beschrieben einige Minuten, bis die aktuelle Uhrzeit angezeigt wird.
MANUELLE EINSTELLUNGEN
Nachdem der DCF-Empfangsversuch abgeschlossen wurde, können Sie noch eini-
ge zusätzlichen Einstellungen durchführen, um die Anzeige an Ihren Standort, Ihre
Wünsche usw. anzupassen.
Außerdem ist hier auch eine manuelle Zeiteinstellung für den Fall möglich, dass das
DCF-Signal nicht empfangen werden konnte.
Die Uhr sucht jedoch auch nach manueller Zeiteinstellung weiterhin nach dem DCF-
Signal und stellt sich nach erfolgreichem Empfang automatisch auf die DCF-Zeit ein.
-
Halten Sie die Taste SET/WAVE (2) gedrückt, um die Einstellfunktion zu aktivie-
ren.
-
Die Zeitzonenanzeige rechts unten im Display und die Sprachenauswahl in der
Wochentagsanzeige blinken.
-
Stellen Sie die Zeitzone mit der Taste + (1) und die gewünschte Sprache für die
Wochentagsanzeige mit der Taste - (3) ein.
-
Drücken Sie die Taste SET/WAVE (2) erneut und stellen Sie mit der Taste + (1)
bzw. mit der Taste - (3) die Jahresanzeige ein.
-
Drücken Sie die Taste SET/WAVE (2) erneut und stellen Sie mit der Taste + (1)
bzw. mit der Taste - (3) die Datumsanzeige ein.
-
Drücken Sie die Taste SET/WAVE (2) erneut und stellen Sie mit der Taste + (1)
bzw. mit der Taste - (3) die Uhrzeitanzeige ein.
-
Drücken Sie die Taste SET/WAVE (2) erneut und stellen Sie das Uhrzeitformat
(12- oder 24h-Anzeige) mit der Taste + (1) und die gewünschte Temperatureinheit
(°C oder °F) mit der Taste - (3) ein.
-
Drücken Sie die Taste SET/WAVE (2) erneut, um die Einstellungen abzuspei-
chern.
Halten Sie die entsprechenden Einstelltasten länger gedrückt, um den ein-
zustellenden Wert kontinuierlich zu verändern.
AUFSTELLUNG/WANDMONTAGE
Die Uhr kann aufgestellt oder an der Wand aufgehängt werden.
Für einen einwandfreien DCF-Empfang sollte die Uhr nicht neben anderen elektroni-
schen Geräten, Kabeln, Metallteilen usw. aufgestellt/montiert werden.
Aufstellung
-
Klappen Sie den Aufstellfuß an der Gehäuserückseite auf und schieben Sie ihn
ins Gehäuse, bis er einrastet.
-
Stellen Sie die Uhr auf einer ebenen, rutschfesten und stabilen Oberfläche auf.
-
Schützen Sie wertvolle Möbeloberflächen mit einer geeigneten Unterlage, ande-
renfalls sind Kratzspuren möglich.
-
Stellen Sie die Uhr so auf, dass sie nicht herunterfallen kann.
Wandmontage
-
Für die Wandmontage ist an der Geräterückseite eine Aufhängeöse vorgesehen.
-
Befestigen Sie die Uhr mit einer Schraube, die Sie einige Millimeter aus der Wand
herausstehen lassen.
-
Hängen Sie die Uhr mit der Aufhängeöse am Schraubenkopf auf.
WARTUNG UND REINIGUNG
Das Produkt ist bis auf den Batteriewechsel wartungsfrei, zerlegen Sie es niemals.
Für eine Reinigung verwenden Sie bitte ein sauberes, weiches, trockenes Tuch.
Verwenden Sie keine chemischen Reinigungsmittel, diese können die Gehäuseober-
flächen beschädigen.
ENTSORGUNG
a) Produkt
Elektronische Geräte sind Wertstoffe und dürfen nicht in den Hausmüll!
Entsorgen Sie das Produkt am Ende seiner Lebensdauer gemäß den gelten-
den gesetzlichen Bestimmungen.
Entnehmen Sie evtl. eingelegte Batterien und entsorgen Sie diese getrennt
vom Produkt.
b) Batterien und Akkus
Sie als Endverbraucher sind gesetzlich (Batterieverordnung) zur Rückgabe aller
gebrauchten Batterien und Akkus verpflichtet; eine Entsorgung über den Hausmüll
ist untersagt!
Schadstoffhaltige Batterien/Akkus sind mit dem nebenstehenden Symbol
gekennzeichnet, das auf das Verbot der Entsorgung über den Hausmüll hin-
weist. Die Bezeichnungen für das ausschlaggebende Schwermetall sind:
Cd=Cadmium, Hg=Quecksilber, Pb=Blei (Bezeichnung steht auf den Batte-
rien/Akkus z.B. unter dem links abgebildeten Mülltonnen-Symbol).
Ihre verbrauchten Batterien/Akkus können Sie unentgeltlich bei den Sammelstel-
len Ihrer Gemeinde, unseren Filialen oder überall dort abgeben, wo Batterien/Akkus
verkauft werden!
Sie erfüllen damit die gesetzlichen Verpflichtungen und leisten Ihren Beitrag zum
Umweltschutz.
KONFORMITÄTSERKLÄRUNG (DOC)
Hiermit erklärt der Hersteller, dass sich dieses Produkt in Übereinstimmung mit den
grundlegenden Anforderungen und den anderen relevanten Vorschriften der Richt-
linie 1999/5/EG befindet.
Die Konformitätserklärung zu diesem Produkt finden Sie unter
www.conrad.com.
TECHNISCHE DATEN
Betriebsspannung: 3 V/DC
Batterien: 2 x 1,5 V Mignon/AA
Betriebsdauer: ca. 2 Jahre
Messbereich Thermometer: -9,9 bis +50 °C
Auflösung Thermometer: 0,1 °C
Displaygröße: 190 x 105 mm
Abmessungen: 273 x 162 x 38 mm
Gewicht: 868 g

RADIO WALL CLOCK, MIRROR GLASS EUS 95
OPERATING INSTRUCTIONS
Item no. 672628 / Version 01/12
INTENDED USE
This product is intended for displaying the time, calendar dates and indoor tem-
perature.
The time is set automatically using an integrated DCF receiver.
Always observe the safety instructions and all other information included in these
operating instructions.
This product complies with the applicable national and European regulations. All
names of companies and products are the trademarks of the respective owner. All
rights reserved.
PACKAGE CONTENTS
-
Radio Wall Clock
-
Operating Instructions
SAFETY INSTRUCTIONS
Please read all of the operating instructions before using the product
for the first time; they contain important information about the correct
operation. The warranty will be void in the event of damage caused by
failure to observe these safety instructions! We do not assume any li-
ability for any consequential damage!
Nor do we assume any liability for material and personal damage caused
by improper use or non-compliance with the safety instructions! In such
cases, the warranty will be null and void.
-
For safety reasons, any unauthorised conversion and/or modification of the
product is not permitted. Never dismantle the product.
-
The product is intended exclusively for use in dry interiors; it must not get damp
or wet.
-
This product is not a toy and does not belong in the hands of children. Only use
the product out of the reach of children; the product contains parts that can be
swallowed as well as batteries.
-
Condensation may form when the product is brought from a cold room into a
warm one. Wait until it has reached room temperature before using it.
-
Do not leave packaging material unattended. They may become dangerous play-
things for children.
-
Handle the product with care; it can be damaged by impacts, blows, or accidental
drops, even from a low height.
INSTRUCTIONS FOR BATTERIES AND RECHARGEABLE
BATTERIES
-
Batteries/rechargeable batteries do not belong in the hands of children.
-
Do not leave batteries/rechargeable batteries lying around; there is a risk that
they could be swallowed by children or pets. If swallowed, consult a doctor im-
mediately.
-
Leaking or damaged batteries/rechargeable batteries in contact with the skin
can cause acid burns, therefore, use suitable protective gloves.
-
Batteries/rechargeable batteries must not be short-circuited, opened or thrown
into a fire. There is a risk of explosion!
-
Do not recharge normal, non-rechargeable batteries, risk of explosion! Only
charge rechargeable batteries that are intended for this purpose; use suitable
rechargeable battery chargers.
-
Check that the polarity is correct when inserting the batteries/rechargeable bat-
teries (pay attention to plus/+ and minus/-).
CONTROLS AND PARTS
(1) Button + (4) RESET button
(2) WAVE/SET button (5) Battery compartment
(3) Button -
INSERTING/REPLACING BATTERIES/RECHARGEABLE
BATTERIES
-
Fold out the stand on the back of the case.
-
Open the battery compartment (5) and insert two batteries of type AA/Mignon
observing the correct polarity. The correct polarity is indicated in the battery
compartment.
-
Close the battery compartment again.
-
A change of battery for the clock is required when the display contrast fades or
the display no longer works.
If nothing is shown in the display after installing the battery, press the
RESET button (4) with a pointed object (e.g. with a bent paper clip). If still
nothing is displayed after that, the batteries are empty. Please replace them
as described above.
The use of rechargeable batteries is possible. The lower operating voltage
(rechargeable battery = 1.2 V, battery 1.5 V) and lower capacity, however, will
reduce the operating time.
INITIAL START UP
-
Shortly after the batteries are inserted, the first reception search for the DCF
signal occurs. The reception symbol appears on bottom right in the display and
after a successful DCF reception the correct time will be displayed.
The detection of the DCF signal and its evaluation may take several minutes.
Do not move the clock, during this time. Do not press any buttons!
Bad reception can be caused, for example, by metalised insulated glass, rein-
forced concrete buildings, coated special wallpapers, proximity to electronic
devices, or installation in cellars.
If the current time is not displayed after 10 minutes, change the position of
the clock and start a manual attempt to detect the signal (see next chapter).
This will start a new reception attempt.
The reception attempt for the daily automatic synchronisation with the DCF time is
done several times a day. One successful reception per day is sufficient to keep the
deviation to less than 1 second.
The DCF signal is transmitted via a transmitter
in Mainflingen (near Frankfurt). Its range is up to
1500 km and, under ideal reception conditions,
even up to 2000 km.
Among other things, the DCF signal includes the
precise time (theoretical deviation of 1 second in a
million years!) and the date.
This means there is no need for manual setting of
summer and winter time.

These operating instructions are a publication by Conrad Electronic SE, Klaus-Conrad-Str. 1,
D-92240 Hirschau (www.conrad.com). All rights including translation reserved. Reproduction by
any method, e.g. photocopy, microfilming, or the capture in electronic data processing systems
require the prior written approval by the editor. Reprinting, also in part, is prohibited. These ope-
rating instructions represent the technical status at the time of printing. Changes in technology
and equipment reserved.
© Copyright 2012 by Conrad Electronic SE.
MAKING A DCF RECEPTION ATTEMPT
-
To perform a manual search for the DCF signal (e.g., if you have placed the radio
alarm clock in a different location), briefly press the SET/WAVE (2).
-
This will start a new reception attempt. Then, as described above, wait for a few
minutes until the correct time is displayed.
MANUAL SETTINGS
After completion of the DCF reception attempt, you can make some additional set-
tings to adjust the display to your location and your individual needs.
Furthermore, it is possible to set the time manually, in case the DCF signal could
not be received.
However, after manually setting the time, the clock keeps searching for the DCF
signal, and automatically adjusts to the DCF time after a successful reception.
-
Keep the button SET/WAVE (2) pressed to activate the setting function.
-
The time zone display on the bottom right in the display and the language selec-
tion in the weekday display flash.
-
Set the time zone using the + key (1) and the desired language for the weekday
display using the - key (3).
-
Press the SET/WAVE button (2) again and set the year display with the + (1) or
the - (3) button.
-
Press the SET/WAVE button (2) again and set the year display with the + (1) or
the - (3) button.
-
Press the SET/WAVE button (2) again and set the year display with the + (1) or
the - (3) button.
-
Press the SET/WAVE button (2) again and set the time format (12 h or 24 h dis-
play) with the + (1) button and the desired temperature unit (°C or °F) with the
- (3) button.
-
Press the button SET/WAVE (2) again to save the settings.
Keep the corresponding setting buttons pressed in order to continuously
change the value to be set.
SETUP/WALL MOUNTING
The clock can be stood on a surface or hung on the wall.
To ensure a correct DCF reception, the clock should not be placed/mounted next to
electronic devices, cables, metal parts, etc.
Set-up
-
Fold out the stand on the back of the case and push it into the case until it clicks
into place.
-
Place the clock on a horizontal, skid-proof and stable surface.
-
Protect valuable furniture surfaces by using a suitable underlay; otherwise, it
may cause scratch marks.
-
Set up the product in such a manner that it cannot fall over.
Wall Mounting
-
There is a suspension eye on the back of the device for wall mounting.
-
Fasten the clock in place with a screw that protrudes a few millimetres from the
wall.
-
Then hang the clock on the screw head with the suspension eye.
MAINTENANCE AND CLEANING
Apart from replacing the batteries, the product does not require any maintenance
and should never be disassembled.
Please use a soft, dry, clean cloth for cleaning.
Do not use aggressive detergents as these can cause discoloration of the case.
DISPOSAL
a) Product
Electronic devices are recyclable waste materials and must not be disposed
of in the household waste!
Please dispose of the product, when it is no longer of use, according to the
current statutory requirements.
Remove any inserted battery and dispose of it separately from the product.
b) Batteries and Rechargeable Batteries
The user is legally obliged (battery regulation) to return used batteries and re-
chargeable batteries. Do not dispose of used batteries via the domestic refuse!
Contaminated batteries/rechargeable batteries are labelled with these sym-
bols to indicate that disposal in the household waste is forbidden. The sym-
bols for the relevant heavy metals are: Cd=cadmium, Hg=mercury, Pb=lead
(marking can be seen on the battery/rechargeable battery, e.g., underneath
the refuse bin symbol shown on the left).
You can dispose of your used batteries/rechargeable batteries free of charge at your
community’s collection point or any place where batteries/rechargeable batteries
are sold!
You thereby fulfil your statutory obligations and contribute to the protection of the
environment.
DECLARATION OF CONFORMITY (DOC)
The manufacturer hereby declares that this product conforms to the fundamental
requirements and the other relevant regulations of Directive 1999/5/EC.
You can find the Declaration of Conformity for this product at
www.conrad.com.
TECHNICAL DATA
Operating voltage: 3 V/DC
Batteries: 2 x 1.5 V AA/Mignon
Battery life: approx. 2 years
Measuring range of thermometer -9.9 to +50 °C
Thermometer resolution: 0.1 °C
Display size: 190 x 105 mm
Dimensions: 273 x 162 x 38 mm
Weight: 868 g

HORLOGE MURALE SPIEGELGLAS EUS 95
NOTICE D‘EMPLOI
N° de commande 672628 / Version 01/12
UTILISATION CONFORME
L’appareil sert à afficher l’heure, la date et la température intérieure.
Grâce à un récepteur DCF intégré, l’heure est réglée automatiquement.
Il faut impérativement respecter les consignes de sécurité et les autres informations
de ce manuel d’utilisation.
Cet appareil satisfait aux exigences légales nationales et européennes. Tous les
noms d’entreprises et les appellations d’appareils figurant dans ce mode d’emploi
sont des marques déposées de leurs propriétaires respectifs. Tous droits réservés.
CONTENU DE LA LIVRAISON
-
Horloge murale sans fil
-
Mode d’emploi
CONSIGNES DE SÉCURITÉ
Lisez intégralement les instructions d’utilisation avant la mise en ser-
vice de l’appareil. Elles contiennent des consignes importantes pour son
bon fonctionnement. En cas de dommages dus au non-respect de ce ma-
nuel d’utilisation, la validité de la garantie sera annulée ! Nous déclinons
toute responsabilité pour les dommages consécutifs !
De même, nous n’assumons aucune responsabilité en cas de dommages
matériels ou corporels résultant d’une manipulation de l’appareil non
conforme aux spécifications ou du non-respect des présentes consignes
de sécurité ! Dans de tels cas, la garantie prend fin.
-
Pour des raisons de sécurité, toute transformation et/ ou modification de l’appa-
reil, réalisée à titre individuel, est interdite ! Ne jamais le démonter.
-
L’appareil convient uniquement à une utilisation dans des locaux secs et à l’inté-
rieur ; il ne doit pas être mouillé ou humide.
-
Cet appareil n’est pas un jouet, il ne doit pas être laissé à la portée des en-
fants. Utilisez cet appareil uniquement hors de la portée des enfants ; l’appareil
contient des petites pièces qui peuvent être avalées ainsi que des piles.
-
Lorsque vous transportez l’appareil d’une pièce froide à une pièce chaude, il est
possible que de la condensation se forme. Attendez d’abord que le produit ait
atteint la température ambiante avant de l´utiliser.
-
Ne pas laisser le matériel d’emballage sans surveillance, il pourrait constituer un
jouet dangereux pour les enfants.
-
Manier le produit avec précaution, des coups, des chocs ou une chute, même de
faible hauteur, peuvent l’endommager.
INDICATIONS AFFÉRENTES AUX PILES ET PILES
RECHARGEABLES
-
Les piles et les piles rechargeables ne doivent pas être laissées à la portée des
enfants.
-
Ne laissez pas traîner des piles ou piles rechargeables. Elles risquent d’être ava-
lées par des enfants ou des animaux domestiques. En pareil cas, consultez immé-
diatement un médecin.
-
Des piles/accus présentant des fuites ou des dommages peuvent brûler la peau,
pour cette raison, utilisez des gants de protection appropriés.
-
Ne court-circuitez pas les piles/ piles rechargeables. Ne les démontez pas et ne
les jetez pas au feu. Risque d’explosion !
-
Les piles normales non rechargeables ne doivent pas être rechargées. Risque
d’explosion ! Ne recharger que les accus prévus à cet effet, utiliser uniquement
un chargeur d‘accus approprié.
-
Respecter la polarité lors de la mise en place des piles/accumulateurs (respecter
les pôles positif/+ et négatif/-).
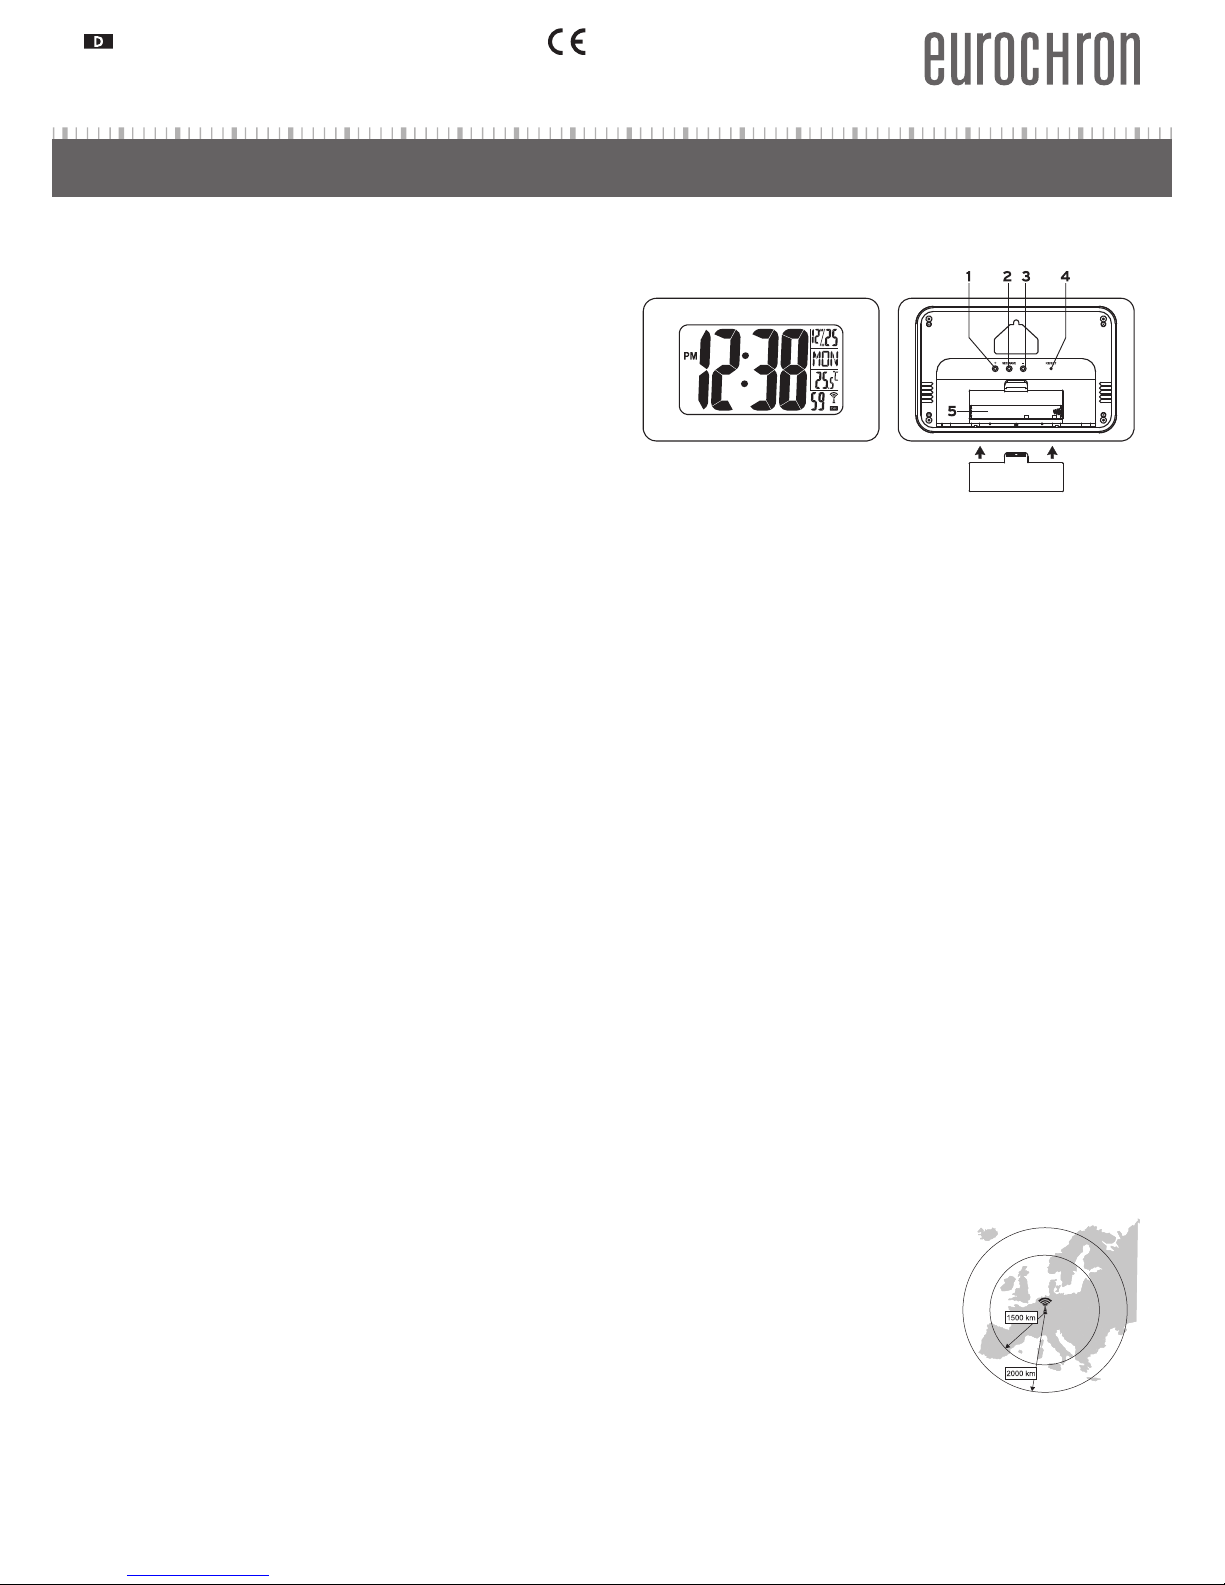
PIÈCES DÉTACHÉES ET ÉLÉMENTS DE COMMANDE
(1) Touche + (4) Touche RESET
(2) Touche SET/WAVE (5) Compartiment à piles
(3) Touche -
MISE EN PLACE ET REMPLACEMENT DES PILES/ACCUS
-
Dépliez le pied de support au dos du boîtier.
-
Ouvrez le compartiment à piles (5) et y insérer deux piles neuves de type AA/
Mignon en respectant la polarité. La polarité correcte est indiquée dans le com-
partiment à piles.
-
Refermez le compartiment à piles.
-
Le remplacement des piles est nécessaire lorsque le contraste de l’écran s’affai-
blit ou que l’écran ne fonctionne plus.
S’il n’y a aucun affichage à l’écran après insertion des piles, appuyez sur la
touche RESET (4) avec un objet pointu (par ex. avec un trombone déplié).
Si l‘écran n‘affiche toujours aucune image, cela signifie que les piles sont
déchargées. Veuillez alors remplacer la pile comme décrit ci-dessus.
Il est possible d’utiliser des accus. En raison de la faible tension de service
(pile rechargeable = 1,2 V, pile normale = 1,5 V) et de la faible capacité des
piles rechargeables, la durée de fonctionnement et la capacité seront ré-
duites.
PREMIÈRE MISE EN SERVICE
-
Immédiatement après la mise en place des piles, l’appareil effectue le premier
test de réception du signal DCF. L’icône de réception s’affiche à droite en bas de
l’écran et l’heure correcte est affichée en cas de réception réussie du signal DCF.
La détection du signal DCF et son analyse peuvent prendre quelques mi-
nutes. Ne pas déplacer la montre pendant ce temps. N´appuyez sur aucune
touche !
Les fenêtres isolantes en métal, les murs en béton armé, les revêtements
spéciaux de papier peint, les appareils électriques à proximité ou l’installa-
tion dans une cave peuvent aussi altérer la réception.
Si l’heure actuelle ne s’affiche pas au bout de 10 minutes, déplacez l’horloge
et recommencez une tentative de réception manuelle du signal radio (voir
chapitre suivant).
Cela va démarrer une nouvelle recherche de réception.
La recherche de réception pour la synchronisation automatique quotidienne avec
l’heure DCF peut être réalisée plusieurs fois par jour. Une seule réception par jour
suffit à maintenir l’écart au dessous de 1 seconde.
Le signal DCF est émis à partir d’un émetteur si-
tué à Mainflingen (à proximité de Francfort-sur-
le-Main) Sa portée est d´environ 1500km, voire
même de 2000km dans des conditions de récep-
tion idéales.
Le signal radio DCF comprend entre autres l’heure
exacte (écart théorique d’une (1) seconde sur un
million d’années !) et la date.
Bien entendu, cela élimine aussi les tracas du ré-
glage manuel des heures d’hiver et d´été.
Table of contents
Languages:
Other Eurochron Clock Radio manuals

Eurochron
Eurochron EFW 5000 User manual

Eurochron
Eurochron EFWUJumbo102 User manual

Eurochron
Eurochron EFWU 2600 User manual

Eurochron
Eurochron EFWU 330 S User manual

Eurochron
Eurochron EFWU 555 S User manual

Eurochron
Eurochron Monalisa User manual

Eurochron
Eurochron EFP 3900 User manual

Eurochron
Eurochron EFWU 4603 User manual

Eurochron
Eurochron EFWU Jumbo 100 User manual

Eurochron
Eurochron EFWU 555 N User manual