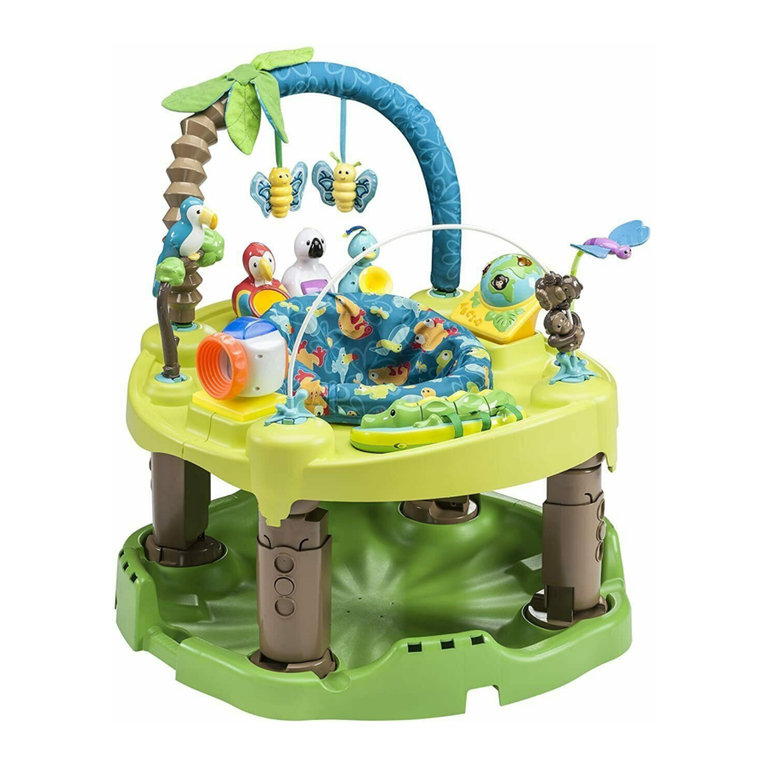
Evenflo ExerSaucer Triple Fun User manual

25701262 4/14© 2014 EVENFLO COMPANY, INC.
Centre d’apprentissage actif • Centro de aprendizaje activo
®
™
Triple FunTM
KEEP INSTRUCTIONS FOR FUTURE USE.
Read all instructions BEFORE assembly and use of product.
CONSERVER CES INSTRUCTIONS POUR RÉFÉRENCE ULTÉRIOR.
Lire les instructions AVANT l’assemblage et L’UTILISATION du produit.
GUARDE ESTAS INSTRUCCIONES PARA REFERENCIA FUTURA.
Lea las instrucciones ANTES de armar y USAR el producto.

Feet (2)
Phillips Screwdriver
CAUTION: Tighten all screws until snug; do not overtighten. Use only #6 x 3/4” (3.5 x 19 mm) screws (included).
DO NOT USE POWER TOOLS.
Tray Half (2)
Base (1)
Lower Leg
Pedestal (4)
Lower Leg (4)
Seat Pad (1)
Seat Ring (1)
Upper Leg
Crown (4)
Upper Leg (4)
Hardware Kit Bag (1)
1 Instructions
24 Screws–#6x3/4”(3.5 x 19 mm)
4 Washers
4 Large springs
4 1-3/4” (44.5 mm) springs
4 1-1/2” (38 mm) springs
2 End Caps
4 Leg Locks
4 Pylon Rings
4 Stabilizer Feet
6 Seat Wheels
Toy Kit Bag (1)
8 Toys
Pylon Ring (4) Leg Lock (4)
Playmat (1)
•www.evenflo.com • USA: 1-800-233-5921, 8 AM – 5PM E.T.
• Canada: 1-937-773-3971 • México: 01-800-706-12-00
Table of Contents
Tools Required
Warnings .......................................................................................... 1
Stage1Assembly.................................................................................... 2
Stage2Assembly.................................................................................... 2
Stage2BaseAssembly............................................................................... 2
Stage2TrayAssembly............................................................................... 4
Stage2SeatAssembly............................................................................... 7
ToyAssembly ....................................................................................... 9
Folding/Unfolding Stage 2.............................................................................10
Stage3Assembly...................................................................................11
CareandMaintenance...............................................................................14
LimitedWarranty ...................................................................................15
End Caps (2)
Large Small
Registration Information
Please register this product so we can reach you if there is a safety alert or recall. We will not sell, rent, or share your personal
information. To register your product, please complete and mail the card that came with it or visit our online registration at
www.evenflo.com/registerproduct
For future reference, record the Model Number and Date of Manufacture below.
Model Number: Date of Manufacture:

1
WARNING
Warnings
READ AND FOLLOW ALL WARNINGS AND INSTRUCTIONS! FAILURE TO DO SO COULD RESULT IN
SERIOUS INJURY OR DEATH!
• NEVER leave child unattended. ALWAYS keep child in view while in the ExerSaucer®.
• Read all instructions before assembly and use of the ExerSaucer®.
• Keep instructions for future use.
• Keep children away from unassembled product.
• Adult assembly required. Take care when unpacking and assembling; contains small parts and sharp edges.
• To prevent a possible choking hazard, remove and immediately discard packing material before using this product.
• Strings Can Cause Strangulation!
• DO NOT place the ExerSaucer® anywhere near cords from window blinds, draperies, phone, etc.
• DO NOT place items with strings, such as hood strings or pacifier cords, around your child’s neck .
• DO NOT suspend strings over product or attach strings to toys.
• To avoid possible entanglement or strangulation (on Stage 1), remove toy bar when baby begins to push up on hands
and knees.
• NEVER use near stairs or steps.
• NEVER use ExerSaucer® near ranges, radiators, space heaters, fireplaces or any other heat source.
• NEVER use ExerSaucer® in or near swimming pools or other bodies of water.
• DO NOT fill the ExerSaucer® tray with water.
• DO NOT fold or adjust height while baby is sitting in ExerSaucer®.
• DO NOT use the ExerSaucer® if any parts are missing, damaged or broken.
• NEVER use as a sled.
• DO NOT allow child to sleep in ExerSaucer® (Stage 2).
• DO NOT spin baby in seat. Only permit baby to rotate the seat.
• Stage 2 is for use by children who are at least 4 months old AND can hold up their head and neck unassisted.
• Stop using Stage 2 when your child reaches any of the following developmental stages:
• Can walk by himself/herself
• Is over 30” (76 cm) tall
• Can climb out of the product
• Can stand flat-footed in the ExerSaucer® in the highest adjustment level
• Allow only the baby’s toes to touch the base. DO NOT allow the baby to stand flat-footed on the base.
• DO NOT use or store this product outdoors.
• To avoid tip-over, place product on flat, level floor.
• NEVER place playmat from Stage 1 in the bottom of saucer.
• DO NOT mix old and new batteries.
• DO NOT mix alkaline, standard (carbon-zinc), or rechargeable (nickel-cadmium) batteries. Only batteries of the same or
equivalent type, as recommended, are to be used.
• DO NOT dispose of batteries in fire, as batteries may explode or leak.
• DO NOT use rechargeable batteries.
• DO NOT recharge non-rechargeable batteries.
• Promptly remove old batteries from the toy.
• Remove batteries before storing unit for a prolonged period of time.
2
2. Locate four pedestals C, then turn over and install the
1-1/2 inch (38 mm) spring Dwith screw Ein each
pedestal. Position spring as shown. Do not overtighten
screw.
EDD
1. Place mat Aon floor.
2. Place feet Bon either side of mat, as shown.
3.lnstall toy bar Cinto feet, as shown. Press toy bar down
firmly until it snaps into place. Pull up on the toy bar and
stalk toys installed into the feet to make sure they are locked
in place.
A
C
B
B
Stage 1 is used for infants from birth to 4 months old.
Stage 1
Stage 2 is used for infants 4 months old (who can hold up head and neck unassisted)
to walking age and under 30 inches tall.
C
B
A1. Turn base Aupside down and locate four stabilizer feet B.
Insert one side of foot Binto the foot bracket hole and twist
the foot until the other side snaps into the opposite hole, as
shown. Repeat until all four stabilizer feet are installed.
To use stabilizer feet:
Flip the four stabilizer feet out from beneath base to prevent
ExerSaucer®from rocking.
Stage 1
Stage 2 Stage 2
B

3
F
J
3.To install a pedestal C, hold it above the base Fso that
the locking tab with the rib Glines up directly over the
slot with the notch H.
C
G
H
F
Stage 2 Base Assembly
4.Attach the spring Dto the hook Ion the base F, as
shown. Once the spring is in place, align all three locking
tabs Jon the pedestal with the slots in the base and snap
the pedestal into place.
DI
5.Turn the base Fupside down and make sure the
locking tabs Jon each pedestal Care completely pushed
through to the underside of the base Fand have locked
over the edge of the openings, as shown.
6.Check to ensure that the locking tabs are installed properly
by turning the pedestal Cclockwise, then releasing.
The pedestal MUST spring back into place.
Repeat for all four pedestals.
F
C
J
CC

4
1.Locate two tray halves A.Install spring B, upper leg
crown C, and pylon ring Donto one of the tray halves.
Secure with four screws E.
Note: Hold the upper leg crown Cand pylon ring D
securely while installing screws. Tension from the spring will
try to push the upper leg crown and pylon ring upward.
Repeat for other upper leg crown on this tray and for both
upper leg crowns on the other tray half.
A
C
B
E
Stage 2 Tray Assembly
M
D
Install and tighten screws on the
pylon ring Din the following
sequence.
TIP
1
2
3
4
D
Stage 2 Base Assembly
2.Insert upper leg Finto the upper leg crown Cuntil it
snaps into place. Pull up on upper leg Fto ensure it is
securely installed in upper leg crown C.
Repeat until all four upper leg assemblies are
complete.
Note: Make sure the adjustment holes on the front of
all four upper legs Fare facing the outer edge of the
tray A, as shown.
A
FF
F
C
C
M
M
C
M
C
M
C
7.Insert lower leg assembly Mat an angle (as shown) onto top of pedestal C, then
rock gently while applying a steady downward pressure until it snaps into place.
Swing lower leg assembly Mup until it locks in the upright position. Repeat for all
four leg assemblies.
You are now finished assembling the base. Set it aside so you can assemble the tray.

5
Stage 2 Tray Assembly
G
I
3. Slide one end of 1-3/4 inch (44.5 mm) spring Ginto the
spring notch Hin leg lock I, as shown.
Note: Once the spring has been installed correctly, it will
stay in place. Repeat for all four leg locks.
4.Set one leg lock Ion the pylon ring Dand on the tray A,
as shown.
Note: The Side Cutaway View above illustrates how the
spring Gmust rest against the spring tab Jso the leg
lock Iwill operate properly.
I
D
A
H
J
D
G
I
Side Cutaway View
5. Push downward on the leg lock I(against the pylon
ring Dand the tray A) while pulling it toward you until it
slides off of the pylon ring, as shown.
6.While holding the leg lock I, allow the spring to pull the
leg lock back toward the upper leg as you guide it through
the pylon ring D, as shown.
D
I
A
I
D

6
7. Secure the leg lock Iwith screw Eand washer K.
Do not overtighten.
Note: Check that each leg lock is installed correctly by pull-
ing backward, then releasing it. If the leg lock springs back
into positon, it is installed correctly. If it does not spring back
into position, remove the screw and washer and repeat Steps
5 and 6. Repeat for all legs.
I
I
E
K
Stage 2 Tray Assembly
AA
8.Assemble the tray by snapping both tray
halves Atogether, as shown.
Note: Make sure the tray halves lock
securely.
N
O
N
P
Q
P
9. Locate the large end cap Nand press it onto
mounting posts Ofor storage, as shown.
Locate the small end cap Pand press it onto
mounting posts Qfor storage, as shown.

7
Stage 2 Seat Assembly
3.Press assembled seat ring Hdown firmly onto the top of the tray I
until it snaps into place and spins freely.
2.Turn seat ring Aright side up. Align triangle D
on the back of the seat ring with the triangle Eon
the seat pad label. Snap the plastic tabs Fon the
pad over the pegs Gon the seat ring. Continue this
process until all tabs are attached to all pegs.
1.Place seat ring Aupside down and locate the wheel
holders B. Snap six (6) seat wheels Cinto wheel
holders, as shown.
A
EF
G
D
H
I
B
C
B
A

8
Stage 2 Seat Assembly
CB
Align and start each upper leg Ainto the lower leg openings B.
Push button Cand guide upper leg into lower leg until upper
leg snaps into place.
Allow only the baby’s toes to touch the base. DO NOT allow
the baby to stand flat-footed on the base. As baby grows and
becomes more active, raise the tray to the next level so that
baby enjoys the most comfortable fit and maximum use of the
spin and bounce features.
To adjust height:
ALWAYS remove baby from ExerSaucer® before adjusting.
Push the button Cuntil the desired position is obtained.
Make sure that all four legs are adjusted to the same position.
C
WARNING
A

9
Toy Assembly
ON/OFF
Batteries
Batteries
Batteries
ON/OFF
ON/OFF

10
Folding/Unfolding Stage 2
2.To unfold the ExerSaucer®, release the four tray
locks Fby pulling them outward from the base E,
as shown.
Hold the base down with your foot, and pull the tray
upward. The tray will rotate as you pull and the legs will
lock in the upright position. The leg assemblies Bwill
lock onto the pedestals G.
Twist the tray to make sure all legs are locked properly.
IMPORTANT: Make sure all four leg assemblies Bare
firmly locked onto the pedestals Gbefore use.
G
B
G
12
F
E
C
B
1.To fold ExerSaucer®,ALWAYS remove baby and toy
bar(s) Afrom ExerSaucer® before folding.
With ExerSaucer® flat on the floor, twist each leg
assembly Bfully clockwise (the direction of the arrow)
until it stops in the position shown.
Fully depress one of the pedestal locking tabs Cthen
push on the leg assembly B; leg will partially fold. Repeat
this procedure for all four legs.
After pressing the fourth pedestal locking tab C, the
ExerSaucer® will fold with the tray Drotating toward the
base E. Make sure all four tray locks Fare locked onto
the base before trying to carry ExerSaucer®.
Note: Make sure the legs are at the same height
adjustment or the ExerSaucer®will bind and not fold
properly (refer to page 8).
A
BB
E
D
F
F
F

11
1.Remove toys and seat from the ExerSaucer®.
2.Follow Step 1 on page 10 to fold the ExerSaucer®, but
do not let the tray lock to the base.
3.Place your fingers beneath the legs A, as shown, and
push upward to disconnect the leg assemblies from the
pedestals B. Repeat for all four leg assemblies.
4.After all four legs have been disconnected from the
pedestals, remove tray assembly Cfrom the base D.
Stage 3 is used for children who are walking age to 24 months.
IMPORTANT: Child should not use the activity table if they can not stand up by themselves.
Stage 3 Stage 3
C
C
D
E
F
A
B
C
CG
6. Squeeze both locking tabs Gon
each side of the tray to disconnect
and separate the tray halves C.
Re-position them as shown.
B
A
5.Turn tray Cupside down and remove the large end cap E
and the small end cap Ffrom beneath.

12
8.Rotate leg assemblies Afully counterclockwise, (the
direction of the arrow) until they lock into the position
shown. Make sure that all four leg locks Hare locked
properly into the upper leg crown I, as shown
above. Also, make sure the ends of all four leg
locks Hare sticking out past the edge of the tray,
as shown.
IMPORTANT: DO NOT use this activity table unless
the legs have locked into place!
Stage 3 Assembly
7.Connect tray halves Cto form activity table.
Note: Make sure the tray halves lock securely.
C
C
A
A
A
A
H
I
H
H

13
Stage 3 Assembly
F
F
E
G
F
9. Install the small end cap F, as shown. Make sure
the locking tabs Ghave locked over the edge of the
opening, as shown.
10. Turn table over and install the large end cap E,
as shown. Make sure both end caps Eand Fare
locked into place.
11. Install toys on activity table. If desired, adjust table to
the appropriate height (page 8) for your child.
Note: Always make sure that all four legs are
adjusted to the same height.
IMPORTANT: NEVER use Stage 3 without end caps!

14
For Plastic Parts:
Wipe surface clean with cloth slightly moistened with mild soap and water. Allow to air dry.
For Seat Pad and Playmat:
For Best Results
Machine Wash Separately, Cold Water – Delicate Cycle. NO CHLORINE BLEACH.
Tumble Dry: 10 – 15 Minutes on Low Heat – Remove Immediately.
If musical toys fail to operate, check the batteries. Note: ONLY the AAA batteries are replaceable. Dispose of old batteries safely.
DO NOT use this product if any parts are missing, damaged or broken.
BATTERY INFORMATION
Battery life varies with use.
Safety Information: Batteries are small objects. Batteries must be replaced by adults. Follow the polarity (+/-) diagram in the
battery compartment.
• DO NOT mix old and new batteries.
• DO NOT mix alkaline, standard (carbon-zinc), or rechargeable (nickel-cadmium) batteries.
• Remove batteries before storing unit for a prolonged period of time.
• DO NOT allow unit to get wet.
• Promptly remove dead batteries from the toy.
• Dispose of used batteries properly.
• Only batteries of the same or equivalent type, as recommended, are to be used.
• DO NOT dispose of batteries in fire, as batteries may explode or leak.
• DO NOT use rechargeable batteries.
• DO NOT recharge non-rechargeable batteries.
Battery Replacement: To replace batteries, loosen screw and remove battery door. Discard old batteries properly and replace
with 3 AAA alkaline batteries. Replace door and tighten screw.
Troubleshooting:
Toy does not turn on or does not respond.
• Make sure batteries are installed correctly.
• Make sure battery cover is correctly secured.
• Install new batteries.
Toy makes improper responses.
• Check or install new batteries.
• Power Off then Power On, to reset.
WARNING
Care and Maintenance
Other manuals for ExerSaucer Triple Fun
4
Table of contents
Other Evenflo Baby Accessories manuals

Evenflo
Evenflo Soft n’ Wide Gate User manual

Evenflo
Evenflo Shyft DualRide User manual

Evenflo
Evenflo ExerSaucer Triple Fun User manual

Evenflo
Evenflo Exersaucer Seaside Splash User manual

Evenflo
Evenflo Jump Up User manual

Evenflo
Evenflo 8754 User manual

Evenflo
Evenflo Play-Away User manual

Evenflo
Evenflo Exersaucer Jam Session User manual

Evenflo
Evenflo SENSOR SAFE Guide

Evenflo
Evenflo Exersaucer Sweet Tea User manual