eVision BUTP108 User manual

MANUALE TECNICO
BUTP108
Telecamera a colori True Day&Night con OSD
e illuminatore IR
True Day&Night color camera with OSD and
IR illuminator
090000817

2
MANUALE TECNICO - BUTP108 -090000817 - TECHNICAL MANUAL
AVVERTENZE - FOREWORD
PER L’INSTALLATORE:
Attenersi scrupolosamente alle normative vigenti sulla realizzazione di impianti elettrici e sistemi di sicurezza, oltre che alle prescrizioni del costruttore
riportate nella manualistica a corredo dei prodotti.
Fornire all’utilizzatore tutte le indicazioni sull’uso e sulle limitazioni del sistema installato, specificando che esistono norme specifiche e diversi livelli di prestazioni di sicurezza
che devono essere commisurati alle esigenze dell’utilizzatore.
Far prendere visione all’utilizzatore delle avvertenze riportate in questo documento.
PER L’UTILIZZATORE:
Verificare periodicamente e scrupolosamente la funzionalità dell’impianto accertandosi della correttezza dell’esecuzione delle manovre di inserimento
e disinserimento. Curare la manutenzione periodica dell’impianto affidandola a personale specializzato in possesso dei requisiti prescritti dalle norme vigenti. Provvedere a
richiedere al proprio installatore la verifica dell’adeguatezza dell’impianto al mutare delle condizioni operative (es. variazioni delle aree da proteggere per estensione, cambiamento
delle metodiche di accesso ecc...)
Questo dispositivo è stato progettato, costruito e collaudato con la massima cura, adottando procedure di controllo in conformità alle normative vigenti. La piena rispondenza
delle caratteristiche funzionali è conseguita solo nel caso di un suo utilizzo esclusivamente limitato alla funzione per la quale è stato realizzato, e cioè:
BUTP108 Telecamera a colori True Day&Night con OSD e illuminatore IR
Qualunque utilizzo al di fuori di questo ambito non è previsto e quindi non è possibile garantire la sua corretta operatività.
I processi produttivi sono sorvegliati attentamente per prevenire difettosità e malfunzionamenti; purtuttavia la componentistica adottata è soggetta a guasti in percentuali
estremamente modeste, come d’altra parte avviene per ogni manufatto elettronico o meccanico. Vista la destinazione di questo articolo (protezione di beni e persone) invitiamo
l’utilizzatore a commisurare il livello di protezione offerto dal sistema all’effettiva situazione di rischio (valutando la possibilità che detto sistema si trovi ad operare in modalità
degradata a causa di situazioni di guasti od altro), ricordando che esistono norme precise per la progettazione e la realizzazione degli impianti destinati a questo tipo di applicazioni.
Richiamiamo l’attenzione dell’utilizzatore (conduttore dell’impianto) sulla necessità di provvedere regolarmente ad una manutenzione periodica del sistema almeno
secondo quanto previsto dalle norme in vigore oltre che ad effettuare, con frequenza adeguata alla condizione di rischio, verifiche sulla corretta funzionalità del sistema
stesso segnatamente alla centrale, sensori,avvisatori acustici, combinatore/i telefonico/i ed ogni altro dispositivo collegato. Al termine del periodico controllo l’utilizzatore
deve informare tempestivamente l’installatore sulla funzionalità riscontrata.
La progettazione, l’installazione e la manutenzione di sistemi incorporanti questo prodotto sono riservate a personale in possesso dei requisiti e delle conoscenze necessarie
ad operare in condizioni sicure ai fini della prevenzione infortunistica. E’ indispensabile che la loro installazione sia effettuata in ottemperanza alle norme vigenti. Le parti interne
di alcune apparecchiature sono collegate alla rete elettrica e quindi sussiste il rischio di folgorazione nel caso in cui si effettuino operazioni di manutenzione al loro interno prima
di aver disconnesso l’alimentazione primaria e di emergenza. Alcuni prodotti incorporano batterie ricaricabili o meno per l’alimentazione di emergenza. Errori nel loro collegamento
possono causare danni al prodotto, danni a cose e pericolo per l’incolumità dell’operatore (scoppio ed incendio).
FOR THE INSTALLER:
Please follow carefully the specifications relative to electric and security systems realization further to the manufacturer’s prescriptions indicated in the manual provided.
Provide the user the necessary indication for use and system’s limitations, specifying that there exist precise specifications and different safety performances levels that should
be proportioned to the user needs. Have the user view the directions indicated in this document.
FOR THE USER:
Periodically check carefully the system functionality making sure all enabling and disabling operations were made correctly.
Have skilled personnel make the periodic system’s maintenance. Contact the installer to verify correct system operation in case its conditions have changed (e.g.: variations
in the areas to protect due to extension, change of the access modes, etc…)
This device has been projected, assembled and tested with the maximum care, adopting control procedures in accordance with the laws in force. The full correspondence to
the functional characteristics is given exclusively when it is used for the purpose it was projected for, which is as follows:
BUTP108 True Day&Night color camera with OSD and IR illuminator
Any use other than the one mentioned above has not been forecasted and therefore it is not possible to guarantee its correct operativeness.
The manufacturing process is carefully controlled in order to prevent defaults and bad functioning. Nevertheless, an extremely low percentage of the components used is
subjected to faults just as any other electronic or mechanic product. As this item is meant to protect both property and people, we invite the user to proportion the level of
protection that the system offers to the actual risk (also taking into account the possibility that the system was operated in a degraded manner because of faults and the like),
as well reminding that there are precise laws for the design and assemblage of the systems destinated to these kind of applications.
The system’s operator is hereby advised to see regularly to the periodic maintenance of the system, at least in accordance with the provisions of current legislation,
as well as to carry out checks on the correct running of said system on as regular a basis as the risk involved requires, with particular reference to the control unit,
sensors, sounders, dialler(s) and any other device connected. The user must let the installer know how well the system seems to be operating, based on the results
of periodic checks, without delay.
Design, installation and servicing of systems which include this product, should be made by skilled staff with the necessary knowledge to operate in safe conditions in order
to prevent accidents. These systems’ installation must be made in accordance with the laws in force. Some equipment’s inner parts are connected to electric main and the-
refore electrocution may occur if servicing was made before switching off the main and emergency power. Some products incorporate rechargeable or non rechargeable
batteries as emergency power supply. Their wrong connection may damage the product, properties and the operator’s safety (burst and fire).
Timbro della ditta installatrice - Your dealer/installer:

MANUALE TECNICO - BUTP108 - 090010756 - TECHNICAL MANUAL
3
1. GENERALITA’
Leggere attentamente le istruzioni prima dell’uso.
BUTP108 è una telecamera avanzata adatta per vari ambien-
ti installativi. L'immagine delle telecamere è composta da 640
linee TV che garantiscono un' elevata risoluzione del sensore
CCD. La telecamera è dotata di un filtro meccanico IR, garanzia
di ottime riprese in qualsiasi condizione di luce. Ulteriori caratter-
istiche avanzate: 2DNR, HLC, DWDR e DPC. Inoltre, grazie al
passaggio cavi interno, la telecamera garantisce una protezione
maggiore da eventuali atti vandalici e manomissioni.
2. CARATTERISTICHE TECNICHE
Modello: BUTP108
Standard TV: PAL
Sensore: 1/3" Sony Super HAD II CCD
Area sensibile: 4,9mm x 3,7mm
Sistema di scansione: 2:1 interlacciato
Sistema di sincronizz.: Interna
Risoluzione orizz.: 640 linee TV
Rapporto S/N: >50dB (AGC OFF)
OSD: incorporato
Segnale uscita video: 1.0 Vpp, 75Ohm (BNC)
Illuminazione minima: 0Lux con IR accesi
Ottica: 5-50mm AUTOIRIS
IR Cut Filter: SI’
Electronic Shutter: AUTO - 1/50 - 1/100.000 s
Fr. di scansione: H:15,625 KHz - V:50Hz
Funz. DWDR: ON (0-63) / OFF
Bilan. del bianco: Auto, ATW1, ATW2, FIXED, MANUAL
Funz. 2DNR: ON / OFF
Controllo AGC: Alto / Medio / Basso / OFF
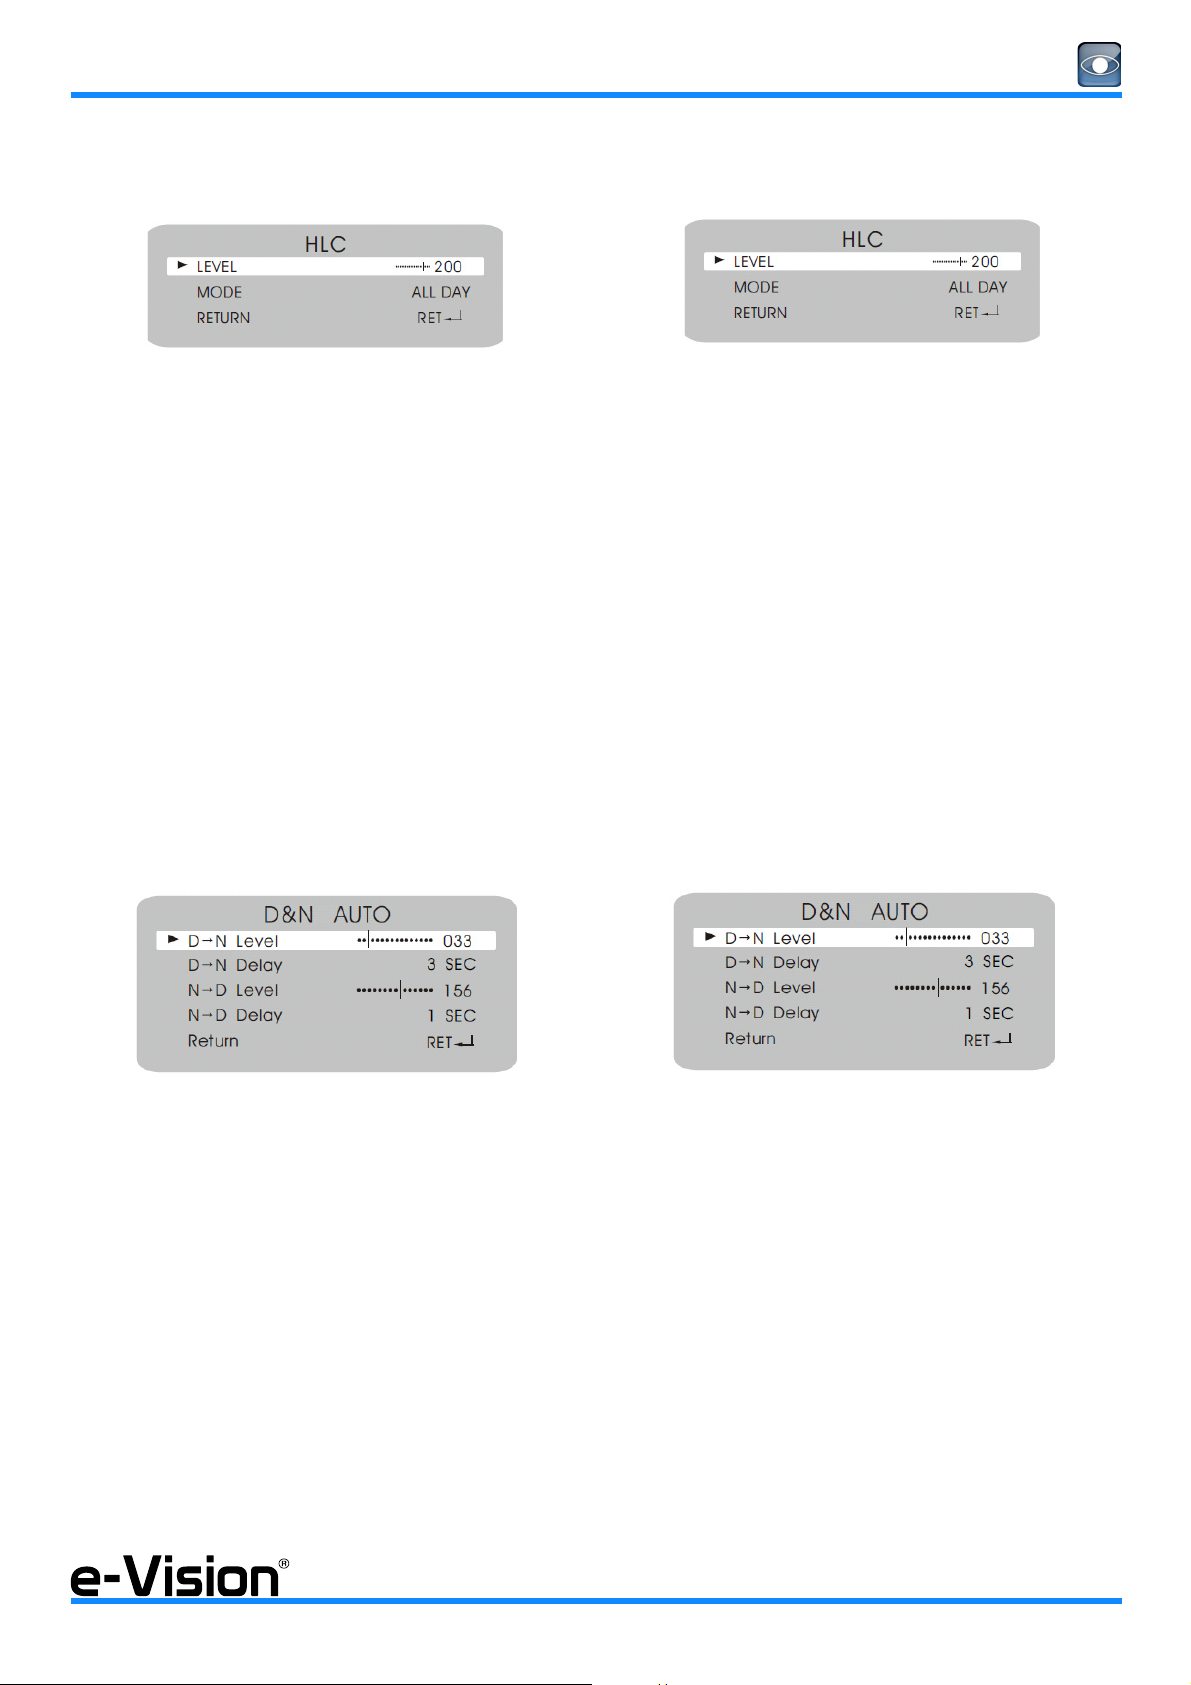
Comp. controluce: HLC / BLC / OFF
Funz. Day&Night: Auto / B/N / Colore / EXT
Controllo led IR: a fotoresistenza (CDS)
Lunghezza d’onda IR: 850nm
IR Led: 48 LED (potenza regolabile)
Illuminazione IR: 3 Lux
Funz. DPC: SI’
Rilevaz. Motion: ON (4 aree) / OFF
Mascheramento: ON (8 aree) / OFF
Funzione Mirror: ON / OFF
Regolaz. Immagine: Contrasto, Nitidezza, Saturazione
Correzione Gamma: 0,05 - 1,0 (0,45)
Modalità display: CRT / LCD / USER
Custodia: Lega di alluminio
Grado di protezione: IP67
Alimentazione: 12Vcc +/- 10%
Assorbimento: 200mA (IR OFF) 600mA (IR ON)
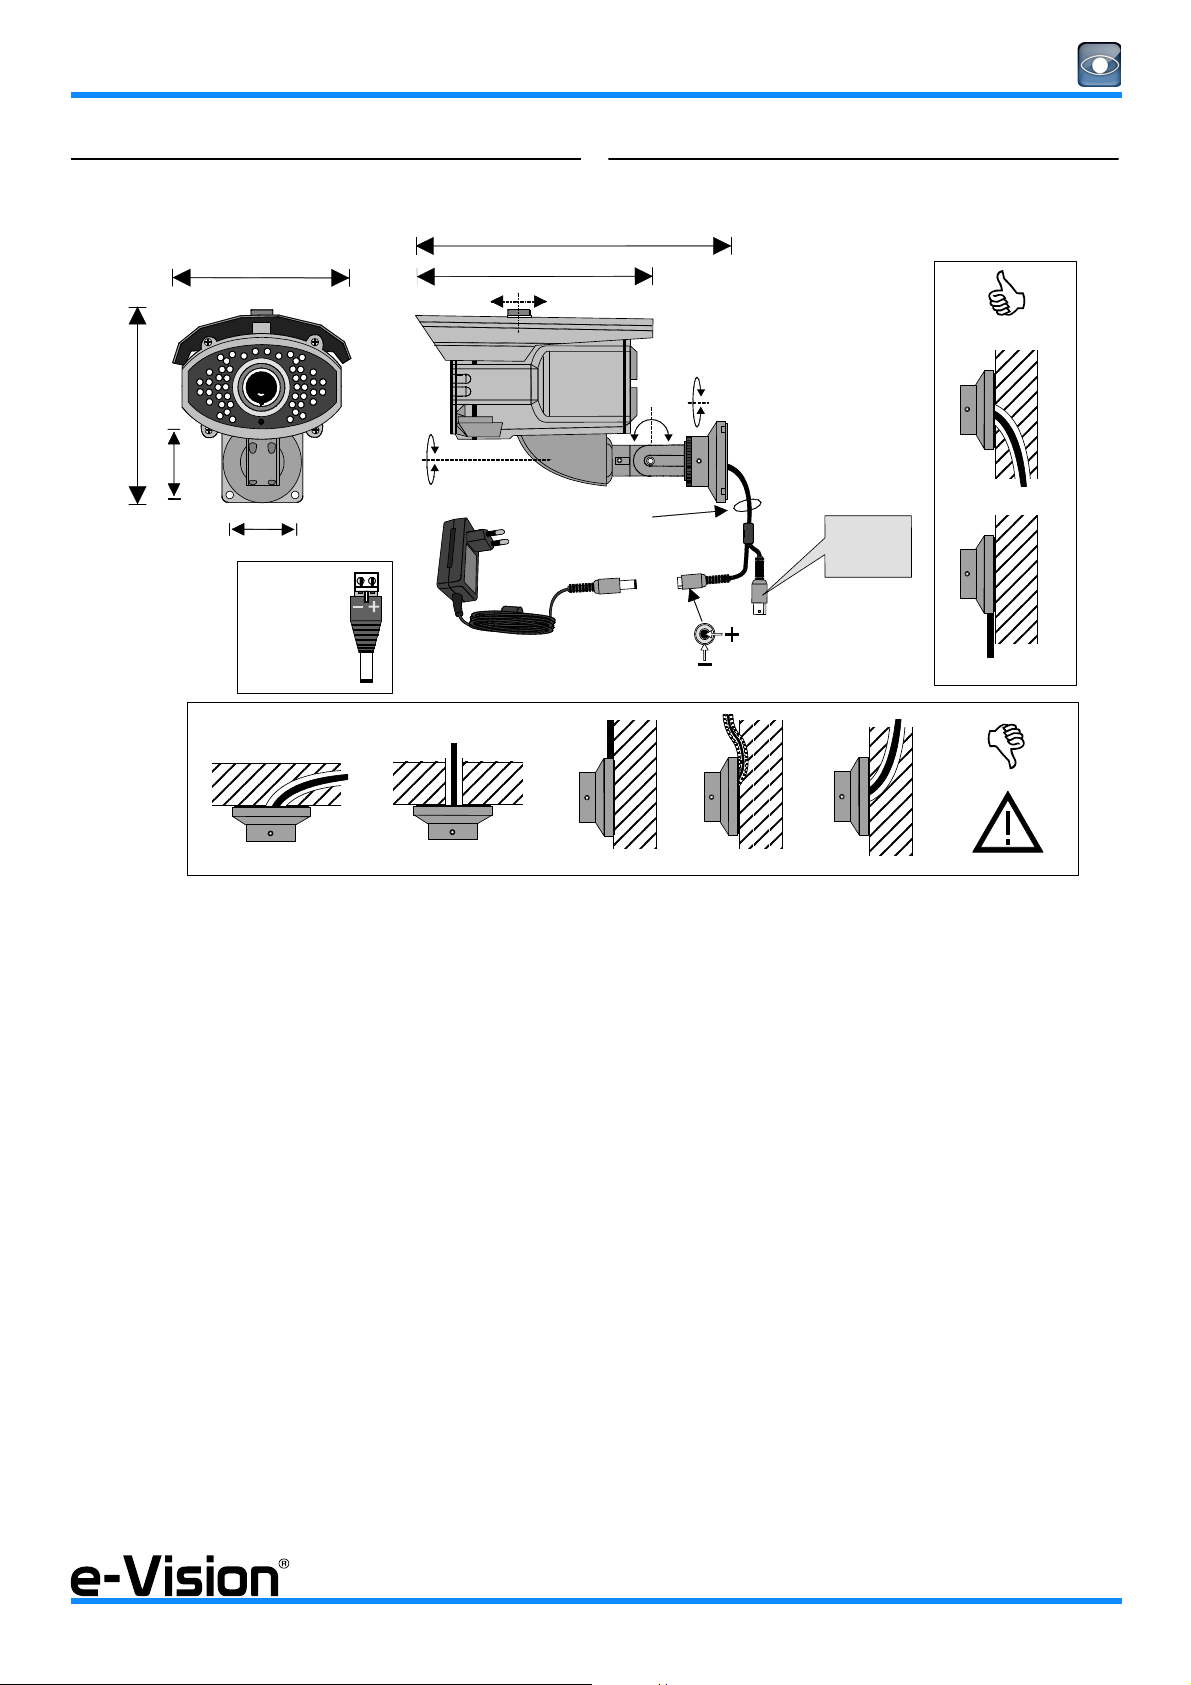
Dimensioni: L102 / H180 / P185
Peso: 1140g
Condizioni operative: -20°C : +50°C - 95% UR
1. GENERALS
Please review carefully instructions before use.
BUTP108 is an advanced camera suitable for various instal-
lation environments. It features 640 TV lines ensuring CCD high
resolution for clearer and detailed images. The camera is
equipped with an IR mechanical filter that ensures excellent re-
cordings under all light conditions. It features advanced charac-
teristics such as 2DNR, HLC, DWDR, and DPC. The full cable
management ensures an easy installation granting, at the same
time, an effective protection against tamper attempts and acts of
vandalism.
2. TECHNICAL SPECIFICATIONS
Model: BUTP108
Standard TV: PAL
Image sensor: 1/3" Sony Super HAD II CCD
Sensing area: 4.9mm x 3.7mm
Scanning system: 2:1 interlaced
Synchronization system: Internal
H-Resolution: 640 TV lines
S/N Ratio: >50dB (AGC OFF)
OSD: built in
Video output signal: 1.0 Vpp, 75Ohm (BNC)
Minimum illumination: 0Lux with IR led ON
Lens: 5-50mm AUTOIRIS
IR Cut Filter: YES
Electronic Shutter: AUTO - 1/50 - 1/100.000 s
Scanning Frequency: H:15.625 KHz - V:50Hz
DWDR: ON (0-63) / OFF
White Balance: Auto, ATW1,ATW2, FIXED, MANUAL
2DNR function: ON / OFF
AGC: High / Mid / Low / OFF
Back light comp.: HLC / BLC / OFF
Funz. Day&Night: Auto / B/N / Colore / EXT
IR Led Controls: Photo resistor (CDS)
IR Wavelenght: 850nm
IR Led: 48 LEDs (adjustable)
IR illumination: 3 Lux
DPC function: YES
Motion Detection: ON (4 areas) / OFF
Privacy Zones: ON (8 areas) / OFF
Mirror Function: ON / OFF
Image adjust. : Contrast, Sharpness, Saturation
Gamma correction: 0,05 - 1,0 (0,45)
Display mode: CRT / LCD / USER
Housing: Alluminium alloy
Protection class: IP67
Power supply: DC12V +/- 10%
Power consumption: 200mA (IR OFF) 600mA (IR ON)
Dimensions: L102 / H180 / P185
Weight: 1140g
Operation Temperature: -20°C : +50°C - RH 95%

4
MANUALE TECNICO - BUTP108 - 090010756 - TECHNICAL MANUAL
IR illuminator range for indoor installations is 50m under ideal
conditions.
For outdoor installations, illuminator range may differ and has
to be estimated considering the object to monitor and environ-
ment conditions.
NOTE: if the scene to shoot is completely devoid of light or re-
flection surfaces (walls), illuminator range is reduced by 60%.
3. INSTALLATION
Cautions:
- Do not install the camera in extreme temperature conditions. Do use the
camera under conditions where temperatures are within -20°C ~
+50°C.
- Do not install the camera under unstable lighting conditions. Severe li-
ghting change or flicker can cause the camera to work improperly.
- Do not install or use the camera in a environment where the humidity is
high. It can result in poo-quality image.
- Donotdisassemblethe camera. There are notuser-serviceableparts inside
it. Refer all servicing to qualified personnel only.
- Do not touch the imaging surface of sensor. Use a soft cloth with alcohol
to clean the surface if it is touched accidentally.
- Ensure the supply voltage is correct before operation!
- Do not focus the camera on the sun directly.
Steps:
1. Mount camera on to its bracket using suitable screws.
2. Install camera nad bracket to wall (or other appropriate
place) using drilling template, screws and dowels.
3. Connect camera according to diagram below.
4. Adjust focal lenght and focus as indicated in the chapter
below.
Parts supplied:
bracket,drillingtemplate,screws anddowels,
2 L-wrenches to adjust the bracket, rubber
tube for the screwdriver, sunshield, power
supply adapter, zoom and focus adjust tool,
secondary monitor cable, technical sheet
La portata dell'illuminatore all'interno in condizioni ideali è di
50m.
Per qualsiasi tipo di applicazioni in esterno, la portata dell'il-
luminatore varia e deve essere valutata volta per volta in base al
soggetto da inquadrare e alle condizioni ambientali del luogo di
ripresa.
NOTA: attenzione se la scena da riprendere è priva di qual-
siasi tipo di riflessione e in totale assenza di luce, la portata dell'il-
luminatore diminuisce del 60%.
3. INSTALLAZIONE
Avvertenze:
- Non installare la telecamera in condizioni ambientali estreme, le condizioni
d’uso sono comprese tra i -20°C e +50°C.
- Non installare la telecamera in luoghi con condizioni di illuminazione
estrema ed instabile. Importanti cambiamenti di illuminazione e sue re-
pentine variazioni, comportano il degrado della ripresa video.
- Non installare la telecamera in condizioni di elevata umidità, questa può
causare il degrado della ripresa video.
- Non smontare la telecamera, non ci sono particolari riparabili dall’instal-
latore. In caso di malfunzionamenti è necessario inviarla al centro di as-
sistenza.
- Non toccare il sensore con le dita. Usare un batuffolo di cotone imbevuto
di alcool per pulire dove è stato toccato accidentalmente.
- Assicurarsi che la tensione di alimentazione sia corretta prima di proce-
dere.
- Non regolare il fuoco inquadrando direttamente il sole.
Modalità:
1. Fissare la telecamera alla staffa fornita con le apposite viti.
2. Installare la staffa al muro o altro luogo appropriato utiliz-
zando la dima di foratura e le viti fornite.
3. Procedere con le connessioni della telecamera seguendo
le istruzioni del diagramma seguente.
4. Procedere alla regolazione della telecamera come indicato
nel capitolo seguente.
Dotazione:
staffa di fissaggio, dima di foratura, viti e tasselli
di fissaggio, 2 chiavi a brugola per regolazione
staffa, tubetto di gomma per il cacciavite,
tettuccio parasole, adattatore di alimentazione,
cacciavite per regolazione, cavo per monitor
secondario, foglio tecnico.

MANUALE TECNICO - BUTP108 - 090010756 - TECHNICAL MANUAL
5
4. SCHEMA DI ISTALLAZIONE
NOTE IMPORTANTI
1. L'installazione consigliata prevede l'utilizzo dell'ali-
mentatore TLC/ALVS2 (o TLC/AL4) connesso alla
telecamera con il suo jack di uscita.
2. La telecamera deve essere alimentata con 12Vcc
+/-10%. L'alimentatore stabilizzato deve erogare
più di 800mA. Non utilizzare un alimentatore per
antifurto: potrebbe danneggiare irreparabilmente
la telecamera.
3. Il grado di protezione IP viene garantito solo se la
telecamera viene installata seguendo scrupolosa-
mente le indicazioni riportate nel diagramma sopra.
4. INSTALLATION DIAGRAM
IMPORTANT NOTES
1. We recommend the installation of TLC/ALVS2 (or
TLC/AL4) power unit to be connectedto the camera
using the output jack.
2. Power camera @ DC12V +/-10%.Stabilized power
unit output shall exceed 800mA. Do not use power
units for burglar systems: they may cause irrepa-
rable damage to the camera .
3. The IP protection class is granted only if camera is
installed according to indications in the above in-
stallation diagram.
CABLE LENGHT
700mm
LUNGHEZZA CAVO
167
121
140
DIMENSIONI IN MILLIMETRI DIMENSIONS IN MILLIMETRES
DC IN
12V +/-10%
POWER SUPPLY
ALIMENTAZIONE
ESEMPIO TLC/ALVS2 oppure TLC/AL4
E.G. TLC/ALVS2 or TLC/AL4
75 OHM VIDEO
OUTPUT
USCITA
VIDEO 75 OHM
ADAPTER
SUPPLIED
ADATTATORE
FORNITO
58
58
DA 236 A (TO)256

6
MANUALE TECNICO - BUTP108 - 090010756 - TECHNICAL MANUAL
5. REGOLAZIONI DELLA TELECAMERA
6. UTILIZZO DEI PULSANTI PER MENU OSD
Utilizzare il tasto ENTER per:
- accedere al menu principale
- accedere agli altri menu/sottomenu
- selezionare un’opzione
Utilizzare i tasti UP / DOWN per:
- navigare tra menu e opzioni in senso verticale
Utilizzare i tasti LEFT / RIGHT per:
- navigare tra menu e opzioni in senso orizzontale
Il simbolo accanto ad una voce di menu indica la pre-
senza di un sottomenu per quell’opzione.
Per entrare nel menu, premere il tasto ENTER.
Per uscire dal menu, selezionare RETURN.
5. CAMERA ADJUSTMENTS
6. BUTTONS FUNCTION IN OSD MENU
Use ENTER button:
- to enter the main menu
- to enter other menus
- to select a menu option
Use UP / DOWN buttons:
- to browse menus and options vertically
Use LEFT / RIGHT buttons:
- to browse menus and options horizontally
A sign next to an item menu indicates an available sub-
menu.
To enter the submenu, press ENTER button.
To exit a menu/submenu, select RETURN.
"O" RING
UNSCREW
REAR COVER
REAR COVER REMOVED
SCREW REAR COVER
SVITARE IL COPERCHIO
POSTERIORE
AVVITARE IL COPERCHIO
POSTERIORE
COPERCHIO POSTERIORE
RIMOSSO
FOCUS ADJUST SCREW
VITE DI REGOLAZIONE DEL FUOCO PULSANTI PER OSD MENU
OSD MENU BUTTONS
CONNETTORE
DI USCITA PER
MONITOR
SECONDARIO
OUTPUT
CONNECTOR
FOR SECONDARY
MONITOR
INSERIRE IL TUBICINO IN
GOMMA SUL CACCIAVITE
E UTILIZZARLO COME
CHIAVE DI APERTURA/CHIUSURA
DEL COPERCHIO
DOWN
SET
UP
RIGHTLEFT
FOCUS ZOOM
SPOT
MONITOR
LED CONTROL
DOWN
SET
UP
RIGHTLEFT
FOCUS ZOOM
SPOT
MONITOR
LED CONTROL
TOOL PROVIDED
UTENSILE FORNITO
ZOOM ADJUST SCREW
VITE DI REGOLAZIONE DELLO ZOOM
CONTROLLO IR
IR CONTROL
INSERT THE SCREWDRIVER INTO
THE RUBBER TUBE AND USE IT TO
OPEN / CLOSE CAMERA COVER

MANUALE TECNICO - BUTP108 - 090010756 - TECHNICAL MANUAL
7
7. MENU OSD
Uscita automatica dal menu OSD e da ogni posizione interna
dopo 60sec
Menu principale
7.1 Menu LENS (Ottica)
Menu per l’impostazione dell’ottica.
Selezioni disponibili: Manual, Video, DC.
Impostare l’opzione ’DC’.
7.2 Menu EXPOSURE (Esposizione)
Menu per l’impostazione dell’esposizione.
- SHUTTER (OTTURATORE)
Velocità selezionabili per l’otturatore della telecamera:
1/50,FLK,1/250,1/500,1/1000,1/2000,1/4000,1/5000,
1/10000,1/100000,AUTO
- BRIGHTNESS (LUMINOSITÀ)
Range valori selezionabili per la luminosità: 0-255.
- AGC (CONTROLLO AUTOMATICO GUADAGNO)
Valori selezionabili per il guadagno automatico:
OFF / LOW / MIDDLE / HIGH.
- DWDR (Wide Dynamic Range Digitale)
Valori selezionabili per wide dynamic digitale:
OFF / ON (range: 0 - 63)
La telecamera fornisce immagini chiare, di elevata qualità an-
che in caso di presenza di controluce: aumentando l’esposi-
zione nelle aree più scure dell’immagine e diminuendola nelle
aree più luminose è in grado di ottenere ottimi risultati.
7. OSD MENU
Time out from OSD and any internal menu position after 60
sec.
Main menu
7.1 LENS menu
Menu to set lens type.
Settings available: Manual, Video, DC.
Set LENS menu to ’DC’.
7.2 EXPOSURE menu
Menu to setup camera exposure.
- SHUTTER
Choose the electronic shutter speed:
1/50,FLK,1/250,1/500,1/1000,1/2000,1/4000,1/5000,
1/10000,1/100000, AUTO
- BRIGHTNESS
Range of values available for brightness: 0-255.
- AGC
Values available for automatic gain:
OFF / LOW / MIDDLE / HIGH.
- DWDR (Digital Wide Dynamic Range)
Values available for wide dynamic range:
OFF / ON (values range: 0 - 63)
The camera delivers clears, high quality pictures even in a
backlight, by increasing exposure in dark areas while decrea-
sing it in bright areas; a corrected image with clear results.

8
MANUALE TECNICO - BUTP108 - 090010756 - TECHNICAL MANUAL
7.3 Menu WHITE BALANCE
Menu per il bilanciamento automatico del bianco.
Valori selezionabili: ATW1, ATW2, ATW->SET, MANUAL.
- ATW (
BILANCIAMENTO AUTOMATICO DEL BIANCO
)
La telecamera monitora continuamente la temperatura del
colore e bilancia automaticamente il colore bianco.
Disponibili due settaggi: ATW1 e ATW2.
- AWC->SET
Premendo il tasto SET la telecamera regola il bianco in funzio-
ne dell’ambiente in cui si trova.
- MANUAL (MANUALE)
Bilanciamento manuale dell’immagine con intervento sui colo-
ri rosso e blu con regolazione da 0 a 255.
Temperatura Colore: Manuale, Interno, Esterno.
Blue + Rosso: selezionare il valore desiderato.
Le opzioni Red e Blue possono essere impostate solo selezio-
nando Manual per Color Temperature.
7.4 Menu BACKLIGHT
Menu per la compensazione del controluce.
Valori selezionabili: BLC, HLC, OFF.
- BLC (COMPENSAZIONE CONTROLUCE)
Seleziona area: selezionare AREA 1 o AREA 2.
Seleziona stato: visualizzazione area (ON - OFF).
Guadagno: impostare il guadagno.
Altezza: regolare l’altezza dell’area.
Larghezza: regolare la larghezza dell’area.
Sinistra / Destra: regolare la posizione (orizzontale).
Alto / Basso: regolare la posizione (verticale).
7.3 WHITE BALANCE menu
White balance setup menu.
Settings available: ATW1, ATW2, ATW->SET, MANUAL.
- ATW (Auto Tracking Balance)
Camera continously monitors color temperature, and automa-
tically sets proper white balance to display true color.
Two settings available: ATW1 e ATW2.
- AWC->SET
Press SET button to balance white color automatically accor-
ding to the environment in which it is operating.
- MANUAL
Manual balance of image with red and blue regulation from 0
to 255.
Color Temperature: Manual, Indoor, Outdoor.
Blue + Red: select a value.
These settings will be availble for selection only setting Ma-
nual option for Color Temperature.
7.4 BACKLIGHT menu
Backlight setup menu.
Settings available: BLC, HLC, OFF.
- BLC (Back Light Compensation)
Area Selection: select BLC area (AREA1 - AREA 2).
Area State: BLC area display (ON - OFF.)
Gain: Set BLC gain value.
Height: Adjust the height of BLC area.
Width: Adjust the width of BLC area .
Left / Right: Adjust horizontal position of BLC area .
Top / Bottom: Adjust vertical position of BLC area

MANUALE TECNICO - BUTP108 - 090010756 - TECHNICAL MANUAL
9
- HLC (COMPENSAZIONE LUCE INTENSA)
Funzione in grado di mascherare le aree più luminose e quindi
garantire maggiore uniformità della luce in un immagine.
Livello: regolare il livello.
Modalità: ALL DAY (Sempre) / NIGHT ONLY (solo notte).
7.5 Menu Day & Night
Menu per l’impostazione della modalità Day&Night.
Valori selezionabili: Color, EXT, Auto, B/W.
- COLOR (COLORE)
La telecamera non passa mai in modalità B/N.
- EXT (ESTERNO)
Passaggio modalità da colore a B/N con utilizzo del sensore
CDS.
- AUTO (AUTOMATICO)
Passaggio automatico da modalità colore a modalità B/N.
Livello D -> N: livello di sensibilità da modalità giorno a mo-
dalità notte.
Attivazione D -> N: tempo di attivazione da modalità giorno a
modalità notte.
Livello N -> D: livello di sensibilità da modalità notte a modal-
ità giorno.
Attivazione N -> D: tempo di attivazione da modalità notte a
modalità giorno.
- B/W (MODALITÀ BIANCO E NERO)
La telecamera rimane in modalità bianco e nero costante.
Burst: segnale di burst (ON-OFF).
IR Smart: attiva la modalità ’notte’ se non è già utilizzato il filtro
IR Cut (ON-OFF).
IR Level: livello sensibilità IR Smart.
- HLC (High Light Compensation)
Highlight compensation function will darken the brightest ima-
ge portions and consequently grant clearer images.
Level: adjust HLC level.
Mode: select HLC mode: ALL DAY / NIGHT ONLY.
7.5 Day & Night menu
Day&Night setup menu.
Settings available: Color, EXT, Auto, B/W.
- COLOR
Camera never switches to B/W mode.
- EXT
Change from COLOR to B/W mode using CDS sensor.
- AUTO
Automatic switch from color to B/W mode: color at day time,
B/W mode at night.
D -> N Level: camera sensitivity level from color to B/W mo-
de.
D -> N Delay: camera switching time from color to B/W mo-
de.
N -> D Level: camera sensitivity level from B/W to color
mode.
N -> D Delay: camera switching time from B/W to color
mode.
- B/W (BLACK&WHITE mode)
Black&White mode always on.
Burst: burst signal (ON-OFF).
IR Smart: activates ’night’ mode when IR Cut filter is not used
(ON-OFF).
IR Level: IR Smart sensitivity level.

10
MANUALE TECNICO - BUTP108 - 090010756 - TECHNICAL MANUAL
7.6 Menu DPC
Funzione di compensazione dei pixel di un immagine.
Coprire l’obiettivo durante la compensazione.
Coprire l’obiettivo per qualche secondo e premere il tasto SET.
7.7 Menu SPECIAL
Menu funzioni speciali.
- CAM TITLE (NOME TELECAMERA)
Attiva (ON) la visualizzazione del nome della telecamera.
Il nome può contenere al massimo 15 caratteri (0-9, A-Z, pun-
teggiatura).
Utilizzare la funzione POS per posizionare il nome della teleca-
mera.
Selezionare CLR per cancellare l’intero nome.
Per modificare un carattere, utilizzare la freccia a sinistra o po-
sizionare il cursore sul carattere da modificare e selezionare il
tasto SET.
7.6 DPC menu
Image pixels compensation function.
Lens must be covered.
Cover the lens for few seconds and press SET button.
7.7 SPECIAL Menu
Special functions menu.
- CAM TITLE
Option to display (ON) the camera title.
The camera title can be 15 characters max (0-9, A-Z, punctua-
tion.)
The position of camera title can be adjusted with POS function.
CLR function clears the entire entry.
To modify one character, use left arrow or position the cursor
on the character to be modified and click SET button.

MANUALE TECNICO - BUTP108 - 090010756 - TECHNICAL MANUAL
11
- MOTION (RILEVAZIONE MOVIMENTO)
Funzione di rilevazione movimento in una delle 4 aree imposta-
bili.
Quando viene rilevato un movimento, l’icona relativa (omino
che corre) inizierà a lampeggiare sullo schermo.
L’evento di motion viene attivato perchè la telecamera rileva
una modifica repentina del contorno degli oggetti e dei livelli di
luminosità e colore.
Seleziona area: selezionare l’area di motion (4 aree).
Seleziona stato: attivazione area di motion (ON-OFF).
Altezza: regolare l’altezza dell’area.
Larghezza: regolare la larghezza dell’area.
Sinistra / Destra: regolare la posizione (orizzontale).
Alto / Basso: regolare la posizione (verticale).
Sensibilità: settare il livello di sensibilità dell’area.
Visualizza: visualizzazione dell’area a schermo (ON-OFF).
- PRIVACY
Funzione per il mascheramento di aree (8 aree).
Selezioni: ON - OFF.
Seleziona area: selezionare l’area di privacy (8 aree).
Seleziona stato: attivazione area di privacy (ON-OFF).
Altezza: regolare l’altezza dell’area.
Larghezza: regolare la larghezza dell’area.
Sinistra / Destra: regolare la posizione (orizzontale).
Alto / Basso: regolare la posizione (verticale).
Colore: impostare il colore della maschera (16 colori).
- MOTION
Motion function detects motion in one of the four areas that
can be set.
When movement is detected, the relevant icon (running man)
starts flashing on the screen.
The camera detects a movement by sensing disparity of outli-
ne, and changes in brightness and color levels.
Area Select: select the motion area (4 areas)
Area State: set ON/OFF for the selected area.
Height: adjust the height of motion detection area.
Width: adjust the width of motion detection area.
Left / Right: adjust horizontal position of area.
Top / Bottom: adjust vertical position area.
Degree: set degree of the motion detection.
View: display the motion area on the screen (ON-OFF).
- PRIVACY
This function allows masking up to 8 areas.
Selections: ON - OFF.
Area Select: select the privacy area (8 areas)
Area State: set ON/OFF for the selected area.
Height: adjust the height of privacy masking area.
Width: adjust the width of privacy masking area.
Left / Right: adjust horizontal position of area.
Top / Bottom: adjust vertical position area.
Color: set color of privacy masking area (16 colors).

12
MANUALE TECNICO - BUTP108 - 090010756 - TECHNICAL MANUAL
- PARK. LINE
Funzione parking line.
LT : regolazione del lato superiore sinistro della linea.
LB : regolazione del lato inferiore sinistro della linea.
RT : regolazione del lato superiore destro della linea.
RB : regolazione del lato inferiore destro della linea.
F: regolazione del lato più lontano della linea.
N: regolazione del lato più vicino della linea.
T: regolazione dello spessore della linea.
- IMAGE ADJUST
Funzione regolazioni immagine.
Lens Shad.: funzione di compensazione della luce laterale
(ON-OFF).
2DNR: funzione di riduzione dei disturbi e conseguente visual-
izzazione di immagini più nitide anche in condizioni di scarsa
illuminazione.
Mirror: capovolgimento di immagini in senso orizzontale.Il
soggetto è visto nel monitor come se fosse riflesso in uno
specchio
Colore Font: impostazione colore OSD e nome e ID telecame-
ra.
Contrasto: regolazione contrasto immagine (0-255).
Nitidezza: regolazione nitidezza immagine (0-255).
Display: impostare LCD, quindi settare i valori di gamma (ran-
ge 0,05 - 1), e i livelli di colore rosso e di guadagno.
- PARK. LINE
Parking line function.
LT : Adjust left top side of park line.
LB : Adjust left bottom side of park line
RT : Adjust right top side of park line
RB : Adjust right bottom side of park line
F: Adjust far side of park line
N: Adjust near side of park line
T: Adjust the size of park line
- IMAGE ADJUST
Image adjust function menu.
Lens Shad.: side light compensation function (ON-OFF).
2DNR: gain noise reduction and production of clear imges in
low illumination environments.
Mirror: flip the image horizontally. Images will be displayed as
if in a mirror.
Font Color: adjust OSD font color and camera title&ID font co-
lor.
Contrast: contrast setup menu (0 to 255.)
Sharpness: sharpness adjust menu, (0 to 255.)
Display: set this option to LCD, then set gamma (range 0,05
to 1), red level and gain values for the option.

MANUALE TECNICO - BUTP108 - 090010756 - TECHNICAL MANUAL
13
Neg. Image: funzione per invertire immagini in modo che ap-
paiano ’normali’, e non invertite come nei negativi delle foto-
grafie.
- COMM ADJUST
Funzione non utilizzata.
- LANGUAGE (LINGUA)
Lingua del menu OSD.
Lingue disponibili: inglese e cinese.
- VERSION (VERSIONE)
Versione della telecamera.
7.8 Menu RESET
Ritorno alle impostazioni di default.
7.9 EXIT menu
Opzione per uscire dal menu salvando le impostazioni.
Neg. Image: function inverting images so that they look nor-
mal to human eyes, and not inverted as in films negative ima-
ges.
- COMM ADJUST
Function disabled.
- LANGUAGE
OSD menu language.
Languages available: English and Chinese.
- VERSION
Camera’s version.
7.8 RESET menu
Reset the camera function settings to default.
7.9 EXIT menu
Exit and save the camera function settings

14
MANUALE TECNICO - BUTP108 - 090010756 - TECHNICAL MANUAL
8. NOTE 8. NOTE

MANUALE TECNICO - BUTP108 - 090010756 - TECHNICAL MANUAL
15
9. AVVERTENZE PER LO SMALTIMENTO
Ai sensi dell’art. 13 del Decreto legislativo 25 luglio
2005, n° 151 "Attuazione delle Direttive 2002/95/CE,
2002/96/CE e 2003/108/CE, relative alla riduzione
dell’uso di sostanze pericolose nelle apparecchiature
elettriche ed elettroniche, nonchè allo smaltimento
dei rifiuti":
- Il simbolo del cassonetto barrato riportato sull’ap-
parecchiatura o sulla sua confezione indica che il
prodotto alla fine della propria vita utile deve essere
raccolto separatamente dagli altri rifiuti.
- La raccolta differenziata della presente apparec-
chiatura giunta a fine vita è organizzata e gestita dal
produttore. L’utente che vorrà disfarsi della presente
apparecchiatura dovrà quindi contattare il produttore
e seguire il sistema che questo ha adottato per con-
sentire la raccolta separata dell’apparecchiatura
giunta a fine vita.
- L’adeguata raccolta differenziata per l’avvio suc-
cessivo dell’apparecchiatura dismessa al riciclaggio,
al trattamento e allo smaltimento ambientalmente
compatibile contribuisce ad evitare possibili effetti ne-
gativi sull’ambiente e sulla salute e favorisce il reim-
piego e/o riciclo dei materiali di cui è composta
l’apparecchiatura. Lo smaltimento abusivo del pro-
dotto da parte del detentore comporta l’applicazione
delle sanzioni amministrative previste dalla norma vi-
gente.
9. DISPOSAL INSTRUCTIONS
Art. 13 Decreto legislativo 25 luglio 2005, n° 151:
Enforcement of 2002/95/EC, 2002/96/EC and 2003/
108/EC Directives on Restriction of Hazardous Sub-
stances (RoHS) and Waste of Electric and Electronic
Equipment (WEEE):
- The rubbish container symbol on equipment or
on equipment package indicates that it shall be dis-
posed of separately from other waste products.
- The separate collection of this product is organ-
ized and managed by the manufacturer. Users wish-
ing to dispose of this product shall contact the
manufacturer and follow his indications on the sys-
tem adopted for the disposal of separate collected
waste products.
- A proper separate collection of waste aiming at
an environmentally friendly recycling, treatment and
disposal of the products contributes to inflict minimal
harm on the environment and on public health and fa-
cilitates a new use or the recycle of materials the
waste products are made of.
- Improper disposal of this product will be pun-
ished by current law.

Edizione Maggio 2012 - May 2012 Edition - Made in China 090010756
Le informazioni e le caratteristiche di prodotto non sono impegnative e potranno essere modificate senza preavviso.
Product specifications as described above do not bind the manufacturer and may be altered without prior notice.
EL.MO. SpA Global Security Solutions Via Pontarola, 70 - 35010 Campodarsego - Padova - Italy
Tel. +39 0499203333 (R.A.) - Fax +39 0499200306 - Technical Ass. +39 0499200426
Table of contents
Other eVision Security Camera manuals

eVision
eVision BUTP109 User manual

eVision
eVision BUMDV07IR User manual

eVision
eVision BUMDV03IR User manual

eVision
eVision 090010947 User manual

eVision
eVision BCM300 User manual

eVision
eVision TP111 User manual

eVision
eVision BUTP107 User manual

eVision
eVision PRO Series User manual

eVision
eVision TP112 User manual

eVision
eVision VDH40 User manual