Exibel DAB X50 User manual

DAB+/FM-radio med Bluetooth
DAB+/UKW-Radio mit Bluetooth
Ver. 20170822
English 3
Svenska 15
Norsk 27
Deutsch 39
Bluetooth DAB+/FM Radio
Art.no. Model
38-8182 DAB X50

2

3
English
Bluetooth DAB+/FM Radio
Art.no 38-8182 Model DAB X50
Please read theentire instruction manual before using theproduct and then save
it for future reference. We reserve theright for any errors in text or images and any
necessary changes made to technicaldata. In theevent of technical problems or other
queries, please contact our Customer Services (see address details on theback).
Safety
• Theproduct should not be taken apart or modified. Certain unshielded
components inside thecasing carry dangerous voltages. Contact with these can
lead to fire or anelectricshock.
• Theproduct is intended for indoor useonly.
• Never subject theproduct to high temperature, dust, heavy vibration, impacts,
humidity or moisture.
• Do not place theproduct where there is arisk of it falling into water or other liquid.
Donot place any objects containing liquid on theproduct,e.g. flower vases or drinks.
• Do not cover theproduct. Adequate ventilation with adistance of at least
10cm between theproduct and thesurrounding area is necessary to prevent
theappliance from becoming toowarm.
• Disconnect theproduct from thepower supply by unplugging it from thewall
socket. Makesure that thewall socket and plug/mains adaptor are easily
accessible.
• Theon/off button on thefront of theradio does not disconnect theproduct from
theelectricitymains.
• Protect your hearing. Listening on high volume for prolonged periods can lead to
permanent hearingloss.
• Repairs and service should only be performed by qualified tradesmen, and only
with original spareparts.

4
English
10
11
12
13
14
15
16
1 6
2 7
3
4 8
5 9
Product description
1. [MODE] Select audio source: FMradio, DAB
radio, Bluetooth or Auxiliary Input.
2. [ ] On/off
3. [VOLUME/SELECT ►ll] Volume, search for
radio channel, menu navigation, confirm,
Bluetooth, play/pause.
4. [MENU/INFO] Hold in for menu, quick-press for
info and to back out of thecurrent menu selection.
5. [l◄◄ ] Search for radio channel on lower
frequency, menu navigation, change track on
aBluetooth-connected device.
6. [PRESET] Save radio channels as presets,
select preset radio channel.
7. [ALARM] Set-up for alarm 1 and 2
8. [DIMMER/SNOOZE] Set-up of dimmer function
and snooze function.
9. [►►l] Search for radio channel on higher
frequency, menu navigation, change track on
aBluetooth-connected device.
10. Display
11. Loudspeaker
12. Aerial
13. 3.5 mm headphone socket
14. 3.5mm AUX IN socket for external audio sources
15. USB port for charging external devices
16. Mains adaptor socket

5
English
Operating instructions
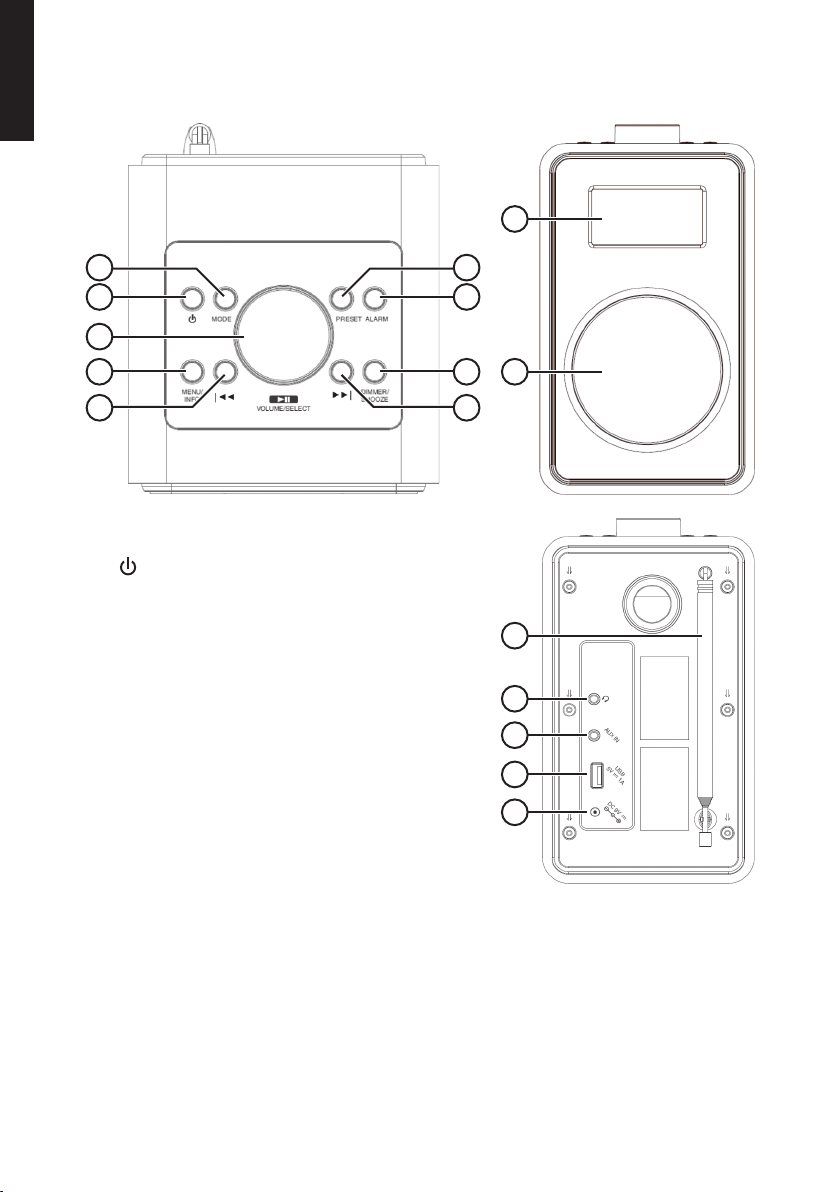
Switching on/off
1. Connect themains adaptor to thesocket (16) and to awall socket.
2. When theradio is connected to themains supply it will enter standbymode.
Themessage “Welcome to Digital Radio” will appear on thedisplay for amoment
before being replaced by aflashingclock.
3. Theclock will be set automatically if there is FM or DAB radio reception.
Note: Iftheclock is not set automatically, thetime can be set manually, refer to
theSetting thetime and date sectionbelow.
4. Switch theradio on by pressing [ ].
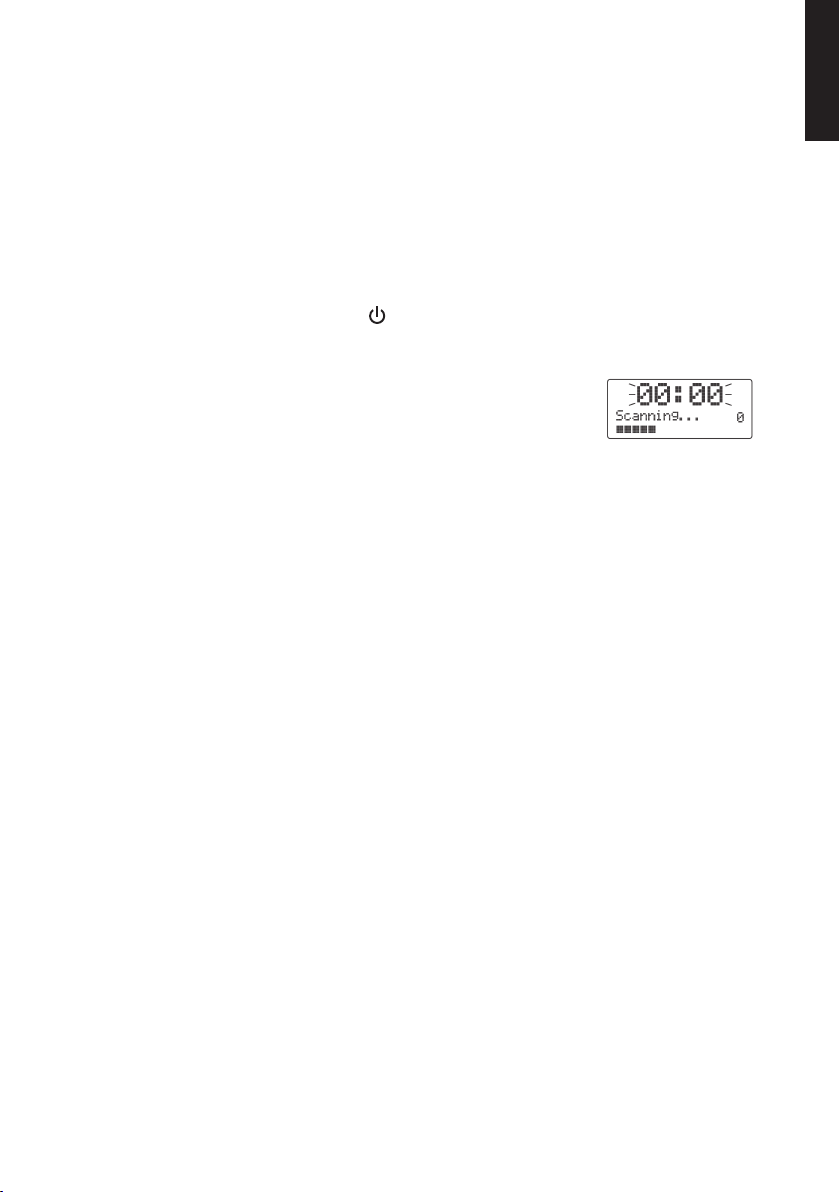
5. Thefirst time theradio is turned on, it will perform anautomatic search for DAB
radio channels.
6. Whilst theradio is scanning, “Scanning…” will appear
on thedisplay along with aprogress bar indicator and
anumber showing how many channels have beenfound.
Oncethescan has finished, theradio will select thefirst
alphanumerically found channel.
• Note: Ifno DAB channels are found “No DAB Station” will appear on thedisplay.
Thereafter theradio will change to showing theDABmenu.
• Make sure that DAB broadcasts are available in your geographicalarea.
• If reception is poor, try to change theposition of theaerial or move theradio to
improve reception.
• Refer to theDAB menu section to carry out anew channel search.
Audio setting
Adjust thevolume by turning [VOLUME/SELECT ►ll] (3).
Display backlight
Adjust thedisplay backlight by repeatedly pressing [DIMMER/SNOOZE] (8). Thereare
four settings to choosefrom: Low, Medium, High and Off.
Setting the time and date
Theradio automatically sets thetime and date with thehelp of DAB or FM radio
signals. Thetime and date can also be set manually if theradio signal is tooweak:
1. Press and hold in [MENU/INFO]. Press [|◄◄ ] or [►►|] repeatedly to navigate
themenu.
2. Select System. Press [VOLUME/SELECT ►ll] to confirm.
3. Select Time. Press [VOLUME/SELECT ►ll] to confirm.
4. Select Set Time/Date. Press [VOLUME/SELECT ►ll] to confirm. “Set Time”
appears on thedisplay and thehoursflash.
5. Set thehours with [|◄◄ ] or [►►|] and confirm with [VOLUME/SELECT ►ll].
6. Repeat thesame procedure for theminutes, day, month andyear. Confirm each
step with [VOLUME/SELECT ►ll].

6
English
7. When each step has been performed thesettings will be saved and “Time Saved”
will appear on thedisplay.
8. Press [MENU/INFO] to return to normal displaymode.
DAB radio
Select audio source: Press [MODE] repeatedly until “DAB” appears on thedisplay.
Thecurrent radio channel will then be shown on thedisplay.
If no channels are saved in theradio anautomatic search for DAB channels will be
initiated.
Choosing radio channels
1. Press [|◄◄ ] or [►►|] to select achannel from thechannellist. Thedisplay will
then show “Station list” and thechannelname. Press [VOLUME/SELECT ►ll] to
confirm.
2. Up to 10 channels can be saved as preset channels on alist so that you can
choose your favourite stations more quickly. Referto thePreset channels
sectionbelow.
Note: Iftheradio is moved to anew location or if radio stations change frequencies,
some preset channels might become unavailable. Iftheradio does not find
theselected channel, “Service not available” will appear on thedisplay. Referto
theDAB menu section to carry out anew search and to delete any unavailable
channels from thechannellist.
DAB menu
1. In DAB mode, press hold in [MENU/INFO] to go to theDABmenu.
2. Press [|◄◄ ] or [►►|] repeatedly to navigate themenu.
3. Press [VOLUME/SELECT ►ll] to select amenu/function.
4. Press [MENU/INFO] to go back one step in themenu.
Thesettings marked with anasterisk are thecurrent settings.
Thefollowing
menus will
appear:

7
English
1. Full Scan: Automatic scan for DAB radio channels.
- Press [VOLUME/SELECT ►ll] to confirm. Theradio automatically starts
scanning for DAB radio channels.
2. Manualtune: Manual scan for DAB radio channels.
- Press [|◄◄ ] or [►►|] repeatedly and select Manual tune. Press [VOLUME/
SELECT ►ll] to confirm. Thechannel number and frequency will be displayed.
- Press [|◄◄ ] or [►►|] repeatedly to manually select achannel.
Press[VOLUME/SELECT ►ll] to confirm.
3. Prune: Clearthechannel list of unavailable radio channels.
- Press [|◄◄ ] or [►►|] to select Yes or No. Press [VOLUME/SELECT ►ll] to
confirm. Yes clears thechannel list and No aborts theclearance.
4. System: Choose from thefollowing list of sub-menus:
- Time: Setting thetime and date
- Factory Reset: Resettheradio to thefactory settings.
- SW version: Showsthecurrent software version.
- Sleep: Sleeptimer.
Time
Select asub-menu by pressing [|◄◄ ] or [►►|] therequired number oftimes.
Press[VOLUME/SELECT ►ll] to confirm.
• Set Time/Date: Setsthetime and date, see theSetting thetime sectionabove.
• Auto update submenus:
- Update from Any (update time using DAB or FM radio signals).
- Update from DAB (update time using DAB radio signals).
- Update from FM (update time using FM radio signals).
- No update (no automatic update, set time manually).
• Set 12/24hour: Selects a12 or 24 hour clock display.
• Set date format: sets thedate display format (day-month-year/month-day-year).
Factory Reset
Reset to factory default settings. Select No to cancel or Yes to confirm.
Press[VOLUME/SELECT ►ll] to confirm.
SW version
Press [VOLUME/SELECT ►ll] to show info about thesoftware version.
Sleep
Set how long theradio is to be left on before it automatically shutsoff. Selection
options: Off, 10,20,30,60,70,80 or 90min.
Example: Ifthetime delay is set for 60 minutes, “S6” will be shown on thedisplay to
indicate that thesleep timer is activated.

8
English
Display options (DAB mode)
Press [MENU/INFO] repeatedly to display information about thecurrent radio channel.
Thefollowing information can be displayed:
• Radiotext: Showstext information transmitted on thechannel.
• Signal strength: Showsthesignal strength of thechannel.
• Programmetype: Showsthecurrent programme type (genre).
• Ensemble: Showsthegroup name of thechannels transmitted on thesame
frequency.
• Frequency: Showsthechannel number and frequency of theradio channel.
• Signalerror: Showsthesignal quality of thechannel.
• Audio bitrate: Showsthebit rate of theaudio stream.
• Time: Showscurrenttime
• Date: Showscurrentdate
FM radio
Select audio source: Press [MODE] repeatedly until “FM” appears on thedisplay.
Thereafter display will show thechosen radio channel/frequency.
Tuning knob
1. Manual tuning: Press [|◄◄ ] or [►►|] repeatedly to navigate through
thefrequencyband.
2. Automatic search: Holdin [|◄◄ ] or [►►|] or quick-press [VOLUME/SELECT ►ll]
to automatically search for thenext detectable radio channel. Thesearch stops
when achannel has beenfound.
Up to 10 channels can be saved as preset channels on alist so that you can
choose your favourite stations more quickly. Referto thePreset channels
sectionbelow.
3. If theselected channel transmits RDS information (Radio Data System), thename
of channel will be shown on thedisplay.
FM menu
1. In FM mode, press and hold in [MENU/INFO] to go to theFMmenu.
2. Press [|◄◄ ] or [►►|] repeatedly to navigate themenu.
3. Press [VOLUME/SELECT ►ll] to select thechosen menu/function.
4. Press [MENU/INFO] to go back one step in themenu.
Thesettings marked with anasterisk are thecurrent settings.

9
English
Thefollowing
menus will appear:
1. Scan setting: Choose thesensitivity for scanning for FM channels. Press [|◄◄ ]
or [►►|] to select either Strong stations only (low sensitivity) or All stations
(highsensitivity). Press [VOLUME/SELECT ►ll] to confirm.
2. Audio setting: Select whether you wish to receive stereo audio or if you want
to receive transmissions inmono. Inpoor reception conditions mono can
improve thesound quality. Press [|◄◄ ] or [►►|] to select Stereo allowed or
Forcedmono. Press [VOLUME/SELECT ►ll] to confirm.
3. System: Choose from thefollowing list of sub-menus:
- Time: Setting thetime and date
- Factory Reset: Resettheradio to thefactory settings.
- SW version: Showsthecurrent software version.
- Sleep: Sleeptimer.
Time
Select asub-menu by pressing [|◄◄ ] or [►►|] therequired number oftimes.
Press[VOLUME/SELECT ►ll] to confirm.
• Set Time/Date: Setsthetime and date, see theSetting thetime sectionabove.
• Auto update submenus:
- Update from Any (update time using DAB or FM radio signals).
- Update from DAB (update time using DAB radio signals).
- Update from FM (update time using FM radio signals).
- No update (no automatic update, set time manually).
• Set 12/24hour: Selects a12 or 24 hour clock display.
• Set date format: sets thedate display format (day-month-year/month-day-year).

10
English
Factory Reset
Reset to factory default settings. Select No to cancel or Yes to confirm.
Press[VOLUME/SELECT ►ll] to confirm.
SW version
Press [VOLUME/SELECT ►ll] to show info about thesoftware version.
Sleep
Set how long theradio is to be left on before it automatically shutsoff. Selection
options: Off, 10,20,30,60,70,80 or 90min.
Example: Ifthetime delay is set for 60 minutes, “S6” will be shown on thedisplay to
indicate that thesleep timer is activated.
Display options (FM mode)
Press [MENU/INFO] repeatedly to display information about thecurrent radio channel.
Note: Information about thecurrent radio channel is only shown if theFM channel
sends out RDSdata.
Thefollowing information can be displayed:
• Radio Text: Showstext information transmitted on thechannel.
• Programme Type: Showsthecurrent programme type (genre).
• Frequency: Showsthefrequency of thechannel.
• Audiomode: Showswhether thetransmission is received in stereo ormono.
• Time: Showscurrenttime
• Date: Showscurrentdate

11
English
Preset channels
Up to 10 stations can be preset in both DAB and FM mode, this will enable you to
access your favourite stations more quickly.
Note: Nomore than 5 seconds must elapse between button-presses otherwise
theradio will return to theprevious displaymode.
Saving a radio channel as a preset channel
1. Choose thechannel that you wish tosave.
2. Hold in [PRESET] until thechannel appears in thedisplay.
3. Select apreset slot for thechannel by pressing [|◄◄ ] or [►►|].
4. Save by pressing [VOLUME/SELECT ►ll]. “Preset # stored” will appear on
thedisplay.
Selecting a channel from the preset channels
1. Press [PRESET]. “Preset Recall” will appear on thedisplay.
2. Press [|◄◄ ] or [►►|] repeatedly to navigate thepreset channellist.
3. Select achannel slot and confirm by pressing [VOLUME/SELECT ►ll].
If you choose achannel slot which has no preset radio channel on it, “Preset Empty”
will be shown on thedisplay.
External devices
Bluetooth
1. Select audio source: Press [MODE] repeatedly until “Bluetooth” appears on
thedisplay.
2. Make sure that no other Bluetooth device is connected to theradio.
“Disconnected” will appear on thedisplay.
3. Activate Bluetooth on thedevice which is to be paired with theradio.
4. Thespeaker will appear on your device as DAB X50, select it and pair it with your
device. Referto theinstruction manual of your device for further clarification if you
are unsure.
5. “Connected” will appear on thedisplay once they are connected/paired.
6. Control playback from theexternal device and theradio.
Note: Ifyou are prompted to enter aPIN code on your device, you should enter 0000
(four zeroes). Certain devices may also require you to approve theconnection.
Audio source input (AUX IN)
1. Connect anexternal audio source to the3.5mm input jack (14) on theback of theradio.
2. Select audio source: Press [MODE] repeatedly until “Auxiliary Input” appears on
thedisplay.
3. Start playback on theexternal audio source.
4. Adjust thevolume to adesiredlevel.

12
English
Alarm
Setting alarm 1
1. Switch theclock radioon.
2. Press [ALARM]once. “Alarm 1 Setup” will appear on thedisplay.
3. Press [VOLUME/SELECT ►ll]. “Alarm 1 Wizard” will appear on thedisplay.
4. Set thealarm using [|◄◄ ] or [►►|] and confirm each step by pressing
[VOLUME/SELECT ►ll].
5. Make thesettings in thefollowingorder:
- On time (alarm time): hour/min.
- Duration (alarm duration): 15,30,45,60 or 90min.
- Source (alarm signal): buzzer, DAB or FM (if DAB or FM radio is chosen, you
will be prompted to select aradio channel).
- Choose when thealarm is tosound: Daily, Once, Weekends, Weekdays.
IfOnce is chosen, you will be prompted to select adate.
- Volume (alarm volume): Setsthealarm volume setting. Thealarm will start at
alow volume and steadily increase until theset volume level is reached.
- Alarm On/Off.
Setting alarm 2
1. Switch theradio on by pressing [ ].
2. Press [ALARM]twice. “Alarm 2 Setup” will appear on thedisplay.
3. Then follow thesame steps as those used for setting alarm 1 as describedabove.
Snooze
Press [DIMMER/SNOOZE] when thealarm sounds. Presstherequired number of
times to select thesnooze duration setting that you desire, 5, 10, 15 or 30 minutes.
Thesnooze feature will then display acountdown for thetime you haveset.
Switching the alarm off
Press [ ] to stop thealarm sounding.
Activating/Deactivating a programmed alarm
In “on”mode:
1. Select which alarm is to be activated/deactivated by pressing [ALARM] repeatedly.
2. Press [|◄◄ ] or [►►|] repeatedly to select On (activate) or Off (deactivate).
Confirm by pressing [SELECT].
In standbymode:
Press [ALARM] therequired number of times to activate/deactivate either of
therespective alarms.

13
English
Care and maintenance
• Theradio can be wiped clean using asoft, drycloth.
• If theradio is not to be used for anextended period, it should be unplugged and
stored in adry and dust-free location.
Troubleshooting guide
Theradio won’t
turnon.
• Make sure that theadaptor and mains lead are intact and
undamaged.
• Make sure that themains adaptor and its lead are properly
connected both to awall socket and theradio.
• Is thewall socketlive?
No sound from
thespeaker
or connected
headphones.
• Check thevolume.
• Make sure that there are no headphones connected to
the3.5mm headphone socket. Thespeaker is switched off
when theheadphones are connected.
• Make sure that theheadphones and cord are intact and
properly connected theradio.
No sound from
connected external
device.
• Make sure that thecorrect audio source has been chosen.
• Check thevolume level on both theradio and theconnected
device.
If using Bluetooth
• Make sure that theBluetooth connection has been properly
established.
• Test theplayback from your external Bluetooth device before
connectingit.
Things to consider
• Other wireless devices in thevicinity can impair therange of
theradio. Therange can also be affected by thetype of obstacles
located between thetransmitter and thereceiver (e.g. aconcrete
wall will interfere with thesignal more than aplasterboard wall).
If using theAUX IN
• Check that thecable connecting thedevice and theradio is
undamaged and properly connected.
• Check that thecorrect audio source has been chosen
(Auxiliary Input).
Poor or non-existent
radio reception.
Theautomatic FM
scan doesn’twork.
• Make sure that theaerial is fully extended.
• Try moving theaerial.
• Move theradio to another location.
If theradio is
operating abnormally
in some otherway.
• Perform afactoryreset. Referto theFM menu/DAB menu
sectionsabove.

14
English
Responsible disposal
This symbol indicates that this product should not be disposed of with
general householdwaste. Thisapplies throughout theentire EU. Inorder
to prevent any harm to theenvironment or health hazards caused by
incorrect waste disposal, theproduct must be handed in for recycling
so that thematerial can be disposed of in aresponsible manner.
Whenrecycling your product, take it to your local collection facility or
contact theplace of purchase. Theywill ensure that theproduct is
disposed of in anenvironmentally sound manner.
Specifications
Radio
Frequencyrange FM87.5–108MHz, DAB: 174–240MHz
Power consumption 18W
Standby power consumption < 1W
Bluetoothrange Approx. 8m
Operating temperature 5–35°C
Size 135×230×135mm
Weight 1.5kg
Mains adaptor
Input 100–240 V AC, 50/60 Hz, 0.8A
Out 9 V DC, 2.0 A

15
Svenska
DAB+/FM-radio med Bluetooth
Art.nr 38-8182 Modell DAB X50
Läs igenom hela bruksanvisningen före användning och spara den sedan för fram-
tidabruk. Vireserverar oss förev. text- och bildfel samt ändringar av tekniskadata.
Vidtekniska problem eller andra frågor, kontakta vår kundtjänst (se adressuppgifter
påbaksidan).
Säkerhet
• Produkten får inte demonteras eller ändras. Farlig spänning finns oskyddad på
komponenter under produktenshölje. Kontakt med dessa kan leda till brand eller
elektriskstöt.
• Produkten är endast avsedd för inomhusbruk.
• Utsätt aldrig produkten för höga temperaturer, dammig miljö, starka vibrationer,
stötar, fukt ellerväta.
• Placera inte produkten så att den kan falla ner ivatten eller annan vätska. Ställinte
några föremål som innehåller vätska på produkten,t.ex. enblomvas ellerdryck.
• Täck inte över produkten. Tillräcklig ventilation, med ettminsta avstånd på
ca10cm mellan produkten och omgivande ytor, är nödvändig för att förhindra
attprodukten blir förvarm.
• Bryt strömmen till produkten genom att dra ut nätadaptern ur vägguttaget.
Nätadaptern måste vara lättåtkomlig.
• Produktens på/av-knapp bryter inte strömmen från elnätet.
• Skydda din hörsel. Lyssning med hög volym under lång tid kan leda till bestående
hörselskador.
• Låt behörig personal utföra service och reparationer och endast med
originalreservdelar.

16
Svenska
10
11
12
13
14
15
16
1 6
2 7
3
4 8
5 9
Produktbeskrivning
1. [MODE] Val av ljudkälla: FM-radio, DAB-radio,
Bluetooth eller Auxiliary Input (ljudingång).
2. [ ] På/av
3. [VOLUME/SELECT ►ll] Volym, sök efter
radiokanal, menyhantering, bekräfta, Bluetooth,
play/pause.
4. [MENU/INFO] Håll in för meny, tryck kort för
info och för att backa ur menyval.
5. [l◄◄ ] Sök efter radiokanal nedåt
ifrekvensbandet, menyhantering, byt spår
iBluetooth-anslutenenhet.
6. [PRESET] Spara radiokanaler, välj sparad
radiokanal.
7. [ALARM] Inställning av alarm 1 och 2.
8. [DIMMER/SNOOZE] Inställning av
dimmerfunktion och snoozefunktion.
9. [ ► ► l] Sök efter radiokanal uppåt
ifrekvensbandet, menyhantering, byt spår
iBluetooth-anslutenenhet.
10. Display
11. Högtalare
12. Antenn
13. 3,5 mm-anslutning för hörlurar.
14. 3,5 mm AUX IN-anslutning för externa enheter.
15. USB-anslutning för laddning av externa enheter.
16. Anslutning för medföljande nätadapter.

17
Svenska
Användning
På/av
1. Anslut nätadaptern till anslutningen (16) och till ettvägguttag.
2. När radion ansluts till elnätet sätts den istandbyläge. Displayen visar ”Welcome to
Digital Radio” ettögonblick varefter klockan blinkar idisplayen.
3. Klockan kommer att ställas in automatiskt om det finns FM- eller DAB-
radiomottagning.
Obs! Omklockan inte ställs in automatiskt kan tidsinställning göras manuellt, se
avsnitt Inställning av tid och datumnedan.
4. Slå på radion genom att trycka [ ].
5. När radion slås på första gången startas enautomatisk sökning efter DAB-
radiokanaler.
6. Under sökningen visas ”Scanning…” tillsammans med
enindikator samt ensiffra för hur många radiokanaler som
hittats. Närsökningen är klar väljer radion den först numeriskt
hittade kanalen.
• Obs! Ominga radiokanaler hittas under sökningen visas ”No DAB Station”
idisplayen. Därefter övergår radion till att visa DAB-menyn.
• Kontrollera att DAB-utsändningar finns iditt geografiska område.
• Prova att rikta om antennen eller flytta enheten till enannanplats.
• Se avsnitt DAB-meny för att göra enny sökning.
Ljudinställning
Justera volymen genom att vrida [VOLUME/SELECT ►ll] (3).
Displaybelysning
Justera displayens bakgrundsbelysning genom att trycka upprepade gånger på
[DIMMER/SNOOZE] (8). Väljmellan Low, Medium, High och Off.
Tidsinställning
Radion ställer automatiskt in tid och datum med hjälp av DAB- eller FM-radiosignal.
Omradiosignalen är svag kan tid och datum behöva ställas in manuellt:
1. Tryck och håll in [MENU/INFO]. Tryckupprepade gånger på [|◄◄ ] eller [►►|] för
att stega genommenyn.
2. Välj System. Tryck [ VOLUME/SELECT ►ll ] för att bekräfta.
3. Välj Time. Tryck [ VOLUME/SELECT ►ll ] för att bekräfta.
4. Välj Set Time/Date. Tryck [ VOLUME/SELECT ►ll ] för att bekräfta. Displayen visar
”Set Time” och timmarna blinkar.
5. Ställ in timmar med [|◄◄ ] eller [►►|] och bekräfta med [VOLUME/SELECT ►ll].
6. Upprepa samma procedur för minuter, dag, månad ochår. Bekräfta varje steg med
[VOLUME/SELECT ►ll].

18
Svenska
7. När alla steg är genomförda sparas inställningarna och displayen visar
”TimeSaved”.
8. Tryck [MENU/INFO] kort för att återgå till normal display.
DAB-radio
Välj ljudkälla: Tryck [ MODE ] upprepade gånger tills ”DAB” visas idisplayen. Displayen
visar därefter aktuell radiokanal.
Finns det inga radiokanaler lagrade iradion startas enautomatisk sökning av DAB-
kanaler.
Välja radiokanal
1. Tryck [|◄◄ ] eller [►►|] för att välja enradiokanal ikanallistan. Displayen visar
”Station list” och kanalnamn. Tryck [VOLUME/SELECT ►ll] för att bekräfta.
2. Det finns möjlighet att spara upp till 10 kanaler ienfavoritlista för att snabbt kunna
väljakanal. Seavsnitt Favoritlistanedan.
Obs! Omradion flyttas till enny plats eller om radiokanaler byter frekvensetc. så kan
vissa lagrade kanaler bli otillgängliga. Närradion inte hittar vald kanal visas ”Service
not available” idisplayen. Seavsnitt DAB-meny för att göra enny sökning och för att
rensa kanallistan från otillgängliga radiokanaler.
DAB-meny
1. IDAB-läge, tryck och håll in [MENU/INFO] för att komma till DAB-menyn.
2. Tryck upprepade gånger på [|◄◄ ] eller [►►|] för att stega genommenyn.
3. Tryck [VOLUME/SELECT ►ll] för att välja vald meny/funktion.
4. Tryck [MENU/INFO] för att backa tillbaka ettsteg imenyn.
De inställningar som markeras med enasterisk visar aktuell inställning.
Följande
menyervisas:

19
Svenska
1. Fullscan: Automatisk sökning efter DAB-radiokanaler.
- Tryck [VOLUME/SELECT ►ll] för att bekräfta. Radion startar enautomatisk
sökning av DAB-kanaler.
2. Manualtune: Manuell sökning av DAB-radiokanaler.
- Tryck upprepade gånger på [|◄◄ ] eller [►►|] och välj Manualtune.
Tryck[VOLUME/SELECT ►ll] för att bekräfta. Displayen visar kanalnummer
och frekvens.
- Tryck upprepade gånger på [|◄◄ ] eller [►►|] för att manuellt väljakanal.
Tryck [VOLUME/SELECT ►ll] för att bekräfta.
3. Prune: Rensakanallistan från otillgängliga radiokanaler.
- Tryck [|◄◄] eller [►►|] för att välja Yes eller No. Tryck [VOLUME/SELECT ►ll]
för att bekräfta. Yesrensar kanallistan och No avbryter rensningen.
4. System: Väljmellan följande undermenyer:
- Time: Inställning av tid ochdatum.
- Factory Reset: Återställer radion till fabriksinställningar.
- SW version: Visaraktuell mjukvara.
- Sleep: Insomningstimer.
Time
Välj undermeny genom att trycka [|◄◄ ] eller [►►|] upprepade gånger.
Tryck[VOLUME/SELECT ►ll] för att bekräfta.
• Set Time/Date: ställ in tid och datum, se avsnitt Tidsinställningovan.
• Auto update: har fyra undermenyer:
- Update from Any (uppdatera tiden från DAB- eller FM-sändare).
- Update from DAB (uppdatera tiden från DAB-sändare).
- Update from FM (uppdatera tiden från FM-sändare).
- No update (ingen automatisk uppdatering, ställ in tiden manuellt).
• Set 12/24hour: ställ in 12- eller 24-timmars tidvisning.
• Set date format: ställ in datumformat (dag-månad-år/månad-dag-år).
Factory Reset
Återställning till fabriksinställningarna. VäljNo (ingen återställning) eller Yes (återställning).
Tryck [VOLUME/SELECT ►ll] för att bekräfta.
SW version
Tryck [VOLUME/SELECT ►ll] för att visa versionsinfo.
Sleep
Ställ in hur lång tid radion ska vara igång innan den automatiskt stängsav.
Väljmellan:Off (av), 10,20,30,60,70,80 eller 90min.
Ex.: Omtiden ställs in på 60 minuter visar displayen ”S6” för att indikera att
insomningstimern är aktiverad.

20
Svenska
Visningsalternativ (DAB-läge)
Tryck upprepade gånger på [MENU/INFO] för att visa information om enheten och
aktuell radiokanal. Displayenvisar:
• Radiotext: Visartextinformation som kanalen sänderut.
• Signal strength: Visarkanalens signalstyrka.
• Programmetype: Visaraktuell programtyp (genre).
• Ensemble: Visargruppnamnet för de kanaler som sänder på samma frekvens.
• Frequency: Visarradiokanalens kanalnummer och frekvens.
• Signalerror: Visarkanalens signalkvalitet.
• Audio bitrate: Visarljudströmmens bithastighet.
• Time: Visaraktuelltid.
• Date: Visaraktuelltdatum.
FM-radio
Välj ljudkälla: Tryck [ MODE ] upprepade gånger tills ”FM” visas idisplayen.
Displayenvisar därefter vald radiokanal/frekvens.
Inställning av radiokanal
1. Manuell inställning: Tryckupprepade gånger på [|◄◄ ] eller [►►|] för att stega
uppåt eller nedåt ifrekvensbandet.
2. Automatisk sökning: Hållin [|◄◄ ], [►►|] eller tryck [VOLUME/SELECT ►ll] kort
för att automatisk söka efter nästa radiokanal. Sökningen stoppas när nästa kanal
hittas.
Det finns möjlighet att spara upp till 10 kanaler ienfavoritlista för att snabbt kunna
väljakanal. Seavsnitt Favoritlistanedan.
3. Om vald radiokanal sänder ut RDS-information (Radio Data System) visas kanalens
namn idisplayen.
FM-meny
1. IFM-läge, håll in [MENU/INFO] för att komma till FM-menyn.
2. Tryck upprepade gånger på [|◄◄ ] eller [►►|] för att stega genommenyn.
3. Tryck [VOLUME/SELECT ►ll] för att välja vald meny/funktion.
4. Tryck [MENU/INFO] för att backa tillbaka ettsteg imenyn.
De inställningar som markeras med enasterisk visar aktuell inställning.
Table of contents
Languages:
Other Exibel Radio manuals

Exibel
Exibel DX26 User manual

Exibel
Exibel X40 User manual

Exibel
Exibel DAB X30 User manual

Exibel
Exibel NE-6205-UK? NE-6205 User manual

Exibel
Exibel DX25 User manual

Exibel
Exibel MD-088P User manual

Exibel
Exibel X40BT User manual

Exibel
Exibel KK-9802 User manual

Exibel
Exibel DAB X45 User manual

Exibel
Exibel E80170P User manual