Fanmaster ICH2P User manual

FA NM A ST E R
cooling heating ventilation extraction
INSTRUCTION MANUAL
MODEL:
ICH2P (PEDESTAL)
ICH2W (WALL)
ELECTRIC QUARTZ RADIANT HEATER
TO PREVENT SERIOUS INJURY, READ & UNDERSTAND ALL WARNINGS &
INSTRUCTIONS BEFORE USE. PLEASE KEEP THIS DOCUMENT FOR YOUR RECORDS
FOR INDUSTRIAL USE ONLY
FOR YOUR INFORMATION
Thank you for purchasing a Fanmaster electric radiant heater. Please read this
instruction manual carefully before using this heater.
Disclaimer:
Fanmaster reserves the right to make alterations to specications, quantities,
dimensions, for production or other reasons, subsequent to publication.
While we believe the information is accurate and complete, we make no warranty
or representation for any particular purposes. The information is offered in good faith
and with the understanding that any use of the units or accessories in breach of the
directions and warnings in this document is at the sole discretion and risk of the user
Disposal Guidelines:
Do not dispose of this product with general household waste. This product must be
disposed according to the laws governing Waste Electrical and Electronic Equipment.
If required, contact your local authorities for information regarding the available
disposal facilities.

1. GENERAL SAFETY RULES & WARNINGS
• PLEASE READ INSTRUCTIONS CAREFULLY.
• PLACE INSTRUCTION MANUAL IN A SAFE PLACE FOR FUTURE REFERENCE. DO NOT ALLOW
ANYONE WHO HAS NOT READ THESE INSTRUCTIONS TO ASSEMBLE, ADJUST OR OPERATE THIS
HEATER.
• IF THE INFORMATION IN THIS MANUAL IS NOT FOLLOWED EXACTLY, A FIRE OR EXPLOSION
MAY RESULT IN CAUSING PROPERTY DAMAGE, SERIOUS INJURY OR LOSS OF LIFE.
• FAILURE TO COMPLY WITH THE PRECAUTIONS AND INSTRUCTIONS PROVIDED WITH THIS
HEATER, CAN RESULT IN DEATH, SERIOUS INJURY AND PROPERTY LOSS OR DAMAGE FROM
HAZARDS OF FIRE, EXPLOSION, BURN, AND/OR ELECTRICAL SHOCK.
• ONLY PERSONS WHO CAN UNDERSTAND AND FOLLOW THE INSTRUCTIONS SHOULD USE OR
SERVICE THIS HEATER. IF YOU NEED ASSISTANCE OR REQUIRE HEATER INFORMATION SUCH AS
AN INSTRUCTION MANUAL, LABELS, ETC. CONTACT FANMASTER.
• DO NOT STORE OR USE GASOLINE, PETROL OR ANY OTHER FLAMMABLE OR COMBUSTIABLE
VAPORS AND LIQUIDS IN THE VICINITY OF THIS HEATER.
• FIRE, BURN, INHALATION, AND EXPLOSION HAZARD. KEEP SOLID COMBUSTIBLES, SUCH AS
BUILDING MATERIALS, PAPER OR CARDBOARD, A SAFE DISTANCE AWAY FROM THE HEATER
AS RECOMMENDED BY THE INSTRUCTIONS. NEVER USE THE HEATER IN SPACES WHICH DO OR
MAY CONTAIN VOLATILE OR AIRBORNE COMBUSTIBLES, OR PRODUCTS SUCH AS GASOLINE,
SOLVENTS, PAINT THINNER, DUST PARTICLES OR UNKNOWN CHEMICALS
• NOT FOR DOMESTIC OR RECREATIONAL VEHICLE USE
• THE ELECTRICAL SYSTEM TO WHICH THE APPLIANCE IS CONNECTED MUST COMPLY WITH
LOCAL REGULATIONS. A RESIDUAL-CURRENT DEVICE (RCD) MUST BE INSTALLED.
• UNPLUG THE APPLIANCE BEFORE PERFORMING ANY MAINTENANCE OPERATIONS.
• ALWAYS CHECK THE POWER CABLE BEFORE USING THE APPLIANCE. IT MUST NOT BE BENT,
TAUT, STRETCHED, CRUSHED OR ANY WAY DAMAGED.
• IF THE POWER CORD AND/OR PLUG IS DAMAGED, IT MUST BE REPLACED BY FANMASTER, A
SERVICE AGENT OR A QUALIFIED PERSONS.
• DO NOT COVER THE FAN HEATER
• THE FRONT OUTLET IS VERY HOT DURING OPERATION. DO NOT TOUCH! BURN DANGER.
• DO NOT LEAVE THE HEATER UNATTENDED WHEN IN USE.
• NEVER USE THE HEATER WITH WET HANDS OR WHEN EITHER THE HEATER OR THE POWER CABLE
IS WET.
• CHILDREN SHOULD BE SUPERVISED TO ENSURE THAT THEY DO NOT PLAY WITH THE HEATER.
• THE HEATER IS NOT INTENDED FOR USE BY PERSONS (INCLUDING CHILDREN) WITH REDUCED
PHYSICAL, SENSORY OR MENTAL CAPABILITIES, OR LOCK OF EXPERIENCE & KNOWLEDGE.
FOR YOUR INFORMATION
2. PRODUCT DESCRIPTION & SPECIFICATIONS
PRODUCT DESCRIPTION
Industrial electric Quartz radiant heater.
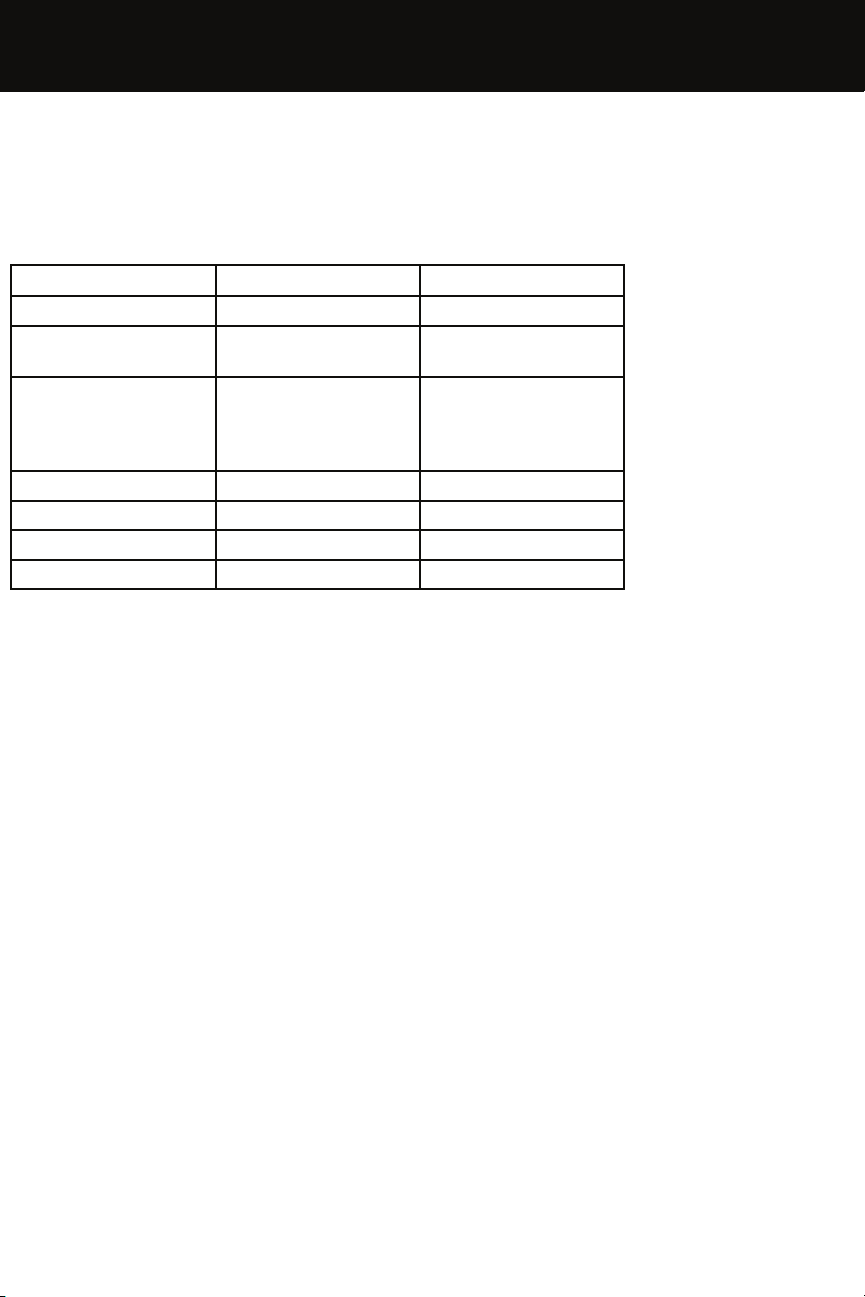
SPECIFICATIONS
MODEL ICH2P ICHW
Type Pedestal Wall
Heat Output 2000W
3,824BTU
2000W
3,824BTU
Control settings
3 Heat Settings
1 x 650W
2 x 1300W
3 x 2000W
3 Heat Settings
1 x 650W
2 x 1300W
3 x 2000W
Voltage (V/Hz) 240V/50Hz 240V/50Hz
Area Covered m2 up to 12 up to 12
Current Rating (A) 8.3 8.3
Net Weight (kg) 2.6 9.65
SAFETY DEVICES
This heater has the following protection devices:
• Tilt Switch - this will automatically turn the heater off if it is not in the appropriate
operating position, fallen over on its front or side.
• Self-Resetting Thermostat - this will automatically disconnect the power to the
heater at a pre-set overheat temperature.

3. GETTING TO KNOW YOUR HEATER2. PRODUCT DESCRIPTION & SPECIFICATIONS
1 HEATER/ELEMENT HEAD
2KNOB
3HEATER BODY
4SETTING INDICATOR
5PULL SWITCH
6ADJUSTMENT HEIGHT KNOB
7 TOP POST
83 x M5 X 6 SCREW
9 MIDDLE POST
10 3 x M5 X 6 SCREW
11 LOWER POST
12 CORD CLAMP
13 POWER CORD
14 BASE COVER
15 4 x M6 X 30 SCREW
16 BASE

4. ASSEMBLING & OPERATING INSTRUCTIONS
Remove the heater from the carton. If the heater is damaged, please contact
Fanmaster or where you purchased the heater from.
How to assemble (ICH2P)
1. Insert Lower Post (11) into the Base (16). Fix it by screwing 4 x M6X30 screws
(remove from base). Insert Cord Clamp (12) over Lower Post (11).
2. Connect the Middle Post (9) to the Lower Post (11) and x with 3 x M5X6 screws.
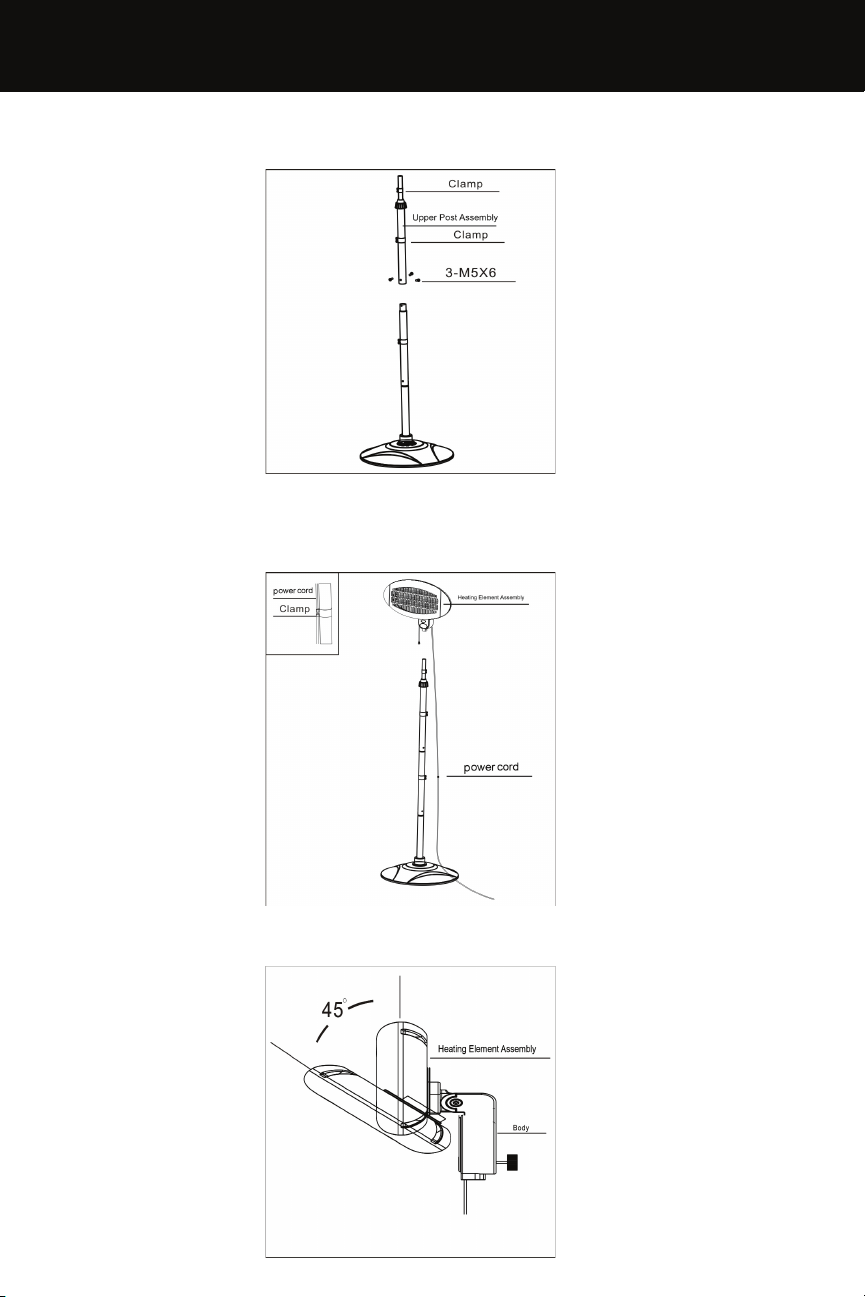
4. ASSEMBLING & OPERATING INSTRUCTIONS4. ASSEMBLING & OPERATING INSTRUCTIONS
3. Connect the Top Post (7) to the Middle Post (9) and x with 3 x M5X6 screws.
4. Connect the Heater Head (1) to the Top Post (7) and tighten by rotating the
Knob (2). Place the power cord (13) to the cord clamp (12).
5. Adjust heater head angle as required 0º~45º.

4. ASSEMBLING & OPERATING INSTRUCTIONS
Wall Mount Installation (ICH2W)
1. Please ensure the distance between the top of heater heater & ceiling should be
more than 0.5m. The distance between side of the heater should more than 0.5m
and the distance between the bottom of the heater to the oor should be more
than 2m.
2. Do not install the heater upside down, on the side or off the ceiling.

4. ASSEMBLING & OPERATING INSTRUCTIONS4. ASSEMBLING & OPERATING INSTRUCTIONS
1. Mark out corresponding holes on the wall as per the mounting bracket on the
back of the heater. All 4 holes must be marked & drilled.
2. Use an 8mm drill bit to make the holes in the wall, minimum 35mm depth. Please
use the correct drill bit for the wall material you are drilling into.
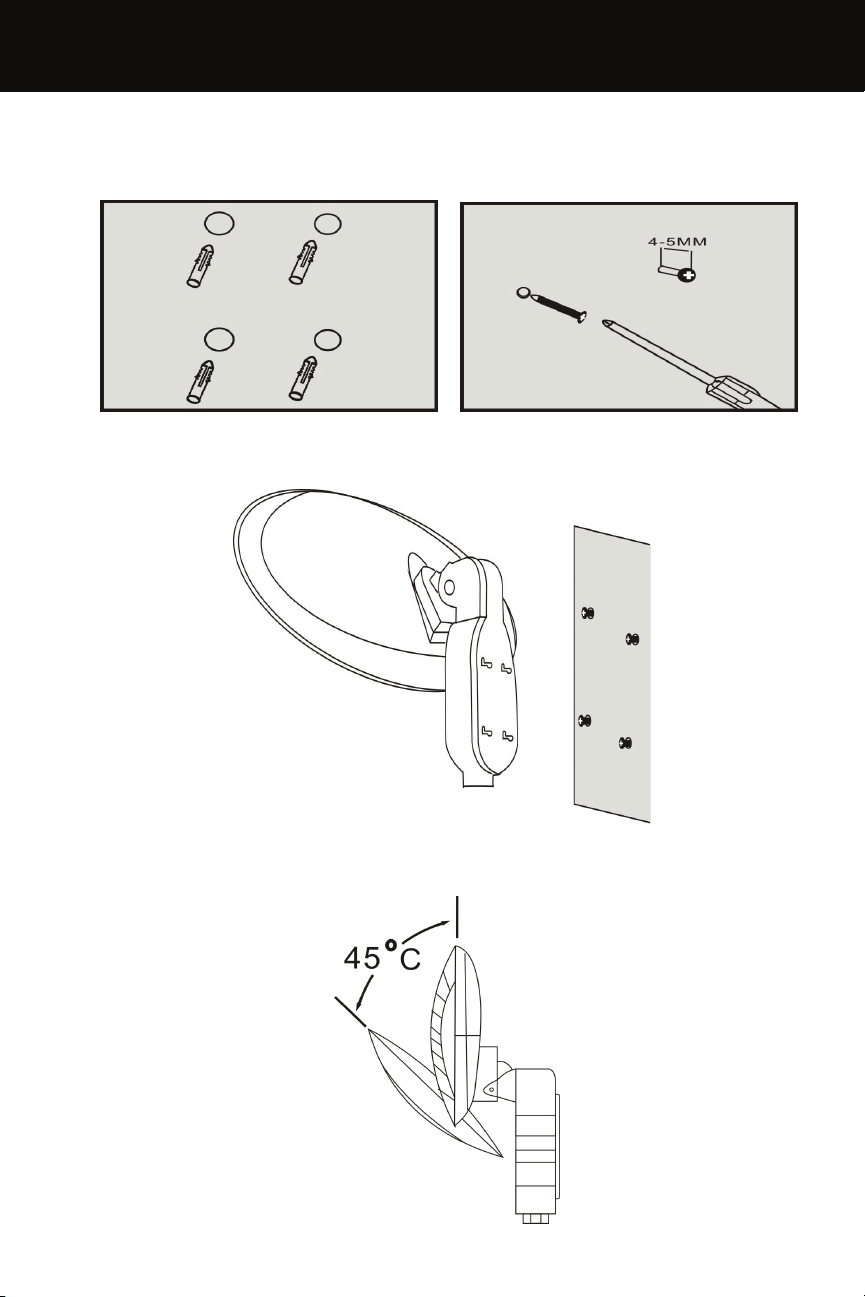
4. ASSEMBLING & OPERATING INSTRUCTIONS
3. Ensure you use the correct xings for the wall material you are mounting the
heater to. Fasten the xings and allow for 4-5mm overhang.
4. Align the back of heater bracket holes, move the product to the left into the
safety holes.
5. Adjust heater head angle as required 0º~45º.
This manual suits for next models
1
Table of contents
Other Fanmaster Electric Heater manuals


