Fein Optic Mi50 User manual

Fein
Mi50 Inverted Microscope User’s Manual
info@feinoptic.com

1Fein
Mi50 Microscope Components
Dust
Protector
Siedentopf
Trinocular Head Stage Plate
On/O Switch
Fine
Focus
Beam
Splitter
Mechanical
Stage Locking
Screw
Hex Wrench
Storage
Color
Filter Slider
Aperture
Diaphragm
Field
Diaphragm
Base
Coarse
Focus
Tension
Adjustment
Light
Rheostat
ECO Energy
Saving
Button

2
Fein
Mi50 Microscope Components
Color
Filter Slider
Objective
Lens Quintuple
Nosepiece Brighteld /
Darkeld Lever
PolarizerAnalyzer
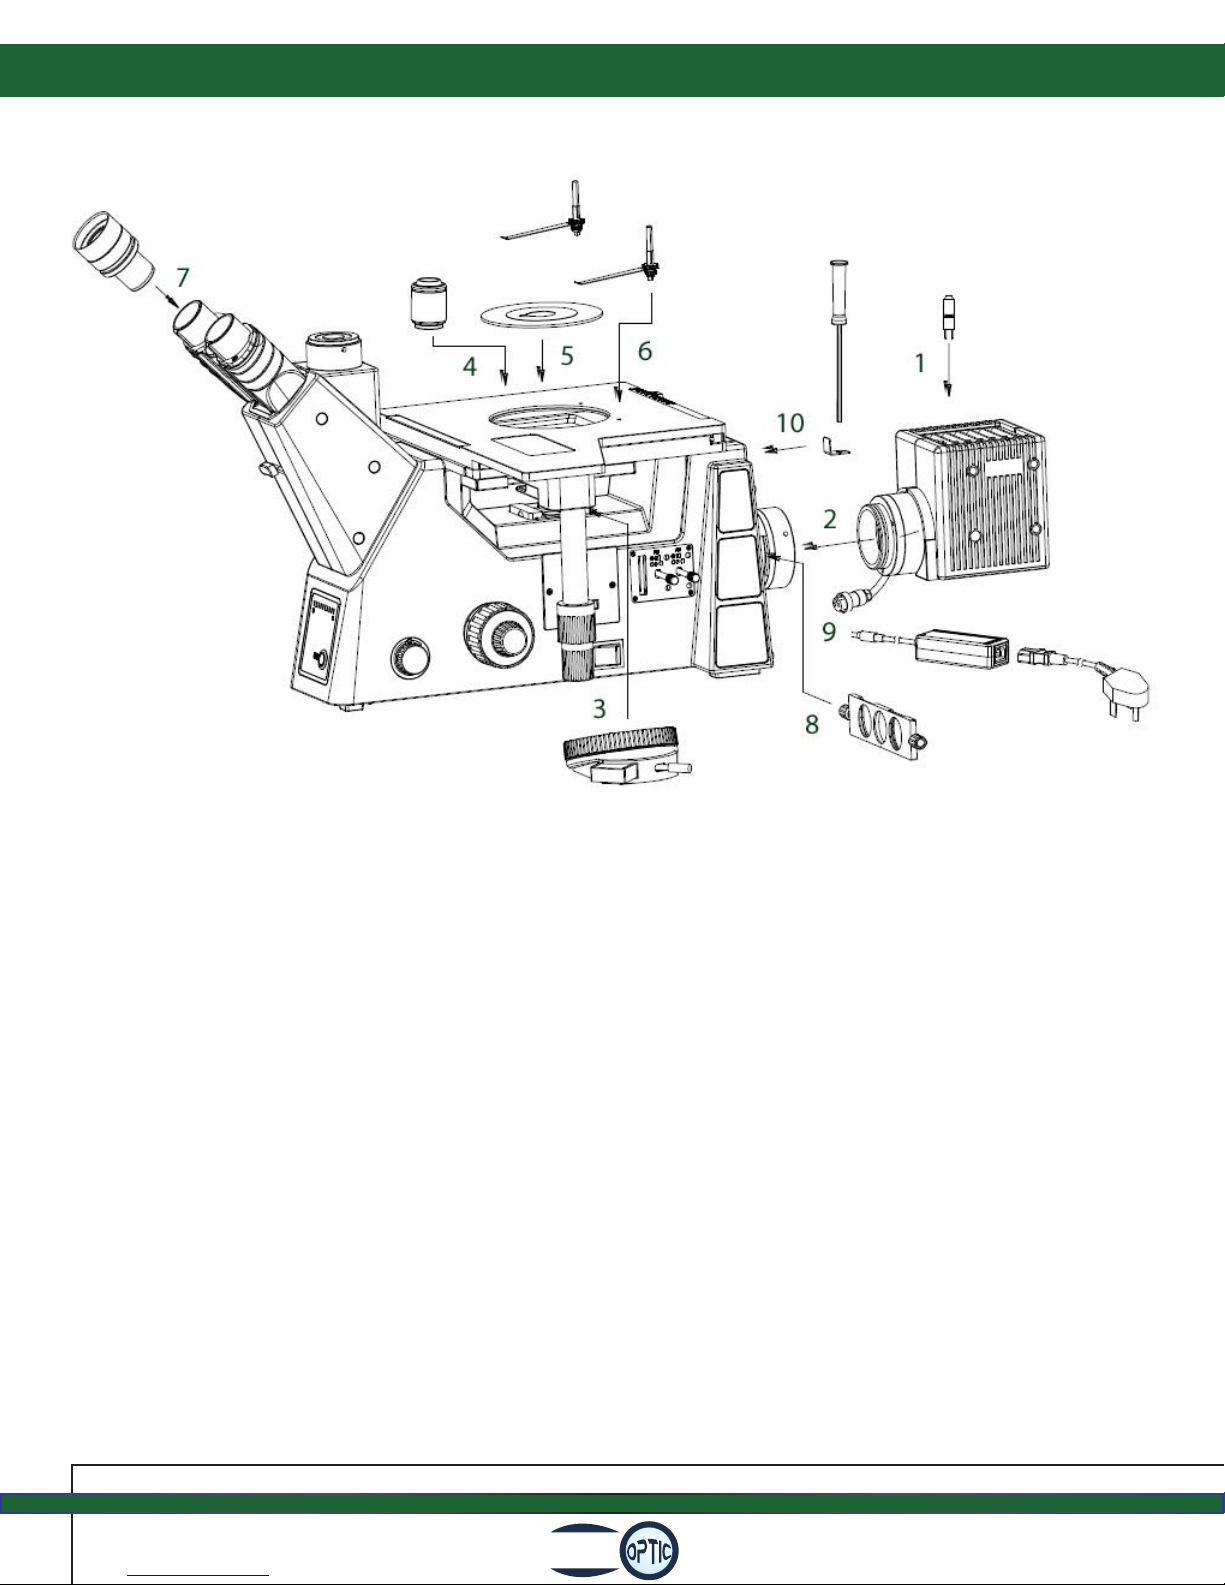
Mi50 Inverted Microscope Assembly
3Fein
NOTE: Each of the above installation steps is outlined in detail on the following pages.
1. Install the bulb into the lamp housing.
2. Connect the lamp housing to the microscope frame.
3. Connect the nosepiece to the frame.
4. Screw the objective lenses onto the nosepiece.
5. Insert the stage plate.
6. Connect the stage clips.
7. Insert the eyepieces into the eyetubes.
8. Insert the color lter slider into the illuminator port.
9. Connect the power cord.
10. Place the inner hex spanner into its holder on the frame.
Mi50 Inverted Microscope Operation Instructions
4
Fein
Do not shake or drop the microscope.
Do not expose the microscope
to direct sun, high temperatures,
high humidity, dust, or damp
environments. Use a at work surface.
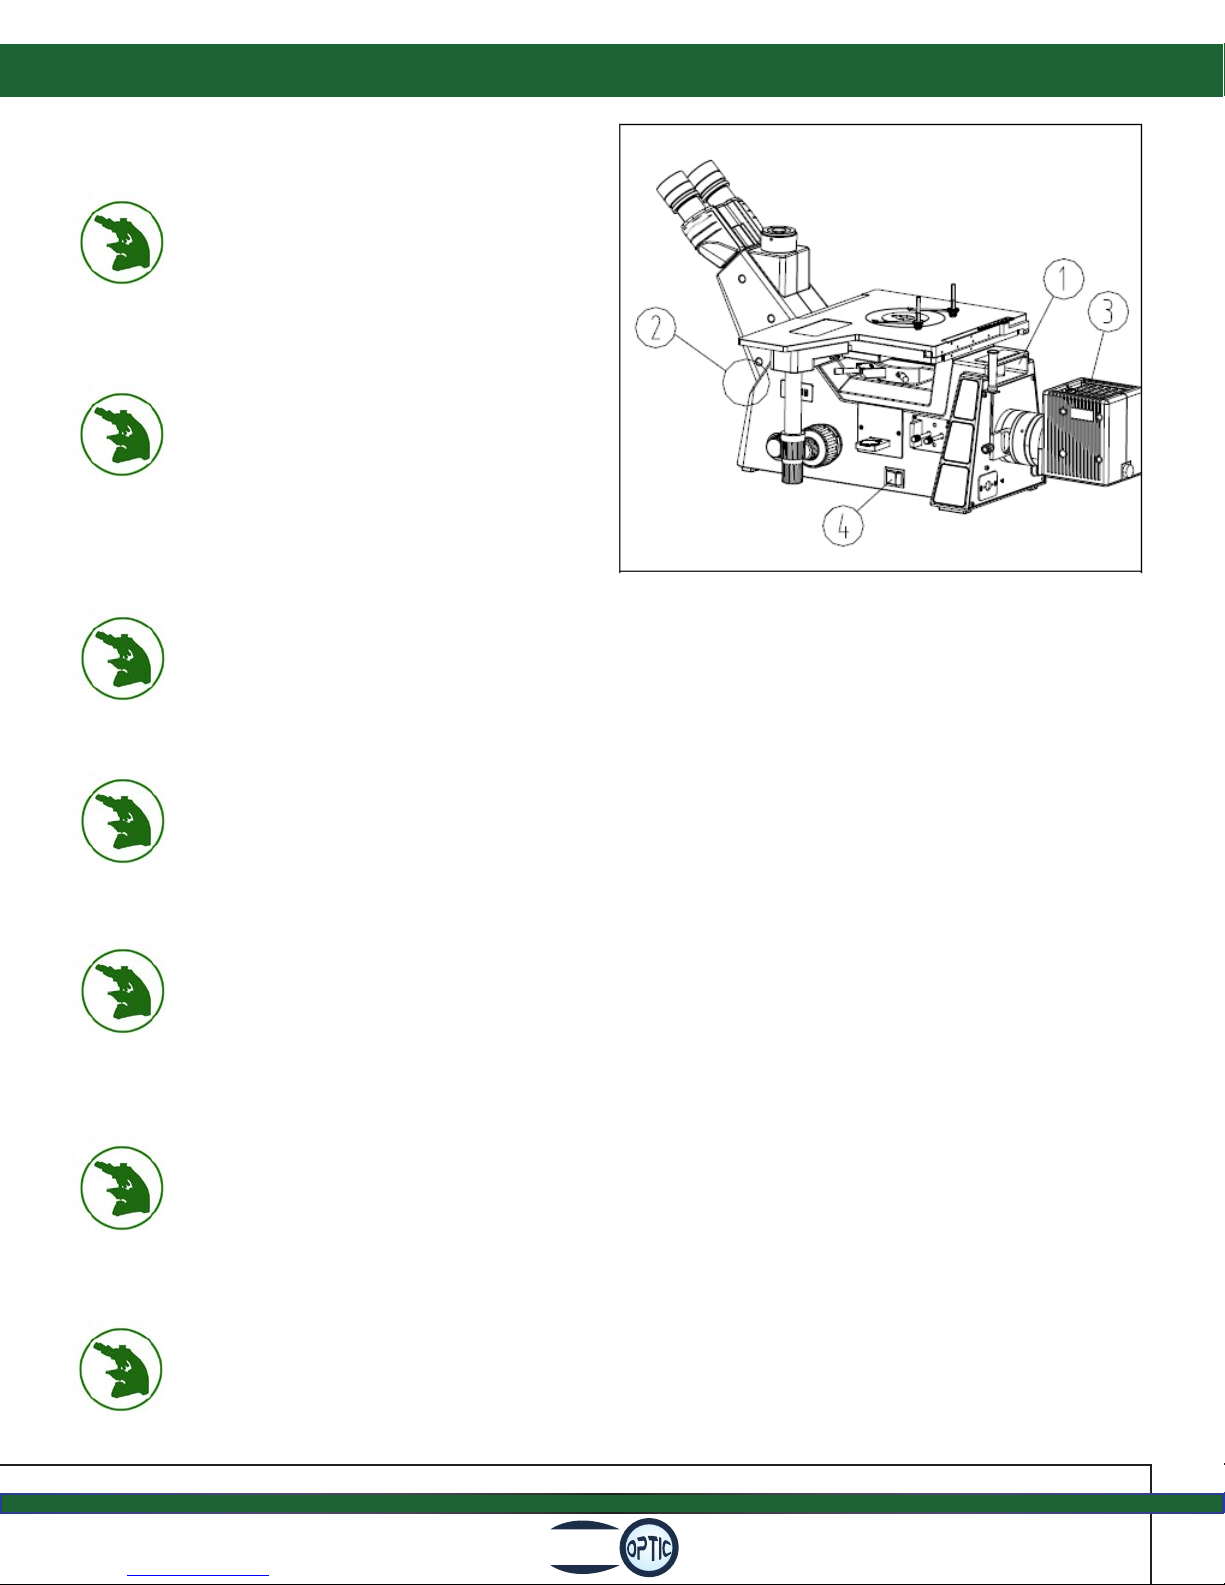
When moving the microscope use both hands, holding the handle at the back
(1) and the frame at the front (2) as shown in the image at right. Do not carry by
holding stage.
Set the power switch (4) to o “O” before replacing a bulb or fuse, and wait until the
lamp is cool. The power switch is located on the side of the microscope. Microscope
uses 12v, 100w Halogen bulb. (Part #12v100wH).
Voltage range of 100~240V is supported. Use the power cord supplied with the
microscope.
When working make sure there is plenty of room for heat dissipating around the
light source (3).
Operating indoor temperature should be 5°C~40°C (41°F~104°F), with a max
relative humidity of 80%.

Mi50 Inverted Microscope Bulb Replacement
5Fein
Open the bulb locking mechanism
(2) and holding the bulb (3) with a
soft tissue, insert the bulb pins (4)
into the bulb holder (5). The bulb
will be vertical after assembly. Put
the bulb locking mechanism (2) back
into its original position, lock the
bulb and install the lamp housing by
tightening the set screw (1).
Connect the lamp housing to the
microscope frame. Loosen the
set screw (1) on the light source
connector. Push the lamp housing
socket (2) into the connector
thoroughly, and re-tighten the set
screw (1).
Power o and unplug the
microscope. Loosen the set screw (1)
and remove the lamp housing.
Mi50 Inverted Microscope Operation Instructions
6
Fein
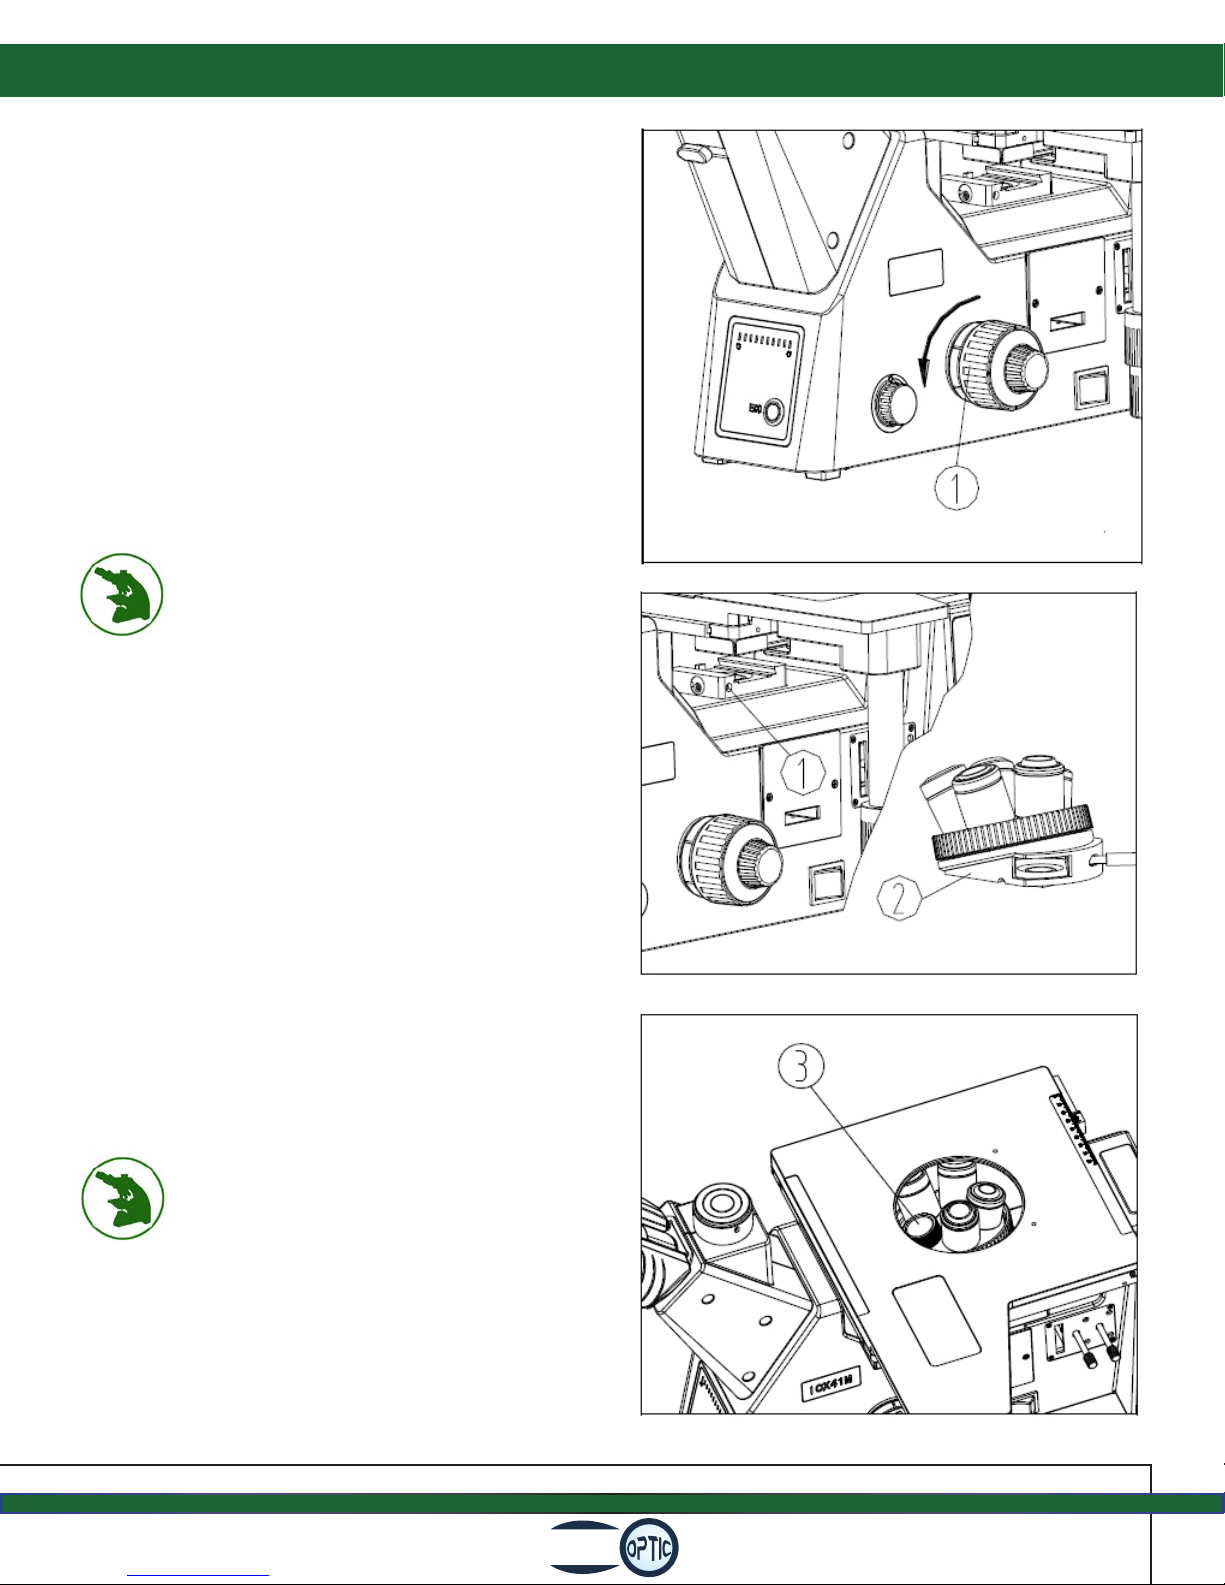
ASSEMBLE THE NOSEPIECE:
Rotate the coarse focus knob (1) until
the focusing slider is raised to the
position where the locking screw (1
below) can be rotated with a screw
driver. Loosen the lock screw on the
focusing slider. Match up the dovetail
interface (2) of the nosepiece with
the dovetail groove of the illuminator,
pushing it in all the way. Re-tighten
the lock screw (1).
CONNECT THE OBJECTIVES:
Rotate the coarse focusing knob
to lower the nosepiece. Install the
objective lenses into the microscope
nosepiece starting with the lowest
magnication objective up to the
highest in a clockwise direction.
If nosepiece slots are not being used
cover them with a dust cover.
When viewing samples always
start focusing with the lowest
magnication objective, and then
move up in magnication.

Mi50 Inverted Microscope Operation Instructions
7Fein
Insert the metal stage plate (1) into
the hole in the top of the stage. Turn
the stage plate so that“V” groove (2) is
closest to the eyepieces. This makes it
easier to view the objective lenses.
Remove the clips (1) from the support
columns (2). Screw the support
columns (2) into the holes (3) of
the mechanical stage. These can be
locked in place with the screws (4).
Finally, insert the clips (1) back into the
support columns (2) and face them
toward the eyepieces.
Remove the eyepiece dust caps (1).
Insert the eyepiece (2) into the eyetube
(3). If using the diopter adjustable
eyepiece, it can be locked into place by
using the hex screw so it will not rotate
when adjusting the diopter.
Mi50 Inverted Microscope Operation Instructions
8
Fein
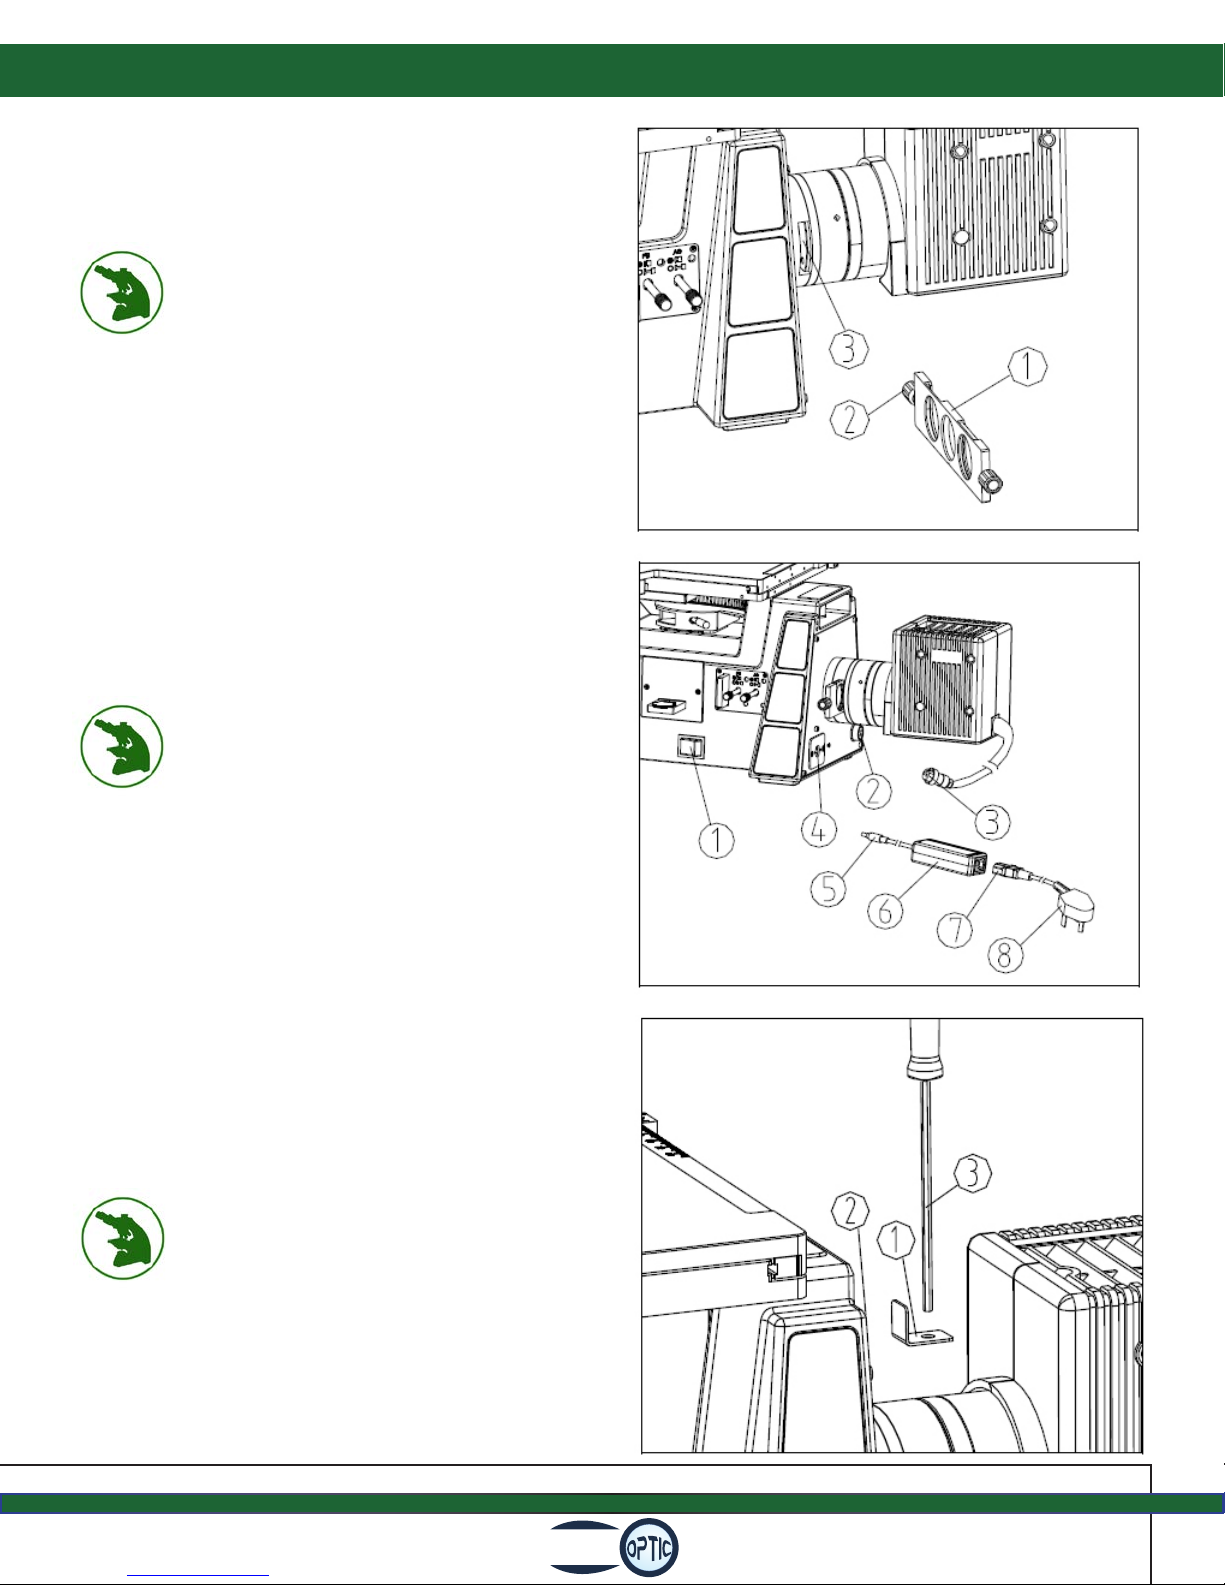
Install the color lter slider (1) by
unscrewing and removing one of
the handles on the slider (2). Insert
the lter slider into the slot (3) on
the illuminator connector. When the
slider clicks into place it is aligned
in one of the proper operating
positions. Screw the handle (2)
back onto the lter slider once it is
inserted.
Turn the main power switch (1) to “O”
o. Insert the lamp house plug (3)
into the socket (2).
Insert the plug (5) of the external
power supply (6) into the power
supply socket (4).
Insert the plug (7) of the power cord
into the socket of the external power
supply (6).
Insert the plug (8) of the power cord
into the wall outlet.
Use the power cord supplied with the
microscope, do not substitute.
HEX WRENCH HOLDER:
Grip the inner hex spanner xed
mount on the magnet (2) of the
microscope body. Insert the hex
wrench (3) into the hold of the inner
hex spanner xed mount (1).

Mi50 Inverted Microscope Operation Instructions
9Fein
Plug in the power cord and turn
the microscope on (1). Adjust
the rheostat knob (2) until the
illumination is comfortable for
observation. Rotate clockwise to
increase brightness, which in turn
will increase the brightness readout
(3). Using the microscope at a lower
brightness will increase bulb life.
Press the ECO energy saving button
(4) to turn on the energy saving
function. This automatically turn o
the microscope light after 30 minutes
of use when the user leaves the
microscope. When the user returns
to the microscope, the light will
automatically turn on.
The beam splitter (1) controls the
light direction from the eyepieces to
the camera. When the beam splitter
is all the way to the left the light is
0:100, with 0% of the light at the
eyepieces and 100% at the trinocular
port for photography. When the
beam splitter is moved to the right,
all light is directed to the eyetubes.
FOCUS TENSION ADJUSTMENT:
If the coarse focus knob is hard to
turn, or the specimen leaves the
focus plane soon after focusing, the
tension adjustment ring (1) needs
to be adjusted. Rotate the ring
clockwise to tighten focus, counter-
clockwise to loosen the tension.
Table of contents
Other Fein Optic Microscope manuals


Popular Microscope manuals by other brands


VWR
VWR VisiScope 384 Series instruction manual

Nikon
Nikon ECLIPSE E200 POL instructions

Leica
Leica DI C800 User's manual & installation instructions

ThermoFisher Scientific
ThermoFisher Scientific Continuµm manual

ThermoFisher Scientific
ThermoFisher Scientific Continuµm manual

Olympus
Olympus SZ61 instructions