Fermax iL OFT User manual

iLiL
iLiL
iL OFTOFT
OFTOFT
OFT VDS ExtrVDS Extr
VDS ExtrVDS Extr
VDS Extraa
aa
a
COD.: 97646 V06_11
Botón de abrepuertas / llamada a conserje (función disponible según tipo de instalación).
· Al pulsar este botón se activa el abrepuertas. Es posible abrir la puerta en cualquier momento.
· Con el teléfono colgado, al pulsar este botón se realiza una llamada al conserje (si existe conserjería).
Lock release button / Call guard unit (function available depending on the installation’s type).
· Pressing this button activates the lock-release. The door can be opened at any time.
· When you press this button with the telephone on the hook, a call will be made to the guard (*where one exists).
Bouton-poussoir de la gâche électrique / appel au concierge (fonction disponible selon le type d’installation)
· Si l’on appuie sur cette touche, la gâche électrique est activée. On peut ouvrir la porte à tout moment.
· Lorsque le combiné est raccroché, en appuyant sur cette touche, un appel au concierge est effectué (s’il y a une conciergerie).
Türöffnungstaste / Portierruf (Funktion verfügbar je nach Installationstyp):
· Durch Drücken dieser Taste wird der Türöffner aktiviert. Die Tür kann dabei immer geöffnet werden.
· Bei aufgelegtem Hörer, wird durch Drücken dieser Taste ein Anruf zur Portierzentrale hergestellt (falls vorhanden).
Разблокировка замка / Вызов консьержа (функция доступна для систем с консьержем)..
· Нажав эту кнопку вы разблокируете замок. Дверь может быть открыта в любое время.
· Когда вы нажмете эту кнопку в режиме ожидания, произойдет вызов консьержа (если он есть).
Телефон - Telephone - Poste
Telefon - Telefone
BOTONES BUTTONS BOUTONS TASTE КНОПКИ INSTALACIÓN МОНТАЖ INSTALLATION INSTALLATION INSTALAÇÃO
LED
rojo/red/rouge/rot/красный
LED
verde/green/verte/grün/зеленый
LED
azul/blue/bleue/blau/синий
МИКРОФОН
Botones/Buttons/Boutons/Tasten/Кнопки
Botón de activación de Audio, Colgado y Autoencendido.
· Al recibir una llamada se dispone de 30 segundos para contestar. El led azul parpadea durante ese tiempo indicando
llamada pendiente.
·Activación de audio: Al recibir una llamada pulsar y soltar este botón para hablar con el visitante. Se abre el canal de
audio en sentido calle y vivienda, el funcionamiento es en modo manos libres. El led azul permanecerá encendido
indicando conversación con placa de calle.
·Colgado: pulsar para finalizar la comunicación, si no la conversación finalizará en 90 segundos.
·Autoencendido (placa principal): en reposo, pulsar y soltar este botón, (el led azul se enciende).
Audio activation, hang up and auto-start button.
· On receiving a call the user has 30 seconds to answer. The blue led flashes during this time to indicate a call waiting.
·Audio activation: When a call is received, press and release this button to speak to the visitor. The audio channel between
the entry panel and the residence is opened; operating in hands-free mode. The blue led will remain on indicating that a
conversation with the entry panel is underway. .
·Hang-Up: press to end communication, if not the conversation will be disconnected after 90 seconds.
·Auto-start (main panel): on standby, press and release this button (the blue led lights up).
Bouton d’activation du son, pour raccrocher et pour l’allumage automatique
· Lorsqu’il y a appel, on dispose de 30 secondes pour répondre. La DEL bleue clignote pendant cette durée, indiquant de
la sorte qu’il y a un appel en cours.
·Activation du son : si vous recevez un appel, appuyez sur ce bouton et relâchez-le pour parler avec le visiteur. Le canal
audio sens rue-logement s’active et le tout fonctionne en mode mains libres. La DEL bleue reste allumée, indiquant de
la sorte qu’il y a une communication en cours avec la platine de rue.
·Pour raccrocher : appuyez sur cette touche pour mettre fin à la communication. Dans le cas contraire, la conversation
prend fin au bout de 90 secondes.
·Allumage automatique (platine principale) : en mode veille, appuyez sur cette touche et relâchez-la (la DEL bleue s’allume).
Taste für Audioaktivierung, Auflegen und Eigenstart.
· Geht ein Anruf ein, hat man 30 Sekunden Zeit zum Antworten. Die blaue LED blinkt während dieser Dauer und zeigt den
eingehenden Anruf an.
·Audioaktivierung: Drücken Sie bei einem eingehenden Anruf auf diese Taste, um mit dem Besucher zu sprechen. Der
Audiokanal wird in Richtung Türstation und Wohnung freigegeben und auf Freisprechbetrieb geschaltet. Die blaue LED
leuchtet während des Sprechverkehrs mit der Türstation.
·Auflegen: Drücken, um das Gespräch zu beenden, ansonsten wird das Gespräch nach 90 Sekunden automatisch beendet.
·Eigenstart (Haupttürstation): Im Bereitschaftsmodus, diese Taste drücken und los lassen (die blaue LED leuchtet auf).
Активация разговора, отбой и кнопка авто-соединения.
· При поступлении вызова абонент имеет 30 секунд на ответ. В это время мигает голубой светодиод, отображая пос-
тупивший вызов.
·Активация разговора:
при получении вызова, нажмите и отпустите эту кнопку для разговора с посетителем. Аудио канал
·Отбой:нажмите для окончания соединения, иначе разговор будет закончен автоматически через 90 секунд.
·Авто-соединение (с главной панелью):
в режиме ожидания нажмите и отпусте эту кнопку (загорится голубой светодиод).
F1:Botónparafuncionesadicionales F1: Button for additional functions F1:Touchepourfonctions supplémentaires
F1:Taste fürZusatzfunktionen
F1: Кнопка для дополнительных ф-ций
Potenciómetro/Potentiometer/Potentiomètre/Volumenregler/Потенциометр
ESQUEMA DE CABLEADO СХЕМА ПОДКЛЮЧЕНИЯ SCHEMA DE CABLAGE
VERKABELUNGSSCHEMA ESQUEMA DE CABLAGEM
••
••
•
"+" , "-" :
Alimentación (18 Vdc)
Power supply (18 Vdc)
Alimentation (18 Vcc)
Stromversorgung (18 Vdc)
Питание (18 Vdc)
••
••
•"L" :
Datos y Audio.
Data & Audio.
Données et son.
Daten und Audio.
Данные и Аудио
••
••
•(P1) "T" , "-":
Pulsador de llamada puerta vivienda
Call pushbutton at the apartment’s door
Poussoir d’appel sur la porte du logement
Ruftaste an der Wohnungstür
Кнопка дверного звонка
CARACTERÍSTICAS TÉCNICAS ТЕХНИЧЕСКИЕ ХАРАК-КИ CARACTERISTIQUES TECHNIQUES
TECHNISCHE EIGENSCHAFTEN CARACTERÍSTICAS TÉCNICAS
Potenciómetro
· Ajuste de volumen de llamada (en reposo). Al MÍNIMO:
desconexión de llamada.
· Ajuste audio de subida (en conversación).
Potentiometer
· Call volume settings (on standby). MINIMUM:
disconnects the call.
· Increases audio volume settings (during conversation).
Potentiomètre
· Réglage du volume d’appel (en mode veille). Niveau
MINIMUM : déconnexion de l’appel.
· Réglage du son montant (lors d’une communication).
Volumenregler
· Einstellen der Lautstärke des Anrufs (im Bereitschafts-
modus). MINIMUM: Unterbrechung des Anrufs.
· Audioeinstellung nach oben (Gespräch).
Потенциометр
· Громкость сигнала вызова (в режиме ожидания).
МИНИМАЛЬНОЕ положение отключает сигнал.
· Регулировка громкости (во время разговора).
Información - Information - Informations - Information - Informação
Para más información, consultar el Man. Avanzado del Teléfono iLOFT VDS EXTRA (Cod. 97631) en www.fermax.com.
For more information, please refer to the Advanced iLOFT VDS EXTRATelephone Manual (Code. 97631) en www.fermax.com.
Pour plus d’informations, voir le manuel avancé du poste iLOFT VDS EXTRA (code 97631) sur www.fermax.com.
Um weitere Informationen, konsultieren das Handbuch für Fortgeschrittene des Telefons iLoft VDS EXTRA (Kode 97631) auf
unserer Webseite: www.fermax.com .
Для более подробной информации, пожалуйста, обратитесь к Подробной инструкции (код. 97631) на сайте www.fermax.com
.
Temperatura de funcionamiento - Working Temperature
Température de fonctionnement - Betriebstemperatur - Рабочая температура
Alimentación - Power Supply - Alimentation - Stromversorgung - Питание
-5ºC, +40ºC
18 Vdc
Consumo - Consumption - Consommation - Stromverbrauch - Consumo
en reposo - in standby - en veille - Im Bereitschaftsmodus - в режиме ожидания
audio activo - audio active -son activé - bei Sprechverkehr - в активном режиме
24 mA
100 mA
••
••
•"+A" , "-A":
Conexión prolongador de llamada o activador de luces y timbres.
Call extension connection or light and bell activator.
Connexion prolongateur d'appel ou activateur pour sonnettes et éclairages.
Anschluss Anruferweiterung oder Aktivierung der Beleuchtung und Klingeln.
Подключение повторителя вызова или активатора света и звонка
P1
между вызывной панелью и квартирой открыт; работа в режиме hads-free. Голубой светодиод будет гореть во время
разговора с вызывной панелью.
PROGRAMACIÓN PROGRAMMING PROGRAMMATION
PROGRAMMIERUNG ПРОГРАММИРОВАНИЕ
Selección de melodía - Ringtone Selection - Sélection de la mélodie - Melodieauswahl-
Выбор рингтона
Melodía procedente de la placa principal.
Partiendo del estado de reposo:
· pulsar el botón durante 5" hasta escuchar un "beep", soltar, se escuchará la melodía de la placa principal y el led rojo parpadeará
lentamente. Se encuentra en el menú de configuración de "Selección de melodías".
· pulsar el botón F1 para seleccionar la melodía, (secuencia circular), la última escuchada será la escogida. Led rojo - parpadeo lento.
· pulsar el botón para seleccionar la melodía de la placa secundaria.
Melodía procedente de la placa secundaría.
· pulsar el botón F1 para seleccionar la melodía, (secuencia circular), la última escuchada será la escogida. Led rojo - parpadeo rápido.
Salir de selección de Melodías.
Estando en selección de melodías para placa secundaría pulsar el botón para volver al estado de reposo, (led rojo apagado).
Ringtone corresponding to the main panel.
From standby mode:
· press and hold the button for 5 seconds until you hear a «beep» then release, a ringtone will sound on the main panel and the red led will
flash slowly. This is found in the «Ringtone Selection» configuration menu.
· press the F1 button to select the ringtone, (circular sequence), the last one played will be the one selected. Red led - slow flash.
· press to select the secondary panel’s ringtone.
Ringtone corresponding to the secondary panel.
· press the F1 button to select the ringtone, (circular sequence), the last one played will be the one selected. Red led - slow flash.
Exit ringtone selection .
To return to standby mode while selecting the secondary panel’s ringtone simply press the button (red led off).
Mélodie provenant de la platine principale
À partir du mode veille :
· Appuyez sur la touche pendant 5 s jusqu’à ce qu’un bip soit émis. Relâchez la touche. La mélodie de la platine principale se déclenche
et la DEL rouge clignote lentement. Elle se trouve dans le menu de configuration de « Sélection des mélodies ».
·Appuyezsur latoucheF1poursélectionner lamélodie (séquencecirculaire).Ladernièreécoutéeestcellequiestchoisie. DELrouge-clignotementlent.
· Appuyez sur la touche pour sélectionner la sonnerie d’appel de la platine secondaire.
Mélodie provenant de la platine secondaire
·Appuyezsur latouche F1poursélectionner lamélodie(séquencecirculaire).Ladernièreécoutéeest cellequiestchoisie. DELrouge- clignotement rapide.
Pour quitter le mode Sélection des mélodies
En mode Sélection des mélodies pour la platine secondaire, appuyez sur la touche pour revenir au mode veille (DEL rouge éteinte).
Melodía procedente de la placa principal.
Vom Bereitschaftsmodus ausgehend:
· Taste 5" gedrückt halten, bis ein Piepton ertönt, darauf hin Taste los lassen, anschließend erklingt die Melodie der Haupttürstation und die
rote LED blinkt langsam. Sie befinden sich im Konfigurationsmenü "Melodieauswahl".
·Taste F1drücken,umdieMelodiezuhören(Kreis-Sequenz),wobeidiezuletztgehörteMelodieautomatischausgewähltwird.Dierote LEDblinkt langsam.
· Taste drücken, um die Melodie der Nebentürstation auszuwählen.
Die Melodie stammt von der Nebentürstation.
·Taste F1 drücken,umdieMelodiezuhören(Kreis-Sequenz), wobeidie zuletztgehörte Melodieautomatischausgewählt wird.Dierote LEDblinktschnell.
Melodieauswahl verlassen.
In der Melodieauswahl für die Nebentürstation die Taste drücken, um in den Bereitschaftsmodus umzuschalten (rote LED aus)..
Рингтон, соответствующий главной вызывной панели.
В режиме ожидания
· нажмите и удерживайте 5 секунд до звукового сигнала "бип", затем отпустите, вы услышите рингтон для главной
панели и красный диод будет медленно мигать.
·
·
нажмите кнопку F1 для выбора рингтона (последовательно), последний проигранный рингтон останется выбранным. Красный диод
медлено мигает.
нажмите для выбора рингтона для дополнительной вызывной панели.
Рингтон, соответствующий дополнительной вызывной панели
.
·нажмите кнопку F1 для выбора рингтона (последовательно), последний проигранный рингтон останется выбранным. Красный диод медлено мигает.
Выход из выбора рингтона
.
Для возврата в режим ожидания просто нажмите кнопку во время выбора рингтона для дополнительной панели (красный диод погаснет).
Programación dirección teléfono - Telephone Programming - Programmation adresse poste -
Programmierung der Telefonadresse - Программирование переговорного устройства
RESET DE PARÁMETROS RESETTING PARAMETERS RÉINITIALISATION DES
PARAMÈTRES NULLSTELLUNG DER PARAMETER СБРОС ПАРАМЕТРОВ
Mantener pulsado el botón durante 10" consecutivos. El teléfono genera un doble pitido corto y pone todos los parámetros por
defecto sin desprogramar el código de llamada.
Press and hold the button for 10 seconds. The telephone will emit a short double beep and will reset all parameters to their
default settings without deprogramming the call code.
Apuyez sur la touche et maintenez-la enfoncée pendant 10 secondes. Le poste émet un double bip bref et remet en place tous
les paramètres par défaut sans déprogrammer pour autant le code d’appel.
Taste 10" lang gedrückt halten. Das Telefon gibt zwei kurze Pieptöne aus und übernimmt die Werkseinstellungen. Die Rufkodes
werden davon nicht betroffen.
Нажмите и удерживайте кнопку 10 секунд. Телефон издаст два коротких сигнала "бип" и установит все параметры
по умолчанию, кроме кода вызова.
2
3
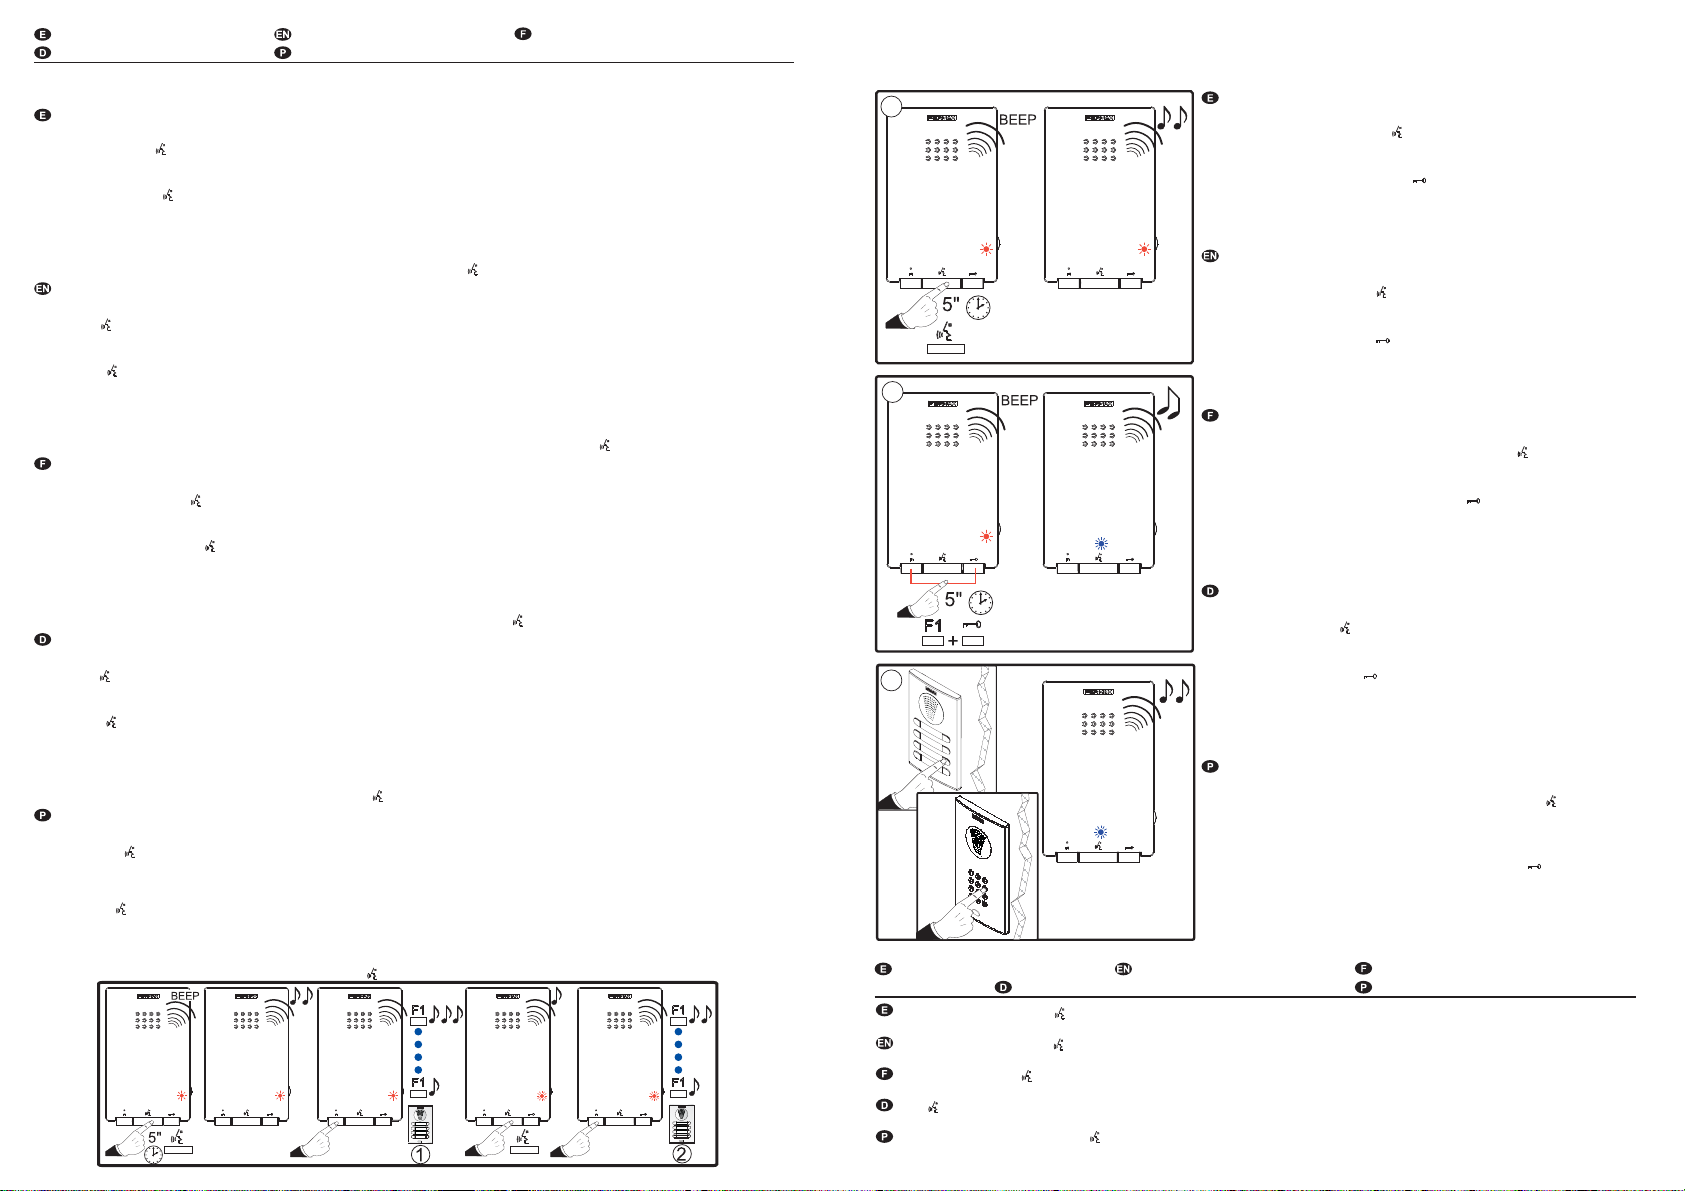
Programación dirección teléfono desde placa de calle (principal).
1. Se debe partir desde el menú de configuración de "Selección de
melodías": pulsar el botón durante 5" hasta escuchar un "beep", soltar,
se escuchará la melodía de la placa principal y el led rojo parpadeará
lentamente. En este estado:
2. Pulsar el botón F1 y botón simultáneamente durante 5" hasta
escuchar una confirmación acústica (BEEP). Soltar, se envía co-
mando de configuración a placa (led azul parpadeando).
3. Pulsar el pulsador/codigo de llamada a vivienda desde placa. Se escucha-
rá el tono de confirmación en el teléfono. El teléfono está programado.
Programming a telephone number from the entry panel (main).
1. The user should start from the «Ringtone Selection» configuration
menu: press and hold for 5 seconds until you hear a «beep» then
release, a ringtone will sound on the main panel and the red led will flash
slowly. While in this mode:
2. Press the F1 and the button simultaneously for 5 seconds until
you hear a tone (BEEP). Releasing the button sends a panel
configuration command (blue led flashing).
3. Press the button/residential call code from the panel. A confirmation tone will
sound on the telephone. The telephone is programmed.
Programmation adresse poste à partir de la platine de rue (principale)
1. Cette programmation est effectuée à partir du menu de configuration de
« Sélection des mélodies ». Appuyez sur la touche pendant 5 s jusqu’à
ce qu’un bip soit émis. Relâchez la touche. La mélodie de la platine principale
se déclenche et la DEL rouge clignote lentement. Dans ce mode :
2. Appuyez sur la touche F1 et sur la touche en même temps pendant 5 s
jusqu’à ce qu’un bip de confirmation soit émis. Relâchez. Une commande
de configuration est envoyée à la platine (la DEL bleue clignote).
3. Appuyez sur le bouton-poussoir/composez le code d’appel du logement à
partir de la platine. Une tonalité de confirmation est émise au niveau du
poste. Le poste est désormais programmé.
Programmierung der Telefonadresse über die Haupttürstation).
1. Gehen Sie im Konfigurationsmenü auf die Einstellung «Melodie-
auswahl»: Taste 5" lang gedrückt halten, bis ein Piepton ertönt,, darauf
hin Taste los lassen, anschließend erklingt die Melodie der Haupttürstation
und die rote LED blinkt langsam. In diesem Zustand:
2. Taste F1 und Taste gleichzeitig 5" lang gedrückt halten, bis zur
Bestätigung ein Piepton ertönt. Anschließend Taste los lassen,
worauf ein Konfigurationsbefehl an die Türstation übermittelt wird
(LED blau blinkt).
3. Taste/Rufkode (Türstation>Wohnung) drücken. Das Telefon gibt einen
Piepton zur Bestätigung aus. Das Telefon ist nun programmiert.
Программирование переговорного устройства с вызывной
панели (главной).
.
1. Вы должны начать с "Выбора рингтона": нажмите и удерживай-
те 5 секунд пока не услышите "бип", затем отпустите, вы услышите
рингтон для главной панели и красный диод будет медленно мигать.
В этом режиме:
2. Нажмите кнопки F1 и одновременно и удерживайте 5 секунд
пока не услышите сигнал "бип". Освобождение кнопок посылает
панели команду конфигурации (мигает голубой диод).
3. Нажмите кнопку/наберите код вызова на вызывной панели. Вы услы-
шите подтверждающий сигнал на переговорном устройстве. Телефон
запрограммирован.
1
This manual suits for next models
1
Other Fermax Telephone manuals

Fermax
Fermax DUOX PLUS User manual

Fermax
Fermax iLoft VDS Dominium User manual

Fermax
Fermax iLOFT Lynx User manual

Fermax
Fermax LOFT UNIVERSAL User manual

Fermax
Fermax iloft User manual

Fermax
Fermax DUOX plus iLoft User manual

Fermax
Fermax DUOX User manual

Fermax
Fermax DUOX iLOFT User manual

Fermax
Fermax MDS DIRECT GUARD UNIT User manual

Fermax
Fermax DUOX MEMOPHONE CITYLINE User manual


