Doro 916CR User manual

916cr


www.doro.com
1 Newvoicemessage-(ashing),
answermachineon(on/ashing),
answermachineoff(off)and
visualringindicator
2 Two-wayrecording/Memo
3 HangingHookforHandset
4 HandsetVolumeControl
5 MuteButton
6 OK/Storebutton
7 Redialbutton
8 SelectCallerID/Phonebook
mode
9 CallNumber
10 NewCIDmessage
11 Menubutton
12 CancelButton
13 ScrollingButtons
14 Answeringmachinefunctions
buttons(pleaserefertopage10)
15 HandsFreeButtonwithindicator
16 Recallbutton
2
3
4
5
7
9
812
11
13
14
1
15
16
10
6

www.doro.com
Installation 1
Connection ............................... 1
Batteries ................................... 2
Thedisplay ............................... 2
Operation 3
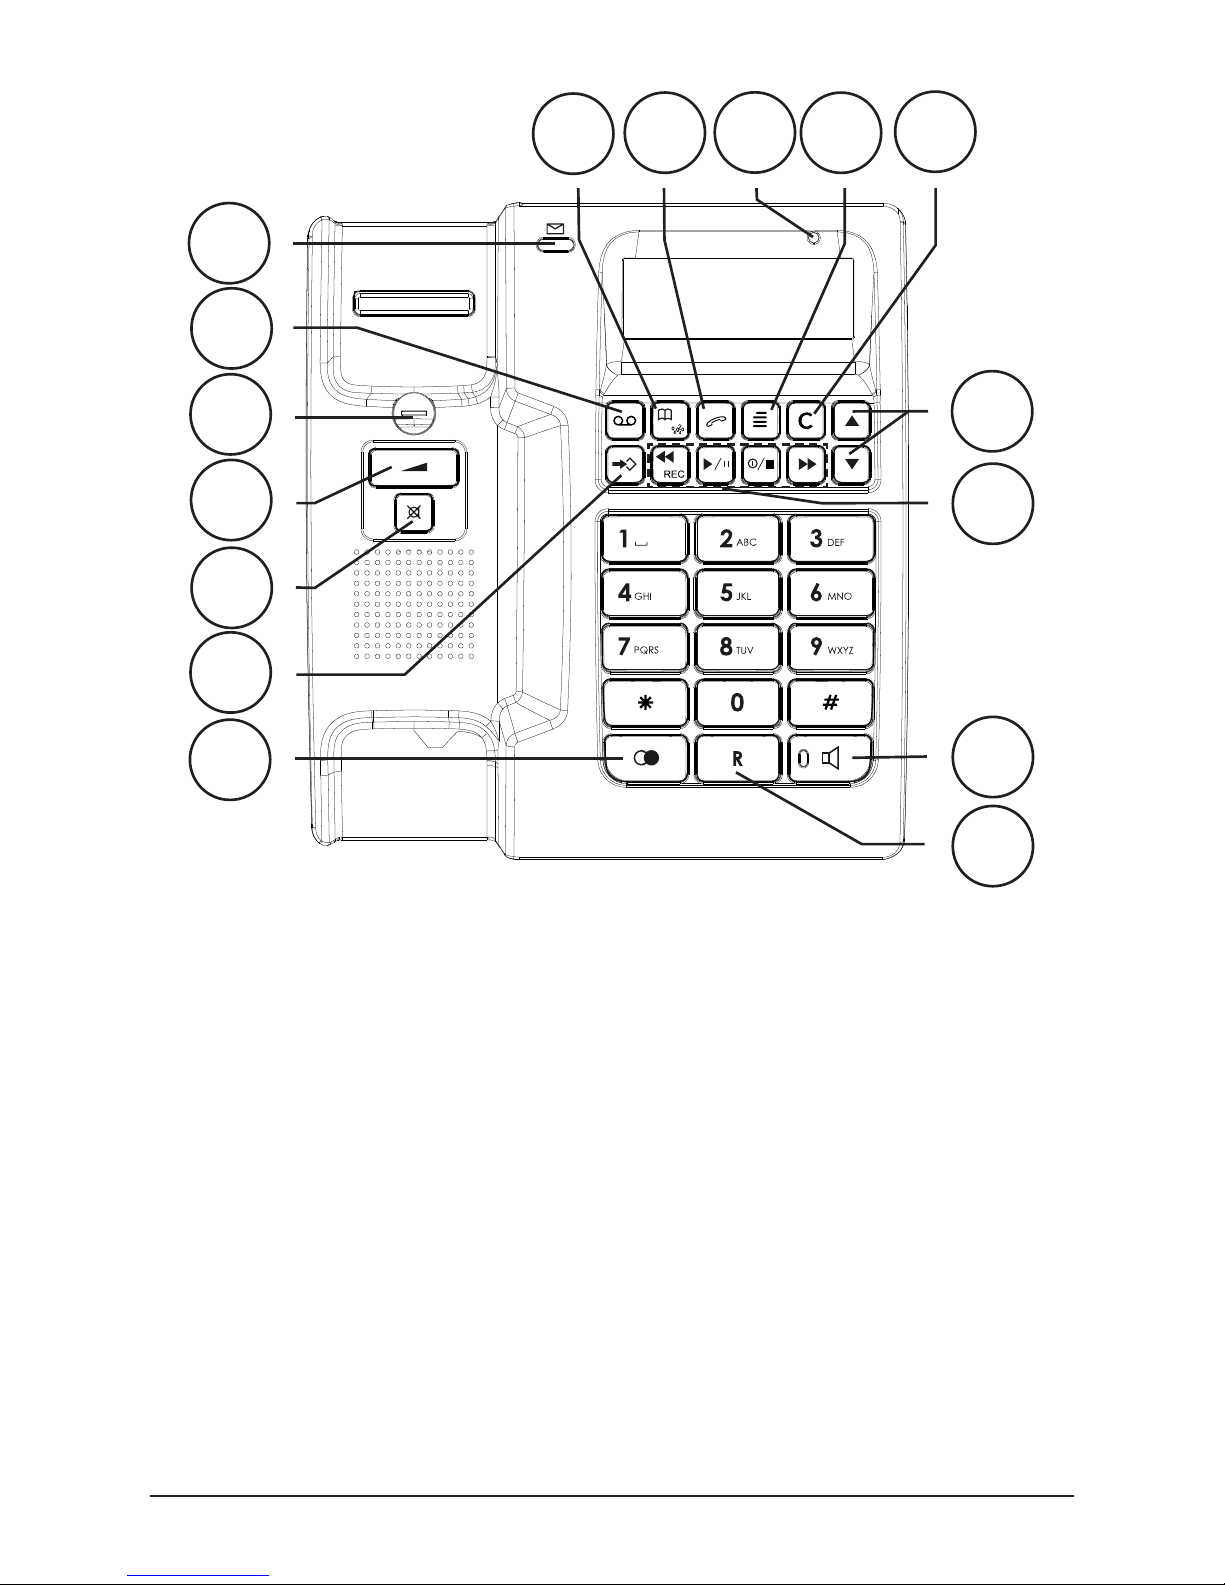
Makingacall ............................ 3
Mutebutton .............................. 3
Redialbutton ............................ 3
Volumecontrol ......................... 3
Timer ........................................ 3
Handsfreefunction.................. 4
Ringer....................................... 4
Recall ....................................... 4
PhoneBook 5
CallerIdentication 7
Theansweringmachine 9
AbouttheAnsweringmachine . 9
Outgoingmessage................... 9
Playbackofmessages ............. 10
Switchingtheanswering
machineOn/Off........................ 11
Personalmessages-MEMO ... 11
CallMonitoring ......................... 11
Two-wayrecording ................... 11
Remotecontrol......................... 12
Remoteactivation .................... 13
OutofMemory ......................... 13
Settings 14
Contrast.................................... 14
Numberofrings........................ 14
Remotecode............................ 14
Answeronly.............................. 14
Other 15
HearingAidcompatible............ 15
Troubleshooting........................ 15
Declarationofconformity ......... 16
Guarantee ................................ 16
Index

English
www.doro.com 1
Installation
Connection
1. Connect the curly cord to the handset and to the socket marked qon the
underside of the telephone.
2. Connect the mains adapter to the socket marked DC 9V on the bottom of
the telephone and then to an electrical wall socket.
3. Connect the telephone line cord to the socket marked Ton the underside
of the telephone, and then to a network wall socket.
4. Position the cables in the grooves underneath the telephone.
5. Lift the handset and listen for the dial tone.
6. Mount the included desktand for better angle of display and phone (see
below).
7. You will need to record an outgoing message (page 9), and also set the date
and time (see below).
Note: After the mains adapter is connected, display will show INITIALISING
for 20 seconds.
DateandTime
1. Scroll using wuntil it shows SET TIME/DATE.
2. Select the time format 12/24H using {/}. Press p.
3. Set the hour (00-23) using {/}. Press p.
4. Set the minute using {/}. Press p.
5. Set the date using {/}. Press p.
6. Set the month using {/}. Press p.
7. Press 1to return to standby mode.

English
2 www.doro.com
Installation
Batteries
To ensure that messages and the time/date are retained (maximum 24 hours) during
a power failure, 4 good quality AAA alkaline battery must be installed. If batteries
are not installed or is running low, the indicator will be displayed, you will need
to change the batteries as soon as possible.
The battery compartment is located on the underside of the telephone.
1. Ensure the telephone line cord is disconnected from the telephone network wall
socket.
2. On the underside of the telephone carefully remove the battery cover.
3. Install the battery ensuring the correct battery polarity is observed.
4. Replace the battery cover.
5. Reconnect the telephone line cord.
The display
When the telephone is not in use, the date and time, number of new and total
number of calls stored in the Caller ID memory will be shown in the display.
Note!
There are separate logs for answering machine and caller-id and separate red LED’s.
In order to stop the ashing LED the corresponding log must be reviewed.

English
www.doro.com 3
Operation
Making a call
NormalDialling
1. Lift the handset.
2. Dial the desired telephone number.
Pre-Dialling
This allows you to enter and change a telephone number before it is dialled.
1. Enter the required telephone number. Mistakes can be erased by pressing C.
2. You can now either lift the handset, press OR , the displayed telephone
number will now be dialled.
Please note!
During a conversation, you can switch from the handset to hands free mode at
any time by pressing
. Press again to terminate the call.
Mute Button
The handset microphone can be disabled during a call by pressing and holding z.
Redial function
If the number dialled is engaged or you wish to redial the last number called
simply lift the handset (or press
) and press r.
Volume control
The handset earpiece volume may be adjusted during a call using .
To adjust the speaker volume (hands free), use {/}during a call.
Timer
Immediately after dialling a telephone number a call timer will be shown on the
display. The timer is a simple way to help you keep track of how long the call lasts.

English
4 www.doro.com
Operation
Hands free function
1. Press . The speaker will be activated and the Hands free indicator light
will illuminate.
2. Dial the required telephone number. The speaker volume can be adjusted
during a call using {/}.
3. Speak towards the microphone located on the front edge of the telephone.
4. Press to terminate the call.
Please note!
During a conversation, you can switch from the hands free to handset mode at
any time by picking up the handset. Replace the handset to terminate the call.
Please remember that in hands free speaker mode it is only possible for one
person at a time to talk. The switch over between speaker and microphone
is automatic and dependent on the sound level of the incoming call and the
microphone respectively. It is therefore essential that there are no loud noises,
e.g. music, in the immediate vicinity of the telephone, as this will disrupt the
speaker function.
Ringer
The ringer volume, melody and tone can be selected using the switches located
on the rear side of the telephone:
eRing volume
nRing melody
Ringer tone
Recall
Press the recall button Rfollowed by the extension number to transfer calls when
connected to a PBX (TBR only).
Access to additional network services can be gained by using the recall button R,
*and #keys. Contact your network operator for more information.

English
www.doro.com 5
Phone Book
UsingthePhoneBook
The Phone Book will store 56 telephone numbers (32 digits max)and their
associated names (16 characters max) with entries arranged alphabetically.
A stored phone number can be dialled using fewer keystrokes than if dialled
manually. If you subscribe to a Caller ID service, the name/number of the caller
will be shown when you receive an incoming call (only for those numbers stored
in the Phone Book).
Letters
Each number key has been allocated certain characters.
Button Letters/symbols
1.......................................... [Spacecharacter]+&-/X1
2.......................................... ABCÅÄÆæåäß2
3.......................................... DEFë3
4.......................................... GHIï4
5.......................................... J K L 5
6.......................................... MNOÑñÖö6
7.......................................... PQRS7
8.......................................... TUVÜü8
9.......................................... WXYZ9
* .......................................... `@()*<>
0.......................................... ,.:?=0
#.......................................... $ _ % ! ; #
Storingnames/numbers
1. Press bto select phone book mode. Ensure bshows.
2. Press p. Display will show SAVE?
3. Press pagain.
4. Enter the telephone number to be stored (up to 32 digits). Press p.
5. Enter the name (up to 16 characters). Press the corresponding number
button one or more times for the rst letter (see the table above).
6. Press p.
Press r if you need to insert a pause in the telephone number.
If you wish to change a number, store the new number in the same location as
the old one.

English
6 www.doro.com
Phone Book
DiallingfromthePhoneBook
1. Press bto select phone book mode. Ensure bshows.
2. Scroll to the required memory location using {/}. To quick-search in the
Phone Book press the corresponding number button one or more times for
the rst letter (refer to the table on the previous page).
3. Press to dial the displayed number. If you do nothing the phone will
return to standby mode.
Please note!
During a conversation, you can switch from the handset to hands free mode at
any time by pressing . Press again to terminate the call.
Changingphonenumbers/names
1. Press bto select phone book mode. Ensure bshows.
2. Scroll to the required memory location using {/}.
3. Press and hold puntil EDIT? is displayed. Press p.
4. Changes to the displayed telephone number can be made using Cand {/}.
Press p.
5. Changes to the displayed name can be made using Cand {/}.
6. Press p to conrm the changes.
Deletingaphonebookentry
1. Press bto select phone book mode. Ensure bshows.
2. Scroll to the required memory location using {/}.
3. Press C.DELETE? will be displayed.
4. Press and hold Cuntil the displayed telephone number disappears.
DeletingallentriesinthePhoneBook
1. Press b.
2. Scroll to the required memory location using {/}.
3. Press and hold Cuntil the display shows DELETE ALL?
4. Press and hold Cuntil the displayed telephone number disappears.

English
www.doro.com 7
Caller Identication
ExplanationofCallerID
Caller ID allows you to see who is calling before you answer a call and to see
who has called in your absence. If the number is stored in the Phone Book, the
callers name will be shown instead. Received calls are stored chronologically
with the sequential number shown in the top right hand side of the display.
When the Caller ID log is full, the oldest number will be deleted automatically
as the new call is logged. New calls are indicated by text in the display and
ashing of the upper red ring indicator light.
Please note!
In order for numbers to be shown, the Caller ID service must be provided
by your network operator and a current subscription in place. Contact you
operator for more information.
There are separate logs for answering machine and caller-id and separate red
LED’s.
In order to stop the ashing LED the corresponding log must be reviewed.
RetrievinganddiallingCIDnumbers
1. Press to select caller-id mode.
2. Press either {or }to review the numbers stored in the Caller ID memory.
3. To dial a displayed telephone number either press OR , the displayed
telephone number will now be dialled. If you do nothing the phone will
return to standby mode.
Please note!
During a conversation, you can switch from the handset to hands free mode at
any time by pressing . Press again to terminate the call.
Messages
Besides showing telephone numbers, the display can show a number of text
messages or symbols:
OUT OF AREA It is an International call or a call from a PBX (no
information received).
PRIVATE Information on the number is blocked. The call could
also be from a PBX.
qThe call was received while using the Call Waiting function.
TNew number not previously recorded or logged.
5Message Waiting indication.
ZSeveral calls have been received from the same caller.

English
8 www.doro.com
Caller Identication
DeletingNumbers
1. Scroll to the telephone number you wish to erase using {/}.
2. Press C. DELETE? will be displayed, alternatively press and hold cuntil
the display shows DELETE ALL?
3. Press and hold Cuntil the number disappears.
TransferringNumberstothePhoneBook
1. Scroll to the telephone number you wish to copy using {/}.
2. Press p.
3. Press pagain.
4. Name can later be added according to the chapter Changing phone
numbers/names on page 6.

English
www.doro.com 9
The Answering Machine
About the Answering Machine
The answering machine has to be turned on in order to receive messages. When a
call is received it will be answered after the selected number of rings (please refer to
page 14).
When the answering machine answers an incoming call, the caller will hear your
outgoing message. After a short beep they can then leave a message up to 120
seconds. Should the caller exceed this limit the call will be disconnected.
The memory will store approximately 40 minutes of incoming messages (including
the outgoing message).
Outgoing Message
The outgoing message is your message to an incoming caller and may be up to 60
seconds in length.
You may want the message to tell the caller that they may start speaking once the
beep is heard after your outgoing message.
An example of an outgoing message:
-“Hello we are unable to take your call right now, please leave a message at the sound
of the beep and we’ll return your call as soon as possible. Thanks for calling.”
RecordinganOutgoingMessage
1. Press and hold 88 . You will hear a short beep, and the display will ash.
2. Record your outgoing message. Speak clearly towards the machine from a
distance of 15-20 cm (6-8 inches).
3. Release 88 to stop recording.
4. The outgoing message will be repeated after a few seconds. Repeat this
procedure if you want to change the message, any old outgoing message will
automatically be erased when a new one is recorded.
CheckingtheOutgoingMessage
Press 8 8 . The current outgoing message will now be played.
Please note!
In case of a power failure if no back-up battery is tted your outgoing message will
be erased.

English
10 www.doro.com
The Answering Machine
Playback of messages
The red indicator ashes to show that new messages have been received.
Playback will always begin with any new messages, for example if there are three
old messages and two new ones, only the two new ones will be played back,
then the answering machine will return to standby mode.
Press the play button once again to listen to all messages, starting with the
oldest messages.
1. Press 9to start playback.
2. After each message a short beep will be heard.
3. When playback is nished you will hear two short beeps, and the machine
will return to standby mode. All incoming messages are saved (unless you
have erased any during playback, see below), new messages will then be
recorded after the old ones.
The following functions are available during playback:
Button Function Function
88 Repeat the current message, or hold down until you hear a beep
to step back through the messages.
99 Skip to next message.
Stop playback.
CErase messages.
{/}Increase or decrease the speaker volume.
9
||
Pause during playback (max. 7 seconds). Press 9
||
again to
resume playback.
DeleteIncomingMessages
If you want to delete a single incoming message press Cwhile the message is
playing.
To erase all messages after playback, press and hold Cuntil unit beeps.
Please note that new messages cannot be deleted until they have been played.

English
www.doro.com 11
The Answering Machine
Switching the Answering Machine On/Off
The answering machine can be switched ON or OFF using the 1button. In the
ON position, incoming calls will be answered by the answering machine, in the
OFF position no calls will be answered and the display will be off.
Please note!
Although turned Off, the Answering Machine will answer a call after 10 Rings.
This is to allow the remote ON and other features to be accessed.
Personal Message - MEMO
A personal message – MEMO – is a message recorded directly onto the answering
machine (120 seconds maximum) without dialling. This means that the answering
machine may be used as an electronic notebook, where messages, reminders or
other notes to family members or colleagues can be recorded.
1. Press and hold the abutton. You will hear a beep.
2. Start speaking clearly towards the machine to record your Memo message.
3. Release the abutton to stop recording.
4. Memos are played back in the same way as regular incoming messages.
Call Monitoring
Incoming messages can be heard through the loudspeaker as they are received. If
there is no sound adjust the volume using {/}.
You can lift the handset of a parallel telephone and speak directly to the caller. If
the recording does not stop automatically, press on the answering machine.
Two-way Recording
You can record telephone conversations as they occur. There is approximately 40
minutes available recording time in memory, with the answering machine handling
two-way recordings as a regular incoming call.
1. A call is connected.
2. Press a. The display will show RECORDING CALL and a, indicating
that two-way recording is in progress.
3. Press ato terminate recording.

English
12 www.doro.com
The Answering Machine
Remote Control
This machine can be remotely controlled using the keys of an ordinary tone dialling
telephone. Call up the answering machine and enter the remote code (see page 14)
while the outgoing message is playing. Once the code is accepted, several remote
control commands are available.
RemoteControl
1. Call up the answering machine.
2. While the outgoing message is playing, enter the remote code. If the code is
accepted, you will hear two beeps.
3. Select a remote control command (within 10 seconds) from below.
4. When you have nished accessing the machine replace the handset.
Command Function Function
1#........................................ Playnewmessages
2# ....................................... Playallmessages
Duringplayback:
3#........................................ Erasesinglemessageduringplayback
4#........................................ Repeatmessage/Skiptopreviousmessage
5#........................................ Stopplayback
6#........................................ Skiptonextmessage
Afterplayback:
7#........................................ TurntheansweringmachineeitherOnorOff.
8#........................................ Recordanewoutgoingmessage,toStop
recordingpress5#.
9#........................................ RecordaMEMO,toStoprecordingpress5#.
0#........................................ Roommonitoring(activefor30secondspress0#
tocontinue).
RoomMonitoring
This remote access feature enables you to call your home and turn ON the
answering machine’s microphone function, allowing you to monitor sounds in the
room where the answering machine is situated.
Please note!
If the machine doesn’t respond correctly to the remote control commands, try
pressing the telephone buttons for a longer or shorter time. In normal cases, the
answering machine should react to tones approximately 0.5 – 1 seconds in length,
but longer tones may be necessary in certain telephone networks. If you do not enter
any remote control command, the answering machine will disconnect after a few
seconds.
If you listen to any incoming messages for more than 2 minutes and 40 seconds, you
will hear two beeps. Press any key to continue.

English
www.doro.com 13
The Answering Machine
Remote Activation
The answering machine can be activated using the remote control functions.
1. Call up the answering machine. After approximately 10 rings, the machine
will answer and emit a long tone.
2. Enter the remote code, see page 14. If the code is accepted, you will hear
two short beeps.
3. Press 7#. One beep conrms that the answering machine is now on.
Replace the handset.
Out of Memory
The total capacity of the answering machine’s memory is approximately 40
minutes. The memory space is shared between the outgoing message, personal
memos, and regular incoming messages.
When the memory is full the display will show TAD MEMORY FULL, the
answering machine will answer after 10 rings to allow remote playback and
deletion of messages, no new messages will be accepted until the existing
messages have been played and erased.

English
14 www.doro.com
Settings
Contrast
The display contrast can be adjusted between 1 - faint to 4 - dark.
1. Scroll using wuntil it shows LCD CONTRAST.
2. Select the desired setting using {/}. Press p.
3. Press 1to return to standby mode.
Number of Rings
The number of rings before the answering machine answers can be selected
between 2, 4 or TS.
1. Scroll using wuntil it shows ANSWER DELAY.
2. Select the desired setting using {/}. Press p.
3. Press 1to return to standby mode.
Please note:
With TS (Toll Saver) selected, calls will be answered after four rings until a
new ICM (incoming message) has been recorded, any subsequent calls will be
answered after two rings. Once these ICM’s (incoming messages) have been
erased this cycle will be repeated. This is useful when remotely accessing your
unit, if there is no answer after three rings no ICM's (incoming messages) have
been recorded, you can therefore terminate the call before you are charged.
Remote code
This code is needed in order to gain access to the remote control functions of
the answering machine (factory setting is 000). You can alter the code according
to the description below.
1. Scroll using wuntil it shows CODE SETTING.
2. Enter the new code number (000-999). Press p.
3. Press 1to return to standby mode.
Answer Only
ANSWER ONLY is your announcement message to a caller in which contact
information can be supplied but no incoming message (ICM) will be recorded.
An example:
“Sorry I cannot take your call at this time, if urgent try contacting me on 0746
……. Please do not leave a message as this will not be recorded. Thanks for
calling.”
1. Scroll using wuntil it shows ANSWER MODE.
2. Select the desired setting (A2=on) using {/}. Press p.
3. Press 1to return to standby mode.

English
www.doro.com 15
Other
Hearing Aid compatible
This telephone is hearing aid compatible. Select the T mode on your hearing aid
to enable this feature.
Troubleshooting
Check that the telephone cord is undamaged and properly plugged in.
Disconnect any additional equipment, extension cords and other telephones. If
the problem is resolved, the fault is with the other equipment.
Test the equipment on a known working line. If the product works, then the
fault is probably with the line. Please inform your local line provider.
Nonumbershownindisplaywhenringing
- In order for this feature to function, you must subscribe to the Caller
Identication service from your network provider.
- If a text message is shown on the display, the call may be an international
call (no data received), or from a private or withheld number.
- It may not be possible to receive Caller ID information if the phone operates
in a PBX system.
TheAnsweringMachineIsNotAnswering
- Check that the unit is switched onCheck that the unit is switched on
- Check that the telephone cable and the mains adapter are correctly
connected
TheAnsweringMachineDoesNotRespondtoRemoteControl
- Check that the telephone you are using to remotely access the answeringCheck that the telephone you are using to remotely access the answering
machine is tone dialling.
- Telephones that generate only a short tone signal when pressing a buttonTelephones that generate only a short tone signal when pressing a button
may not allow you to remotely access your machine. In this situation please
use a separate tone transmitter.
- Try holding the buttons down longer, approximately 1 second per digit.Try holding the buttons down longer, approximately 1 second per digit.

English
16 www.doro.com
Other
Ican�t hear the outgoing message very well�theartheoutgoingmessageverywell
- Record a new outgoing message.Record a new outgoing message.
- Speak closer to the unit/microphone when recording.
Thelineisdisconnectedwhensomeoneleavesamessage:
- The incoming message may be over the maximum recording time (120The incoming message may be over the maximum recording time (120
seconds). After this time, the call will be disconnected.
- If an incoming caller pauses for approximately 7 seconds while leaving aIf an incoming caller pauses for approximately 7 seconds while leaving a
message the call will be disconnected, as the voice control function will
believe that they have hung up.
Ihearatonesequence,butnothinghappenswhenIpresstheplayback
button:
- There are no incoming messages.There are no incoming messages.
If the telephone still does not work, contact the place of purchase. Please note
that the receipt or a copy invoice will be required for guarantee purposes.
Declaration of conformity
Doro hereby declares that the product Doro 916cr conforms to the essential
requirements and other regulations contained in the directives 1999/5/EC (R&TTE),
2002/95/EC (ROHS). A copy of the manufacturer’s declaration is available at
www.doro.com/dofc
Guarantee
This product is guaranteed for a period of 12 months from the date of purchase.
Proof of purchase is required for any service or support required during the
guarantee period.
This guarantee shall not apply to a fault caused by an accident or a similar
incident or damage, liquid ingress, negligence, abnormal usage, not reasonably
maintained or any other circumstances on the purchaser’s part. Furthermore,
this guarantee shall not apply to a fault caused by a thunderstorm or any other
voltage uctuations.
This guarantee does not in any way affect your statutory rights. (As a matter of
precaution, we recommend disconnecting the telephone during a thunderstorm.)
Table of contents
Other Doro Telephone manuals

Doro
Doro COMFORT 4005 User manual

Doro
Doro 916i cr User manual

Doro
Doro 509C User manual

Doro
Doro PhoneEasy 311C User manual

Doro
Doro AFTI 30 User manual

Doro
Doro HEARPLUS 313CI User manual

Doro
Doro 920 User manual

Doro
Doro PhoneEasy 311cs User manual

Doro
Doro 931 User manual

Doro
Doro PhoneEasy 331ph User manual