Fermax iLOFT Lynx User manual

iLOFT Lynx
Botón de abrepuertas / llamada a conserje (función disponible según tipo de instalación).
· Al pulsar este botón se activa el abrepuertas. Es posible abrir la puerta en conversación o con llamada entrante.
· Con el teléfono colgado, al pulsar este botón se realiza una llamada al conserje (si existe conserjería).
Lock release button / Call guard unit (function available depending on the installation’s type).
· Pressing this button activates the lock-release. You can open the door during a conversation or incoming call.
· When you press this button with the telephone on the hook, a call will be made to the guard (*where one exists).
Bouton-poussoir de la gâche électrique / appel au concierge (fonction disponible selon le type d’installation)
· Si l’on appuie sur cette touche, la gâche électrique est activée. Il est possible d'ouvrir la porte lorsqu'il y a communication ou
lors d'un appel entrant.
·Lorsquelecombinéest raccroché, enappuyant sur cettetouche, un appelau concierge est effectué (s’ily a uneconciergerie).
Türöffnertaste / Portierruf (Funktion verfügbar je nach Installationstyp):
· Durch Drücken dieser Taste wird der Türöffner ausgelöst. Man kann die Tür öffnen, auch dann wenn man ein Gespräch führt
oder gerade ein Anruf eingeht.
· Bei aufgelegtem Hörer, wird durch Drücken dieser Taste ein Anruf zur Portierzentrale hergestellt (falls vorhanden).
Teléfono - Telephone - Poste - Telefon
BOTONES BUTTONS BOUTONS TASTE
INSTALACIÓN INSTALLATION INSTALLATION INSTALLATION
LED rojo/red/rouge/rot
LED verde/green/verte/grün
LED azul/blue/bleue/blau
MICRO/Mikrofon
Botones/Buttons/Boutons/Tasten
Botón de activación de Audio, Colgado y Autoencendido.
·Alrecibirunallamadasedisponede30segundosparacontestar.Elledazulparpadeaduranteesetiempoindicandollamadapendiente.
· Activación de audio: Al recibir una llamada pulsar y soltar este botón para hablar con el visitante. Se abre el canal de audio
en sentido calle y vivienda, el funcionamiento es en modo manos libres. El led azul permanecerá encendido indicando con-
versación con placa de calle.
· Colgado: pulsar para finalizar la comunicación, si no la conversación finalizará en 90 segundos con placa o EGR y en 300
segundos si es un monitor o un teléfono. Al terminar se apaga el led azul.
· Autoencendido: en reposo, pulsar y soltar este botón, (el led azul se enciende). El autoencendido se realizará con las placas
en el siguiente orden:
* Primero, placa del Chalet de la vivienda (con número de placa 0).
* Segundo, placa del Bloque de la vivienda (con número de placa 0).
* Tercero, placa de Entrada General (con número de placa 0).
Si no hay ninguna que cumpla estas condiciones, no se realiza el autoencendido.
Audio activation, hang up and auto-start button.
· On receiving a call the user has 30 seconds to answer. The blue led flashes during this time to indicate a call waiting.
· Audio activation: When a call is received, press and release this button to speak to the visitor. The audio channel between
the entry panel and the residence is opened; operating in hands-free mode. The blue led will remain on indicating that a con-
versation with the entry panel is underway.
· Hang-Up: press to end communication, if not the conversation will be disconnected after 90 seconds with a panel or PMU
and in 300 seconds if it is a monitor or telephone. Once finished, the blue led will turn off.
· Auto-start (main panel): on standby, press and release this button (the blue led lights up). Auto-start is done with the panels
in the following order:
* First, Home or residence panel (with panel 0).
* Second, residence block (with panel 0).
* Third, General Entrance panel (with panel number 0).
If there is none fulfilling these conditions, autostart doesn't work.
Bouton d’activation du son, pour raccrocher et pour l’auto-insertion
· Lorsqu’il y a appel, on dispose de 30 secondes pour répondre. La DEL bleue clignote pendant cette durée, indiquant de la
sorte qu’il y a un appel en cours.
F1: Botón para funciones adicionales F1: Button for additional functions F1 : touche pour fonctions supplémentaires
F1: Taste für Zusatzfunktionen
Potenciómetro/Potentiometer/Potentiomètre/Lautstärkeregler
ESQUEMA DE CABLEADO WIRING DIAGRAM SCHÉMA DE CÂBLAGE VERKABELUNGSSCHEMA
Potenciómetro
· Ajuste de volumen de llamada (en reposo). Al MÍNIMO:
desconexión de llamada.
· Ajuste audio de subida (en conversación).
Potentiometer
· Call volume settings (on standby). MINIMUM: discon-
nects the call.
· Increases audio volume settings (during conversation).
Potentiomètre
· Réglage du volume d’appel (en mode veille). Niveau
MINIMUM : déconnexion de l’appel.
· Réglage du son montant (lors d’une communication).
Lautstärkeregler
· Einstellen der Lautstärke des Rufsignals (im Bereit-
schaftsmodus). MINIMUM: Ruftonabschaltung.
· Regulierung der Sprachlautstärke von der Türstation.
Información - Information - Informations - Information
Para más información, consultar el Man. Avanzado del Teléfono iLOFT Lynx (Cod. 970100) en www.fermax.com.
For more information, please refer to the Advanced iLOFT Lynx Telephone Manual (Code. 970100) en www.fermax.com.
Pour plus d’informations, voir le manuel avancé du poste iLOFT Lynx (code 970100) sur www.fermax.com.
Detailliertere Informationen über das Gerät finden Sie im Kompletthandbuch des Telefons iLOFT Lynx (Kode 970100) auf unserer
Webseite: www.fermax.com.
· Activation du son : si vous recevez un appel, appuyez sur ce bouton et relâchez-le pour parler avec le visiteur. Le canal audio sens
rue-logement s’active et le tout fonctionne en mode mains libres. La DEL bleue reste allumée, indiquant de la sorte qu’il y a une
communication en cours avec la platine de rue.
· Pour raccrocher : appuyez sur cette touche pour mettre fin à la communication. Dans le cas contraire, la conversation prend fin
au bout de 90 secondes avec platine ou CGR et au bout de 300 secondes s'il s'agit d'un moniteur ou d'un poste. Une fois terminé,
la DEL bleue s'éteint.
· Auto-insertion (platine principale): en mode veille, appuyez sur cette touche et relâchez-la (la DEL bleue s’allume). L'auto-insertion
sera effectuée avec les platines dans l'ordre suivant :
* Premièrement, platine de la villa (avec numéro de platine 0).
* Deuxièmement, platine du bâtiment (avec numéro de platine 0).
* Troisièmement, platine de l'entrée générale (avec numéro de platine 0).
Si aucune ne remplit ces conditions, l'auto-insertion n'aura pas lieu.
Taste für Audioaktivierung, Auflegen und Eigenstart.
· Geht ein Anruf ein, hat man 30 Sekunden Zeit zum Antworten. Die blaue LED blinkt während dieser Dauer und zeigt den einge-
henden Anruf an.
· Audioaktivierung: Drücken Sie bei einem eingehenden Anruf auf diese Taste, um mit dem Besucher zu sprechen. Der Audiokanal
wird in Richtung Türstation und Wohnung freigegeben und auf Freisprechbetrieb geschaltet. Die blaue LED leuchtet während des
Sprechverkehrs mit der Türstation.
· Auflegen: Drücken, um das Gespräch zu beenden, ansonsten wird das Gespräch nach 90 Sekunden automatisch beendet, wenn
eineTürstation oder ein ZMSangerufen wirdund innerhalbvon 300Sekunden, wennes sichum einenMonitor oderTelefon handelt.
Nach Beendigung schaltet sich die blaue LED aus.
·Eigenstart (Haupttürstation): Im Bereitschaftsmodus, dieseTaste drücken und los lassen(die blaue LED leuchtet auf).Der Eigenstart
erfolgt bei den Türstation in folgender Reihenfolge:
* Zuerst die Türstation des Einfamilienhauses (mit Türstation-Nr. 0).
* Anschließend die Türstation des Wohnblocks (mit Türstation-Nr. 0).
* Dann die Türstation des Haupteingangs (mit Türstation-Nr. 0).
Falls keine Türstation vorhanden ist, die diese Bedingungen erfüllt, erfolgt kein Eigenstart.
PoE
Max PoE
PWR
LINK/ACT PoE LINK/ACT PoE LINK/ACT 100M
SWITCH
100 - 240Vac
987
64
321
AB
0
Cod. 970101 V06_17
1.60m
.2 feet
1
2
3
Consultar el Man. Avanzado Cod. 970100.
See Advanced Man. Cod. 970100.
Consulter le manuel avancé code 970100.
Siehe Handbuch für fortgeschritteneAnwendungen
Kode 970100.
Programación dirección teléfono/ Telephone Programming/Programmation adresse poste/Programmierung der Telefonadresse
RESET DE PARÁMETROS/RESETTING PARAMETERS/RÉINITIALISATION DES PARAMÈTRES/RESET DER EINSTELLUNGEN
Mantener pulsado el botón durante 10" consecutivos. El teléfono genera un BEEP a los 5", y a los 10" un BEEP largo. Se ha
realizado el reset de parámetros a valores por defecto sin desprogramar la dirección IP del teléfono.
Press and hold the button for 10 seconds. The phone will sound a BEEP after 5", and at 10" a long BEEP. You have reset the
parameters to default values without unprogrammnig the phone's IP address.
Maintenir le bouton enfoncé pendant 10 secondes consécutives. Le poste émet un BIP au bout de 5 secondes et un BIP long au
bout de 10. La réinitialisation des paramètres permettant de revenir aux valeurs par défaut a eu lieu sans déprogrammer l'adresse
IP du poste.
Die Taste 10" lang gedrückt halten. Das Telefon gibt nach 5" einen Signalton aus und nach 10" einen weiteren längeren. Es erfolgt
eine Rückstellung der Parameter auf die Standardwerte, ohne dass dabei die IP-Adressen der Telefon gelöscht werden.
Configuración dirección IP del teléfono mediante servidor web.
Notas:
- Para más información, consultar los manuales cod. 970100 Man. Avanzado del Teléfono iLOFT Lynx y cod. 970020 LynxWebServer,
disponibles en www.fermax.com.
- El teléfono iLOFT Lynx dispone de un servidor web (sólo en inglés), mediante el cual se pueden configurar todos los parámetros del
dispositivo. Los cambios en la configuración pueden tardar sobre 4 segundos en actualizarse.
- El acceso al servidor web Lynx se realiza por medio del navegador web del ordenador, introduciendo en la barra de direcciones la IP
correspondiente del teléfono que se va a configurar. IP por defecto del teléfono iLOFT Lynx: 10.0.0.1.
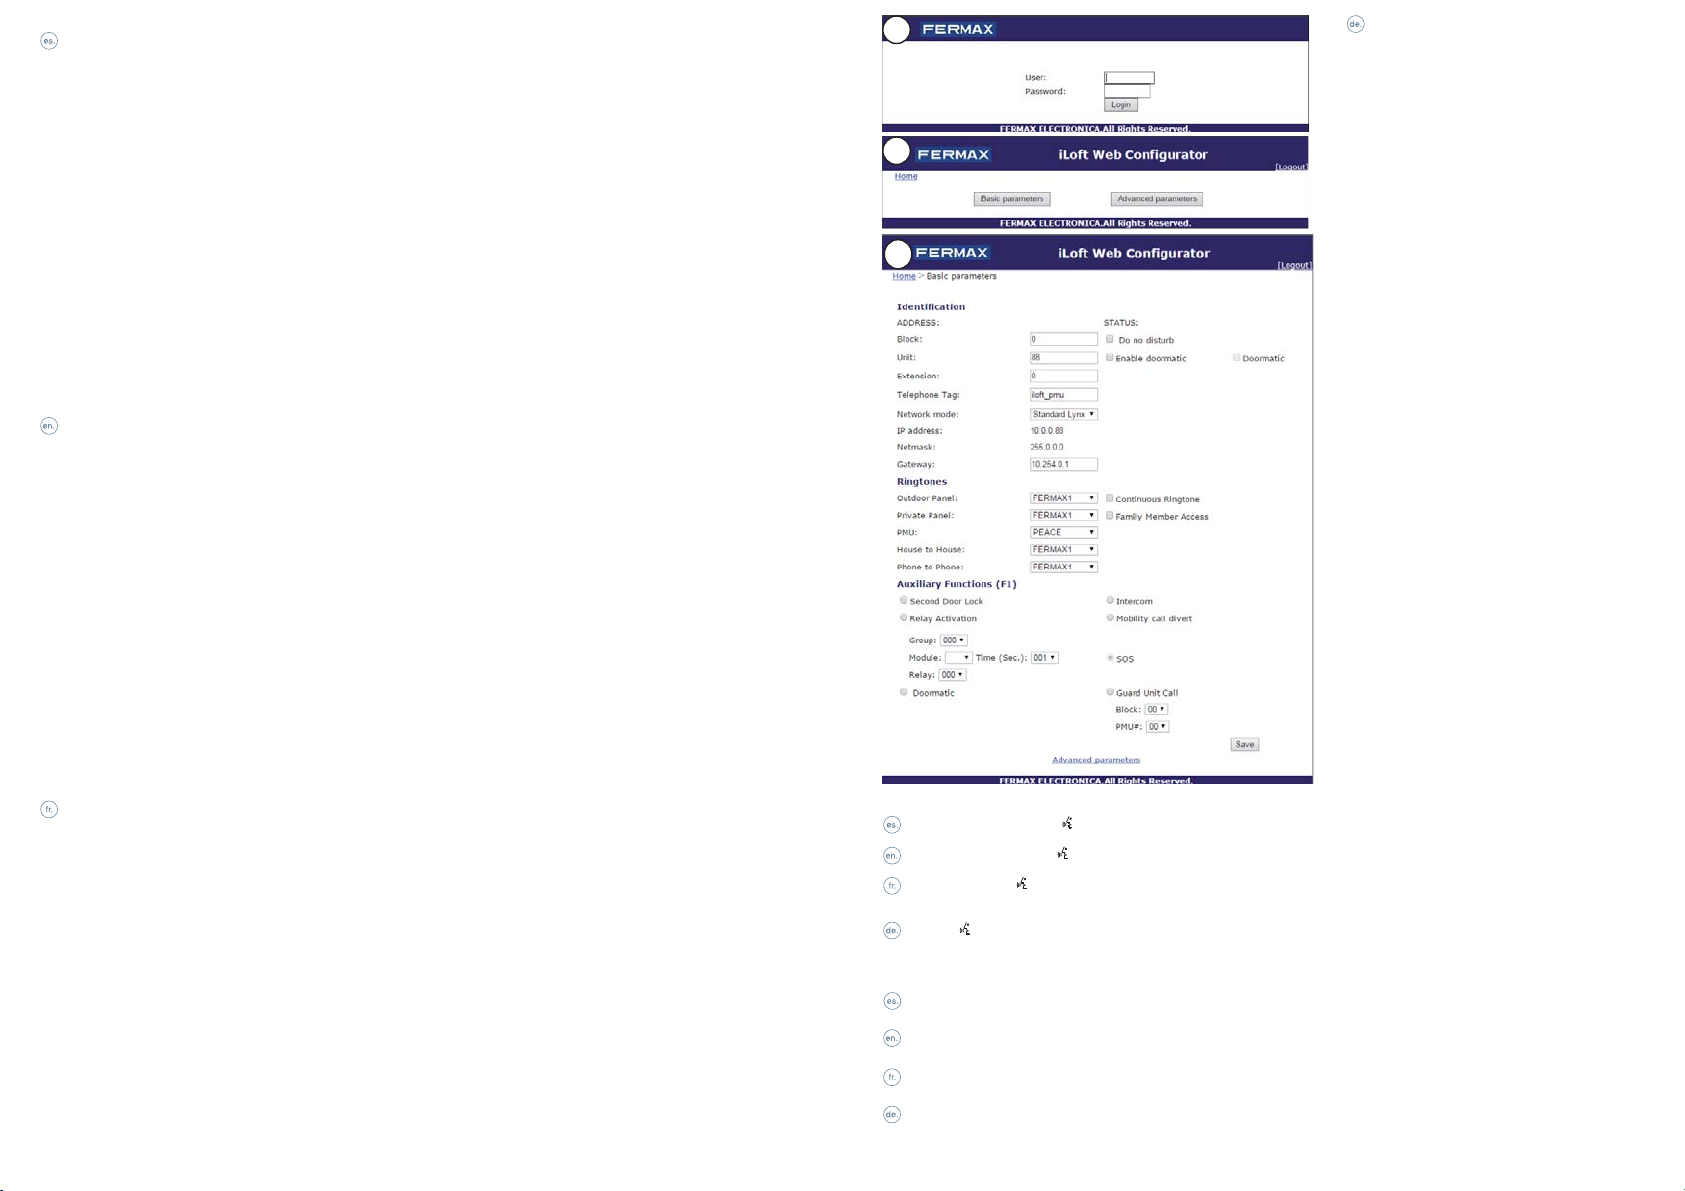
1. PANTALLA DE IDENTIFICACIÓN.
Los valores por defecto son: Usuario (User): admin / Contraseña (Password): admin.
2. PANTALLA PRINCIPAL.
En esta pantalla se debe seleccionar la pantalla "Basic parameters", para configurar la nueva dirección IP del teléfono.
3. PANTALLA BASIC PARAMETERS (Parámetros Básicos).
En esta pantalla se pueden visualizar y modificar los siguientes parámetros:
· ADDRESS. Dirección a la que pertenece el teléfono.
- Block. Número del Bloque.
- Unit. Número de la Vivienda.
- Extension. Número de Extensión.
- Telephone Tag. Etiqueta descriptiva: 16 caracteres máximo.
- Network mode. Modo de red: Standard Lynx. Modo Lynx estándar / DHCP. Modo DHCP / Static IP. Modo IP estática.
En esta pantalla también se pueden configurar otros parámetros tales como:
· STATUS. Modos / RINGTONES. Melodías asociadas a diferentes fuentes / AUXILARY FUNCTIONS F1. Configuraciones para F1.
Para más detalles ver manuales indicados arriba.
Configuring IPAddress of the telephone via web server.
Notes:
- For more information see the manuals cod. 970100 Advanced iLOFT Lynx Telephone Manual and cod. 970020 LynxWebServer, avail-
able at www.fermax.com.
- The iLOFT Lynx telephone has a web server (only in English), through which you can configure all device parameters. The changes in
configuration can take 4 seconds to update.
- This Lynx web server is accessed via the computer’s web browser, entering the corresponding IP address of the panel to be configured.
Default IP on the iLOFT Lynx Telephone: 10.0.0.1.
1. IDENTIFICATION SCREEN.
The default values are: User: admin / Password: admin.
2. MAIN SCREEN.
On this screen you can select the "Basic parameters", to configure a new IP address on the telephone.
3. BASIC PARAMETERS SCREEN.
On this screen you can view and change the following parameters:
· ADDRESS. Telephone´s address.
- Block. Block number.
- Unit. Residence Number.
- Extension. Panel Number.
- Telephone Tag. Descriptive tag: 16 users maximum.
- Network mode: Standard Lynx / DHCP / Static IP.
On this screen you can also configure other parameters like:
· STATUS. Modes / RINGTONES. Ringtones associated to different calls / AUXILARY FUNCTIONS F1. Configurations for F1.
For more details see the aforementioned manuals.
Configuration adresse IP du poste via un serveur web.
Remarques :
- Pour plus d'informations, consulter les manuels code 970100 Manuel avancé du poste iLOFT Lynx et code 970020 LynxWebServer,
disponibles sur www.fermax.com.
- Le poste iLOFT Lynx dispose d'un serveur web (en anglais uniquement), grâce auquel tous les paramètres du dispositif peuvent être
configurés. Les changements au niveau de la configuration peuvent prendre jusqu'à 4 secondes pour être mis à jour.
- L'accès au serveur web Lynx s'effectue au moyen du navigateur web de l'ordinateur, en saisissant dans la barre des adresses l'IP cor-
respondante du poste à configurer. IIP par défaut du poste iLOFT Lynx : 10.0.0.1.
1. ÉCRAN D'IDENTIFICATION.
Les valeurs par défaut sont les suivantes : Identifiant (User) : admin / Mot de passe (Password) : admin.
2. ÉCRAN PRINCIPAL.
Sur cet écran, on doit sélectionner l'écran « Basic parameters » afin de configurer la nouvelle adresse IP du poste.
3. ÉCRAN BASIC PARAMETERS (paramètres de base).
Sur cet écran, on peut voir et modifier les paramètres suivants :
· ADDRESS. Adresse à laquelle appartient le poste.
- Block. Numéro du bâtiment.
- Unit. Numéro du logement.
- Extension. Numéro du poste.
- Telephone Tag. Étiquette descriptive. 16 caractères maximum.
- Network mode. Mode du réseau : Standard Lynx. Mode Lynx standard / DHCP. Mode DHCP / Static IP. Mode IP fixe.
Sur cet écran, on peut également configurer d'autres paramètres tels que :
· STATUS. Modes / RINGTONES. Mélodies associées à différentes sources / AUXILARY FUNCTIONS F1. Configurations pour F1.
Pour plus de détails, voir les manuels indiqués ci-dessus.
Konfiguration der IP-Adresse de Telefons mithilfe
des Web-Servers.
Hinweise:
- Weitere Information finden Sie in den Handbüchern,
Kode 970100, Handbuch über die fortgeschrittenen
Anwendungen des Telefons iLOFT Lynx und Kode
970020, Lynx-Web-Server, verfügbar unter: www.
fermax.com.
- Das Telefon iLOFT Lynx verfügt über einen Web-
Server(nurin Englisch),mit dem sämtlicheParameter
des Geräts konfiguriert werden können. Die Konfigu-
rationsänderungen können ungefähr vier Sekunden
in Anspruch nehmen, bevor sie aktualisiert werden.
- Der Zugang auf den Lynx-Web-Server erfolgt über
den Web-Browser des Rechners, durch Eingabe
der IP-Nummer des zu konfigurierenden Telefons
im Eingabefeld. Standardmäßige IP-Adresse des
Telefons iLOFT Lynx: 10.0.0.1.
1. BILDSCHIRM KENNDATEN.
Die standardmäßigen Werte lauten wie folgt:
Benutzer (User): admin / Passwort (Pas-
sword): admin.
2. HAUPTBILDSCHIRM.
Auf diesem Bildschirm kann der Bildschirm
"Basic parameters",ausgewählt werden, um
die neue IP-Adresse de Telefons zu konfigu-
rieren.
3. BILDSCHIRM BASISPARAMETER (Basis-
parameter).
Die auf diesem Bildschirm angezeigten Para-
meter können hier geändert werden:
·ADDRESS. Adresse, zu der dasTelefon gehört.
- Block. Wohnblocknummer.
- Unit. Wohnungsnummer.
- Extension. Erweiterungsnummer.
- Telephone Tag. Beschreibende Etikette:
Maximal 16 Zeichen.
- Network mode. Netzwerkmodus: Stan-
dard Lynx. Lynx Standardmodus / DHCP.
DHCP-Modus / Static IP. Statische IP-
Adresse.
Auf diesem Bildschirm können auch andere
Parameter konfiguriert werden:
· STATUS. Modos / RINGTONES. Klingelmelo-
dien die von unterschiedlichen Anrufquellen
stammen / AUXILARY FUNCTIONS F1.
Konfigurationen für F1.
WeitereEinzelheitenfinden Siein nachfolgend
gelisteten Handbüchern.
1
2
3
Características técnicas/Technical features/Caractéristiques techniques/Technische Eigenschaften
El teléfono iLOFT Lynx sólo dispone de un conector RJ-45, para la conexión a la red lynx y para recibir la alimentación por PoE.
Funciona con switches PoE clase A y clase B.
Consumo en reposo: 28 mA. - Sonando/Conversación: 40mA.
The iLOFT Lynx telephone only has one RJ-45, to connect to the lynx network and to receive power via PoE.
The iLoft Lynx telephone works with PoE classA and class B switches.
Standby Consumption 28 mA. - Ringing/Conversation: 40mA.
Le poste iLOFT Lynx ne dispose que d'un connecteur RJ-45 pour la connexion au réseau lynx et pour recevoir l'alimentation par PoE.
Fonctionne avec des commutateurs PoE classes A et B.
Consommation en veille : 28 mA. - Avec sonnerie/communication : 40 mA.
Das Telefon iLOFT Lynx verfügt nur über einen RJ-45-Stecker, um es an das Lynx-Netz anzuschließen und über PoE mit Strom ver-
sorgt zu werden.
Funktioniert mit PoE-Schaltern der Klasse A und B.
Stromverbrauch im Bereitschaftsmodus: 28 mA. - Sprechbetrieb/Klingeln: 40mA
Other Fermax Telephone manuals

Fermax
Fermax iloft User manual

Fermax
Fermax DUOX iLOFT User manual

Fermax
Fermax LOFT UNIVERSAL User manual

Fermax
Fermax MDS DIRECT GUARD UNIT User manual

Fermax
Fermax DUOX plus iLoft User manual

Fermax
Fermax DUOX PLUS User manual

Fermax
Fermax DUOX MEMOPHONE CITYLINE User manual

Fermax
Fermax iL OFT User manual

Fermax
Fermax iLoft VDS Dominium User manual

Fermax
Fermax DUOX User manual


 Pentara+Plus user guide")

