Fischer Amps ALC 49 User manual

1
FISCHER AMPS
INNOVATIVE TECHNOLOGY FOR STAGE AND SOUND
MANUAL
9.5-inch CHARGER
ALC 49 ALC 81
Dear customer,
You have decided to buy a
FISCHER AMPS
product. Thank you.
This product – as well as the accompanying rechargeable batteries (accus) – has been developed according to the
latest state-of-the-art technology and is steadily developed further if required. The Charger complies with the
European Safety Standards and VDE (Association of German Electrical Engineers) regulations.
Please read this manual carefully prior to the first use, you will get important information for use and
safety of the unit. These safety and operating instructions should be retained for future reference.
Should you have further questions, please do not hesitate to contact FISCHER AMPS.
WHAT YOU SHOULD OBSERVE BEFORE FIRST COMMISSIONING !
When choosing your rechargeable batteries, ensure that they are suitable for fast charging. Particularly
older or very cheap batteries are often not admitted for this type of charging.
New rechargeable batteries
- The batteries supplied with the unit are already charged. You should charge all batteries first before
using them, since they discharge after a longer storage time.
- The maximum capacity of the rechargeable battery is only achieved after several charging/discharging
cycles.
What you should note in general when working with NiCd and NiMH batteries:
- Do not dispose batteries in domestic waste, but surrender them to a battery collecting point.
- Use nickel/metal-hydride (NiMH) rechargeable batteries instead of nickel/cadmium (NiCd) batteries, since NiCd
batteries contain environment-polluting and unhealthy heavy metals. NiMH batteries have a higher capacity and
thus longer operating times.
- Do not charge batteries in extreme cold or hot (> 40 °C) conditions.
- Always store a rechargeable battery in charged condition when the rechargeable battery is not used for a longer
period of time.
- After a longer time of non-use, recharge battery before use.
(NiMH batteries have a self-discharge of approx. 10 % per month when not used.)

2
How you notice that a rechargeable battery is defective or old:
- The operating time of the unit working with the battery decreases considerably.
- The rechargeable battery does not accept charging any more (status LED of the charging chamber flashes red
immediately after inserting the batteries and does not switch over to fast charging (red light) after a longer period
of time).
Functional description of the FISCHER AMPS rack-mount Chargers:
The FISCHER AMPS ALC chargers have 4 resp. 2 charging chambers (ALC 49 resp. ALC 81) in which –
depending on the type of charger – 9 V block batteries are charged individually, or AA batteries are charged in
pairs. The AA batteries are charged in pairs because they are used in pairs in the UHF systems. Each of the
charging chambers is controlled separately. After inserting the charging box with the battery into the charging
chamber, a voltage measurement process detects whether the battery is extremely deep-discharged.
In this case, the battery is charged in refresh mode with a small amount of current until a voltage has been reached
which allows fast charging. In fast charging mode, the status LED of the corresponding charging chamber flashes
red. A defective battery which cannot be charged any more is therefore detected, because it does not reach the
voltage required for fast charging. When a regularly discharged battery is inserted, fast charging starts
immediately.
In fast charging mode, the status LED of the charging chamber lights red. After a qualifying period for
voltage stabilisation at the battery, the charging current is switched off for a short time and the voltage of the
battery is measured.
When the charging processor detects that the battery is fully charged, the fast charging current is switched off and
the battery is kept full by means of trickle charging until it is removed, while the status LED lights green. The
battery can remain in the Charger for an indefinite period of time without danger of overloading.
A fully charged battery is detected as "charged" after approx. 10 to 15 min. when charged again (i. e.
switching on the Charger) and changeover to trickle charging mode is made.
Commissioning:
Power cable:
Plug in the enclosed 2-pole power cable into the 2-pole mounting jack at the rear connector panel of the Charger.
Inside the charger, there is an isolated, encapsulated switching power supply with an input voltage of 90V to
250VAC with 50Hz to 60Hz. Therefore the unit does not need to be grounded by a 3-pole grounded power cable.
Voltage adjustment of the units is made automatically depending on the mains voltage. The integrated
mains adapter of the unit has an electronic overload protection for short-circuit, defect or overvoltage.
Switching on the Charger:
The mains switch with a green LED is at the front of the Charger on the left. After changeover to position "On", the
red status LEDs of the charging chambers flash for a short time and the green Power ON LED lights. If the
batteries have already been inserted the charging process starts immediately. When charging, the LEDs light red.

3
Operation:
Inserting the rechargeable batteries into the charging boxes and chambers:
9V block batteries:
Remove an empty charging box by slightly pulling it upwards and at the same time drawing it out. Insert the battery
based on the drawing in the charging box. Inserting the batteries with the poles in incorrect direction is
mechanically prevented. Push battery into the charging chamber until the box positively latches.
Mignon (AA) batteries:
Remove an empty charging box by pressing the two lateral strips and pulling out the box at the same time. Insert a
pair or two pairs of AA batteries into the charging box based on the drawing in the charging box.
CAUTION: The two AA batteries left and right are charged together. As the batteries are used two by two,
they always should be charged in pairs. This is very important for an optimum result as far as charging
and operation with the batteries is concerned.
After inserting one or two pairs of batteries into the charging box, pull the box into the chamber until it latches
safely and positively at both sides. Press both sides carefully to ensure the box is safely inserted in the charger.
When only one pair of batteries is inserted for charging, it is no problem to pull out the chamber and insert a
second pair of batteries for charging. The charging process of the first pair of batteries continues after pushing in
the box again.
Remove batteries from the Charger:
9V block batteries:
Remove an occupied charging box where the status LED lights green (battery charged) by slightly pulling it
upwards and at the same time drawing it out.
AA batteries:
Remove an occupied charging box where the status LED lights green (battery charged) by pressing the two
vertical strips at the box and pulling it out at the same time. Should charging of the second pair of batteries be
interrupted by doing so, remove the fully charged pair of batteries and then push in the charging box again into the
chamber; after that the charging process continues.
Switching off the Charger:
Put power switch in position "OFF" or switch off master switch of the rack.
CAUTION! Never insert dry batteries or alkaline / manganese batteries into the Charger, the Charger could
be damaged. In such a case FISCHER AMPS do not undertake liability for damage of the appliance or
consequential damage or loss.
Keep your Charger in a dry place (indoor use only). Do not spill liquid into the enclosure through openings. Danger
of fire and electric shock!
Do not expose appliance to direct solar radiation (danger of overheating).
The ventilation openings on top of the appliance may not be covered or blocked.
When mounting the appliance into a rack, leave 5 mm free space on top of it so that the air can circulate between
the appliances. Do not impede the flow of air through ventilation openings.
Do not insert hot rechargeable batteries (>40°C). Allow the batteries to cool before charging them.
There are no parts inside the appliance which need maintenance service. Do not open appliance.
Repair may only be carried out by the manufacturer.
When rackmount, leave 5mm free space above the Charger so that the air can circulate to prevent buildup of heat.
4
WARRANTY:
The manufacturer grants a warranty of 24 months from the date of purchase by the original owner for defects in
materials or workmanship. The rechargeable batteries are excluded from the warranty. When the appliance has been
subject to misuse or has been altered, the warranty expires. When returning the defective unit, enclose the receipt,
pack the unit to avoid transit damage, and return the unit carriage prepaid. The manufacturer does not accept carriage
forward consignments.
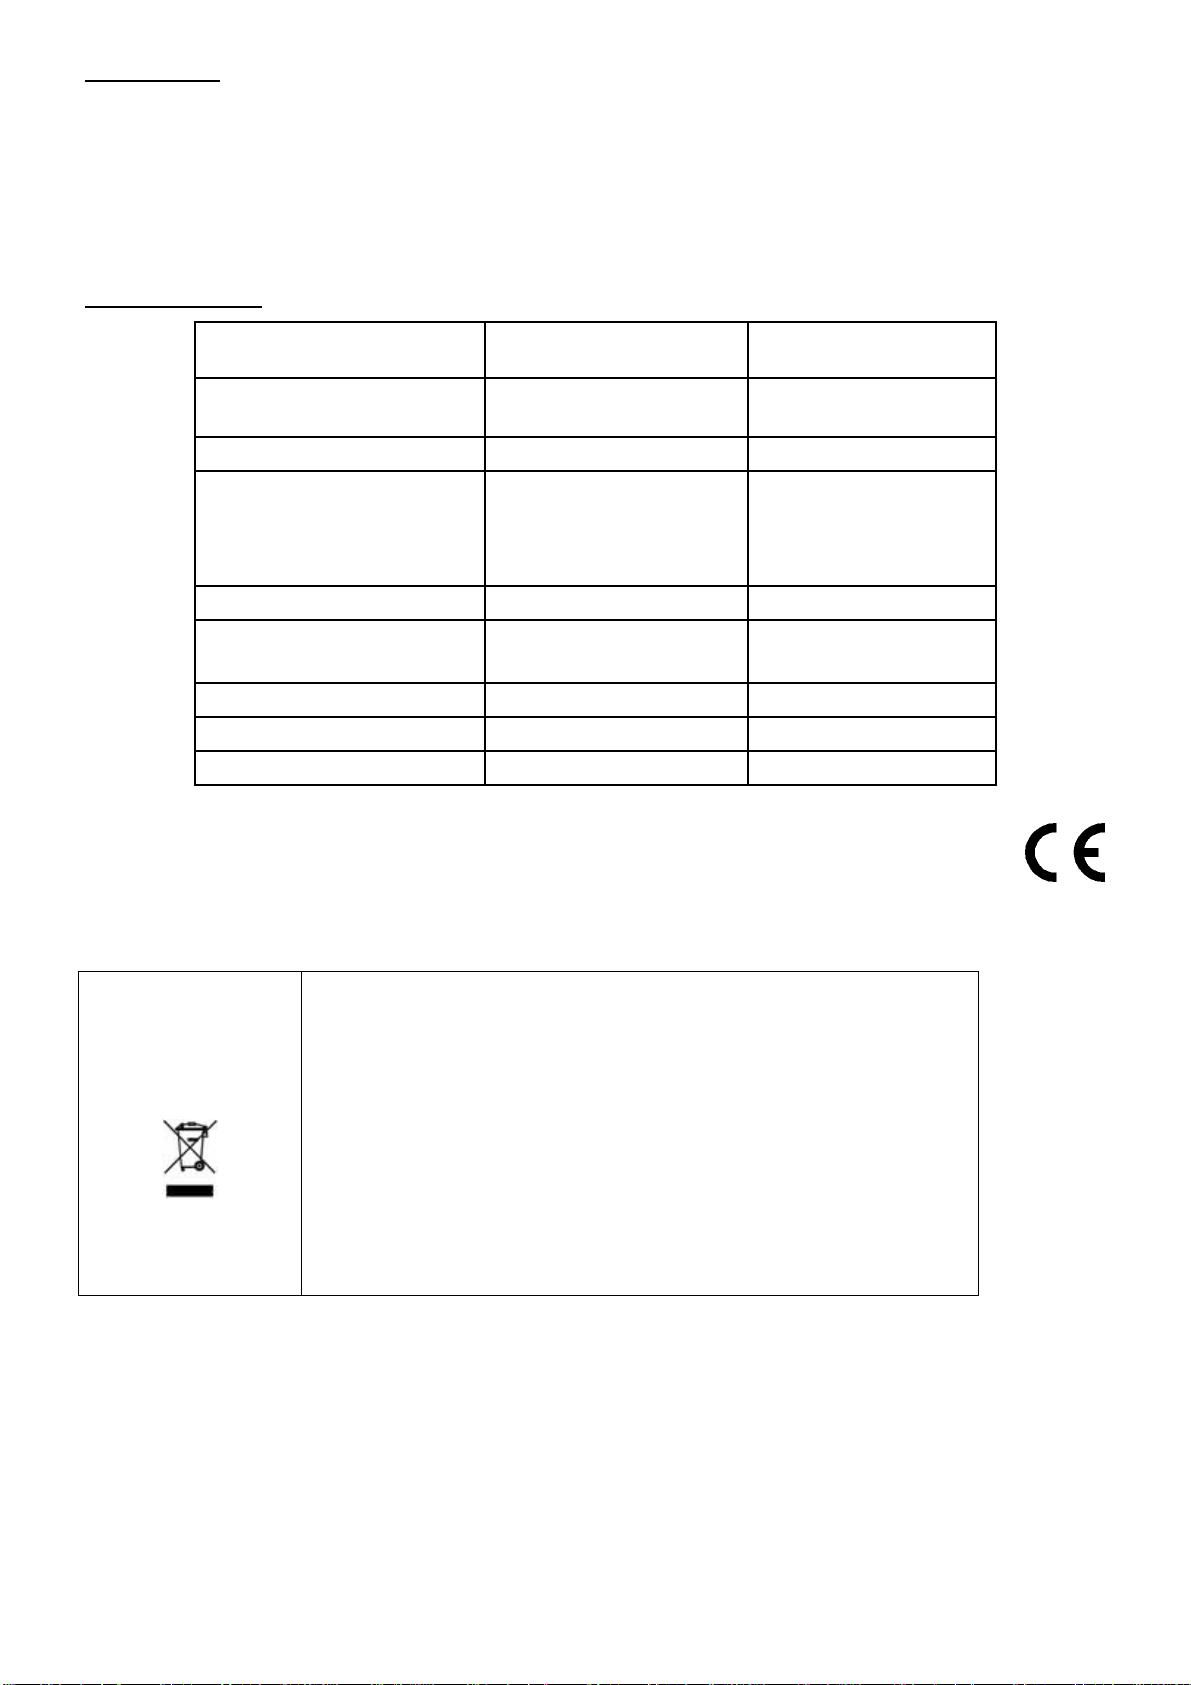
SPECIFICATION:
Type of Charger: ALC 49 ALC 81
Operating voltage / frequency 90 – 260 VAC / 50-60 Hz
automatic voltage adjustment
90 – 260 VAC / 50-60 Hz
automatic voltage adjustment
Max. input power 35W 35W
Type and number of batteries 4 x 9V block rechargable NiMH
300mAh max.
8 x mignon (AA) rechargeable
NiMH
(charging in pairs!)
2600mAh max.
Charging current max. 4 x 70mA +/- 10% 4 x 600mA +/- 10%
Charging time max. (depends on
capacity and charging status) 180-300 min 120-320 min
Maximum timeout approx. 360 min approx. 360 min
Dimensions, W, H, D 219mm, 42mm, 200mm 219mm, 42mm, 200mm
Weight (excluding batteries) approx. 1.8 kg approx. 1.8 kg
Disposal of Old Electrical & Electronic Equipment
(Applicable in the European Union and other European countries
with separate collection systems)
This symbol on the product or on its packaging indicates that this product
shall not be treated as household waste. Instead it shall be handed over to
the applicable collection point for the recycling of electrical and electronic
equipment. By ensuring this product is disposed of correctly, you will help
prevent potential negative consequences for the environment and human
health, which could otherwise be caused by inappropriate waste handling
of this product.
The recycling of materials will help to conserve natural resources. For
more detailed information about recycling of this product, please contact
your local city office, your household waste disposal service or the shop
where you purchased the product.
FISCHER AMPS
Hans-Ulrich-Breymann-Str. 3, D-74706 Osterburken / Germany, Phone +49 (0)6291–648 79-0, Fax 648 79-19
This manual suits for next models
1
Other Fischer Amps Batteries Charger manuals


