FISNAR SL101N User manual

P/N 562179 REV. C Dec 2011
1 © 2011 Fisnar
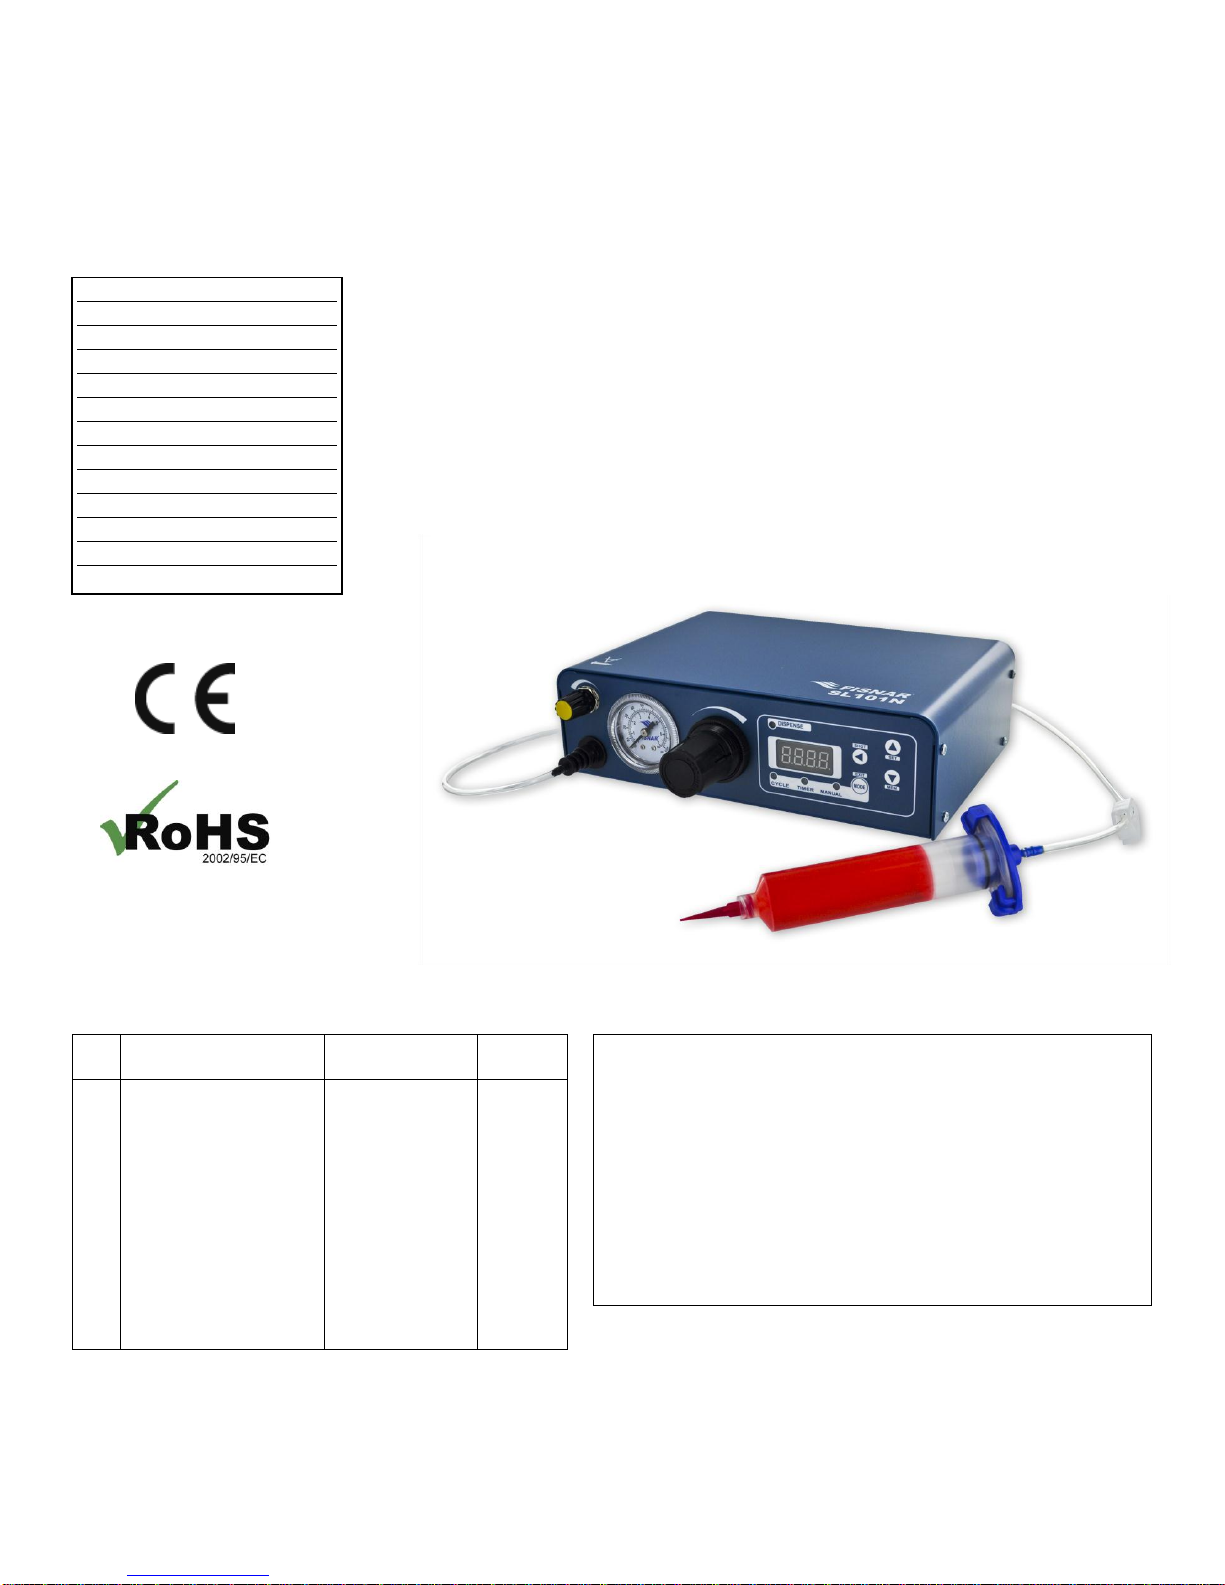
SL101N
DIGITAL LIQUID DISPENSER
O
OP
PE
ER
RA
AT
TI
IN
NG
G
M
MA
AN
NU
UA
AL
L

P/N 562179 REV. C Dec 2011
2 © 2011 Fisnar
This page intentionally left blank.
P/N 562179 REV. C Dec 2011
3 © 2011 Fisnar
SL101N Digital Dispenser
Standard Accessories
Qty
Description
Re-order P/N
Re-order
Qty/Pkg
1
1
1
1
1
1
1
1
3
2
3
2
1
Power cord –110V
Power cord –220V
Power cord –220V
Barrel stand
Air input Line
Foot pedal
30cc barrel adapter
5cc barrel adapter
30cc barrel
5cc barrel
30cc barrel piston PE
5cc barrel piston PE
Component Kit
560033-LF
560033E-LF
560033E-PLUG
560751LF
561851
560027D
5601468
5601035
5601004
5601001
5601465
5601019
DCK500
1
1
1
1
1
1
1
1
10
10
20
40
1
Specifications
Size:
8 ⅝” x 8 ½” x 2 ⅝” (22 x 21 x 6.7cm)
Weight:
2.2 lbs. (1 kg)
Input Voltage:
90-260 VAC
Dispense Time:
0.01 - 9999 seconds
Internal Voltage
24VDC
Cycle Speed:
600+ /Minute
Air Input:
70-100psi (5-7 bar)
Air Output:
1-100psi (0.1-7 bar)
Standards:
European CE approved unit
Barrel “Suck-Back” Feature
The SL101N digital liquid dispenser, with its versatile design makes it perfectly
suited for a wide variety of dispensing applications, from microdot deposits to
large potting and filling. Suitable for all types of fluids, it includes a suck-back
feature to ensure low viscosity liquids do not drip.
The SL101N provides micro controlled timer programmable from 0.01 to 9999
seconds.
All set up hoses and fittings, along with barrels and tips, make the unit ready to
use right out of the box.
Accessories
3
Specifications
3
Set Up
4
Controls Overview
5
Operating Modes
5
Manual Mode
6
Timer Mode
7
Cycle Mode
8
Saving
9
Loading
10
Setting Decimal
11
Auto-Purge
11
Warranty
12
Table of Contents

P/N 562179 REV. C Dec 2011
4 © 2011 Fisnar
SETTING UP
1.Connect air hose to filtered compressed air 70 - 100 psi
(5-7 bar) and connect fitting to the dispenser.
2.Insert Foot Switch Plug.
3.Insert and twist male quick connect into dispenser.
4.Insert power cord female plug into dispenser and insert the
male plug into a grounded outlet.
5.Fill barrel (with barrel tip cap on the barrel) with material to be
dispensed and lock barrel to adapter assembly as shown in
the image to the left.
AIR & ELECTRICAL SET UP DIAGRAM
ADAPTER
ASSEMBLY
BARREL
P/N 562179 REV. C Dec 2011
5 © 2011 Fisnar
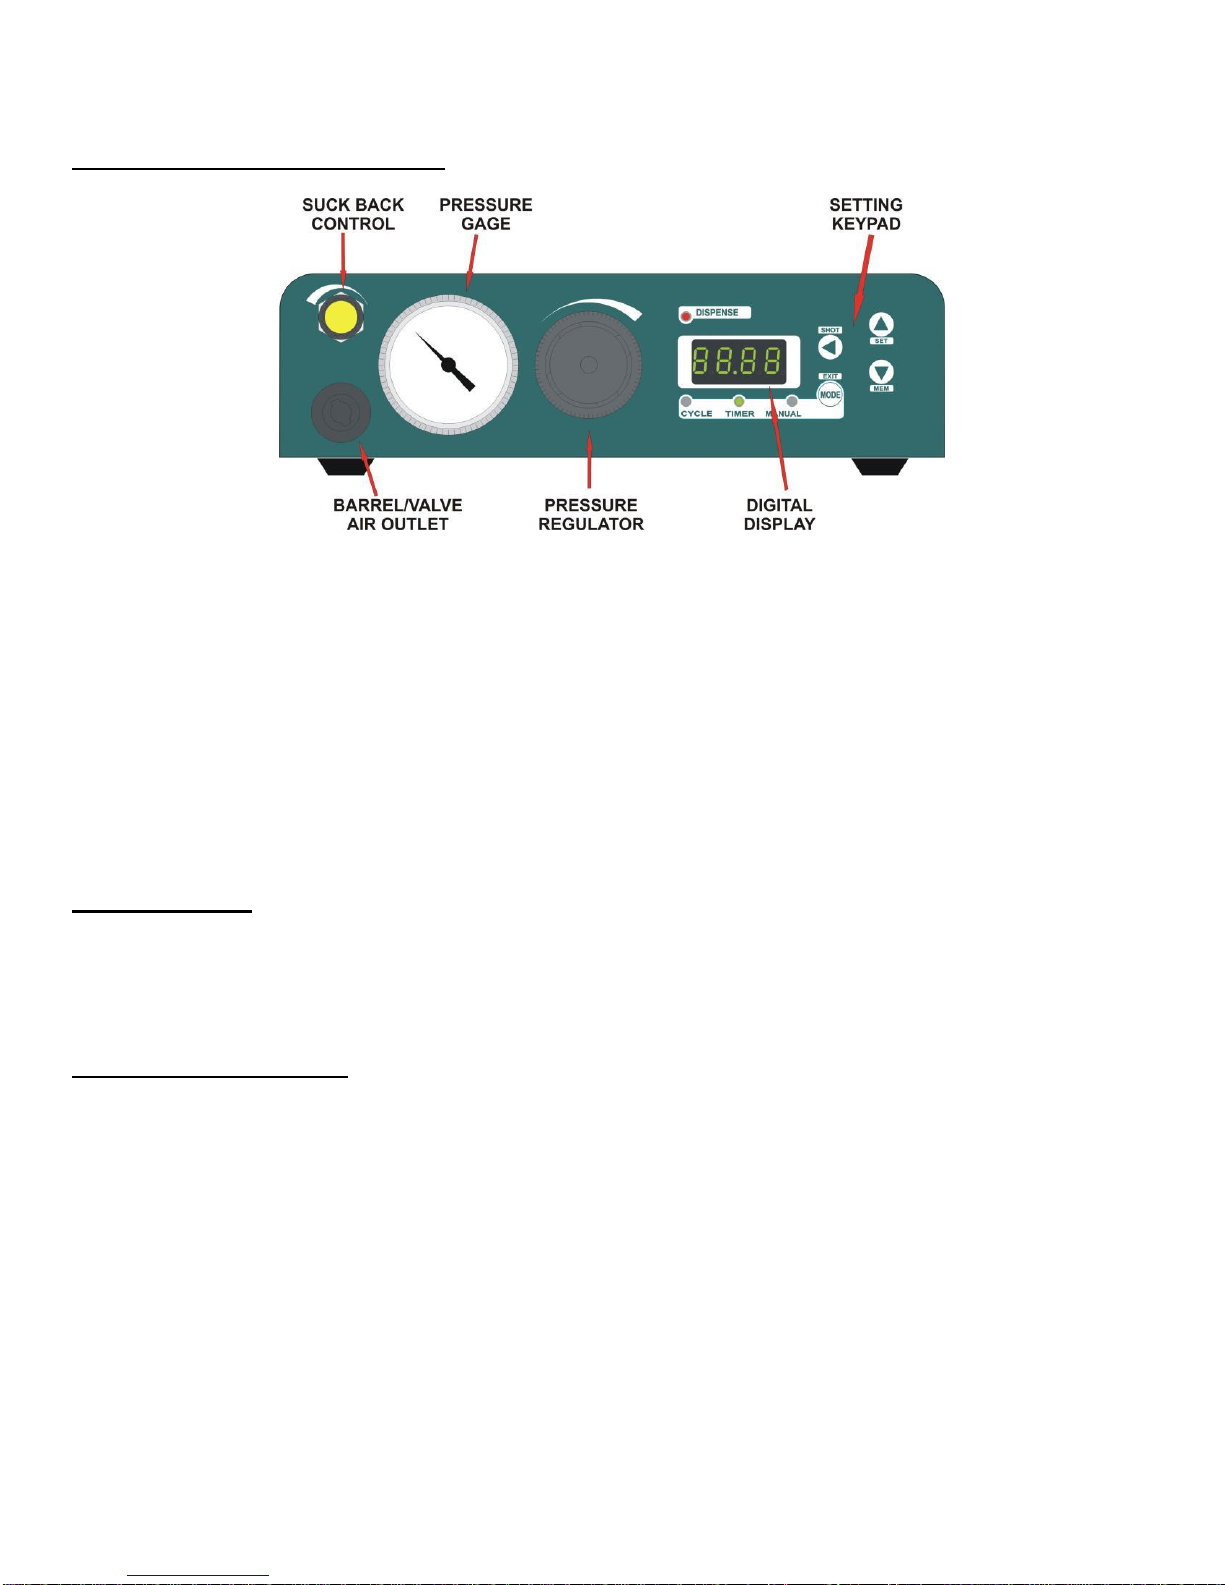
UNDERSTANDING THE CONTROLS
Suck Back Control –Keeps a steady pull of air pressure in the syringe when not dispensing. This will help with material
leaking from the syringe.
Pressure Gage –Shows the amount of pressure being used to dispense.
Pressure Regulator–Adjusts the amount of pressure being used to dispense. In order to reach a desired pressure
level, first to pull the knob out to unlock it so it will rotate. Turn the knob counter-clockwise to a
point below the desired pressure, and then turn the dial clockwise to reach the desired pressure.
Barrel / Valve Air Outlet –Air outlet where valve or barrel can be hooked up.
Digital Display –Displays information pertaining to the programming and use of the unit.
▲/SET –Used as an up scroll key and to begin the programming of a mode.
▼/MEM – Used as a down scroll key and to save / recall a program.
◄/SHOT –Used as a left scroll key and to begin dispensing.
MODE/EXIT –Used to toggle between dispensing modes and to exit some functions.
Operation Modes
-MANUAL –In this mode the unit will dispense as long as the foot pedal or SHOT button is pressed.
-TIME –The unit will dispense for a set amount of time regardless of how long the foot pedal or shot button is pressed.
-CYCLE –The unit will dispense and wait for a specified amount of time before dispensing again. It will cycle
continuously until the EXIT button is pressed.
Switching Between Modes
Use the MODE button to switch between the 3 modes. You can identify which mode you are in by the illuminated light
above the modes.
P/N 562179 REV. C Dec 2011
6 © 2011 Fisnar
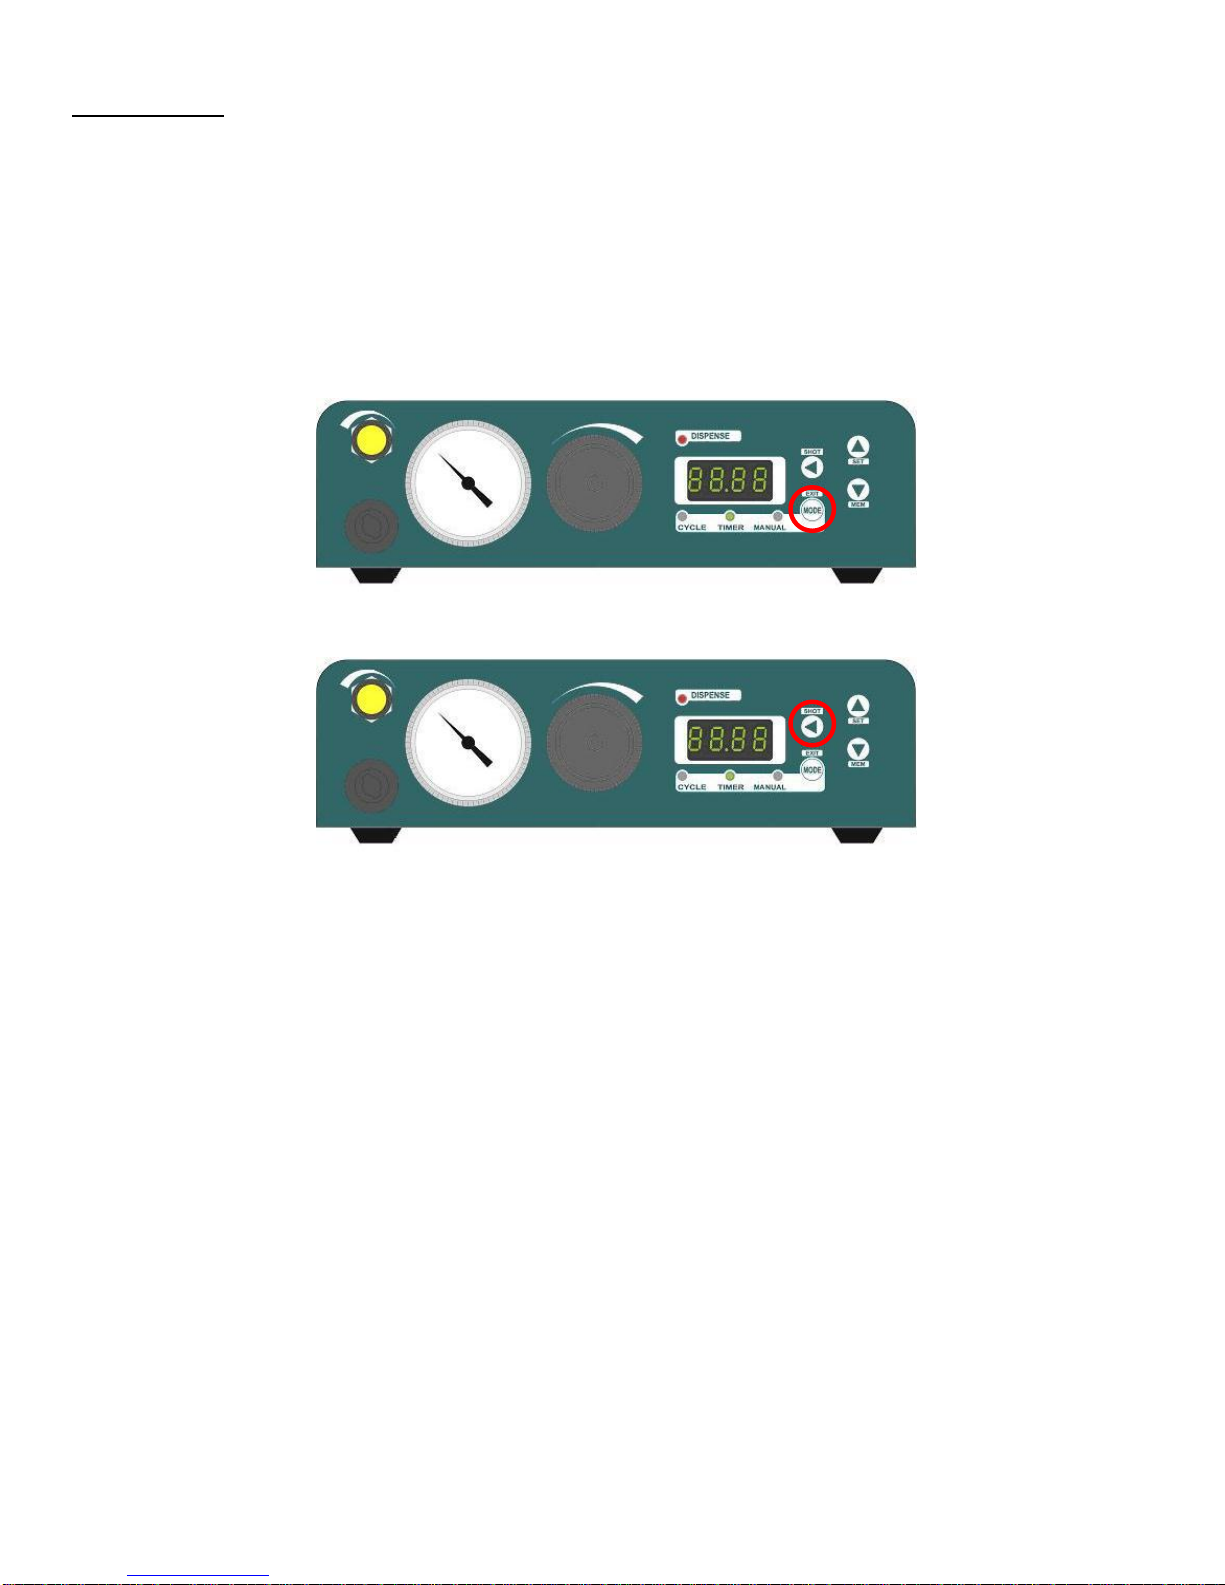
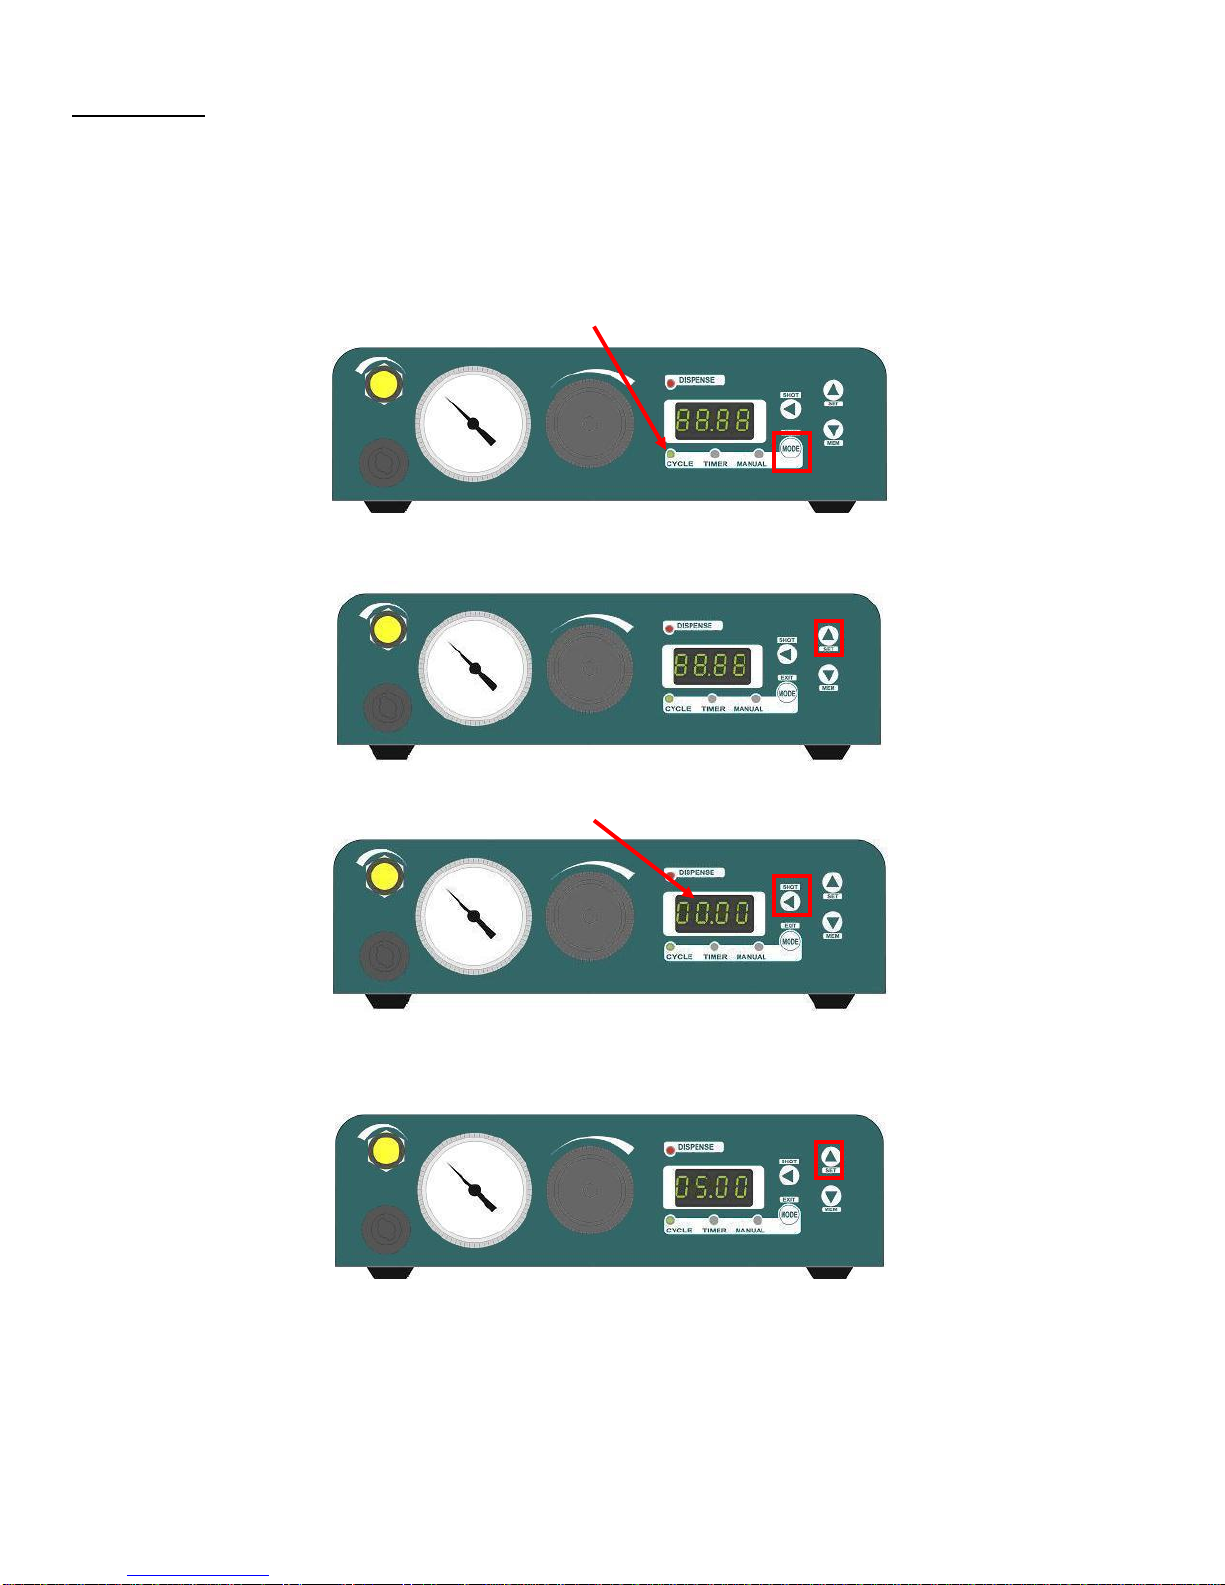
Manual Mode
Manual Mode allows the user to dispense for an unlimited amount of time by either pressing down on the supplied foot
pedal or pushing the SHOT button on the front of the SL101N unit. The material will continue to dispense for as long as
the user is pushing down on the foot pedal or pressing the SHOT button, as soon as either of these are released the
dispensing will stop.
The unit will also count the amount of time you are dispensing during a cycle which may be helpful in determining a time
to be used when programming the timer mode. If you need to adjust the decimal point to allow for the timer to show a
higher or smaller value press the SET button then use the ▲ and ▼ to adjust the position.
1. Press the MODE button to cycle to Manual Mode.
2. The SHOT button is located at the circled area below.
P/N 562179 REV. C Dec 2011
7 © 2011 Fisnar
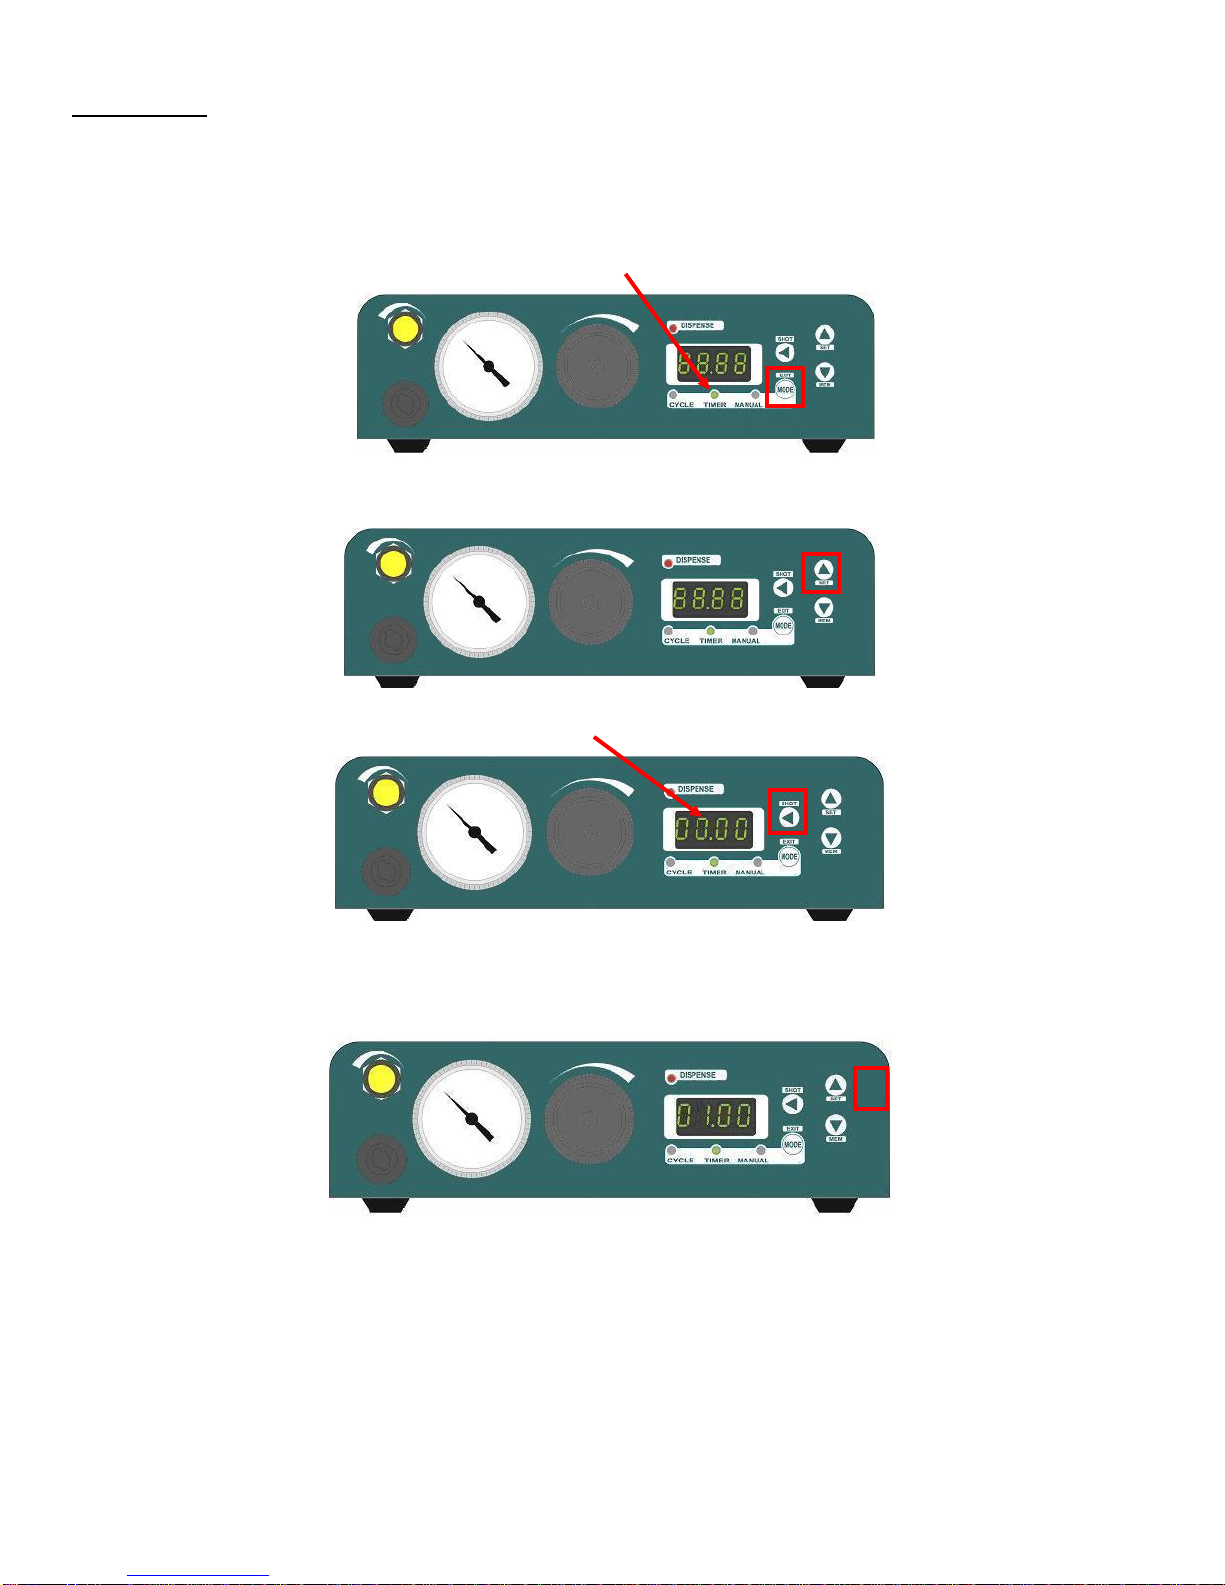
Timer Mode
The Timer Mode allows the user to dispense for a set period of time despite how long the foot pedal is pressed.
For Example: If you would like to set the dispenser to dispense for 1 second follow the below instructions.
1. Press the MODE button until the Timer Mode is selected.
2. Press the SET button. The first digit on the right side of the display will start blinking.
3. Press the ◄ button twice. The third digit from the right should be blinking.
4. Press the ▲ button once to increase the value of this digit. The display should look like the one below. (To adjust
the decimal refer to page 11.)
5. Press Exit/Mode to save as current setting.
To use Timer Mode you can either press the SHOT key on the front panel of the SL101N unit or press down on the foot
pedal.
P/N 562179 REV. C Dec 2011
8 © 2011 Fisnar
Cycle Mode
Cycle Mode allows the user to create a repeating cycle of dispensing. This is programed by setting a wait time between
dispensing. This mode is reliant on the previous setting that was made in Timer Mode to determine the length of
dispensing during the cycle.
For Example: If you would like to dispense for 1 second then wait for 5 seconds and cycle these times over again you
would need to have already set your Timer Mode for 1 second (see previous page for these instructions). To set the 5
second wait time in your cycle follow the below directions.
1. Press the Mode button until the Cycle Mode is selected.
2. Press the Set button. The first digit on the right side of the display will start blinking.
3. Press the ◄ button two times. The third digit from the right should be blinking.
4. Press the ▲ button five times. The display should now show a 5 second wait time. (To adjust the decimal refer to
page 11)
5. Press Exit/Mode to save as current setting.
To use the cycle mode press the SHOT button on the SL101N to activate the cycle. To deactivate the cycle press the
EXIT button.
P/N 562179 REV. C Dec 2011
9 © 2011 Fisnar
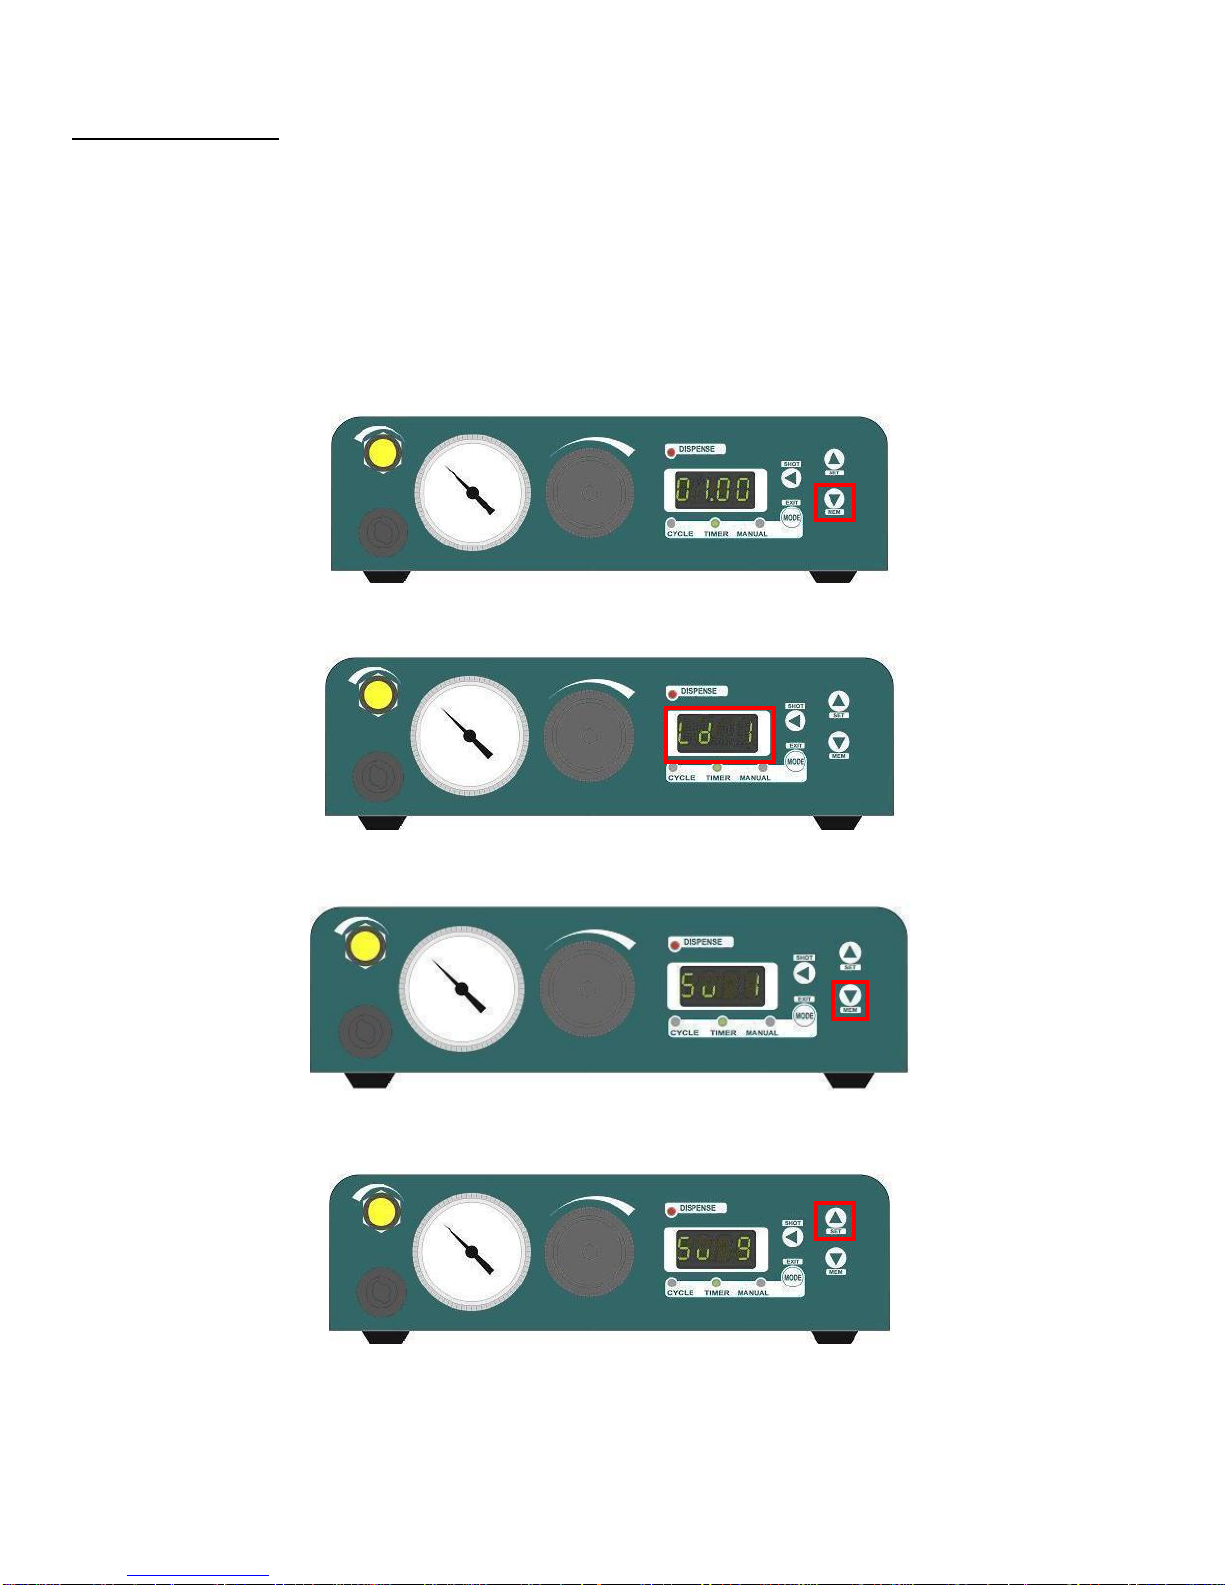
Saving to Memory
The SL101N has the storage capacity for up to 9 programs that can be saved to its memory for future recall. The memory
will always save your current settings for the particular mode you are in.
For Example: If you wanted to save your current Timer Mode setting to program 9 you would first need to select timer
mode then proceed with saving. You can also save your Cycle Mode settings to program 9 by following the same
procedure.
To save your current settings to memory address 9 follow the below instructions.
1. Change to the mode you would like to save then press and hold the MEM (Memory) key for 2 seconds until the
unit beeps.
2. The display will show Ld 1 (Load from Memory #1).
3. Press the MEM key again to change from Ld 1 to Sv 1 (Save to Memory #1).
4. Press the ▲key 8 times to get to memory address 9.
5. Press the EXIT key to complete the save.
To save your current cycle mode settings switch the mode to cycle and then continue with the above procedure.

P/N 562179 REV. C Dec 2011
10 © 2011 Fisnar
Loading from Memory
After saving your Cycle Mode and Timer Mode settings to the SL101N memory you can then recall them to be used
again. Both the Cycle Mode and Timer Mode need to be loaded separately by switching to the mode you would like to
load.
For Example: To load the cycle time that was saved in memory 9 on the previous page follow the below steps.
1. Switch to Cycle Mode then press and hold the MEM (Memory) key for 2 seconds until the unit beeps.
2. The display will show Ld 1 (Load from Memory #1).
3. Press the ▲key 8 times to get to memory address 9.
4. Press the EXIT key to complete the load. Program 9 Cycle Mode settings are now in effect. The display should
show 5 seconds.
To load the timer mode settings switch to Timer Mode then follow the same directions.

P/N 562179 REV. C Dec 2011
11 © 2011 Fisnar
Setting the Decimal Point
The decimal point is normally set at a default place between the second and third digits on the display. This can be
changed to allow for a longer or shorter dispense time. To change the decimal place position press the SET button then
the ◄ button 4 times. This will make the decimal point blink. When the decimal point is blinking you can then press the
▲or ▼ buttons to adjust its position.
Auto-Purge Function
The Auto-Purge function is used when a material is being dispensed that may cure in the dispensing needle if left sitting
for long periods of time. Before auto purging your material be sure to read over the material MSDS for any precautions
that may need to be taken. Also be sure that you have a proper storage container for the purged material.
In order to setup auto purge on the SL101N dispenser, the user must configure both the time it needs to dispense
(dispense time) and the time it pauses before dispensing again (wait time). The total time will be the time it takes the
dispenser to do the whole routine (cycle time).
Cycle time = Dispense time + Wait time
For example, let’s say you wanted to auto purge one second worth of material every five seconds for a total time of six
seconds. What you need to do is the following:
1. Set the Dispense time to 1 second.
2. Set the Wait time to 5 seconds.

P/N 562179 REV. C Dec 2011
12 © 2011 Fisnar
LIMITED WARRANTY
Manufacturer warrants this product to the original purchaser for a period of two (2) years from
the date of purchase to be free from defects in material and workmanship, but not against damages
caused by misuse, negligence, accident, faulty installation, abrasion, corrosion or by not operating in
accordance with factory recommendations and instructions. Manufacturer will repair or replace
(at factory's option), free of charge, any component of the equipment thus found to be defective, upon
prepaid return of the equipment to the factory during the warranty period of the equipment. In no
event shall any liability or obligation of Manufacturer arising from this warranty exceed the purchase
price of the equipment. This warranty is valid only when 5 micron filtered air is used. The
manufacturer's written liability, as stated herein, cannot be altered or enlarged except by a written
statement signed by an officer of the company. In no event shall manufacturer be liable for
consequential or incidental damages. A return authorization is required from FISNAR INC. prior to
shipping a defective unit to the factory.
Manufacturer reserves the right to make engineering or product modifications without notice.
Table of contents
Other FISNAR Dispenser manuals


