Fit4Home TF-7102A User manual
1
F4H-RM-TF7102APlease Keep For Future Reference
IMPORTANT - Please Read Instructions Fully Before Assembly Or Use
These instructions contain important information which will help you get the best
from your equipment and ensure safe and correct assembly, use and maintenance.
If you need help or have damaged or missing parts,
call the Customer Helpline: 0330 124 0718 (Opening hours: Mon-Fri 9:00am-6:00pm)
or Email: customerservices@fit4home.co.uk
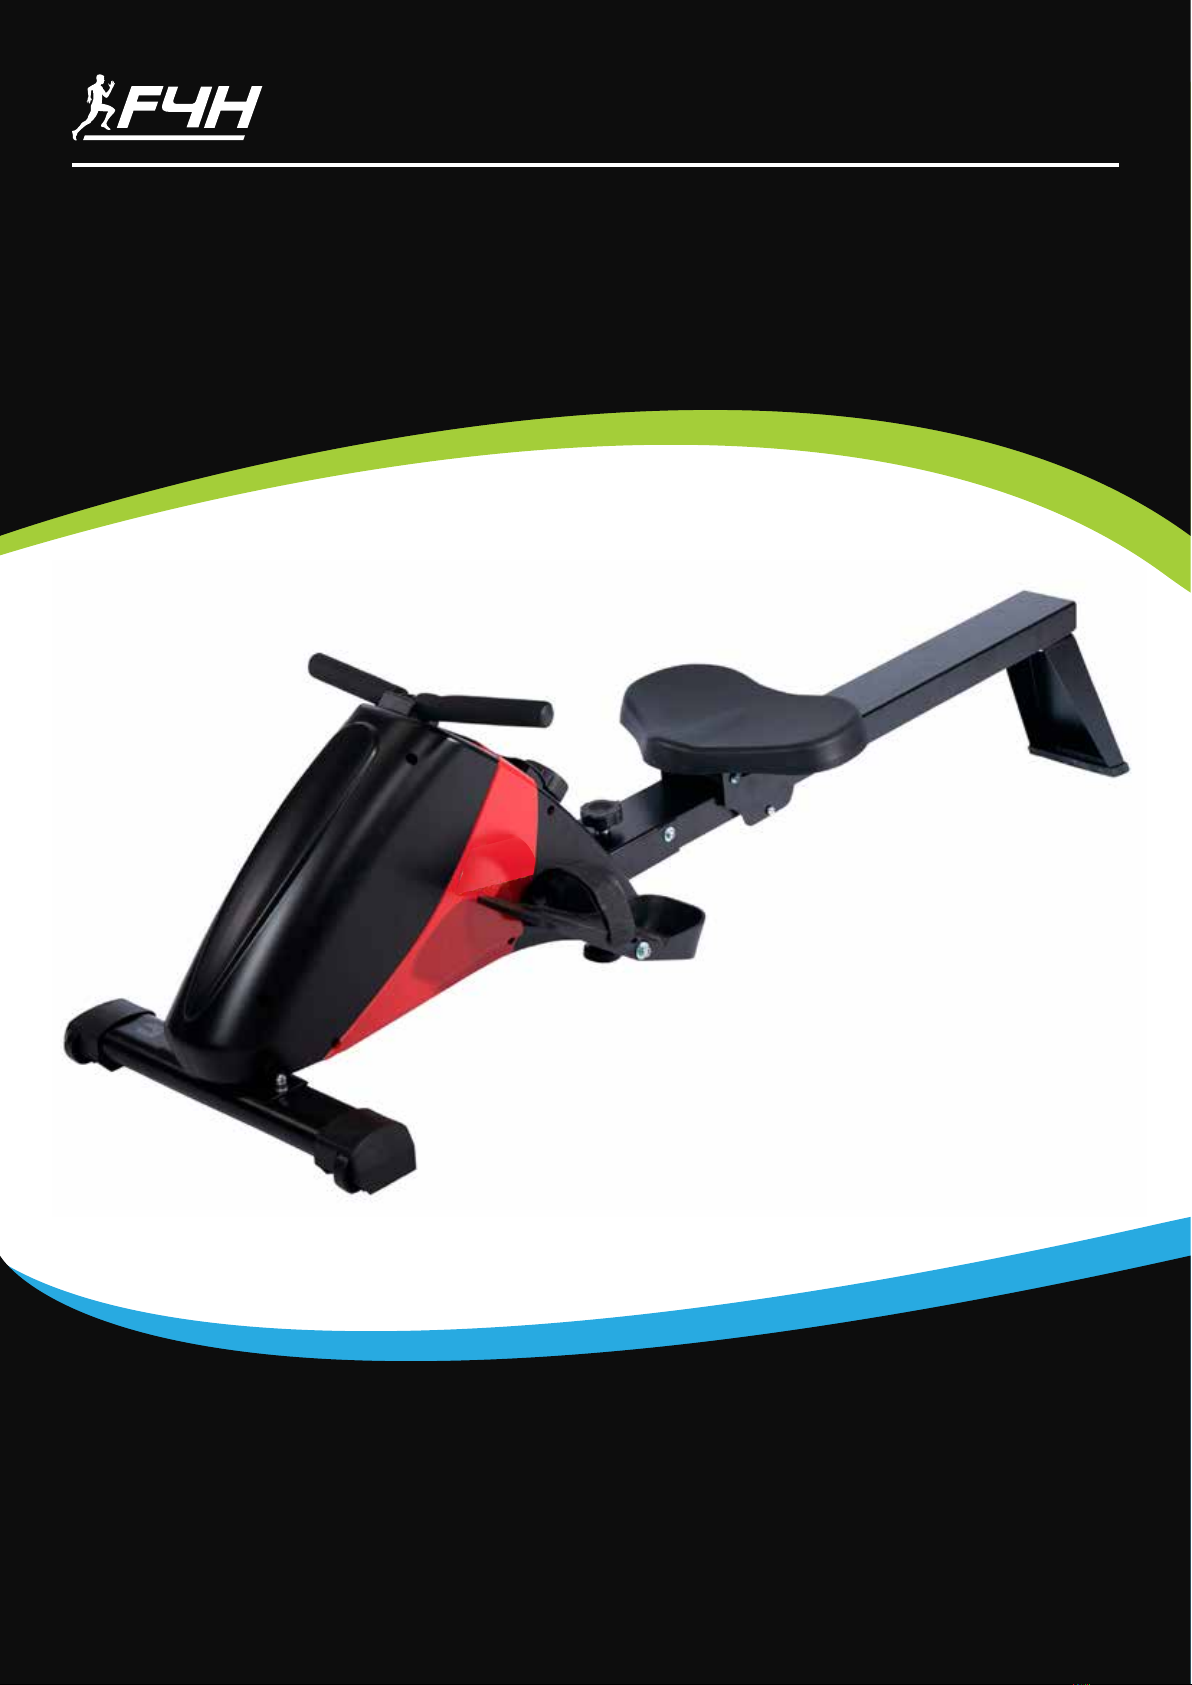
USER MANUAL
TF-7102A ROWING MACHINE

2
CONTENTS
Safety Information
Parts List
Exploded Diagram
Assembly Instructions
Step 1
Step 2
Step 3
Step 4
Folding for Storage
Battery Install
Operating the Computer
Warm Up Cool Down
Fit4Home Ltd
Declaration
03-04
05-06
07
08-11
08
09
10
11
12
13
14
15
16
17

3
IMPORTANT SAFETY INFORMATION
IMPORTANT SAFETY INFORMATION
BE SURE TO READ THE ENTIRE MANUAL BEFORE YOU ASSEMBLE OR
OPERATE YOUR MACHINE. IN PARTICULAR, NOTE THE FOLLOWING SAFETY
PRECAUTIONS:
1. Read all instructions and follow it carefully before using this equipment. Make sure the equipment is
properly assembled and tightened before use.
2. Before exercise, in order to avoid injuring the muscle, warm-up exercises are recommended.
3. Please make sure all parts are not damaged and xed well before use. This equipment should
be placed on a at surface when using. Using a mat or other covering material on the ground is
recommended.
4. Please wear proper clothes and shoes when using this equipment; do not wear clothes that might
catch any part of the equipment.
5. Do not attempt any maintenance or adjustments other than those described in this manual. Should
any problems arise, discontinue use and consult your local dealer.
6. Do not use the equipment outdoors. It is not a commercial model.
7. This equipment is for household use only.
8. Only one person at a time should use this equipment.
9. If you feel any chest pains, nausea, dizziness, or short of breath, you should stop exercising
immediately and consult your physician before continuing.
10. Care should be taken in mounting or dismounting the equipment.
11. Do not allow children to use or play on the equipment. Keep children and pets away from the
equipment while in use. This machine is designed for adults use only. The minimum free space
required for safe operation is not less than two meters.
12. The maximum weight capacity for this product is 120kgs.
WARNING: Before beginning any exercise program consult your physician. This
is especially important for the people who are over 35 years old or who have
pre-existing health problems. Read all instructions before using any tness
equipment.
CAUTION: Read all instructions carefully before operating this product. Retain
this Owner’s Manual for future reference.

4
IMPORTANT SAFETY INFORMATION
IMPORTANT SAFETY INFORMATION
• Check you have all the components and tools listed in the instruction manual.
• Remove all ttings from the plastic bags and separate them into dierent groups.
• Keep children and animals away from the work area, (small components can cause
• choking if swallowed).
• Make sure you have enough space to layout the parts before starting.
• The assembly of this equipment is best to carried out by more than one person.
• Assemble the item as close to its nal position (in the same room) as possible.
• The free-standing equipment shall be installed on a stable and level base.
• Dispose of all packaging carefully and responsibly. Please note that you will have to retain
• the outer packaging in case you may need to return the item.
• Do not use the equipment near water or anywhere outdoors.
• Keep unsupervised children and pets away from the equipment at all times. Also do not
• leave children unattended in the same room with the equipment.
• Injuries to health may result from incorrect or excessive training.
• Before using the equipment to exercise, always warm up with stretching exercise to
• prevent any injuries or muscle pains.
• This product is only intended for domestic use.
• If the user experiences any abnormal symptoms STOP the workout and CONSULT A
• DOCTOR IMMEDIATELY.
• Only one person at a time should use the equipment.
• Keep hands away from moving parts at all times.
• Always wear appropriate workout clothing when using the equipment.
5
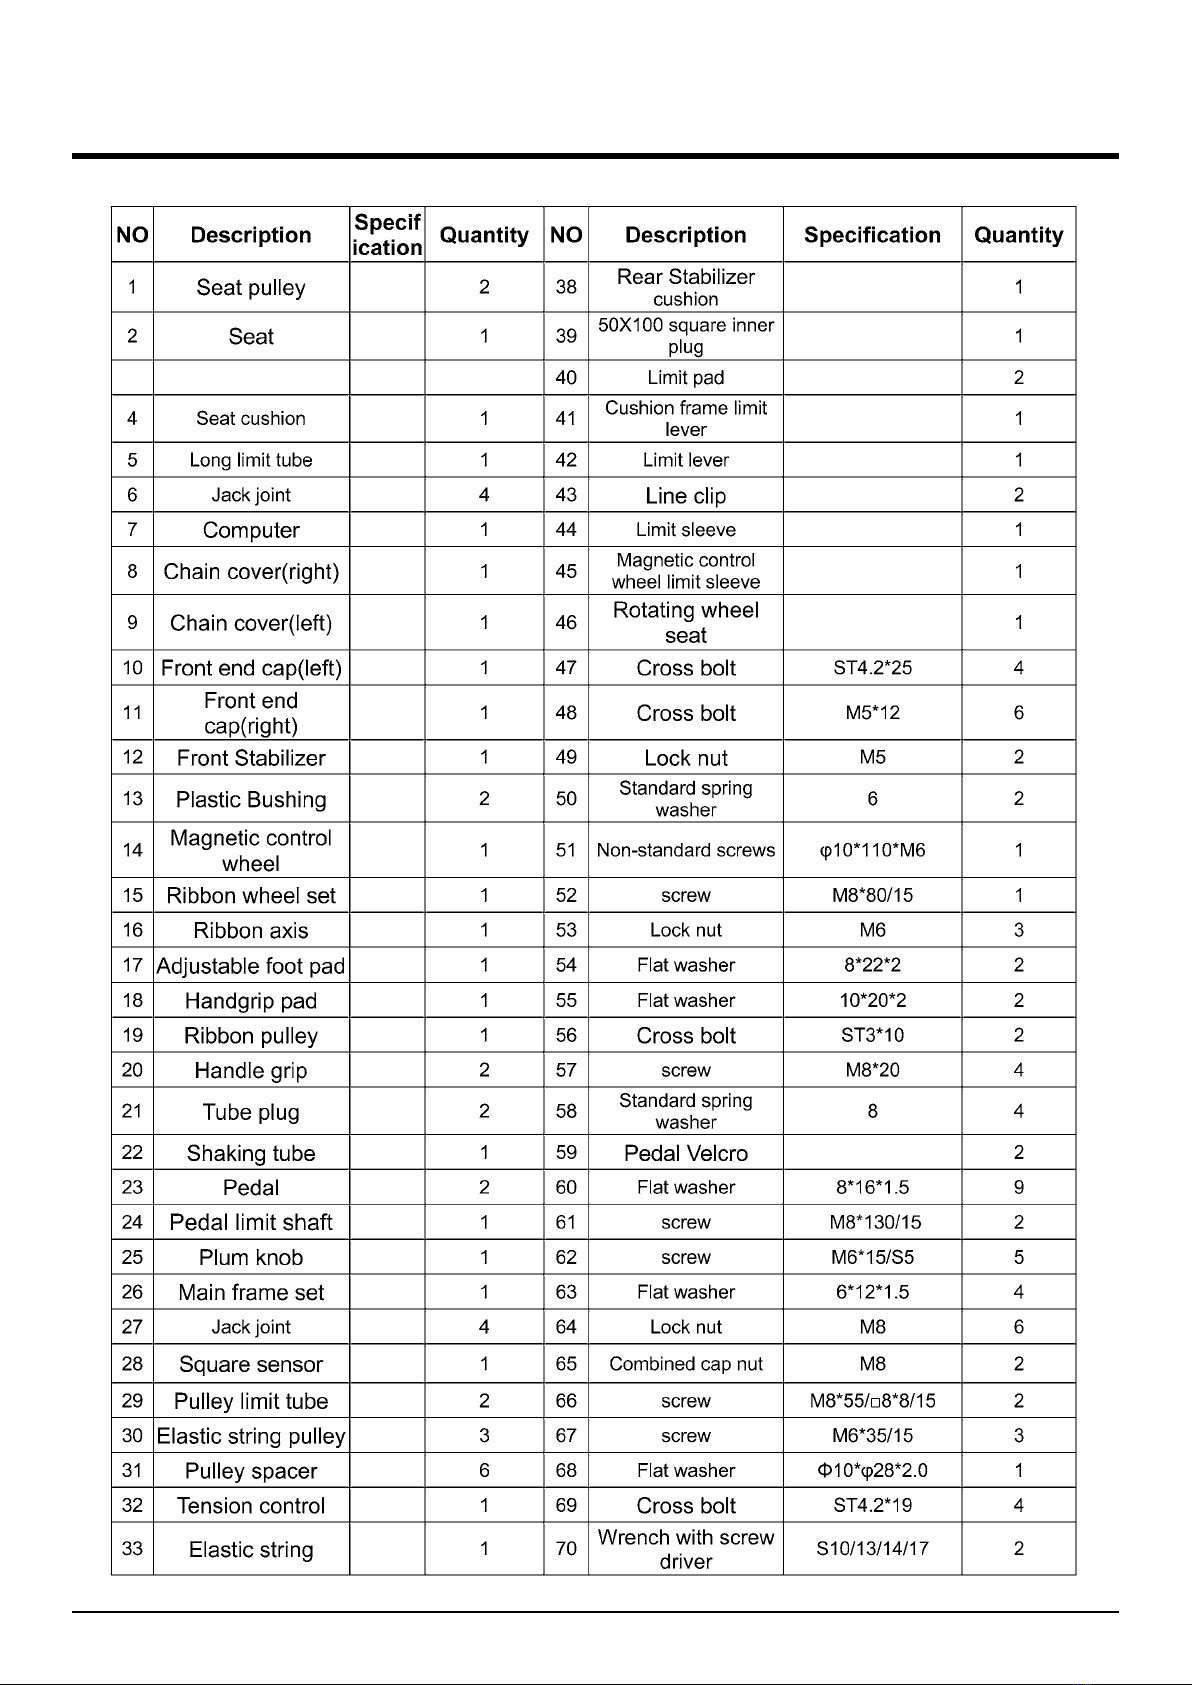
PARTS LIST
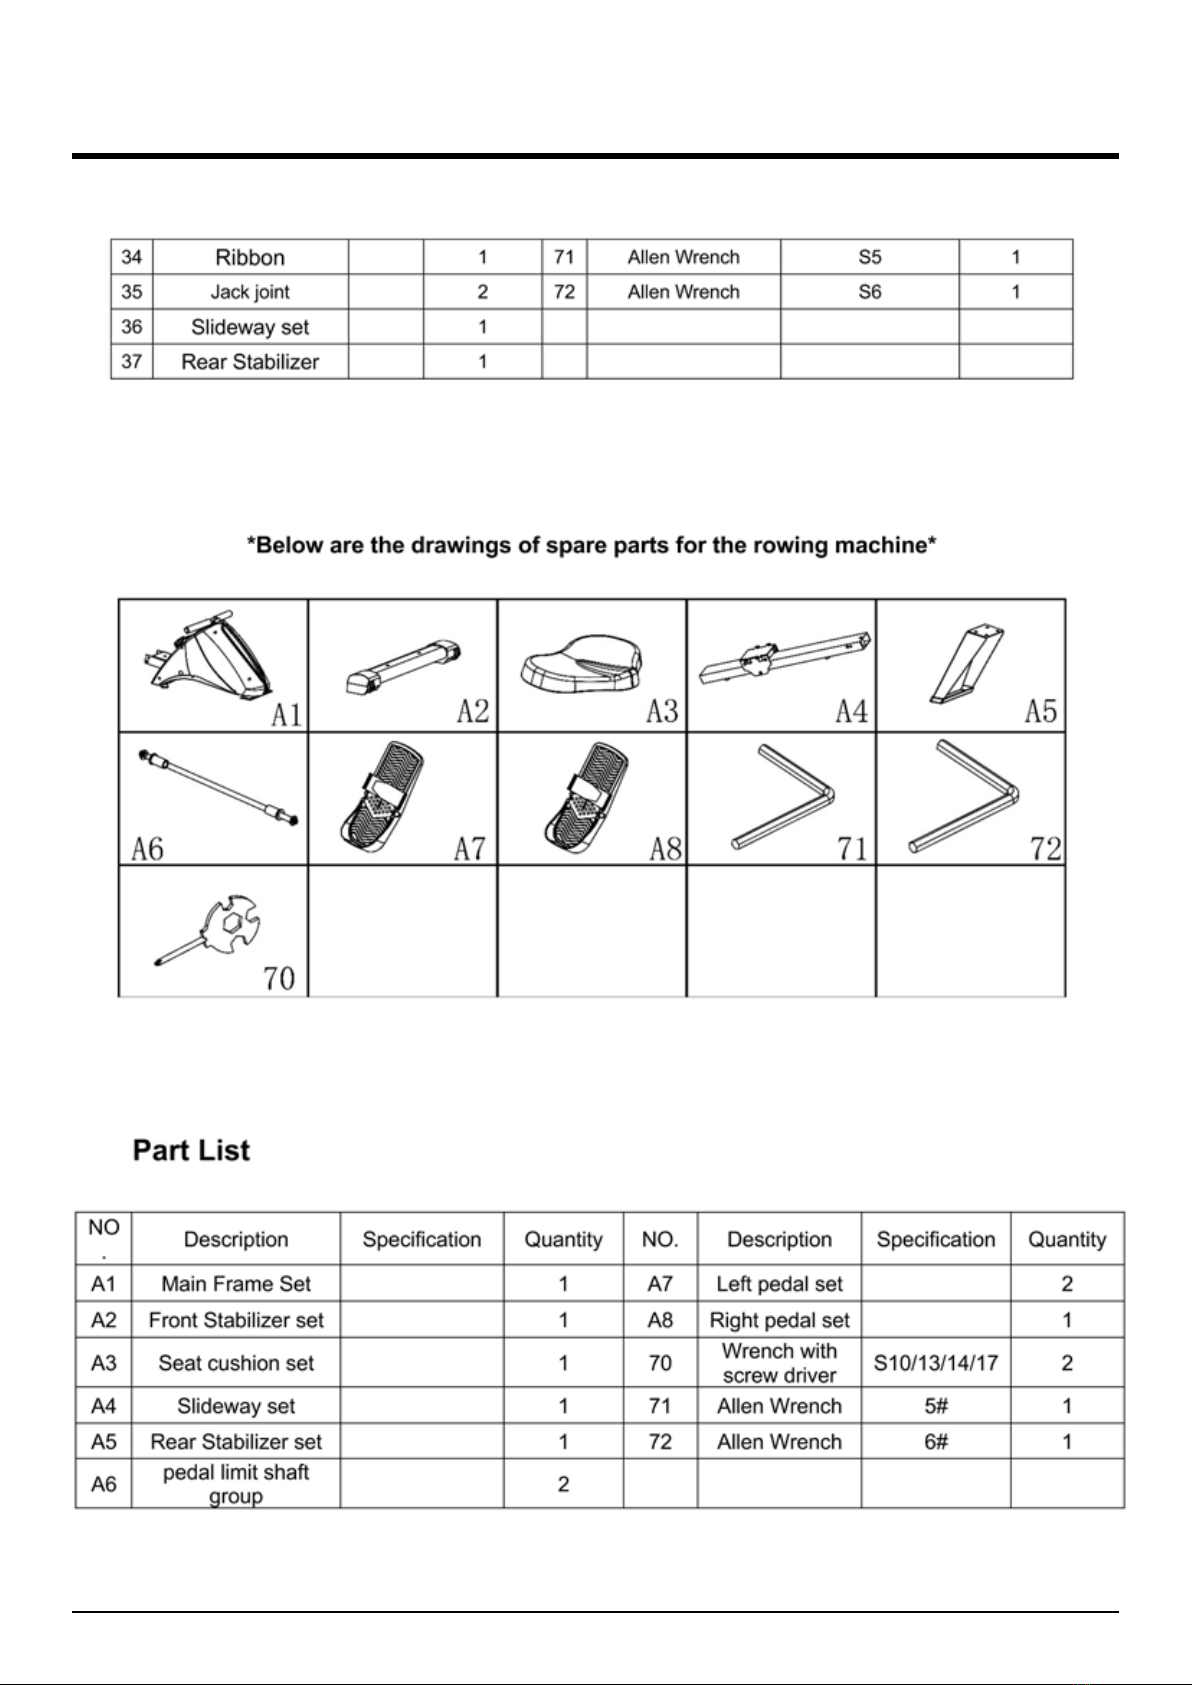
6
PARTS TABLE

7
EXPLODED DIAGRAM
8
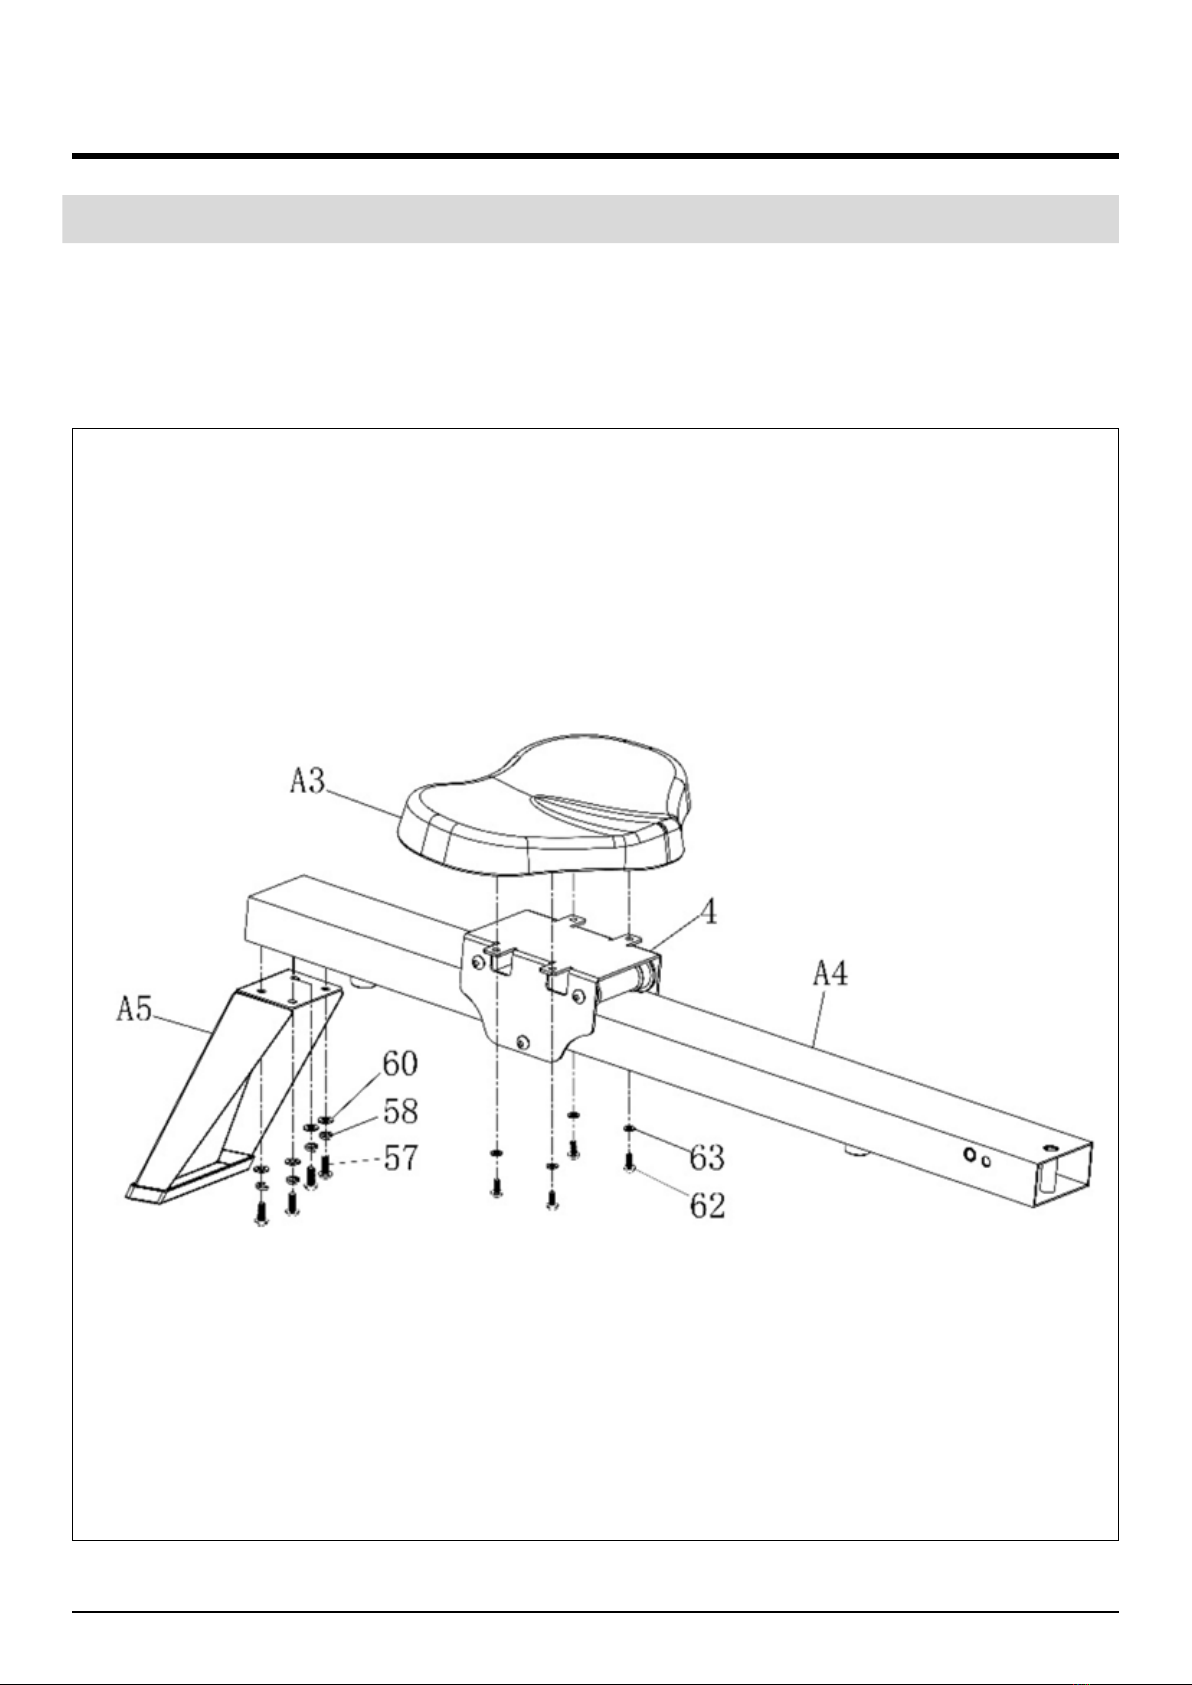
ASSEMBLY INSTRUCTIONS
STEP 1
1. Use Allen wrench (71), 4 screw bolts (57), 4 standard spring washers (58) and 4 at washers
(60) to install the Rear Stabilizer set (A5) onto the Slideway set (A4). Then use Allen wrench
(71), 4 screw bolts (62) and 4 at washers (63) to install the seat cushion set (A3) onto the seat
cushion plate (4).
9
ASSEMBLY INSTRUCTIONS
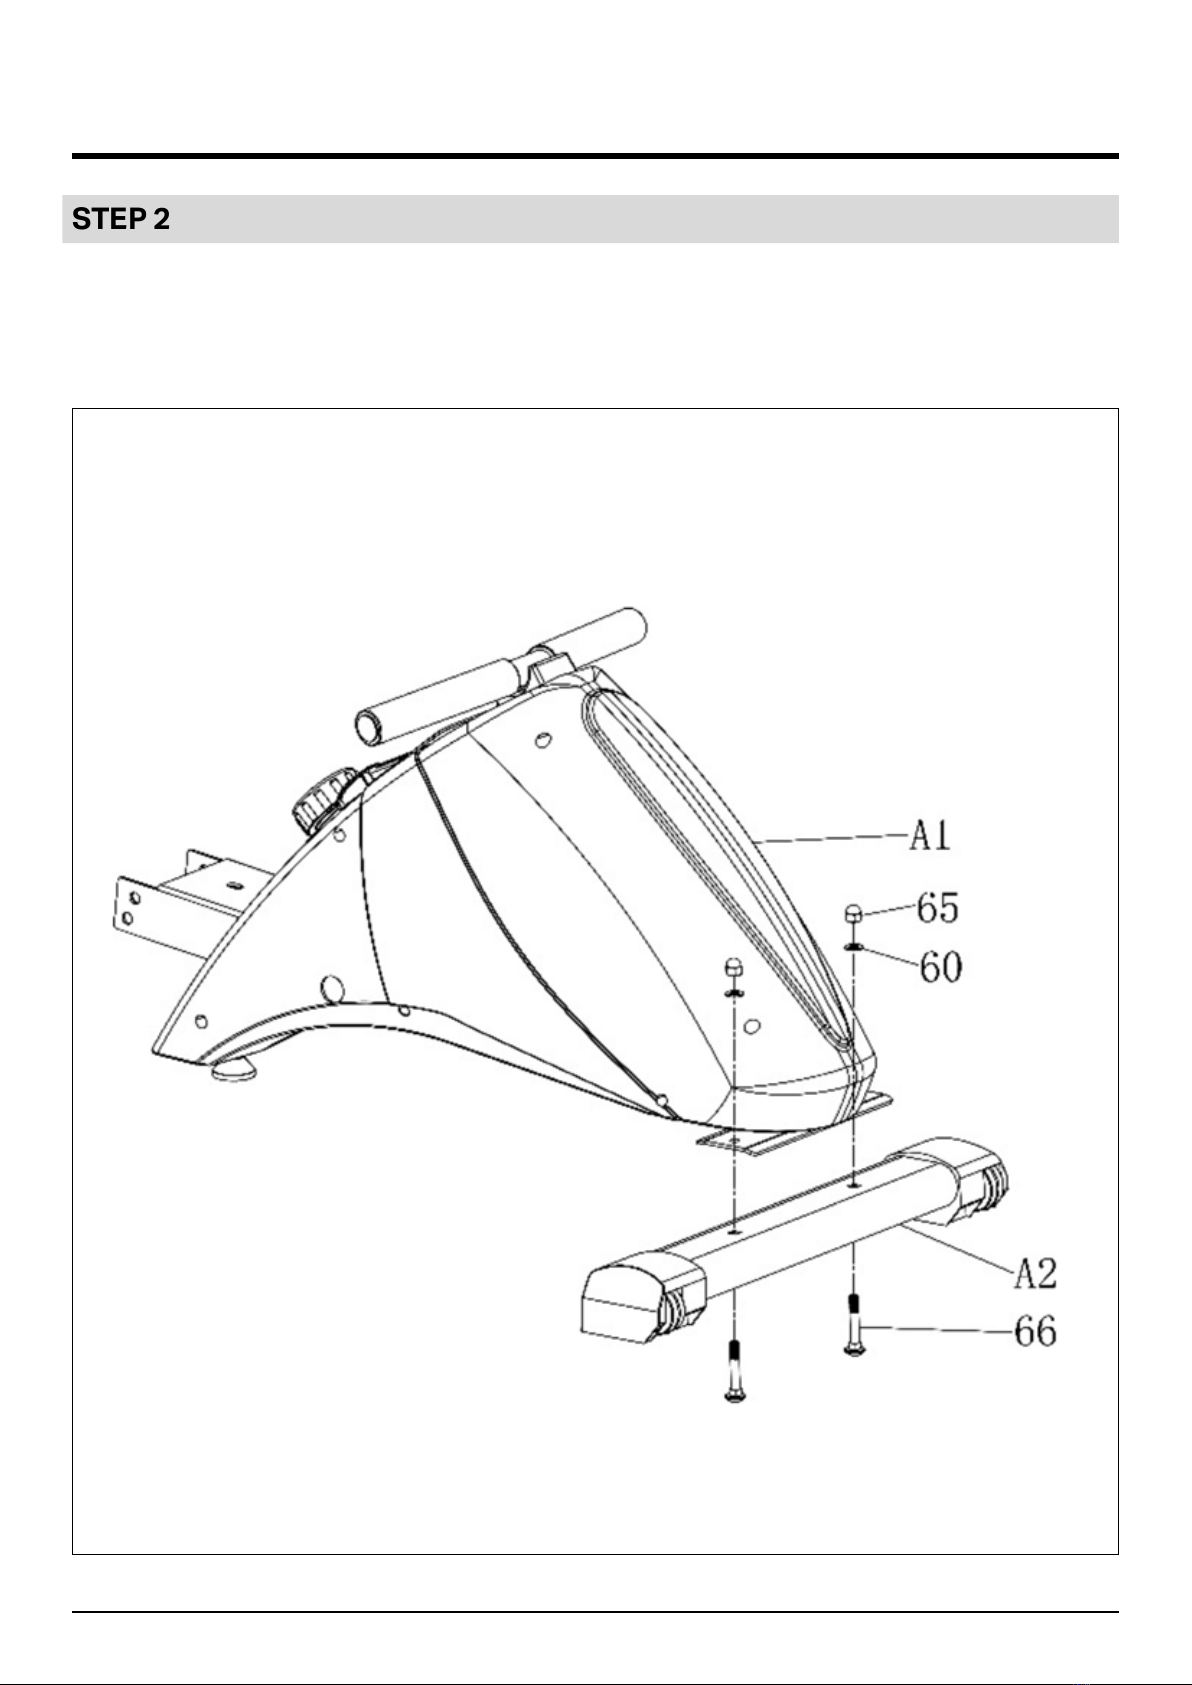
STEP 2
1. Then use the wrench with screw driver (70), 2 screw bolts (66), 2 at washers(60) and 2
combined cap nuts (65) to install the Front Stabilizer set (A2) on the main frame set (A1) and
then lock it tightly.
10
ASSEMBLY INSTRUCTIONS
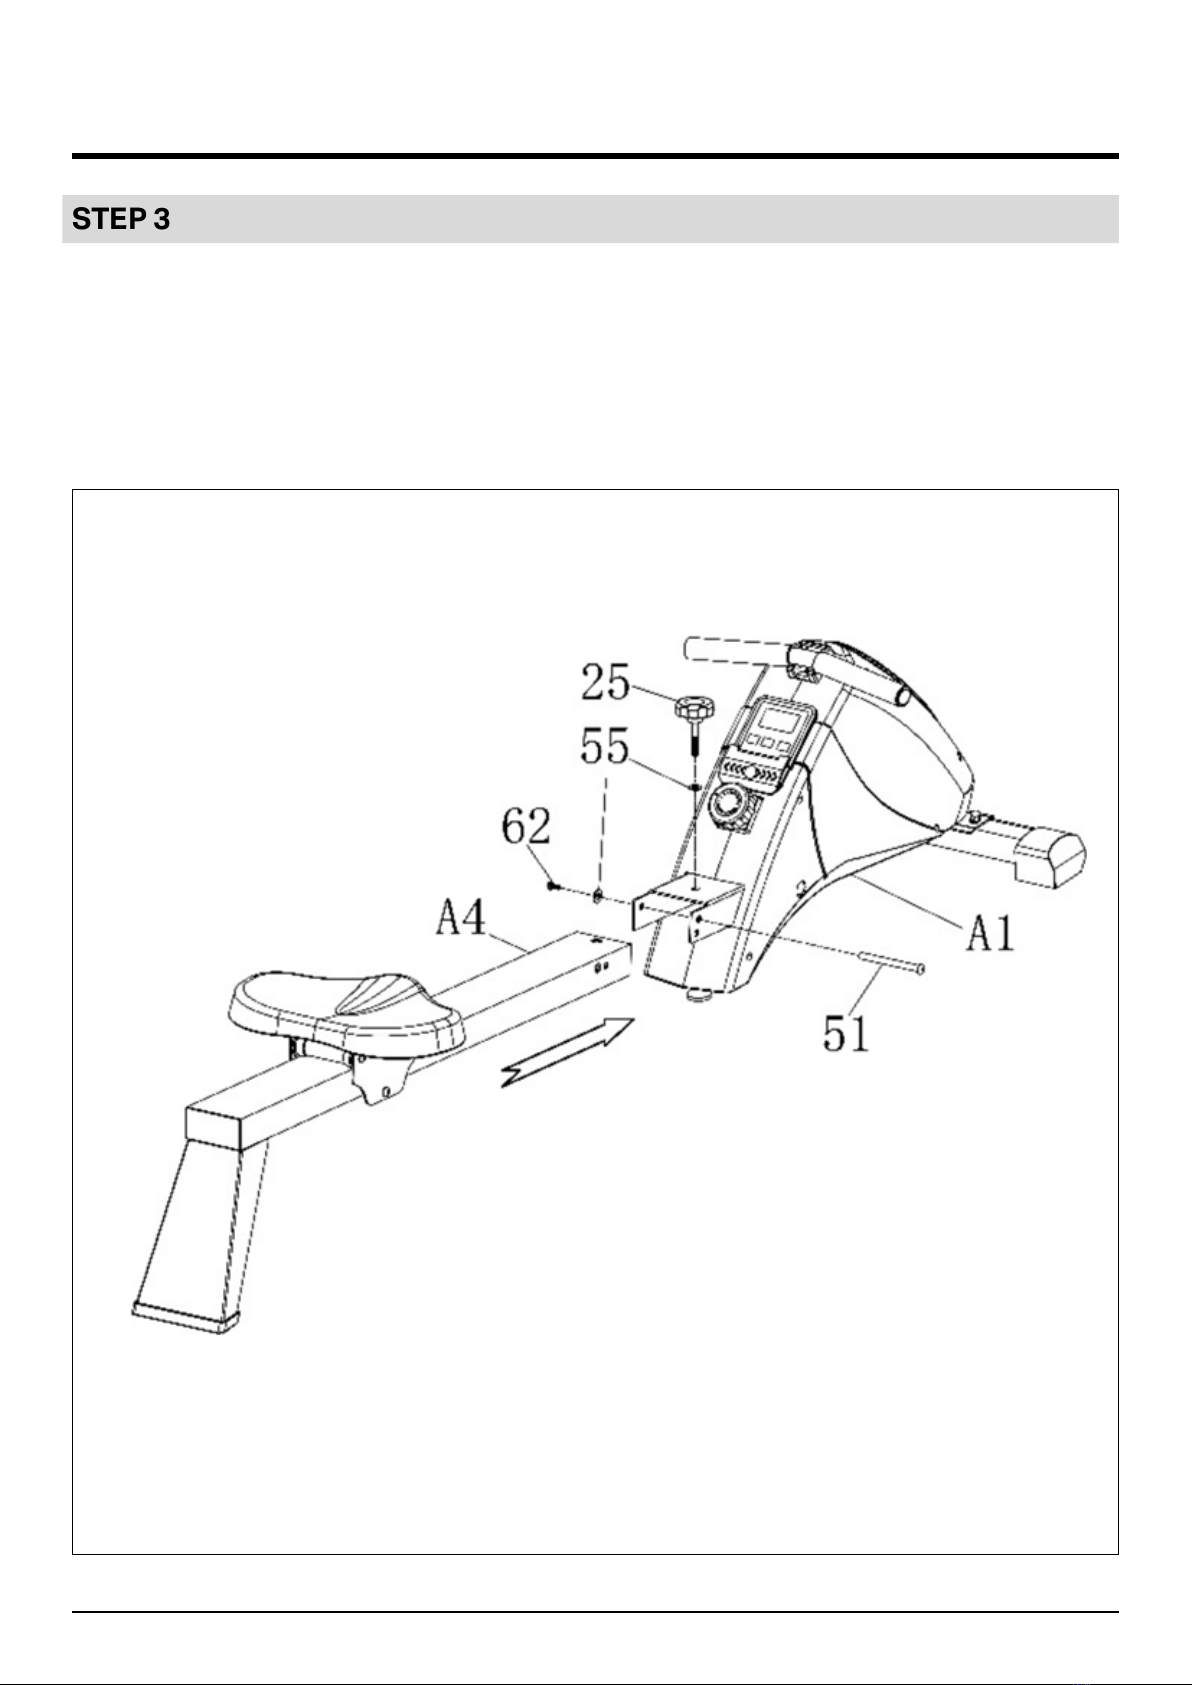
STEP 3
1. Loosen the plum knob (25) and the at washer (75) and pull out. Pay attention to the falling
of the washer. Use both Allen Wrenches (71) and (72), 1 screw (51), 1 at washer (55) and 1
screw (62) to install the Slideway set (A4) onto the Main frame set (A1) and lock tightly. Then
use the Plum knob (25) and 1 at washer (55) to lock and x the Slideway set (A4) to the main
frame set (A1).

11
ASSEMBLY INSTRUCTIONS
STEP 4
1. Insert the Pedal limit shaft (24) into the 2 Plastic Bushings (13) and insert it through the Main
frame Set (A1). Then insert the Left Pedal set (A7) and Right pedal set (A8) into the Pedal limit
shaft (24), using the Wrench with screw (70), x 2 nuts (64) and 2 Flat washers (54) to x and
lock them onto the Main Frame set (A1).
12
FOLDING FOR STORAGE
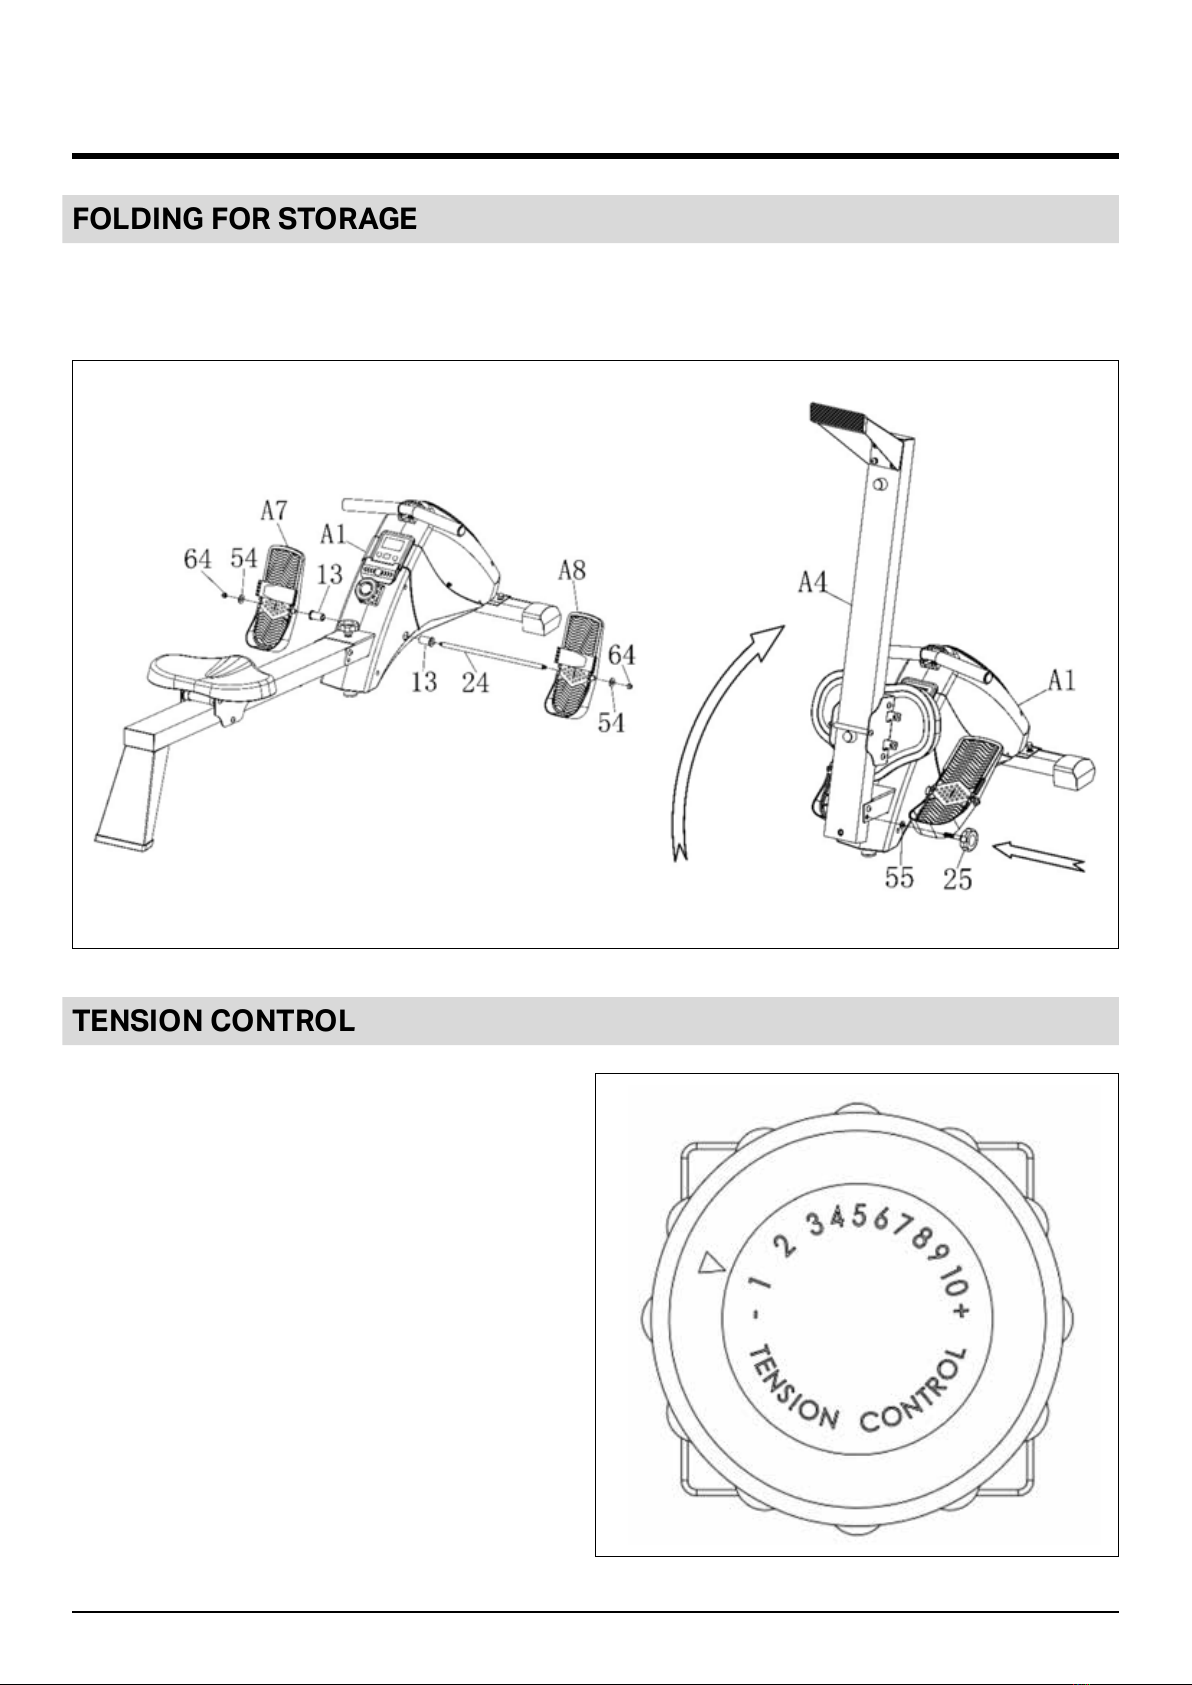
FOLDING FOR STORAGE
1. Fold up the Slideway set (A4) in the position, and insert the plum knob (25) and at washer
(55) to lock it into place.
TENSION CONTROL
1. The user can adjust the tension to exercise
according to their needs. This product
provides 10 levels of adjustment (1 being
the lowest and 10 being the highest).

13
COMPUTER BATTERY INSTALL
COMPUTER BATTERY INSTALL
1. Hold the electronic A and B two
points, push up the computer. Pull
out the computer when the buckle is
removed from the main frame.
2. After unpacking the computer,
note the signal line head. Install the
batteries and check if the signal
cable is plugged in the right direction
before installing the computer.
3. Open the computer and Install the
battery. See the right picture.
4. When reloading the computer, install
the computer’s four buckles into
the four grooves at the main frame,
gently push forward to the right
position then pull the computer.
14
OPERATING THE COMPUTER
FUNCTIONAL BUTTONS
MODE - Push down for selecting functions. If the long time holds down MODE button
down for resetting time, count and calories.
SET - To set the values of time, count and calories when not in scan mode.
RESET - Push down for resetting time, count and calories.
FUNCTION AND OPERATIONS
1. SCAN: Press “MODE” button until “SCAN” appears, then the monitor will rotate through all the 5 functions : Time,
Count, T. Count, RPM, calories, each display will be hold for 4 seconds.
2. TIME: (1) Count the total time from exercise start to end. (2) Press “MODE” button until “TIME” appears, then
press the “SET” button to set exercise time. When the “SET” is zero, the computer will stop 1 second after the
start of the time
3. COUNT: (1) Accumulate the steps while exercising. (2) Press “MODE” button until “Count” appears, then press
the “SET” button to set exercise Count. When the “SET” is zero, the computer will stop 1 second after the start
of the time.
4. T.COUNT: Display the steps you have exercised
5. DISTANCE: The current status of the traveled distance is displayed.
6. CALORIES: (1) Count the total calories from exercise start to end. (2)Press “MODE” button until “CAL” appears,
Press “SET” button to set exercise calories.
HOW TO INSTALL THE BATTERY:
1. If the display is faint or shows no gures, please replace the batteries.
2. The monitor will automatically shut o if there is no signal received after 4 minutes.
3. The monitor will be auto-powered on when starting to exercise.
4. The monitor will automatically start calculating when you start to exercise and will stop calculating when you
stop exercising for 4 seconds.
FUNCTION
AUTO SCAN Every 4 seconds
TIME 00:00’~99:59’
COUNT 0-9999
T.COUNT 0-9999
CALORIES 0.0~999.9kCAL
DISTANCE 0-9999
BATTERY TYPE 2pcs of SIZE –AAA or UM –4
OPERATING TEMPERATURE 0°C ~ +40°C
STORAGE TEMPERATURE -10°C ~ +60°C
15
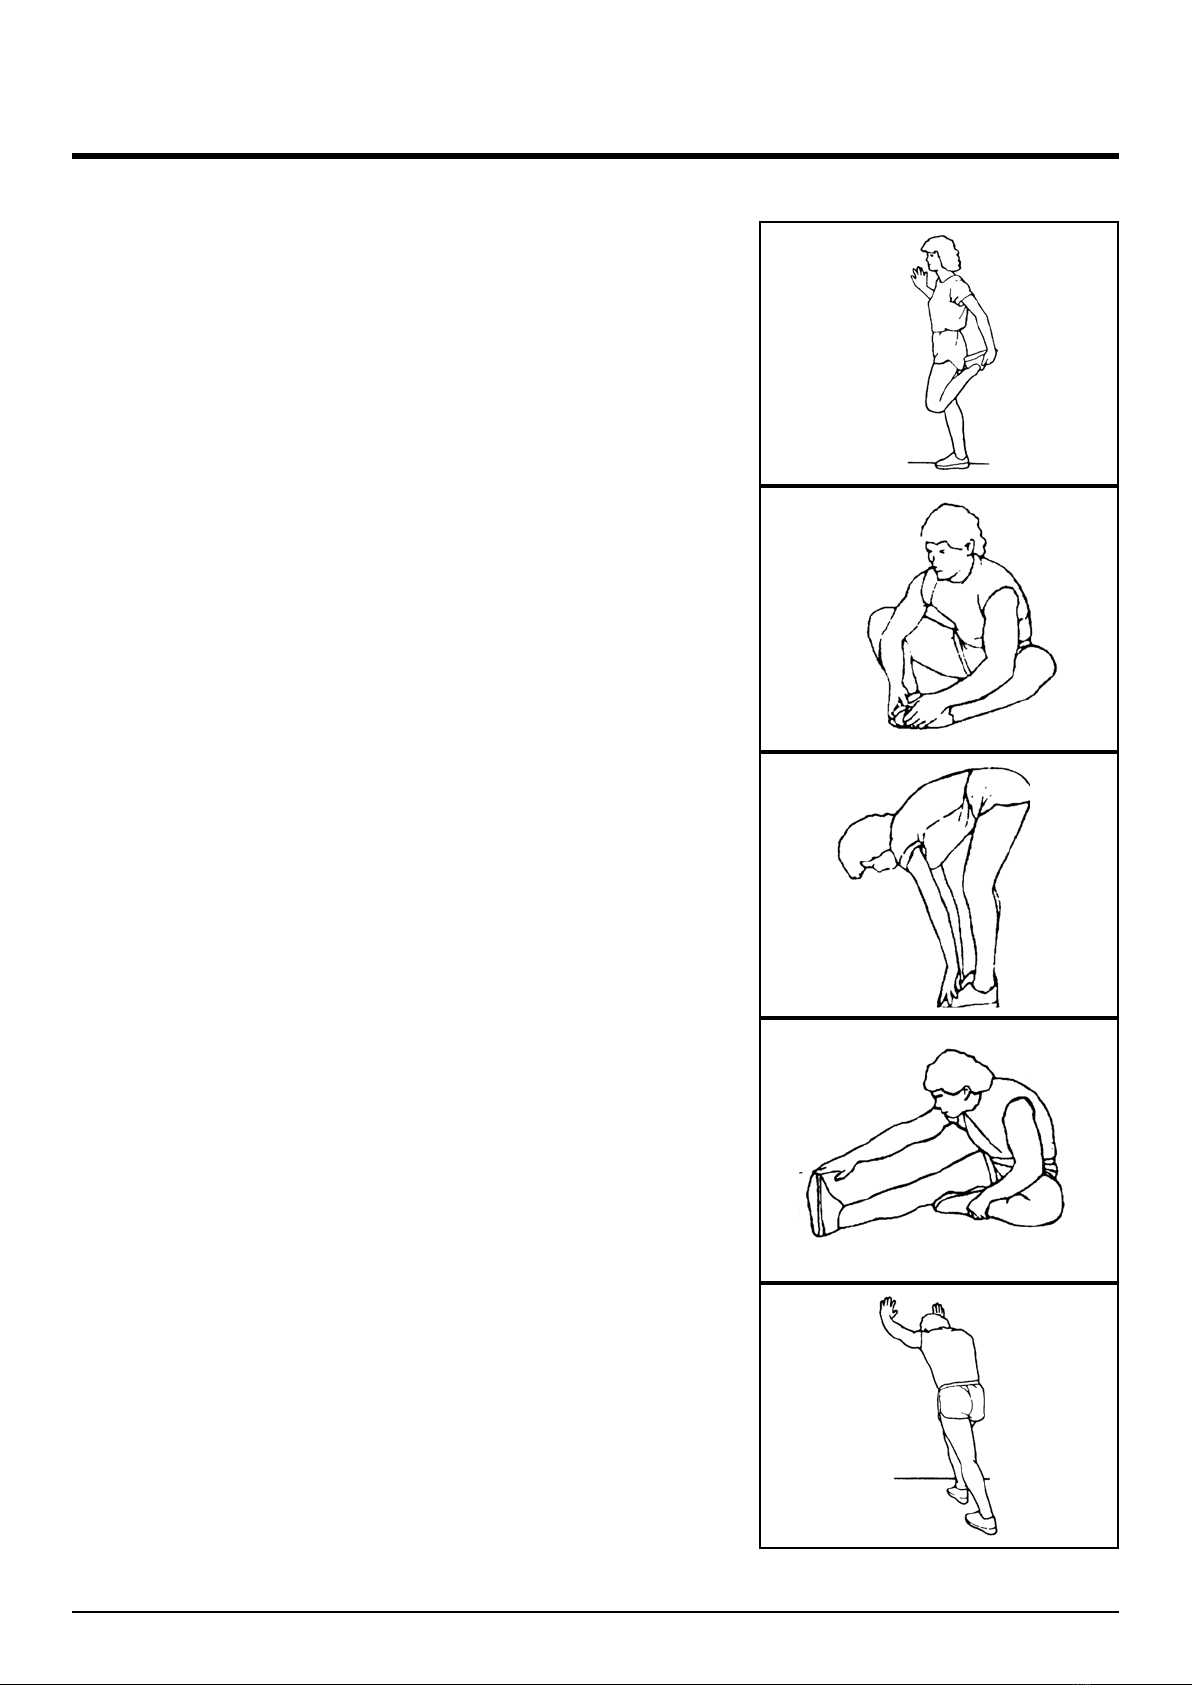
WARM UP AND COOL DOWN ROUTINE
QUADRICEP STRETCH
With one hand against a wall for balance, reach
behind you and pull your right foot up.Bring
your heel as close to your buttocks as possible.
Hold for 15 counts and repeat with left foot.
INNER THIGH STRETCH
Sit with the soles of your feet together and
your knees pointing outward. Pull your feet as
close to your groin as possible. Gently push
your knees toward the oor. Hold for 15 counts.
TOE TOUCHES
Slowly bend forward from your waist, letting
your back and shoulders relax as you stretch
toward your toes.Reach as far as you can and
hold for 15 counts.
HAMSTRING STRETCHES
Extend your right leg. Rest the sole of your
left foot against your right inner thigh. Stretch
toward your toe as far as possible. Hold for 15
counts.Relax and then repeat with left leg.
CALF/ACHILLES STRETCH
Lean against a wall with your left leg in front of
the right and your arms forward.Keep your right
leg straight and the left foot on the oor; then
bend the left leg and lean forward by moving
your hips toward the wall.Hold, then repeat on
the other side for 15 counts.

16
FIT4HOME LTD
Fit4Home is essentially an online business which aims to provide high quality
Exercise and Fitness products to ensure all customers maintain a healthy lifestyle.
At Fit4Home we stock various dierent types of tness and exercise equipment
such as Treadmills, Cross Trainers, Weights, Exercise Bikes etc and aim to provide
an excellent service to each and every one of our valued customers. We try to cater
for every type of individual, so if you are someone who is very serious about health
and tness we can provide you with professional heavy duty products, but if you are
someone who is busy and short on space we can provide you with equipment that is
compact and aesthetically pleasing.
Fit4Home employs a dedicated customer service team to ensure the consumer is
provided with the best service and experience. For any queries or issues feel free to
contact us via e-mail or phone.
As an online business we sell our products independently via our website, and we
also trade from established markets such as Amazon and EBay. As an established
business we endeavour to earn the condence of the customer, it is for this reason
that we try our utmost best to dispatch products the same day using a next working
day delivery service to all UK mainland areas.
Along with the customer service department, Fit4Home consists of hard-working
and reliable technicians and designers who aim to meet the needs of our customers.
Fit4Home© Ltd
Hours of Business: 9am - 5pm
Website: www.t4home.co.uk
E-mail: customerservices@t4home.co.uk

17
Declaration of Conformity
We, Importer
Fit4home Ltd
Unit A, Perseverance Mills, Olive Lane, Darwen BB3 3DQ United Kingdom
Declare that the product
Rowing Machine F102A
Complies with the essential health and safety requirements of the
following directive:
Stationery training equipment
EN ISO 20957-1: 2013
EN ISO 20957-7: 2005
Authorised Signatory and technical le holder
Signed for and behalf of:
Fit4home Ltd
Unit A
Perseverance Mills
Olive Lane
Darwen
BB3 3DQ
United Kingdom
Tassadaq Hussain

18
Table of contents
Other Fit4Home Fitness Equipment manuals

Fit4Home
Fit4Home TF-WB1007 User manual

Fit4Home
Fit4Home KPR65714 User manual

Fit4Home
Fit4Home MAXX1 TF-7005A User manual

Fit4Home
Fit4Home TF-7512 User manual

Fit4Home
Fit4Home KPR91220 ROWER User manual

Fit4Home
Fit4Home TF-1109 User manual

Fit4Home
Fit4Home TF-1001 User manual

Fit4Home
Fit4Home TF-WB501001 User manual

Fit4Home
Fit4Home TF-306A User manual
Popular Fitness Equipment manuals by other brands


G-FITNESS
G-FITNESS AIR ROWER user manual

CAPITAL SPORTS
CAPITAL SPORTS Dominate Edition 10028796 manual

Martin System
Martin System TT4FK user guide

CIRCLE FITNESS
CIRCLE FITNESS E7 owner's manual

G-FITNESS
G-FITNESS TZ-6017 user manual

Accelerated Care Plus
Accelerated Care Plus OMNISTIM FX2 CYCLE/WALK user manual


