FitLogic YK-ET1402B User manual

PM-ET1402B/YK—ET1402B
INSTRUCTION MANUAL
PLEASE READ THIS MANUAL CAREFULLY BEFORE USING AND SAVE IT FOR FUTURE REFERENCE.

1
CONTENT
Safety Precautions
Assembly Steps
Folding Steps
Technical Data
Operation Instruction
Instructions for Use
Maintenance
Explosive Drawing

2
Safety Precautions
Thank you for purchasing this treadmill, it has been designed and manufactured to give you many years of trouble
free service. You may already be familiar with using a similar product but please take the time to read these
instructions which have been written to ensure that you get the very best from your purchase.
Warnings
1. To reduce the risk of serious injury, read the following important warnings before using the treadmill.
2. Before starting any exercise program you should consult your doctor to determine if you have any physical or
health conditions that could create a risk to your health and safety, or prevent you from using the treadmill
properly. Your doctor’s advice is essential if you are taking medication that affects your heart rate, blood
pressure or cholesterol level.
3. Be aware of your body’s signals. Incorrect or excessive exercise can damage your health. Stop exercising if
you experience any of the following symptoms: Pain, tightness in your chest, irregular heartbeat, extreme
shortness of breath, feeling light-headed, dizzy or nauseous. If you do experience any of these conditions
you should consult your doctor before continuing with your exercise program.
Electrical Safety Precautions
Failure to observe the following warnings may increase the risk of an electric shock and personal injury.
1. Always check the power cable for damage prior to use. If any damage is observed, do NOT use the power
cable.
2. Never touch the power cable with wet hands.
3. Position the power cable so that it cannot be walked on or pinched.
4. Only the supplied power cable should be used with the treadmill.
General Safety Precautions
1. Use the treadmill only in the way described in this instruction book.
2. Ensure that the voltage of the electrical supply is the same as that indicated on the power cable.
3. It is the responsibility of the owner to ensure that all users of the treadmill are adequately informed of all
warnings and safety precautions.
4. The treadmill is heavy and should be removed from the packaging and assembled by two people.
5. Before assembling the treadmill, make sure that it is not plugged into any electrical source, such as a wall
socket.
6. Use the treadmill on a solid, flat level surface with a protective cover for your floor or carpet. Position the

3
treadmill with at least 2 meters * 1 meter of free space behind the treadmill.
7. Keep the treadmill away from excessive moisture and dust.
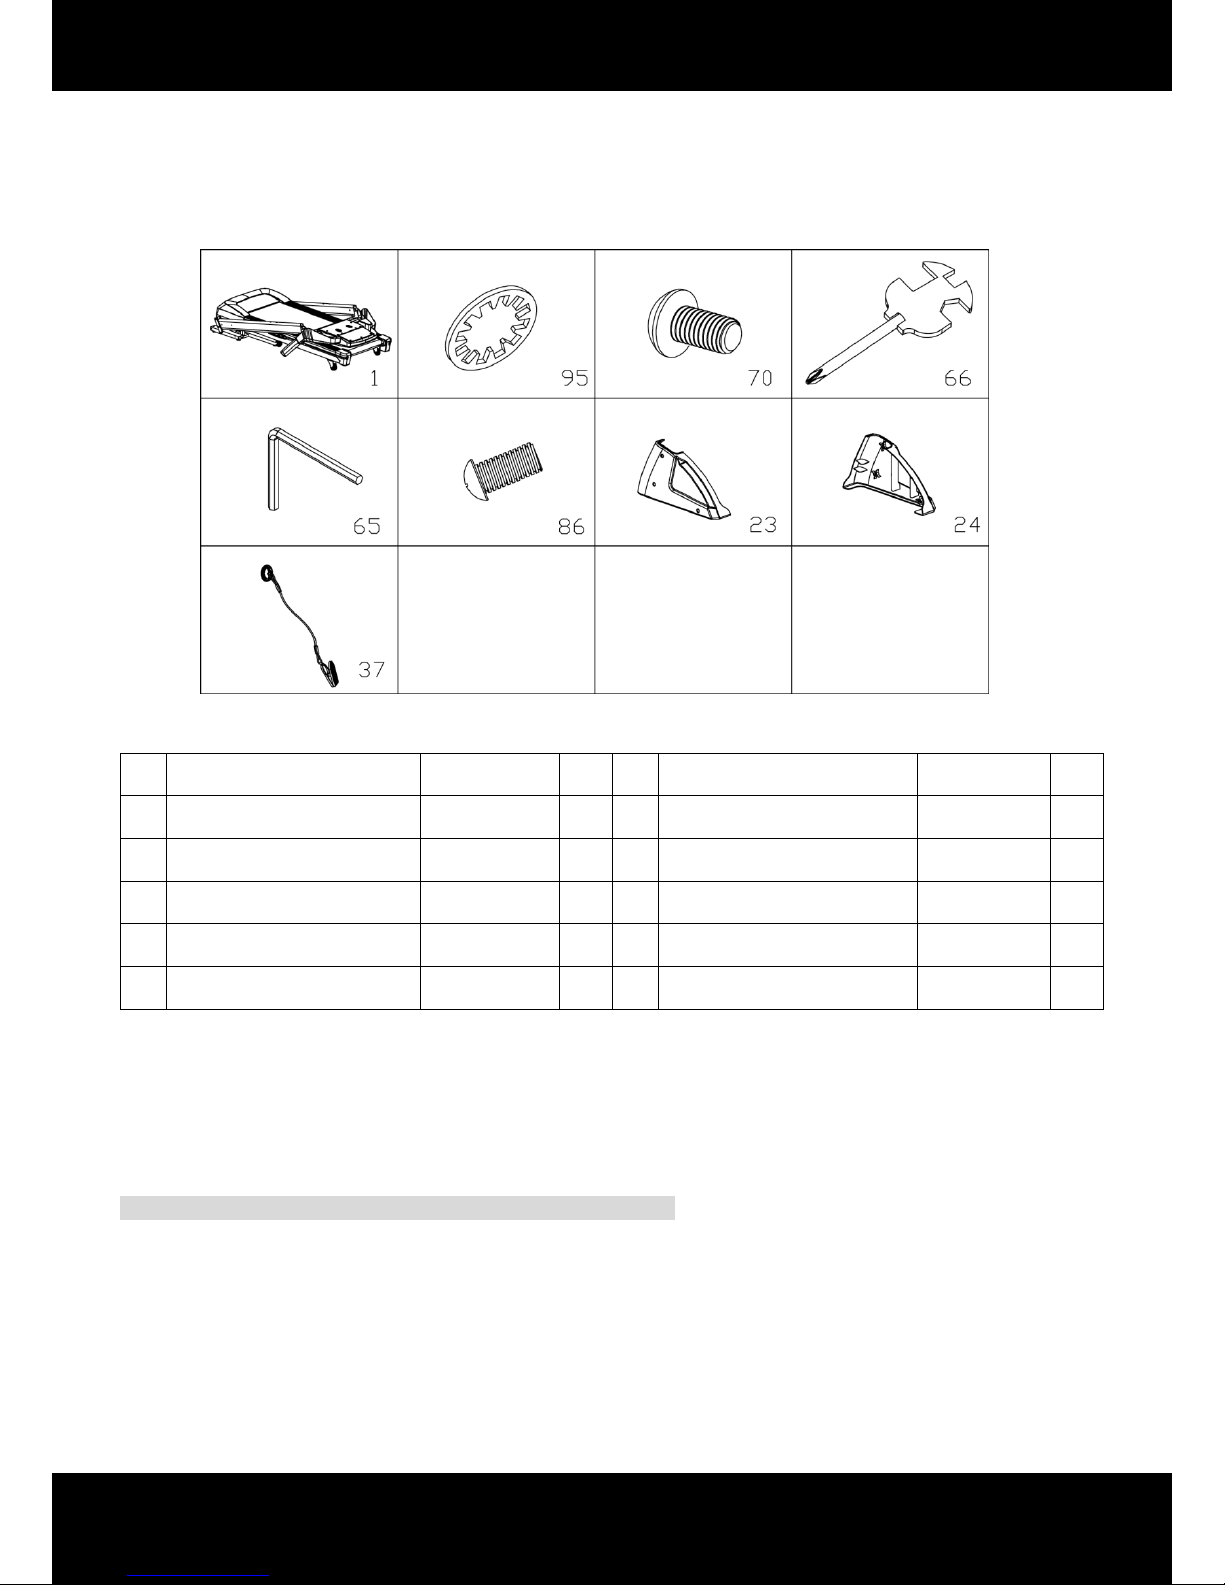
8. Before using the treadmill, check the nuts and bolts are securely tightened.
9. The safety level of the treadmill can be maintained only if it is examined regularly for damage and wear.
Replace defective components immediately. Do not use the treadmill until they have been replaced.
10. The treadmill has been tested and certified to EN957 under class H.C. Suitable for domestic, home use only.
Maximum weight of user: 115kg/250lbs.
11. Braking is controlled by the belt rotation power supply.
12. The treadmill is not suitable for therapeutic use.
13. Keep children and pets away from the treadmill. The treadmill is designed for adult use only.
14. Wear suitable clothing whilst using the treadmill. Avoid wearing loose clothing which may get caught in the
treadmill or clothing that may restrict or prevent movement.
15. Do not arch your back when using the treadmill; always try to keep your back straight.
16. If you feel pain or dizziness while exercising, stop immediately and cool down.
17. The pulse sensor is not a medical device. Several things including user movement, may affect the accuracy
of the sensor. The sensor is intended only as an exercise aid in determining general heart rate trends.
18. Care must be taken when lifting or moving the treadmill so as not to injure your back. Always use proper
lifting techniques and/or use assistance.
19. A safe key is supplied for personal safety. Use the safe key when operating the treadmill for the emergency
dismount function. In the event of an emergency, place both hands on the handlebars and put your feet onto
the non-slip surface of the main frame.As you do this, the safe key will disengage from the computer and the
emergency dismount function will be triggered.
20. All moveable accessories require weekly maintenance. Check them before use every time. If anything is
broken or loose, please fix it immediately. You may continue using the treadmill after any damaged parts
have been fixed.
21. The treadmill is not to be used by children or persons with reduced physical, sensory or mental capabilities,
or lack of experience and knowledge, unless they have been given adequate supervision or instruction.
22. Supervised children using the treadmill must not be allowed to play with the treadmill.
23. This machine must be well earthed. It can decrease the danger of electric shock.

4
Assembly Steps
The following are the part when you open the package.
Package list:
NO.
Description
Specification
QTY
NO.
Description
Specification
QTY
1
Mainframe
1
66
Solid wrench
S=13,14,15
1
23
Left bottom cover
1
70
Inner hex pan head bolt
M8*15
10
24
Right bottom cover
1
86
Cross pan head screw
M5×12
6
37
Safety key
1
95
Teeth washer
8
10
65
5# Allen wrench
5mm
1
Assembly tools:
5# Inner hex wrench 5mm 1pc
Cross solid wrench S=13 14 15 1pc
Attention: please don`t switch on before finish assembling.

5
Step 1:
Step 2:
Step 3:
Open the package and put the mainframe on
the floor.
Unfold the display (A).
ATTENTION: Hold the column steadily
while unfolding.
Fix the left and right column (B) to the
mainframe (A) with inner hex pan head bolt
(70), teeth washer (95) by 5# Allen wrench
(65) .

6
Step 4:
Step 5:
Step 6:
Fix the left and right bottom cover (23), (24) to the
mainframe with cross pan head screw (86) by solid
wrench (66).
.
Fix the display to the mainframe with teeth washer (95)
and inner hex pan head bolt (70) 5# Allen wrench (65) .
.
Put the safety key (37) into the slot of the display
(A).
.

7
Folding Steps
When folding:
Unfolding:
Hold the running deck which showed in “A”
position and then push it in the arrow direction
until you hear a “bang” voice from the bumper B.
Hold the A position and kick the bumper B
and then pull it down automatically.
ATTENTION:Please confirm everything is securely fastened and read the manual
carefully before using.

8
Technical Data
Assembly size (mm)
1690*760*1430
Power
1837W
Folding size (mm)
1080*760*1470
Max output
2756
Running area (mm)
1300×450
Input currency
As per country
N.W.
65 KG
Speed range
0.8-18KM/h
Incline
15 sections
Max loading
120KG
LED window
Speed Time Distance Calorie Pulse Incline

9
Operation Instruction
1. Window Display:
1) “SPEED” window: display the exercising speed from 0.8 to 18 km/h. (Initial data is 0.0.) Under setting
mode, display P1-P6; Under count down mode, display H1-H3.
2) “TIME” window: display the exercising time from 0:00 to 99:59. (Initial data is 0.0.)
3) “CAL” window: display the exercising calorie data from 0 to 999. (Initial data is 0.0.)
4) “DIS” window: display the exercising distance from 0.00-99.9. (Initial data is 0.0.)
5) “PULSE/INCLINE” window: display the incline data from 0 to 15. (Initial data is 0.0.) Display the runner’s
heart beat when the runner holds handle pulse with two hands.The system can calculate the runner’s
heart beat and show in this window, the range is 50-200 beats/min. (The data is just for reference and
cannot be used for medical purpose.)
6) Dot matrix window: the green circle stands for a 400m rally. And the data inside the circle stands for the
number of the circle and will beep for 1 second after each rally; when using the program, the dot matrix
stands for the program graph.
2. Button Function:
1) “START” key which is for activating the machine. You can start the machine anytime when the machine
is switched on after 3 seconds and the safety key is in correct position.
2) “STOP” key which is for stopping the machine working and reset the machine to zero.
3) “M”key which is for choosing different mode : “0:00” “ 30:00” “ 1.0” “ 50” ( “0:00” is manual mode, “30:00”
is time countdown mode, “1.0”is distance countdown mode, “50” is calorie countdown mode). While

10
change different mode the window data will flash continuously. Users can change the data by pressing
“-SPEED+” or “-INCLINE+” key. After that you can press the “START” key to start the machine.
4) You can choose each program by pressing the program key directly. There are 6 programs inside:
WEIGHT LOSS, INTERVAL, HILLCLIMB,WALK and FUN RUN. If you want to make a program yourself
you can press the MUANUAL key first and then press the INCLINE+、INCLINE-”or “SPEED+、
SPEED-”to change the incline and speed.At last press the start key to workout.
5) “-SPEED+” which is for changing the speed. In setting mode it can change the target data and in
normal working mode it can change the speed by 0.1km/h per time. When you press the “-SPEED+” key
lasting for 0.5 sec the speed data will change continuously.
6) “-INCLINE+” which is for changing the incline. In setting mode it can change the target data and in
normal working mode it can change the incline by 1 step per time. When you press the “-INCLINE+” key
lasting for 0.5 sec the incline data will change continuously.
7) “INCLINE: 4 6 8 10 which is for choosing the incline directly.
8) “SPEED: 4 6 8 10 which is for choosing the speed directly.
9) “USB, Mp3”(Optional): it defaults Mp3 function when switch on the machine. If you want to use the USB
function, please pull out the Mp3 connection wire first. In USB mode, normally by pressing the “-VOL+”
key you can choose the next or previous music. And by pressing the “-VOL+” key for several seconds
you can change the volume of the speaker.
3. Start-up Quickly:
1) Switch on and put the safety key in correct position.
2) Press the “START”key and then the machine will work at a speed of 0.8km/h after the beeper
countdown from 3 to 1.
3) According to your need you can change the speed and incline by pressing “-SPEED+”and “-INCLINE+”
separately.
4. Manual Mode:
1) Press the “START”key and then the machine will work at a speed of 0.8km/h and all other windows will
count from 0 in standby mode. Press the “-SPEED+” key to change the speed and the “-INCLINE+” key
to change the incline.
2) In standby mode press the “MODE”key to enter into time countdown mode. “30:00” will be flashed
displaying in the “TIME”window. Press the “-INCLINE+” or “-SPEED+”key to change the data from 5:00
to 99:00.

11
3) In time countdown mode press the “MODE”key to enter into distance countdown mode. “1.0” will be
flashed displaying in the “DIST” window. Press the “-INCLINE+” or “-SPEED+” key to change the data
from 0.5 to 99.9.
4) In distance countdown mode, press the “MODE”key to enter into calorie countdown mode, “50” will be
flashed displaying in the “CAL”window. Press the “-INCLINE+” or “-SPEED+” key to change the data
from 10 to 999.
5) Choose one of the three countdown mode and then press the “START”key and the machine will work
after 3 sec. Press the “-INCLINE+” key to change the incline and the “-SPEED+” key to change the
speed. Press the “STOP”key to shut off the machine.
5. Quick program mode
Press the quick choice program key and congratulations you have entering the program. Meanwhile the
TIME window will display default data “30:00”and flash all the time. The dot matrix window will show the
graphic of the program. Of course you can change the speed and incline by pressing the “-INCLINE+” or
“-SPEED+”key when the column is in flashing mode. There are 15 stages each program. And each
exercising time=set time/15 minutes. It will enter into the next program automatically when the previous one
is finished. Meanwhile there will be 3 “Bi-Bi- Bi-”warning voices. The speed and incline will change
accordingly to the program graphic. When the program is over, the incline will decrease to zero degree.
During the program workout you can press STOP key or pull off the safety key to stop training. When a
program is over, there will be 3 ““Bi-Bi- Bi-”warning voices. And after 5 seconds the machine will be in
standby mode.

12
6. Program introduction
Each program is divided into 15 stages.And every stage has its own speed and incline.
Formula table
Stage
formula
Preset time/15 = Each exercising time
1
2
3
4
5
6
7
8
9
10
11
12
13
14
15
MANUAL
SPEED
3
3
3
3
3
3
3
3
3
3
3
3
3
3
3
INCLINE
2
2
2
2
2
2
2
2
2
2
2
2
2
2
2
WEIGHT
LOSS
SPEED
3
3
6
6
3
3
3
6
6
3
3
3
6
6
3
INCLINE
2
2
4
4
4
4
4
4
4
4
4
4
2
2
2
INTERVAL
SPEED
3
8
8
3
3
8
8
3
3
8
8
3
3
8
8
INCLINE
2
2
4
4
6
6
6
6
4
4
4
4
2
2
2
HILL CLIMB
SPEED
3
5
6
8
10
8
6
3
3
6
8
10
8
6
5
INCLINE
2
2
4
4
6
6
6
6
4
4
4
4
2
2
2
WALK
SPEED
3
5
5
6
6
5
5
8
8
5
3
3
5
5
8
INCLINE
2
2
4
4
4
4
4
4
4
4
4
4
2
2
2
FUN RUN
SPEED
3
7
7
9
9
10
3
3
7
7
9
9
10
7
7
INCLINE
2
2
4
4
4
4
4
4
4
4
4
4
2
2
2
7. Manual mode:
User can set manual mode according to their need.
1) MANUAL SET
Press the MANUAL key to enter into MANUAL mode in the standby mode. And the TIME window will
show “30:00”and flash all the time. You can change the time by pressing “incline+”、“ incline -”、
“speed+”、“speed -”. After set the time, press the MODE key to enter into the program setting. You can
press“incline+”、“incline -”、“ speed+”、“speed -”key to set the speed or incline of the flashing column.
At last press the MODE key to finish setting.And the repeat the above step to set the following column till
to the 15th column. The data will be saved all the time unless you changed by yourself.
2) Starting of the MANUAL mode
Press the MANUAL key continuously to enter into MANUAL mode. When finish press the START key to
exercise.
3) Each program is divided into 15 stages. When finish setting 15 stages please press the START key to
begin exercising.

13
8. Display Range of Each Item:
Item
Initial
Original data
Range
Display range
Time (min: sec)
0:00
30:00
5:00-99:00
0:00-99:59
Incline (step)
0
0
0-15
0-15
Speed (km/h)
0.0
0.8
0.8-18
0.8-18
Distance (km)
0
1.0
0.50-99.9
0.00-99.9
Heart rate (time/min)
P
N/A
N/A
50-200
Calorie (K)
0
50
10-999
0-999
9. Function of the safety key
All of the display window will show “---”and the alarm beeps for 3 sound if you pull off the safety
key. And meanwhile any operation is not available. If you want to continuous please insert the
safety key first.
10. Energy saving mode
If there is not any operation in 10 munities, the machine will enter into energy saving mode. And do not show
anything. You can wake the system by pressing any key.
11. Switch off
You can switch off any time if you want to stop training and it won`t do any damage to the machine.
12. Attention:
1) Please check the power and the safety key is well or not.
2) If any accident happened during exercising, please pull out the safety immediately until it stop.
3) If there is something wrong with the machine, please connect the retailer as soon as possible. It`s not
allowed to repair the equipment by non-special person.
13. Simple Malfunction and Solution:
1) Switched on but without any signal on the display.
A. Check the overload protection is work or not, if so, press it down.
B. Check the switch, overload protection and the cable between the driver and the voltage transformer
are ok or not and make sure the connection is good.
C. Check the connection between the driver and display is ok or not and.
D. The voltage transformer is broken, replace the transformer.
2) The display shows E01 after switch on.
A. There something wrong with the signal cable. Please check each cable between display and the

14
driver is ok or not.
B. There are something wrong with the display component part, please replace the display.
C. Replace the transformer.
3) The display shows E02 after switch on.
A. Check the motor cable is ok or not, if not please reconnect the motor cable. If it does not work,
please replace the motor.
B. Check the controller whether there is any special smell. If so please replace the controller.
C. Check whether the input voltage is correct or not. Please use the right input voltage.
4) The display shows E04 after switch on.
A. Please check whether the signal wire of the incline motor is ok or not, please pull of the connector
and insert it again.
B. Please check the connection of the AC wire of the incline motor is correct or not. Please check
according to drawing.
C. Please check the wire of the incline motor is broken or not, replace the wire or the incline motor.
D. Replace the PCB board
E. After checking all of the PCB, please press the LEARNING key to learn it again.
5) The display shows E05 after switch on-----overload protection
A. The load is too big, please reset.
B. Maybe some part is jammed which make the motor too heavy, so the machine cannot work. Please
adjust the running belt or lubricate some oil.
C. Check the motor whether there is any special smell or overload currency sound. If so please replace
the motor.
D. Check whether the PCB board is burnt or not, please replace the PCB board.
E. The IGBT on the PCB board is short circuit, please check the IGBT is ok or not by multi-meter. Please
replace the PCB board.
Tips for Stretching:
•Begin with gradual mobility exercises of all the joints, i.e. simply rotate the wrists, bend the arm and roll your
shoulders. This will allow the body’s natural lubrication (synovial fluid) to protect the surface of the bones at
these joints.

15
•Always warm up the body before stretching, as this increases blood flow around the body, which in turn
makes the muscles more supple.
•Start with your legs, and work up the body.
•Each stretch should be held for at least 10 seconds (working up to 20 to 30 seconds) and usually repeated
about 2 or 3 times.
•Do not stretch until it hurts. If there’s any pain, ease off.
•Don’t bounce. Stretching should be gradual and relaxed.
•Don’t hold your breath during a stretch.
•Stretch after exercising to prevent muscles tightening up. Stretch at least three times a week to maintain
flexibility.
Thigh Stretch:
•Stand on right leg and take
hold of the left ankle with the
left hand, drawing the foot up
close behind to the hips.
•Keep back straight and
knees together. Use a wall
for balance if required.
•Hold for about 10 seconds.
•Repeat for the other leg.
Hamstring Stretch:
•Keep front leg straight,
hands on bent leg (thigh).
Push down and out until you
begin to feel the stretch in
back of knee (or straight leg).
•Keep knees unlocked and
back straight.
•Hold for about 10 seconds.
•Repeat for other leg.
Calf Stretch:
•Stand with the back foot
flat on the floor and
transfer weight to the
front foot.
•Hold for about 10
seconds.
•Repeat for other leg.
Note: Keep your back and
rear leg straight when
performing this exercise.
Inner Thigh Stretch:
•Sit with the soles of
your feet together and
your knees outward.
Pull your feet toward
your groin area as far
as possible.
•Hold for about 10
seconds.

16
Maintenance
Warning:
Before cleaning the machine, please make sure the power has been switched off.
1. Cleaning:Wipe away the dust on the belt, running board and side footboard as excess dust may increase the
frictional on the belt and cause damage to the machine. It is recommended to clean the machine once a
month.
2. Lubrication: Please use lubrication oil between the running belt and board twice a year.
3. Running belt is off-center: The Running belt may become off-center after using for a period of time. First
allow the machine to run by it-self and the belt may centralize automatically. If it does not centralize
automatically, you can adjust the position of the belt by screwing the bolt shown in the images below. If the
running belt has shifted to the right, you need to tighten the screw on the right of the belt or loosen the screw
on the left. If the belt has moved to the left, do the opposite.
4. Belt Slipping: Please adjust bolts according to the diagram below. When adjusting the two sides make sure
each adjustment is the same, on either side of the treadmill. We recommend adjusting by half a turn until the
running belt does not slip or deviate.Avoid making the belt too tight as this may damage it.

17
Explosive Drawing

18
Part List
NO.
Description
QTY
NO.
Description
QTY
1
Bottom frame
1
37
Safety key
1
2
Running frame
1
38
DC motor
1
3
Incline frame
1
39
Incline motor
1
4
Display frame
1
40
PCB board
1
5
Motor seat frame
1
41
Black bumper cushion
2
6
Left column
1
42
Plug
1
7
Right column
1
43
Square shaped switch
1
8
Filter
1
44
Overload protector
1
9
Inductor
1
45
Running belt
1
10
Front roller
1
46
Multi-v belt
1
11
Rear roller
1
47
Foam
2
12
Air cylinder
1
48
Handlebar incline direct key
1
13
Rotation sleeve
4
49
Handlebar speed direct key
1
14
Plastic washer
4
50
Black rubber cushion
2
15
End cap
4
51
Blue rubber cushion
2
16
Transportation wheel
2
52
Blue rubber cushion
2
17
Running deck
1
53
Regulation wheel
2
18
Display front cover
1
54
Tapered rubber cushion
2
19
Control panel
1
55
Plat wheel pad
6
20
Elliptical end cap
2
56
Wire keeper
2
21
Safety key seat
1
57
Cross pan head tapered screw
2
22
Display bottom cover
1
58
Handle pulse
2
23
Left bottom cover
1
59
AC wire
2
24
Right bottom cover
1
60
AC wire
1
25
Left rear regulator
1
61
Earth wire
1
26
Right rear regulator
1
62
O ring magnet
1
27
Motor front cover
1
63
Magnet core
1
28
Motor bottom cover
1
64
Power cable
1
29
Bumper cushion
2
65
Allen wrench
1
30
Side rail
2
66
Solid wrench
1
31
Pressing spring
6
67
Prevailing torque type non-metal hexagon nuts
6
32
O ring cushion
6
68
Prevailing torque type non-metal hexagon nuts
6
33
Top cover of the handle pulse
2
69
Cross recessed pan head tapered screw
4
34
End cap
2
70
Inner hex pan head bolt
12
35
AC wire
1
71
Inner hex pan head bolt
4
36
AC wire
1
72
Inner hex pan head bolt
1

19
73
Inner hex pan head bolt
1
97
Washer
6
74
Inner hex pan head bolt
2
98
Washer
7
75
Inner hex pan head bolt
2
99
Washer
8
76
Inner hex pan head bolt
2
100
Cross recessed pan head screw
6
77
Inner hex pan head bolt
2
101
Upper wire of the display
1
78
Inner hex pan head bolt
4
102
Lower wire of the display
1
79
Inner hex pan head bolt
1
103
Handle pulse
4
80
Inner hex column head bolt
1
104
Speaker
2
81
Inner hex pan head bolt
2
105
Prevailing torque type non-metal hexagon nuts
2
82
Cross recessed pan head tapered screw
8
106
Friction belt
2
83
Hexagon socket head cap bolt
3
107
Cross recessed pan head tapered screw
6
84
Inner hex countersunk bolt
2
108
Belt guidance
2
85
Inner hex countersunk bolt
6
109
Closing plate
2
86
Cross pan head screw
8
110
Running board support
1
87
Cross pan head screw
14
111
EVA cushion
1
88
Cross recessed pan head tapered drilling screw
16
89
Cross pan head tapered screw
19
90
Cross countersunk screw
2
91
Cross recessed pan head tapered screw
4
92
Cross recessed countersunk tapered screw
2
93
Nut
4
94
Curved washer
3
95
Curved washer
16
96
Curved washer
2
Table of contents
Other FitLogic Treadmill manuals
Popular Treadmill manuals by other brands

cecotec
cecotec DRUMFIT WAYHOME 1800 RUNNER SPRINT instruction manual

zebris
zebris FDM-T-Sports Operating instructions and specifications

NordicTrack
NordicTrack INCLINE TRAINER X5 NTK1494.1 user manual

Horizon Fitness
Horizon Fitness Evolve Plus owner's guide

PowerTrainer
PowerTrainer PT-333 owner's manual

BH FITNESS
BH FITNESS 3265723 Instructions for assembly and use