FLOS 548 User manual

Model 548
Gino Sarfatti, 1951


Model 548
Gino Sarfatti, 1951

4
Model 548
Istruzioni di installazione
e impiego
ATTENZIONE!
La sicurezza dell’apparecchio é garanti-
ta solo rispettando queste istruzioni sia
in fase di installazione che di impiego; é
pertanto necessario conservarle.
AVVERTENZE:
- All’atto dell’installazione ed ogni volta
che si interviene sull’apparecchio, assi-
curarsi che sia stata tolta la tensione di
alimentazione.
- L’apparecchio non può essere in alcun
modo modificato o manomesso, ogni
modifica ne può compromettere la si-
curezza rendendo lo stesso pericoloso.
Astep declina ogni responsabilità per i
prodotti modificati.
- L’apparecchio è esente dal rischio di
emissione fotobiologica.
- La sorgente luminosa non può essere
sostituita dal cliente. Per informazioni
contattare Astep.
- Se il cavo flessibile si danneggia, deve
essere sostituito da Astep o da persona-
le qualificato al fine di evitare pericoli.
- Il simbolo riportato sull’apparec-
chio indica che il prodotto deve essere
smaltito in modo differenziato dai rifiuti
urbani.
DATI TECNICI:
Nr.1 LED 11W.
ISTRUZIONI PER LA PULIZIA
DELL’APPARECCHIO
- Per la pulizia dell’apparecchio utiliz-
zare esclusivamente un panno morbido
eventualmente inumidito con acqua e
sapone.
- Attenzione: non utilizzare alcool o
solventi.
Instruction for correct
installation and use
WARNING!
The safety of this fitting can only be
guaranteed if these instructions are ob-
served, during both installation and use.
Please retain these instructions safety.
REMARKS:
- When installing and whenever acting
on the appliance, ensure that the power
supply has been switched off.
- The appliance may in no way be mod-
ified or tampered with, any modification
may compromise safety causing the
appliance to become dangerous. Astep
declines all responsibility for products
that are modified.
- The device carries no risk of photobio-
logical emissions.
- The light source cannot be replaced
by the customer. Contact Astep for
information.
- Should the external trailing cable get
damaged,it must be replaced by Astep
or by qualified personnel in order to
avoid any danger.
- The symbol shown on the device in-
dicates that the product must be thrown
out in a different manner than with the
urban trashes.
TECHNICAL DATA:
Nr.1 LED 11W.
CLEANING INSTRUCTIONS
- Use only a soft cloth to clean the appli-
ance, dampened with water and soap.
- Warning: do not use alcohol or other
solvents.

5
Model 548
Installation
und Gebrauchsanweisungen
ACHTUNG!
Wir garantieren nur dann für die
Sicherheit der Leuchte, wenn diese
Anweisungen sowohl bei der Installation
als auch beim Gebrauch genau be-
achtet werden. Es ist daher ratsam, sie
aufzubewahren.
BEMERKUNGEN:
- Bei der Installation und bei Eingriffen
an der Leuchte ist sicherzustellen, daß
die Anlage vom Netz abgeschaltet ist.
- Der Apparat darf auf keinen Fall vera-
endert oder unerlaubt geoeffnet werden,
jede Veraenderung desselben kann die
Sicherheit in Frage stellen und somit
gefaehrlich werden. Astep lehnt jede
Verantwortung fuer unsachgemaess
behandelte Produkte ab.
- Das Gerät ist frei von photobiologi-
schen Emissionsgefahren.
- Die Leuchtquelle kann nicht vom
Kunden ausgewechselt werden. Für
Informationen bitte Astep kontaktieren.
- Falls das flexible äußere Kabel
beschädigt wird, muß es von Astep
oder von qualifiziertem Personal ersetzt
werden, um Gefahren zu vermeiden.
- Das auf dem Gerät wiedergegebene
Symbol zeigt an, dass das Produkt
getrennt vom Stadtmüll entsorgt werden
muss.
TECHNISCHE DATEN:
Nr.1 LED 11W.
REINIGUNGSVORSCHRIFTEN
- Bei der Reinigung der Leuchte darf
man ausschließlich weiche Tücher
verwenden. Eventuell kann man diese
mit Wasser und Seife oder mit einem
neutralen Reinigungsmittel anfeuchten.
- Achtung: Weder Alkohol noch
Lösungsmittel verwenden.
Notice de montage
et d’utilisation
ATTENTION!
La sûreté de cet appareil est garan-
tie uniquement si l’on respecte ces
instructions soit en phase d’installation
soit pendant l’utilisation; il faut donc les
conserver.
NOTICES:
- Au moment de l’installation et chaque
fois que l’on intervient sur l’appareil,
s’assurer que la tension d’alimentation
ait été coupée.
- L’appareil ne peut être modifié ou
altéré de quelque manière que ce soit,
toute modification peut compromettre
la sécurité de celui-ci en le rendant dan-
gereux. Astep décline toute responsabi-
lité pour les produits modifiés.
- L’ appareil ne présente aucun risque
photobiologique;
- La source lumineuse ne peut pas être
remplacée par le client. Pour obtenir des
informations, contacter la société Astep.
- Si le cordon flexible externe est
endommagé, il doit être remplacé par
Astep ou par le personnel qualifié afin
d’éviter des dangers.
- Le symbole reporté sur l’appareil
indique que le produit doit être éliminé
dans le respect des règles de tri sélectif
des déchets.
DONNEES TECHNIQUES:
Nr.1 LED 11W.
INSTRUCTIONS POUR LE NETTOYAGE
- Pour le nettoyage de l’appareil utiliser
exclusivement un chiffon doux, humecté
si nécessaire, avec de l’eau et du savon
ou avec un détergent neutre pour les
salissures les plus tenaces.
- Attention: ne pas utiliser d’alcool ou
solvents.

6
Model 548
Instrucciones de
instalacióny de uso
¡ATENCIÓN!
La seguridad del aparato sólo puede
garantizarse con la condición de que se
respeten las siguientes instrucciones,
tanto en la fase de instalación como
de uso, por lo cual se recomienda
conservarlas.
ADVERTENCIA:
- Para efectuar la instalación, y toda vez
que se efectúe alguna operación en el
aparato, asegurarse de haber cortado la
corriente eléctrica.
- El aparato no puede ser en ningùn
caso modificado o forzado, cualquier
modificaciòn puede comprometer la
seguridad haciéndolo peligroso. Astep
declina cualquier responsabilidad en los
productos modificados.
- El aparato no presenta ningún riesgo
fotobiológico.
- La fuente luminosa no puede ser
sustituida por el cliente. Para más infor-
mación, ponerse en contacto con Astep.
- Si el cable externo se estropea, debe
ser sustituido por Astep o por personal
cualificado con el fin de evitar situacio-
nes peligrosas.
- El símbolo marcado en el aparato
indica que el producto debe ser elimi-
nado en modo diferenciado del resto de
los desechos urbanos.
DATOS TECNICOS:
Nr.1 LED 11W.
INSTRUCCIONES PARA LIMPIAR EL
APARATO
- Para la limpieza del aparato, utilizar
exclusivamente un paño suave. En caso
de suciedad más resistente, humedecer
el paño con agua y jabón o un detergen-
te neutro.
- Advertencia: no emplear alcohol ni
disolventes.
Instruções
instalação e uso
ATENÇÃO!
A segurança do aparelho é garantida
somente se respeitarmos as instruções
tanto na fase de instalação como na de
uso; portanto é necessário conservar
tais instruções.
ADVERTÊNCIA:
- Quando se instala e cada vez que se
mexe no aparelho, ter a certeza que foi
desligado da tensão de alimentação.
- De forma alguma o aparelho deve ser
modificado ou alterado, toda e qualquer
modificação pode comprometer a se-
gurança tornando o aparelho perigoso.
Astep declina toda e qualquer respon-
sabilidade pelos produtos modificados.
- O aparelho está livre do risco de emis-
são fotobiológica;
- A fonte luminosa não pode ser
substituída pelo cliente. Para maiores
informações contactar Astep.
- Se o cabo flexível está danificado,
deve ser substituído pela Astep ou por
pessoal qualificado para evitar qualquer
perigo.
- O símbolo indicado no aparelho
indica que o produto deve ser eliminado
de forma diferenciada em relação ao
lixo urbano.
DADOS TÉCNICOS:
Nr.1 LED 11W.
INSTRUÇÕES PARA A LIMPEZA DO
APARELHO
- Para limpeza do aparelho utilizar ex-
clusivamente um tecido macio eventual-
mente úmido com água e sabão.
- Atenção: não utilizar álcool ou
solventes.
7
Model 548
ИНСТРУКЦИИ ПО МОНТАЖУ И
ПРИМЕНЕНИЮ
ВНИМАНИЕ!
Надёжность устройства гарантиру-
ется только при соблюдении данных
инструкций, как в фазе монтажа, так и
при применении, поэтому необходимо
обеспечить их сохранность.
ПРЕДУПРЕЖДЕНИЯ:
- В момент установки и каждый раз
при проведении работ с устройством,
убедиться в снятии напряжения
питания.
- Устройство не может изменяться или
разбираться, любые изменения могут
нарушить надёжность, делая его опас-
ным. Astep не несёт ответственность
за измененную продукцию.
- Устройство не обладает риском
фотобиологической эмиссии;
- Источник света не может быть
заменен заказчиком. Для получения
информации связаться с компанией
Astep.
- При повреждении гибкого кабеля
он должен быть заменён Astep или ква-
лифицированным персоналом в целях
предотвращения опасности.
- Символ приведённый на устрой-
стве, указывает на то, что данная
продукция должна быть переработана
отдельно от городских отходов.
ТЕХНИЧЕСКИЕ ДАННЫЕ:
Nr.1 LED 11W.
ИНСТРУКЦИИ ПО ОЧИСТКЕ
УСТРОЙСТВА
Для очистки устройства использовать
только мягкую тряпку, смоченную
водой с мылом или нейтральным мою-
щим средством для наиболее стойких
загрязнений.
- Внимание: Не использовать спирт или
другие растворители.
取り付けおよびご使用方法
警 告!
安全な器具の取り付けおよびご使用の
ために、取扱説明書に従って作業を行っ
てください。また、取扱説明書は必ず保管
してくだ さ い 。
注 意:
- 取り付け作業および取り外しや再取
り付け時には、必ず電源を切ってくだ
さい。
- 危険ですので、器具を改造したり、部
品を追加・変更して使用しないでくださ
い。改造した製品に対しては、Astepは一
切責任を負いません。
- 器具は光生物学上の光害リスクはあり
ません。
-光源はお客様の手でお取り替えいただ
けません。 詳しくは ASTEP までお尋ね
下さい。
- 可とうケーブルが損傷した場合、危険防
止のた め、必ずAstep社または有資格者
にケーブルの 交換を依頼してください。
- 器具上の表示 は、一般ごみと区別
して本製品を廃棄しなければならないこ
とを表します。
技術的な仕様
Nr.1 LED 11W。
器具のお手入れの仕方
- 器具のお手入れの際には、水と中性
石鹸で湿らせた柔らかい布をご利用下
さい。
- 注意:お手入れの際にはアルコールや
溶液はご利用いただけません。
8
Model 548
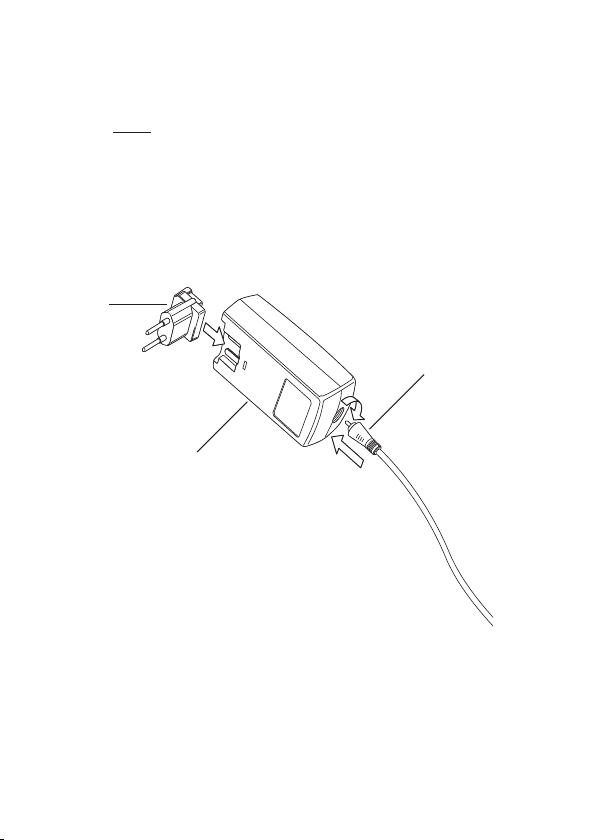
Fig. 1
A
B
C

9
Model 548
Fig. 1 Inserire la ina (A) nell’ali-
mentatore (B) utilizzando le apposi-
te guide fino ad avvertire lo scao
di aggancio (utilizzare la tipologia
di ina correa per la regione in
cui si inalla l’apparecchio); colle-
gare lo inoo (C) all’alimentatore
bloccandolo con una rotazione di
90° in senso orario.
Fig. 1 Insert the plug (A) into the
feeder unit (B). By using the guides
snap it inside its apposite slot (use
the corre type of plug for the area
in which the device mu be inal-
led), conne the plug (C) to the
feeder unit locking it in by rotating
it 90° clockwise.
Abb. 1 Stecker (A) über die vor-
gesehenen Führungen bis zum
Einraen in das Netzgerät (B) ein-
führen (es i der in dem entre-
chenden Benutzerland des Geräts
richtige Steckertyp zu verwenden);
Steckeri (C) mit dem Netzgerät
verbinden und mit einer 90°-Dre-
hung im Uhrzeigersinn blockieren.
Fig. 1 Insérer la fiche (A) dans
le boîtier d’alimentation (B) en
utilisant les guides prévus jusqu’au
verrouillage des crochets (utiliser
le type de prise corree en fonc-
tion du pays où e inallé l’appa-
reil); conneer la petite fiche (C) au
boîtier d’alimentation et la bloquer
par une rotation de 90° dans le
sens des aiguilles d’une montre.
Imag. 1 Introducir el enchufe (A)
en el alimentador (B) utilizando
las adecuadas guías haa que
se advierta el golpe de enganche
(utilizar la tipología de enchufe
correo para la región donde se
inala el aparato); unir el enchufe
(C) en el alimentador bloqueándolo
con una rotación de 90° en sentido
horario.
Fig. 1 Introduzir a ficha (A) no
alimentador (B), utilizando as
respectivas guias até sentir o
encaixe (utilizar o tipo de ficha
correcto para a região na qual se
instala o aparelho); ligar o pino (C)
ao alimentador bloqueando com
uma rotação de 90°no sentido
horário.
Рис. 1 Вставить вилку (A) в
блок питания (B) по специаль-
ным направляющим до щелчка
(использовать вилку, подхо-
дящую для Вашего региона);
вставить штекер (C) в блок
питания и зафиксировать его
повернув на 90° по часовой
стрелке.
図 1. プラグ (A) を電源アダプター
(B)にカチっと音が聞こえるまで、し
っかりと挿入します(プラグタイプ
はご利用になる地域に適した物を
ご利用下さい)。また電源アダプタ
ーを固定し た状態で丸プラグ(C)
を90度時計回りに回しながら接
続します。
10
Model 548
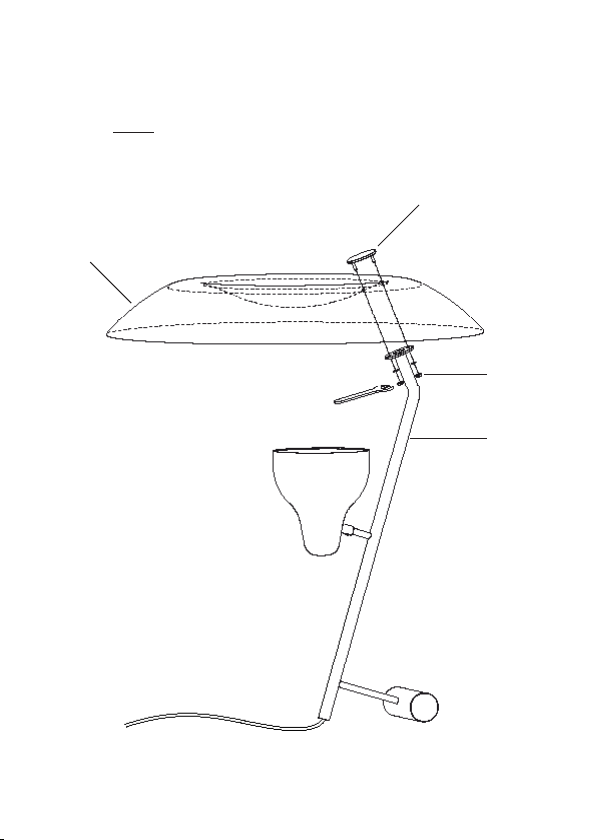
Fig. 2
D
F
E
G
11
Model 548
Fig. 2 Montare il rifleore (D) sul
corpo (E) come morato in figura,
utilizzando il tappo (F), le rondelle e
dadi (G) forniti in dotazione (utilizza-
re la chiave fornita in dotazione per
serrare i dadi).
Fig. 2 Mount the refleor (D) on
the body (E) as shown in the figure,
using the cap (F) , washers and
nuts (G) provided (use the anner
provided to tighten the nuts).
Abb. 2 Den Reflektor (D) am Leuch-
tenkörper (E) wie in der Abbildung
gezeigt montieren, dazu den
Deckel (F), die Unterlegscheiben
und Muern (G), alles beigepackt,
verwenden (zum Feziehen der
Muern den beigepackten Schrau-
benschlüssel verwenden).
Fig. 2 Monter le réfleeur (D) sur
le corps (E) comme indiqué sur
le schéma, en utilisant l’embout
(F) , les rondelles et les écrous (G)
fournis dans l’emballage (utiliser la
clé fournie pour serrer les écrous).
Imag. 2 Montar el refleor (D) sobre
el cuerpo (E) tal y como se indica
en la figura, utilizando el tope (F),
las arandelas y las tuercas (G) que
se incluyen (utilizar la llave incluida
para apretar las tuercas).
Fig. 2 Montar o refleor (D) no
corpo (E) como na figura, com a
tampa (F), as anilhas e as porcas
(G) fornecidas (utilizar a chave
fornecida para apertar as porcas).
Рис. 2 Закрепить отражатель
(D) на штанге (E), как показано
на рисунке, с помощью
заглушки (F), шайб и гаек (G),
поставляемых в комплекте
(для гаек использовать ключ из
комплекта поставки).
図 2. 図で示されているように、付属
の栓(F)と 座 金 とナット (G)( ナット を
締める時には付属のスパナを利用
して下さい。)を用い投光器(D)を本
体(E)に取り付ける。

12
Model 548
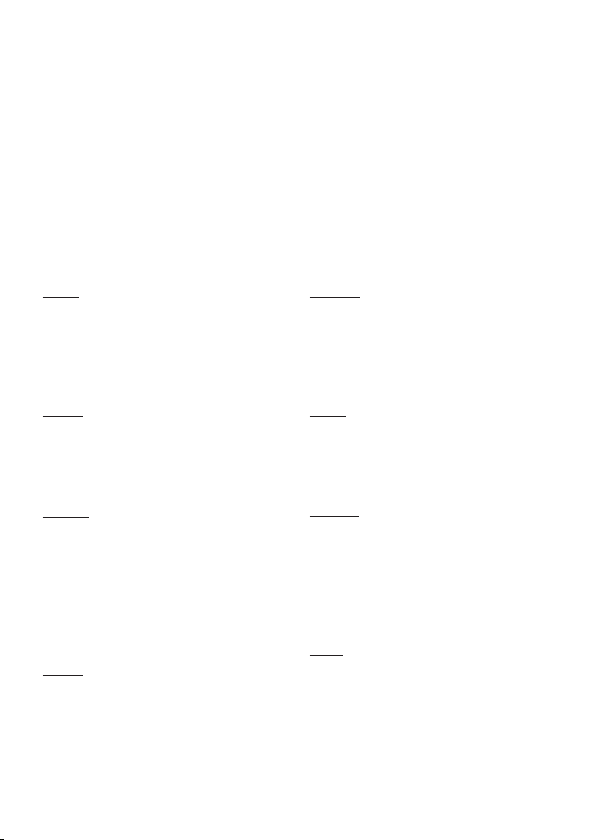
Fig. 3
H

13
Model 548
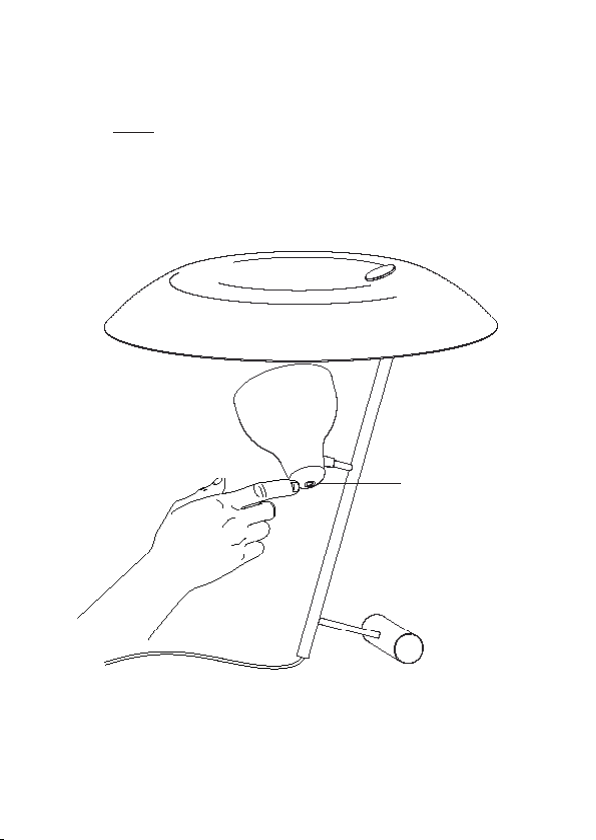
Fig. 3 Lo sfioramento del sensore
(H) provoca nell’ordine: 1 -
Accensione al 100% dell’intensità
luminosa; 2 - Decremento al
50% dell’intensità luminosa; 3 –
Spegnimento. Ad apparecchio
acceso (ep 1 o ep 2) un
contao prolungato del sensore
provoca il decremento progressivo
dell’intensità luminosa fino al 10%
e, prolungando ancora il contao,
l’incremento fino al 100%.
Fig. 3 Placing your finger on
the sensor (H) leads, in order of
occurrence, to: 1 – Turn-on of the
light at 100% brightness; 2 - 50%
decrease in the brightness; 3 –
Turn-o. With device on (ep 1
or ep 2) prolonged conta with
the sensor gradually decreases
the brightness down to 10% and,
by maintaining conta further,
increases it up to 100%.
Abb. 3 Das Berühren des Sensors
(H) mit dem Finger bewirkt in der
genannten Reihenfolge: 1 – Ein-
schalten des Lichts mit 100 %
Helligkeit, 2 – Verringern der Hel-
ligkeit um 50 %, 3 – Ausschalten.
Bei eingeschalteter Beleuchtung
(Schri 1 oder Schri 2) verringert
das längere Berühren des Sensors
die Helligkeit allmählich bis auf 10
% und erhöht sie, bei noch länge-
rem Berühren, bis auf 100 %.
Fig. 3 L’eeurement du sensor (H)
provoque dans l’ordre: 1 – l’é-
clairement à 100% de l’intensité
lumineuse; 2 – la baisse de 50% de
l’intensité lumineuse; 3 – l’extinion.
Lorsque la lampe e allumée (in-
tensité 1 ou 2) le maintien du conta
avec le sensor provoque dans un
premier temps la baisse progressive
jusqu’à 10% de l’intensité lumineuse
puis l’éclairement à 100%.
14
Model 548
H
Fig. 3
15
Model 548
Imag. 3 Si se toca el sensor
(H) se provoca, en ee orden,
lo siguiente: 1 - Encendido al
100% de la intensidad luminosa;
2 - Disminución al 50% de la
intensidad luminosa; 3 - Apagado.
Con el aparato encendido
(paso 1 o paso 2), un contao
prolongado con el sensor provoca
la disminución gradual de la
intensidad luminosa haa el 10% y,
prolongando aún más el contao,
se incrementa haa el 100%.
Fig. 3 Ao colocar o seu dedo
no sensor (H), são acionadas as
seguintes funções, por ordem de
ocorrência: 1 – Liga a luz com inten-
sidade de 100% de luminosidade; 2
– Reduz a intensidade da lumino-
sidade em 50%; 3 – Desliga a luz.
Com o diositivo ligado (passo 1
ou passo 2), o contao prolongado
com o sensor reduz gradualmente
a intensidade da luminosidade até
10% e, mantendo o contao, au-
menta a luminosidade até 100%.
Рис. 3 С помощью легкого
прикосновения к сенсору (H)
обеспечивается следующий
порядок включения: 1 - 100%
интенсивности света; 2 - Умень-
шение интенсивности света до
50%; 3 - Гашение. При включен-
ном устройстве (шаг 1 или шаг
2) длительное прикосновение к
сенсору вызывает прогрессив-
ное уменьшение интенсивности
света до 10%, и дальнейшее
увеличение интенсивности до
100% - при непрерывном при-
косновении.
図 3. センサー (H) に 指 を 置 くこと
によって、順次、次のような操作が可
能です: 1 – 100% の明るさで点灯
する ; 2 - 明るさを50%に落とす ;
3 – 消灯する。前記のステップ1お
よび2の操作で、センサーを指で触
り続けていると、少しずつ照度が落
ちて行き10%の明るさになります。
さらに触り続けていると、今度は少
しずつ照度が上がり再度100%の
明るさになります。

Cod. 22713 - 30/10/2013
www.aep.design
Other FLOS Home Lighting manuals

FLOS
FLOS F6630009 User manual

FLOS
FLOS IC S1-S2 EUR User manual

FLOS
FLOS ROMEO SOFT F User manual

FLOS
FLOS GLO-BALL BASIC 2 User manual

FLOS
FLOS WireRing User manual

FLOS
FLOS GOLDMAN User manual

FLOS
FLOS KELVIN LED User manual

FLOS
FLOS ROMEO SOFT F User manual

FLOS
FLOS TOIO F7600030 User manual

FLOS
FLOS ZEPPELIN 1 User manual

FLOS
FLOS WireRing User manual

FLOS
FLOS F1037046 User manual

FLOS
FLOS RF26676 User manual

FLOS
FLOS BON JOUR F1032057 User manual

FLOS
FLOS BIAGIO User manual

FLOS
FLOS F6604030 User manual

FLOS
FLOS IC C/W1 User manual

FLOS
FLOS NOCTAMBULE F User manual

FLOS
FLOS Antonio Citterio KELVIN LED GM User manual

FLOS
FLOS FU317935 User manual


