FM Electronics FM4000E User manual

Mainson
Alarm
Lowbattery
Tamper
Signalling
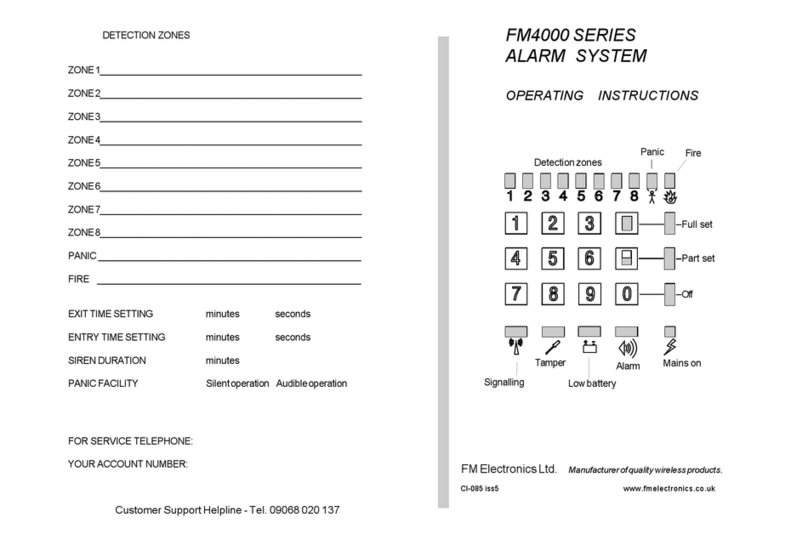
DETECTION ZONES
ZONE1____________________________________________________
ZONE2____________________________________________________
ZONE3____________________________________________________
ZONE4____________________________________________________
ZONE5____________________________________________________
ZONE6____________________________________________________
ZONE7____________________________________________________
ZONE8____________________________________________________
PANIC ____________________________________________________
FIRE ____________________________________________________
EXITTIMESETTING minutes seconds
ENTRY TIME SETTING minutes seconds
SIREN DURATION minutes
PANIC FACILITY Silentoperation Audibleoperation
FOR SERVICE TELEPHONE:
YOUR ACCOUNT NUMBER:
Full set
Part set
Off
Detectionzones Panic Fire
FMElectronicsLtd.
Manufacturerofqualitywirelessproducts.
CI-145ISS1
FM4000E
ALARM SYSTEM
OPERATING INSTRUCTIONS

34
ARMINGTHEALARMSYSTEMWHILSTREMAININGONTHEPREMISES
1. Keyin your4 digitpin number.
2. Press Part set key
3. The indicators illuminate to show which zones are being armed.
To add or remove a zone, press the appropriate number key.
A flashing indicator means that a door has been left open.
4. Vacate the protected area via your designated exit route.
5. Wait for the exit timer bleep to stop. The system is then armed.
If the bleep does not stop, return to the panel to identify where the fault is.
Ifthe detectorsare notclear toset, i.e.. Adoor isstill open,the affectedzone
indicator will flash and will prevent arming until either the door has
been closed, or that zone is omitted.
When armed all zone and fault indicators will be extinguished.
DISARMINGTHEALARMSYSTEM
1. Enter the protected area by the designated entry route.
2. Gostraightto thepanel.
3. Keyin your4 digitpin number.
If you do not disarm the system before the entry time has expired, the alarm
will operate.
PROTECTIONWHILSTYOUAREATHOME
Ifyouhave aportablepanic buttona fullalarmwill beinitiatedby pressingthePanic
button for one second. Refer to the rear page to see if your panic button has been
set for silent or audible operation.
The Part Set facility allows part of the system to be armed whilst you are at home.
For example detectors downstairs can be armed whilst you are in bed. Or a part
ofthebuildingcan be armed whilst youareworkingin another part ofthepremises.
CHANGINGYOURPINNUMBER.
You can change your 4 digit PIN number at any time by the following sequence.
1. Enter your 4 digit pin number.
2. Press key 7.
The full set indicator on the panel will flash.
3. Key in your new 4 digit pin number twice.
The flashing indicators will now stop.
Ifyoumakeamistakewhenkeyinginanumber,presstheFullSetkeytoexitandstartagain.
The number will not change until you have keyed in the same 4 digit PIN number twice.
If no key is pressed for 20 seconds the program mode is aborted and the panel will revert
to the original pin number.
ALARMMEMORY
Following an alarm the event leading to the alarm is stored in memory. At any time whilst
unset, the alarm display can be recalled in order to verify what occurred.
Press the full set button - The detector or fault which initiated the last alarm will be
displayed.
Pressing the Part Set button - Recalls the most recent event.
Pressing 0 returns the display to normal.
CHIMEOPTION
Ifyourequireadetectortotriggerachime. i.e.Togiveanaudibleindicationwhensomeone
enters via the front door, you may set the sensor on that door to operate a chime.
To set or remove chime:
1. Keyin yourpinnumber
2. Press the 8 key.
The Full set indicator will flash.
3. Press the number keys to select which zones will chime.
The zones with their indicators illuminated will chime.
The zones not illuminated will not chime.
4. Press the Full Set key when you have set the desired chime zone

6 Low battery Illuminated - Control panel battery fault. (Call your alarm company)
Flashing with a zone indicator - A detector battery needs replacing.
Call youralarmcompany.
7 Tamper Illuminated - The control panel or external siren has been tampered
or incorrect pin numbers have been entered
Flashing with a zone indicator - A detector has been tampered with.
(Call your alarm company)
8 Signalling Illuminated- A radio signal of a similar frequency is present for more
than 45 seconds. If it continues call your alarm company.
Flashing with a zone indicator- A detector has failed to report.
(Call your alarm company)
Flashing on its own - The telephone line is not operational.
(If the line remains faulty call your alarm company)
9 Zones1 to8 If an alarm has occurred they indicate which detector first
triggered the alarm.
10 Panic Indicates that a panic alarm has been operated.
11 Fire Indicates that a fire sensor has operated.
ARMINGTHEALARMSYSTEMWHENLEAVINGTHEPREMISES
1. Key in your 4 digit pin number. (Factory default is 1 2 3 4)
2. Press Full set key
3. The indicators illuminate to show which zones are being armed.
To add or remove a zone, press the appropriate number key.
A flashing indicator means that a door has been left open.
4. Vacate the protected area via your designated exit route.
5. Wait for the exit timer bleep to stop. The system is then armed.
If the bleep does not stop, return to the panel to identify where the fault is.
If the detectors are not clear to set, i.e.. A door is still open. The affected zone
indicator will flash and will prevent arming until either the door has been
closed or that zone is omitted.
When armed all zone and fault indicators will be extinguished.
5
KEYPADTAMPER
If incorrect attempts are made to enter the pin number, a tamper alarm will
operate,
(Internal audible in daytime. Full alarm when armed).
TESTINGYOURALARMSYSTEM
If your system incorporates an automatic telephone dialler going through to a
neighbour let your neighbour know you are carrying out a test .
If you have Police response via a Central Station connection, triggering the
alarm will not be acceptable to the Police.
Facility exists for you to test the detectors without causing a full alarm.
To select walk test:
1. Keyin yourpinnumber
2. Press the 9 key.
3. Walk around the building triggering each detector.
Each time a detector is triggered a chime tone will be generated.
On return to the panel, the zone indicators will be illuminated, indicating which
zones have been triggered.
Pressing the Off "0" key will clear the indicators.
PIR movement detectors have a 2 minute battery save timer. This means that
once it has sensed movement and transmitted its alarm signal, the detector
must see no movement for 2 minutes before it becomes active again.
Before testing PIR detectors ensure that no one has walked past them for 3
minutes.
A detector with a low battery will operate the internal audible alarm when
triggered.
To return the zone indicators to normal operation:
1. Keyin yourpinnumber
2. Press the 6 key.
In normal operation the zone lights indicate when a door is open and go out
again when the door is closed.
Thepanelwillreturntonormaldisplaynext timeyouarmthesysteminanycase.
TESTINGYOUROUTSIDEBELLS/SIREN
Facility exists for you to test the outside bells.
To operate the bells for 10 seconds:
1. Keyin yourPINnumber
2. Press the 4 key
3. The outside siren will sound for approximately 10 seconds.
2

1 Off Illuminated when the system is disarmed.
2 Part set Illuminated when the system is Part armed.
3 Fullset Illuminated when the system is Fully armed.
4 Mainson Illuminated - indicates mains supply is present.
Flashing - is a warning that mains supply is disconnected.
5 Alarm Illuminated - Indicates an alarm has occurred.
Flashing - An alarm has occurred and the system needs an
engineer reset. (Call your alarm company)
Fire
Full set
3
Part set
2
Off
5
Lowbattery
6
8
910
Panic
Mainson
AlarmTamper
7
Signalling
11
4
1
Explanation of indicators on the control panel
4171PANICBUTTON
This operates in a similar way to the remote control except it has only one
button.
To operate press the red button for one second.
Off
Full arm
Part arm Panic (See notes)
PREVENTINGFALSEALARM
1. When you are away from home with the alarm system armed, Dogs or Cats
must not be allowed access to rooms protected by PIR movement detectors.
2. Always disarm the system immediately on entry and ensure that children or
pets do not deviate from the entry route until the system has been disarmed.
3. When going away do not turn off the electricity supply to the alarm.
WHATHAPPENSIFTHEALARMOPERATESWHILSTYOUAREAWAY
The Siren will operate for a pre-determined time and then turn off to avoid noise
nuisance.
The strobe will continue to flash until the system is disarmed.
The system will automatically re-arm after the siren has cut out.
USINGTHE 4174 REMOTECONTROL
Full arm Press the Full set button for one second.
PartArm Press the Part Set button for one second.
Disarming Press the OFF button for one second.
Panic Alarm Press the two outside (Off and Panic) buttons for one second.
(Some systems may be set to respond to pressing the Panic button
only)
Battery low indicationWhen operating the remote control the green status indicator
illuminates. If it fails to illuminate the battery is getting low. Replace the battery as
soon as possible.
Detectionzones
Battery indicator
61
Table of contents
Other FM Electronics Security System manuals