Foes Shaver 29 User manual


1
Foes will repair or replace any part that is determined by Foes to be covered
by this warranty. This limited warranty is made ONLY to the original owner
and is not transferable. All claims must be made through an Authorized Foes
Dealer, and must be accompanied by the original bill of sale or proof of
purchase that identifies the bicycle frame by serial number. The original
owner is responsible for this and any and all labor and transportation charges
associated with the warrantied repair or replacement of parts, even if Foes
determines that it is under warranty.
If the warranty claim on your Foes frame is determined to be invalid, Foes
Racing will offer a replacement frame/swingarm/part of at least equal value at
a reduced price. This transaction will be offered only through an Authorized
Foes Dealer, and under the following conditions: the frame has been regis-
tered with Foes Racing; the Frame is the property of the original purchaser;
the owner provides a valid sales receipt. This crash replacement is only
available to the original owner, and, for a time period of three years from the
original purchase date. The replacement frame must be assembled by an
Authorized Foes Dealer to maintain the Foes warranty. All freight charges
associated with the crash replacement are the responsibility of the original
owner.
We cannot stress enough that building-up a pro-level frame is not an
endeavor recommended for home mechanics. Special tools and skills accu-
mulated over time are needed to accomplish this successfully, and your
dealer can answer 99% of all the questions related to the complete build of a
high-end frameset. Due to this fact, this manual covers only the most
elemental information.
Every Foes Frameset has a useful product life. The length of this product life
will vary with the construction and materials of the frame or fork, the mainte-
nance and care the frame and fork receives over its useful product life, and
the type and amount of use the frame or fork is subject to. Users in competi-
tive events, trick riding, jumping, ramp jumping, aggressive riding, riding on
severe terrain, riding in severe climate or weather, ...continued
USEFUL PRODUCT LIFE
FOES FRAMES SHOULD BE INSPECTED
PERIODICALLY BY A FOES DEALER
WHAT IF YOUR FRAME IS NOT COVERED
WHAT FOES WILL DO UNDER THE WARRANTY
2
riding with heavy loads, commercial activities, and other types of non-
standard use can dramatically shorten the useful life of the Foes Frame or
Fork. Any one or a combination of these factors and conditions may result in
an unpredictable failure of a Foes Frame or Fork that would not be covered
by warranty. ALL FOES FRAMES, FORKS, AND SHOCKS SHOULD BE
PERIODICALLY CHECKED BY A RETAIL OUTLET OR A FOES DEALER
for indicators of stress and/or potential failure, including cracks, deformation,
corrosion, paint peeling, dents, and any other indicators of potential prob-
lems. These are important safety checks, and may be very important to help
prevent accidents, bodily injury to the rider, and a shortened life of the Foes
frameset or fork. THIS IS AN INTEGRATED AND FINAL STATEMENT OF
THE FOES LIMITED WARRANTY. FOES DOES NOT AUTHORIZE OR
ALLOW ANYONE, INCLUDING FOES DEALERS OR RETAIL BICYCLE
OUTLETS, TO EXTEND ANY OTHER WARRANTIES, EXPRESSED OR
IMPLIED, FOR FOES. NO OTHER REPRESENTATION, AND NO STATE-
MENT FROM ANYONE BUT FOES, INCLUDING A DEMONSTRATION OF
ANY KIND BY ANYONE SHALL CREATE ANY WARRANTY REGARDING
THIS FRAME OR FORK. ALL OF THE REMEDIES AVAILABLE TO THE
ORIGINAL OWNER ARE STATED HEREIN. IT IS AGREED THAT FOES
LIABILITY UNDER THIS LIMITED WARRANTY SHALL BE NO GREATER
THAN THE ORIGINAL PURCHASE PRICE AND IN NO EVENT SHALL
FOES BE LIABLE FOR INCIDENTAL OR CONSEQUENTIAL DAM-
AGES.
All other remedies, obligations, liabilities, rights, or warranties, expressed or
implied, arising from law or otherwise including, but not limited to, any
claimed implied warranty of merchantability, any claimed implied warranty
arising from course of performance, course of dealing or usage of trade, and
any claimed implied warranty of fitness, are disclaimed by Foes and waived
by the original owner. Some states, jurisdictions, countries, and provinces
do not allow some or all of the limitations set herein or the exclusion or limita-
tion of incidental or consequential damages. If any provision is found
enforceable, only that provision shall be stricken and all others shall apply.
This limited warranty does not provide the original owner with certain legal
rights and recourse, and the original owner may possess other rights or
recourse, depending on the state, jurisdiction, country or province.
WARNING: BICYCLE RIDING MAY BE HAZARDOUS TO YOUR
HEALTH, AND EVEN FATAL! ALWAYS WEAR A HELMET AND PROPER
PROTECTIVE CLOTHING.
DISCLAIMER


7
For the break-in period Foes recommends that you introduce a low pressure,
like 65 psi, to start. This is a good setting to break-in your shock, and will
allow you to get a good feel for what this pressure will do over a variety of
terrain. Your Curnutt will break-in properly in about 10 hours of ‘normal’ riding.
This means that, much like a new motor, the contact-moving surfaces of the
shock will ‘seat’ better if they are allowed to move throughout their entire
range or stroke, without introducing them to undue or violent spikes of energy
(as in landing from jumps). Once your shock has broken-in, you will be able
to much more accurately feel what the shock is doing with more or less air
pressure. Adjusting air pressure during the break-in period will be confusing
at best. That being said, if your shock repeatedly bottoms over normal trail
terrain during break-in, it is appropriate to introduce more air pressure to
compensate – 5 psi at a time. Additionally, it should be remembered that
proper break-in requires the shock to cycle through its entire stroke or travel.
If it appears that your shock is not using its entire stroke (too stiff) – over
normal riding conditions - then reducing its air pressure would be an appro-
priate measure – BUT NEVER GO UNDER 50 PSI!. Once your Curnutt XTD
is broken-in, controlling bottoming with proper air pressure and the Ramping
Dial will be more accurately achieved.
BREAK-IN PERIOD
Since your Curnutt was actually built, valved, sprung and pre-loaded accord-
ing to your specific rider weight, skill level and type of riding you mostly enjoy,
your Curnutt shock is about 95% tuned to you right from the factory. The
other 5% will be the Bottoming Control, and tuning your Rebound Damping.
The ‘BOTTOMING CONTROL’ section on page 11 will address Bottoming
Control and the air pressure that affects it. (If you have an AIR shock, please
see its addendum.) Rebound Damping will be addressed in a following
section. Your Curnutt XTD Shock is a true fluid–damped, coil-over shock
which, uniquely, uses air pressure to control bottoming (as well as reduce
fluid foaming). The range of air pressure needed inside your Curnutt XTD is
between 65 and 100 psi. This means, between these minimum and maxi-
mum pressures lies an ideal setting for the control of bottoming the rear
suspension over a given terrain. As said initially, your shock’s compression
damping is mostly set for you at the factory, yet, adjusting the air pressure will
tune your shock’s ability to resist bottoming – an important feature for the life
and longevity of your Curnutt Shock and Foes Frame.
FACTORY SETTINGS
8
FOX Float Air shock : for Rear Suspension Maintenance Check Out
FOX website or FOX manual CD
www.foxracingshox.com
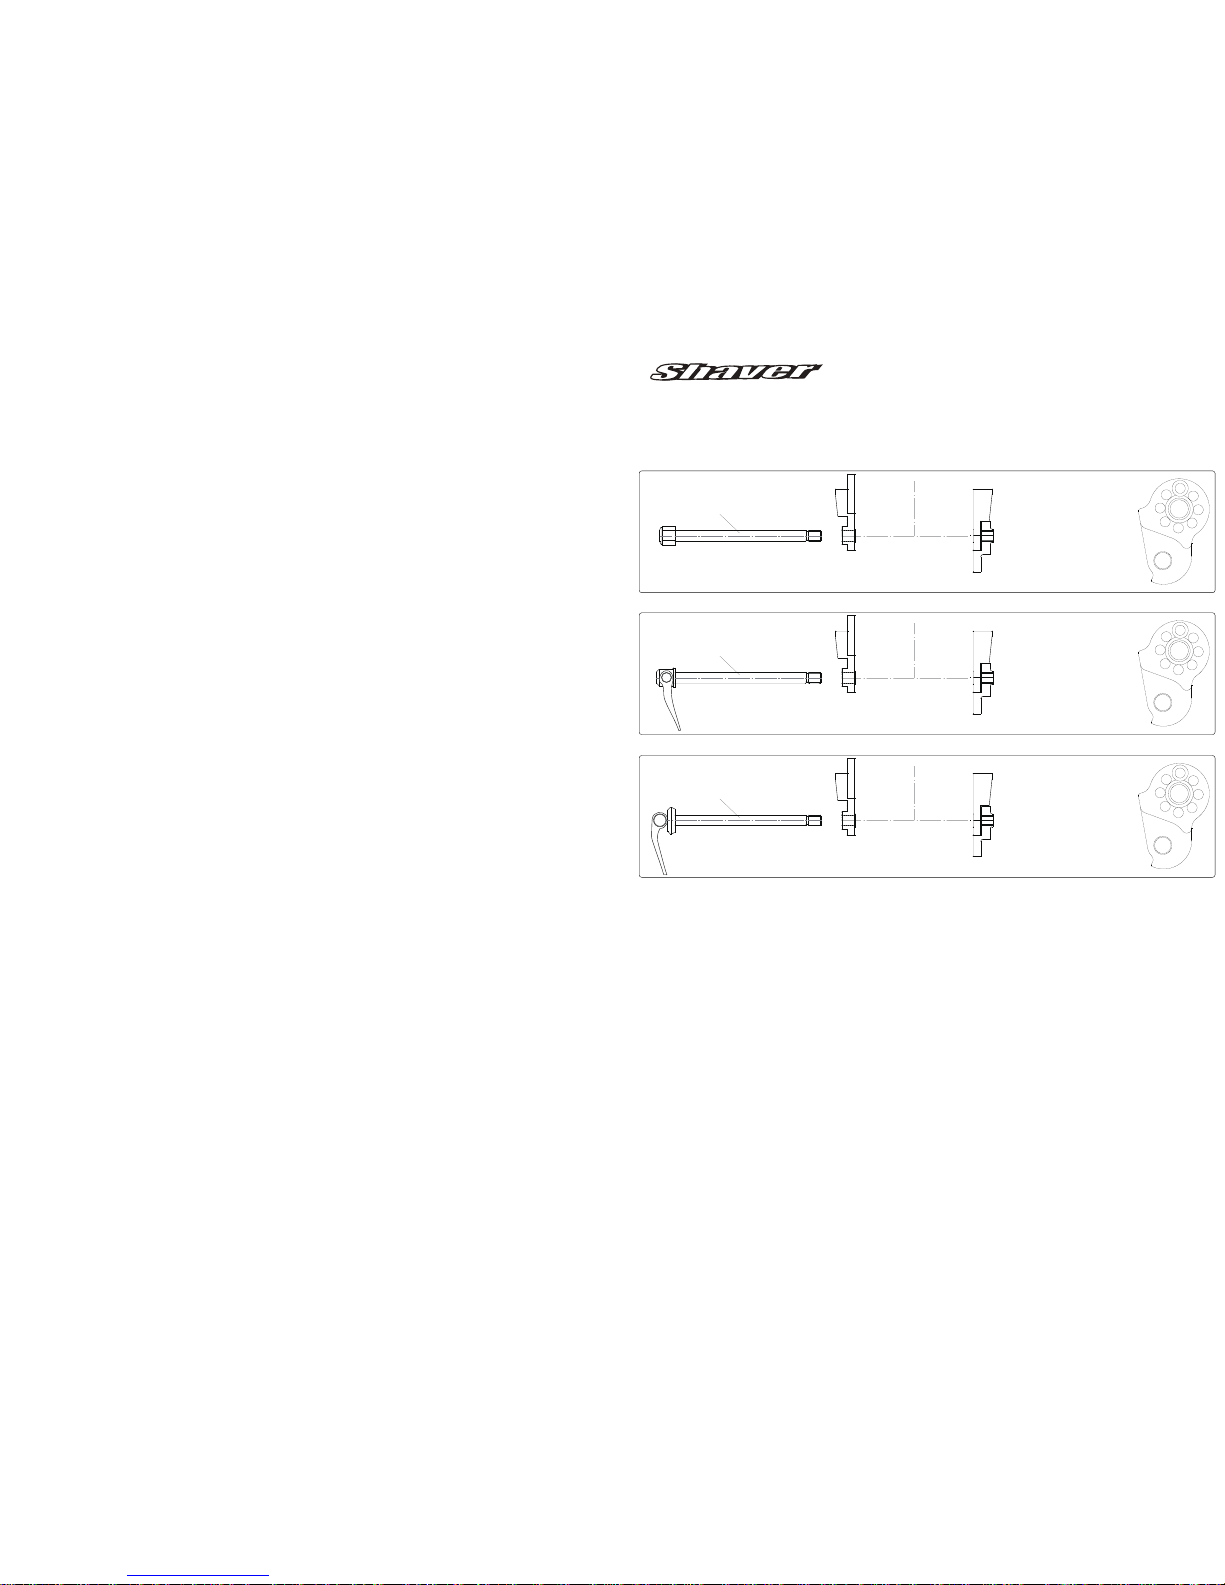
Rear Thru Axle with Derailleur Hanger
Rear Shock Maintenance
Derailleur Hanger for FOES Axle
Parts number [HA08S]
8
FOES Alloy HEX thru Axle
SVTA (142mmOLD x12mm Thru Axle)
SHAVER Rear 142mmOLD x12mm Thru Axle with Derailleur Hanger Nut
Left Dropout Right Dropout
Derailleur Hanger for Shimano Axle
Parts number [HA08S]
8
Shimano E-thru Axle
SM-AX75A (142mmOLD x12mm Thru Axle)
Left Dropout Right Dropout
Derailleur Hanger for SRAM Axle
Parts number [HA09]
Rockshox Rear MAXLE Lite
(142mmOLD x12mm Thru Axle)
Left Dropout Right Dropout

1. AIR PRESSURE
2. SAG
the main air spring controls the sag of the shock.
For the SV to ride properly it is important to
setup the shock with the correct amount of sag.
For general riding the SV works best with
25-30 % (16-19mm ) of shock sag.
to increase
the sag reduce the main spring air pressure.
to reduce the sag increase the main spring air
pressure.
Once you have set your baseline air pressure you
need to measure the sag. to measure the sag
slide the travel indicator (O- ring) up against the
shock body. w ith a friend supporting the bike,
sit on the saddle (do not bounce) and allow your
body weight to compress the shock. Once you
have compressed the shock, get off the bike
and measure the distance between the shock
body and the new position of the travel indicator
(O-r ing). this is your sag.
3. REBOUND
the rebound adjustment has 14 clicks of adjustment.
the rebound knob is the red adjustment dial located
above the blue crompression damping adjustment lever.
as a general rule, adjustments that are too fast
(counter-clockwise adjustment) will produce a springy
ride with excessive kick-up of the rear end causing
a bucking sensation.
a djustments that are too slow
(clockwise adjustment) will cause packing of the rear
wheel indicated by a sluggish ride feeling ride.
s lower rebound- turn the knob clockwise
Faster rebound- turn the knob counter-clockwise
*a ll clicks are counted clockwise, rotating from the all the way out or counter - clockwise dial position.
4. COMPRESSION DAMPING
5. TRAIL ADJUST
the trail adjust dial controls the “trail” mode low
speed compression adjustment. it has three
levels of adjustment and is controlled by the
black dial on the shock body. turning the dial
clockwise increases low speed compression
damping, making the shock feel stiffer under low
speed compressions. turning the dial counter-
clockwise will decrease low speed compression
damping, making the shock feel softer under low
speed compressions. p lease note this adjustment
only affects the shock performance while riding in
“trail” mode.
the compression dampening has three levels
of adjustment and is controlled by the blue
lever on the shock.
the “climb” mode engages
the “trail” mode
engages a moderate low-speed compression
and bike control, on various riding terrain.
Finally, the “descend” mode sets the low-speed
compression setting to fully open, for maximum
bike control and shock absorbency on steep,
aggressive descents.
23-28%
14-18mm
63mm
A IR SPRIN G SETTIN G S [ Reference Data ]
(kg) 55 59 63 68 73 77 82 86 90 95
Rider Weight (lbs) 120 130 140 150 160 170 180 190 200 210
Air Pressure (psi) 120 130 140 150 160 170 180 190 210 220
*E XTERNAL A DJUSTMENTS
Rebound 5 Clicks
compression damping based on terrain
Trail adjust Position 2
S A G S ETTIN G S
Sag % 25 30
Measured (mm) 15 .19.
Shaver/F275/SV29-FOX Float CTD adjust
MAINTENANCE
Following these guidelines will help maintain the performance of your
bicycle and prevent
It is important to remember that service intervals can vary depending
more serious problems from arising.
on climate, trail conditions and riding frequency.
Caution:
and the pace of innovation is increasing.
advances have made bicycles and bicycle components more complex,
FOES
In order to help minimize the chances of injury, do not perform any maintenance that you are no
you are adjusting.
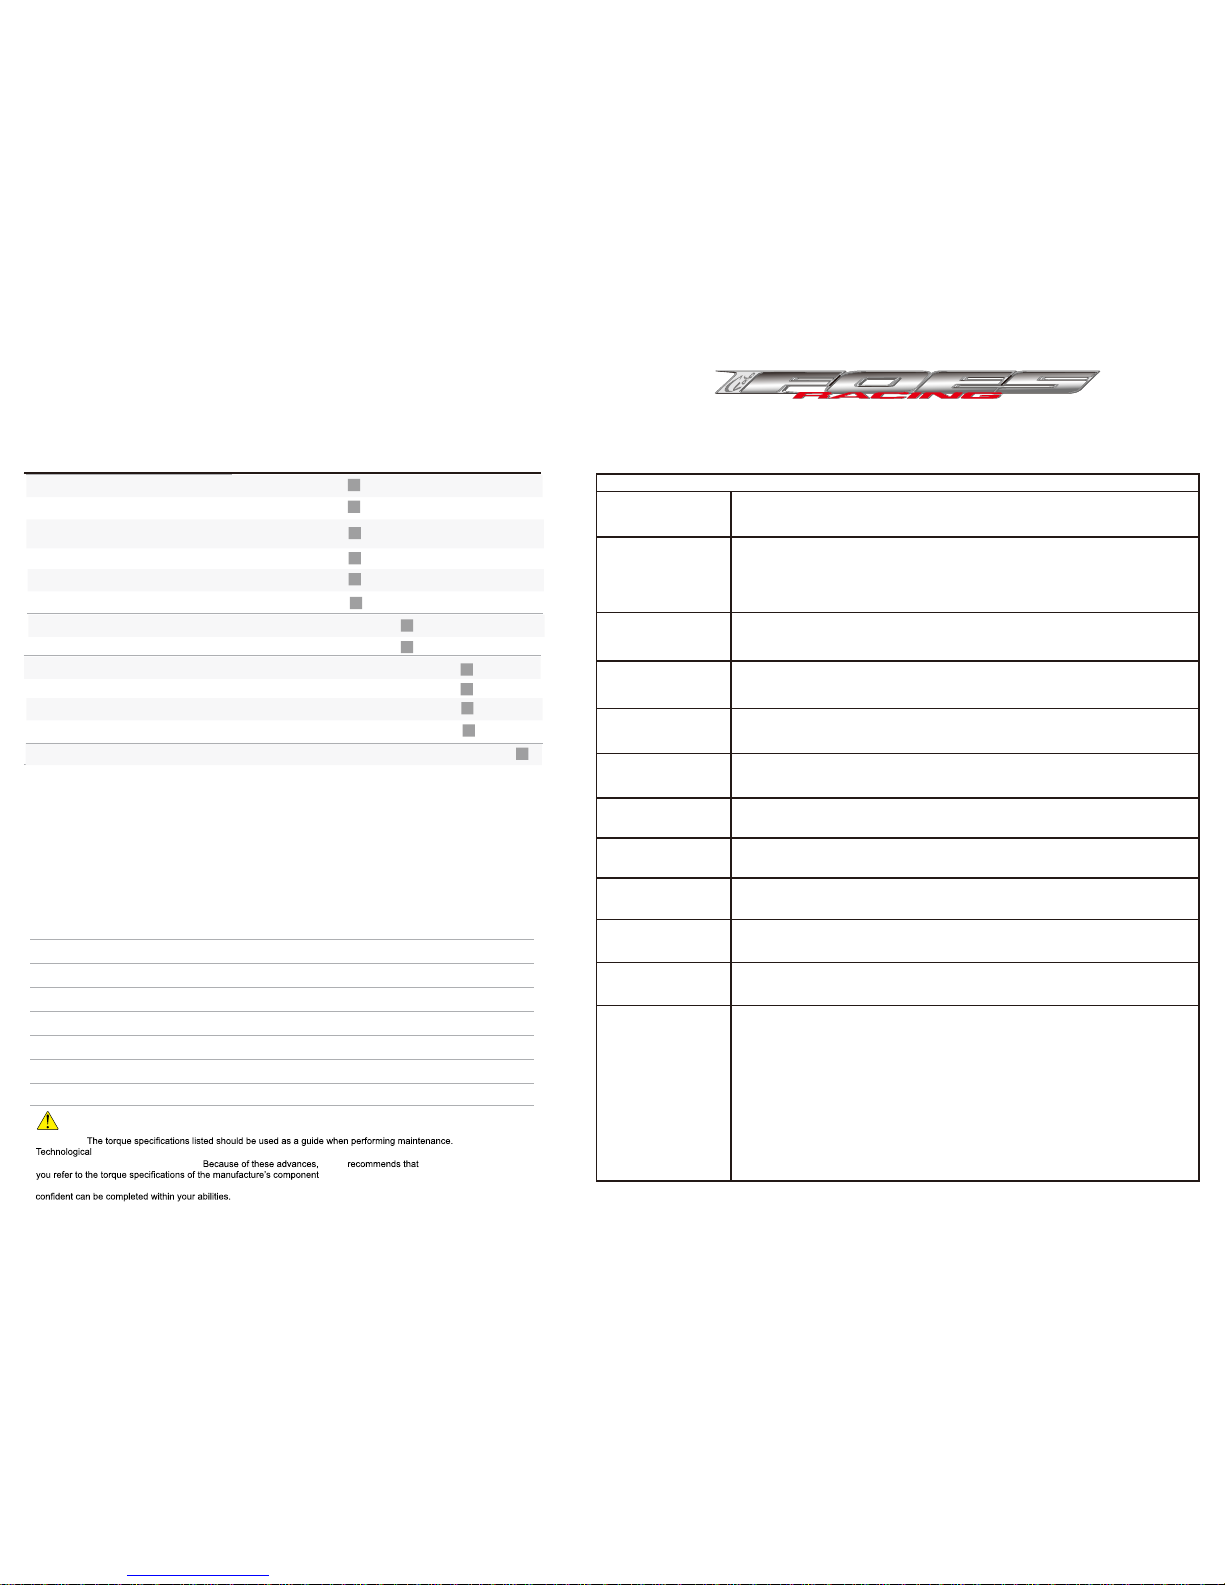
TORQUE
components that may need to
We have attached a brief list of torque specifications for bolts and
This is just a guide. For specific torque, specifications,
be tightened while performing basic maintenance.
please contact the component manufacturer directly.
Pivot Bolts 125 - 150
Discbrake mounting Bolts / Adaptor Bolts 100 - 110
Disc Attachment Bolts 45 - 55
Shock Bolts 80 - 95
B.B cups 300 - 360
Derailleur Hanger Bolts M4 25 - 30
Handlebar Binder Bolt 150 - 180
Stem Binder Bolt 175 - 260
Seatpost Binder Bolt 150 - 180
Saddle Clamp Bolts 175 - 250
Rear Derailleur 70 - 86
Front Derailleur Clamp 45 - 60
Chainring Bolts 88 - 132
ACTIO N WEEKLY M O NTHLY 3 MO NTHS ANNUALLY
Clean and lube chain
Check tire pressure
Clean bike of mud and debris (never
directly into frame or
spray water
components)
Check brake function
Check shock pressure, if applicable
Check for loose bolts and tighten, if necessary
Check headset and tighten / loosen, if necessary
Thoroughly clean pivot points with a rag (do not lubricate)
Replace brake pads, if necessary
Check tires for wear
Check spoke tension and retention, if necessary
Check chain for worn, damaged, or
loose links, replace chain if necessary
Complete tune-up performed by an authorized FOES dealer
Adress:62N SierraMadre blvd Pasadena CA 91107
Fax:1-626-683-8622
Costmor Resistration Form
Name :
Adress:
zip/ country :
Phone:
E-mail:
Serial#:
Bike model:
Size /color :
Purchased Price:
Purchased day :
Purchased from :
Built with :
Table of contents


