fontastic Jive User manual


User Manual
Thank you for choosing this Fontastic®product.
Please read this user manual carefully and comply with
the safety instructions.
Package Contents
● 2 x wireless headset Jive
● Storage and charging case
● Wireless charger
● USB Type-C™ cable
● Micro USB cable
● 3 pairs of earbuds (small, medium & large)
● User manual
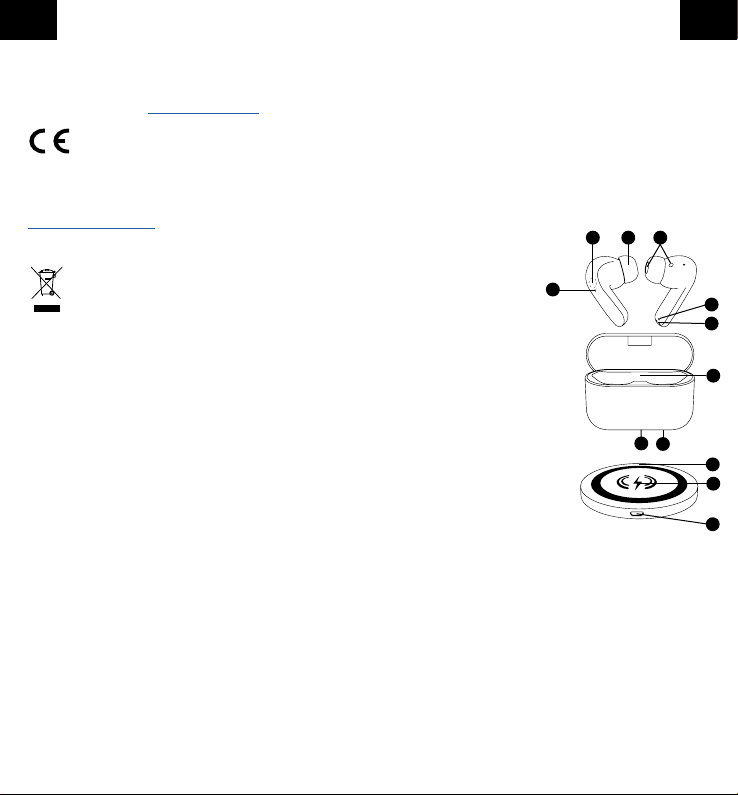
Overview:
1. Status LED
2. Multifunction sensor
3. Earbud
4. Speaker
5. Microphone
6. Charging Pin
7. Headset insertion
8. Charging status indicator
(on the bottom)
9. USB Type-C™ charging port
(on the bottom)
10. Status LED
11. Charging area
12. Micro USB connector
Getting Started
Charging the headset
Insert the headset into the charging
case. By closing the charging case, the headsets get in
contact and are charged in the case.
The LED‘s (1) of the headsets light up red during the
charging process. When fully charged, the LED‘s (1)
turns o.
Charging the case
The battery of the case can be charged directly via the
Micro USB port, or via the wireless charging pad. The
charge status indicator of the Etius (8) shows the charge
of the battery in 25%, 50%, 75% and 100% steps
respectively.
Charge via USB: Connect the USB Type-C™ cable,
included with the headset, to the charging case and to a
power supply or USB port on a computer to charge the
battery of the case.
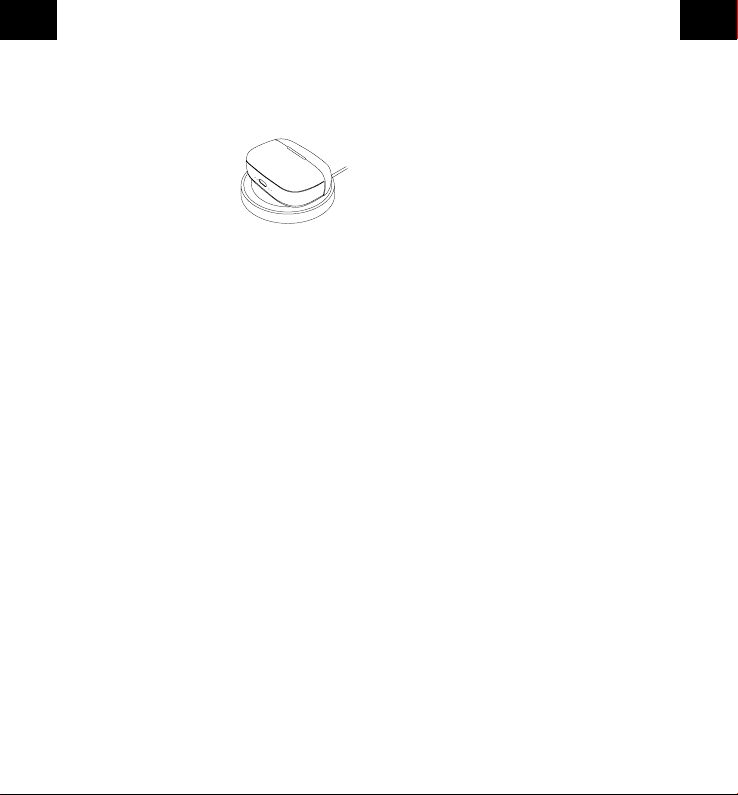
Wireless charging:
Connect the charging cable to the
Micro USB input of the wireless
charging pad (9) and a travel charger
or USB port of a computer.
The red LED lights up as soon as
the pad is supplied with power.
Place the case with the back centered on the charging
pad. The blue LED indicates that the case is charging.
Switching On/O
Switch on: Tap and hold the multifunction sensor (2) for
about 2-3 seconds.
Switch o: Tap and hold the multifunction sensor (2) for
about 5-6 seconds.
Note: Both headsets switch on and o automatically
when they are removed or inserted from the case.
When Jive is switched on, the white LED (1) ashes
until it is connected. During this time it will try to
connect to the last connected device.
Pairing
The Jive Headset has to be paired with a Bluetooth®
device before use. The headsets LED will blink white
when it‘s ready to pair.
1. Take out the Headsets from the charging case. They
will automatically power on and pair with each other.
Now one of them switches to pairing mode to
connect to the Phone.
2. Search for “Jive” on your Bluetooth® device and
select it to pair the headset with your device.
When properly connected, the LED
blinks white and turns o after pairing has been
sucessful.
Note: If the Headste does not nd a Bluetooth®
capable device, it switches itself o after approx. 3
minutes.
1 2
GB GB
1
5
42 3
6
7
98
10
11
12

Note:
- When the headset is placed in the charging case,
the connection is interrupted. As soon as the
headset is removed, the headset automatically
reconnects.
- If the connection is interrupted, the multifunction
sensor must be pressed to reconnect.
Music Control
All control commands are executed with the
multifunction sensor (2).
Play/Pause: Tap the multifunction sensor on one of the
two heasdsets once.
Skip Backwards: Tap the multifunction sensor of the
left head 2 times.
Skip Forwards: Tap the multifunction sensor of the right
headset 2 times.
Hands-free control
Answer/Hang up Call: Tap the multifunction sensor
(2) once.
Reject call: Hold the multifunction sensor (2) for one
second when the call comes in.
Re-Dial: When in standby, tap the multifunction sensor 4
times. Your phone will call the last dialled number.
Voice dial /Voice Command: When in standby, tap and
hold the multifunction sensor for 2 seconds.
A „Bip“ sounds and voice control is activated.
Volume setting
To increase the volume, tap the multifunction sensor
(2) on the right-hand headset 3 times.
To decrease the volume, tap the multifunction sensor
(2) on the left-hand headset 3 times.
Note: Rarely does it happen that the headset‘s
superbass is clipping by mobile phone settings. In
this case, use the „Normalise“ function (also known
as „Adjust volume“) in the audio settings of your
phone.
Safety advice:
• Do not use the headset at high volume for prolonged
periods of time.
• Be careful not to use headset in potentially dangerous
situations.
• Do not use the headset while operating a vehicle.
• Never open the device.
• Never immerse the device in water, always protect it
from moisture.
• Disconnect electronic devices from the power when
not using them for longer time.
Wireless Charger:
• Do not open the charger
• Do not expose the charger to water and protect it
against humidity
• Do not use brute force when connecting the adapter.
• Disconnect electronic devices from the power when
not using them for longer time.
• Do not place cards with magnetic strips, magnetic
recording media or metal objects onto the charging
area or between this and your Headset box; no
charging will take place and can lead to overheating!
• Individuals who wear a pacemaker should maintain a
sucient distance between the device and their
pacemaker. If in doubt, consult your treating physician.
• This product may interfere with the proper functioning
of medical equipment. Consequently, do not use device
in hospitals and other medical facilities.
• Never use the product if signs of damage are visible.
Technical Specications:
Headsets
• BT Version 5.0
• Proles: Headset, Handsfree, A2DP, AVRCP
• Range: up to 10 m
• Driver: 10 mm
• Frequency: 20hz-20Khz
• Sensitivity: 105db+3db
• Built-in high performance microphone
• Status LED Red/White
• Battery: 35 mAh
• Charging time: 1-2 hours
• Operating time: up to 4 hours
• Dimensions per unit: 32 x 21 x 23 mm
• Weight per unit: 4 g
Charging case:
• Input: 5V DC
• Battery: 300 mAh
• Charging port: USB Type-C™
• Dimensions: 61 x 24 x 42 mm
• Weight: 30.5 g (without headsets)
38.5 g (with headsets)
Wireless charger:
• Power: 5 watts
• Dimensions: 90 x 7 mm
3 4
GB GB
The company is not responsible for any damage due
to improper operation.
If you need technical support, please contact our sup-
port team by e-mail at [email protected].
We hereby declare, that this device carries the
CE mark in accordance with the regulations
and standards. It conforms with the fundamental
requirements of the (RED) 2014/53/EU directive.
The full text of the EU Declaration of Conformity is
available at the following Internet address
www.d-parts.de/Konfo
Note on environmental protection:
After the implementation of the European
Directive 2012/19/EU in the national legal
system, the following applies: Electrical and
electronic devices may not be disposed of with
domestic waste. Consumers are obliged by law to return
electrical and electronic devices at the end of their
service lives to the public collecting points set up for this
purpose or point of sale. Details of this are dened by
the national law of the respective country. This symbol
on the product, the instruction manual or the package
indicates that a product is subject to these regulations.
By recycling, re-using the materials or other forms of
utilising old devices, you are making an important
contribution to protecting our environment.
Bedienungsanleitung
Vielen Dank dass Sie sich für dieses Fontastic®Produkt
entschieden haben. Bitte lesen Sie die
Bedienungsanleitung sorgfältig und beachten Sie die
Sicherheitshinweise.
Verpackungsinhalt
● 2 x Drahtloses Headset Jive
● Aufbewahrungs- und Ladeetui
● Drahtloses Ladepad
● Micro USB Ladekabel
● USB Type-C™ Ladekabel
● 3 Paar Ohrpassstücke
● Bedienungsanleitung
Übersicht:
1. Status LED
2. Multifunktions-Sensor
3. Ohrpassstück
4. Lausprecher
5. Mikrofon
6. Ladekontakte
7. Headset-Einschub
8. Ladestatus Anzeige
(auf der Unterseite)
9. USB Type-C™ Ladeanschluss
(auf der Unterseite)
10. Status LED
11. Ladebereich
12. Micro USB Anschluss
Inbetriebnahme
Laden der Headsets
Stecken Sie die Headsets in die Einschübe (7) des
Ladeetui. Schließen Sie das Ladeetui. Durch das
Schließen des Ladeetuis bekommen die Headsets
Kontakt und werden im Etui aufgeladen. Die LED‘s (1)
der Headsets leuchten während des Ladevorgangs rot.
Nach vollständiger Auadung erlöschen die LED‘s (1).
Laden des Etuis
Die Batterie des Etuis kann direkt über den Micro USB
Anschluss, oder über das Drahtlose Ladepad aufgela-
den werden. Die Ladestatus Anzeige des Etius (8) zeigt
die Ladung der Batterie jeweils in 25%, 50%, 75% und
100% Schritten an.
5 6
GB D
1
5
42 3
6
7
98
10
11
12

Über USB auaden:
Verbinden Sie das Ladekabel, das mitgeliefert wurde,
mit dem USB Type-C™ Ladeeingang (9) des Etuis und
einem Reiselader oder USB Port eines Computers, um
die eingebaute Batterie aufzuladen.
Drahtlos auaden: Verbinden Sie das
Ladekabel mit dem Micro USB Eingang
(12) des Drahtlosen Ladepads und
einem Reiselader oder USB Port
eines Computers.
Die rote LED leuchtet sobald das Pad
mit Strom versorgt wird. Platzieren Sie
das Etui mit der Rückseite mittig auf dem Ladepad.
Die blaue LED zeigt an dass das Etui aufgeladen wird.
An-/Ausschalten
Anschalten: Tippen und halten Sie den
Multifunktions-Sensor (2) für ca. 2-3 Sekunden.
Ausschalten: Tippen und halten Sie den
Multifunktions-Sensor (2) für ca. 5-6 Sekunden.
Hinweis: Beide Headsets schalten sich automatisch
ein und aus, wenn sie aus dem Etui entnommen
oder eingesetzt werden.
Wenn Jive eingeschaltet ist, blinkt die weiße LED
(1) bis es verbunden ist. Während dessen versucht
es sich mit dem zuletzt verbundenen Gerät zu ver-
binden.
Verbindung
Das Jive Headset muss mit einem Bluetooth®-
fähigen Gerät verbunden sein, um genutzt zu werden.
Die LED (1) des Headsets blinkt weiß während es bereit
zum Pairen ist.
1. Nehmen Sie die Headsets aus dem Gehäuse, sie
werden automatisch eingeschaltet und miteinander
gekoppelt. Jetzt startet ein Headset den
Pairing-Modus zum Verbinden mit dem Telefon.
2. Suchen Sie auf ihrem Bluetooth®-fähigen Gerät nach
„Jive“ und wählen Sie dieses aus um das Headset
mit dem Gerät zu verbinden. Die weiße LED (1 blinkt
und erlischt nach erfolgreicher Verbindung.
Hinweis: Findet das Headset kein Bluetooth®-
fähiges Gerät, schaltet es sich nach ca. 3 Minuten
aus.
Hinweis:
- Wenn das Headset in das Ladeetui gelegt wird,
wird die Verbindung unterbrochen. Sobald das
Headset entnommen wird, verbindet sich das
Headset automatisch wieder.
- Wenn die Verbindung unterbrochen wird muss der
Multifunktions-Sensor, gedrückt werden um die
Verbindung wieder herzustellen.
Musiksteuerung
Alle Steuerungsbefehle werden mit dem
Multifunktions-Sensor (2) ausgeführt.
Start/Stopp: Tippen Sie einmal den Multifunktions-
Sensor auf einem der beiden Headsets.
Vorheriger Titel: Tippen Sie den Multifunktions-Sensor
des linken Headsts 2 mal.
Nächster Titel: Tippen Sie den Multifunktions-Sensor
des rechten Headsets 2 mal.
Freisprechfunktionen
Gespräch Annehmen/Auegen: Tippen Sie den
Multifunktions-Sensor (2) einmal.
Anruf Ablehnen: Halten Sie den Multifunktions-Sensor
(2) für eine Sekunde wenn der Anruf eingeht.
Wahlwiederholhung: Im Standby Modus den
Multifunktions-Sensor (2) viermal hintereinander Tippen.
Ihr Mobiltelefon wählt die zuletzt gewählte Nummer.
Sprachsteuerung: Im Standby Modus den Multifunk-
tions-Sensor (2) für 2 Sekunden gedrückt halten.
Ein „Bip“ ertönt und die Sprachsteuerung wird aktiviert.
Einstellung der Lautstärke
Um die Lautstärke zu erhöhen, tippen Sie 3 mal auf den
Multifunktions-Sensor (2) des rechten Headsets.
Um die Lautstärke zu verringern, tippen Sie 3 mal auf
den Multifunktions-Sensor (2) des linken Headsets.
Hinweis: Selten kommt es vor, dass der Superbass
des Headset durch Einstellungen des Handy über-
steuert wird. Nutzen Sie in diesem Fall die Funktion
„Normalisieren“ (auch „Lautstärke anpassen“) bei
den Audioeinstellungen des Smartphones.
Sicherheitshinweise
• Betreiben Sie das Headset nicht für längere Zeit auf
der höchsten Lautstärke.
• Stellen Sie die Nutzung des Headsets bei gefährlichen
Situationen ein.
7 8
D D

9 10
D D
• Verwenden Sie nicht beide Headsets beim Führen
eines Fahrzeugs.
• Önen Sie niemals das Gerät
• Tauchen Sie das Gerät nicht in Wasser und schützen
Sie es vor Feuchtigkeit.
• Entfernen Sie elektronische Geräte vom Netz, wenn
sie für einen längeren
Zeitraum nicht gebraucht werden.
• Das Produkt ist kein Spielzeug für Kinder
• Das Produkt ist wegen der hohen Lautsärke für Kinder
nicht geeignet.
• Das Gerät nicht benutzen, wenn es sichtbare Schäden
aufweist.
Drahtloses Ladepad:
• Tauchen Sie das Gerät nicht in Wasser und
schützen Sie es vor Feuchtigkeit.
• Das Gerät nie mit Gewalt anschließen.
• Entfernen Sie elektronische Geräte vom Netz,
wenn sie für einen längeren Zeitraum nicht
gebraucht werden.
• Legen Sie keine Karten mit Magnetstreifen,
magnetische Aufnahmemedien oder Metall-
gegenstände auf die Ladeäche; es ndet keine
Auadung statt und kann zu Überhitzungen führen!
• Träger von Herzschrittmachern sollten einen
ausreichenden Abstand zwischen Gerät und
Herzschrittmacher einhalten.
Konsultieren Sie im Zweifel den behandelnden
Arzt.
• Dieses Produkt kann die Funktion von
medizinischen Geräten beeinträchtigen.
Verwenden Sie es daher nicht in Kliniken und
medizinischen Einrichtungen.
• Benutzen Sie nie das Produkt wenn es sichtbare
Schäden aufweist.
Technische Daten:
Headsets
• BT Version 5.0
• Prole: Headset, Handsfree, A2DP, AVRCP
• Reichweite: bis 10 m
• Treiber: 10 mm
• Frequenz: 20hz-20Khz
• Sensitivität: 105db+3db
• Eingebautes Hochleistungsmikrofon
• Status LED Rot/Weiß
• Batterie: 35 mAh
• Ladezeit: 1-2 Stunden
• Betriebszeit: bis zu 4 Std.
• Abmessung pro Einheit: 32 x 21 x 23 mm
• Gewicht pro Einheit: 4 g
Ladeetui:
• Eingang: 5V DC
• Batterie: 300 mAh
• Ladeanschluss: USB Type-C™
• Abmessungen: 61 x 24 x 42 mm
• Gewicht: 30,5 g (ohne Headsets)
38,5 g (mit Headsets)
Drahtloses Ladepad:
• Leistung: 5 Watt
• Abmessungen: 90 x 7 mm
Bei falscher Bedienung wird keine Haftung für
eventuelle Schäden übernommen.
Falls Sie Technischen Support benötigen, kontaktieren
Sie bitte unser Support-Team per E-Mail unter der
Adresse [email protected].
Hiermit erklären wir, dass dieses Gerät die
CE Kennzeichnung gemäß den Bestimmungen
und Vorgaben trägt. Es entspricht somit den
grundlegenden Anforderungen der RED-Richtlinie
2014/53EU.
Der vollständige Text der EU-Konformitätserklärung ist
unter der folgenden Internetadresse verfügbar:
www.d-parts.de/Konfo
Hinweis zum Umweltschutz:
Gemäß der europäischen Richtlinie 2012/19
EU gilt folgendes: Elektrische und elektronische
Geräte dürfen nicht mit dem Hausmüll entsorgt
werden. Der Verbraucher ist gesetzlich
verpichtet, elektrische und elektronische Geräte an den
dafür eingerichteten, öentlichen Sammelstellen oder
an die Verkaufsstelle zurückzugeben. Einzelheiten dazu
regelt das jeweilige Landesrecht.
Mit der Wiederverwertung von Altgeräten leisten Sie
einen wichtigen Beitrag zum Schutz unserer Umwelt.

Manual del usuario
Gracias por elegir un producto Fontastic®.
Lea atentamente este manual del usuario y cumpla
con las instrucciones de seguridad.
Contenidos del paquete
● 2 x auriculares inalámbricos Jive
● Estuche de carga y almacenamiento
● Cargador inalámbrico
● Cable USB Type-C™
● Cable Micro USB
● 3 pares de auriculares
● Manual del usuario
Descripción:
1. LED de estado
2. Sensor multifunción
3. Auricular
4. Altavoz
5. Micrófono
6. Clavija de carga
7. Inserción de los auriculares
8. Indicador de estado de carga
(en la parte inferior)
9. Puerto de carga USB Tipo-C™
(en la parte inferior)
10. LED de estado
11. Zona de carga
12. Conector micro USB
Primeros pasos
Carga del auricular
Inserte los auriculares en el estuche de carga. Al cerrar
el estuche de carga, los auriculares harán contacto y se
cargarán en el estuche.
Los LED (1) de los auriculares se iluminarán en rojo
durante el proceso de carga. Cuando estén completa-
mente cargados, los LED (1) se apagarán.
Carga del estuche
La batería de la funda se puede cargar directamente a
través del puerto Micro USB, o a través de la almoha-
dilla de carga inalámbrica. El indicador del estado de
carga del Etius (8) muestra la carga de la batería en
pasos del 25%, 50%, 75% y 100% respectivamente.
Carga mediante USB:
Conecta el cable USB Type-C™, incluido con los
auriculares, al estuche de carga y a una fuente de
alimentación o puerto USB de un ordenador para cargar
la batería del estuche.
Carga inalámbrica:
Conecta el cable de carga a la entrada
Micro USB de la almohadilla de carga
inalámbrica (9) y a un cargador de
viaje o al puerto USB de un ordenador.
El LED rojo se ilumina en cuanto la
almohadilla recibe energía. Coloca el
estuche con la parte trasera centrada en la almohadilla
de carga. El LED azul indica que el estuche se está
cargando.
Encendido/Apagado
Encendido: mantenga pulsado el sensor multifunción
(2) durante unos 2-3 segundos.
Apagado: mantenga pulsado el sensor multifunción (2)
durante unos 5-6 segundos.
Nota: ambos auriculares se encienden y apagan
automáticamente cuando se retiran o se insertan en
el estuche.
Cuando Jive está encendido, el LED blanco (1)
parpadea hasta que se conecta. Durante este
tiempo, intentará conectarse al último dispositivo
conectado.
Emparejamiento
Los auriculares Jive deben emparejarse con un
dispositivo Bluetooth® antes de utilizarse. El LED de los
auriculares parpadeará en blanco cuando estén listos
para emparejarse.
1. Saque los auriculares del estuche de carga. Se en
cenderán automáticamente y se emparejarán
entre sí. Ahora uno de ellos cambiará al modo de
emparejamiento para conectarse al teléfono.
2. Busque “Jive” en su dispositivo Bluetooth®
y selecciónelo para emparejar los auriculares con
su dispositivo. Si se conectan correctamente, el LED
parpadeará en blanco y se apagará después de que
el emparejamiento se haya realizado correctamente.
11 12
E E
1
5
42 3
6
7
98
10
11
12

13 14
E E
Nota: si los auriculares no encuentran un dispositi-
vo compatible con Bluetooth®, se apagarán después
de aprox. 3 minutos.
Nota:
- Cuando los auriculares se coloquen en el estuche
de carga, la conexión se interrumpirá. Tan pronto
como se retiren los auriculares, estos se volverán
a conectar automáticamente.
- Si se interrumpe la conexión, se deberá presionar
el sensor multifunción para reconectarlos.
Control de la música
Todos los comandos de control se ejecutan con el
sensor multifunción (2).
Reproducir/Pausa: toque el sensor multifunción de uno
de los dos auriculares una vez.
Saltar hacia atrás: toque el sensor multifunción del
cabezal izquierdo 2 veces.
Saltar hacia adelante: toque el sensor multifunción del
auricular derecho 2 veces.
Función manos libres
Responder/Colgar llamada: toque el sensor
multifunción (2) una vez.
Rechazar llamada: mantenga pulsado el sensor
multifunción (2) durante un segundo cuando entre la
llamada.
Volver a marcar: cuando esté en modo de espera,
toque el sensor multifunción 4 veces. Su teléfono
llamará al último número marcado.
Marcación por voz/Comandos de voz: en el modo
de espera, mantenga pulsado el sensor multifunción
durante 2 segundos. Sonará un pitido y se activará el
control por voz.
Ajuste del volumen
Para aumentar el volumen, golpee tres veces el
sensor multifunción (2) del auricular derecho.
Para disminuir el volumen, golpee tres veces el
sensor multifunción (2) del auricular izquierdo.
Nota: Rara vez sucede que el superbajo del auricu-
lar se vea afectadosobremodulada por los ajustes
del teléfono móvil. En este caso, utilice la función
„Normalizar“ (también conocida como „Ajustar el
volumen“) en los ajustes de audio del teléfono.
Advertencia de seguridad:
• No utilice el auricular a un volumen alto durante
períodos prolongados
• Tenga cuidado de no usar auriculares en situaciones
potencialmente peligrosas
• No utilice los auriculares mientras conduce un vehículo
• Nunca abra el dispositivo
• Nunca sumerja el dispositivo en agua, protéjalo
siempre de la humedad
• Desconecte los dispositivos electrónicos de la
alimentación cuando no los esté utilizándolos durante
mucho tiempo
• No use auriculares si muestran algún daño visible
Cargador inalámbrico:
• No abra el cargador
• No exponga el cargador al agua y protéjalo de la
humedad
• No utilice la fuerza bruta al conectar el adaptador.
• Desconecte los dispositivos electrónicos de la
corriente cuando no los utilice durante un tiempo
prolongado.
• No coloque tarjetas con bandas magnéticas, soportes
de grabación magnéticos u objetos metálicos en la
zona de carga o entre ésta y su caja de auriculares;
no se producirá la carga y puede provocar un
sobrecalentamiento
• Las personas que llevan un marcapasos deben
mantener una distancia suciente entre el dispositivo y
su marcapasos. En caso de duda, consulte a su
médico tratante.
• Este producto puede interferir en el correcto
funcionamiento de los equipos médicos. Por lo tanto,
no utilice el dispositivo en hospitales y otras
instalaciones médicas.
• No utilice nunca el producto si son visibles signos de
daño.
Especicaciones técnicas:
Auriculares
• BT versión 5.0
• Perles: auriculares, manos libres, A2DP, AVRCP
• Rango: hasta 10 m
• Transductor electroacústico: 10 mm
• Frecuencia: 20 Hz-20 kHz
• Sensibilidad: 105 db + 3 db
• Micrófono incorporado de alto rendimiento
• LED de estado rojo/blanco
• Batería: 35 mAh

15 16
E I
• Tiempo de carga: 1-2 horas
• Tiempo de funcionamiento: hasta 4 horas
• Dimensiones por unidad: 32 x 21 x 23 mm
• Peso por unidad: 4 g
Estuche de carga:
• Entrada: 5 V CC
• batería: 300 mAh
• Puerto de carga: USB Type-C™
• Dimensiones: 61 x 24 x 42 mm
• Peso: 30,5 g (sin auriculares)
38,5 g (con auriculares)
Cargador inalámbrico
• Potencia: 5 vatios
• Dimensiones: 90 x 7 mm
La empresa no se hace responsable de ningún daño
debido a una operación incorrecta.
Si necesita asistencia técnica, comuníquese con nues-
tro equipo de asistencia enviando un correo electrónico
Por la presente declaramos que este
dispositivo lleva la marca CE de acuerdo a las
normativas y estándares de calidad. Cumple los
requisitos fundamentales de la RED – (2014/53/UE).
El texto completo de la Declaración de Conformidad de
la UE puede consultarse en la siguiente dirección de
Internet: www.d-parts.de/Konfo
Nota sobre la protección
medioambiental:
Tras la implementación de la Directiva europea
2012/19/UE en el sistema legal nacional, se
aplica lo siguiente: los dispositivos eléctricos y
electrónicos no se pueden eliminar junto con
los residuos domésticos. Los consumidores están
obligados por ley a devolver los dispositivos eléctricos
y electrónicos que hayan nalizado sus vidas útiles a
los puntos de recogida pública establecidos para este
propósito o en su punto de venta. Los detalles de estas
directrices se denen en las leyes nacionales de los
respectivos países. Este símbolo en el producto, el
manual de instrucciones o el paquete indican que el
producto se encuentra sujeto a estas regulaciones. Al
reciclar, reutilizar los materiales u otras formas de usar
los dispositivos viejos, usted realiza una importante
contribución para proteger nuestro medio ambiente.
Manuale di istruzioni
Grazie per aver scelto un prodotto Fontastic®.
Leggi attentamente questo manuale di istruzioni e
attieniti alle indicazioni relative alla sicurezza.
Contenuto della confezione
● 2 x cue wireless Jive
● Custodia per la conservazione e la ricarica
● Caricabatterie wireless
● Cavo USB Type-C™
● Cavo micro USB
● 3 paia di auricolari (piccoli, medi e grandi)
● Manuale utente
Panoramica:
1. LED di stato
2. Sensore multifunzione
3. Auricolare
4. Altoparlante
5. Microfono
6. Pin di ricarica
7. Inserimento delle cue
8. Indicatore dello stato di carica
(sul fondo)
9. Porta di ricarica USB Type-C™
(sul fondo)
10. LED di stato
11. Area di ricarica
12. Connettore micro USB
Guida introduttiva
Ricarica degli auricolari
Inserire gli auricolari nella custodia-caricabatterie.
Chiudendo la custodia-caricabatterie, gli auricolari
vengono connessi e ricaricati al suo interno.
Durante la fase di ricarica, il LED (1) degli auricolari
è rosso. Una volta completata la ricarica, il LED (1) si
spegnerà.
Messa in carica della custodia-caricabatterie
La batteria della custodia può essere caricata diretta-
mente tramite la porta Micro USB, o tramite il pad di
ricarica wireless. L‘indicatore dello stato di carica della
Etius (8) mostra la carica della batteria in passi del 25%,
50%, 75% e 100% rispettivamente.
1
5
42 3
6
7
98
10
11
12
17 18
I I
Carica via USB:
Collega il cavo USB Type-C™, incluso nelle cue,
alla custodia di ricarica e a un alimentatore o a una
porta USB di un computer per caricare la batteria della
custodia.
Ricarica senza li:
Collegare il cavo di ricarica all‘ingresso
Micro USB del pad di ricarica wireless
(9) e a un caricatore da viaggio o alla
porta USB di un computer.
Il LED rosso si accende non appena
il pad viene alimentato. Posizionare la
custodia con il retro centrato sul pad di ricarica.
Il LED blu indica che la custodia si sta caricando.
Accensione/spegnimento
Accensione: tenere premuto il sensore multifunzione
(2) per 2-3 secondi circa.
Spegnimento: tenere premuto il sensore multifunzione
(2) per 5-6 secondi circa.
Attenzione: quando vengono rimossi o riposti nella
custodia, entrambi gli auricolari si accendono e
spengono automaticamente.
Quando Jive è acceso, il LED di colore bianco (1)
lampeggia no alla connessione. Durante questo
periodo, tenterà di connettersi all‘ultimo dispositivo
collegato.
Associazione
Prima dell’utilizzo, gli auricolari Jive devono essere
accoppiati con un dispositivo Bluetooth®. Quando sono
pronti per l‘accoppiamento, il LED bianco lampeggerà.
1. Estrarre gli auricolari dalla custodia-caricabatterie.
Si accenderanno e accoppieranno automaticamente.
A questo punto, uno di essi si commuta in modalità di
accoppiamento per collegarsi al telefono.
2. Cercare “Jive” sul dispositivo Bluetooth®e
selezionarlo per accoppiare gli auricolari al telefono.
Una volta collegati correttamente, il LED bianco
lampeggerà e si spegnerà dopo l’eettuazione
dell’accoppiamento.
Nota: Se l’auricolare non rileva un dispositivo con
funzione Bluetooth®, si spegnerà dopo 3 minuti
circa.
Nota:
- una volta collocati gli auricolari nella
custodia-caricabatterie, la connessione sarà
interrotta. Gli auricolari si riconnetteranno non
appena saranno rimossi.
- Se la connessione viene interrotta, per ripristinarla
è necessario premere il sensore multifunzione.
Controllo della musica
Tutti i comandi di controllo sono eseguiti con il sensore
multifunzione (2).
Riproduci/Metti in pausa: toccare il sensore multifun-
zione su uno degli auricolari una volta.
Indietro: toccare il sensore multifunzione sull’auricolare
sinistro 2 volte.
Avanti: toccare il sensore multifunzione sull’auricolare
destro 2 volte.
Funzione Mani libere
Rispondi/termina una chiamata: toccare il sensore
multifunzione (2) una volta.
Riuta la chiamata: quando arriva una chiamata,
tenere premuto il sensore multifunzione (2) per un
secondo.
Ricomponi il numero: durante la fase di standby,
toccare il sensore multifunzione 4 volte. Il telefono
richiamerà l‘ultimo numero composto.
Composizione/controllo vocale: durante la fase di
standby, toccare il sensore multifunzione per 2 secondi.
Si udrà un segnale “bip”, il quale comunica che il
controllo vocale è attivato.
Regolazione del volume
Per aumentare il volume, toccare 3 volte il sensore
multifunzione (2) sull‘auricolare destro.
Per diminuire il volume, toccare 3 volte il sensore
multifunzione (2) sull‘auricolare sinistro.
Nota: Raramente accade che il super basso delle
cue venga sovrascritto dalle impostazioni del
cellulare. In questo caso, utilizzare la funzione
„Normalizzare“ (anche „Regolare il volume“) nelle
impostazioni audio dello smartphone.
Consigli di sicurezza:
• Non utilizzare le cue ad alto volume per periodi di
tempo prolungati.
• Fare attenzione a non utilizzare le cue in situazioni
19 20
I I
di potenziale pericolo.
• Non utilizzare le cue mentre ci si trova alla guida un
veicolo.
• Non aprire mai il dispositivo.
• Non immergere mai il dispositivo in acqua; proteggerlo
sempre dall‘umidità.
• Disconnettere i dispositivi elettronici dall‘alimentazione
quando non vengono utilizzati per lunghi periodi di
tempo.
• Non usare le cue se mostrano danni visibili.
Caricabatterie wireless:
• Non aprire il caricabatterie
• Non esporre il caricatore all‘acqua e proteggerlo
dall‘umidità
• Non usare la forza bruta quando si collega l‘adattatore.
• Scollegare i dispositivi elettronici dall‘alimentazione
quando non li si utilizza per un lungo periodo.
• Non mettere carte con strisce magnetiche, supporti di
registrazione magnetici o oggetti metallici sull‘area di ri
carica o tra questa e la scatola dell‘auricolare; la ricari
ca non avrà luogo e può portare al surriscaldamento!
• Le persone che portano un pacemaker dovrebbero
mantenere una distanza suciente tra l‘apparecchio e
il loro pacemaker. In caso di dubbio, consultare il
proprio medico curante.
• Questo prodotto può interferire con il corretto
funzionamento delle apparecchiature mediche.
Di conseguenza, non utilizzare il dispositivo negli
ospedali e in altre strutture mediche.
• Non utilizzare mai il prodotto se sono visibili segni di
danni.
Caratteristiche tecniche:
Auricolari
• BT Versione 5.0
• Proli: Auricolare, mano libera, A2DP, AVRCP
• Portata: no a 10 m
• Driver: 10 mm
• Frequenza: 20 Hz - 20 Khz
• Sensibilità: 105 db + 3 db
• Microfono ad alte prestazioni incorporato
• LED di stato rosso/bianco
• Batteria: 35 mAh
• Tempi di ricarica: 1-2 ore
• Autonomia: no a 4 ore
• Dimensioni per unità: 32 x 21 x 23 mm
• Peso per unità: 4 g
Custodia-caricabatterie:
• Ingresso: 5V DC
• batteria: 300 mAh
• Porta di ricarica: USB Type-C™
• Dimensioni: 61 x 24 x 42 mm
• Peso: 30,5 g (senza auricolari)
38,5 g (con auricolari)
Caricabatterie wireless:
• Potenza: 5 watt
• Dimensioni: 90 x 7 mm
L‘azienda non è responsabile per eventuali danni dovuti
a utilizzi impropri.
Se hai bisogno di supporto tecnico, contatta il nostro
team di assistenza via e-mail all‘indirizzo
Con la presente dichiariamo che il dispositivo
porta il marchio CE in conformità con le
regole e gli standard. È conforme ai requisiti
fondamentali del RED- (2014/53/UE). Il testo completo
della dichiarazione di conformità UE è disponibile al
seguente indirizzo Internet www.d-parts.de/Konfo.
Informazioni per protezione
ambientale:
Dopo l’implementazione della Direttiva Europea
2012/19/UE nel sistema legale nazionale, si
applica quanto segue: i dispositivi elettrici ed
elettronici non possono essere smaltiti insieme
ai riuti domestici. Una volta che non siano più
funzionanti, gli utenti sono obbligati dalla legge a portare
i dispositivi elettrici ed elettronici ai punti pubblici di
raccolta istituiti per tale proposito o dal rivenditore.
I dettagli a riguardo sono deniti dalla legge nazionale
del rispetti-vo paese. Questo simbolo sul prodotto,
sul manuale d’istruzioni o sull’imballaggio, indica che
un prodotto è soggetto a queste regole. Riciclando,
riutilizzando i materiali o attraverso altre forme di utilizzo
di vecchi dispositivi, contribuisci in maniera importante
alla protezione del nostro ambiente.

The Bluetooth word mark and logos are owned by the Bluetooth SIG, Inc.
and any use of such marks is under license.
USB Type-C™ and USB-C™ are trademarks of USB Implementers Forum.
Improvement and changes of the technical specications and other data’s could
be made without prior notice.
Registered trademarks are the property of their respective owners.
Fontastic, by D-Parts Mobilphon & Zubehör GmbH
Birkenweiher Str. 16 ● 63505 Langenselbold, Germany ● www.d-parts.de
V1_02_21
Table of contents
Languages:
Other fontastic Headset manuals

fontastic
fontastic SHAGI User manual

fontastic
fontastic Boncy User manual

fontastic
fontastic SOCA User manual

fontastic
fontastic Cobra User manual

fontastic
fontastic Dima User manual

fontastic
fontastic Toka User manual

fontastic
fontastic Rave User manual

fontastic
fontastic ESSENTIAL BT E1 User manual

fontastic
fontastic Nat User manual

fontastic
fontastic Casy User manual


