Foscam FI9821W User manual

V1.0
User
User Manual
Manual
Model: FI9821W
Indoor HD Pan/Tilt Wireless IP Camera
(For Windows & Mac OS)
Black White

www
www.foscam.
.foscam.us
us
Foscam Digital Technologies
Telephone: 1-800-930-0949
Table of Contents
Security Warning...................................................................................................................................................................1
1 Overview.......................................................................................................................................................................... 1
1.1 Key Features........................................................................................................................................................2
1.2 Read Before Use.................................................................................................................................................2
1.3 Package Contents...............................................................................................................................................2
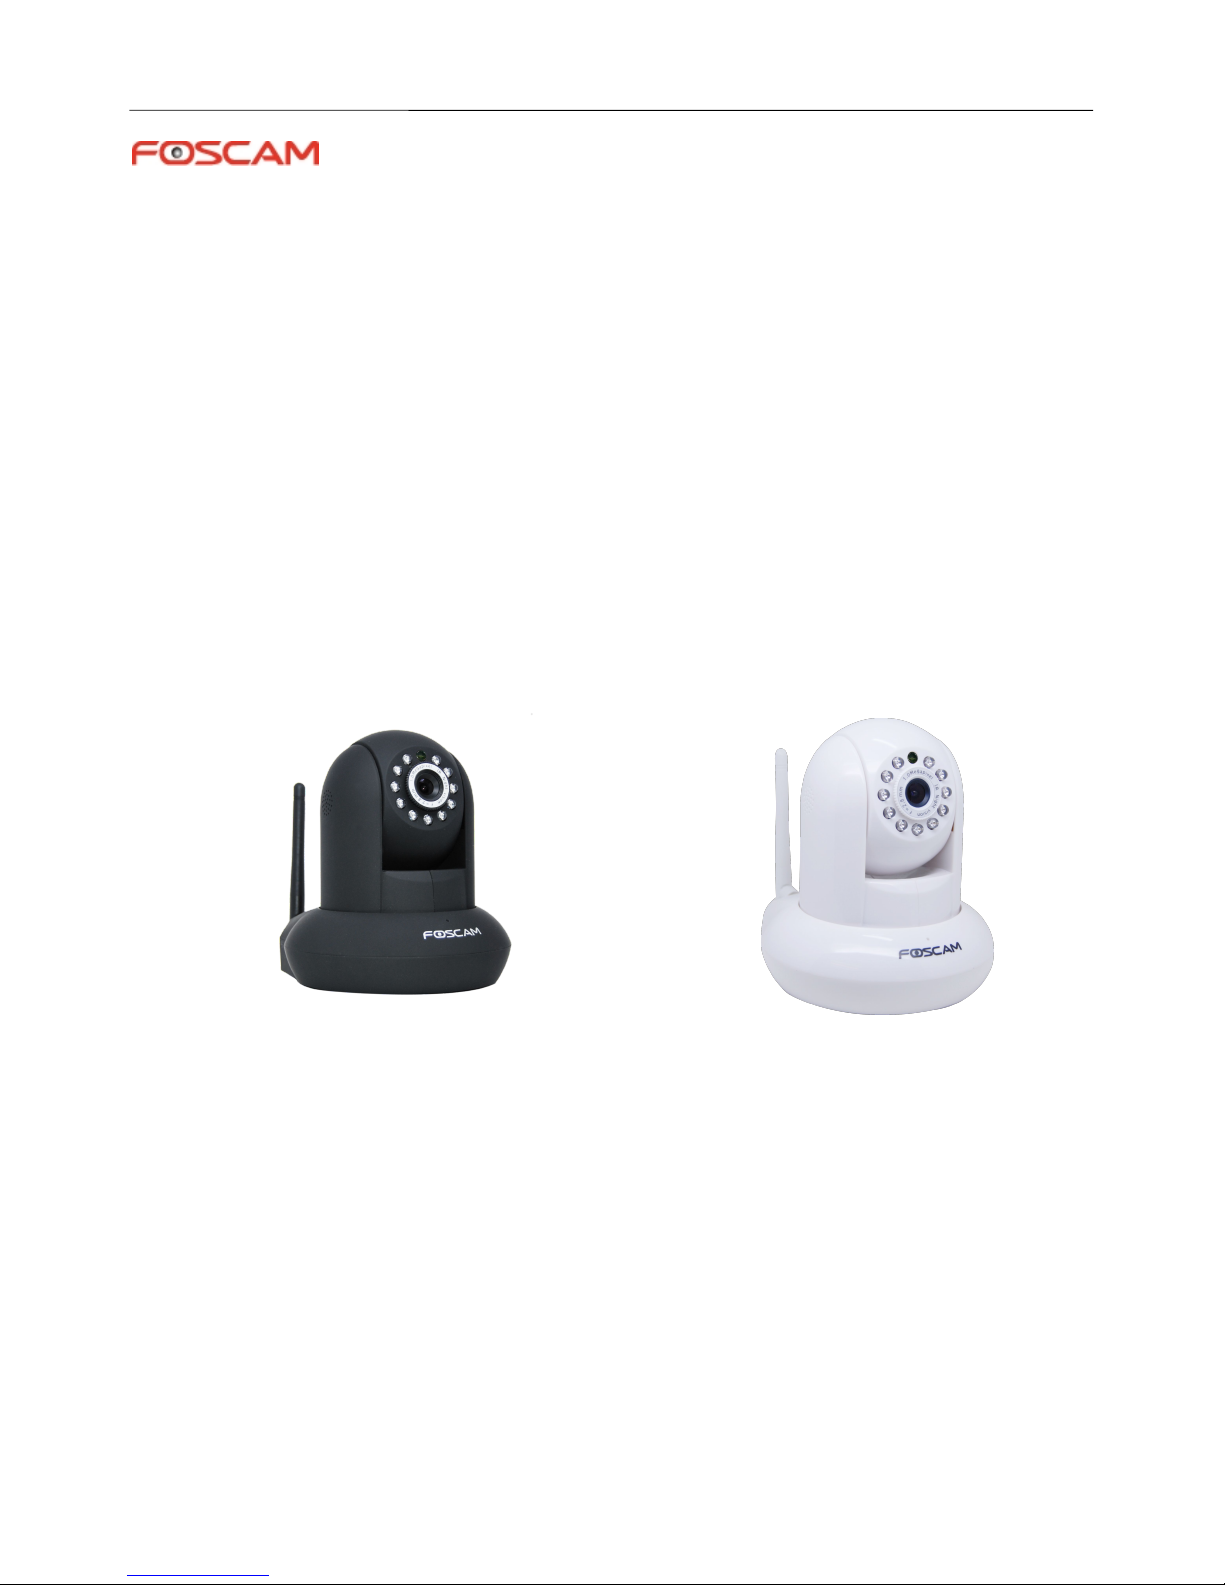
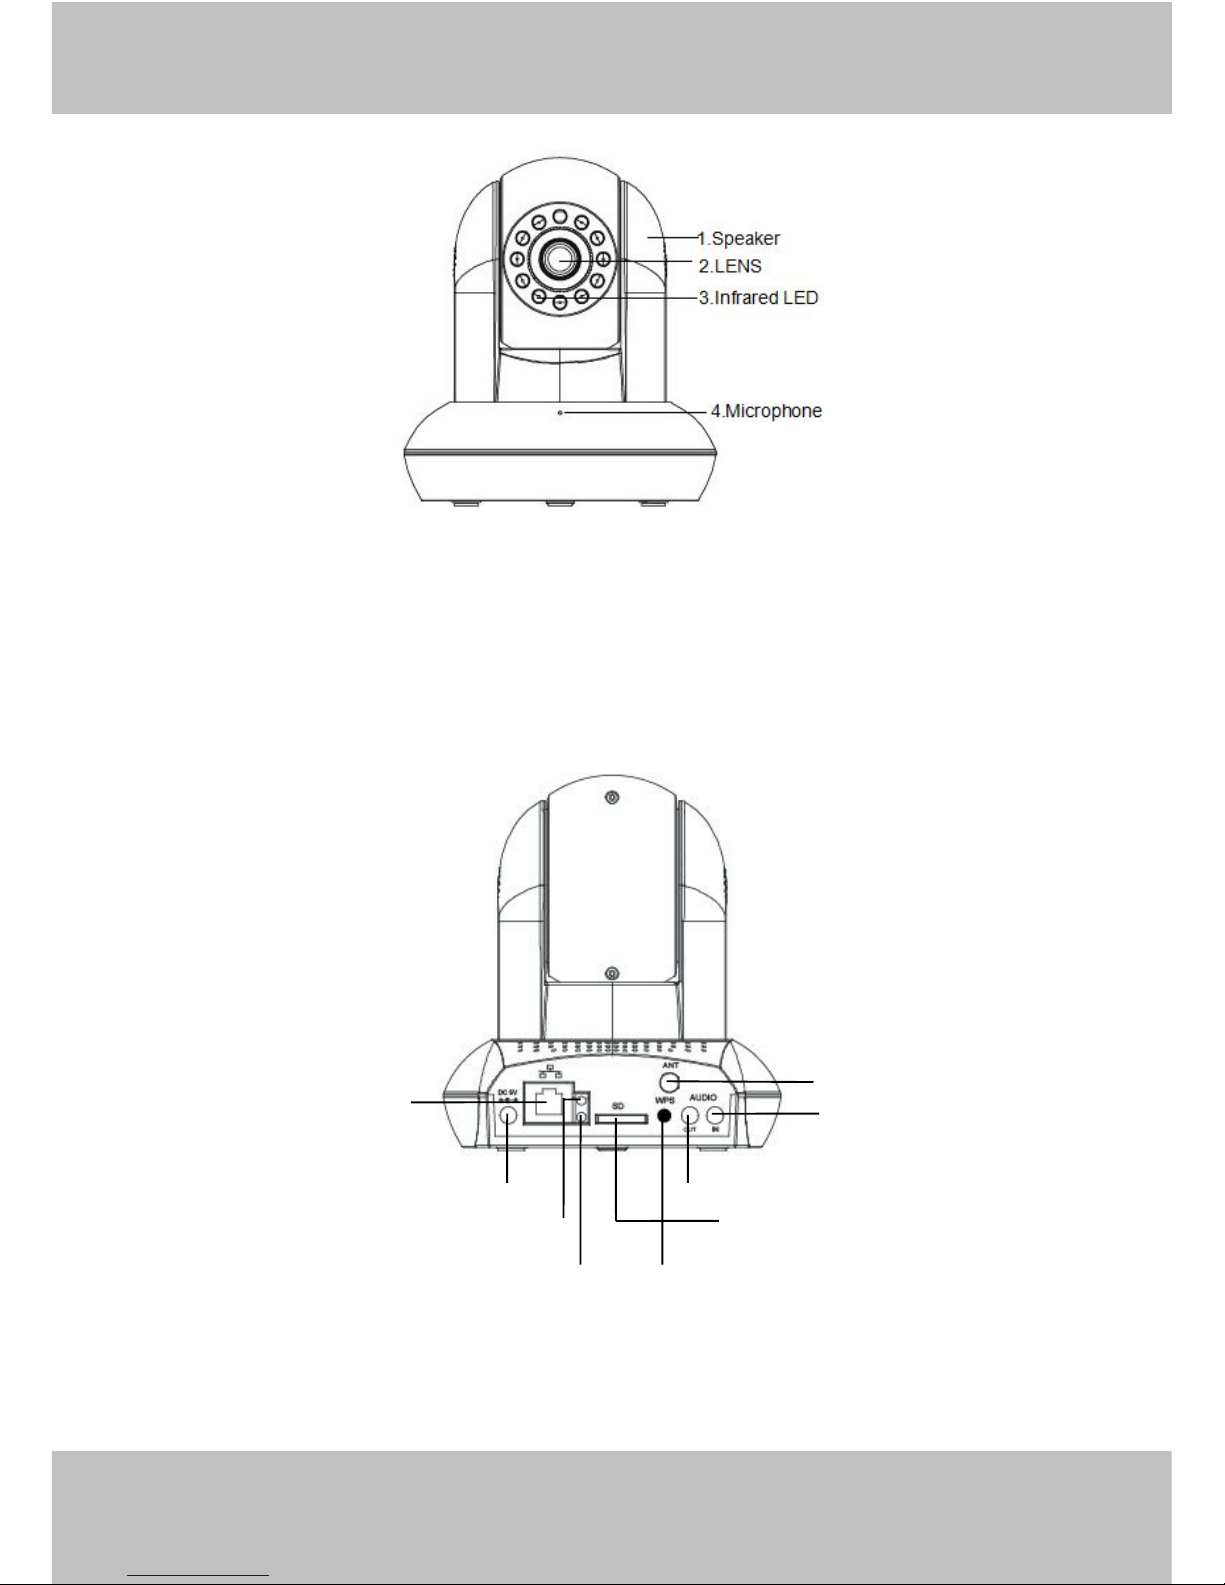
1.4 Physical Description........................................................................................................................................... 2
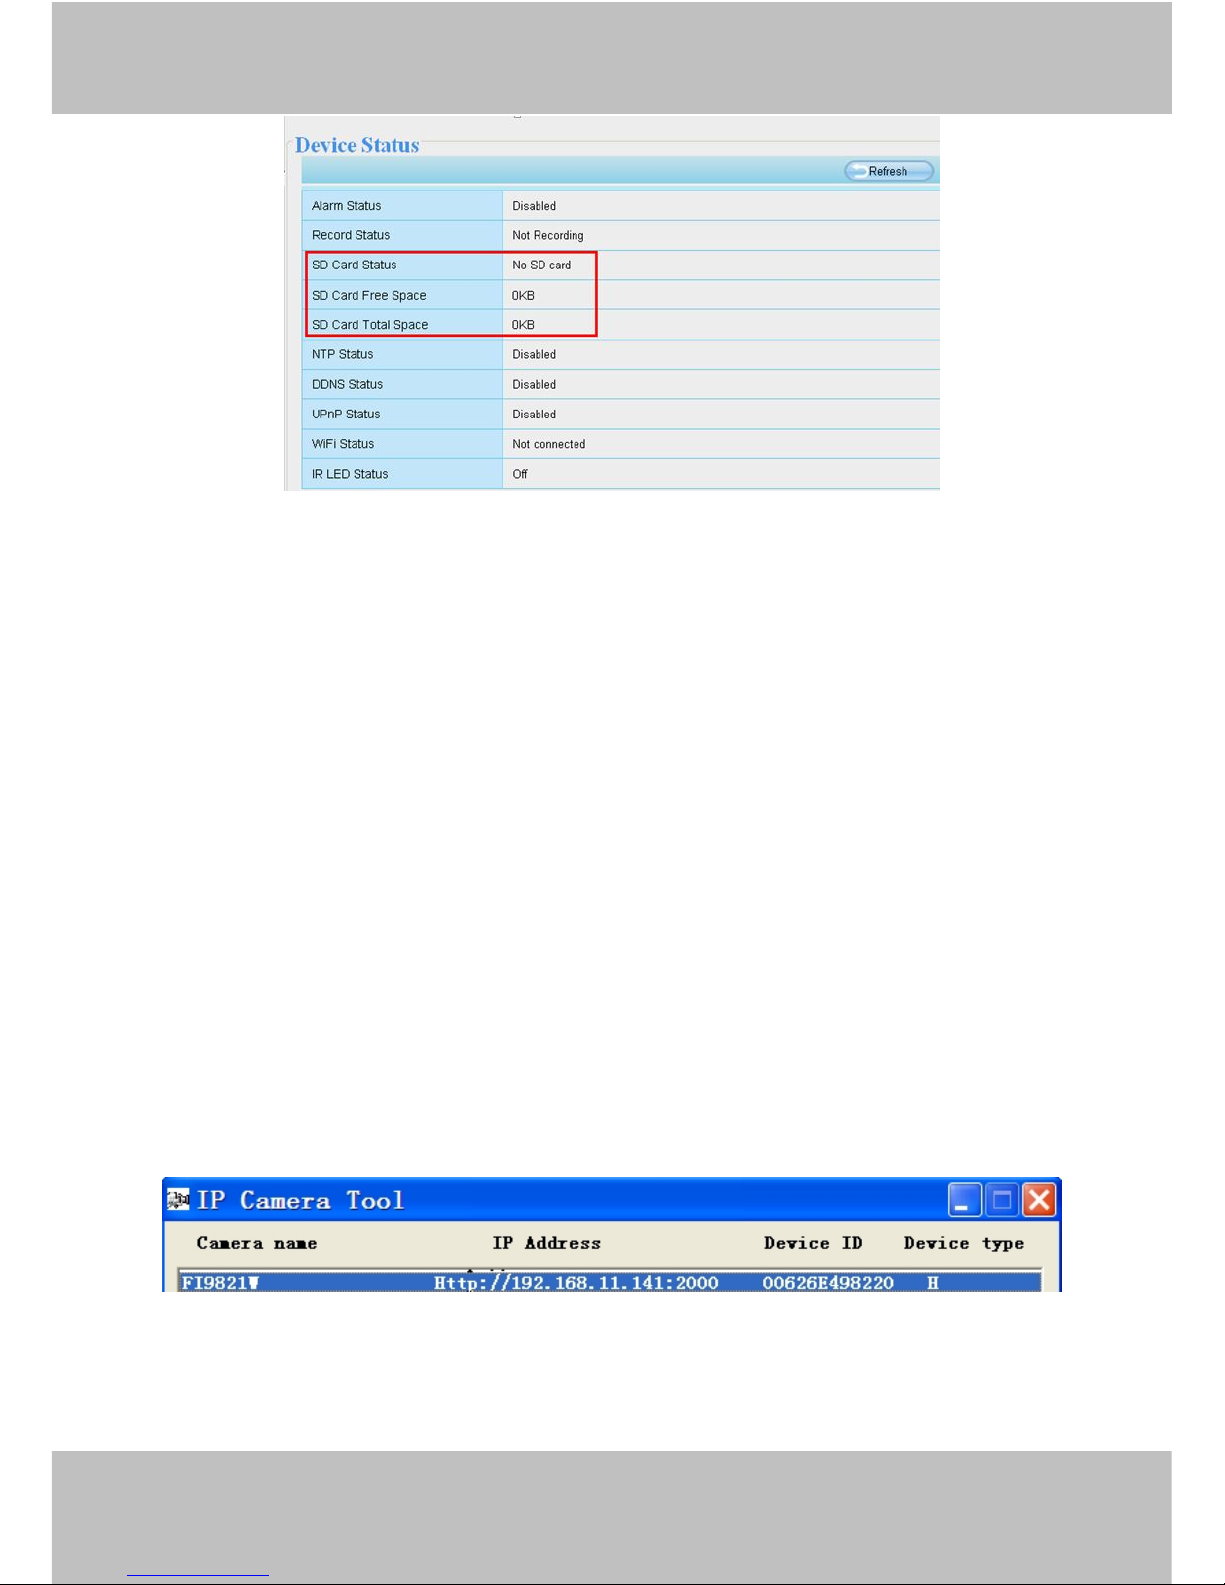
1.5 SD Card................................................................................................................................................................ 4
2 Access the IP Camera................................................................................................................................................... 5
2.1 Access the Camera in LAN................................................................................................................................5
2.2 Access the Camera in WAN.............................................................................................................................. 6
2.3 Using the VLC player........................................................................................................................................11
2.4 IP camera connection to the server...............................................................................................................13
3 Surveillance Software GUI..........................................................................................................................................13
3.1 Login Window.................................................................................................................................................... 14
3.2 Setup Wizard..................................................................................................................................................... 15
3.3 Surveillance Window........................................................................................................................................ 18
4 Advanced Camera Settings........................................................................................................................................ 25
4.1 Status.................................................................................................................................................................. 25
4.2 Basic Settings....................................................................................................................................................28
4.3 Network...............................................................................................................................................................37
4.4 Video................................................................................................................................................................... 57
4.5 Alarm................................................................................................................................................................... 61
4.6 Record.................................................................................................................................................................64
4.7 PTZ......................................................................................................................................................................68
4.8 Firewall................................................................................................................................................................73
4.9 System................................................................................................................................................................ 74
5 Playback.........................................................................................................................................................................78
6 Phone APPs.................................................................................................................................................................. 80
7 Appendix........................................................................................................................................................................ 80
7.1 Frequently Asked Questions........................................................................................................................... 80
7.2 Default Parameters...........................................................................................................................................88
7.3 Specifications.....................................................................................................................................................88
7.4 CE & FCC...........................................................................................................................................................89
8 Obtaining Technical Support.......................................................................................................................................90

www
www.foscam.
.foscam.us
us
Foscam Digital Technologies
Telephone: 1-800-930-0949
1
Security Warning
Safeguarding Your Privacy
Foscam cameras require good security practices to safeguard your privacy. You can help protect your camera
by changing the default username and/or password. Input a username and/or password that is at least 8 – 10
characters or longer. Try to use a combination of lower-case and upper-case letters as well as numbers and
special characters. The more complex the username and password, the harder it will be to guess by an
unauthorized user.
You should update your camera regularly at http://www.foscam.us/firmware.html. Make sure your camera has
the latest firmware installed for your specific camera model. The latest firmware for Foscam cameras utilizes
protection against various types of online hacking, cracking, and unauthorized access. Doing so will make your
device more secure, may add features, and will contain bug fixes to make your device work faster.
1 Overview
FOSCAM Indoor HD Pan/Tilt Wireless IP Camera is an integrated wireless IP Camera with a color CMOS
sensor enabling viewing in High Definition resolution. It combines a high quality digital video camera, with a
powerful web server, to bring clear video to your desktop and mobile devices from anywhere on your local
network or over the Internet.
With flexible 300-degree pan and 120-degree tilt, FOSCAM IP Camera gives users more comprehensive
control over a monitored site. The camera supports H.264 video compression technology, dramatically
reducing file size and saving network bandwidth.
The camera is based on the TCP/IP standard. There is a WEB server inside which could support Internet
Explore. Therefore the management and maintenance of your device is simplified by using the network to
access the website of your camera.
The camera is designed for indoor surveillance applications such as home, retail store and office. Controlling
the camera and managing images are simplified by using the provided web interface across the network
utilizing wired or wireless connectivity.
FOSCAM provides Smart Phone APP for Android and iPhone users, please search and install Foscam Viewer
on Google Play for Android devices, search and install Foscam IP Cam Viewer on APP Store for iOS devices,
then you can view your camera anywhere, anytime on your smart mobile devices.
Please note to change your default username and password once you have initially
logged into your Foscam camera. Changing your default user settings enables better
protection against any types of attacks against your camera.

www
www.foscam.
.foscam.us
us
Foscam Digital Technologies
Telephone: 1-800-930-0949
2
1.1 Key Features
Standard H.264 video compression algorithm to satisfy the transmission of high definition video in narrow
bandwidth network
Megapixel HD video
Pan 300 degree, tilt 120 degree
Supports IE/Firefox/Google/Safari browser
Supports WEP,WPA-PSK and WPA2-PSK Encryption
Wireless connection is compliant with IEEE 802.11b/g/n Wi-Fi, up to 150Mbps
IR night vision (Range: 8m)
Supports image snapshot
Supports dual-stream
Supports SD Card storage up to 32GB
Supports IR-Cut auto switch
Embedded free FOSCAM DDNS(dynamic domain name service) Service
Supporting the Third Party Domain Name Service
Supports ONVIF protocols
Supports two-way audio
Multi-level users management with password protection
Motion detection alert via email or upload image to FTP
Providing free Android and iPhone APP for viewing live video
Providing free Central Management Software to manage and monitor multiple cameras
1.2 Read Before Use
Please first verify that all contents received are complete according to the Package Contents listed below.
Before the IP Camera is installed, please carefully read and follow the instructions in the Quick Installation
Guide to avoid damage due to faulty assembly and installation. This also ensures the product is used properly
as intended.
1.3 Package Contents
● IP Camera × 1 ● DC Power Adapter × 1
● Wi-Fi Antenna × 1 ● Mounting bracket × 1
● Ethernet Cable × 1 ● CD×1
● Quick Installation Guide × 1 ● Security Warning Card × 1
1.4 Physical Description
Front Panel

www
www.foscam.
.foscam.us
us
Foscam Digital Technologies
Telephone: 1-800-930-0949
3
Figure 1.1
1.Speaker: Built-in speaker
2.LENS: Fixed focus lens.
3.Infrared LED: Infrared LEDs for night vision
4.Microphone: Built-in microphone
Rear Panel
Figure 1.2
1.LAN: 10/100 Mbps RJ-45 port for wired connection
2.Power: DC 5V/2A Power supply
9.Antenna
8.Audio Input
7.Audio Output
2.Power
1.LAN
6. Micro SD Card
5.WPS
4.Power light
3.Network light

www
www.foscam.
.foscam.us
us
Foscam Digital Technologies
Telephone: 1-800-930-0949
4
3.Network Light: The LED will blink slowly in wired connection, blink two times faster in wireless connection,
blink four times faster when WPS
4.Power Light: If the power supply works fine, the light will turn on
5.WPS: Push the WPS button on the camera and wireless router in 1 minutes, the camera will connect the
wireless router automatically, in WPS process, the Network Light will blink very fast
6. SD card Slot: Supports up to 32GB SD card for storing the video
7.Audio Output: This jack is used to plug an external speaker
8.Audio Input: This jack is used to plug an external microphone
9.Antenna: Used to connect external wireless antenna
Bottom View
Figure 1.3
1.Mounting Port: Port for mounting bracket
2.Reset Button: Push and hold for more than 5 seconds to set the camera to factory default
3.Product Label: There are MAC address, DDNS URL, default username and password on the label
SN Label: There is serial number of the camera on the label.
4.Wi-Fi Module Label: There is Wi-Fi MAC address and serial number of the Wi-Fi module on the label
1.5 SD Card
This camera supports SD Card and the max size of SD card must be under 32G.
When you plug in the SD card during the camera work process, please reboot the camera again, or else the
SD Card may be cannot work well.
Go to the SettingsStatusDevice Status page, you can see the SD card status.
1.Mounting Port
2.Reset Button
3.Product Label&SN Label
4.Wi-Fi Module Label

www
www.foscam.
.foscam.us
us
Foscam Digital Technologies
Telephone: 1-800-930-0949
5
The default storage path of alarm record files is SD card, when the available size of SD card is less than 256M,
the old record files will be deleted automatically.
2 Access the IP Camera
This chapter explains how to access the camera through browser and RTSP player.
2.1 Access the Camera in LAN
This camera supports HTTP and HTTPS protocols, you can access the camera by two ways.
(1) http:// LAN IP + HTTP Port NO.
The default HTTP port no is 88. Double click the IP Camera Tool icon to run, and it should find the camera’s IP
address automatically after you plug in the network cable.
Figure 2.1
Double click the IP address of the camera; your default browser will open to the camera login page.
(2) https:// LAN IP + HTTPS Port NO.

www
www.foscam.
.foscam.us
us
Foscam Digital Technologies
Telephone: 1-800-930-0949
6
The default Https port no is 443. You can use the url to access the camera: https:// LAN IP + HTTPS port.
Go to Settings - Network - Port panel , you can see and change the http and https port NO.
Figure 2.2
2.2 Access the Camera in WAN
2.2.1 Static IP Addresses
Users who have static IP addresses do not need to set DDNS service settings for remote access. When you
have finished connecting the camera using the LAN IP address and port forwarding, you can access the
camera directly from the Internet using the WAN IP address and port number.
How to Obtain the WAN IP address from a public website
To obtain your WAN IP address, enter the following URL in your browser: http://www.whatismyip.com.The
webpage at this address will show you the current WAN IP.
Figure 2.3
Access your IP Camera from the Internet
You can access the IP Camera from the Internet (remote access). Enter the WAN IP address and port number

www
www.foscam.
.foscam.us
us
Foscam Digital Technologies
Telephone: 1-800-930-0949
7
in your standard browser. For example, you would enter http:// 183.37.28.254:85
NOTE:
Make sure port forwarding is successful. You can do port forwarding two ways.
1) Login to your router to enable the “UPNP” function. You can then login to the camera as administrator,
choose Network, and then choose UPnP to enable UPnP. Make sure that the status of UPnP reads “UPnP
Successful” on the Device Status page.
2) Do port (HTTP port and Media port) forwarding manually.
If your router has a Virtual Server, it can do port forwarding. Add the camera’s LAN IP and port which you had
set earlier to your router’s port forwarding settings.
Note:
If you plug the camera into a router, it will have a dynamic IP address and you need to set DDNS service
settings to view it remotely.
2.2.2 Dynamic IP Addresses
DDNS is a service that allows your IP Camera, especially when assigned with a dynamic IP address, to have a
fixed host and domain name. This means that even though your WAN IP address is constantly changing, you
will have a fixed hostname you can use to access your cameras at all times. You can access the camera
directly from the Internet using the hostname and port number.
What is the HTTP Port NO.?
Default HTTP Port is 88
All cameras have the default HTTP port of 88. For example, if the LAN IP link of the camera is
http://192.168.1.110:88, this means that the camera’s HTTP port is 88. You can change port 88 to another port
if you’d like such as 2000 or 8090, which will not be conflict with other existing ports like 25, 21,10000.Here you
can set the port no. between 1 and 65535.
Change the default http no.88 to another one.
How to assign a different HTTP Port No. and fixed the LAN IP of the camera by the IP Camera
Tool?
Step 1: Open the IP Camera Tool, select the camera you would like to change the port of, right click on the IP
address, and click on ”Network Configuration”, this brings up the network configuration box as shown in Figure
2.4 and 2.5.

www
www.foscam.
.foscam.us
us
Foscam Digital Technologies
Telephone: 1-800-930-0949
8
Figure 2.4
Figure 2.5
Step 2: Enter the username and password of the Administrator (default username is admin with a blank
password), and click “OK” to apply changes.
Step 3: Wait around 10 seconds, you’ll see that the camera’s LAN IP address has changed. In our example it
was changed to 2000, so we see http://192.168.1.110:2000 in IP Camera Tool. Also, the LAN IP address is
now fixed at a static IP address of http://192.168.1.110:2000. This IP address will not change even if the
camera is powered off and back on, the camera will remain on this LAN IP address. This is very important that
a static LAN IP address is set, or you may have problems later with remote access and seeing the camera
remotely if the camera loses power and reconnects on a different LAN IP address. Make sure you set a static
LAN IP address!
Select which camera
you’d like to change the
port for, and right click
Modify the Http Port.
Enter the Username and
password, click OK.

www
www.foscam.
.foscam.us
us
Foscam Digital Technologies
Telephone: 1-800-930-0949
9
Figure 2.6
What is Port forwarding?
If you have never done port forwarding before, you can open and view the following link to understand the
basic concept. Port forwarding allows for outside connections to access a specific device on your network from
anywhere in the world. Every router automatically blocks any incoming connections for safety purposes. Using
port forwarding, you are telling your router to allow a connection through a certain port (you can think of it as a
gateway) into your router. You set this port to a specific device, in our case an IP Camera, so it can be
accessed from anywhere in the world.
Click this link to learn more about port forwarding: http://portforward.com/help/portforwarding.htm
How do we configure Port Forwarding?
For this section, we will be using an example:
Let’s say the camera’s LAN IP address is http://192.168.8.100:2000
Step 1: Login to the router, and go to your router’s port forwarding or port triggering menu. Sometimes this is
also under the name of Virtual Server or NAT.
Using the Linksys brand router as an example, we would log into the router, and go to the Applications &
Gaming menu. We would then click on the “Single Port Forwarding” sub-menu.
Step 2: Create a new column using the LAN IP address & HTTP Port of the camera within the router as shown
below, then push OK or Submit to save your settings:
Figure 2.7
Fill the HTTP Port of the
camera in the columns of
External Port and Internal
Port. Example: 2000
Fill in this section with the
LAN IP of the camera; we
would enter “100” for our
example.
Assign a name for the
port forward setting here

www
www.foscam.
.foscam.us
us
Foscam Digital Technologies
Telephone: 1-800-930-0949
10
First method :
Use the embedded DDNS to access the camera via the Internet
Each Foscam camera has an embedded unique DDNS domain name, the format of this domain name is
xxxxxx.myfoscam.org. On the bottom of the camera, you can see the domain name sticker with this
information on it.
For example, we can use test09.myfoscam.org. In the camera, click Settings at the top, click “Network” on the
left, then click “DDNS” to get to the DDNS settings page. Here you can see the unique domain name of your
camera.
Figure 2.8
Now you can use “http://Domain name + HTTP Port” to access the camera via the Internet.
Take hostname test09.myfoscam.org and HTTP Port of 2000 for example, the URL link to access the camera
via the Internet would be http:// test09.myfoscam.org:2000.
Second method :
Use the Third party DDNS to access the camera via the Internet
Step 1 Please go to the third party DDNS website(such as www.no-ip.com) to create a free hostname.
Step 2 DO DDNS Service Settings within the Camera
Please set DDNS Settings within the camera by hostname, a user name and password you’ve got from
www.no-ip.com
Take hostname ycxgwp.no-ip.info, user name foscam, password foscam2012 for example.
Firstly, goes to option of DDNS Settings on the administrator panel.
Secondly, select No-Ip as a server.
Thirdly, fill foscam as DDNS user, fill password foscam2012 as DDNS password, fill ycxgwp.no-ip.info as
DDNS domain and server URL, Then click save to make effect. The camera will restart and to take the DDNS
settings effective.
Fourthly, after the restart, login the camera, and go to option of Device Status on the administrator panel, and
check if the DDNS status is successful.
If failed, please double check if you have input the correct hostname, user name, and password, and try to
redo the settings.
NOTE:
If you have set Third Party DDNS successfully ,the Foscam Domain Name will be invalid. The Third Party
DDNS and the Foscam Domain Name cannot work at the same time, the last time you configured will take
effect.

www
www.foscam.
.foscam.us
us
Foscam Digital Technologies
Telephone: 1-800-930-0949
11
2.3 Using the VLC player
This camera supports RTSP streaming, here you can view the camera using VLC player.
RTSP URL rtsp:// [user name][:password]@IP:HTTP port number/videosream
The part in the square brackets may be omitted.
user name & password:
The user name and password to access the camera. This part can be omitted.
IP:
WAN or LAN IP address.
Videostream:
Here support three mode: videoMain, videoSub and audio. When the network speed is bad, here you had
better select videoSub. If you select audio, you can only hear the sound but cannot see the video.
For example:
IP: 192.168.1.11
HTTP Port number: 88
User name: admin
Password: 123
Here I can enter one of the following URLs in the VLC.
1) rtsp://admin:[email protected].11:88/videoMain
2) rtsp:// @192.168.1.11:88/videoMain
3) rtsp://:123@192.168.1.11:88/videoMain
4) rtsp://adm[email protected]1:88/videoMain
Open the VLC, and go to MediaOpen Network Stream option, then enter the URL into VLC.
Figure 2.9

www
www.foscam.
.foscam.us
us
Foscam Digital Technologies
Telephone: 1-800-930-0949
12
Figure 2.10
Sometimes you may need to enter the user name and password again. Click OK and you can see the
real-time preview.
Figure 2.11

www
www.foscam.
.foscam.us
us
Foscam Digital Technologies
Telephone: 1-800-930-0949
13
Figure 2.12
If you cannot play the video in the VLC player, please check the port mapping. You can read Quick Installation
Guide about How to configure port forwarding.
NOTE:
If you modify the camera’s username or password, you had better reboot the camera, or else the
new username and password cannot take effect when you enter the authentication in the VLC.
2.4 IP camera connection to the server
Device supports ONVIF 2.2.1 protocol,You can easily access the NVR with ONVIF or server with ONVIF.
3 Surveillance Software GUI
Please refer to the Quick Installation Guide if you install the camera at first time. After finishing quick
installation, you can take time to learn the operation of the software.

www
www.foscam.
.foscam.us
us
Foscam Digital Technologies
Telephone: 1-800-930-0949
14
3.1 Login Window
Figure 3.1
Please check the login window above, it was divided to 4 sections from no. 1 to 4.
Section1 Enter the Username and password
The default administrator username is admin with no password, please reset the password at first using and
prevent unauthorized users login the camera (read chapter 3.2.4 about how to change).
Section2 Stream
The camera supports two stream modes: Main stream and Sub stream. If you want to access the camera form
LAN, here you can select Main stream. If you want to access the camera from Internet, here we recommend
Sub stream.
Note: When the network bandwidth is badly you’d better select Sub Stream and the video will be more fluency.
Section3 Select the language
You can select the language you need via click on the language drop-down list to switch.
Section4 Login the camera
Click Login button and you will see the surveillance windows.(If login the camera for the first time, the page that
modify the username and password will appears.)
NOTE:
When setting up your camera for the first time, it will request that you modify the default username and/or
password if both are still set to default. Input the new username and password, click "Modify" to complete the

www
www.foscam.
.foscam.us
us
Foscam Digital Technologies
Telephone: 1-800-930-0949
15
modification. You will now use the new username and password to login to the camera in the future.
Figure 3.2
Enter the New Username, New password and Confirm the password.
Click Modify button, you will see the login page again.
3.2 Setup Wizard
After logging in for the first time, you will go to “Setup Wizard”automatically. Here you can set the basic
parameters of camera, such as camera name, camera time, wireless settings, IP configuration.
Figure 3.3
Device Name: You could give name for your camera.

www
www.foscam.
.foscam.us
us
Foscam Digital Technologies
Telephone: 1-800-930-0949
16
Figure 3.4
System Time: Select the time zone you need to set the date, time,format and so on.
Figure 3.5
Wireless networks: Click “Scan”, find the SSID of your wireless router, select and enter the password.

www
www.foscam.
.foscam.us
us
Foscam Digital Technologies
Telephone: 1-800-930-0949
17
Figure 3.6
IP: Set IP address of the camera. You could choose to obtain an IP automatically or set the IP address
according to your needs.
Figure 3.7

www
www.foscam.
.foscam.us
us
Foscam Digital Technologies
Telephone: 1-800-930-0949
18
3.3 Surveillance Window
Figure 3.8
Section1 FOSCAM Logo/ Live Video / Settings/Playback buttons
: FOSCAM LOGO
: Path to surveillance window. Click this button and back to the surveillance window
: Path to Administrator Control Panel, Click it, and it will lead to Administrator Control Panel and
do advanced settings.
: Click this button and back to the Playback panel to view the stored audio files stored in the
SD Card.
Section2 Multi-Device Window
The firmware inside the camera supports up to maximum of 9 cameras being monitoring at the same time. You
can add other cameras in multi-device setting (read chapter 4.2.4).
1
9
2
4
3
5
8
6
7
Other manuals for FI9821W
4
Table of contents
Other Foscam IP Camera manuals

Foscam
Foscam FI8918W User manual

Foscam
Foscam FI9803P User manual

Foscam
Foscam FI9821W User manual

Foscam
Foscam IP Camera User manual

Foscam
Foscam FI9805P User manual

Foscam
Foscam FI8903W User manual

Foscam
Foscam FI9820W User manual

Foscam
Foscam R2 User manual

Foscam
Foscam FI8918W User manual

Foscam
Foscam FI8904W User manual

Foscam
Foscam FI9820W User manual

Foscam
Foscam C1 Lite User manual

Foscam
Foscam FI8918W User manual

Foscam
Foscam FI8908W User manual

Foscam
Foscam FI8904W User manual

Foscam
Foscam FI9816P User manual

Foscam
Foscam FI9805P User manual

Foscam
Foscam C1 Lite User manual

Foscam
Foscam FI981W User manual

Foscam
Foscam FI8601W User manual