Foscam 305503000601 User manual

Security Camera
V1.1
305503000601
User Manual • Uživatelský manuál •
Užívateľský manuál • Használati utasítás •
Benutzerhandbuch

2
Dear customer,
The user manual for the product contains the product functions, method of use and
operating procedure. Read the user manual carefully to get the best experience and
avoid unnecessary damage. Keep the manual for future reference.
WARNING
Do not use the product in violation of local laws and regulations. A user who violates
local laws and ordinances will be held responsible for all consequences of purchasing
and using the product.
Alza.cz a.s. is not responsible for any violation of local laws and regulations by the user.
✉www.alza.co.uk/kontakt
✆+44 (0)203 514 4411
Importer Alza.cz a.s., Jankovcova 1522/53, Holešovice, 170 00 Praha 7, www.alza.cz

3
Setting Up Your Foscam Security Camera
1. Getting Started
Package Contents
IP Camera Ethernet Cable Power Adapter
Quick Setup Guide Expansion Screws Ethernet port waterproof kit
Security tips
•Please change the camera’s password regularly, using a combination of numbers,
letters and special characters.
•We recommended that you regularly update your camera with latest available
software and firmware to ensure the best experience with your camera.
2. Physical Description
LENS
Spotlight
LAN
Light Sensor
Power
Spotlight
Micro SD Card Slot
Microphone
Reset
Speaker
LED Indicator
Passive infrared
motion sensor

4
3. Setting Up Your Camera: Connection via Foscam App
Before you get started
Scan the QR code below to download and install the Foscam APP:
To ensure a smoother video experience on your smart phone, it is recommended that
you smart phone meet the following specifications:
•iOS: version 11 or higher.
•Android: 4.1 or higher, using a device with Graphics Processing Unit (GPU)
NOTE: For the best experience, please update the APP to the latest version!
Wi-Fi Connection
1. Plug the power adapter into the camera, and please wait for a few seconds until
hearing the “Ready for Wi-Fi configuration”.
2. Make sure your smart phone is connected to the same Wi-Fi network as the camera.
TIPS: The camera supports dual-band 2.4GHz and 5GHz Wi-Fi networks, so you can
choose the channel with the stronger signal to use. For example SSID: XXXXX_2.4G or
XXXXX_5G.
3. Open the foscam APP and please register a Foscam account, or sign in if you have one
already.

5
4. After logging into Foscam APP, select “Tap to add a camera” or “+” icon on the upper
right corner, then select “Scan the QR code” and scan the QR code that labeled at the
bottom of your camera.
Tap + icon select “Scan the code” Scan the QR code
which is located at the
bottom of your camera.
5. In “Add Device”, if you hear “Hello Foscam”, select the checkbox and tap “Next”,
continue to confirm that the device is in the blue flashing state and tap “Next”. In “Wi-Fi
connection”, enters your Wi-Fi’s password and tap “Confirm”.
6. Please scan the QR code on the doorbell with the smart phone camera, then you will
hear a voice prompt say “Wi-Fi connecting”. Select the checkbox and tap “Next”.
Heard „Hello Focam!
And tap „Next“
Confirm device
flashes blue
Enter you Wi-Fi
password and tap
„Confirm“

6
TIPS: Please place the QR code on the phone screen about 10-15cm (3.94 to 5.9in) away,
and if you encounter difficulties you can try to move the screen slowly around 10-15cm
(3.94 to 5.9in).
7. Wait a few seconds until the camera notifies you that the “Wireless connection
succeeded” which means your camera has connected to your Wi-Fi successfully. After,
you can set the camera name and tap “Save” in “Set name” interface.
NOTE: If the adding process fails, please reset your camera and try adding according to
the above method.
Reset
8. Tapping on the play button in the video box will jump to the “Camera Login” setting
interface. For your security, please set a new username and password for your camera
before viewing live video.
Tap Set a new username
and password
Camera added
successfully and
name has been set

7
9. After completing the above steps, you can begin using your camera.
4. Other ways to access your camera
•Foscam VMS
Foscam VMS is a new tool for PCs. It does not require plug-in and is compatible with
Windows & Mac, supporting all Foscam HD cameras and up to 36 cameras at the same
time. If you would like to manage multiple cameras, we suggest you install Foscam VMS.
You can download the “Foscam VMS” Windows version from foscam.com/vms, and can
download the “Foscam VMS” Mac version from the APP store:
https://apps.apple.com/cn/app/foscamvms/id1521202507?mt=12.
NOTE: For the best experience, please update Foscam VMS to the latest version!
Add the IP Camera
1. Run Foscam VMS, then create a local administrator account and login.
2. Tap the “+” icon on the Foscam VMS and follow the setup wizard to add your camera.
Please visit foscam.com/downloads to view the user manual and for additional detailed
steps.

8
5. Hardware Installation
Point the camera at the desired location and use the screws provided to mount it.
For the best product experience, we suggested installation height of Spotlight camera
2.2m (7.22 feet), camera downward tilt angle 30°.
Please Note:
Ensure that rain or water will not reach the connector ports at the end of the pig tail
wiring. These connectors are not weather-resistant.
6. Important Notice
•Camera Username & Password
The camera username & password are used to access and manage your camera. Having
a strong can significantly improve the security of your camera.
If you have forgotten either of them, please press the “Reset” button and hold it for
more than 10 seconds while the camera is powered on. After release the button. The
camera will automatically reboot and the default settings will be restored.
You can then reconnect the camera by following this Quick Setup Guide.

9
•Foscam Cloud Service Account Username & Password
Your Foscam Cloud service account and password may be used to access both the
Foscam App and then Foscam Cloud service website. Therefore, you can register your
account username & password on either one.
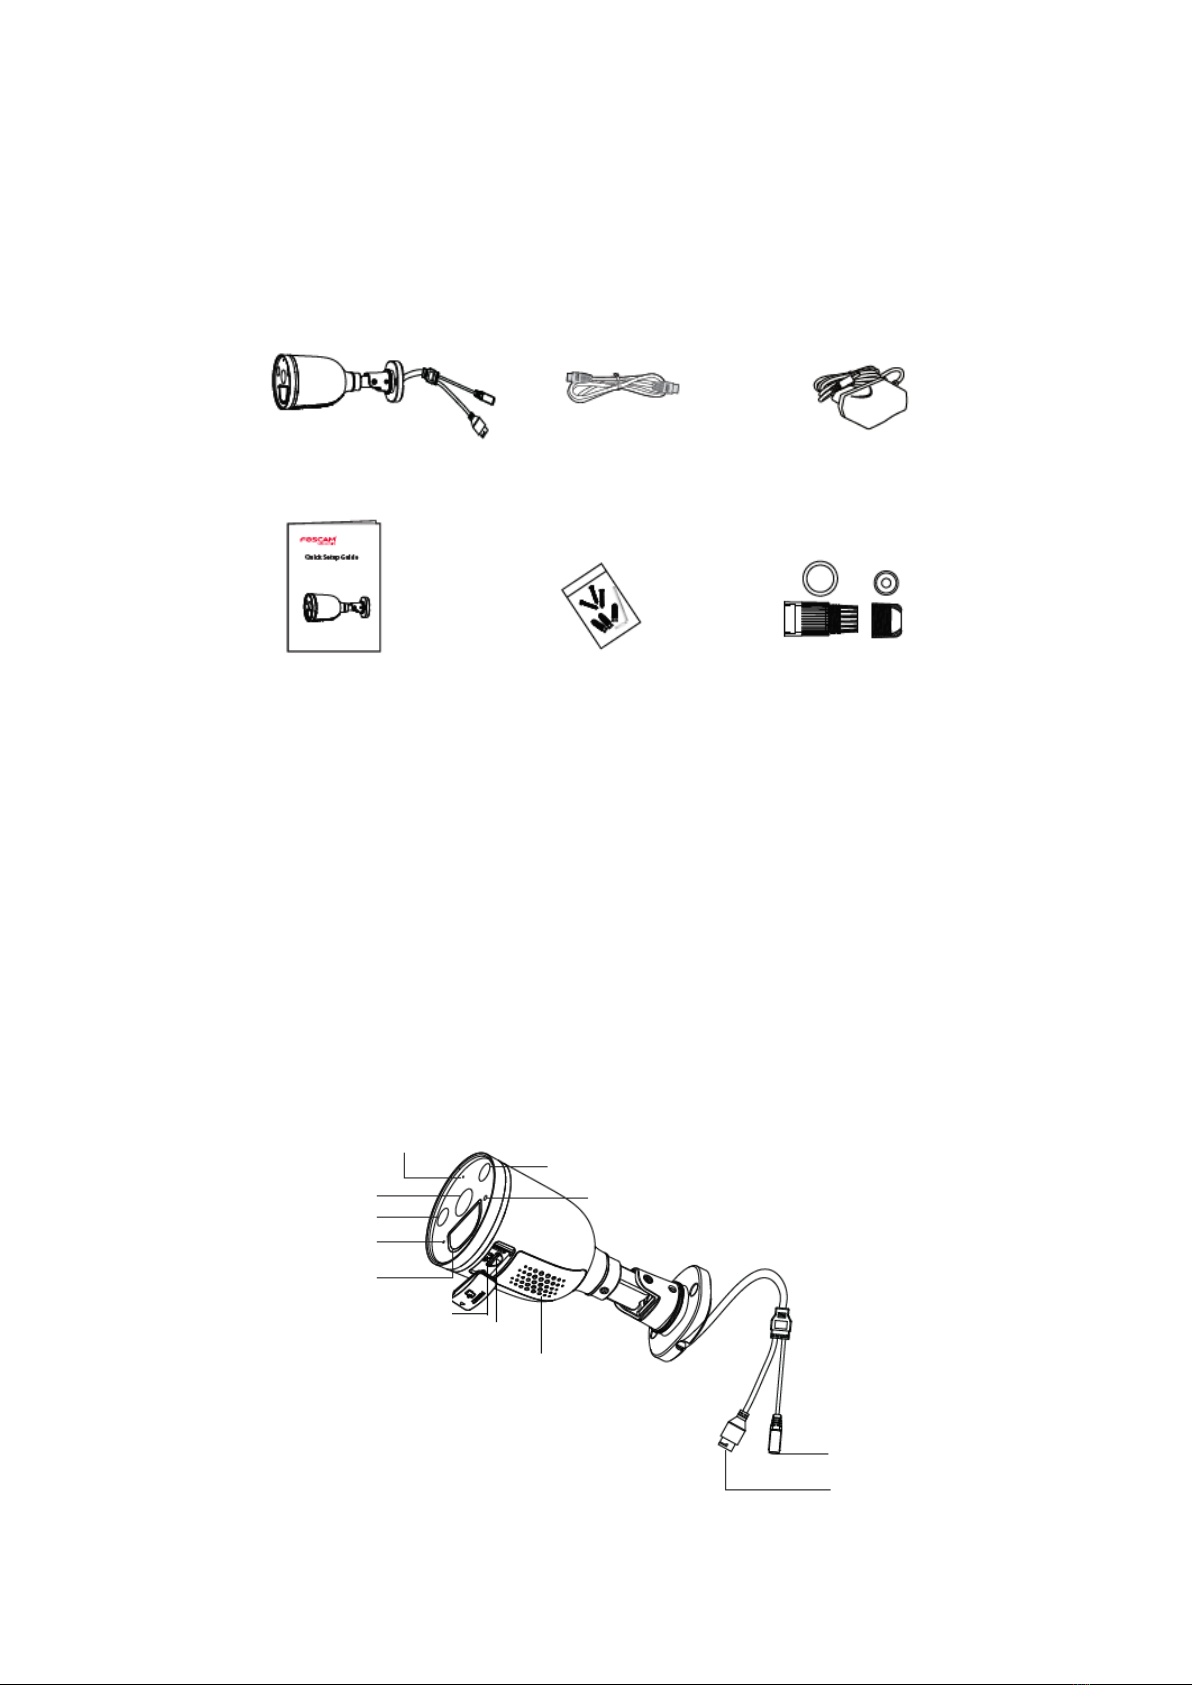
•Storage Media
You camera supports cloud, NVR (Network Video Recorder), and Micro SD card (only
supports FAT-32 format) storage formats. If you wish to record and play back large
amounts of video, we recommend using a Foscam NVR device as well.
•Firmware Upgrade
You can upgrade the firmware of your camera with the Foscam App by using the new
“One-Key Online Upgrade” feature (Open the Foscam App and Login to the camera,
select Settings > Firmware Upgrade).
You also can download the latest version to upgrade your camera from our official
website foscam.com/upgrades.
•Safety Tips
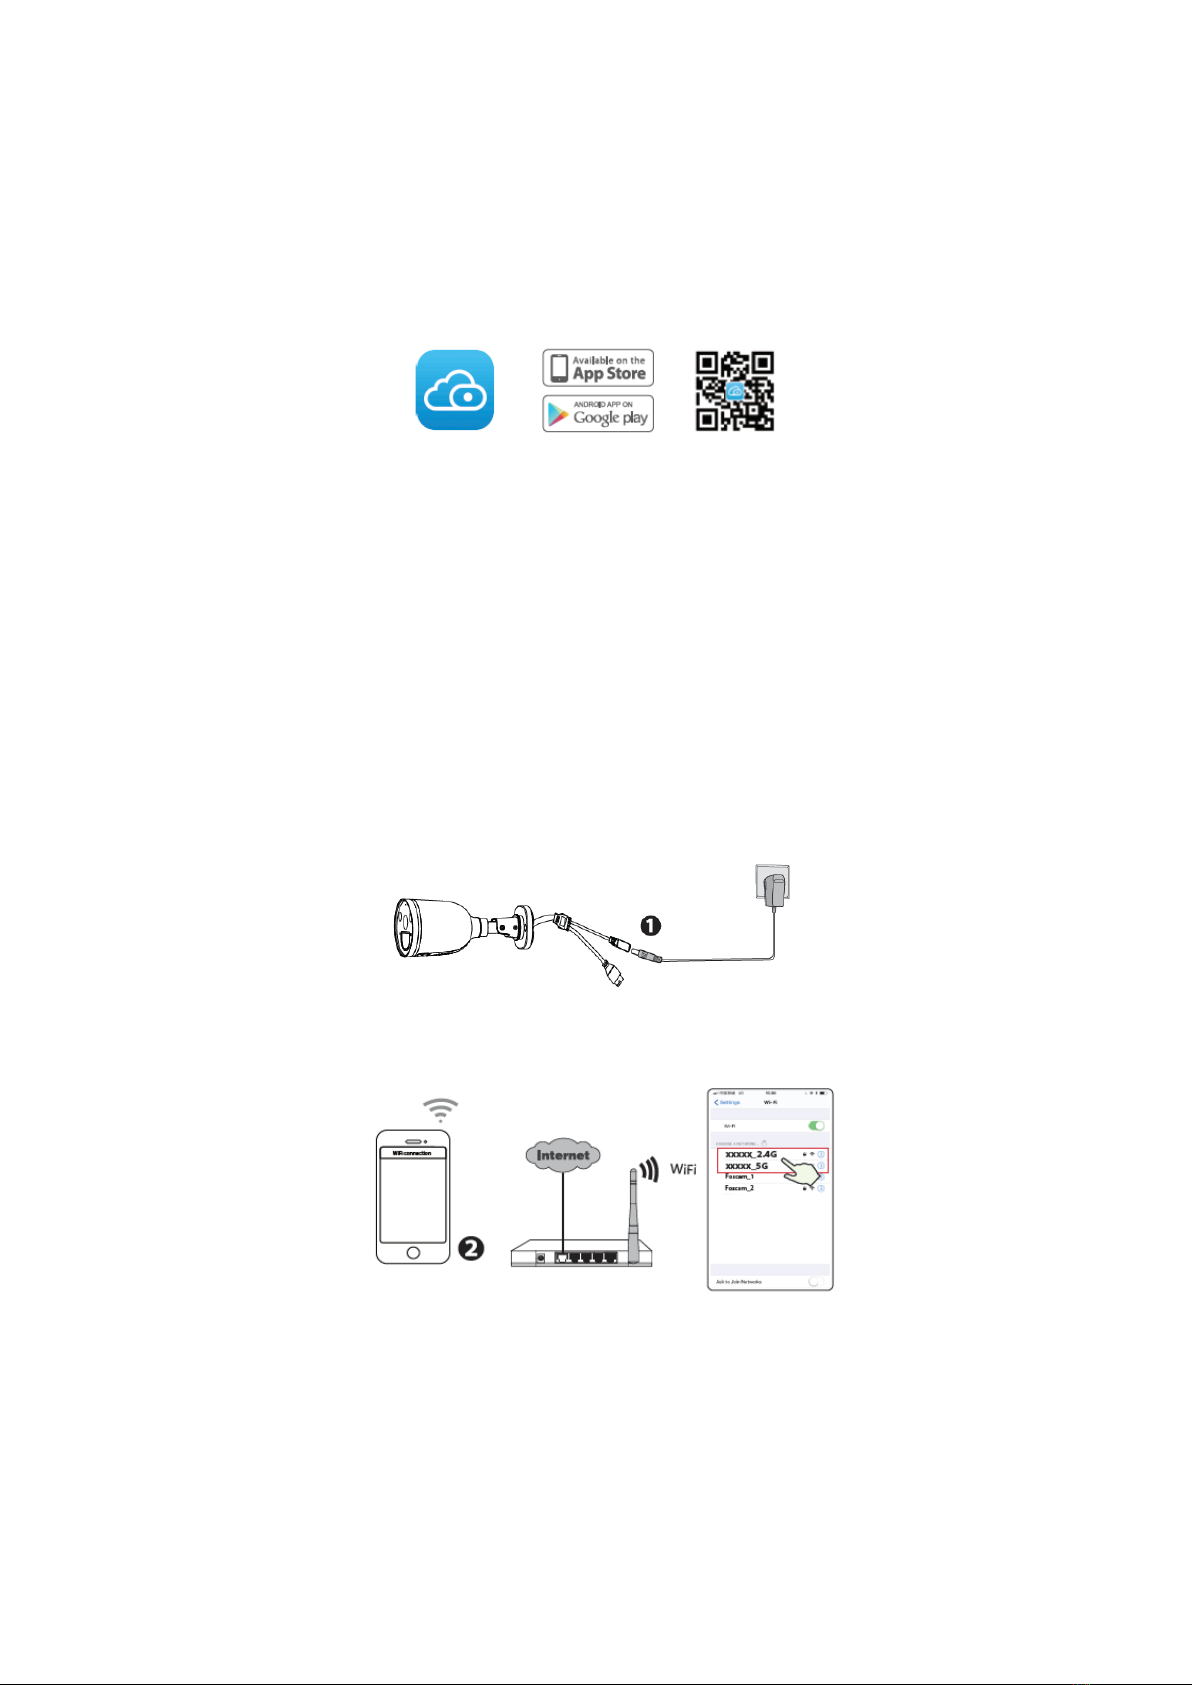
Please ensure that the proper power supply is used before using the camera.
Please install the camera securely using the screw provided.
Please use this product within the temperature range. When the ambient temperature is
too high or too low, it may cause product failure.
To avoid the risk of fire or electric shock, please keep your camera connectors in a cool,
dry place.
Please keep the camera out of reach of small children.
This product is not a toy; children should use the product under adult supervision.
Change your default port to a greater range to help ensure the safety of your
connection. How to change the default port: please visit foscam.com/downloads to view
the user manual.
Check the logs of your Foscam cameras frequently. Foscam Cameras have embedded
logs reminding telling you which IP addresses are accessing the camera.
The cords on this product are a potential strangulation hazard for child safety; please
keep these cords out of the reach of children.

10
7. Product Performance
WLAN frequency range: 2412MHz –2472MHz and 5725MHz –5850MHz
Maximum transmission power: < 16dBm
Wireless Standard: IEEE802.11b/g/n (2.4GHz)
IEEE802.11a/n/ac (5GHz)
Power supply: DC 12V 1.0A 12W
8. Technical Support
If you have problems with your Foscam device, please contact the reseller you
purchased from, or you can e-mail the headquarters technical support team:
support@foscam.com.
Your valuable comments and suggestions on improving Foscam products are welcomed!

11
Warranty Conditions
A new product purchased in the Alza.cz sales network is guaranteed for 2 years. If you
need repair or other services during the warranty period, contact the product seller
directly, you must provide the original proof of purchase with the date of purchase.
The following are considered to be a conflict with the warranty conditions, for
which the claimed claim may not be recognized:
•Using the product for any purpose other than that for which the product is intended
or failing to follow the instructions for maintenance, operation and service of the
product.
•Damage to the product by a natural disaster, the intervention of an unauthorized
person or mechanically through the fault of the buyer (e.g. during transport, cleaning
by inappropriate means, etc.).
•Natural wear and aging of consumables or components during use (such as
batteries, etc.).
•Exposure to adverse external influences, such as sunlight and other radiation or
electromagnetic fields, fluid intrusion, object intrusion, mains overvoltage,
electrostatic discharge voltage (including lightning), faulty supply or input voltage and
inappropriate polarity of this voltage, chemical processes such as used power
supplies, etc.
•If anyone has made modifications, modifications, alterations to the design or
adaptation to change or extend the functions of the product compared to the
purchased design or use of non-original components.

12
EU Declaration of Conformity
Identification data of the manufacturer's / importer's authorized representative:
Importer: Alza.cz a.s.
Registered office: Jankovcova 1522/53, Holešovice, 170 00 Prague 7
IČO: 27082440
Subject of the declaration:
Title: Security Camera Foscam
Model / Type: 305503000601/S41
The above product has been tested in accordance with the standard(s) used to
demonstrate compliance with the essential requirements laid down in the
Directive(s):
Directive No. (EU) 2014/53/EU
Directive No. (EU) 2011/65/EU as amended 2015/863/EU
Prague, 27.5.2021

13
WEEE
This product must not be disposed of as normal household waste in accordance with
the EU Directive on Waste Electrical and Electronic Equipment (WEEE - 2012/19 / EU).
Instead, it shall be returned to the place of purchase or handed over to a public
collection point for the recyclable waste. By ensuring this product is disposed of
correctly, you will help prevent potential negative consequences for the environment
and human health, which could otherwise be caused by inappropriate waste handling of
this product. Contact your local authority or the nearest collection point for further
details. Improper disposal of this type of waste may result in fines in accordance with
national regulations.

14
Vážený zákazníku,
Uživatelská příručka k výrobku obsahuje informace o funkcích výrobku, způsobu použití
a postupu obsluhy. Pečlivě si přečtěte uživatelskou příručku, abyste získali co nejlepší
zkušenosti a předešli zbytečným škodám. Příručku si uschovejte pro budoucí použití.
✉www.alza.cz/kontakt
✆255 340 111
Dovozce Alza.cz a.s., Jankovcova 1522/53, Holešovice, 170 00 Praha 7, www.alza.cz
VAROVÁNÍ
Nepoužívejte výrobek v rozporu s místními zákony a předpisy. Uživatel, který poruší
místní zákony a nařízení, ponese odpovědnost za všechny důsledky nákupu a používání
výrobku.
Alza.cz a.s. nenese odpovědnost za porušení místních zákonů a nařízení ze strany
uživatele.

15
Nastavení vaší Foscam bezpečnostní kamery
1. Začínáme
Obsah balení
IP Kamera Ethernetový kabel Napájecí adaptér
Průvodce rychlým nastavením Expanzní šrouby Vodotěsná sada ethernetového portu
Bezpečnostní tipy
•Heslo kamery pravidelně měňte a používejte kombinaci čísel, písmen a
speciálních znaků.
•Doporučujeme pravidelně aktualizovat kameru pomocí nejnovějšího dostupného
softwaru a firmwaru, abyste si zajistili nejlepší zkušenosti s kamerou.
2. Popis produktu
ČOČKA
Reflektor
LAN
Světelný senzor
Napájení
Reflektor
Slot pro kartu
Micro SD
Mikrofon
Reset
Reproduktor
LED Indikátor
Pasivní infračervený
snímač pohybu

16
3. Nastavení kamery: Připojení prostřednictvím aplikace
Foscam
Než začnete
Naskenujte níže uvedený QR kód pro stažení a instalaci aplikace Foscam:
Pro zajištění plynulejšího sledování videa na chytrém telefonu doporučujeme, aby váš
chytrý telefon splňoval následující specifikace:
•iOS: verze 11 nebo vyšší.
Android: verze 4.1 nebo vyšší, při použití zařízení s grafickým procesorem (GPU)!
Wi-Fi připojení
1. Připojte napájecí adaptér ke kameře a počkejte několik sekund, dokud se neozve
hlášení ”Ready for Wi-Fi configuration" (“Připraven pro konfiguraci Wi-Fi”).
2. Zkontrolujte, zda je váš chytrý telefon připojen ke stejné síti Wi-Fi jako kamera.
TIPY: Kamera podporuje dvoupásmové 2,4GHz a 5GHz sítě Wi-Fi, takže si můžete vybrat
kanál se silnějším signálem. Například SSID: XXXXX¬_2,4G nebo XXXXX¬_5G.
3. Otevřete aplikaci foscam a zaregistrujte si účet Foscam nebo se přihlaste, pokud již
účet máte.

17
4. Po přihlášení do aplikace Foscam vyberte možnost "Tap to add a camera" (Klepnutím
přidáte kameru) nebo ikonu "+" v pravém horním rohu, poté vyberte možnost "Scan the
QR code" (Naskenovat QR kód) a naskenujte QR kód, který je označen na spodní straně
kamery.
Klepněte na ikonu + vyberte “Naskenovat QR kód”
5. Pokud v části “Add devide” ("Přidat zařízení") uslyšíte "Hello Foscam", zaškrtněte
políčko a klepněte na "Next" (“Další”), pokračujte potvrzením, že zařízení je ve stavu
modrého blikání, a klepněte na "Next". V části "Wi-Fi connection" (Připojení Wi-Fi) zadejte
heslo Wi-Fi a klepněte na "Confirm" (Potvrdit).
6. Naskenujte QR kód na kameře pomocí kamery chytrého telefonu a uslyšíte hlasovou
výzvu "Wi-Fi connecting" (“Připojování Wi-Fi”). Zaškrtněte políčko a klepněte na "Next”
(“Další”).
Až uslyšíte „Hello
Focam! Klepněte na
„Next“(„Další“)
Potvrďte, že zařízení
modře bliká
Zadejte heslo Wi-Fi a
klepněte na
„Confirm“ ("Potvrdit)“
Naskenujte kód který je umístěn na
spodní straně kamery.

18
TIPY: Umístěte kód QR na displej telefonu ve vzdálenosti asi 10 až 15 cm (3,94 až 5,9
palce). Pokud se setkáte s potížemi, můžete zkusit pomalu posunout obrazovku asi o 10-
15 cm (3,94 až 5,9 palce).
7. Počkejte několik sekund, dokud vám kamera neoznámí, že “Wireless connection
succeeded” ("Bezdrátové připojení se podařilo"), což znamená, že se kamera úspěšně
připojila k síti Wi-Fi. Poté můžete nastavit název kamery a v rozhraní "Set name"
(Nastavit název) klepněte na "Save" (Uložit).
POZNÁMKA: Pokud proces přidávání selže, resetujte kameru a zkuste přidat podle výše
uvedené metody.
Reset
8. Klepnutím na tlačítko přehrávání v okně videa přejdete do rozhraní nastavení “Camera
Login” ("Přihlášení kamery"). Z důvodu bezpečnosti nastavte před sledováním živého
videa nové uživatelské jméno a heslo pro kameru.
Klepněte Nastavte nové přihlašovací jméno a heslo
9. Po dokončení výše uvedených kroků můžete začít kameru používat.
Kamera byla úspěšně
přidána a byl
nastaven její název

19
4. Další způsoby přístupu ke kameře
•Foscam VMS
Foscam VMS je nový nástroj pro počítače. Nevyžaduje zásuvný modul, je kompatibilní s
Windows a Mac a podporuje všechny HD kamery Foscam a až 36 kamer současně.
Pokud chcete spravovat více kamer, doporučujeme nainstalovat Foscam VMS. Verzi
"Foscam VMS" pro Windows si můžete stáhnout ze stránek foscam.com/vms a verzi
"Foscam VMS" pro Mac si můžete stáhnout z APP store:
https://apps.apple.com/cn/app/foscamvms/id1521202507?mt=12.
POZNÁMKA: Pro dosažení co nejlepšího zážitku aktualizujte systém Foscam VMS na
nejnovější verzi!
Přidání IP kamery
1. Spusťte systém Foscam VMS, vytvořte místní účet správce a přihlaste se.
2. Klepněte na ikonu "+" v systému Foscam VMS a podle průvodce nastavením přidejte
kameru.
Pro zobrazení uživatelské příručky a dalších podrobných kroků navštivte
foscam.com/downloads.

20
5. Instalace hardwaru
Namiřte kameru na požadované místo a pomocí dodaných šroubů ji připevněte.
Pro nejlepší zážitek z produktu doporučujeme instalační výšku kamery 2,2 m (7,22 stop),
úhel sklonu kamery dolů 30°.
Poznámka:
Zajistěte, aby déšť nebo voda nevnikla do portů konektoru na konci kabeláže. Tyto
konektory nejsou odolné vůči vlivům počasí.
6. Důležité upozornění
•Uživatelské jméno a heslo kamery
Uživatelské jméno a heslo kamery slouží k přístupu ke kameře a jeho správě. Silné heslo
může výrazně zvýšit zabezpečení kamery.
Pokud jste některý z nich zapomněli, stiskněte tlačítko "Reset" a podržte je déle než 10
sekund při zapnuté kameře. Poté tlačítko uvolněte. Kamera se automaticky restartuje a
obnoví se výchozí nastavení.
Poté můžete kameru znovu připojit podle tohoto stručného návodu k nastavení.
Table of contents
Languages:
Other Foscam Security Camera manuals

Foscam
Foscam C2M User manual

Foscam
Foscam FN7104W-B4 User manual

Foscam
Foscam FI8905E User manual

Foscam
Foscam C2M User manual

Foscam
Foscam FI9902P User manual

Foscam
Foscam R4M User manual

Foscam
Foscam V5EP User manual

Foscam
Foscam FI8918 User manual

Foscam
Foscam FI9804W User manual

Foscam
Foscam FI8620 User manual

Foscam
Foscam SABIP1100 User manual

Foscam
Foscam FN3108XE-B4-1T User manual

Foscam
Foscam X5 User manual

Foscam
Foscam FI8918W Operating and maintenance instructions

Foscam
Foscam E1 User manual

Foscam
Foscam FN3108XE-B4-1T User manual

Foscam
Foscam FI9803P V2 User manual

Foscam
Foscam SD4 User manual

Foscam
Foscam V5P User manual

Foscam
Foscam FI9803W User manual