Foxpro HELLCAT PRO User manual


2
Important Information
FOXPRO®’s goal is to provide our customers with the highest quality
products in the industry. We take extraordinary pride in manufacturing
our products in the USA. Please do not hesitate to contact us for
assistance, comments, or questions.
FOXPRO®Inc. 14 Fox Hollow Drive Lewistown, PA 17044
Contact Us
Service & Support: 717-248-2507
Toll Free Orders Only: 866-463-6977
Technical Support: techsupport@gofoxpro.com
Stay up to date with the latest sounds, products, and videos on:
Facebook: https://www.facebook.com/Foxpro.Furtakers
YouTube: @FOXPROINC
Instagram: @foxpro_inc
Twitter: @FOXPROInc
TikTok: @foxpro_inc
Website: www.gofoxpro.com
This manual, the animal sounds stored in your caller, and animal sounds purchased from FOXPRO®Inc.
are protected by copyright.
Copyright ©℗ 2023 by FOXPRO®Inc.
Publication Date: September 12, 2023 REV 1

3
Contents
1. Getting Started............................................................................................5
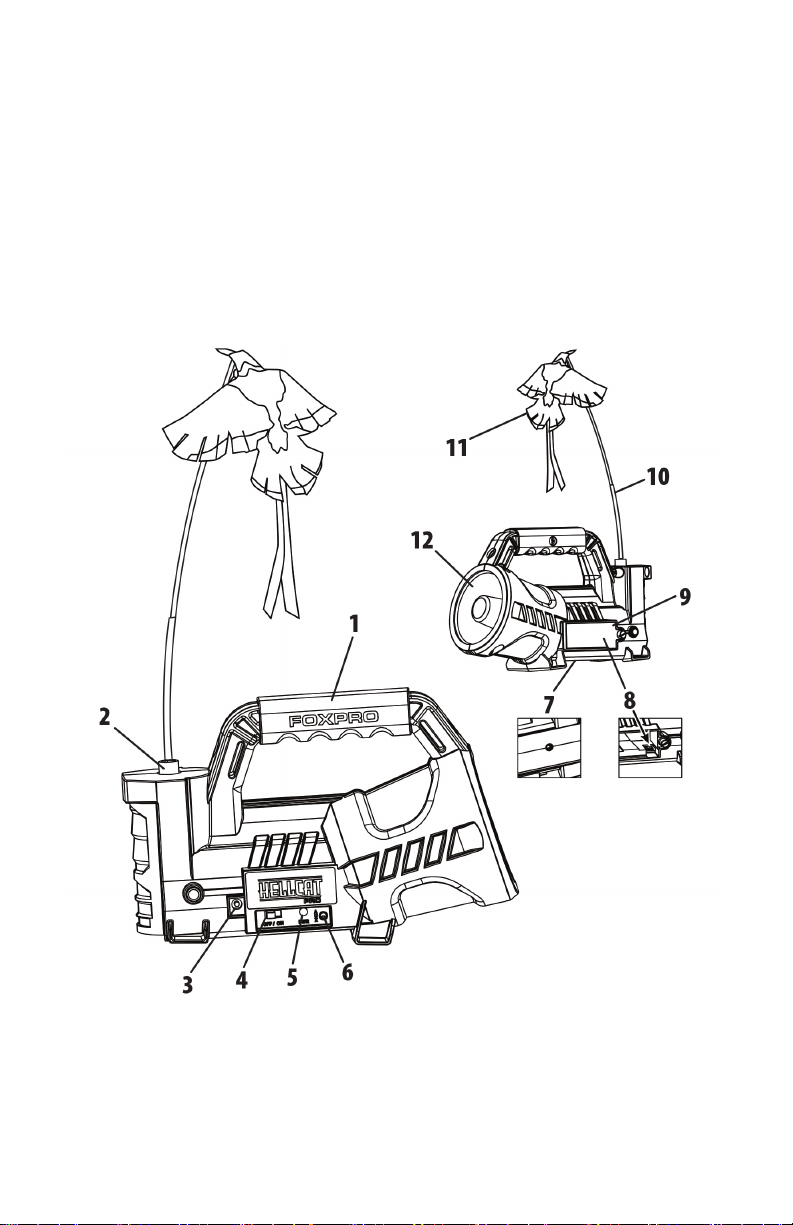
1-1 HellCat Pro Overview ................................................................................5
1-3 Charging the HellCat Pro...........................................................................7
1-4 HellCat Pro Remote: First Glance..............................................................8
2. Quick Start Guide ......................................................................................11
2-1 Playing Sounds ........................................................................................11
2-2 Favorites/Presets ....................................................................................12
2-3 Integrated Decoy Operation ...................................................................12
3. Auxiliary Device Jack Specifications ..........................................................13
4. HellCat Pro Remote in Depth ....................................................................13
4-1 Navigating the HellCat Pro Remote ........................................................13
4-2 Understanding the HellCat Pro Remote-Control Display........................13
4-3 HellCat Remote Configurations Menu ....................................................14
4-4 Channel of Operation..............................................................................15
4-4 Smart Light ..............................................................................................15
4-5 Sound Settings ........................................................................................15
4-6 Display/Power.........................................................................................16
4-7 Date/Time(r) ...........................................................................................18
4-8 TX1000 Settings.......................................................................................19
4-9 HellCat Pro Remote USB Port Operation ................................................21
5. FOXFEATURES ...........................................................................................21
5-1 FOXBANG ................................................................................................22
5-2 AUTO VOLUME........................................................................................22
5-3 User Buttons ...........................................................................................23
5-4 FOXCAST..................................................................................................23

4
5-5 FOXGRIP ..................................................................................................24
6. Programming the HellCat Pro ...................................................................24
7. Maximizing Remote Range .......................................................................24
8. Product Care & Maintenance....................................................................25
9. FCC & IC Information.................................................................................26
10. Warranty Information...............................................................................28

5
1. Getting Started
Congratulations on your purchase of the FOXPRO Hellcat Pro digital
game call! Included with the box you should find the following list of
items: HellCat Pro digital game call, HellCat Pro remote control,
Operator’s manual, Warranty registration card, 11.1V lithium-ion
battery pack/charger kit, Built-in decoy with a blue bird topper.
1-1 HellCat Pro Overview
Figure 1 Image of the HellCat Pro

6
Figure 1 displays the HellCat Pro. Numbered lines are present to
highlight different features. The following numbered list corresponds to
the numbered lines in the image:
1. The carry handle is located on the top of the HellCat Pro.
2. The decoy is located on the left side.
3. The charge jack is located to the left of the control panel.
4. The power switch is located on the left side of the control panel.
5. The pilot lamp/low battery indicator is to the right of the power
switch.
6. The auxiliary jack is located to the right of the pilot lamp/low
battery indicator.
7. The tripod mount is located on the underside of the HellCat Pro.
8. The USB port is located inside of the battery compartment.
9. The battery compartment door is located on the backside of the
HellCat Pro.
10. The decoy support rod connects to the decoy coupler.
11. The blue bird topper connects to the decoy support rod.
12. The horn speaker is located on the right side.
Installing the Battery Pack in the HellCat Pro
Open the battery compartment by unscrewing the knurled
thumbscrew. Locate and connect the power wire to the battery pack
and install the battery pack into the battery compartment.
Turning on the HellCat Pro
To turn on the HellCat Pro, move the power switch to the right or “on”
position. The green LED will illuminate solid green to indicate that it is
now powered on. To turn it off, move the power switch to the left or
“off” position.

7
1-3 Charging the HellCat Pro
After you have the battery installed, MAKE SURE THE CALLER IS TURNED
OFF and any accessories (external decoy, USB cable) are disconnected.
Plug your charger into the charge jack on the front of the caller and
connect the other end to a 120V AC wall plug. At the end of the
charger, you will notice a glowing red light. This means the battery pack
is charging. The light will turn green once the battery is fully charged. It
takes roughly 6 hours to charge a fully depleted battery pack.
Note: There are some instances where the red charging light will slowly
blink before turning solid red. This is perfectly normal.
General Precautions and Warnings for Charging
•Never attach an unapproved or a non-FOXPRO® charger to your
Hellcat Pro battery pack! Damages caused by plugging
unapproved charging devices into your Hellcat Pro will not be
covered by the warranty.
•Never connect your Hellcat Pro to an unregulated 12V system
(i.e., automotive systems, high current power supplies, etc.)
Serious damage will occur which is not covered by the warranty.
The charge jack is intended only for FOXPRO® chargers.
•Never attempt to charge batteries that are not intended to be
recharged! This includes both Zinc Carbon and alkaline cells. The
resulting damage can be serious and will not be covered by the
warranty. For maximum charge efficiency, we recommend
charging your Hellcat Pro in temperatures ranging from 40°F to
85°F (5°C to 30°C).
•Disconnect any/all accessory devices that may be attached to
the Hellcat Pro prior to charging. This includes auxiliary devices,
and USB cables.
•Make sure that the rechargeable battery pack is installed in the
Hellcat Pro properly.

8
•Connect the approved FOXPRO charger to the charger jack on
the Hellcat Pro and attach the transformer to the appropriate
outlet.
•Do not leave charging batteries unattended.
•Recharge your batteries periodically—even when not in use—to
prevent deep discharge.
1-4 HellCat Pro Remote: First Glance
Figure 2 (next page) shows the HellCat remote control. The image
features lined numbers pointing to various features. The remote is
divided into two main sections: the top/screen portion and lower
handle/button portion. The text underneath the image reviews each of
the numbered lines.

9
Figure 2 Image of the HellCat Pro Remote
1. FOXBANG/FOXGRIP status indicator is in the upper left side of
the screen.
2. The upper portion of the remote features the screen. The screen
contains sound categories, a menu system, and numerous
runtime data related to operation.
3. In the bottom-right corner of the screen is an elapsed stand
timer.
4. To the left of the elapsed timer is the battery level indicator
displaying the battery level of the remote control.

10
5. On the keypad area, to the upper right is the back/menu button.
6. In the middle of the keypad is a large button. Directly above and
below the large button are the scroll up and scroll down
buttons.
7. The mute button is located under and to the right of the scroll
down button.
8. User button 2 is located under the mute button.
9. The lanyard loop is located on the very bottom of the remote.
10. The auxiliary button is located directly under the scroll down
button.
11. User 1 button is located to the left of the User 2 button.
12. The FOXPITCH button is located directly above the User 1
button.
13. In the middle of the keypad is a large button. Directly to the left
and right of this button are the volume up and down buttons.
Volume down is located to the left and volume up is located to
the right.
14. The play/select button is in the middle of the keypad.
15. The power button is located on the upper left of the keypad.
16. The volume level indicator is located to the left of the battery
level indicator on the screen.
17. The mute status indicator is in the bottom left corner of the
screen, to the left of the volume level indicator.
18. On the back of the remote is the battery compartment door.
Also, in the battery compartment, is the USB port.
Installing Batteries in the HellCat Pro Remote
The HellCat Pro remote requires 3 ‘AA’ batteries. It is recommended
that you use high-quality lithium or alkaline batteries for the best
performance. To install the batteries, remote the battery compartment
door from the back of the remote. Place the batteries in each slot while

11
observing correct polarity as indicated. Slide the battery compartment
door back on the remote.
Turning on the HellCat Pro Remote & Basic Setup
To turn on the HellCat Pro remote control, push down the power
button for about 1-2 seconds. The screen will display startup
information briefly before going to the main view. Every time you
replace batteries in the HellCat Pro remote, it’s a good practice to
update the date and time settings.
2. Quick Start Guide
Important Note: The HellCat Pro remote control is not intended to
operate the caller at distances shorter than 1 meter (3 feet). If the
remote is too close to the caller, proper operations cannot be ensured.
2-1 Playing Sounds
Turn on the Hellcat Pro by sliding the power switch to the “On”
position. Notice the pilot light will illuminate green. The pilot light also
acts as a low battery indicator. If the green light is turned on, but it
blinks during use, it indicates that the battery pack will need to be
recharged. Turn on the Hellcat Pro remote by pushing and holding the
power button for approximately 1-2 seconds. When powered on, the
Hellcat Pro remote default view will display the available categories.
Using the scroll buttons on the Hellcat Pro remote, highlight the
category you wish to pick a sound from, and then push the
“Play/Select” button. The sounds assigned to that category will now be
displayed. Use the scroll buttons to highlight a sound that you wish to
play, and then push the “Play/Select” button to begin playback. You
then must use the volume up button to raise the volume level to your
desired setting.

12
To mute the sound, simply push the “Mute” button. Un-muting is
accomplished by pushing the “Mute” button a second time. You can
quickly change to a different sound by highlighting it on the screen and
then pushing the “Play/Select” button.
2-2 Favorites/Presets
The Hellcat Pro remote can store up to 50 unique presets or favorites. A
preset is a shortcut to a particular sound which has a defined volume
level. By default, your Hellcat Pro remote will have no presets
established. The following instructions will describe how to setup a
preset:
To Create a Preset/Favorite: From the main screen, select the
“Favorites/Presets” menu item. Select one of the 50 preset slots. Notice
that the screen will indicate “Preset Recording”. The first step is to
select the sound. Use the scroll buttons to highlight the sound you want
to establish for this preset and then push the “Play/Select” button. The
last step is setting the volume level. Use the volume buttons to dial-in
the desired volume level you wish to assign to this preset and then push
“Play/Select” to lock it in. To overwrite an existing preset, move the
highlight bar to an existing present and then push the “Play/Select”
button 1-2 seconds. You can now repeat the process of selecting a
sound and volume level.
To initiate playback of a preset, simply select the “Favorites/Presets”
menu on the main screen, browse through the available presets, and
then use the “Play/Select” button, just as if you were picking a sound
for normal playback.
2-3 Integrated Decoy Operation
The HellCat Pro features an integrated decoy and blue bird decoy
topper. To install the decoy, insert one end of the decoy support rod
into the coupler on the HellCat Pro (to the left of the handle, on the

13
top). The blue bird topper has a plastic sleeve that slides down on the
tip of the decoy support rod. Locate the decoy on/off toggle switch on
the side of the HellCat Pro and ensure that it is in the “on” position (to
the right). Turn on the HellCat Pro and HellCat Pro remote. The AUX
button on the HellCat Pro remote control is responsible for remotely
toggling the decoy motion off and on. If the decoy is in motion, push
the AUX button one time to stop it and once more to start motion
again.
3. Auxiliary Device Jack Specifications
The auxiliary jack is primarily used to connect a FOXPRO decoy such as
the XDECOY. When a FOXPRO decoy is connected to the jack with the
appropriate 3.5mm cable, you can use the AUX button on the HellCat
Pro remote to turn the motion off and on.
4. HellCat Pro Remote in Depth
This section covers all aspects of the Hellcat Pro remote control.
4-1 Navigating the HellCat Pro Remote
The Hellcat Pro remote has a scroll up and scroll down button for
cycling through the on-screen display. A selected menu item is
highlighted with a horizontal bar and, by pressing the scroll up or down
arrow button, that horizontal bar will move up or down through the
menu items list. To make menu selections, use the “Play/Select”
button. The “Back/Menu” button allows you to access the Hellcat Pro
Remote menu configuration and step back one level in the menu
system.
4-2 Understanding the HellCat Pro Remote-Control Display
The Hellcat Pro remote-control screen can be viewed in three main
segments: top status line, primary display area, and bottom status line.
The top and bottom status lines are static— meaning that they will

14
always be present. The primary display area is dynamic and will change
depending upon the operation that you are performing.
On the top line of the screen is the FOXBANG/FOXGRIP status indicator
(the letters “FB” appear above the screen). If FOXBANG is activated, it
will display “FB”. If FOXGRIP is activated, it will display “FG”. If both are
activated, it will display “FB/FG”. To learn more about these specific
features, please refer to the FOXFEATURES section of the manual.
The primary display area for the Hellcat Pro remote (with default
settings) begins with “Categories” at the stop, which is the title of this
screen. When you enter other menu sections, the title will change
accordingly. The two main items on the screen “Favorites/Presets” and
“FoxCast” options are always available on this screen (in both Category
and Sound List mode). Directly beneath “FoxCast” begins the category
listings. If using sound list mode, you will then see “Sound List” as the
third option.
Along the bottom of the screen is the status line. This line features
(from left to right):
•“MT” is the mute status indicator. If muted, the screen will
display an “M”.
•“VOL” indicates the volume level from 0-30.
•“BATT” displays the battery level of the HellCat Pro remote.
•“TIME(R)” displays either the stand timer or real-time clock.
When an alarm is indicated, the background will blink.
4-3 HellCat Remote Configurations Menu
From the sounds screen, push the “Back/Menu” button a single time.
This will get the Hellcat Pro configuration menu to appear. There are a
total of six elements that will appear on this menu: FOX FEATURES,
Sound Settings, Display/Power, Date/Time(r), TX1000 Settings, and
Smart Light.

15
4-4 Channel of Operation
By default, both the caller and the remote are set to channel 4, from
the factory. If the two devices are not on the same channel, then radio
communication will not be possible. In order to change the channel of
operation of the HellCat Pro, you will need to connect it to a computer
and use the FOXPRO Programming Utility.
4-4 Smart Light
With Smart Light technology, you can control your FOXPRO hunting
light with the Hellcat Pro remote control. Instructions on how to
connect to and control the light are outlined in the manual that is
included with the light.
4-5 Sound Settings
The sound settings menu allows you to select how the Hellcat Pro plays
your sounds, how the speakers work, and so forth. This section will
explore each of the options, their values, and how they affect
operation.
Volume Steps
The Hellcat Pro remote has a range of volumes from 0 – 30. Increasing
the volume in the field by increments of 1 may be too slow for some
and therefore this stepping value is configurable. You can choose from
1, 2, and 3. The factory default setting is 2.
Primary Mode
There are three different modes in which the Hellcat Pro will play
sounds: Repeat, Single, and Jukebox.
•Repeat (default play mode) – In Repeat play mode, the caller
will play the current sound until the end of the sound file, then
automatically start playing it again until it is changed by the
user.

16
•Single – In Single play mode, the sound plays one time and then
stops until it is selected again, or a sound change is made,
•Jukebox – In Jukebox play mode, the caller will play the selected
sound, then play the next sound in the sound list and continue
that way until it is stopped by the user. Jukebox mode is ideal
for users who want to add a music playlist to their caller to use it
as a boom box.
Audio Limiter
This setting will allow you to turn the audio limiter on or off. The audio
limiter is designed to limit the maximum volume of the caller in order to
maximize the battery life of the caller. This is useful in situations where
you may be hunting in areas where less than total volume is sufficient,
and you want to conserve your battery. Once you highlight the “Audio
Lim” menu option, press the “Select” button and toggle between your
choices of “On” or “Off.” Press the “Select” button a final time to lock it
in.
Preset Mute Override
During normal operation, if the Hellcat Pro is muted and you play a
preset, the preset is queued for playback, but it cannot be heard until
the caller is un-muted. Preset mute override will take care of this and
eliminate the need for un-muting the call upon preset activation. It
works by initially checking to see if mute is active and, if it is, un-mute
the unit while playing the preset sound.
4-6 Display/Power
The Display/Power menu allows you to control on-screen display
options such as backlight, screen timeout, and the operational theme.

17
Brightness
This controls the brightness of the display. You can adjust the screen
brightness from 2% (minimum) to 100% (maximum).
Keypad
This controls the intensity of the keypad back light. You can adjust the
intensity from 0% - 100%. Night hunters should select the lowest
possible setting for screen and keypad brightness for the best possible
results. You may want to experiment with the various settings prior to a
hunt to familiarize yourself with it and what to expect.
Theme
The Hellcat Pro remote has three operational themes built in. These
themes are designed to help optimize the appearance of the on-screen
display based upon factors such as time of day. The two main themes to
address this are: night and day. These themes provide the basic
framework for the visual look, but you are not limited to the themes
default setting. You can still adjust screen brightness to fine-tune it to
your specific needs. Also included is the FOXPRO theme which is built
with FOXPRO company colors (orange/black). This theme is very good
for night hunting.
Display Timeout
After being idle for an established period, the on-screen display will go
blank. The Hellcat Pro remote will not power off completely during
display timeout (see Auto Off) and is still completely usable. When the
screen completes a timeout cycle, the screen can be reactivated by
pushing any button on the keypad. There are five different time settings
that you can use for configuring the display timeout: 5 seconds, 15
seconds, 30 seconds, 1 minute, 2 minutes, and 5 minutes. This feature
is also useful in helping to preserve and maximize your battery life. By
having the screen shutoff when idle, the load on the batteries is
reduced, which equates to improved run times of your batteries.

18
When your display times-out, you can push the power button a single
time to wake it back up to ensure that no functions are initiated. For
example, if you were to use a preset button or mute button in attempt
to wake the remote up, you will be performing the function of that
button at the same time. A single press of the power button will wake it
up without causing any changes in operation.
Auto Off
After being idle for an established period, the Hellcat Pro remote
control will completely power down. When this happens, the remote
must be powered back on like normal. There are five different time
settings that you can use for configuring the auto power off: 30
minutes, 45 minutes, 1 hour, 2 hours, and 4 hours.
4-7 Date/Time(r)
The Date / Time(r) menu provides access to the date and time
configuration, stand timer configuration, and the stand alarm.
Stand Timer & Timer Reset
When activated, the far-right indicator on the bottom status line will
begin keeping time that has elapsed since the Hellcat Pro remote has
been powered on. The timer displays as: “MMM: SS” (“M” stands for
minutes and “S” for seconds). The stand timer begins tracking time as
soon as the Hellcat Pro remote is turned on.
Alarm
The Hellcat Pro remote features a visual alarm that can be set to go off
after a span of time. The available times are represented in minutes: 1 –
60. When the alarm is set and the configured time span passes, the
stand timer (or clock if set to display the clock) will begin to flash
alerting you.

19
The alarm is based upon the stand timer only, not the real time clock.
Keep in mind that the stand timer begins tracking time as soon as the
Hellcat Pro remote is turned on. Make sure that you select the Stand
Timer Reset option (described earlier on this page) when setting up the
alarm. For example, if you turn on the Hellcat Pro remote and 10
minutes have passed while getting setup, and then you set the alarm
for 30 minutes, it’s going to go off 20 minutes later unless you use the
Stand Timer Reset prior after setting the alarm. Also, if the screen
timeout occurs prior to the alarm going off, it will turn back on when
the alarm goes off.
Time
The Hellcat Pro remote has a real time clock. This clock must be set
when you first install or change batteries. The clock can be displayed in
either the standard 12-hour format or 24-hour format (military time).
The bottom status line of the Hellcat Pro display can show either the
current time or the stand timer. The stand timer will only be displayed if
it is turned on—otherwise, the clock will show the current time.
Date & Time Format
The Hellcat Pro remote will keep track of the current date. This needs to
be setup when you first start using the Hellcat Pro remote. There are
three different date formats that you can choose from depending upon
your personal preference. They are month/day/year, year-month-day,
and day.month.year.
4-8 TX1000 Settings
The TX1000 Settings menu allows you to change the radio channel, download
the sound list, and configure other options.
Radio Channel
The Hellcat Pro remote can be configured to operate on one of 8
different radio channels (0-7). If you change the radio channel for the

20
Hellcat Pro remote, you must also change the radio channel for the
Hellcat Pro digital game call—otherwise the two devices will not be able
to communicate. Do not change the radio channel on the remote
control without also changing it on the Hellcat Pro. Doing this will
result in a loss of communication.
Download List
Any time you reprogram the Hellcat Pro digital game call to add new
sounds or new FOXCAST sequence files, you must download a new copy
of the play list to the Hellcat Pro remote. This menu item will guide you
through that process.
AUX
The auxiliary jack operation specifications can be changed for either
momentary or latched. All FOXPRO Jack Predator Decoys require that
the jack be setup for momentary. Some third-party decoys may require
latched operation as opposed to momentary. A detailed list of other
products and their specific requirements is not maintained by FOXPRO.
You will need to check with the equipment manufacturer to determine
if it is compatible and what the requirements are.
View
The Hellcat Pro remote control can display your sounds either by
general listing or by category listing. Sound categories are the best
route to go if you have many sounds.
About Info
The About Info screen displays a variety of information pertaining to
version number, number of sounds loaded, number of FOXCAST
sequences loaded, number of categories loaded, and the number of
presets.
Table of contents
Other Foxpro Speakers manuals

Foxpro
Foxpro HELLFIRE User manual

Foxpro
Foxpro SNOWPRO User manual

Foxpro
Foxpro NX4 User manual

Foxpro
Foxpro X1 User manual

Foxpro
Foxpro Scorpion User manual

Foxpro
Foxpro CS-24C User manual

Foxpro
Foxpro SUPER SNOW-CROW PRO W User manual

Foxpro
Foxpro XWave User manual

Foxpro
Foxpro X24 User manual

Foxpro
Foxpro Hammer Jack 2 User manual
Popular Speakers manuals by other brands

Rockford Fosgate
Rockford Fosgate ELEMENT READY M0WL-65MB manual

MT-POWER AUDIO
MT-POWER AUDIO RFW-60R V2 user manual

Canton
Canton Smart Soundbox 3 operating instructions

Furrion Lit
Furrion Lit FBSM05NSU-BL instruction manual

thomann
thomann The box pro TP 108 MA user manual

Sven
Sven Studio Operation manual