Foxpro TURKEY PRO User manual


2
Important Information
FOXPRO®’s goal is to provide our customers with the highest quality products in the
industry. We take great pride in manufacturing our products in the USA. Please do not
hesitate to contact us for assistance, comments, or questions.
FOXPRO® Inc. 14 Fox Hollow Drive -Lewistown, PA 17044
Hours of Operation
Monday – Friday
8AM – 5PM EST
Service & Support: 717-248-2507
Toll Free Orders Only: 866-463-6977
General Inquiry E-mail: sales@gofoxpro.com
Technical Support: techsupport@gofoxpro.com
Stay up to date with the latest sounds, products, and videos on:
Facebook: https://www.facebook.com/Foxpro.Furtakers
YouTube: @FOXPROINC
Instagram: @foxpro_inc
Twitter: @FOXPROInc
TikTok: @foxpro_inc
Website: www.gofoxpro.com
This manual, the animal sounds stored in your caller, and animal sounds purchased from
FOXPRO®Inc. for installation in your caller is protected by copyright.
Publication Date: September 19, 2023, REV2
Copyright ©℗ 2023 by FOXPRO®Inc.

3
Table of Contents
1. Getting Started............................................................................................5
1-1 TurkeyPro Overview............................................................................5
1-2 TX433 Transmitter Overview ..............................................................6
2. Quick Start Guide ........................................................................................7
2-1 TurkeyPro Requirements ..........................................................................7
2-2 TX433 Requirements.................................................................................8
2-3 Playing Sounds ..........................................................................................8
2-4 Favorites..................................................................................................10
3. Auxiliary Jack Function..............................................................................11
4. Using an External Speaker.........................................................................11
5. Batteries and Charging..............................................................................12
6. TX433 Transmitter Detailed Information..................................................14
6-1 Primary Display Area...............................................................................14
6-2 Main Menu..............................................................................................15
6-3 Sound Settings: Volume Step..................................................................15
6-4 Sound Settings: Play Mode .....................................................................15
6-5 Sound Settings: Fav Mute OR..................................................................16
6-6 Display/Power: Backlight ........................................................................16
6-7 Display/Power: Bklt T.O. .........................................................................16
6-8 Display/Power: Contrast .........................................................................16
6-9 Display/Power: LCD Mode ......................................................................17
6-10 Display/Power: LCD Mode ....................................................................17
6-11 Timer/User: Stand Tmr .........................................................................17
6-12 Timer/User: Alarm ................................................................................17
6-13 Timer/User: USER 1 & USER 2...............................................................
18

4
6-14 Remote Settings: Download List ...........................................................18
6-15 Remote Settings: Channel.....................................................................18
6-16 Remote Settings: AUX Cntrl ..................................................................19
6-17 Remote Settings: View ..........................................................................19
6-18 Remote Settings: Snd Nums..................................................................20
6-19 Remote Settings: About Info.................................................................20
6-19 Remote Settings: Cable Detect .............................................................20
7. Field Deployment Options ........................................................................20
8. Programming the TurkeyPro.....................................................................23
9. Maximizing Remote Range .......................................................................23
10. Product Care & Maintenance....................................................................24
11. Troubleshooting ........................................................................................25
12. FCC & IC Information.................................................................................26
13. Warranty Statement .................................................................................28

5
1. Getting Started
Congratulations on your purchase of the FOXPRO TurkeyPro digital
game call! To avoid personal injury and product damage, be sure to
read all operating instructions before using the FOXPRO TurkeyPro.
1-1 TurkeyPro Overview
The following image features the TurkeyPro game call. Certain aspects
of the TurkeyPro are marked with a number that corresponds to the list
below defining that element.
Figure 1 TurkeyPro
1. The power switch is located to the far left on the side of the
TurkeyPro.
2. The pilot LED is located to the right of the power switch.
3. The auxiliary device jack is located to the right of the pilot LED.
4. The external speaker jack is located to the right of the auxiliary
device jack.
5. The charge jack is located to the right of the external speaker
jack.
6. The lanyard is located on the far right on the side of the
TurkeyPro.

6
1-2 TX433 Transmitter Overview
The following is an image of the TX433 transmitter. Certain aspects of
the TX433 are marked with a number that corresponds to a list, located
after the image, defining each element.
Figure 2 TX433 Remote Control
1. The sound list upload jack is located on the top center of the
TX433.
2. The screen consumes the largest upper portion of the TX433.
3. In the lower-right corner of the screen is the elapsed stand
timer.
4. On the lower keypad portion of the TX433, the Back/Menu
button is to the upper right.
5. In the center of the TX433 is a large button. Directly above and
below this button are the Scroll Up and Scroll down buttons.
6. The User 2 button is located on the bottom right.

7
7. The Mute button is located to the left of the User 2 button.
8. The lanyard loop is located on the bottom of the TX433.
9. The User 1 button is located to the left of the Mute button.
10. The Volume Up and Volume Down buttons are located to the
left and right of the large button in the middle.
11. The Play/Select button is the largest button in the middle of the
TX433.
12. The Power button is located on the upper left of the keypad.
13. The Battery Level Indicator is located to the left of the elapsed
timer on the screen.
14. The Mute Status Indicator is located to the left of the Battery
Level Indicator.
15. The Volume Level Indicator is located to the left of the Mute
Status Indicator.
16. The antenna is located on the top left of the TX433.
2. Quick Start Guide
The Quick Start Guide gives you a quick rundown on how to get your
TurkeyPro up and running right away.
2-1 TurkeyPro Requirements
The TurkeyPro ships from the factory without batteries installed. The
TurkeyPro requires 8 ‘AA’ batteries. We recommend the use of lithium,
rechargeable NiMH, or high-quality alkaline batteries for the best
performance. If you plan on operating the TurkeyPro in cold conditions
(under 32°F/0°C), use lithium batteries for the best run times. Alkaline
batteries do not hold up nearly as well in colder temperatures.
Installing Batteries in the TurkeyPro
1. Open the battery compartment on the back side of the
TurkeyPro. You might need to use a coin or a flathead
screwdriver to loosen and remove the knurled thumbscrews.

8
2. Locate and remove the plastic battery holder from the battery
compartment. The battery holder features a white connector
that plugs into two pins inside the battery compartment.
3. Place the ‘AA’ batteries into each battery cavity of the battery
holder while observing correct polarity as indicated. Remember:
the battery holder is double-sided, and each side accepts 4 ‘AA’
batteries.
4. If you unplugged the battery holder plug it back in.
5. Verify the DIP switch is set to the appropriate battery chemistry
by inspecting switch 3 on the DIP switch (see Section 6-15). This
switch is responsible for setting battery chemistry type. The
switch has two positions: ON and OFF. For alkaline and lithium
batteries, place the switch in the OFF position. For rechargeable
NiMH batteries, move the switch to the ON position.
6. Place the battery holder back into the battery compartment and
replace the battery compartment door.
7. To verify that you have power: Push the orange power button
on the bottom of the TurkeyPro. The pilot LED should illuminate
green, indicating that the TurkeyPro is powered on. If the LED
does not illuminate, verify that your batteries are fresh and
double-check the connections. The LED may flicker for a period
before glowing solid when the TurkeyPro is initially powered on,
this is normal. If the LED begins blinking during operation, it
indicates the batteries are low and need replaced.
2-2 TX433 Requirements
The TX433 remote control operates on a single 9V battery. It is
recommended that you use a high-quality lithium or alkaline battery for
the best performance.
2-3 Playing Sounds
The primary function of your TurkeyPro game call is to produce sounds
to attract wildlife. This section explains how to turn on the TurkeyPro

9
and the TX433 and how to start playing sounds. THE TX433 IS NOT
INTENDED TO OPERATE THE CALLER AT DISTANCES SHORTER THAN 1
METER (3 FEET). IF THE TRANSMITTER IS LOCATED TOO CLOSE TO THE
CALLER, PROPER OPERATION CANNOT BE ENSURED.
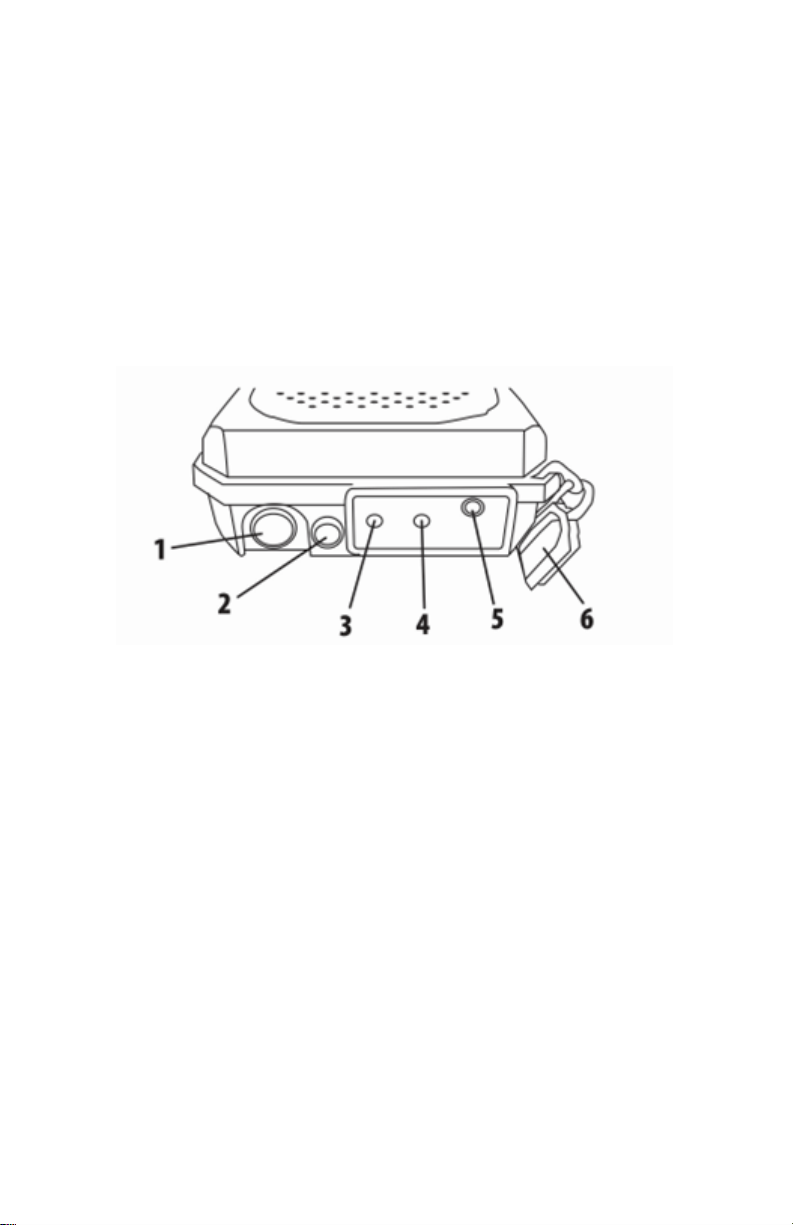
1. Turn on the TurkeyPro by pushing in the power button a single
time. When powered on, the TurkeyPro pilot light illuminates
green, indicating that it is powered on. If the light does not
activate, replace your batteries, and try again.
2. By default, the TurkeyPro internal cone speaker is turned on and
the external speaker jack is turned off. Note that you can only
operate the internal speaker or an external speaker individually,
not both simultaneously. A DIP switch, located inside of the
battery compartment, controls the audio path and whether
audio is directed to the internal speaker or external speaker
jack. To ensure that audio is produced through the internal
speaker only, make sure that switch 4 is set to the OFF position.
If you wish to use an external speaker, rather than the internal
cone speaker, place switch 4 to the ON position. Section 4 of this
manual covers the use of external speakers.
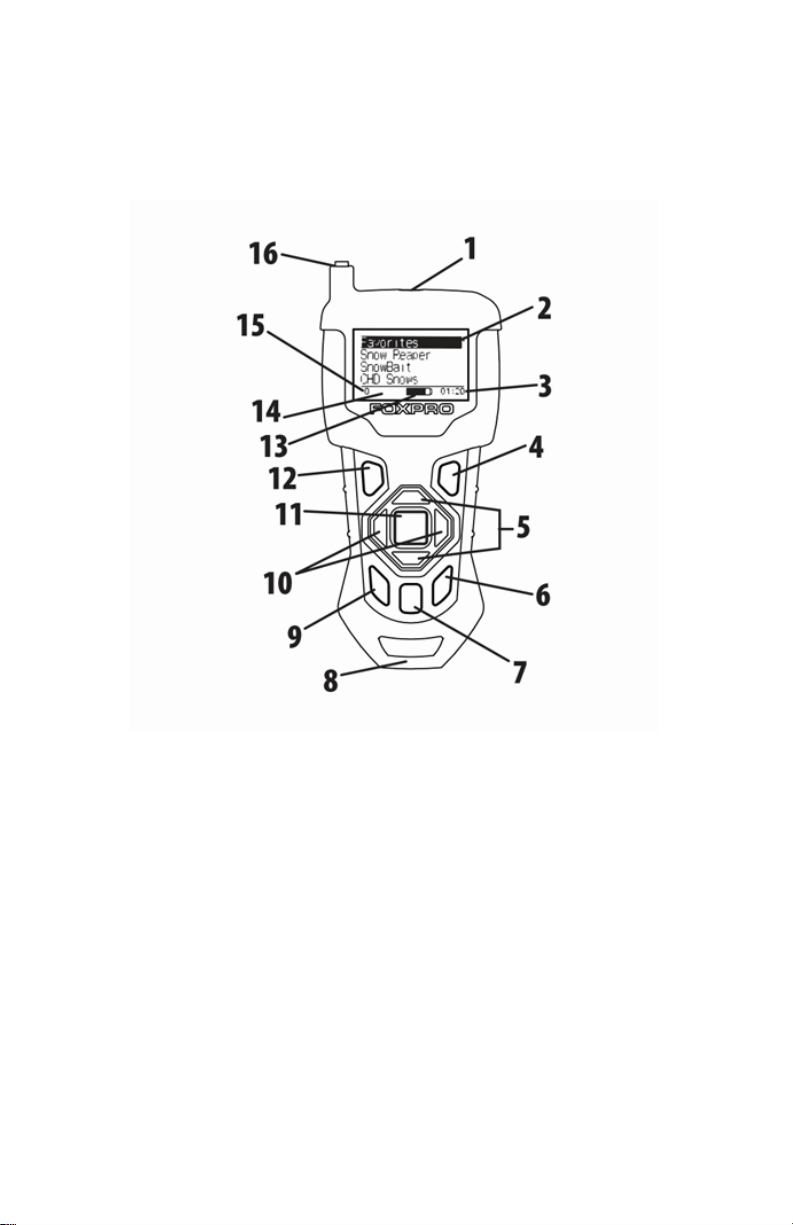
3. Turn on the TX433 transmitter by pushing and holding the
power button for approximately 1-2 seconds.
4. Notice the black horizontal highlight bar on the TX433 display.
The bar moves up and down the screen as you use the “Scroll
Up” or “Scroll Down” arrow buttons.
5. Move the highlight bar to one of the sound categories and push
the “Select” button. Doing this results in displaying all of the
sounds in that particular category. To exit the current category,
push the “Back/Menu” button.
6. After moving the highlight bar to the sound you wish to play,
push the “Select” button a single time to begin playback. You
won’t hear anything at first as the volume level hasn’t been set.
7. To adjust the volume: Use the “Volume Up” button to raise the
volume level to your desired setting. Use the “Volume Down”

10
button to decrease the volume level. The transmitter has 20
volume steps.
8. To silence the sound:Push the “Mute” button a single time.
When muted, the mute status indicator on the TX433 display
shows an “M” and the current sound is silenced. Un-muting is
accomplished by pushing the “Mute” button a second time (the
“M” will no longer be displayed, and the sound will resume
playing).
9. To switch sounds: Use the scroll buttons to navigate to a
different sound and push the “Select” button. You can switch
sounds while the TurkeyPro is actively playing a sound or while
muted.
10. To turn off the TX433: Push and hold the power button for
approximately 1-2 seconds. Be aware that turning off the
remote control does not end sound playback on the TurkeyPro.
When you are finished calling, use the “Mute” button to silence
the TurkeyPro prior to turning off the TX433.
11. To turn off the TurkeyPro:Push the power button on the
bottom of the unit. The pilot LED will extinguish.
2-4 Favorites
The TX433 allows you to establish a list consisting of 10 of your most
frequently used sounds under the “Favorites” menu. Each favorite is
comprised of a single sound and a single volume level. This section
describes the process involved in creating, changing, and using your
presets.
To create a favorite, select the “Favorites” menu item on the TX433. If
this is your first time working with presets, they will all be blank to start.
To set a preset, position the black highlight bar on one of the blank
preset slots and push the “Select” button a single time. The first step is
selecting the sound you wish to use. Use “Sound Up” or “Sound Down”
buttons to navigate through your sound list and locate the desired
sound. Once found, push the “Select” button to lock it in. Next, you
select the volume level that you wish to use for this favorite. This is

11
done by using the “Volume Up” or “Volume Down” arrow buttons.
After you have found your desired volume level, push the “Select”
button to assign the volume level and finish setting up the favorite. You
will notice that the slot you assigned this favorite to now displays the
sound name and the volume level for reference.
To overwrite an existing favorite, select the “Favorites” menu item on
the TX433. Position the highlight bar on the favorite that you wish to
change. Push and hold the “Select” button for about 3-4 seconds. The
remainder of the process is the same as setting up a new favorite where
you select the desired sound and volume level.
To use a favorite, select the “Favorites” menu item on the TX433.
Position the highlight bar on the preset that you wish to activate. Push
the “Select” button a single time to begin playback. The resulting action
is the TurkeyPro playing the selected sound at the preset volume level.
3. Auxiliary Jack Function
The AUX jack is provided primarily for the control of FOXPRO decoys
and may be suitable for controlling other similar devices.
4. Using an External Speaker
The TurkeyPro is equipped with an external speaker jack which allows
you to connect an additional speaker. By connecting a larger and more
efficient external speaker to the TurkeyPro, the volume level can be
increased significantly. Note that the TurkeyPro can be configured to
produce audio through the internal speaker only or the external
speaker jack only—not both simultaneously. To use an external
speaker with the TurkeyPro, review the following:
1. Remove the battery compartment door from the back side of
the TurkeyPro.
2. Locate the DIP switch. Each switch has two positions: ON and
OFF. Switch 4 controls the audio path. To direct audio through

12
the external speaker jack, place switch 4 to the ON position.
Note that doing this will result in no audio being produced
through the internal speaker.
3. The TurkeyPro external speaker jack accepts a standard 3.5mm
plug. Make sure that the speaker you intend to use has an
impedance rating of 8Ω.
4. Be sure the TurkeyPro is turned off prior to connecting the
external speaker.
5. Plug the connector of the external speaker into the external
speaker jack on the bottom of the TurkeyPro.
6. Proceed with operation.
7. To change the audio path back to the internal speaker, place
switch 4 to the OFF position.
5. Batteries and Charging
The TurkeyPro operates on 8 ‘AA’ batteries. For optimal performance
and run times, we recommend using high capacity (2300mAh or higher)
NiMH (nickel metal hydride) rechargeable batteries rather than alkaline
types. When you operate the TurkeyPro at extremely loud volume
levels, the current demand on the batteries is much more than alkaline
cells can deliver. Consequently, the running time of these batteries can
be very short.
Your FOXPRO®unit incorporates circuitry to terminate charge current if
high battery temperatures are detected. Battery temperatures increase
at the end of the charge cycle. If the temperature edges towards a
dangerous level, the charge current will be interrupted, and the green
LED will extinguish. If excessive temperature is not detected, the green
LED will not be extinguished. It is quite possible for the batteries to be
fully charged without their temperature rising to a dangerous level. For
this reason, the LED should not be considered as a “full charge”
indicator as it may or may not extinguish when the batteries are fully
charged. The batteries are fully charged any time their temperature

13
rises substantially above ambient. How long this takes depends on how
much charge has been taken from the batteries and how much time has
passed since the last charge. If the green LED goes out, the batteries
are charged. If the green LED is on and the batteries are cool, they are
still charging. If the green LED is on and the batteries are very warm,
they are fully charged, and you should terminate the charge by
unplugging the charger.
You should not permit the charge to continue for more than 10 hours
under any circumstances! The batteries need to be recharged when the
“Low Battery” LED is blinking. Battery run time is directly related to how
loud you operate the TurkeyPro. With the internal speaker playing,
expect 6 to 15 hours of run time, depending on the volume level.
Remember that very loud volumes are rarely needed as animals hear
much better than we do. All FOXPRO rechargeable battery kits are
shipped with individual instruction sets that pertain to their unique
operations. The following list of cautions and warnings should be
observed with any rechargeable system you decide to use.
•Do not mix battery types! For example: never use NiMH
rechargeable batteries in conjunction with non-rechargeable
alkaline batteries.
•Never connect your TurkeyPro to an unregulated 12V system
(i.e., automotive systems, high current power supplies, etc.)
Serious damage will occur which is not covered by the warranty.
The charge jack is intended only for FOXPRO®chargers.
•Never attach an unapproved or a non-FOXPRO®charger to your
TurkeyPro! Damages caused by plugging unapproved charging devices
into your TurkeyPro will not be covered by the warranty.
•Never attempt to charge batteries that are not intended to be
recharged! This includes both Zinc Carbon and alkaline cells.
The resulting damage can be serious and will not be covered by

14
the warranty. For maximum charge efficiency, we recommend
charging your TurkeyPro in temperatures ranging from 40°F to
85°F (5°C to 30°C).
•Disconnect any/all accessory devices that may be attached to
the TurkeyPro prior to charging. This includes external speakers,
auxiliary devices, and USB cables.
•Make sure that the power switch is in the “off” position while
charging.
•Make sure that the rechargeable battery pack is installed in the
TurkeyPro properly.
•Connect the approved FOXPRO charger to the charger jack on
the TurkeyPro and attach the transformer to the appropriate
outlet.
•Remember that NiMH batteries self-discharge about 1% per day.
•Do not leave the charging batteries unattended.
•Remove batteries from battery holder when caller will not be
used for prolonged periods to help prevent deep discharge.
•Recharge your batteries periodically—even when not in use—to
prevent deep discharge.
6. TX433 Transmitter Detailed Information
6-1 Primary Display Area
When powered on, the TX433 briefly displays a startup screen
(firmware version) and a message reminding you to extend the
telescopic antenna. After selecting “OK” on the antenna reminder, the
TX433 will take you to the primary display area. The “Favorites” menu
item holds your 10 favorite sounds. Beneath “Favorites” are your
various sound categories. The bottom line of the display is a status bar
that shows (in order): current volume level, mute status, radio channel,
battery level, and elapsed timer. You navigate through the screen with
the “Scroll Up” and “Scroll Down” buttons. As you scroll, the black
highlight bar moves up and down, respectively. You select a menu item
by pushing the “Select” button. To move back to the previous screen
after selecting, use the “Menu” button. Note that the “Menu” button

15
also works as a back button to navigate through the menu system. For
example, if you push the “Menu” button a single time from the primary
display area, you will view the main menu. If you push the “Menu”
button from the main menu, it returns you to the primary display area.
As you work through the menu’s options, you will use the “Menu”
button to return to the previous screen.
6-2 Main Menu
The main menu provides access to a variety of transmitter
configurations. To access the main menu, push the “Menu” button a
single time. The available menu options are as follows: “Sound
Settings,” “Display/Power,” “Timer/User,” and “Remote Settings.” The
following sections cover each of these menu items and their sub-menu
items in detail.
6-3 Sound Settings: Volume Step
The TX433 has a range of volumes from 0 – 20. Increasing the volume in
the field by increments of 1 may be too slow for some, therefore, this
stepping value is configurable. You can choose from 1, 2, and 3.
6-4 Sound Settings: Play Mode
This menu allows you to specify which mode of sound playback the
TurkeyPro operates on. The available options are: repeat, single play,
and jukebox. The default setting is repeat. In repeat mode, the
TurkeyPro will play the selected sound repeatedly until you interrupt it.
In single play mode the sound will play a single time then stop. In
jukebox mode the sounds play a single time, incrementally. The Play
Mode setting is NOT stored between power cycles. You will need to
change this setting each time you turn on the TurkeyPro remote.

16
6-5 Sound Settings: Fav Mute OR
During normal operation, if the TurkeyPro is muted and you request to
play a favorite, the sound is queued for playback, but it cannot be heard
until the caller is un-muted. Favorite mute override will take care of this
and eliminate the need for un-muting the sound upon preset activation.
It works by initially checking to see if mute is active and, if it is, un-mute
the TurkeyPro prior to initiating playback of the sound. Turning on
favorite mute override can be done by accessing Sound Settings,
highlighting the “Fav Mute OR” menu item, pushing “Select”, then using
the “Scroll Up” or “Scroll Down” buttons to toggle between off and on.
Push “Select” a final time to lock it in. This setting is remembered
between power cycles.
6-6 Display/Power: Backlight
This item allows you to change the intensity of the backlight in a range
from 5% - 100%. The lower the intensity, the better your battery life will
be.
6-7 Display/Power: Bklt T.O.
This item allows you to set the duration for the backlight timeout. The
backlight illuminates per button press. If the backlight is illuminated and
you do not push a button within the set period, the backlight will
automatically shut off. Available values are 15 seconds, 30 seconds, and
1 minute. Keeping this at a lower value will help promote maximum
battery life.
6-8 Display/Power: Contrast
This allows you to adjust the screen contrast. In ‘normal’ display mode,
the higher the value, the darker the text will appear. In ‘inverse’ display
mode, the higher the value, the darker the background will appear.

17
6-9 Display/Power: LCD Mode
This item allows you to set the desired display mode. Available options
include normal and inverse. In normal mode, the text will appear black,
and the background will be light. In inverse mode, the background will
be black with light text.
6-10 Display/Power: LCD Mode
If you do not push a button on the remote for a set amount of time, the
remote will automatically power down to conserve battery life. The
available options for this setting include 30 minutes, 45 minutes, 1
hour, 2 hours, and 4 hours.
6-11 Timer/User: Stand Tmr
The elapsed timer (located on the bottom right on the display) allows
you to see how long you have been on a stand. The timer starts as soon
as you turn on the TurkeyPro transmitter. You can reset the timer by
accessing the main menu, selecting timer option, and then selecting the
“Stand Timer Reset.” The timer will automatically reset to 00:00 if it is
allowed to continue beyond 99:59.
6-12 Timer/User: Alarm
The TurkeyPro remote features a visual alarm that can be set to go off
after a span of time. The available times are represented in minutes: 1 –
15 (individual steps) and 20-60 (steps of 5). When the alarm is set and
the configured time span passes, the stand timer will display a
confirmation message and the timer indicator will begin to flash. To set
an alarm, select the “Alarm (minutes)” menu item, push the “Select”
button, and then use the “Scroll Up” or “Scroll Down” buttons to find
the desired time value. When the desired time value is selected, push
the “Select” button to activate the alarm.

18
6-13 Timer/User: USER 1 & USER 2
User buttons 1 and 2 can be assigned a function of your choice for quick
one-button access. You can choose from: favorite 1, favorite 2, favorite
3, AUX, channel, recall, timer reset, and backlight.
6-14 Remote Settings: Download List
Any time you reprogram the TurkeyPro to add new sounds or rearrange
existing sounds, you must download a new copy of the play list to the
transmitter. This menu item will guide you through that process. To
download the playlist, you will need a 3.5mm stereo male-to-male
cable. See Section 8-3 for more information.
6-15 Remote Settings: Channel
The TX433 can control multiple TurkeyPro units at once, or
independently. For example, you can have 3 individual TurkeyPro units
stationed out in the field, each set to a specific radio channel (C1, C2, or
C3). Using this menu, you can set what radio channel the TX433 is
operating on, relative to the unit you wish to control, or you control all
3 simultaneously. Each TurkeyPro unit features a DIP switch that is used
to set specific features. Switches 1 and 2 set the radio channel.
Figure 3 Image of the DIP Switch
The following displays the switch combinations used to establish the
channel setting:

19
Switch 1 Position Switch 2 Position Channel Value
OFF OFF C1 (factory default)
OFF ON C2
ON OFF C3
To change the radio channel on the TX433, highlight the Channel menu
option and press the “Select” button a single time. Note that the value,
to the right of Channel, is now highlighted. You can now use the “Scroll
Up” or “Scroll Down” buttons to cycle through the available options.
When the correct option is found, push the “Select” button a final time
to lock it in. This setting is remembered between power cycles. To
control 3 units simultaneously from the TX433, set the channel option
to “BC(ALL).”
The user buttons can be configured to toggle the radio channel. This
provides you with a quick method of switching between units without
having to navigate through the menu system to find the channel
setting. Please refer to section 6-13 of this manual to learn about
setting up the two user buttons.
6-16 Remote Settings: AUX Cntrl
The auxiliary jack operation specifications can be changed from either
momentary or latched. All FOXPRO decoys require that the jack be
setup for momentary.
6-17 Remote Settings: View
The TX433 can display your sounds either by general listing or by
category listing. Sound categories are the best route to go if you have
many sounds. The TX433 supports up to 25 unique categories.

20
6-18 Remote Settings: Snd Nums
The TX433 displays your sound list in a logical format based upon the
index value of each sound file. The sounds are numbered from 000 –
299. You can choose to either have the index values visible in your
sound list or you can hide them. The advantage of hiding the numbers is
that the sound names might be easier to read. The options for this
setting are “Show” and “Hide.”
6-19 Remote Settings: About Info
The About Info screen displays a variety of information pertaining to
version number, number of sounds loaded, number of favorites, and
transmitter health.
6-19 Remote Settings: Cable Detect
If cable detect is turned on, the transmitter will automatically prompt
you to perform the download list function when a 3.5mm stereo cable
is connected to the sound upload jack. You can manually initiate the
download list process, if you prefer, by disabling this feature.
7. Field Deployment Options
The TurkeyPro features numerous options for deployment in the field.
First is by using a tripod. The TurkeyPro features an “L” shaped bracket
with a standard ¼”-20 female receptacle that supports most tripods.
The bracket is secured to the back of the TurkeyPro with 2 Phillips
screws. We recommend using a tripod with a wide leg span to help
prevent it from accidentally tipping over. The following image shows
the TurkeyPro mounted to the optional tripod bracket accessory (sold
separately). Note: Tripod Not Included.
Table of contents
Other Foxpro Speakers manuals

Foxpro
Foxpro SUPER SNOW-CROW PRO W User manual

Foxpro
Foxpro X1 User manual

Foxpro
Foxpro SNOWPRO User manual

Foxpro
Foxpro X24 User manual

Foxpro
Foxpro FUSION User manual

Foxpro
Foxpro Scorpion User manual

Foxpro
Foxpro HELLFIRE User manual

Foxpro
Foxpro NX4 User manual

Foxpro
Foxpro HELLCAT PRO User manual

Foxpro
Foxpro Hammer Jack 2 User manual