Foxpro X1 User manual


2
Important Information
FOXPRO®’s goal is to provide our customers with the highest quality products in the
industry. We take great pride in manufacturing our products in the USA. Please do not
hesitate to contact us for assistance, comments or questions.
FOXPRO®Inc.
14 Fox Hollow Drive
Lewistown, PA 17044
Hours of Operation
Monday –Friday
8AM –5PM EST
Contact Us
Service & Support: 717-248-2507
Toll Free Orders Only: 866-463-6977
General Inquiry E-mail: sales@gofoxpro.com
Stay up to date with the latest sounds, products and videos on Facebook:
https://www.facebook.com/Foxpro.Furtakers
This manual, the animal sounds stored in your caller, and animal sounds purchased from FOXPRO®Inc. for
installation in your caller are protected by copyright.
Copyright ©℗ 2020 by FOXPRO®Inc.
Publication Date: January 20, 2022 –REV2.1

3
Table of Contents
Getting Started.................................................................................................4
1-1X1 Overview...............................................................................................4
1-2TX433 Transmitter Overview.....................................................................6
Operating Manual............................................................................................6
2-1 What’s Included ........................................................................................6
2-2 X1 Requirements.......................................................................................6
2-3 Charging the X1.........................................................................................7
2-4 TX433 Requirements.................................................................................7
2-5 Playing Sounds ..........................................................................................8
2-6 Favorites....................................................................................................8
Auxiliary Jack Function.....................................................................................9
Using External Speakers...................................................................................9
Picatinny Rail Mount/IR Port ...........................................................................9
Tripod Mount...................................................................................................9
TX433 Transmitter Detailed Information.......................................................10
7-1Primary Display Area ...............................................................................10
7-2Main Menu ..............................................................................................10
7-3Sound Settings: Volume Step ..................................................................10
7-4Sound Settings: Play Mode......................................................................10
7-5 Sound Settings: Audio Limiter .................................................................10
7-6Sound Settings: Fav Mute OR..................................................................11
7-7Display/Power: Backlight.........................................................................11
7-8Display/Power: Bklt T.O...........................................................................11
7-9Display/Power: Contrast..........................................................................11
7-10 Display/Power: LCD Mode ................................................................11
7-11 Display/Power: Auto Off ...................................................................11
7-12 Timer/User: Stand Tmr......................................................................11
7-13 Timer/User: Alarm.............................................................................12
7-14 Timer/User: USER 1 & USER 2...........................................................12
7-15 Remote Settings: Download List .......................................................12
7-16 Remote Settings: AUX Cntrl ..............................................................12
7-17 Remote Settings: View ......................................................................12
7-18 Remote Settings: Snd Nums..............................................................12
7-19 Remote Settings: About Info.............................................................12

4
7-20 Remote Settings: Cable Detect .........................................................13
Programming the X1 ......................................................................................13
8-1Obtaining New FOXPRO Sounds..............................................................13
8-2Programming the X1................................................................................13
8-3Updating the Transmitter Playlist ...........................................................15
Maximizing Remote Range ............................................................................15
Product Care & Maintenance................................................................16
Troubleshooting ....................................................................................16
FCC & IC Information.............................................................................16
Warranty Statement .............................................................................17
Getting Started
Congratulations on your purchase of the FOXPRO X1 digital game call! To avoid personal injury and product
damage, be sure to read all operating instructions before using the FOXPRO X1.
1-1 X1 Overview
The following graphic highlights the functions and details of the X1 digital game call:
1
Power Switch
2
Antenna
3
External Speaker Jack
4
Auxiliary Jack
5
Charge Jack
6
Pilot Light/Low Battery Indicator
7
Battery Cover Screw

5

6
1-2 TX433 Transmitter Overview
The following graphic highlights the functions and details of the Patriot TX433 transmitter:
1
Power on/off
2
Play/select
3
Volume up/down
4
User 1
5
Lanyard loop
6
Mute
7
User 2
8
Scroll up/down
9
Menu/back
10
Elapsed timer
11
Sounds/categories
12
Volume level
13
Mute status indicator
14
Battery indicator
15
Telescopic antenna
16
Sound upload jack
Operating Manual
The Operating Manual explains how to use
the X1 Digital Game Call. We strongly suggest
reading the manual in its entirety to fully
understand all of the features and get the
most of your new product.
2-1 What’s Included
A. X1 Digital Game Call
B. TX433 Transmitter
C. 3.5mm Male Stereo to Stereo Sound Upload Cable
D. 11.1V Lithium Ion Battery Pack/Charger Kit
2-2 X1 Requirements
The X1 ships from the factory with an 11.1V Lithium Ion Battery Pack/Charger Kit. The battery pack will
need to be charged fully before use in order to get the best performance.
Installing the Battery Pack in the X1
1. Remove the battery compartment cover on the back of the X1. You may need a flat-head screw
driver to remove the thumb screw.
2. Locate the power wire that is inside the battery compartment. It will have a white, plastic
connector on the end.
3. Connect the battery pack to the plastic connector and place the battery pack into the X1.
4. Reinstall the battery cover.
5. To verify that you have power: Flip the power switch to the “on” (UP) position. The pilot LED will
illuminate green, indicating that the X1 is powered on. If the LED does not illuminate, verify that
your battery pack is charged. The LED may flicker for a period of time before glowing solid when
the X1 is initially powered on. This is normal. If the LED begins blinking during operation, it
indicates the battery pack is low and needs recharged.

7
2-3 Charging the X1
Your X1 game call comes with an 11.1V 5200mAh lithium ion battery pack and compatible charger. In order
to charge the battery pack, you will have to install the battery into the caller by following the steps in
Section 2-2 “Installing the Battery Pack in the X1.”
Once you have installed the battery, MAKE SURE THE CALLER IS TURNED OFF and any accessories (decoy,
external speaker, USB cable) are disconnected from the unit. You can now plug your charger into the
charge jack on the back of the caller and connect the other end to a 120V AC wall plug. At the end of the
charger, you will notice a glowing red light. This means the battery pack is charging. The light will turn
green once the battery is fully charged. It takes roughly 6 hours to charge a fully-depleted battery pack.
Note: There are some instances where the red light on the charger will slowly blink before turning solid
red. This is perfectly normal.
2-4 TX433 Requirements
The TX433 remote control operates on a single 9V battery (not included). It is recommended that you use a
high-quality lithium or alkaline battery for the best performance.
Installing a Battery in the TX433 Transmitter
1. Access the battery compartment by removing the battery compartment door from the
back of the TX433. The door slides down and off the remote.
GENERAL PRECAUTIONS FOR CHARGING
•Never attempt to charge batteries that are not intended to be recharged! This
includes both Zinc Carbon and alkaline cells. The resulting damage can be serious and
will not be covered by the warranty. For maximum charge efficiency, we recommend
charging your X1 in temperatures ranging from 40°F to 85°F (5°C to 30°C).
•Disconnect any/all accessory devices that may be attached to the X1 prior to charging.
This includes external speakers, auxiliary devices, and USB cables.
•Make sure that the power switch is in the “off” position while charging.
•Make sure that the rechargeable battery pack is installed in the X1 properly.
•Connect the approved FOXPRO charger to the charger jack on the X1 and attach the
transformer to the appropriate outlet.
•Do not leave charging batteries unattended.
•Remove battery pack from power wire when caller will not be used for prolonged
periods to help prevent deep discharge.
•Recharge your batteries periodically—even when not in use—to prevent deep
discharge.
WARNING
•Do not mix battery types! For example: never use NiMH rechargeable batteries in
conjunction with non-rechargeable alkaline batteries.
•Never connect your X1 to an unregulated 12V system (i.e. automotive systems, high
current power supplies, etc.) Serious damage will occur which is not covered by the
warranty. The charge jack is intended only for FOXPRO®chargers.
•Never attach an unapproved or a non-FOXPRO®charger to your X1!Damages caused
by plugging unapproved charging devices into your X1 will not be covered by the
warranty.

8
2. Insert the 9V battery in the back of the remote.
3. Slide the battery compartment door back onto the remote.
4. Push and hold the power button on the TX433 for approximately 1-2 seconds to power it
on. The LCD will activate and display the primary screen.
2-5 Playing Sounds
The primary function of your X1 game call is to produce sounds to attract wildlife. This section explains how
to turn on the X1 and the TX433 and how to start playing sounds.
1. Turn on the X1 by flipping the power switch to the “On” position. When powered on, the X1
pilot light illuminates green, indicating that it is powered on. If the light does not activate,
recharge your battery pack and try again.
2. Turn on the TX433 transmitter by pushing and holding the power button for approximately 1-2
seconds.
3. Notice the black horizontal highlight bar on the TX433 display. The bar moves up and down the
screen as you use the “Scroll Up” or “Scroll Down” arrow buttons.
4. Move the highlight bar to one of the sound categories and push the “Select” button. Doing this
results in displaying all of the sounds in that particular category. To exit the current category,
push the “Back/Menu” button.
5. After moving the highlight bar to the sound you wish to play, push the “Select” button a single
time to begin playback. Your selected sound will begin playing at low volume.
6. To adjust the volume: Use the “Volume Up” button to raise the volume level to your desired
setting. Use the “Volume Down” button to decrease the volume level. The transmitter has 20
volume steps.
7. To silence the sound: Push the “Mute” button a single time. When muted, the mute status
indicator on the TX433 display shows an “M” and the current sound is silenced. Un-muting is
accomplished by pushing the “Mute” button a second time (the “M” will no longer be displayed
and the sound will resume playing).
8. To switch sounds: Use the scroll buttons to navigate to a different sound and push the “Select”
button. You can switch sounds while the X1 is actively playing a sound or while muted.
9. To turn off the TX433: Push and hold the power button for approximately 1-2 seconds. Be aware
that turning off the remote control does not end sound playback on the X1. If you are finished
calling, use the “Mute” button to silence the X1 prior to turning off the TX433.
10. To turn off the X1: Flip the power switch to the “Off”(DOWN) position. The pilot LED will
extinguish.
2-6 Favorites
The TX433 allows you to establish a list consisting of 10 of your most frequently used sounds under the
“Favorites” menu. These “Favorites” allow for quick selection of your favorite sounds at your
predetermined volume level. This section describes the process involved in creating, changing, and using
your presets.
Creating New Favorites
1. Select the “Favorites” menu item on the TX433. If this is your first time working with favorites,
favorite 1 is automatically set to Coyote Pup Distress 3 at volume 10.
2. To set a preset, position the black highlight bar on one of the blank preset slots and push the
“Select” button a single time.
IMPORTANT NOTE
THE PATRIOT TRANSMITTER IS NOT INTENDED TO OPERATE THE CALLER AT DISTANCES
SHORTER THAN 1 METER (3 FEET). IF THE TRANSMITTER IS LOCATED TOO CLOSE TO THE
CALLER, PROPER OPERATION CANNOT BE ENSURED.

9
3. The first step is selecting the sound you wish to use. Use “Sound Up” or “Sound Down” buttons
to navigate through your sound list and locate the desired sound. Once found, push the “Select”
button to set the sound.
4. Next, select the volume level that you wish to use for this favorite. This is done by using the
“Volume Up” or “Volume Down” arrow button. After you have found your desired volume level,
push the “Select” button to set the volume level. This will complete setting up your Favorite.
5. You will notice that the slot you assigned this favorite to now displays the sound name and the
volume level for reference.
Changing/Overwriting Existing Favorite
1. Select the “Favorites” menu item on the TX433.
2. Position the highlight bar on the favorite that you wish to change.
3. Push and hold the “Select” button for about 3-4 seconds. Repeat the steps for Creating a New
Favorite.
Using a Favorite
1. Select the “Favorites” menu item on the TX433.
2. Position the highlight bar on the preset that you wish to activate.
3. Push the “Select” button a single time to begin playback. The X1 will begin playing the selected
sound at the preset volume level.
Auxiliary Jack Function
The AUX jack is provided primarily for the remote control of FOXPRO decoys, and may be suitable for
controlling other similar devices. It is NOT intended for the direct control of motors, flashlights, or other
devices requiring the internal AUX jack circuitry to switch more than 50 milliamps. The jack tip polarity is
positive. Do not exceed 15 volts. You are urged to seek help from a knowledgeable professional before
connecting any unapproved device to the jack. Keep in mind that any damage to the FOXPRO caller as a
result of improper use of the AUX jack is not covered by the warranty, nor will FOXPRO be liable for damage
to any connected devices.
Using External Speakers
The X1 is equipped with an external speaker jack which allows you to connect an additional speaker. By
connecting a larger and more efficient external speaker to the X1, the volume level can be increased
significantly. You can find a complete selection of external speakers on the FOXPRO website. The external
speaker jack on your X1 accepts a standard 3.5mm plug. When selecting an external speaker, be sure to use
one with an impedance rating of 8-ohms. Be sure the X1 is turned OFF before connecting an external
speaker! To connect an external speaker, plug the connector of the external speaker into the external
speaker jack on the back of the X1.
Picatinny Rail Mount/IR Port
The X1 includes a picatinny rail mount located on top of the caller (rail not included). In order to install the
rail, remove the 2 set screws that are included with the caller. Mount the rail so the holes line up and re-
install the screws. You can now attach accessories that utilize a picatinny rail.
Beside the mount, you will see a small lens. This is the IR port for use with the X-Decoy (sold separately). If
you have an X-Decoy attached to your caller (see decoy’s instructions for mounting), when you press the
remote button to control the auxiliary function, this port will send a signal to the X-Decoy to start and stop
the motion of the decoy, eliminating the need to connect the decoy to the caller with an external cable.
Note: Early versions of the X1 do not have an IR Port and require the use of an Auxiliary cable to connect
to the X-Decoy
Tripod Mount
The X1 features a universal tripod mount (tripod not included) located on the bottom of the longer leg. This
mount will work with most tripods using the universal-type tripod connector. Using a tripod can be helpful

10
in two ways. First, elevating the caller off the ground can help sound propagation by lessening the
dampening of the emitted sound to the ground. Second, elevation can be helpful in maximizing the remote
range.
TX433 Transmitter Detailed Information
This section covers the TX433 in detail including breakdowns and explanations of each menu item.
7-1 Primary Display Area
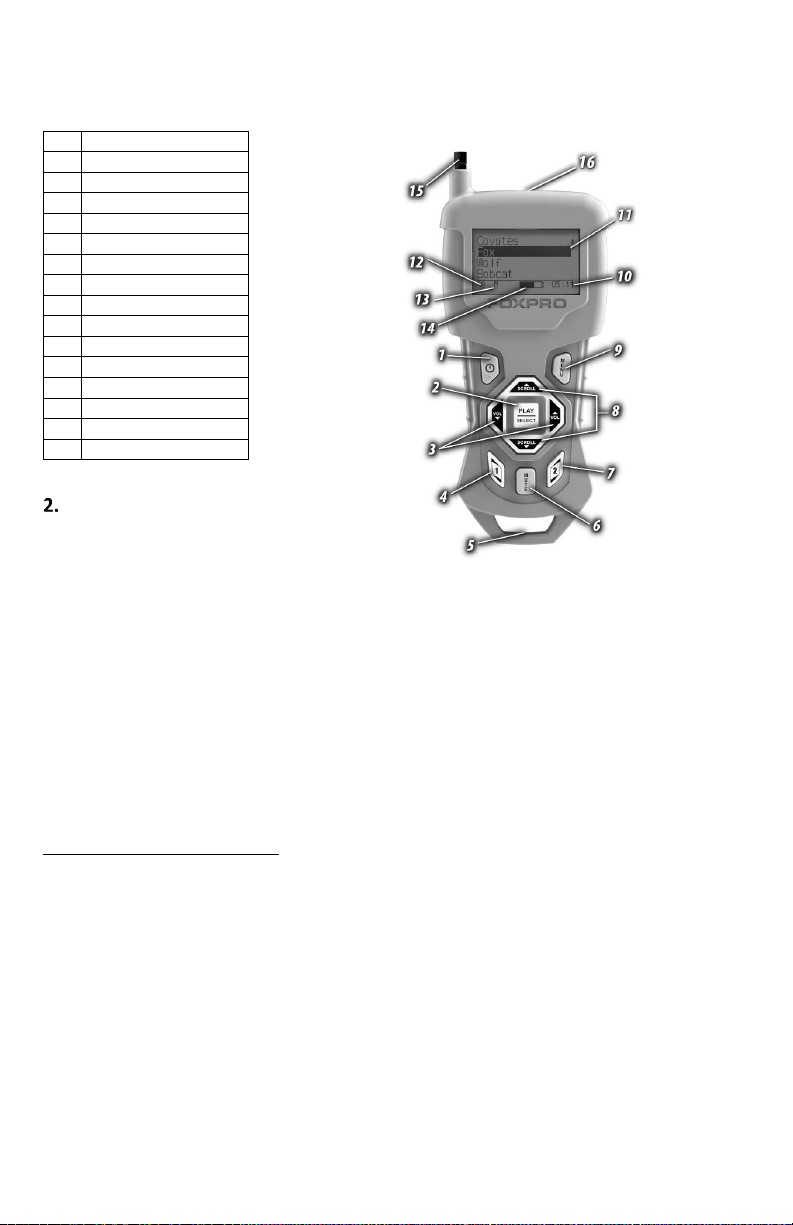
When powered on, the TX433 briefly displays a startup screen (firmware version) and then goes straight to
the primary display area (see image to the right). The
“Favorites” menu item holds your 10 favorite sounds.
Below “Favorites” are your various sound categories.
The bottom line of the display is a status bar that
shows (in order): current volume level, mute status,
battery level, and elapsed timer. You navigate
through the screen with the “Scroll Up” and “Scroll
Down” buttons. As you scroll, the black highlight bar
moves up and down, respectively. To select a menu
item, push the “Select” button. To move back to the
previous screen after making a selection, use the
“Back/Menu” button.
7-2 Main Menu
The main menu provides access to a variety of transmitter configurations. To access the main menu, push
the “Back/Menu” button a single time. The available menu options are as follows: “Sound Settings,”
“Display/Power,” “Timer/User,” and “Remote Settings.” The following sections cover each of these menu
items and their sub-menu items in detail.
7-3 Sound Settings: Volume Step
The TX433 has a range of volume steps from 0 –20. Increasing the volume in the field by increments of 1
may be too slow for some, therefore, this stepping value is configurable. You can choose from 1, 2, and 3.
To change the volume step value, highlight the “Volume Step” menu item, push the “Select” button, then
use the “Sound Up” or “Sound Down” scroll buttons to cycle through the options. When the desired option
is set, push “Select” a final time to lock it in. The value assigned to the Volume Step option will be
remembered between power cycles.
7-4 Sound Settings: Play Mode
This menu allows you to specify which mode of sound playback the Patriot operates on. The available
options are: repeat, single play, and jukebox. The default setting is repeat. In Repeat mode, the Patriot will
play the selected sound repeatedly until you interrupt it. In Single play mode the sound will play a single
time, then stop. In Jukebox mode the sounds play a single time, incrementally. The Play Mode setting is
NOT stored between power cycles. You will need to change this setting each time you power on the Patriot
remote.
7-5 Sound Settings: Audio Limiter
This setting will allow you to turn the audio limiter on or off. The audio limiter is designed to limit the
maximum volume of the caller in order to maximize the battery life of the caller. This is useful in situations
where you may be hunting in areas where less than total volume is sufficient and you want to conserve your
battery. Once you highlight the “Audio Lim” menu option, press the “Select” button and toggle between
your choices of “On” or “Off.” Press the “Select” button a final time to set it.
Note: Early versions of the X1 do not have this feature included

11
7-6 Sound Settings: Fav Mute OR
During normal operation, if the Patriot is muted and you request to play a favorite, the sound is queued for
playback, but it cannot be heard until the caller is un-muted. Favorite mute override will take care of this
and eliminate the need for un-muting the sound upon preset activation. It works by initially checking to see
if mute is active and, if it is, un-mute the Patriot prior to initiating playback of the sound. Turning on favorite
mute override can be done by accessing Sound Settings, highlighting the “Fav Mute OR” menu item,
pushing “Select”, then using the “Sound Up” or “Sound Down” to toggle between off and on. Push “Select”
a final time to set it. This setting is remembered between power cycles.
7-7 Display/Power: Backlight
This setting allows you to change the intensity of the backlight in a range from 5% - 100%. The lower the
intensity, the better your battery life will be. To adjust this setting, highlight the Backlight menu option,
push the “Select” button, and then use the “Sound Up” or “Sound Down” scroll buttons to cycle through the
values. When you have selected the desired backlight intensity, push the “Select” button a final time to set
it. This setting is remembered between power cycles.
7-8 Display/Power: Bklt T.O.
This setting allows you to set the duration for the backlight timeout. The backlight illuminates every time a
button is pressed. If the backlight is illuminated and you do not push a button within the set period of time,
the backlight will automatically shut off. Available values are 15 seconds, 30 seconds, and 1 minute. Keeping
this at a lower value will help promote maximum battery life. To adjust this setting, highlight the Backlight
T.O. menu option, push the “Select” button, and then use the “Scroll Up” or “Scroll Down” scroll buttons to
cycle through the values. When you have selected the desired backlight timeout period, push the “Select”
button a final time to set it. This setting is remembered between power cycles.
7-9 Display/Power: Contrast
This setting allows you to adjust the screen contrast. In ‘normal’ display mode (see 5-9 Display/Power: LCD
Mode), the higher the value, the darker the text will appear. In ‘inverse’ display mode, the higher the value,
the darker the background will appear. To change this value, highlight the contrast menu item, push the
“Select” button, then use the “Scroll Up” or “Scroll Down” buttons to cycle through the values. When you
have selected the desired contrast setting, push “Select” a final time to set it. This setting is remembered
between power cycles.
7-10 Display/Power: LCD Mode
This setting allows you to set the desired display mode. Available options include normal and inverse. In
normal mode, the text will appear as black and the background will be light. In inverse mode, the
background will be black with light text. To change this value, highlight the LCD Mode menu item, push the
“Select” button, then use the “Scroll Up” or “Scroll Down” buttons to cycle through the available options.
When you have selected the desired LCD Mode, push the “Select” button a final time to set it. This setting is
remembered between power cycles.
7-11 Display/Power: Auto Off
If you do not push a button on the remote for a set amount of time, the remote will automatically power
down to conserve battery life. The available options for this setting include 30 minutes, 45 minutes, 1 hour,
2 hours, and 4 hours. To change this value, highlight the Auto Off menu item, push the “Select” button, then
use the “Scroll Up” or “Scroll Down” buttons to cycle through the available options. When you have
selected the desired auto off period, push the “Select” button a final time to set it. This setting is
remembered between power cycles.
7-12 Timer/User: Stand Tmr
The elapsed timer (located on the bottom right of the display) allows you to see how long you have been on
a stand. The timer starts as soon as you turn on the Patriot transmitter. You can reset the timer by accessing

12
the Main Menu, selecting Timer/User option, and then selecting the “Stand Timer Reset.” The timer will
automatically reset to 00:00 if it is allowed to continue beyond 99:59.
7-13 Timer/User: Alarm
The Patriot remote features a visual alarm that can be set to go off after a span of time. The available times
are represented in minutes: 1 –15 (individual steps) and 20-60 (steps of 5). When the alarm is set and the
configured time span passes, the stand timer (or clock if set to display the clock) will display a confirmation
message and the timer indicator will begin to flash. To set an alarm, select the “Alarm (minutes)” menu
item, push the “Select” button, and then use the “Scroll Up” or “Scroll Down” buttons to find the desired
time value. When the desired time value is selected, push the “Select” button to set the alarm.
7-14 Timer/User: USER 1 & USER 2
User button 1 and 2 can be assigned a function of your choice for quick one-button access. You can choose
from: Favorite 1, Favorite 2, Favorite 3, AUX, Recall, Timer reset, and Backlight. To set this, highlight the
“USER 1” or “USER 2” menu item, push the “Select” button, then use the “Scroll Up” or “Scroll Down”
buttons to cycle through the options. When the desired option has been set, push “Select” a final time to
set it. These settings are remembered between power cycles.
7-15 Remote Settings: Download List
Any time you reprogram the Patriot to add new sounds or rearrange existing sounds, you must download a
new copy of the play list to the transmitter. This menu item will guide you through that process. In order to
download the playlist, you will need a 3.5mm stereo male-to-male cable (included). See section 6-3 for
more information.
7-16 Remote Settings: AUX Cntrl
The auxiliary jack
operation specifications
can be changed from
either momentary or
latched. All FOXPRO
decoys require that the
jack be setup for
momentary. To configure the auxiliary jack setting, highlight the “Aux Control” menu item, push the
“Select” button, and then use “Scroll Up” or “Scroll Down” to toggle the two options. When the appropriate
setting is selected, push the “Select” button to set it. This setting is remembered between power cycles.
7-17 Remote Settings: View
The TX433 can display your sounds either by general numerical listing or by category listing. Sound
categories are the easiest to navigate if you have a large number of sounds. The TX433 supports up to 25
unique categories. To configure the view setting, highlight the “View” menu item, push the “Select” button,
and then use the “Scroll Up” or “Scroll Down” buttons to cycle through the options. When the appropriate
setting is selected, push the “Select” button to set it. This setting is remembered between power cycles.
7-18 Remote Settings: Snd Nums
The TX433 displays your sound list in a numerical format based upon the index value of each sound file. The
sounds are numbered from 000 –299. You can choose to either have the index values visible in your sound
list or you can hide them. The advantage of hiding the numbers is that the sound names might be easier to
read. The options for this setting are “Show” and “Hide.” To toggle the options, highlight “Snd Nums” in the
menu, push the “Select” button, use the “Scroll Up” or “Scroll Down” button to cycle the options, then push
“Select” to set it. This setting is remembered between power cycles.
7-19 Remote Settings: About Info
The About Info screen displays a variety of information pertaining to version number, number of sounds
loaded, number of favorites, and transmitter health.
IMPORTANT NOTE
Some third party decoys may require latched operation as opposed to
momentary. A detailed list of other products and their specific requirements
is not maintained by FOXPRO. You will need to check with the equipment
manufacturer to determine if it is compatible and what the requirements
are.

13
7-20 Remote Settings: Cable Detect
If cable detect is turned on, the transmitter will automatically prompt you to perform the download list
function when a 3.5mm stereo cable is connected to the sound upload jack. You can manually initiate the
download list process, if you prefer, by disabling this feature.
Programming the X1
The X1 can store up to 300 sounds in total. From the factory, it’s loaded with 100 premium sounds along
with all current free sounds. All free sounds are prefixed with “F_” for easy recognition. The main
difference between premium sounds and free sounds is the premium sounds are all live animal recordings
whereas the free sounds contain both manmade and real sounds. The X1 is capable of using FOXPRO’s
proprietary audio file type (FXP), MP3, and uncompressed WAV files. Programming the X1 can be done with
a PC or Mac computer, or by sending the X1 to the factory. In order to program the X1 from home, you will
need a USB 2.0 cable (not included with the X1) and a computer running one of the following operating
systems: Windows XP, Vista, 7, 8, 8.1, Windows 10, or Mac OS X 10.7.3 or newer.
8-1 Obtaining New FOXPRO Sounds
Access the FOXPRO website to purchase new sounds or download new free sounds. The website is located
at: http://www.gofoxpro.com. You can purchase premium sounds of your choice, or you can choose to
download free sounds. To purchase and download new sounds, click on the desired sound pack choice and
work through the ordering steps. At the end of the process, you will be able to save your sound pack to the
computer. To download free sounds, please visit: http://www.gofoxpro.com/free.
To download sounds that you have purchased, access the FOXPRO website and login to your store account.
Click the “My Account” menu and click on “Sound Pack Download Manager.” Locate the sound pack you
wish to download and click the “Download” button. Note that, you will be saving a compressed zip archive
file that bundles all of the sounds together (you can opt to download the sounds individually if you have a
slow internet connection). The new sounds can then be programmed into the X1 by using the FOXPRO
Sound Programming Utility, which is covered in the next section.
8-2 Programming the X1
The FOXPRO Sound Programming Utility has versions available for both Windows and Mac operating
systems. You can find them both at the following link:
https://www.gofoxpro.com/programming
Under the heading “Software Links”, you should see a link for the Windows and Mac versions. Click on the
appropriate link for your operating system to go to the download page.
Windows users will see that there is both a 32-bit and 64-bit version of the utility available. The 64-bit
version should work fine on most modern computers. If your computer is a little on the older side, you will
want to use the 32-bit version. To download the installer (executable .exe file), click on the link
corresponding with the correct version. After doing that, the installer file will be saved to your computer.
You must now open that file to allow the installer to setup the utility on your computer. We recommended
keeping all of the default options as they are. You will have the ability to create a Desktop icon if you wish.
When installation is complete, the utility can be located in your Start Menu > FOXPRO Programmer.
Mac users can download a Mac Application Bundle for the utility. This is a bundle that contains the utility
and provides the easiest method for installation. Simply download the bundle and then move it into your
Applications folder. Note that, depending upon your security settings, you may need to add an exception
for the file after you have it downloaded.
Connecting your X1 to the PC
Remove the cover from the rear of the X1. Once inside, also remove the battery pack. You will find the USB

14
port on the top of the inside compartment. Connect your USB cable between the USB port in the X1 and a
USB port on your computer. Make sure the caller is powered off while it is connected to your computer!
After connecting the X1 to your computer, launch the utility. The utility should recognize the device and
display the sounds currently installed in the X1 in the “Caller Sound Files” column on the right. If this is your
first time using the utility, the “Source Sound Files” column on the left will be empty.
Launching the Utility
Windows users can launch the utility by finding the shortcut in the Start Menu and clicking on it. For those
who created a Desktop icon, locate it and double-click on it to launch the utility.
Mac users can double-click on the icon for the bundle that you placed in your Applications folder earlier.
As the utility launches, you will see a splash screen that shows some basic information. When it is fully
loaded, you will be presented with a screen that is divided into two main sections. The left side is
called Source Files, which represents the default storage location for sounds on your computer. The right
side is called Caller Files, which displays the sounds loaded in your game call. Because we already connected
the game call to the computer previously, the Caller Files section should be displaying the sound list for your
game call. If this is your first time using the utility, the Source Files column should be empty.
File Locations / Sound Library
Whether using Windows or Mac versions, the utility establishes the local sound storage point under
Documents > FOXPRO > Sounds. We recommend that you place all of your new sounds in this location for
easy access.
For purposes of example, we can quickly add some new sounds from the free library with the utility. To do
this, click on the File menu on the utility screen and then click on the “Download Free Sounds” menu item.
This displays a list of all free sounds available from FOXPRO. You can select one or all of the free sounds to
highlight them. Next, click on the “Download Selected” button to save the selected files to your computer.
If you have already purchased new sounds from FOXPRO, be aware that you can login to your store account
and download the new sounds directly in the utility. To do this, click on the File menu and then click on the
“Sound Pack Downloader” menu item. Enter the email address for your store account along with the
account password, then click on the “Login” button. Upon logging in, any sound pack that you have
purchased through the online store will appear in the column on the right. Simply click on one of the sound
packs to select it and then click the “Download Selected” button to save the files to your computer. When
the download is complete, the sounds will appear in the Source Files column.
Installing New Sounds
Now that you have downloaded sounds in the previous step, you can easily add them into your game call.
The game call should already be connected to your computer and the Caller Files column should show the
sounds currently loaded into the unit. The left, or Source Files column, should be displaying the sounds we
previously downloaded. On the Caller Files column, scroll down to the end of your sound list and locate the
first available sound slot. Click on it a single time so that it becomes highlighted. On the Source Files column,
you can click on a single file or all of the files to highlight them. Next, click on the “Insert Sound(s)” button
the center of the screen. The sounds that were highlighted on the Source Files column will now be displayed
in the Caller Files column and will also now be installed into your game call.
After you have added new sounds into your game call, you will need to edit the categories to get the new
sounds to display properly. The steps for that process can be found in the next section.
Editing the Categories with the Programming Utility
With the game call connected to your computer, launch the utility as described in section 8-2. Under the
Caller Files column, locate and click on the button called “Edit Categories”.
The screen is split into two distinct panes. The left pane displays all of the sounds that are stored in your
FOXPRO game call. The column to the right displays how the categories are arranged. You will notice that

15
each category name features a list of sounds indented just beneath it. This represents the sounds that are in
each category.
To add a new sound into the correct category, first locate the sound on the column to the left. It should be
near the end of the list. After you have located it, click on it one time to highlight it. Next, locate the
appropriate category on the right that you want to place that sound into. Click on the category name to
highlight it. To place the sound into that category, click on the “Insert Selected” button in the middle of the
screen. You should now see the new sound appearing under the category name selected on the right.
When finished, click on the “Save & Exit” button to commit the changes to the categories. To finish
programming, you will now need to update the playlist on your remote which is covered in the next section.
8-3 Updating the Transmitter Playlist
You will need a 3.5mm male-to-male stereo cable for this process. This cable is included with the X1 when
purchased.
1. Disconnect the X1 from your computer if it is still connected.
2. Disconnect all accessories from the X1 (i.e. speakers or decoy) and make sure that it is turned
off.
3. Turn on the TX433 transmitter.
4. Connect one end of the 3.5mm cable to the sound upload jack on the top of the TX433. You will
see a message displayed on the screen stating, “Turn caller off. Connect to AUX jack on call.”
5. Connect the other end of the 3.5mm cable to the AUX jack on the X1 game call. Select “OK” on
the TX433.
6. Power on the X1 to initiate the transfer process. The display on the remote updates as the
transfer progresses. It displays the number of sounds transferred. When complete, the screen
returns to the normal view. If there is an error in the programming, the transfer will fail. If that
occurs, you will need to connect the X1 to your computer and review the programming for
errors. Watch for duplicate sound numbers or missing numbers.
7. When the transfer completes, unplug the cable from the transmitter and X1. Browse through the
sound list to view the changes.
Maximizing Remote Range
Remote range can be affected by many factors. Some of these factors can be controlled while others
cannot. In order to achieve the best possible remote range with your X1 digital game call system, it is
recommended that the following points be observed:
•Fully extend the telescopic antenna on the TX433 remote control.
•Raise the antenna on top of the X1.
•Always use a high-quality alkaline or lithium battery in the remote.
•Always maintain clear line of sight between the remote control and the X1. Any obstructions—
no matter how significant or insignificant—can adversely affect the radio signal.
•Keep the remote control a minimum of six inches away from your body, gun barrel, and metal
shooting sticks as these things can detune the remote control.
•Hold the remote control vertically with the antenna pointing skyward (see image below):

16
•Avoid using the device remotely when you are near power lines, cellular phone towers, and
radar (such as near airports or military installations).
•Try to elevate the caller off of the ground by approximately three feet. This can greatly maximize
your overall remote control range.
•Try to avoid situations where the X1 is placed at a lower elevation than the remote control—the
caller should always be higher.
Product Care & Maintenance
Avoid exposure to all precipitation and moisture. Moisture (perhaps from rain, snow, condensation, or
other) can potentially enter the unit or the battery compartment and cause serious problems. Proper care
should be taken to mitigate the introduction of moisture into the machine and make sure that no moisture
is present during storage. Moisture can quickly lead to corrosion, electrical shorts, and even rust—all of
which can render the unit damaged and out of warranty. This type of damage is preventable! If you are
operating in rainy, wet conditions, it is recommended that you place the unit inside of a large plastic storage
bag or use a water/weatherproof deployment bag to keep water from getting to it. When storing the unit
for prolonged periods, be sure that you keep it in a dry location. Remove batteries prior to storage or
extended periods of inactivity! All batteries, whether alkaline or rechargeable, should be removed from the
game calls, decoys, and transmitters prior to storage or periods of inactivity. Batteries left inside of
electronic devices can leak over time. Damages caused by this can be severe and potentially destroy the
electrical components. To prevent this from happening, simply remove all batteries from all devices before
you put them away. Keep in mind: damage caused by battery leakage is not covered under warranty.
Troubleshooting
PROBLEM
SOLUTION
X1 will Not Turn On
Make sure your battery pack is fully charged.
Cannot transfer sound list to X1
transmitter
This typically stems from an error in the play list in the X1. If
you recently added new sounds, double-check the
programming for errors such as duplicate or missing sound
numbers.
TX433 transmitter does not turn on
Install fresh batteries and try again.
Poor battery life in extreme cold
weather conditions
Cold weather operations can take a serious toll on alkaline
batteries. It is strongly recommended that you use lithium or
rechargeable NiMH batteries to get the best performance in
cold weather.
X1 not being recognized by computer
Make sure that the X1 is turned OFF while connected to the
computer.
Pilot light / LED is blinking
This is the low battery indicator. Recharge your battery pack.
Pilot light blinks 5 times and then turns
off
Problem detected with the memory card. Contact support.
FCC & IC Information
RF Exposure Safety Notice
The Patriot transmitter is not intended to be operated closer than 20cm (about 8 inches) to your body. The
transmitter can produce a radiated RF field similar to that of a standard cell telephone, although the duty
cycle of this RF field is much lower than that of a cell telephone. Using the transmitter closer than 8 inches
to your body can increase your exposure to RF energy levels thought by some to be harmful. Additionally,
operation in close proximity to your body can detune the antenna causing a decrease in operating
performance.
The antenna(s) used for this transmitter must be installed to provide a separation distance of at least 20 cm

17
from all persons and must not be co-located or operating in conjunction with any other antenna or
transmitter. End-users and installers must be provided with antenna installation instructions and
transmitter operating conditions for satisfying RF exposure compliance.
FCC Information
NOTE: This equipment has been tested and found to comply with the limits for a Class B digital device,
pursuant to Part 15 of the FCC Rules. These limits are designed to provide reasonable protection against
harmful interference in a residential installation. This equipment generates, uses, and can radiate radio
frequency energy and, if not installed and used in accordance with the instructions, may cause harmful
interference to radio communications. However, there is no guarantee that the interference will not occur
in a particular installation. If this equipment does cause harmful interference to radio or television
reception, which can be determined by turning the equipment off and on, the user is encouraged to correct
the interference by one or more of the following measures:
•Reorient or relocate the receiving antenna.
•Increase the separation between the equipment and receiver.
•Connect the equipment into an outlet or circuit different that to which the receiver is
connected.
•Consult the dealer or an experienced radio/TV technician for help.
Operation is subject to the following two conditions: (1) this device may not cause harmful interference,
and (2) this device must accept any interference received, including interference that may cause undesired
operation of this device. Modifications not expressly approved by the manufacturer could void the user’s
authority to operate the equipment under FCC rules.
Industry Canada Notice
This device complies with Industry Canada licence-exempt RSS standard(s). Operation is subject to the
following two conditions: (1) this device may not cause interference, and (2) this device must accept any
interference, including interference that may cause undesirable operation of the device.
Le présent appareil est conforme aux CNR d’Industrie Canada applicable aux appareils radio exempts de
licence. L’exploitation est autorisée aux deux conditions suivantes : (1) l’appareil ne doit pas produire de
brouilage, et (2) l’utilisateur de l’appareil doit accepter tout brouillage radioélectrique subi, même si le
brouillage est susceptible d’en compromettre le functionnement.
Note: Units exported beyond the boundaries of North America are not FCC certified. FOXPRO Inc. makes
every attempt at complying with regional regulations governing radio spectrum. However, it is the user’s
responsibility to ensure compliance with local laws and ordinances that govern the use of radio controlled
devices in the area of operation.
Warranty Statement
Your FOXPRO® game call is warranted to be free from defects in materials and workmanship that diminish
its usefulness for a period of time as established for 5 years from the date of purchase if the item was
purchased from a FOXPRO Authorized Retailer. Return the unit prepaid and packaged securely along with
proof of purchase to FOXPRO. Include a note describing the defect or problem. This limited warranty is void
if the unit is physically damaged, used in a manner contrary to intended use, or otherwise abused, either
intentionally or unintentionally. Also specifically excluded are batteries and damage caused by attempts to
charge batteries not intended to be recharged, and water damage. Examples of non-warranty issues:
product ceases to work after exposure to water (in the form of any precipitation), moisture, or other
elemental forces; product is physically damaged from dropping, running over with any vehicle, falling from
any surface and impacting with the ground, gunshot, misuse, neglect, abuse, animal attack; product ceases
to work as a result of battery leakage, battery damage, intentional or unintentional wiring accidents,
connecting an unapproved charging device to the product, overpowering, and incorrect installation of
batteries; product ceases to work after connecting an unapproved external auxiliary device.

18
Notes

19

20
Table of contents
Other Foxpro Speakers manuals

Foxpro
Foxpro PROWLER User manual

Foxpro
Foxpro FUSION User manual

Foxpro
Foxpro HELLCAT PRO User manual

Foxpro
Foxpro SNOWPRO User manual

Foxpro
Foxpro XWave User manual

Foxpro
Foxpro Hammer Jack 2 User manual

Foxpro
Foxpro NX4 User manual

Foxpro
Foxpro HELLFIRE User manual

Foxpro
Foxpro X24 User manual

Foxpro
Foxpro SUPER SNOW-CROW PRO W User manual