Framery Q Technical specifications

Framery Q
Maintenance instructions English
Version 2.0


Contents
1 Safety............................................................................................................ 5
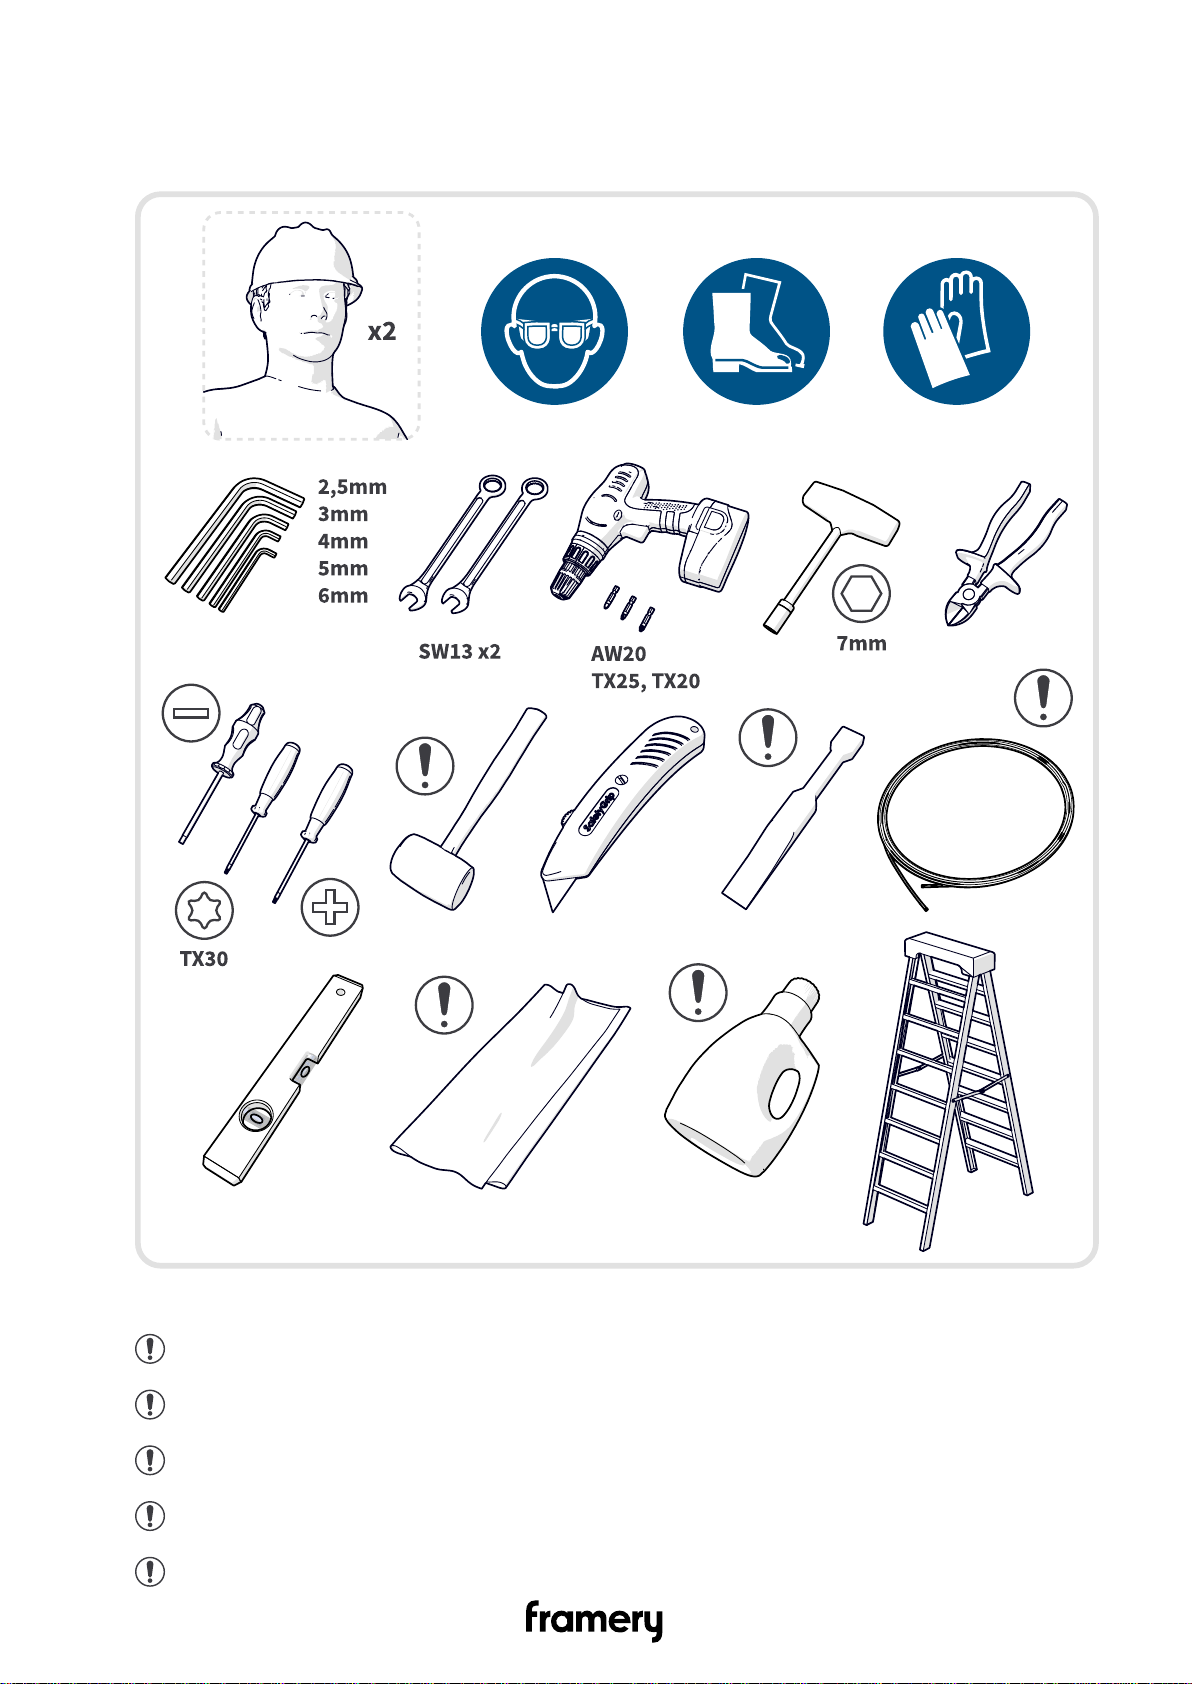
2 Tools and accessories................................................................................ 7
3 General inspection...................................................................................... 9
4 Check sound insulation............................................................................ 10
5 Disassemble the necessary parts............................................................11
5.1 Disconnect the power cord.................................................................................. 11
5.2 Remove the body covers..................................................................................... 11
5.3 Remove the floor grid and table.......................................................................... 12
5.4 Remove the floor threshold..................................................................................15
5.5 Remove the carpet...............................................................................................15
5.6 Remove the floor cover board............................................................................. 16
5.7 Remove the cover panels and plates.................................................................. 17
5.8 Detach the fan modules....................................................................................... 19
6 Check the straightness of the pod.......................................................... 21
6.1 Level the floor.......................................................................................................21
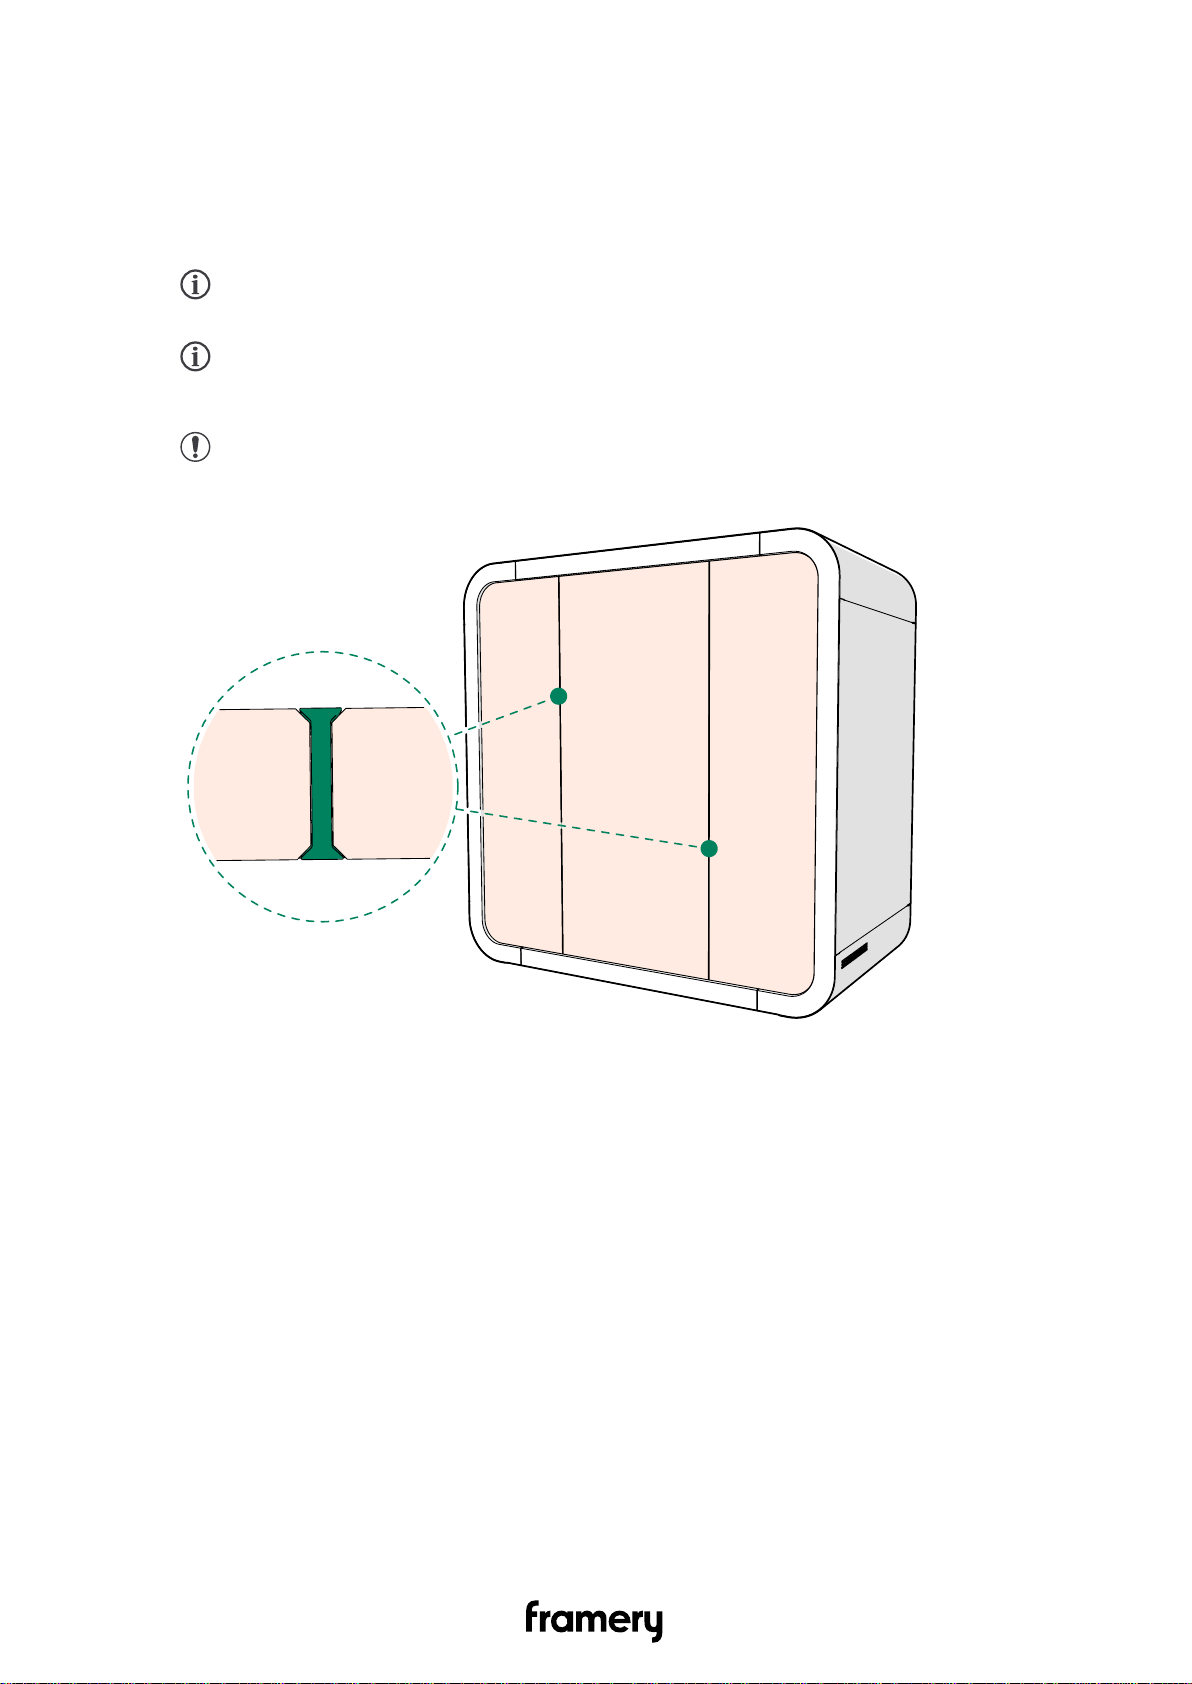
6.2 Straighten the walls..............................................................................................22
6.3 Tighten the frame and body bolts........................................................................ 29
7 Service the door........................................................................................ 32
7.1 Check the hinges................................................................................................. 32
7.1.1 Replace the hinges...................................................................................32
7.1.2 Lubricate the hinges................................................................................. 34
7.2 Check the seals....................................................................................................36
7.3 Check the door handle.........................................................................................37
7.3.1 Adjust the handle..................................................................................... 37
7.3.2 Check the strike plate.............................................................................. 41
7.3.3 Lubricate the lock..................................................................................... 42
8 Clean the fans and ventilation channels.................................................43
9 Replace the fan modules..........................................................................44
10 Check all the electrical connections..................................................... 45
11 Reassemble.............................................................................................. 47
11.1 Install the cover panels and plates.....................................................................47

11.2 Install the floor cover board................................................................................49
11.3 Install the carpet................................................................................................. 49
11.4 Install the floor threshold.................................................................................... 50
11.5 Install the table and floor grid.............................................................................52
11.6 Install the bottom body covers........................................................................... 55
11.7 Install the roof body covers................................................................................ 56
11.8 Install the wall body covers................................................................................ 59
12 Clean up....................................................................................................61
13 Finalize...................................................................................................... 62

1 Safety
This chapter outlines important safety matters concerning the installation, maintenance or
disassembly of the pod. It is important that these instructions are followed to recognize and
prevent potential risks before they occur.
Note: All personnel must understand and observe these instructions prior to
installation, maintenance or disassembly of the pod.
Restrictions
• Non-conventional use
• Installation, maintenance or disassembly of the pod without reading and understanding
the instructions
• Use of the pod beyond the limits of use
• Making alterations to the pod
• Using the pod in spite of obvious defects or damage
• Using the pod outdoors
Making alterations to the pod
Warning: To prevent risks and ensure optimal performance, rebuilding or making
any alterations to the pod may not be carried out without the manufacturer’s explicit
prior permission.
Safety considerations
Warning: Always disconnect the pod from the power outlet before performing any
maintenance. To disconnect, remove plug from outlet.
Note: Read these instructions before installation, maintenance or disassembly.
Note: Use safety boots, safety glasses and cut-resistant gloves during installation,
maintenance or disassembly.
Note: The use of the pod is only permitted after it has been properly installed.
Note: When installing, performing maintenance or disassembling, obey all the local
requirements for safety issues, lifting, and other special tasks.
Note: Keep the installation, maintenance or disassembly area clean.
Note: After installation, maintenance or disassembly, clean up the surroundings of
the pod.
Note: Do not cover the ventilation channels.
Note: Never drop or insert any object into any opening unless instructed.
Note: Do not place heavy objects on the roof of the pod.
Note: Do not attach or hang extra weight from the door.
Framery Q Maintenance instructions
5

Installation environment
The pod is intended to be used in the following conditions.
• Ambient temperature: +15°C ... +30°C (59°F ... 86°F)
• Humidity: max. 50%
6Framery Q Maintenance instructions

2 Tools and accessories
Figure 1: Tools and accessories needed for installation and maintenance
Note: Use a white rubber mallet to prevent leaving marks on the body covers.
Note: Use a plastic chisel to remove the body covers.
Note: Use a draw wire in the electrical installations.
Note: Use a separate piece of carpet in the door installation.
Note: Use a lint-free cloth to clean the pod.
Framery Q Maintenance instructions
7

Note: Use a mild alcohol-based cleaning solution to clean the pod.
Tip: Use glass washing liquid as a lubricant to help install the seal.
8Framery Q Maintenance instructions

3 General inspection
Check:
• that the floor is level.
• the straightness of the pod.
• the pod for wear and tear.
• the pod for visual defects.
• that the seals are in good condition and properly installed. Poor condition of the seals
can affect the pod's sound insulation.
• that the handle is not too loose or too tight.
Write down deficiencies, need of spare parts, and need of repair.
Related tasks
Level the floor on page 21
Straighten the walls on page 22
Check sound insulation on page 10
Adjust the handle on page 37
Framery Q Maintenance instructions
9

4 Check sound insulation
1. Go into the pod and close the door.
2. Listen to the incoming sounds and check all the seals.
Tip: Typical leakage points are the door seals at the side glass frame corners
in the front of the pod.
Tip: The nylon screws on the sides of the back of the pod may be loose.
3. Use a flashlight to locate the part of the seam where the light shines through.
Note: If you tighten the nylon screws, make sure that the glasses are aligned
all the way in the H profile before you tighten the screws.
10 Framery Q Maintenance instructions

5 Disassemble the necessary parts
5.1 Disconnect the power cord
To provide a safe working environment, disconnect the power cord.
5.2 Remove the body covers
Tip: Use a plastic chisel to remove the body covers.
1. Remove the wall body covers.
Framery Q Maintenance instructions
11

2. Remove the straight and curved roof body covers.
3. Remove the bottom body covers.
4. Place the removed covers in a safe place out of the way.
5.3 Remove the floor grid and table
1. Take out the seats.
12 Framery Q Maintenance instructions

2. Unscrew the black 5x30 screws (2 pcs) and remove the floor grid.
3. If the pod has a wide or Working with PAL table, unscrew the 5x50 mm screws (2 pcs)
and remove the installation brackets under the table top.
Framery Q Maintenance instructions
13

4. Turn the carpet away from the opening in the floor.
5. Unscrew the M6x20 countersunk screws (6 pcs) and 5x50 screws (4 pcs) and detach
the table.
Working with PAL table has M6x20 countersunk screws (6 pcs).
14 Framery Q Maintenance instructions

6. Disconnect the power outlet cord from the power unit in the floor.
5.4 Remove the floor threshold
Unscrew the 5x50 screws (2 pcs) and remove the floor threshold.
5.5 Remove the carpet
To access the body bolts, remove the carpet.
Framery Q Maintenance instructions
15

1. Pull the carpet out from under the wall felts and remove it from the pod.
2. Clean the carpet with a vacuum cleaner.
5.6 Remove the floor cover board
Unscrew the 5x50 screws (5 pcs) and remove the floor cover board.
16 Framery Q Maintenance instructions

5.7 Remove the cover panels and plates
Remove the cover panels and plates to access the frame bolts. The screws are 4x30 AW20
(you can also use TX20 screwdriver).
1. Unscrew the 4x30 screws (32 pcs) and remove the wall cover panels (4 pcs).
Framery Q Maintenance instructions
17

2. Unscrew the 4x30 screws (4 pcs) and remove the floor cover plates (4 pcs).
3. Unscrew the 4x30 screws (4 pcs) and remove the roof cover plates (4 pcs).
18 Framery Q Maintenance instructions

5.8 Detach the fan modules
1. Unscrew the 3.5x16 screws (4 pcs) holding the fan module in its place.
2. Lift the fan module out of the roof module.
3. Detach the fan DC cord and DC extension cord.
Framery Q Maintenance instructions
19
Other manuals for Q
2
Table of contents
Other Framery Indoor Furnishing manuals