manuals.online logo
Brands
  1. Home
  2. •
  3. Brands
  4. •
  5. Franke
  6. •
  7. Plumbing Product
  8. •
  9. Franke SWING 115.0083.729 Installation guide

Franke SWING 115.0083.729 Installation guide

Franke Portugal S.A.
+35 / 121 426 9670
www.franke.pt
Franke Polska Sp. z o.o.
+48 / 22 / 711 6700
www.franke.pl
Franke Romania SRL
+40 / 21 / 350 1550
www.franke.ro
Franke Russia GmbH
www.franke.ru
+ 7 / 812 / 324 12 84
Franke Ramnaes AB
+46 / 220 / 220 50
www.franke.se
Franke Singapore Prviate Limited
+65 / 627 / 66898
www.franke.com.sg
+66 / 2 / 236 9777
www.franke.co.th
Franke Thailand Co. Ltd.
Franke Tunisia SARL
+216 / 71 / 700 430
www.franke.com
Franke Mutfak ve Banyo Sistemleri Sanayi Ticaret A.S.
+90 / 262 / 644 65 95
www.franke.com.tr
+38 / (0) 44 / 492 0015
www.franke.ua
Franke Ukraina LLC
Franke Consumer Products Inc.
+1 / 215 / 822 6590
www.frankeconsumerproducts.com
+7 / 3272 / 501 149
www.franke.com
Franke Kazakhstan Ltd.
+27 / 31 / 450 6301
www.franke.co.za
Franke Kitchen Systems (Pty) Ltd.
+43 / 1699 / 2002
www.franke.at
Franke GmbH
A
P
PL
RO
RUS
S
SGP
THA
TN
TR
UA
USA
KAZ
ZA
MA
NL
N
AUS Franke Australia Pty Ltd
+61 / 3 / 9535 2000
www.franke.com.au
BFranke N.V.
+32 / 54 / 310 111
www.franke.be
BG
+359 / 2 / 963 0130
www.franke.bg
Franke Bulgaria Ltd.
BR Franke Sistemas de Cozinhas Ltda.
+55 / 47 / 3431 0500
www.franke.com.br
CZ Franke s.r.o.
+42 / 02 / 810 904 11
www.franke.cz
CN Franke China Kitchen System Co. Ltd.
+86 / 750 / 841 9288
www.franke.com.cn
CH Franke Küchentechnik AG
+41 / 62 / 787 3131
www.kt.franke.ch
CDN Franke Kindred Canada Limited
+1 / 705 / 526 5427
www.frankekindred.com
DK Franke Danmark A/S
+45 / 86 / 249 024
www.frankedanmark.dk
DFranke GmbH
+49 / 7761 / 520
www.franke.de
FFranke France S.A.S.
+33 / (0) 130 / 289 400
www.franke.fr
EFranke Espana S.A.U.
+34 / 93 / 565 3535
www.franke.es
FIN
+358 / 15 / 34 11-1
www.franke.fi
Franke Finland Oy
ET
+202 / 418 7757
www.franke.com
Nile Metallic Industries Co.
GR
+30 / 2299 / 040 100
www.franke.gr
Franke Hellas S.A.
H
+36 / 1 / 347 3600
www.franke.hu
Franke Kft.
GB
+44 / 161 / 436 6280
www.franke.co.uk
Franke UK Ltd.
HK
+86 / 750 / 885 5288
www.franke.com.hk
Franke Hong Kong Company Ltd.
I
+39 / 045 / 644 9311
www.franke.it
Franke S.p.A.
GE
+995 / 32 / 913 172
www.franke.ge
Franke Caucasus Ltd.
IND
+91 / 22 / 2491 9557
www.franke.co.in
Franke India Pvt. Ltd.
+212 / 22 / 674 200
www.franke.com
Franke Kitchen System SARL
+31 / 492 /585 111
www.franke.nl
Franke Roestvrijstaal Nederland B.V.
+47 / 35 / 566 450
www.franke-norge.no
Franke Norge A/S
Top_Clip_print.prn
D:\out\Top_Clip_ges.cdr
Donnerstag, 18. Mai 2006 10:44:01
Farbprofil: Generisches CMYK-Druckerprofil
Komposit Standardbildschirm
SWING
Franke Küchentechnik AG
CH-4663 Aarburg / Switzerland
Tel.: +41 62 787 31 31
Fax.: +41 62 787 30 18
www.kt.franke.ch.
?????????????
VPC2011091205
FUN-NR. 115.0083.729 chrom
MONTAGE-,WARTUNGS- UND
GEBRAUCHSANWEISUNGEN
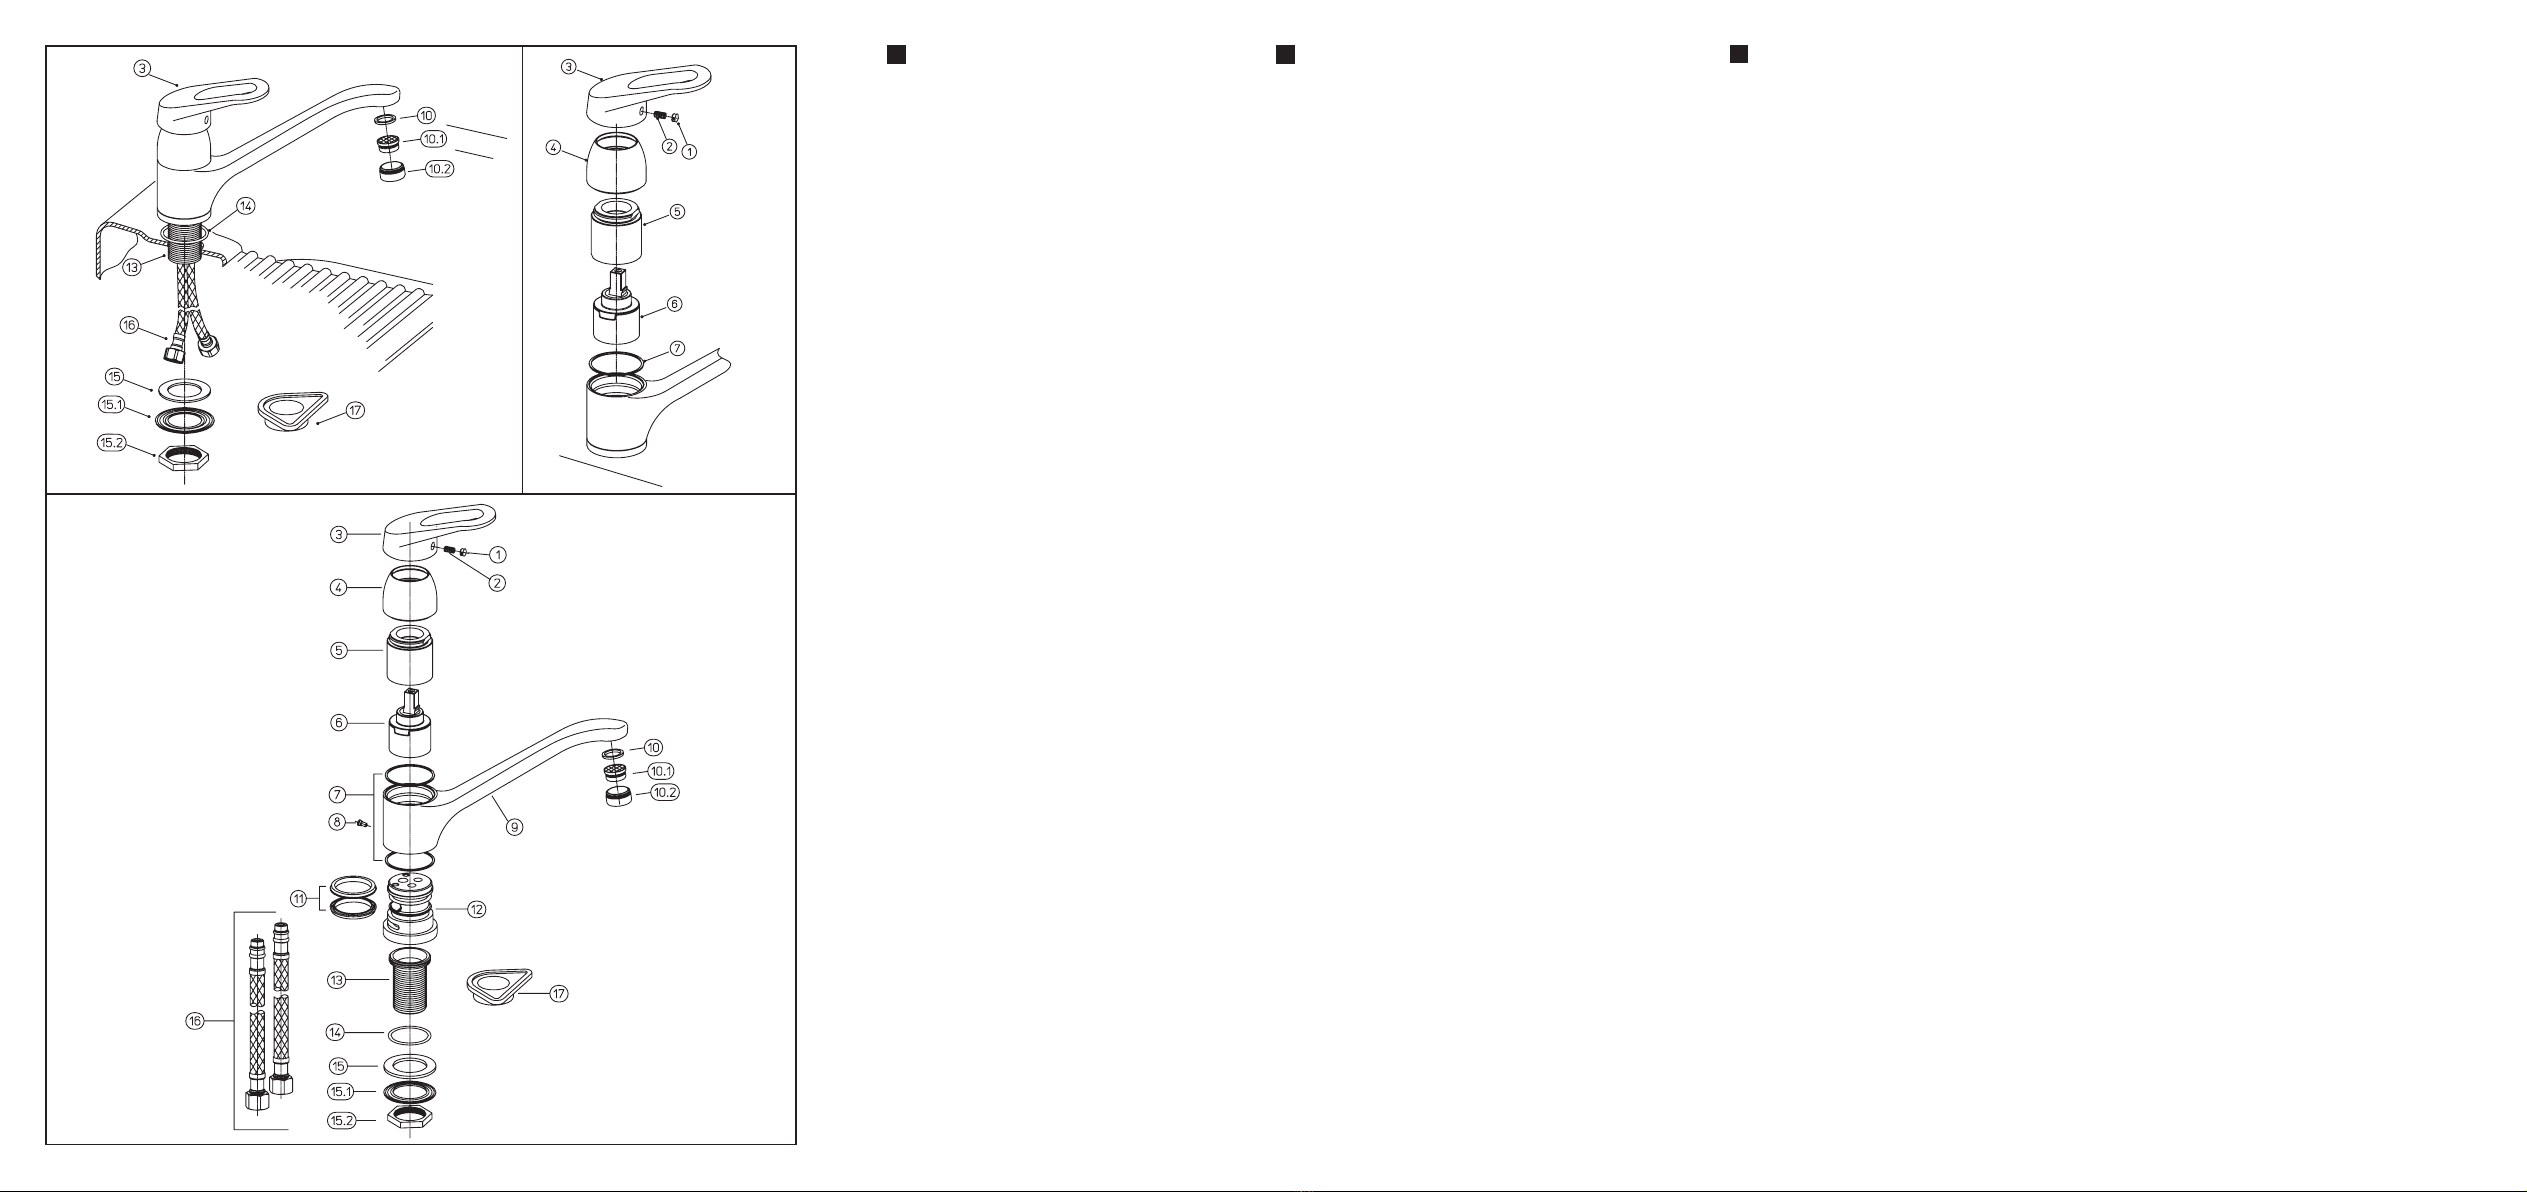
MONTAGE SPÜLTISCHMISCHER MIT SCHWENK-
AUSLAUF (Abb.1)
Die Dichtung (14) auf die Bolzenflanke (13) einsetzen und
die Armatur im Spültisch einlegen. Die Dichtung (15) und
den Flansch (15.1) auf die Bolzenflanke (13) einlegen
und die Armatur durch die Mutter (15.2) befestigen.
Zum Befestigen der Armatur ist die Verwendung
vom Flansch (17) zwischen Dichtung (15) und
Spülbecken empfehlenswert. Die Anschlussschläuche
(16) verbinden. Der linke Anschlussschlauch an
die Heisswasserzuführungsseite und der rechte
Anschlussschlauch an die Kaltwasserzuführungsseite
einschrauben. Die Versorgung (3) öffnen und die
einwandfreie Wirkung der Armatur prüfen.
ERSATZ DER KARTUSCHE (die Versorgung
schließen) (Abb.2)
Das Plättchen (1) herausnehmen, die Klemmschraube
(2) abschrauben und den Hebel (3) entfernen. Die
Kappe (4) und den Befestigungsring (5) abschrauben
und die Kartusche (6) herausnehmen. Zur Montage
umgekehrt vorgehen und alle Oberfläche, welche
dichtend sind, reinigen. Den Ring (5) so anziehen, dass
die Dichtung und gleichzeitig eine sanfte Bewegung
des Hebelgriffes gewährleistet ist. Vor Montage die
Dichtung (7) korrekt einlegen.
ERSATZ BZW. REINIGUNG DES PERLATORS
(Abb.1)
Es ist angebracht, eine regelmäßige Reinigung des
Perlators durchzuführen, um eine Ansammlung von
Rückständen und Kalkablagerungen zu entfernen, die
im Laufe der Zeit eine graduelle Leistungsvermeidung
verursachen. Den Ring (10.2) abschrauben und das
Sieb (10.1) von Unsauberkeit reinigen. Zur Montage des
Perlators umgekehrt vorgehen und sicherstellen, das
richtige Einsetzen der Dichtung (10) zu gewährleisten.
PFLEGE DER ARMATUR
Oberfläche: Verchromte Oberfläche reagieren
empfindlich auf kalkösende, säurehaftige und
scheuernde Reinigungs- und Pflegemittel. Farbige
Oberfläche sind mit einem Spezial-Einbrennlack
versiegelt und dürfen auf keinen Fall mit scheuernden,
ätzenden oder alkoholhaftigen Mitteln gereinigt werden.
Nur mit klarem Wasser und einem weichen Tuch oder
Leder reinigen. Bei Nichtbeachtung dieser Anleitung
können keine Garantiesprüche geltend gemacht
werden.
INSTRUCTIONS DE MONTAGE, D’EMPLOI
ET D’ENTRETIEN
MONTAGE EVIER AVEC BEC ORIENTABLE (Fig.1)
Positionner le joint (14) sur le corps du robinet (13) et
introduire le robinet dans le trou de l’évier. Enfiler le
joint (15) et la bride (15.1) sur le corps du robinet (13)
et serrer avec le contre-écrou (15.2). Pour augmenter
la stabilité du robinet positionner la bride (17) entre le
joint (15) et l’évier. Relier les tuyaux flexibles (16): celui
de gauche à la distribution de l’eau chaude et celui de
droite à la distribution de l’eau froide. Ouvrir la manette
(3) et vérifier le fonctionnement correct du robinet.
REMPLACEMENT DE LA CARTOUCHE (fermer l’ali-
mentation) (Fig.2)
Enlever la pastille (1), dévisser la vis (2) et extraire la
manette (3); dévisser le capuchon (4) et l’embout de
serrage (5), donc extraire la cartouche (6). Pour le
montage, procéder dans l’ordre inverse et nettoyer la
surface du corps où agissent les joint d’étanchéité de
la cartouche. Serrer l’embout de serrage (5) de façon à
garantir l’étanchéité et en même temps le mouvement
souple de la manette. Avant le montage de la manette
positionner le joint (7) correctement.
REMPLACEMENT ET ENTRETIEN DU MOUSSEUR
(Fig.1)
Nettoyer régulièrement le mousseur de façon que le
jet reste fort et qu’il ne se forme aucun résidu dans le
mitigeur qui puisse causer un suintement. Dévisser le
mousseur (10.2) et nettoyer le filtre (10.1) des impu-
retés. Remonter le mousseur en procédant en sens
inverse en s’assurant de positionner le joint (10) cor-
rectement.
NETTOyAGE DU MITIGEUR
Surface: les surfaces chromées sont sensibles aux
détergents anticalcaires, acides ou abrasifs. Les surfa-
ces colorées sont vernies avec une laque à feu spécia-
le et elles ne doivent en aucun cas être nettoyées avec
des détergents acides, abrasifs ou qui contiennent de
l’alcool. Il faut nettoyer seulement avec de l’eau et un
chiffon doux. Si l’on observe pas ces instructions, les
droits de garantie échouent.
D
Fig.1 Fig.2 ISTRUZIONI PER L’INSTALLAZIONE
MONTAGGIO LAVELLO CON BOCCA GIREVOLE
(Fig.1)
Posizionare la guarnizione (14) sul gambo filettato
(13) ed inserire il rubinetto nel foro del lavello. Infilare
la guarnizione (15) e la flangia (15.1) sul gambo filet-
tato (13) poi fissare il rubinetto tramite il dado (15.2).
Qualora si ritenesse necessario aumentare la stabilità
del rubinetto utilizzare la flangia (17) tra guarnizione
(15) e lavello. Collegare i tubetti di alimentazione (16):
il sinistro all’erogazione dell’acqua calda ed il tubetto di
alimentazione destro all’erogazione dell’acqua fredda.
Verificare il corretto funzionamento del rubinetto non-
ché la perfetta tenuta di tutte le sue parti azionando la
maniglia (3).
SOSTITUZIONE CARTUCCIA (chiudere l’impianto
idrico) (Fig.2)
Estrarre la placchetta (1), allentare il grano (2) e toglie-
re la maniglia (3); svitare il cappuccio (4) e la ghiera
di serraggio (5), quindi estrarre la cartuccia (6). Per
il montaggio, procedere in senso inverso facendo
particolare attenzione alla pulizia delle superfici dove
agiscono le guarnizioni di tenuta. Chiudere la ghiera di
serraggio (5) in modo tale da garantire la tenuta e al
tempo stesso consentire un morbido movimento della
maniglia. Durante la fase di montaggio assicurarsi che
l’anello antifrizione (7) sia in posizione corretta.
SOSTITUZIONE O PULIZIA DELL’AERATORE (Fig.1)
E’ buona norma procedere alla pulizia periodica dell’ae-
ratore per evitare l’accumulo di detriti e calcare che con
il passare del tempo, sono causa di una graduale di-
minuzione della portata. Per procedere allo smontag-
gio dell’aeratore svitare la ghiera (10.2) e pulire il filtro
(10.1) dalle impurità.
Rimontare procedendo nel senso inverso assicurando-
si di posizionare correttamente la guarnizione (10).
PULIZIA DEL MISCELATORE
Superfici: le superfici cromate sono sensibili a deter-
genti anti-calcare, acidi o abrasivi. Le superfici colorate
sono verniciate con una speciale laccatura a fuoco e
non devono essere in nessun caso pulite con detergen-
ti acidi, abrasivi o contenenti alcool. Pulire solo con ac-
qua e un panno morbido. Qualora non si osservassero
queste istruzioni decadrebbero i diritti
FI

Other Franke Plumbing Product manuals

Franke CRYSTAL SEMI-PRO FFPD4600 User manual

Franke

Franke CRYSTAL SEMI-PRO FFPD4600 User manual

Franke F3SM1005 User manual

Franke

Franke F3SM1005 User manual

Franke FFPD100 SERIES User manual

Franke

Franke FFPD100 SERIES User manual

Franke SIRIUS CA210/2N User manual

Franke

Franke SIRIUS CA210/2N User manual

Franke FF 5000 SERIES User manual

Franke

Franke FF 5000 SERIES User manual

Franke F5SV1001 User manual

Franke

Franke F5SV1001 User manual

Franke F5SV1002 User manual

Franke

Franke F5SV1002 User manual

Franke WASHINO-3 SANW215 User manual

Franke

Franke WASHINO-3 SANW215 User manual

Franke FFP S700 SERIES User manual

Franke

Franke FFP S700 SERIES User manual

Franke AQUA501 User manual

Franke

Franke AQUA501 User manual

Franke Eos Neo TA9600 Manual

Franke

Franke Eos Neo TA9600 Manual

Franke F3SM2004 User manual

Franke

Franke F3SM2004 User manual

Franke UNJ-FW-304 User manual

Franke

Franke UNJ-FW-304 User manual

Franke AQFU0240 2030064986 User manual

Franke

Franke AQFU0240 2030064986 User manual

Franke DVS Series User manual

Franke

Franke DVS Series User manual

Franke Triflow Professional Trend User manual

Franke

Franke Triflow Professional Trend User manual

Franke PLANAR 8 User manual

Franke

Franke PLANAR 8 User manual

Franke SIRIUS BS313N User manual

Franke

Franke SIRIUS BS313N User manual

Franke CUBE FFPD3350 User manual

Franke

Franke CUBE FFPD3350 User manual

Franke EOS FFT3350 User manual

Franke

Franke EOS FFT3350 User manual

Franke F5 F5LT1010 User manual

Franke

Franke F5 F5LT1010 User manual

Franke FAID0002 User manual

Franke

Franke FAID0002 User manual

Franke 7612982104701 User manual

Franke

Franke 7612982104701 User manual

Franke F5LM2003 User manual

Franke

Franke F5LM2003 User manual

Popular Plumbing Product manuals by other brands

Toto SW204312 installation guide

Toto

Toto SW204312 installation guide

Imi Heimeier Vekolux Installation and operating instructions

Imi Heimeier

Imi Heimeier Vekolux Installation and operating instructions

Price Pfister 01-801 manual

Price Pfister

Price Pfister 01-801 manual

Kohler K-3393 Homeowner's guide

Kohler

Kohler K-3393 Homeowner's guide

JADO Borma 814 707 Series installation instructions

JADO

JADO Borma 814 707 Series installation instructions

American Standard BERWICK 7430.801 installation instructions

American Standard

American Standard BERWICK 7430.801 installation instructions

Blanco 1-1/2 Reverse Bowl Undermount 513-619 specification

Blanco

Blanco 1-1/2 Reverse Bowl Undermount 513-619 specification

Pfister Contempra LG49-NC1C Quick installation guide

Pfister

Pfister Contempra LG49-NC1C Quick installation guide

Moen Brushed Nickel 6600BN Illustrated parts list

Moen

Moen Brushed Nickel 6600BN Illustrated parts list

BELLOSTA M-uno 8903 Installation instruction

BELLOSTA

BELLOSTA M-uno 8903 Installation instruction

Zline Apollo FSNZ Installation guide and user's manual

Zline

Zline Apollo FSNZ Installation guide and user's manual

Glacier bay GBFA004 installation manual

Glacier bay

Glacier bay GBFA004 installation manual

Hans Grohe AXOR Uno 38113000 Instructions for use/assembly instructions

Hans Grohe

Hans Grohe AXOR Uno 38113000 Instructions for use/assembly instructions

Oras Electra 6661FTX Installation and maintenance guide

Oras

Oras Electra 6661FTX Installation and maintenance guide

Porcelanosa KRION NEST0 PRE-INSTALLATION AND INSTALLATION MANUAL

Porcelanosa

Porcelanosa KRION NEST0 PRE-INSTALLATION AND INSTALLATION MANUAL

American Standard Metering 024220-0070A parts list

American Standard

American Standard Metering 024220-0070A parts list

American Standard Colony Soft T675.500 installation instructions

American Standard

American Standard Colony Soft T675.500 installation instructions

Oras Electra 6517A Installation and maintenance guide

Oras

Oras Electra 6517A Installation and maintenance guide

manuals.online logo
manuals.online logoBrands
  • About & Mission
  • Contact us
  • Privacy Policy
  • Terms and Conditions

Copyright 2025 Manuals.Online. All Rights Reserved.