manuals.online logo
Brands
  1. Home
  2. •
  3. Brands
  4. •
  5. Freelap
  6. •
  7. Transmitter
  8. •
  9. Freelap PowerUnit User manual

Freelap PowerUnit User manual

• To trigger the start, make a loud sound (e.g. clap or gunshot) close to the transmitter
(within approx. 1m for an optimal detection).
• When the transmitter detects the sound signal, it instantly triggers the start of the
transponder timer. The green MIC led flashes to indicate that the start has been
triggered.
7. Trigger the start
The PowerUnit has a 3.7V 5AH LiPo rechargeable battery.
•Low battery indicator: When the battery is low, the PWR led flashes red.
•Recharging the battery:
- Connect the USB port of the power cable (supplied) to a USB socket. Unscrew the
sealing cap from CHG port and connect the power cable to the CHG port.
- It is recommended to make complete charges (charging time: 10h).
- When the battery is fully charged, the device has a battery life of 50h.
- The PowerUnit has an automatic shutdown function (after 12h), to save the battery.
Further information
Battery and battery life
• Weight: 700 g
• Dimensions: PowerUnit 75 x 140 x 25 mm / SpaceUnit: Diameter 65 cm
• Compatibility: FxChip / FxChip BLE
• Transmitter with 2 modes: Tx / Mic
• Transmitter with 3 codes: START / LAP / FINISH
• Detection field: 6 m
• Minimum time between 2 transmitters: 0,7 s
• Accuracy: 2/100 of a second
• Water resistance: IP67
• Operating temperatures: -20°C to +50°C
Technical sheet
PowerUnit & SpaceUnit
V220623






   
Find our FAQ (Frequently Asked Questions), as well as other manuals and user guides,
on our website at: www.freelap.com/support
If you cannot find the answers to your questions, please contact your Freelap dealer.
Find the list of Freelap dealers at: www.freelap.com/freelap-contact
The PowerUnit & SpaceUnit are guaranteed 2 years. If you have any questions or if
you need assistance with your device, please contact your Freelap dealer.
Technical support
After-sales service & warranty
FREELAP SA
Av. D.-Jeanrichard 2A CH-2114 Fleurier – Switzerland
+41 32 861 52 42 - www.freelap.com
@freelap
50.80 m0 m 100.80 m
1
3
4
5
6
7
8
About the PowerUnit & SpaceUnit
Use of the PowerUnit & SpaceUnit
PowerUnit is the start transmitter specially designed for sounds starts. Thanks to its
microphone, it starts the transponder's timer as soon as it detects a noisy sound nearby
(such as a clap or a gunshot). It is associated with an antenna flag, the SpaceUnit,
which provides a wider detection zone (6m), and lets trigger the start on up to 8 lanes.
1. Prerequisites
PowerUnit & SpaceUnit transmitter is a part of the Freelap timing system. To get your
timing data, you must attach the transponder(s) to the athlete(s) and use the
MyFreelap app (cf corresponding user manuals).
2. Get to know the PowerUnit
• Take the SpaceUnit out of its packaging, the ellipse will take shape itself.
• Join the 2 central axes, fitting them together to stiffen the structure.
• Press 2s on the Power button to turn on the transmitter.
• Press on the Set button to select the MIC mode. Each press of the Set button
switches you to the next mode. The LED of the MIC mode must flash. The START led
automatically lights up to indicate that the transmitter is set as a START transmitter.
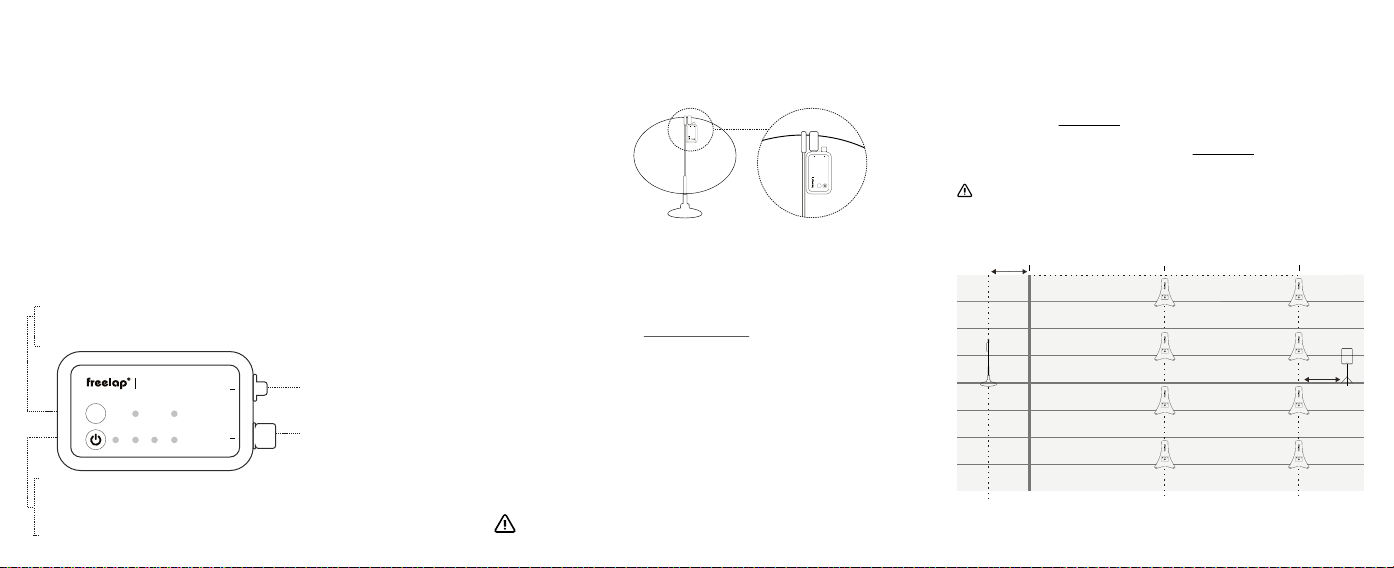
• Place the transmitter on the ground, at a distance of 2 meters behind the start line.
• The Freelap logo must face toward the start line.
• If you time on 8 lanes, place the transmitter between lanes n°4 and n°5.
Power button: To turn on/off the transmitter
Set button: To select MIC mode
PWR led: Indicates if the device is on (green) or if the battery is low (red)
Tx / Mic Leds : Indicate on which mode the transmitter is set
START / LAP / FINISH leds: Indicate on which code the transmitter is set
Tx: To connect the
PowerUnit to the SpaceUnit
CHG port: To charge the
device
3. Install the PowerUnit & SpaceUnit
5. Place the PowerUnit & SpaceUnit
4. Turn on and set the PowerUnit
Placing the transmitter at any other location or position may result in
inaccuracies or non-detection.
6. Associate it with other Freelap transmitters
• The transmitters must be minimum 0.7 second appart.
• Your track must contain a maximum of 11 transmitters.
> Example: Time 100m (2x50m) - 8 athletes :






   






   
• Connect the SpaceUnit to
the Tx port of the PowerUnit.






   
Tx Junior Pro
code FINISH
Tx Junior Pro
code LAP
(optional)
PowerUnit &
SpaceUnit
To make Freelap timing system work, you must have a transmitter set with the code
FINISH on your track.
PowerUnit is a START transmitter.
• You must add 1 FINISH transmitter (e.g: 1 Tx Junior Pro transmitter set with the
code FINISH), placed 80cm AFTER the desired distance.
• You can add more Freelap transmitters (e.g: 1 Tx Junior Pro transmitter set with the
code LAP to get intermediate LAP times), placed 80cm AFTER the desired distance.
PWR START LAP FINISH
2
Mobile
device
50m max
2 m

This manual suits for next models

1

Other Freelap Transmitter manuals

Freelap TX GATE PRO User manual

Freelap

Freelap TX GATE PRO User manual

Freelap TX H2O PRO User manual

Freelap

Freelap TX H2O PRO User manual

Freelap Tx Track Pro User manual

Freelap

Freelap Tx Track Pro User manual

Freelap TX TOUCH PRO User manual

Freelap

Freelap TX TOUCH PRO User manual

Freelap Tx Gate Pro User manual

Freelap

Freelap Tx Gate Pro User manual

Freelap TX TRACK PRO User manual

Freelap

Freelap TX TRACK PRO User manual

Freelap TX JUNIOR PRO User manual

Freelap

Freelap TX JUNIOR PRO User manual

Freelap Tx Pad Pro User manual

Freelap

Freelap Tx Pad Pro User manual

Popular Transmitter manuals by other brands

Altronics A 1107A operating instructions

Altronics

Altronics A 1107A operating instructions

Sonic Alert HomeAware HA360VPT Installation and setup guide

Sonic Alert

Sonic Alert HomeAware HA360VPT Installation and setup guide

Tek-Trol TEK-BAR 3800E quick start guide

Tek-Trol

Tek-Trol TEK-BAR 3800E quick start guide

Delta SDI-60/CAT5 user manual

Delta

Delta SDI-60/CAT5 user manual

Heinrichs KDSE operating manual

Heinrichs

Heinrichs KDSE operating manual

Tek-Trol Tek-Sound 4200B quick start guide

Tek-Trol

Tek-Trol Tek-Sound 4200B quick start guide

ACE RC Kraft Assembling instructions

ACE RC

ACE RC Kraft Assembling instructions

Smarte SLX-TX16 SmartLynx user guide

Smarte

Smarte SLX-TX16 SmartLynx user guide

Data Video HBT-5 instruction manual

Data Video

Data Video HBT-5 instruction manual

Green Brook DW070A instruction manual

Green Brook

Green Brook DW070A instruction manual

HYDACELECTRONIC HLT 2150-R1 operating instructions

HYDACELECTRONIC

HYDACELECTRONIC HLT 2150-R1 operating instructions

Abus FU8305 user guide

Abus

Abus FU8305 user guide

Hotspot HSV8112W user manual

Hotspot

Hotspot HSV8112W user manual

Fire-Lite H350 Installation and maintenance instructions

Fire-Lite

Fire-Lite H350 Installation and maintenance instructions

Rf-t Safe Place Baby Check user guide

Rf-t

Rf-t Safe Place Baby Check user guide

Abus Funk-Notrufsender manual

Abus

Abus Funk-Notrufsender manual

Delta OHM HD45 17V operating manual

Delta OHM

Delta OHM HD45 17V operating manual

Evikon PluraSens E2218 user manual

Evikon

Evikon PluraSens E2218 user manual

manuals.online logo
manuals.online logoBrands
  • About & Mission
  • Contact us
  • Privacy Policy
  • Terms and Conditions

Copyright 2025 Manuals.Online. All Rights Reserved.