2 3 4 5
1
6
Congratulations on the purchase of your Tx Track Pro transmitter ! This
device has been designed to be convenient and simple to use. In this guide
you will find all the information about how it works.
OVERALL FUNCTIONING
1
USE OF YOUR TX TRACK PRO
2
YOUR TX TRACK PRO
Your Tx Track Pro is the versatile transmitter with large detection field of
the Freelap system. The Tx Track Pro can be quickly set as start, lap, or
finish transmitter. Thus, it lets you get both your lap times and your split
times. It emits a magnetic field automatically detected by your transpon-
der during its passage.
PREREQUISITES
Your Tx Track Pro transmitter is part of the Freelap system. In order to
make it work, you must attach transponder(s) to the athlete(s) and use
the MyFreelap app (consult the corresponding user manuals for more
details).
ASSOCIATE THE TX TRACK PRO WITH OTHER
FREELAP TRANSMITTERS
To make Freelap system work, you must have a transmitter set with the
code "Finish" on your track.
The Tx Track Pro is a versatile transmitter, so you can use several Tx
Track Pro on your track (set as start, lap or finish transmitter).
You can also use it in combination with other Freelap transmitters (e.g.
: you can use the Tx Gate Pro transmitter as start transmitter for skiing).
Transmitters must be spaced at least 10m apart, with a minimum time
of 0.7 second.
/! \ Your FxChip and FxChip BLE transponders have a temporary memory
of 10 Laps. It means that your track must contain a maximum of 11
transmitters.
BUTTON, LEDS AND PORT
OF THE TX TRACK PRO
TURNING ON AND SET YOUR TX TRACK PRO
• To turn on the transmitter simply press the central "ON" button for 1
second.
• Once the transmitter is on, press the central button again to select the
desired code (Start = for start transmitter/ Lap = for intermediate transmit-
ter/ Finish = for finish transmitter). Each press of the central button
switches you to the next code. The LED of the selected code flashes.
PLACE YOUR TX TRACK PRO ON THE TRACK
• Place the Tx Track Pro on the ground.
The transmitter has a detection field of 3.5m on each side, it must be
placed as follows:
• This transmitter has the shape of an arrow. Place the transmitter at the
side of the track, pointing the front of the arrow toward the track. The
direction of the arrow indicates an imaginary line of passage.
• Place the transmitter at the side of the track, at less than 3.5m of the
athlete's passage (so that the transponder of the athlete crosses the
detection field).
• It can be placed inside a slalom gate and on arrival. It can also be placed
under the snow in the middle of the finish area to increase the detection
field (7 meters).
> LEDS :
2. PWR : indicates that the device is on, and turns red when the battery is
low.
3. START : indicates that the transmitter is set as “Start” transmitter.
4. LAP : indicates that the transmitter is set as “Lap” transmitter.
5. FINISH : indicates that the transmitter is set as “Finish” transmitter.
> BUTTON :
1. ON/OFF BUTTON : To turn on /
off the transmitter, and set the
desired code (start / lap / finish). /! \ Placing the transmitter at any other location or position may result
in inaccuracies or non-detection.
> PORT :
6. USB : to charge the device.
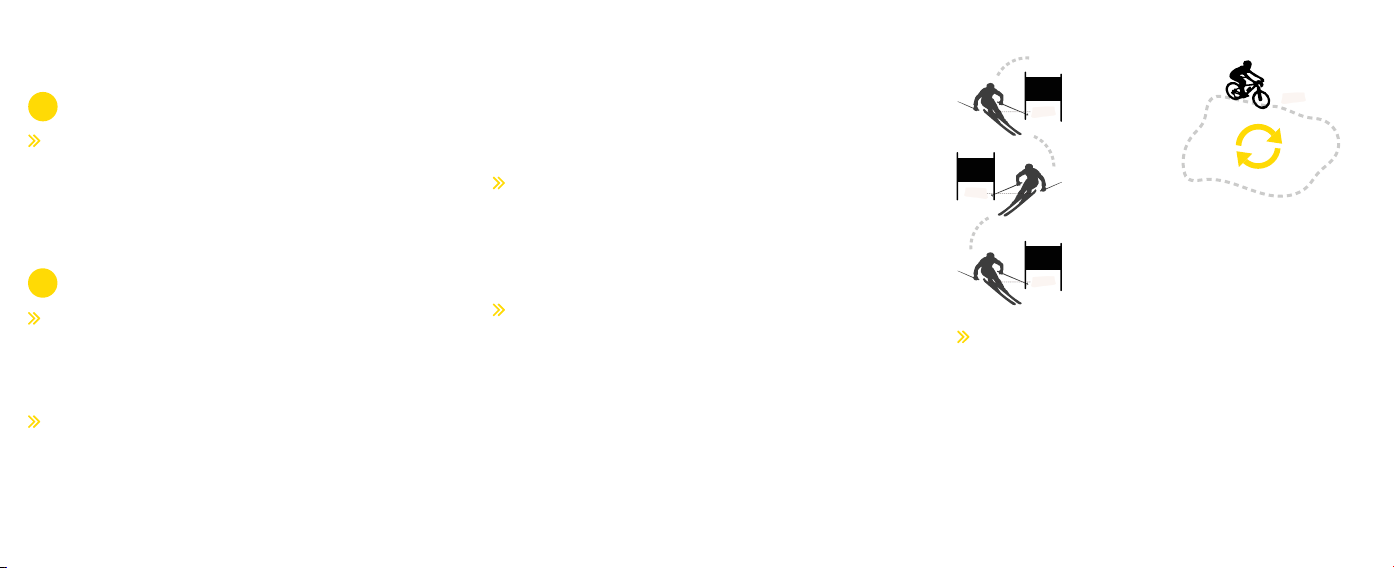
Example for ski / standard system : Example for MTB / system in loop :
START
LAP
FINISH
FINISH
To get your lap times in a loop system,
only 1 transmitter with the code "Finish"
is enough.
To take the start, stay 5 seconds in the
transmitter detection field and start
the race.


