Freestyle Lite User manual

Blood Glucose Monitoring System
Sistema de Control de Glucosa en la Sangre
ART22813-003_rev-A.indd 1
Owner’s Booklet
Manual del Usuario
11/9/16 1:28 PM

i
Sample Areas (dark-colored half-circles on test strip)
Apply blood or control solution to one sample
area only. Insert strip into the meter printed side
up (see image to the right).
c (Configure) Button
• Marks a control solution test
• Scrolls forward
• Displays clock
• Silences a reminder alarm
Bottom
FreeStyle Lite test strip
Sample area
Top
Data Port
Downloads test results. Requires
a compatible data management
system. For more information,
please go to our website or
contact Customer Care.
Display Screen
Displays your test results and other
important information.
m (Mode) Button
• Moves to different mode settings
• Scrolls backward
• Silences a reminder alarm
Light Button
Controls the display backlight and test
strip port light
.
The FreeStyle Lite® Meter and How It Works
Test Strip Port
Insert the Top end of a new
FreeStyle Lite® test strip here.
The meter powers on when
you insert the test strip.
System Check Screen
This display always appears when the meter
is turned on. You should check that your
meter matches the example exactly
every time your meter turns on. Do
not use the meter if the display
check screen does not exactly match the example.
If the screen does not match, the meter may show
an incorrect result. Please contact Customer Care.
English
ART22813-003_rev-A.indd 2-1 1:28 PM11/9/16

English
English
Table of Contents
ART22813-003_rev-A.indd 2-3
The FreeStyle Lite® Meter and How It Works . . . . . . . . . . . . . . . . . . . . . . . . . . . . . . . . . .i
Important Information About Your Blood Glucose Monitoring System. . . . . . 1
Intended Use . . . . . . . . . . . . . . . . . . . . . . . . . . . . . . . . . . . . . . . . . . . . . . . . . . . . . . . . . . . . . . . . . 1
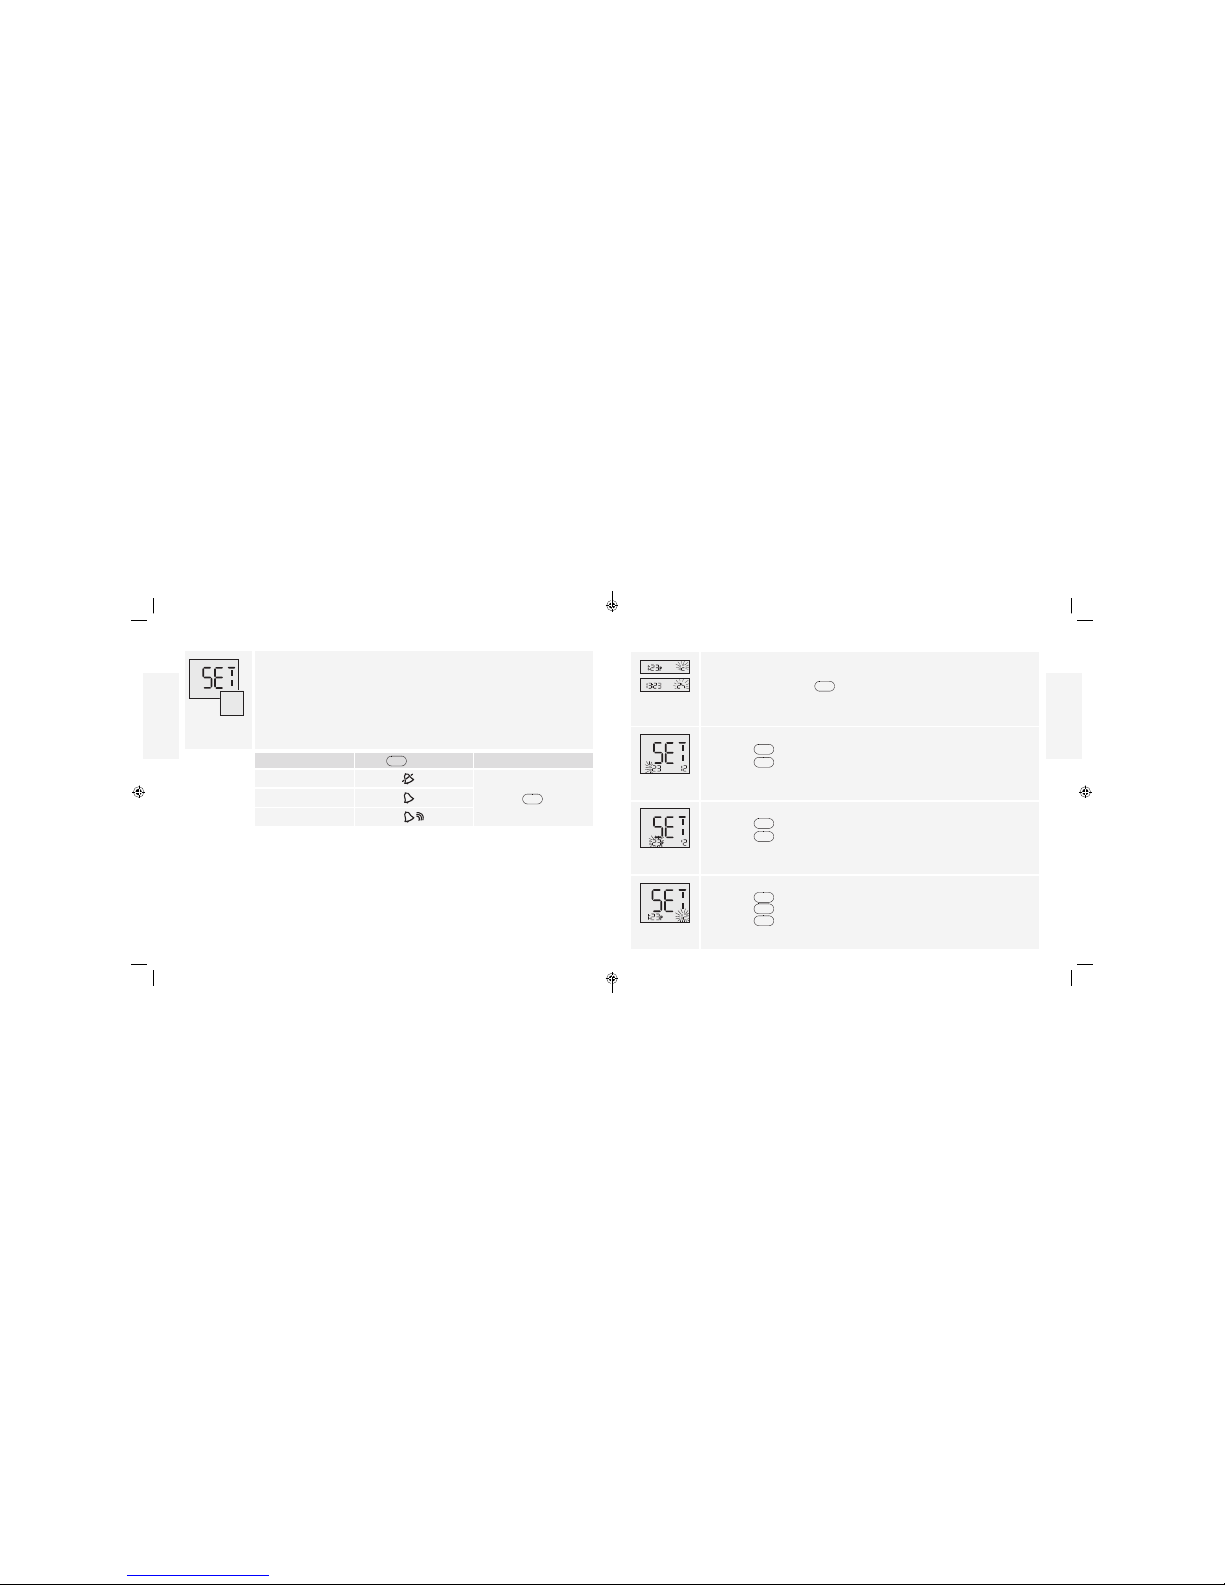
Setting Up the Meter ........................................................4
Purpose .......................................................................4
Set Sound Volume .............................................................5
Set Time.......................................................................6
Set Date.......................................................................7
Using Meter Lights . . . . . . . . . . . . . . . . . . . . . . . . . . . . . . . . . . . . . . . . . . . . . . . . . . . . . . . . . . . . 9
Testing Your Blood Glucose . . . . . . . . . . . . . . . . . . . . . . . . . . . . . . . . . . . . . . . . . . . . . . . . .10
Purpose ......................................................................10
Prepare to Test . . . . . . . . . . . . . . . . . . . . . . . . . . . . . . . . . . . . . . . . . . . . . . . . . . . . . . . . . . . . . . .10
Important Test Strip Information ..............................................12
Performing a Blood Glucose Test . . . . . . . . . . . . . . . . . . . . . . . . . . . . . . . . . . . . . . . . . . . . . .13
Understanding Blood Glucose Test Results . . . . . . . . . . . . . . . . . . . . . . . . . . . . . . . . . 15
Low and High Blood Glucose Results ..........................................16
Error Codes .................................................................19
Troubleshooting . . . . . . . . . . . . . . . . . . . . . . . . . . . . . . . . . . . . . . . . . . . . . . . . . . . . . . . . . . . . 22
FreeStyle® Control Solution. . . . . . . . . . . . . . . . . . . . . . . . . . . . . . . . . . . . . . . . . . . . . . . . . 24
Purpose ......................................................................24
Control Solution Information . . . . . . . . . . . . . . . . . . . . . . . . . . . . . . . . . . . . . . . . . . . . . . . . .24
Out of Range Control Solution Results.........................................25
Performing a Control Solution Test ............................................26
Using Your Meter Memory ..................................................29
Purpose ......................................................................29
Viewing Blood Glucose Averages in Memory ..................................29
Viewing Test Results in Memory ...............................................30
Setting Reminder Alarms (optional) . . . . . . . . . . . . . . . . . . . . . . . . . . . . . . . . . . . . . . . . 31
Purpose ......................................................................31
Transferring Test ResultsTo a Computer . . . . . . . . . . . . . . . . . . . . . . . . . . . . . . . . . . . . . . .32
Maintaining the Meter......................................................33
Replacing the Battery.........................................................33
Cleaning and Disinfecting the Meter and Lancing Device ......................35
Specications. . . . . . . . . . . . . . . . . . . . . . . . . . . . . . . . . . . . . . . . . . . . . . . . . . . . . . . . . . . . . . . 40
Denition of Symbols. . . . . . . . . . . . . . . . . . . . . . . . . . . . . . . . . . . . . . . . . . . . . . . . . . . . . . . 42
11/9/16 1:28 PM

Caution: Please read all the instructions provided in this owner’s booklet and practice
the testing procedures before using the FreeStyle Lite® system. Blood glucose monitoring
should be done with the guidance of a healthcare professional.
3American Diabetes Association. (2015). 2. Classication and Diagnosis of Diabetes. Diabetes Care, 38(Supplement 1), S8-S16.
English
English
Contact Customer CareToll Free at 1-888-522-5226 www.MyFreeStyle.com
1
Important Information About Your Blood Glucose Monitoring System
Intended Use
The FreeStyle Lite Blood Glucose Monitoring System is intended for self-testing outside the body (in
vitro diagnostic use) by people with diabetes at home as an aid in monitoring the eectiveness of a
diabetes control program by quantitatively measuring glucose in fresh whole blood from the nger,
upper arm and palm. The FreeStyle Lite Blood Glucose Monitoring System should not be used for the
diagnosis of or screening of diabetes or for neonatal use. It is intended to be used by a single person
and should not be shared. Alternate site testing should be done only during steady state times (when
glucose is not changing rapidly). The FreeStyle Lite Blood Glucose Test Strips are for use with the
FreeStyle Lite Blood Glucose Meter to quantitatively measure glucose (sugar) in fresh capillary whole
blood samples drawn from the ngertips, upper arm and palm.
IMPORTANT:
The device must not be used on more than one person including other family members due to the
risk of spreading infection. All parts of the device and its accessories are considered biohazardous
and can potentially transmit infectious diseases, even after performing the cleaning procedure.1,2
If the meter is being operated by a second person who is providing testing assistance to the user,
the meter and lancing device should be cleaned and disinfected prior to use by the second person.
Use only FreeStyle Lite test strips and FreeStyle® control solution with this meter. Other products
can produce inaccurate results.
1“FDA Public Health Notication: Use of Fingerstick Devices on More than One Person Poses Risk for Transmitting Bloodborne
Pathogens: Initial Communication” (2010) http://www.fda.gov/MedicalDevices/Safety/AlertsandNotices/ucm224025.htm.
2“CDC Clinical Reminder: Use of Fingerstick Devices on More than One Person Poses Risk for Transmitting Bloodborne Pathogens”
(2010) http://www.cdc.gov/injectionsafety/Fingerstick-DevicesBGM.html
ART22813-003_rev-A.indd 1-2
• The expected glucose level for a non-diabetic, non-pregnant fasting adult is under
100 mg/dL.3
• Two hours after meals, levels should be less than 140 mg/dL.3
• Consult your healthcare professional to determine the range that is appropriate for you.
Warning:
• Test on your ngers if you are testing for low blood glucose (hypoglycemia) or if you suer
from hypoglycemia unawareness.
• This system contains small parts that may be dangerous if swallowed.
11/9/16 1:28 PM
2

1. With the meter o, press and hold
m
for 3seconds until appears.
2. Press
m
to bypass setting the optional reminder alarms. You may choose to
set these later (see Setting Reminder Alarms section).
4 Atkins SH, Dasmahapatra A, Jaker MA, Chorost MI, Reddy S: Fingerstick glucose determination in shock. Ann Int Med 114: 1020-
1024. 1991.
5 Sandler M, Low-Beer T: Misleading capillary glucose measurements. Practical Diabetes 7: 210. 1990.
6 Wickham NWR, Achar KN, Cove DH: Unreliability of capillary blood glucose in peripheral vascular disease. Practical Diabetes 3: 100. 1986.
Setting Up the Meter
English
English
Contact Customer CareToll Free at 1-888-522-5226 www.MyFreeStyle.com
Limitations:
• For in-vitro diagnostic use only (external use only).
• Not for diagnosis of or screening for diabetes.
• Not for testing of neonates.
• The test strips are for single use only. Do not reuse test strips.
• The system can give false results greater than 10,000 feet (3,048 meters) above sea level.
• The system can give false results outside the hematocrit range: 15% to 65%.
• Individuals experiencing a hypoxia state may yield falsely low results.
• In situations of decreased peripheral blood ow, capillary blood testing may not be
appropriate as it may not represent the true physiological state. Examples would include but
are not limited to: severe dehydration caused by diabetic ketoacidosis or the hyperosmolar
non-ketotic state, hypotension, shock, or peripheral vascular disease.4, 5, 6
• This device should not be used to test critically ill patients.
• Alternative site testing (AST) should not be used to calibrate continuous glucose monitors
(CGMs) nor for use in insulin dose calculations.
• AST testing should only be done during steady-state times (when glucose is not changing rapidly).
• For single patient use at home by a lay user.
• Severe dehydration or excessive water loss may cause false low results. If you believe you are
suering from severe dehydration, consult your physician immediately.
• Cholesterol up to 500 mg/dL or triglycerides up to 3,000 mg/dL do not signicantly aect test
results. However, glucose values in specimens beyond these levels, should be interpreted with
caution.
Purpose
The purpose of this section is to set the meter sound volume, time and date.
3 4
ART22813-003_rev-A.indd 3-4 1:28 PM11/9/16

Time Format
Note: Your meter can display either the 12-hour (1:23P) or the 24-hour (13:23)
time formats. If you prefer the 12-hour format, there is no “Afor AM. If setting a
PM time, continue to press
c
until you see the“Pdisplayed for PM.
Hour
4. Set hour
• Press
c
to display correct hour
• Press
m
to save
Minutes
5. Set minutes
• Press
c
to display correct minutes
• Press
m
to save
Time Format
6. Set time format
• Press
m
to accept time format or
• Press
c
to change
• Press
m
to save
English
English
Contact Customer CareToll Free at 1-888-522-5226 www.MyFreeStyle.com
Set Sound Volume Set Time
With the sound volume on, your meter will beep when:
• The test strip is full of blood ”
• The test result appears on the display ”
• An error occurs
You may also choose to silence your meter.
3. Set sound volume
If you prefer: Press
c
until you see: Then
No sound
•Press
m
to save
A low beep
A louder beep
5 6
ART22813-003_rev-A.indd 5-6 1:28 PM11/9/16

7 8
Set Date
Note: The date format can display either:
Year Month Day
OR
Year Day Month
Month
The month will ash rst
7. Set month
• Press
c
to display correct month
• Press
m
to save
Day
8. Set day
• Press
c
to display correct day
• Press
m
to save
Date Format
9. Set date format
• Press
m
to accept date format or
• Press
c
to change
• Press
m
to save
Year
10. Set year
• Press
m
to accept year or
• Press
c
to change
• Press
m
to save
11. Press and hold
m
for 3seconds until meter turns o. Meter set up is
complete.
English
English
Contact Customer CareToll Free at 1-888-522-5226 www.MyFreeStyle.com
ART22813-003_rev-A.indd 7-8 1:28 PM11/9/16

1. Select your test site.
Note: Avoid moles, veins, bones, and tendons. Bruising may occur at the test site. If bruising occurs,
consider selecting another site.
There are dierences in testing on ngers versus alternative sites.
Warning:
Test on your ngers if you are testing for low blood glucose (hypoglycemia) or if you suer from
hypoglycemia unawareness.
Check for low blood glucose when:
• You feel symptoms such as weakness, sweating, shakiness, headache, or confusion
• You eat a delayed meal after taking insulin
• You are following your healthcare professional’s advice
Testing Your Blood Glucose
English
English
Contact Customer CareToll Free at 1-888-522-5226 www.MyFreeStyle.com
Using Meter Lights
You can light the display screen or test strip port by pressing on meter when Purpose
the meter is turned on. The purpose of this section is to produce an accurate blood glucose test result.
To light your display backlight, press Prepare to Test
The light turns o:
• When you press again
• After 10 seconds of inactivity
To light the test strip port after you’ve inserted the test strip, press
The light turns o:
• When you press again
• After 60 seconds of inactivity
• When the test strip is lled
• When the test strip is removed from the meter
9 10
ART22813-003_rev-A.indd 9-10 1:28 PM11/9/16

Warning: Drying agents in the test strip vial may be harmful if inhaled or
swallowed and may irritate skin and eyes.
English
English
Contact Customer CareToll Free at 1-888-522-5226 www.MyFreeStyle.com
11
IMPORTANT:
2. Wash your hands and the test site with warm water and soap to ensure
accurate results.
• Thoroughly dry your hands and the test site.
• Do not use lotion or cream on the test site.
3. Check test strip expiration date.
Do not use expired test strips; they may produce inaccurate results.
IMPORTANT: Use only FreeStyle Lite® test strips. Other test strips can
produce inaccurate results. The test strips are for single use only.
ART22813-003_rev-A.indd 11-12
Important Test Strip Information
Please read the FreeStyle Lite® test strip package insert for more information.
• Use the test strips within the meter’s operating range: 40° – 104° F (4° – 40° C).
• Store test strips in a cool, dry place between 40° – 86° F (4° – 30° C).
• Store test strips away from direct sunlight and heat.
• Store test strips in their original vial only.
• Clean and dry your hands before removing a strip from the vial.
• Close the vial cap tightly immediately after removing a test strip.
• Do not transfer test strips to another container.
• Do not store test strips outside the vial.
• Do not bend, cut, or alter test strips.
• Do not apply blood to both sides of the test strip.
• Do not press the test strip against the test site.
• Do not scrape the blood onto the test strip.
• Do not apply blood to the at side of the test strip.
• Do not apply blood to the test strip when the test strip is out of the meter.
• Do not put blood or foreign objects into the meter.
11/9/16 1:28 PM
12

5. Apply and hold blood to 1 sample area of the test strip until:
• You see short lines moving clockwise on the display or
• You hear a beep
This indicates the test strip obtained enough blood and the meter is checking
your glucose level. If a short line does not appear after 5 seconds, the sample may
be too small. You can add blood to the same side only for up to 60 seconds. If the
test does not start after applying blood drop, go to Troubleshooting section.
(Example only)
6. View result
The result appears on the display when the test is complete. The time that the
meter takes to display a result depends on your blood glucose level. Higher
glucose levels require more time.
Note: If you see an“Er1, Er2, Er3, or Er4” on the display, it is an error code. Go to
Error Codes section.
7. Remove test strip to turn meter o.
Discard used lancet and test strip properly.
8. Wash your hands and test site thoroughly with warm water and soap after
handling the meter, lancing device or test strips.
English
English
Contact Customer CareToll Free at 1-888-522-5226 www.MyFreeStyle.com
Performing a Blood Glucose Test
1. Remove test strip from vial. Top
2. Insert test strip to turn meter on.
Note: The meter turns o after 2 minutes of inactivity. Printed side up
Remove and reinsert the unused test strip to restart
the meter.
Sample areas
If the meter does not turn on, go to Troubleshooting section.
3. Conrm System Check Screen.
• This display appears when you turn on the meter. Do not use the meter if
the display check screen does not exactly match the example. Contact
Customer Care.
• See The FreeStyle Lite® Meter and How It Works section for more information.
• If the system check screen does not appear, go to Troubleshooting section.
4. Obtain a blood drop.
When the and appears, use the lancing device to obtain a blood drop.
(See FreeStyle® lancing device insert for instructions.)
The test strip requires only a 0.3 microliter of blood for accurate results.
13 14
ART22813-003_rev-A.indd 13-14 1:28 PM11/9/16

Result What It Means What To Do
lower than
60 mg/dL
Low (hypoglycemic) Repeat the test with a new test strip, even if you do
not feel that you have low blood glucose.
If your blood glucose result is still not consistent with
your symptoms, contact your healthcare professional
and follow his or her treatment advice.
higher than
240 mg/dL
High (hyperglycemic) Repeat the test with a new test strip, even if you do
not feel that you have high blood glucose.
If your blood glucose result is still not consistent with
your symptoms, contact your healthcare professional
and follow his or her treatment advice.
English
English
Contact Customer CareToll Free at 1-888-522-5226 www.MyFreeStyle.com
Understanding Blood Glucose Test Results Low and High Blood Glucose Results
The meter displays results in mg/dL. The unit of measurement is preset. You cannot change
this setting.
IMPORTANT: The meter displays results from 20 – 500 mg/dL. Low or
high blood glucose results can indicate a potentially serious medical
condition.
15 16
ART22813-003_rev-A.indd 15-16 1:28 PM11/9/16

IMPORTANT:
• Severe dehydration may cause false low results. If you believe you are suering
from severe dehydration, contact your healthcare professional immediately.
• Contact your healthcare professional if you have symptoms that do not match
your test result, and you have followed the instructions in this owner’s booklet.
English
English
Contact Customer CareToll Free at 1-888-522-5226 www.MyFreeStyle.com
17
Follow your healthcare professional’s
advice to treat low blood glucose.
If your blood glucose result does
not match how you feel, perform a
control solution test to conrm that
your meter and strips are working
properly.
Display What It Means Symptoms What To Do
Appears when
result is:
lower than
20 mg/dL
Severe low blood
glucose
Weakness
Sweating
Shakiness
Headache
Confusion
ART22813-003_rev-A.indd 17-18
Follow your healthcare professional’s
advice to treat high blood glucose.
If your blood glucose result does
not match how you feel, perform a
control solution test to conrm that
your meter and strips are working
properly.
Display What It Means Symptoms What To Do
Appears when
result is:
higher than
500 mg/dL
Severe high blood
glucose
Fatigue
Thirst
Excess Urination
Blurry Vision
11/9/16 1:28 PM
18

Message What It Means What To Do
• There may be a problem
with the test strip
• Meter error
• Very high blood glucose
higher than 500 mg/dL
• HIGH control solution
was applied when the
temperature was too
cold. (Applies only to
control solution labeled
as HIGH).
1. Follow your healthcare professional’s advice to
treat high blood glucose if you have symptoms
such as:
•Fatigue •Thirst
•Excess urination •Blurry vision
2. Perform a control solution test using a new
test strip. If the test results are within the range
printed on the test strip vial, retest using blood
and a new test strip.
3. If the control solution result is out of range or the
error reappears, contact Customer Care.
lower than 20 mg/dL
English
English
Contact Customer CareToll Free at 1-888-522-5226 www.MyFreeStyle.com
Error Codes
Message What It Means What To Do
• The sample is too small
• There may be a problem
with the test strip
• Meter error
• Very low blood glucose
1. Follow your healthcare professional’s advice to
treat low blood glucose if you have symptoms
such as:
•Weakness •Shakiness
•Sweating •Headache
•Confusion
2. Perform a control solution test using a new
test strip. If the test results are within the range
printed on the test strip vial, retest using blood
and a new test strip.
3. If the control solution result is out of range or the
error reappears, contact Customer Care.
19 20
ART22813-003_rev-A.indd 19-20 1:28 PM11/9/16

1.The meter
does not
enter test
mode after
inserting a
test strip.
• Test strip is inserted
upside down, or bottom
end in, or not fully
inserted into the meter
1. Insert test strip print side up, top end in.
• No battery is installed
• Battery is installed
incorrectly
1. Install battery with (+) facing up.
• Dead battery 1. Replace battery. Reset date and time, if
necessary.
2. If meter still does not enter test mode,
contact Customer Care.
• Defective test strip or
meter
• Blood or foreign objects
put in the test strip port
1. Contact Customer Care.
English
English
Contact Customer CareToll Free at 1-888-522-5226 www.MyFreeStyle.com
21-22 1:29 PM
21 22
Message What It Means What To Do
• Incorrect test procedure.
For example, putting
blood on the test strip
before inserting it into
the meter or applying
blood before and
appear
• There may be a problem
with the test strip
• Meter error
1. Wait for and to appear before applying
blood or control solution.
2. Perform a control solution test using a new
test strip. If the test results are within the range
printed on the test strip vial, retest using blood
and a new test strip.
3. If the control solution result is out of range or the
error reappears, contact Customer Care.
• There may be a problem
with the test strip
• Meter error
1. Perform a control solution test using a new
test strip. If the test results are within the range
printed on the test strip vial, retest using blood
and a new test strip.
2. If the control solution result is out of range or the
error reappears, contact Customer Care.
Troubleshooting
What It Means What To Do
11/9/16ART22813-003_rev-A.indd

IMPORTANT: Control solution results should fall within the control
solution range printed on the test strip vial. Do not use this range
when testing blood glucose.
English
English
Contact Customer CareToll Free at 1-888-522-5226 www.MyFreeStyle.com
23
What It Means What To Do
2.The test
does not
start after
applying
the blood
drop.
• Blood drop is too small 1. Add blood to the same sample area within
60 seconds, or repeat the test using a new
test strip and a larger blood drop.
• Defective test strip
• Sample applied after
meter turns o
1. Repeat the test using a new test strip. Wait for
and to appear before applying blood or
control solution.
2. If problem persists, contact Customer Care.
• Defective meter 1. Contact Customer Care.
23-24ART22813-003_rev-A.indd
FreeStyle® Control Solution
Purpose
FreeStyle control solution is a red liquid that contains a xed amount of glucose.
The purpose of doing a control solution test is:
• To practice testing without using your own blood
• To conrm that the meter and test strips work together properly
• When you are unsure of your blood glucose test results
Contact Customer Care for information on how to obtain control solution.
Control Solution Information
• Use only FreeStyle control solution with the meter.
• Replace the cap securely on the bottle immediately after use.
• Control solution results are accurate only between 59° – 104° F (15° – 40° C).
• Do not add water or other liquid to control solution.
• There are three levels of control solution available (Low, Normal, High).
For information on how to obtain control solution, contact Customer Care.
11/9/16 1:29 PM
24

IMPORTANT: Do not use control solution past expiration date. Discard
control solution 3 months after opening or on the expiration date
printed on the bottle whichever comes rst. (Example: open April 15,
discard July 15; write the discard date on the side of the bottle.)
Top
Printed side up
Sample areas
English
English
Contact Customer CareToll Free at 1-888-522-5226 www.MyFreeStyle.com
25
Out of Range Control Solution Results
• Repeat the test if control solution results are outside the range printed on
the test strip vial.
• Stop using the meter if control solution results are consistently outside the
range printed on the test strip vial. Contact Customer Care.
Causes of out-of-range results include:
• Expired or bad control solution
• Expired or bad test strip
• Testing error
• Watered-down control solution
• Meter malfunction
• Test strip deterioration
• Control solution test done outside 59° – 104° F (15° – 40° C)
ART22813-003_rev-A.indd 25-26
Performing a Control Solution Test
1. Check control solution expiration date.
2. Remove test strip from vial.
3. Insert test strip to turn meter on.
Note: The meter turns o after 2 minutes of inactivity.
Remove and reinsert the unused test strip to restart
the meter.
If the meter does not turn on go to Troubleshooting section.
11/9/16 1:29 PM
26

(Example only)
6. View result.
The result appears on the display when the test is complete.
7. Compare the control solution result to the range printed on the test strip vial.
The result should fall within the range.
Note: If you see an “Er1, Er2, Er3, or Er4”on the display, it is an error code. Go to
Error Codes section.
(Example only)
8. Press and hold
c
for 2seconds until appears on the display to mark the
result as a control solution result.To unmark a control solution test result, press
and hold
c
for 2seconds. A value with the indicates you have marked
this reading as a control solution test.
9. Remove the test strip to turn meter o.
English
English
Contact Customer CareToll Free at 1-888-522-5226 www.MyFreeStyle.com
4. Conrm System Check Screen.
• This display appears when you turn on the meter. Do not use the meter if
the display check screen does not exactly match the example. Contact
Customer Care.
• See The FreeStyle Lite® Meter and How It Works section for more information.
• If the system check screen does not appear, go to Troubleshooting section.
5. Apply and hold control solution to 1 sample area of the test strip until:
• You see short lines moving clockwise on the display or
• You hear a beep
This indicates the test strip obtained enough control solution and the meter is
processing. If the test does not start after applying the control solution, go to
Troubleshooting section.
IMPORTANT: If a short line does not appear after 5 seconds, the
sample may be too small. Do not add control solution to both sides
of the strip. The test strips are for single use only. Do not reuse test
strips. Discard used test strips.
27 28
ART22813-003_rev-A.indd 27-28 1:29 PM11/9/16

on the display indicates that you are viewing stored test results.
shows the average value of glucose readings from the last 7-, 14-, or 30-days.
on the display indicates that the test result occurred when it was too hot or too cold
to use the meter and may not be accurate. This result is included in 7-, 14-, and 30-day
averages.
a test result of under 20 mg/dL is included in memory as LO.
a test result of over 500 mg/dL is included in memory as HI.
indicates a control solution test result.
English
English
Contact Customer CareToll Free at 1-888-522-5226 www.MyFreeStyle.com
Using Your Meter Memory Viewing Test Results in Memory
Meter memory stores the last 400 test results with time and date. Press
c
to scroll through the
Purpose results. The most recent result appears rst.
The purpose of this section is to review your stored test results and 7-, 14-, and 30-day averages.
Viewing Blood Glucose Averages in Memory
Start with the meter o (no test strip inserted). Press
m
. Your 7-day average
appears (control solution, LO, and HI readings not included).
Note: To exit meter memory at any time, press and hold
m
.
Example:
Memory Display
your average
n= number of results included in your average
• Press
c
to scroll through 14- and 30-day averages and all stored test
results. The most recent result appears rst.
• Press
m
to scroll backward.
29 30
ART22813-003_rev-A.indd 29-30 1:29 PM11/9/16

appears on the display when you insert a data cable in the data port. The computer
must have a compatible data management system to complete the transfer. Remove
this cable before performing a test.
Contact Customer Care to learn more about the data management system.
English
English
Contact Customer CareToll Free at 1-888-522-5226 www.MyFreeStyle.com
Setting Reminder Alarms (optional) 5. Set alarm sound volume
Purpose
The purpose of this section is to set up to four reminder alarms to prompt you to test throughout No sound
the day.
A low beep •Press to save
A louder beep
6. Press
c
and repeat 2, 3, 4 and 5 to set remaining reminder alarms or
7. Press and hold
m
for 3seconds until meter turns o.
Transferring Test Results To a Computer
Reminder Alarm
1. With the meter o, press and hold
m
for 3seconds until appears
and 0 is ashing.
2. Press
c
. Reminder alarm 1ashes.
Hour
Note: You are setting time for Reminder Alarm not clock time.
3. Set hour
• Press
m
to set hour
• Press
c
to display correct hour
• Press
m
to save
Minutes
4. Set minutes
• Press
c
to display correct minutes
• Press
m
to save
If you prefer: Press
c
until you see: Then
m
31 32
ART22813-003_rev-A.indd 31-32 1:29 PM11/9/16

1. Press in the battery door clip and move the battery door away from
the meter.
2. Push the battery toward the bottom of the meter to remove it.
3. Insert a new battery: (+) facing up.
4. To close, angle the battery door back onto the meter and snap into place.
Note: The battery in this product should be removed and disposed in accordance
with local regulations for separate collection of spent batteries.
English
English
Contact Customer CareToll Free at 1-888-522-5226 www.MyFreeStyle.com
Maintaining the Meter
Replacing the Battery
The meter comes with a #2032, 3-volt, lithium battery installed. It provides power for about
500 tests.
• When appears on the display, the battery is low.
• When appears, the display light and test light dim, or fail to turn on.
IMPORTANT: When appears, or when the display light and test
light dim, replace the battery immediately.
• When you are ready to install a new battery, remove the old battery and install the new
battery within 60 seconds to avoid losing time and date settings.
• If time and date settings are lost, both time and date will ash until reset.
Reset time and date to get the correct 7-, 14-, and 30-day averages. If the time and date
settings are lost, you may still perform an accurate blood glucose test.
• Memory log and previously stored user settings, such as date and time format, are not
aected by removing the battery.
33 34
ART22813-003_rev-A.indd 33-34 1:29 PM11/9/16
Other manuals for Lite
2
Table of contents
Languages:
Other Freestyle Blood Glucose Meter manuals

Freestyle
Freestyle Freedom User manual

Freestyle
Freestyle Precision Neo User manual

Freestyle
Freestyle Precision Neo User manual

Freestyle
Freestyle FREEDOM LITE User manual

Freestyle
Freestyle Libre 14 day User manual

Freestyle
Freestyle Libre 14 day User manual

Freestyle
Freestyle Libre User manual

Freestyle
Freestyle LIBRE PRO User manual

Freestyle
Freestyle Libre 14 day User manual

Freestyle
Freestyle Libre User manual