Frick SGC 1913 User manual

Form 070.650-IOM (AUG 2015)
INSTALLATION - OPERATION - MAINTENANCE
File: SERVICE MANUAL - Section 070
Replaces: 070.650-IOM (NOV 2013)
Dist: 3, 3a, 3b, 3c
SGC/SGX
ROTARY SCREW COMPRESSORS
MODELS:
SGC 1913-2824, SGCB/H 3511-3519
Original SGXB 3519-3524, SGXH 3519 & 4013-4021
THIS MANUAL CONTAINS RIGGING, ASSEMBLY, START-UP,
AND MAINTENANCE INSTRUCTIONS. READ THOROUGHLY
BEFORE BEGINNING INSTALLATION. FAILURE TO FOLLOW THESE
INSTRUCTIONS MAY RESULT IN PERSONAL INJURY OR DEATH,
DAMAGE TO THE UNIT, OR IMPROPER OPERATION.
Please check www.johnsoncontrols.com/frick for the latest version of this publication.

070.650-IOM (AUG 2015)
Page 2
SGC ROTARY SCREW COMPRESSOR
INSTALLATION - OPERATION - MAINTENANCE
Contents
GENERAL INFORMATION
PREFACE .......................................................................... 3
DESIGN LIMITATIONS ........................................................ 3
JOB INSPECTION .............................................................. 3
STANDARD BARE COMPRESSOR ...................................... 3
TRANSIT DAMAGE CLAIMS .............................................. 3
COMPRESSOR IDENTIFICATION ........................................ 3
LONG TERM STORAGE ...................................................... 4
PREPARING COMPRESSOR FOR STORAGE ........................ 4
MAINTAINING COMPRESSOR IN STORAGE ........................ 4
DESCRIPTION .................................................................... 5
SGC/SGX COMPRESSORS ............................................ 5
COMPRESSOR LUBRICATION SYSTEM ......................... 5
OIL PUMP...................................................................... 6
CONSTRUCTION DETAILS.................................................. 6
INSTALLATION
DESIGN LIMITS .................................................................. 7
OUTLINE DIMENSIONS ...................................................... 7
HOLDING CHARGE AND STORAGE....................................15
RIGGING AND HANDLING..................................................15
FOUNDATION ..................................................................15
CUSTOMER CONNECTIONS ..............................................16
OIL SYSTEM REQUIREMENTS...........................................16
OIL SELECTION ............................................................16
OIL PRESSURE .............................................................16
BALANCE PISTON OIL REQS & REGULATIONS..............16
OIL COOLING REQUIREMENTS .....................................18
OIL FILTER(S) ...............................................................19
OIL HEATER(S) .................................................................19
COMPRESSOR OIL............................................................19
OIL PUMP.........................................................................19
COMPRESSOR ..................................................................19
MOTOR MOUNTING USING TUNNEL.................................19
COMPRESSOR/MOTOR COUPLING REQUIREMENTS.....19
COUPLING ALIGNMENT REQUIREMENTS
(FOOT MOUNTED ONLY)............................................. 20
DEHYDRATION / EVACUATION TEST................................ 20
ELECTRICAL INSTALLATION............................................. 20
SLIDE STOP TRANSMITTER......................................... 20
CAPACITY SLIDE VALVE TRANSMITTER ...................... 20
DIRECTIONAL CONTROL VALVES ................................21
COMPRESSOR HYDRAULIC SYSTEM ...............................21
VOLUMIZER VOLUME RATIO CONTROL ...........................22
OPERATION
OPERATION AND START-UP INSTRUCTIONS ...................23
LOW AMBIENT TEMPERATURE OPERATION ....................23
INITIAL START-UP ...........................................................23
INITIAL START-UP PROCEDURE ..................................23
NORMAL START-UP PROCEDURE ...............................23
MAINTENANCE
GENERAL INFORMATION ................................................ 24
NORMAL MAINTENANCE OPERATIONS .......................... 24
GENERAL MAINTENANCE ........................................... 24
CHANGING OIL ............................................................ 24
RECOMMENDED MAINTENANCE PROGRAM ............... 24
MAINTENANCE SCHEDULE ...............................................25
VIBRATION ANALYSIS ......................................................26
OIL QUALITY AND ANALYSIS ..........................................26
OPERATING LOG .........................................................26
TROUBLESHOOTING GUIDE .............................................26
ABNORMAL OPERATION ANALYSIS & CORRECTION ...26
CAPACITY LINEAR TRANSMITTER REPLACEMENT -
SLIDE VALVE .............................................................. 28
VOLUMIZER®TRANSMITTER REPLACEMENT - SLIDE
STOP........................................................................... 28
BARE COMPRESSOR REPLACEMENT .............................. 28
SHUTDOWN DUE TO IMPROPER OIL PRESSURE
(High Stage and Booster) ............................................... 28
FORMS.............................................................................29
VIBRATION DATA SHEET...................................................32
Indicates an imminently hazardous situation which, if not avoided, will result in death or serious
injury.
Indicates a potentially hazardous situation or practice which, if not avoided, will result in death or
serious injury.
SAFETY PRECAUTION DEFINITIONS
Indicates a potentially hazardous situation or practice which, if not avoided, will result in damage
to equipment and/or minor injury.
Indicates an operating procedure, practice, etc., or portion thereof which is essential to highlight.
Referenced manuals:
070.610-IOM RWF II Rotary Screw Compressor Units
090.020-M Quantum LX Maintenance
160.802-SPC CompressorOilSpecications
090.040-O Quantum HD Operation
WARNING
CAUTION
DANGER
NOTICE

070.650-IOM (AUG 2015)
Page 3
SGC ROTARY SCREW COMPRESSOR
INSTALLATION - OPERATION - MAINTENANCE
NOTICE
THE INFORMATION CONTAINED IN THIS
DOCUMENT IS SUBJECT TO CHANGE
WITHOUT NOTICE
General Information
PREFACE
This manual has been prepared to acquaint the owner and
serviceman with the INSTALLATION, OPERATION, and
MAINTENANCE procedures as recommended by Johnson
Controls-Frick for SGC, SGCB/H and SGXB/H Rotary Screw
Compressors (referred to in this document as SGC or SGX).
The term SGC refers to the 1913, 1918, 2313, 2317, 2321,
2813, 2817, 2821, and 2824 SGC units, as well as the 3511,
3515, and 3519 SGCB and SGCH units. The term SGX refers
to the 3519, 4013, 4018, and 4021 SGXB and SGXH units, as
well as the 3524 SGXB unit.
It is most important that these compressors be properly ap-
plied to an adequately controlled refrigerant or gas system.
Your authorized Johnson Controls-Frick representative should
be consulted for his expert guidance in this determination.
Proper performance and continued satisfaction with these
units is dependent upon:
CORRECT INSTALLATION
PROPER OPERATION
REGULAR, SYSTEMATIC MAINTENANCE
To ensure correct installation and application, the equipment
must be properly selected and connected to a properly
designed and installed system. The Engineering plans,
piping layouts, etc. must be detailed in accordance with the
best practices and local codes, such as those outlined in
ASHRAE literature.
A screw compressor is a VAPOR PUMP. To be certain that it
is not being subjected to pumping liquid, it is necessary that
controls are carefully selected and in good operating
condition; the piping is properly sized and traps, if necessary,
are correctly arranged; the suction line has an accumulator
or slugging protection; that load surges are known and
provisions are made for control; operating cycles and stand
still periods are reasonable; and that high side components
are sized within system and compressor design limits.
It is required that the discharge temperature be kept
high enough to prevent condensation of any moisture in
the compressor and oil separator.
DESIGN LIMITATIONS
SGC/SGX compressors are designed for operation within the
pressure and temperature limits which are specied by
Johnson Controls-Frick and the Johnson Controls-Frick
selection software COOLWARE
™
. They are primarily used for
compressing refrigerant gas and most hydrocarbon gasses.
If your application is for sour gas, there are special require-
ments to protect the compressor. Contact Johnson Con-
trols-Frick Compressor Engineering for application details.
JOB INSPECTION
Immediately upon delivery examine all crates, boxes and
exposed compressor and component surfaces for damage.
Unpack all items and check against shipping lists for any
discrepancy. Examine all items for damage in transit.
STANDARD BARE COMPRESSOR
Items not included with bare compressor that are available
as sales order options: Motor Mount, Solenoid Valve Block,
Solenoid Valves, Tank Drain Tubing (T connection), Oil Feed
Line (P connection), Connection Fittings, Coupling.
TRANSIT DAMAGE CLAIMS
All claims must be made by consignee. This is an ICC re-
quirement. Request immediate inspection by the agent of
the carrier and be sure the proper claim forms are execut-
ed. Report damage or shortage claims immediately to
Johnson Controls-Frick Sales Administration Department,
in Waynesboro, PA.
COMPRESSOR IDENTIFICATION
Each compressor has an identicationdataplate,containing
compressor model and serial number mounted on the
compressor body.
NOTICE
When inquiring about the compressor or unit, or
ordering repair parts, provide the MODEL, SERIAL, and
JOHNSON CONTROLS - FRICK SALES ORDER NUMBERS
from the data plate. See Figure 1.
Figure 1. Identication Data Plate
Rotaryscrewcompressorserialnumbersaredenedbythe
following information:
EXAMPLE: 10240A90000015Z
GLOBAL ADDITIONAL
PLANT DECADE MONTH YEAR SEQ NO. REMARKS
1024 0 A 9 0000015 Z
Plant: 1024 = Waynesboro, 1153 = Monterrey
Month:
A = JAN, B = FEB, C = MAR, D = APR, E = MAY, F = JUN,
G = JUL, H = AUG, K = SEP, L = OCT, M = NOV, N = DEC.
Additional Remarks:
R = Remanufactured;
R1 = Rebuild;
R2 = Rebuild Plus;
Z =DeviationfromStandardConguration.

070.650-IOM (AUG 2015)
Page 4
SGC ROTARY SCREW COMPRESSOR
INSTALLATION - OPERATION - MAINTENANCE
The name plates in Figure 2 show which refrigerants are
compatible with the compressor as manufactured.
Figure 2. Refrigerant Name Plates
LONG TERM STORAGE
Long term storage (6 months to 5 years) provisions are
required, regardless of storage environment, if start-up
and/or useful operation does not occur within six (6) months
of equipment shipment. Special provisions may be required
for storage of less than six (6) months if the storage area is
subject to unusual environment such as high humidity, large
changes in temperature, dusty atmosphere, etc.
The standard Johnson Controls-Frick Warranty for an SGC/
SGX screw compressor covers twelve (12) months from
start-up or 18 months from shipment, whichever comes
rst.Itisrecommendedthatarrangementsbemadewith
the local JOHNSON CONTROLS-FRICK service organization
(arranged through factory service) regarding surveillance
and maintenance during the storage period. It will be the
customer’s responsibility to submit a monthly report
showing the condition of the unit and noting any
discrepancies to the guidelines listed herein. Failure to
comply with this Long Term Storage Recommendation may
void the warranty.
Long term storage of equipment may lead to the
deterioration of components over the period of time.
Synthetic components in the compressor may deteriorate
overtimeeveniftheyarekeptoodedwithoil.Awarmand
dry environment is essential to minimize environmental and
corrosion damage. Long term storage of the affected
equipment at a customer’s site may involve additional
requirements and interested parties should refer to the
JohnsonControlswebsite,www.jci.com/frick,forspecic
instructions (Location: Bare Compressors\General\
Warranties\Screw Compressor Purchased for Long Term
Storage).
The following guidelines must be followed to maintain the
SCREW COMPRESSOR WARRANTY.
PREPARING COMPRESSOR FOR STORAGE
Evacuate compressor to remove moisture. Evacuation lines
are to be connected to port SM1. Evacuation lines are to be
connected to the three Schrader access valves provided
with the compressor. One valve is connected to compressor
suction. The other two valves are located at the block on
the cylinder.
Break vacuum with dry nitrogen and bring pressure to zero psig
.
Pump oil into the same ports mentioned in step 1. Johnson
Controls-Frick recommends break-in oil P/N 111Q0831809
for storage purposes. The amounts of oil needed per
compressor are:
95mm* 2 Gal. 233mm 15 Gal.
120mm* 3 Gal. 283mm 25 Gal.
163mm* 8 Gal. 355mm 35 Gal.
193mm 12 Gal. 408mm 50 Gal.
After compressor is oil charged, pressurize compressor to
15 psig with nitrogen.
MAINTAINING COMPRESSOR IN STORAGE
• Ensure that the 5-15 psig nitrogen charge is maintained
with 15 psig preferred.
• Rotate the male rotor shaft every two weeks. Mark the
shaft to ensure the rotor does not return to the original
position.
COMPRESSOR
MODEL
ROTOR
DIAMETER ROTOR MAX
SPEED
GEOMETRICAL SWEPT VOLUME
DRIVE SHAFT END
DISPLACEMENT
3550 RPM 2950 RPM
MM L/D RPM FT³/ REV M³/REV CFM M³/H
SGC 1913 193 1.35 4,500 0.16653 0.004713 591 834
SGC 1918 1.8 4,500 0.22204 0.006284 788 1,112
SGC 2313
233
1.35 4,500 0.29301 0.008292 1,040 1,468
SGC 2317 1.7 4,500 0.36897 0.010442 1,310 1,848
SGC 2321 2.1 4,500 0.45580 0.012899 1,618 2,283
SGC 2813
283
1.35 4,200 0.52501 0.014858 1,864 2,630
SGC 2817 1.7 4,200 0.66115 0.018711 2,347 3,312
SGC 2821 2.1 4,200 0.79546 0.022512 2,824 3,985
SGC 2824 2.4 4,200 0.89858 0.025430 3,190 4,501
SGCH/B 3511
355
1.1 3,600 0.82248 0.023276 2,920 4,120
SGCH/B 3515 1.5 3,600 1.12154 0.031739 3,981 5,618
SGCH/B 3519 1.9 3,600 1.42748 0.040398 5,068 7,150
SGXB 3519 1.9 3,600 1.42748 0.040398 5,068 7,150
SGXB 3524 2.4 3,600 1.80328 0.051033 6,402 9,033
SGXH 3519 355 1.9 3,600 1.42748 0.040398 5,068 7,150
SGXH 4013
408
1.3 3,600 1.41180 0.03998 5,012 7,076
SGXH 4018 1.8 3,600 1.95481 0.05535 6,940 9,798
SGXH 4021 2.1 3,600 2.31319 0.06550 8,212 11,594
Table 1. Geometrical Swept Volume
*For reference only. These are non-SGC/X compressors.

070.650-IOM (AUG 2015)
Page 5
SGC ROTARY SCREW COMPRESSOR
INSTALLATION - OPERATION - MAINTENANCE
• Compressor must be stored inside a dry building
environment.
• Grease the male rotor shaft to prevent rust.
• Record all information in a “Compressor Long Term
Storage Log.”
Contact Johnson Controls-Frick Service with any
questions regarding long term storage.
DESCRIPTION
SGC/SGX COMPRESSORS
Frick SGC/SGX rotary screw compressors utilize mating
asymmetricalprolehelicalrotorstoprovideacontinuous
owofvaporandtheyaredesignedforbothhigh-pressure
and low-pressure applications. The compressors
incorporate the following features:
1. High-capacity roller bearings to carry radial loads at both
the inlet and outlet ends of the compressor.
2. Heavy-duty, four-point contact ball or angular-contact
bearings are mounted at the discharge end of the
compressor to carry axial loads.
3. Balance pistons, located in the inlet end of the compressor,
reduce axial loads on the male axial bearings to increase
bearing life.
4. Moveable slide valve to provide fully modulating capacity
control from 100% to approximately 10% (2824, 3519, and
4021 - to 15%; 3524 - to 20%) of full load capacity.
5. VOLUMIZER volume ratio control to allow innitely
variable volume ratio from 2.2 to 5.0 for most SGC models
(2824 Vi = 2.0 - 4.1; 3524 Vi = 2.4 – 4.5; 4021 Vi = 2.2 - 4.3)
during compressor operation.
6. A hydraulic cylinder to operate the slide stop and slide
valve.
7. Housings are designed for 400 psig pressure in SGC/SGX
models through 355. Model SGXH 4013 has 700 psig max.
allowable pressure, while the SGXH 4018 and 4021 models
allow 600 psig.
8. Bearing and control oil vented to closed thread in the
compressor instead of suction pressure to avoid
performance penalties from superheating and displacing
suction gas.
9. Shaft seal housing is designed to maintain operating
pressure on seal well below discharge pressure for increased
seal life.
10. Oil injected into the rotors to maintain good volumetric
and adiabatic efciency even at very high compression
ratios.
11. Shaft rotation clockwise facing compressor, suitable for
all types of drives. SEE FOLLOWING WARNING.
WARNING
Compressor rotation is clockwise when facing the
compressor drive shaft. The compressor should never
be operated in reverse rotation, as bearing damage
will result.
12.SuctionanddischargeangesareANSIB16.1Class300
for all but the SGX 4013 model. SGX 4013 has Class 400
suctionanddischargeanges.
13. Integral suction strainers are provided for all models
except the SGX 35XX and 408 series. These models must
be tted with a suitable strainer, #60 mesh X .0065”
diameter stainless steel wire or better, to prevent damage
to the compressor from particles entering the suction area.
COMPRESSOR LUBRICATION SYSTEM
The lubrication system on SGC/SGX screw compressor units
performs several functions:
1. Provides lubrication to bearings and seal.
2. Provides a cushion between the rotors to minimize noise
and vibrations.
3. Helps keep the compressor cool and prevents overheating.
4. Provides an oil supply to hydraulically actuate the slide
valve and slide stop.
5. Provides oil pressure to the balance piston to help increase
bearing life. NOTE: Some applications/operating conditions
require a regulated pressure to the balance piston.
6. Provides an oil seal between the rotors to prevent rotor
contact or gas bypassing.
7.OnSGXmodels,providesoilsupplytothesqueezelm
dampers.
COMPRESSOR AND PACKAGED EQUIPMENT STORAGE LOG
COMPRESSOR* ROTOR VISUAL
SHAFT ROTATION HOUSING CHARGE INSPECTION
MODEL SERIAL NO. 1½ TURN CHARGE ADDED PER QAI-3 CHARGE CHECKED BY DATE
*Compressor, Motor, Oil Pump and Refrigerant Pump

070.650-IOM (AUG 2015)
Page 6
SGC ROTARY SCREW COMPRESSOR
INSTALLATION - OPERATION - MAINTENANCE
OIL PUMP
A demand oil pump is required for low differential pressure
applications (CoolWare™ will provide a warning when the
oil differential pressure is too low). Oil being supplied to
the compressor from the oil separator is at system
discharge pressure. Within the compressor, oil porting to
all parts of the compressor is vented back to a location in
the compressor’s body that is at a pressure lower than
compressor discharge pressure. All oil entering the
compressor is moved by the compressor rotors out the
compressor outlet and back to the system oil separator.
All SGX compressors are equipped with Squeeze Film
Dampers (SFD) in the rotor blocking diameters. Depending
on operating conditions and power consumption, a full
time and full lube oil pump is required to supply oil to the
compressor (SB-3 & SB-4 ports) at a pressure up to 40-50
psi above discharge pressure. Coolware will provide the
exact calculation at the actual operating condition. If the
calulation information is not available, the oil pressure
should be a minimum of 40 psi above discharge pressure.
On all SG*H compressors, the oil pressure to the balance
piston must be controlled and regulated through the SB-2
compressor port. For booster and low pressure applications,
SB-2 may not need to be connected. For higher operating
pressure a Balance Piston Regulator (BPR) must be installed
and piped to the SB-2 connection.
Since there are several variants of the BPR, use Coolware
to select the best option. Correct BPR information and
pressure settings are required. Do not run the compressor
without this information.
NOTICE
DO NOT RUN THE COMPRESSOR WITHOUT
THE CORRECT BALANCE PISTON REGULATOR
INFORMATION AND PRESSURE SETTINGS.
CONSTRUCTION DETAILS
HOUSING: Castings for SGC/SGX screw compressors
through model 3524 are close grain, pressure tight, grey
cast iron to ensure structural integrity and mechanical and
thermal stability under all operating conditions. Ductile
iron housings are also available for special applications.
Standard casing material for SGX 4013-4021 compressor
models is ductile iron grade 60-40-18 per ASTM A395 and
ASME SA395. Contact Johnson Controls – Frick Sales for
additional information.
ROTORS: The rotors are made from the highest quality
steel bar-stock or forgings to the exacting tolerances of
Frick-designed high-efciency rotor proles. The four-
lobed male rotor (5 lobes on 408) is directly connected to
the driver. The six-lobed female rotor (7 lobes on 408) is
drivenbythemaleonathinoillm.
BEARINGS: Antifriction bearings with L
10
rated life in
excess of 50,000 hours at design conditions (using the
Frick Superlter™) are used for reduced frictional
horsepower and superior rotor positioning, resulting in
reduced power consumption, particularly at higher
pressure ratios. Cylindrical roller bearings are provided to
handle the radial loads and the thrust loads are absorbed
by four point contact or angular contact bearings. In
addition, thrust balance pistons are provided to reduce the
thrust load and improve bearing life.
SHAFT SEAL: The compressor shaft seal is a single-face
type with a spring-loaded carbon stationary surface riding
against a cast iron rotating seat. The seal is capable of
withstanding static pressure up to 600 psig. During opera-
tion it’s vented to low pressure to provide extended life.
The 408 compressors utilize silicon-tungsten carbide seal
face material.
VOLUMIZER VARIABLE VOLUME RATIO CONTROL: The
Frick compressor includes a method of varying the internal
volume ratio to match the system pressure ratio. Control of
the internal volume ratio eliminates the power penalty
associated with over- or under-compression. Volume ratio
control is achieved by the use of a slide stop which is a
movable portion of the rotor housing that moves axially with
the rotors to control discharge port location. The slide stop
is moved by hydraulic actuation of a control piston. The
range of adjustment is listed in the COMPRESSOR VOLUME
and CAPACITY RATIO table.
STEPLESS CAPACITY CONTROL: Capacity control is
achieved by use of a movable slide valve. The slide valve
moves axially under the rotors to provide fully modulated
capacity control from 100% to minimum load capacity.
Minimum load capacity varies slightly with compressor
model, pressure ratio, discharge pressure level, and rotor
speed. See the TABLE 1 for minimum capacity for all SGC
models.
The slide valve is positioned by hydraulic movement of its
control piston. When in the unloaded position, gas is
bypassed back to suction through a recirculation slot before
compression begins and any work is expended, providing
themostefcientunloading method available for part-load
operation of a screw compressor.
MOTOR MOUNT: SGC/SGX models through 3524 are
designedwithadriveendangethatmateswithacastiron
motor mount (available as a sales order option). The motor
mount is precision machined so that it ensures proper
alignment of the compressor and motor coupling.
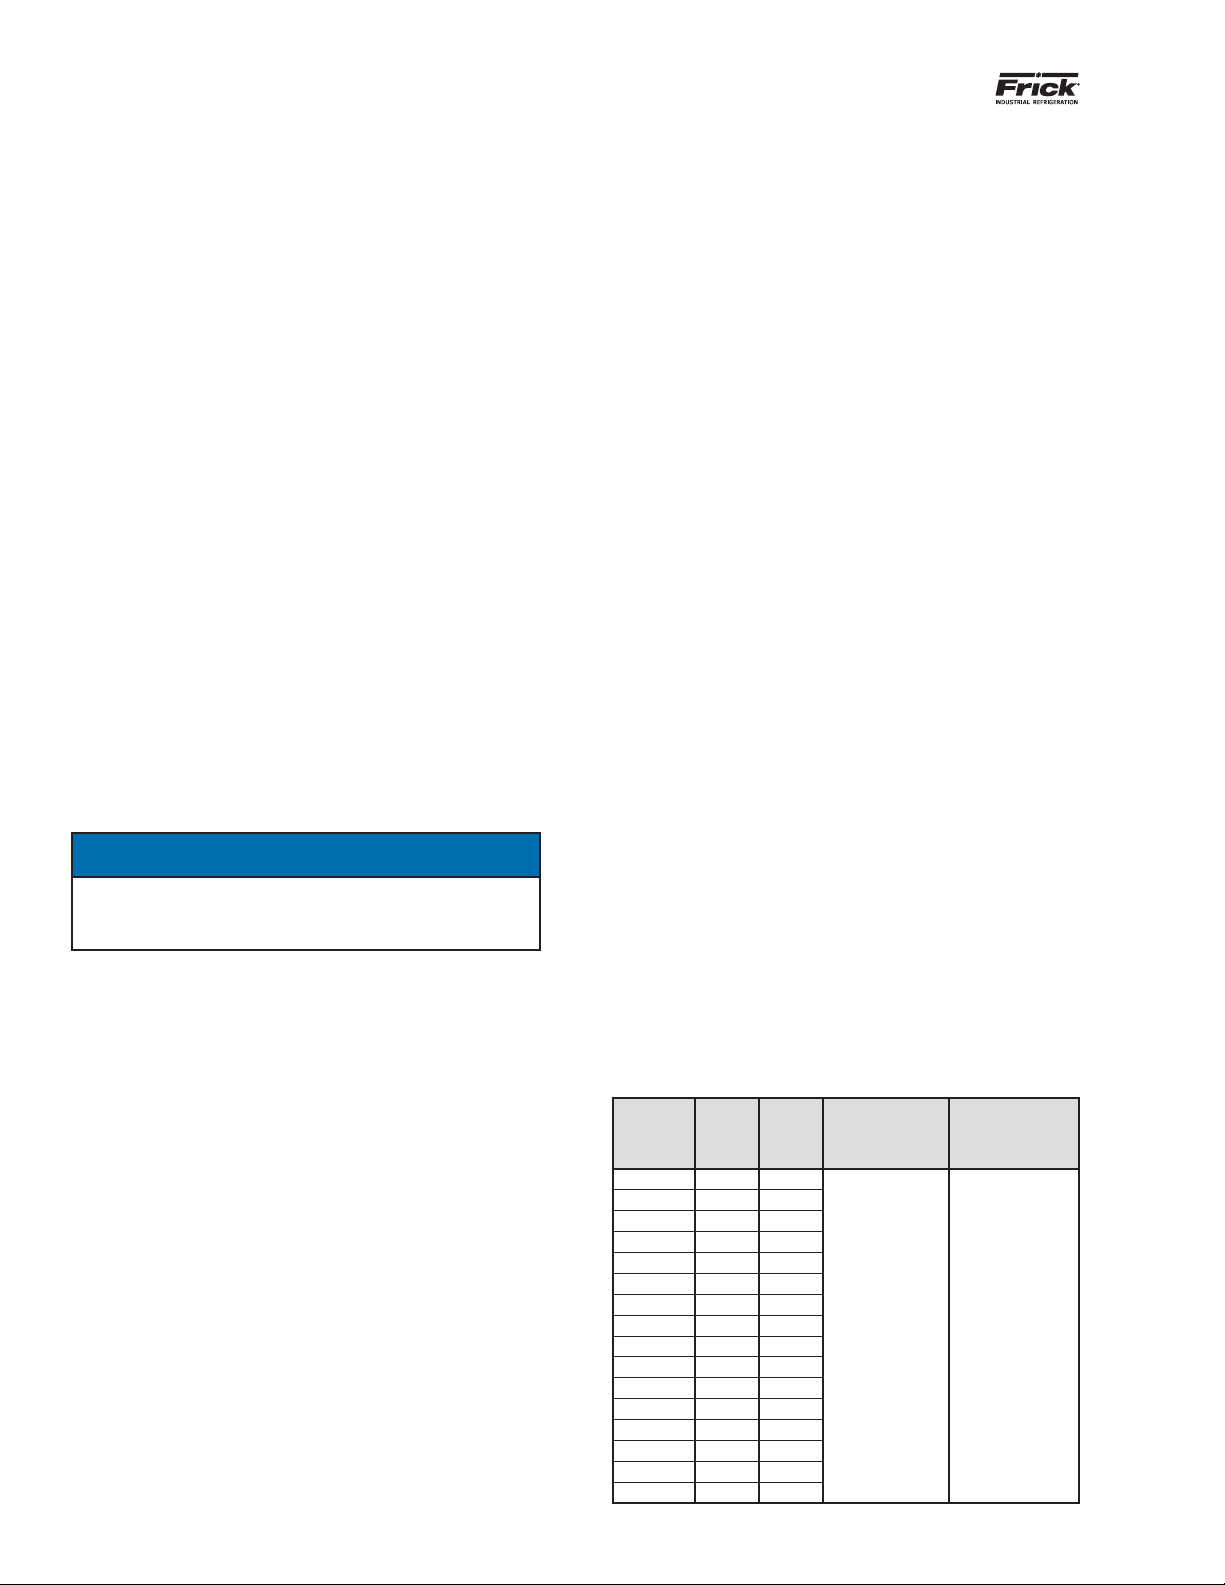
Table 2. COMPRESSOR VOLUME and CAPACITY RATIO
SGC
MODEL
MIN.
VI(1)
MAX.
VI
MIN.
CAPACITY %
SLIDE VALVE
& SLIDE STOP
TRAVEL
1913 2.2 5.0
REFER TO
COOLWARE™
REFER TO
NS-7-11
COMPRESSOR
VOLUME
RATIO
AND CAPACITY
INFORMATION
1918 2.2 5.0
2313 2.2 5.0
2317 2.2 5.0
2321 2.2 5.0
2813 2.2 5.0
2817 2.2 5.0
2821 2.2 5.0
2824 2.0 4.1
3511 2.2 5.0
3515 2.2 5.0
3519 2.2 5.0
3524 2.4 4.5
4013 2.2 5.0
4018 2.2 5.0
4021 2.2 4.3
1. Optional 1.7 - 3.0 VI

070.650-IOM (AUG 2015)
Page 7
SGC ROTARY SCREW COMPRESSOR
INSTALLATION
Installation
DESIGN LIMITS
General information for all of the models is provided below.
Please see CoolWare to determine the limits for a
specic application.
SGC/SGX compressor models are primarily designed for
connecting to an electric drive motor using a tunnel mount.
If the application requires it, the compressor can also be
driven with a foot-mounted motor. The tunnel mount en-
sures proper alignment of the compressor and motor so
that the shaft seal and coupling will operate properly. The
rotor and bearing design set limitations must not be ex-
ceeded (See CoolWare). Refer to Johnson Controls - Frick
Compressor Control Panel instruction 090.020-M for addi-
tional information on setpoint limits.
For proper piping, also see the Frick package manual,
070.610-IOM for RWF II rotary screw compressor units,
Models 100 through 1080.
OUTLINE DIMENSIONS
Drawings for reference only can be found on the following
pages. Complete dimensions and access connections can
be found on the outline drawings.
SGC 1913 & 1918 DWG# 534E0677
SGC 2313 & 2317 DWG# 534E0700
SGC 2321 DWG# 534E0714
SGC 2813 & 2817 DWG# 534E0749
SGC 2821 DWG# 534E0768
SGC 2824 DWG# 534E0973
SGCH 3511 & SGCB 3511 DWG# 534E0966
SGCH 3515 & SGCB 3515 DWG# 534E0971
SGCH 3519 & SGCB 3519 DWG# 534E0972
SGXH 3519 & SGXB 3519/3524 DWG# 534E1405
SGXH 4013, 4018 & 4021 DWG# 534E1403
If you do not have these drawings, please request any you
require by contacting Johnson Controls - Frick sales.

070.650-IOM (AUG 2015)
Page 8
SGC ROTARY SCREW COMPRESSOR
INSTALLATION
Figure 3. Port Locations, SGC 1913/1918
P: MANIFOLD
BLOCK
PRESSURE
SC-6: DISCHARGE PRESSURE
SD-1: COALESCER BLEED
SUCTION PORT
SIZE “L” CLASS 300 FLANGE
DISCHARGE
PORT
4" CLASS 300
FLANGE
SC-7: SEAL
WEEPAGE
SE-1: SLIDE STOP
LINEAR TRANSMITTER
SE-2: SLIDE VALVE
LINEAR TRANSMITTER
SC-8: CLOSED THREAD DRAIN
SM-1: MAIN OIL
INJECTION
T: MANIFOLD BLOCK
TANK
TE-1: SUCTION GAS
TEMP. ELEMENT
PORT THREAD SIZE NOTE
SB-3 1Z\zn - 12 UN-2B X
SC-5 ⁹\zn - 18 UNF-2B O
SC-6 ⁹\zn - 18 UNF-2B O
SC-7 Z\₈ - 27 NPTF O
SC-8 1Z\zn - 12 UN-2B S
SC-9 ⁹\zn - 18 UNF-2B S
SC-13 ⁹\zn - 18 UNF-2B S
SC-14 ⁹\zn - 18 UNF-2B O
SD-1 1Z\zn - 12 UN-2B O
SE-1 DIN Connector X
SE-2 DIN Connector X
SL-1 1Z\zn - 12 UN-2B O
SL-2 1Z\zn - 12 UN-2B O
SM-1 1Z\zn - 12 UN-2B X
SV-1
1½ Square Flange
O
TE-1 ³\₄ - 14 NPTF O
P⁹\zn - 18 UNF-2B X
T⁹\zn - 18 UNF-2B X
X - Mandatory connection
O - Optional connection
S - Service connection

070.650-IOM (AUG 2015)
Page 9
SGC ROTARY SCREW COMPRESSOR
INSTALLATION
SE-1: SLIDE STOP
LINEAR TRANSMITTER
T: MANIFOLD BLOCK
TANK
SM-1: MAIN OIL
INJECTION
SC-11: CLOSED THREAD DRAIN
SE-2: SLIDE VALVE
LINEAR TRANSMITTER
TE-1: SUCTION GAS
TEMP. ELEMENT
P: MANIFOLD
BLOCK
PRESSURE
SC-7: SEAL WEEPAGE
SUCTION PORT
SIZE “P” CLASS 300 FLANGE
DISCHARGE
PORT
6" CLASS 300
FLANGE
Figure 4. Port Locations, SGC 2313/2317/2321
PORT THREAD SIZE NOTE
SB-3 1Z\zn - 12 UN-2B X
SC-5 ⁹\zn - 18 UNF-2B O
SC-6 ⁹\zn - 18 UNF-2B O
SC-7 Z\₈ - 27 NPTF O
SC-8 1Z\zn - 12 UN-2B S
SC-9 ⁹\zn - 18 UNF-2B S
SC-11 1B\zn-12 UN-2B S
SC-13 ⁹\zn - 18 UNF-2B S
SC-14 ⁹\zn - 18 UNF-2B O
SD-1 1Z\zn - 12 UN-2B O
SE-1 DIN Connector X
SE-2 DIN Connector X
SL-1 1Z\zn - 12 UN-2B O
SL-2 1Z\zn - 12 UN-2B O
SM-1 1B\zn - 12 UN-2B X
SV-1
2 Square Flange
O
TE-1 ³\₄ - 14 NPTF O
P⁹\zn - 18 UNF-2B X
T⁹\zn - 18 UNF-2B X
X - Mandatory connection
O - Optional connection
S - Service connection

070.650-IOM (AUG 2015)
Page 10
SGC ROTARY SCREW COMPRESSOR
INSTALLATION
SC-7: SEAL
WEEPAGE
SE-1: SLIDE STOP
LINEAR TRANSMITTER
T: MANIFOLD
BLOCK
TANK
P: MANIFOLD
BLOCK
PRESSURE
SE-2: SLIDE VALVE
LINEAR TRANSMITTER
TE-1: SUCTION GAS
TEMP. ELEMENT
SUCTION PORT
SIZE “L” CLASS 300 FLANGE
DISCHARGE
PORT
4" CLASS 300
FLANGE
Figure 5. Port Locations, SGC 2813/2817
PORT THREAD SIZE NOTE
SB-3
1
Z\₄
Square Flange
X
SC-5 ⁹\zn - 18 UNF-2B O
SC-6 ⁹\zn - 18 UNF-2B O
SC-7 Z\₈ - 27 NPTF O
SC-8 1B\zn - 12 UN-2B S
SC-9 ⁹\zn - 18 UNF-2B S
SC-13 ⁹\zn - 18 UNF-2B S
SC-14 ⁹\zn - 18 UNF-2B O
SD-1 1Z\zn - 12 UN-2B O
SE-1 DIN Connector X
SE-2 DIN Connector X
SL-1 1B\zn - 12 UN-2B O
SL-2 1B\zn - 12 UN-2B O
SM-1 1B\zn - 12 UN-2B X
SV-1
2
Z\₂
Square Flange
O
TE-1 ³\₄ - 14 NPTF O
P1Z\zn - 12 UN-2B X
T³\₄ - 16 UNF-2B X
X - Mandatory connection
O - Optional connection
S - Service connection

070.650-IOM (AUG 2015)
Page 11
SGC ROTARY SCREW COMPRESSOR
INSTALLATION
SL-1: LOW Vi
LIQUID INJECTION
SV-1: VAPOR
INJECTION
SC-8: CLOSED THREAD DRAIN
P: MANIFOLD
BLOCK
PRESSURE
T: MANIFOLD
BLOCK
TANK
SE-1: SLIDE STOP
LINEAR TRANSMITTER
SE-2: SLIDE VALVE
LINEAR TRANSMITTER
TE-1: SUCTION GAS
TEMP. ELEMENT
SC-7: SEAL
WEEPAGE
SUCTION PORT
10" CLASS 300 FLANGE
DISCHARGE
PORT
8" CLASS 300
FLANGE
Figure 6. Port Locations, SGC 2821/2824
PORT THREAD SIZE NOTE
SB-3
1
Z\₄
Square Flange
X
SC-5 ⁹\zn - 18 UNF-2B O
SC-6 ⁹\zn - 18 UNF-2B O
SC-7 Z\₈ - 27 NPTF O
SC-8 1B\zn - 12 UN-2B S
SC-9 ⁹\zn - 18 UNF-2B S
SC-13 ⁹\zn - 18 UNF-2B S
SC-14 ⁹\zn - 18 UNF-2B O
SD-1 1Z\zn - 12 UN-2B O
SE-1 DIN Connector X
SE-2 DIN Connector X
SL-1 1B\zn - 12 UN-2B O
SL-2 1B\zn - 12 UN-2B O
SM-1 1B\₈ - 12 UN-2B X
SV-1
2
Z\₂
Square Flange
O
TE-1 ³\₄ - 14 NPTF O
P1Z\zn - 12 UN-2B X
T³\₄ - 16 UNF-2B X
X - Mandatory connection
O - Optional connection
S - Service connection

070.650-IOM (AUG 2015)
Page 12
SGC ROTARY SCREW COMPRESSOR
INSTALLATION
SE-1: SLIDE STOP
LINEAR TRANSMITTER
SE-2: SLIDE VALVE
LINEAR
TRANSMITTER
DISCHARGE
PORT
10" CLASS 300
FLANGE
SC-7: SEAL
WEEPAGE
Figure 7. Port Locations, SGC 3511/3515/3519
SGC 3519 Shown
PORT THREAD SIZE NOTE
SB-2 ³\₄ - 14 NPTF X
SB-3
1
Z\₂ 11Z\₂ NPTF X
SC-3 Z\₂ - 14 NPTF X
SC-4 Z\₂ - 14 NPTF S
SC-5 ³\₈ - 18 NPTF O
SC-6 ³\₈ - 18 NPTF O
SC-7 Z\₈ - 27 NPTF O
SC-8
1
Z\₄ 11Z\₂ NPTF S
SC-9
1
Z\₂ 11Z\₂ NPTF S
SC-10
1
Z\₂ 11Z\₂ NPTF S
SD-1 Z\₂ - 14 NPTF O
SE-1 DIN Connector X
SE-2 DIN Connector X
SL-1
1
Z\₄ 11Z\₂ NPTF O
SL-2
1
Z\₄ 11Z\₂ NPTF O
SM-1 2" Square Flange X
ST-1 ³\₄ - 14 NPTF O
SV-1 3" Square Flange O
TW-1 ³\₄ - 14 NPTF O
SP-1 ³\₄ - 14 NPTF X
X - Mandatory connection
O - Optional connection
S - Service connection

070.650-IOM (AUG 2015)
Page 13
SGC ROTARY SCREW COMPRESSOR
INSTALLATION
SGX 3519 Shown
A
B
B
C
C
SB-4: DAMPER
OIL FEED
SC-7: SEAL
WEEPAGE
SE-1: SLIDE STOP
LINEAR TRANSMITTER
SE-2: SLIDE VALVE
LINEAR
TRANSMITTER
SUCTION PORT
14" CLASS 300
FLANGE
SC-5: INLET
PRESSURE
DISCHARGE
PORT
10" CLASS 300
FLANGE
Figure 8. Port Locations, SGXB 3519/3524, SGXH 3519
PORT THREAD SIZE NOTE
SB-2 ³\₄ - 14 NPTF X
SB-3
1
Z\₂ - 11Z\₂ NPTF X
SB-4
1
- 11Z\₂ NPTF X
SC-3 Z\₂ - 14 NPTF X
SC-4 Z\₂ - 14 NPTF S
SC-5 ³\₈ - 18 NPTF O
SC-6 ³\₈ - 18 NPTF O
SC-7 Z\₈ - 27 NPTF O
SC-8
1
Z\₄ - 11Z\₂ NPTF S
SC-9
1
Z\₂ - 11Z\₂ NPTF S
SC-10
1
Z\₂ - 11Z\₂ NPTF S
SD-1 Z\₂ - 14 NPTF O
SE-1 DIN Connector X
SE-2 DIN Connector X
SL-1
1
Z\₄ - 11Z\₂ NPTF O
SL-2
1
Z\₄ - 11Z\₂ NPTF O
SM-1 2" Square Flange X
ST-1 ³\₄ - 14 NPTF O
SV-1 3" Square Flange O
TW-1 ³\₄ - 14 NPTF O
SP-1 ³\₄ - 14 NPTF X
X - Mandatory connection
O - Optional connection
S - Service connection

070.650-IOM (AUG 2015)
Page 14
SGC ROTARY SCREW COMPRESSOR
INSTALLATION
SC-4: CYLINDER DRAIN
SC-8: SEAL WEEPAGE
SC-12: DRAIN/
SUCTION PRESSURE
SP-1: SUCTION
A
CCELEROMETER
SUCTION PORT
16” CLASS 300 FLANGE (4018, 4021)
16” CLASS 400 FLANGE (4013)
SP-2: DISCHARGE
ACCELEROMETER
SB-3: DAMPER OIL FEED,
OUTLET BEARINGS & SEAL
SL-1: LOW Vi
LIQUID INJECTION
SC-2: SLIDE VALVE
SC-13: BALANCE PISTON PRESSURE
SC-3: SLIDE STOP
DISCHARGE PORT
12” CLASS 300 FLANGE (4018, 4021)
12” CLASS 400 FLANGE (4013)
SL-2: HIGH Vi
LIQUID INJECTION
SC-10: SLIDE
VALVE TOOL/
DISCHARGE
PRESSURE
SC-11: DRAIN/
DISCHARGE PRESSURE
SC-6: DISCHARGE PRESSURE
SC-1: SLIDE VALVE
SB-4: DAMPER
OIL FEED
MALE & FEMALE
INLET BEARING
SB-2: BALANCE PISTON
SC-5: SUCTION PRESSURE
SC-9: CLOSED THREAD
PRESSURE
SC-7: OIL PRESSURE
SC-5: SUCTION PRESSURE
ST-1: SUCTION TEMPERATURE SD-1: COALESCER BLEED/SUCTION PRESSURE
SM-1: MAIN OIL INJECTION
ST-2: DISCHARGE
TEMPERATURE
SC-9: CLOSED THREAD PRESSURE
SV-1: VAPOR INJECTION
Figure 9. Port Locations, SGXH 4013/4018/4021
PORT NPTF SIZE NOTE
SB-2 5/8-11 X*
SB-3 3/4-10 X
SB-4 5/8-11 X
SC-1 9/16-18 X
SC-2 9/16-18 X
SC-3 9/16-18 X
SC-4 9/16-18 S
SC-5 3/4-16 O
SC-6 3/4-16 O
SC-7 3/4-16 O
SC-8 1/8-27 X
SC-9 1 7/8-12 S
SC-10 1 5/8-12 S
SC-11 1 5/8-12 S
SC-12 3/4-16 S
SC-13 1 1/1 6-12 O
SD-1 1 1/1 6 -12 O
SL-1 3/4-10 O
SL-2 3/4-10 O
SM-1 3/4-10 X
SP-1 1/4-28 O
SP-2 1/4-28 O
ST-1 1 1/1 6-12 O
ST-2 1 1/1 6-12 O
SV-1 3/4-10 O
X - Mandatory
connection
O - Optional
connection
S - Service
connection
*Review SB-2 connection on every installation.

070.650-IOM (AUG 2015)
Page 15
SGC ROTARY SCREW COMPRESSOR
INSTALLATION
HOLDING CHARGE AND STORAGE
SGC/SGX compressors are pressure and leak tested at the
Johnson Controls–Frick factory and then thoroughly evacu-
ated and charged with dry nitrogen to ensure integrity dur-
ing shipping and short term storage prior to installation.
All compressors must be kept in a clean, dry location to
prevent corrosion damage. Compressors that will be stored
for more than two months must have their nitrogen charge
checked periodically (see pages in GENERAL INFORMATION
for complete instructions).
WARNING
Holding-charge shipping gauges (if mounted) are rated
for 30 psig and are for checking the shipping charge
only. They must be removed before pressure testing
and operating the system. Failure to remove these
gauges may result in catastrophic failure of the gauge
resulting in serious injury or death.
CAUTION
THIS EQUIPMENT HAS BEEN PRESSURIZED WITH
NITROGEN GAS. TEMPORARY VALVES & GAUGES
HAVE BEEN INSTALLED.
1. RELIEVE PRESSURE PRIOR TO OPENING LINES OR
MAKING FIELD CONNECTIONS.
2. REMOVE CHARGING VALVES OR GAUGES PRIOR
TO PRESSURIZING SYSTEM.
3. REFER TO INSTALLATION OPERATION AND MAIN-
TENANCE MANUAL FOR ADDITIONAL INFORMA-
TION.
ESCAPING GAS MAY CAUSE INJURY
RIGGING AND HANDLING
The compressor can be moved with rigging, using a crane
or forklift, by hooking into the two lifting rings at each end
of the main housings. The compressor lifting rings shall only
be used to lift the compressor itself. See Figures 10 - 12.
Figure 10. Lifting Rings, 1913-2824
Figure 11. Lifting Rings, 3511-3524
LIFTING RINGS
Figure 12. Lifting Rings, 4013-4021
FOUNDATION
Each SGC Rotary Screw Compressor is shipped mounted on
a wooden skid, which must be removed prior to unit
installation.
CAUTION
Allow proper spacing for servicing (see Dimensional
Outline Drawing).
Therstrequirementofthecompressorfoundationisthat
it must be able to support the weight.
SGC 1913 1,830 lb SGC 3511 8,525 lb
SGC 1918 2,050 lb SGC 3515 9,000 lb
SGC 2313 2,690 lb SGC 3519 9,500 lb
SGC 2317 2,990 lb SGC 3524 10,000 lb
SGC 2321 3,115 lb
SGC 2813 4,505 lb SGX 4013 14,100 lb
SGC 2817 4,585 lb SGX 4018 15,700 lb
SGC 2821 6,030 lb SGX 4021 16,730 lb
SGC 2824 6,440 lb
Screw compressors are capable of converting large
quantities of shaft power into gas compression in a relatively
small space. The compression process creates relatively
highfrequencyvibrationsthatrequiresufcientmassinthe
base to effectively dampen them.

070.650-IOM (AUG 2015)
Page 16
SGC ROTARY SCREW COMPRESSOR
INSTALLATION
Thebestinsuranceforatrouble-freeinstallationistormly
anchor the compressor to a suitable foundation using
proper bolting and by preventing piping stress from being
imposed on the compressor. Once the compressor is rigged
into place, its feet must be shimmed to level it. There must
be absolutely no stresses introduced into the compressor
bodyduetoboltingofthefeetandanges.
The compressor motor mount is not designed to carry the
unsupported weight of the motor. The full motor weight
must be supported using the motor lifting point during the
motor installation process. After the necessary bracket to
support the motor have been welded into place on the
package and the rear motor feet and the motor mount have
been bolted into place, the weight of the motor can rest on
the support bracket and the motor mount.
In any screw compressor installation, suction and discharge
lines should be supported in pipe hangers (preferably within
2 feet of vertical pipe run) so that the lines won’t move if
disconnected from the compressor. See table for Allowable
Flange Loads.
Table 3. Allowable Flange Loads
ALLOWABLE FLANGE LOADS
NOZ. MOMENTS (ft-lbf) LOAD (lbf)
SIZE AXIAL VERT. LAT. AXIAL VERT. LAT.
NPS MRMCMLP VCVL
1 25 25 25 50 50 50
1.25 25 25 25 50 50 50
1.5 50 40 40 100 75 75
2 100 70 70 150 125 125
3 250 175 175 225 250 250
4 400 200 200 300 400 400
5 425 400 400 400 450 450
6 1,000 750 750 650 650 650
8 1,500 1,000 1,000 1,500 900 900
10 1,500 1,200 1,200 1,500 1,200 1,200
14 2,000 1,800 1,800 1,700 2,000 2,000
CUSTOMER CONNECTIONS
Asaminimumyoumustconnecttothelocationsspecied
on the port location and oil hydraulic schematic, in addition
to suction and discharge.
Other connections are available for instrumentation, oil
return, and service as noted on the Dimensional Outline
drawing. The electrical connections for the slide stop and
the slide valve transmitters and the solenoid valve coils
must be connected to your control system.
OIL SYSTEM REQUIREMENTS
WARNING
Access valves in brass material must be removed and
the holes lled with steel plugs when package is as-
sembled.
Figure 13. Caution/Identication Tag on Access Valve
The oil system must provide oil to the compressor within
limitation on:
• Oil selection
• Oil pressure
• Oil temperature
• Oil cleanliness
OIL SELECTION
The oil selected must be suitable for the application,
refrigerant and operation condition. Compressor bearings
require a minimum viscosity based on size and speed (rpm).
A maximum viscosity of 100 cSt should not be exited.
Frick compressor oils are recommended —see form
160.802-SPC. Also, Coolware provides Frick oil properties
and information on viscosity requirements for a given
compressor selection.
OIL PRESSURE
Design the complete oil system so that the pressure drops
nomorethan15psiwithacleanoillterelement.Thisis
critical for the proper function of the balance piston and to
ensure the life of the axial bearings. For low pressure and
low pressure differential operation, an oil pump must be
built-intoprovidesufcientoilpressure.
The control system needs to be able to check the oil pressure
and compare to both suction and discharge pressures. In
general, oil pressure shall be minimum (1.5 times the suction
pressure +15 psi) and higher than (discharge pressure – 25
psi). For applications with economizer and/or sideloading,
the oil pressure shall additionally be more than 15psi above
the pressure at the side port when in operation.
Advanced control systems like the Frick Quantum HD will
monitor the oil pressure in many more ways in order to
keep the compressor running beyond these basic limits.
This advanced control will keep the compressor running
safely in partial load conditions.
See “Oil Pump” section on page 6 for additional information.
BALANCE PISTON OIL REQUIREMENTS & REGULATIONS
All SG compressors have a balance piston on the male rotor
inlet end (Fig 14). Oil is fed to the balance piston to coun-
teract a portion of the force of gas pressure.
For models using 193-283mm rotors, the balance piston oil
feed is internal using the common oil connection through
theSB-3port(standardconguration).Aseparatecongu-
ration is available for high pressure operation. On 355 and
408 compressors the oil is fed separately through the SB-2
port (Fig 15). The oil pressure must be kept within the spec-
iedrangeonallcompressors.

070.650-IOM (AUG 2015)
Page 17
SGC ROTARY SCREW COMPRESSOR
INSTALLATION
Figure 14. Balance Piston Location & Capacity/Vi Manifold Designations (193 - 283)
V
i
Increase
V
i
Decrease
Capacity
Decrease
Capacity
Increase
Balance
Piston
Slide Stop
Shaft Seal
Linear Transmitter
For Capacity Indication
Slide Valve
(Internal Oil Feed: 193 - 283 models)
Inlet End
Male Side
Balance
Piston
SB-2
Port
Inlet End
Female Side
Outlet End
Male Side
Outlet End
Female Side
Figure 15. Balance Piston, SB-2 Port & Squeeze Film Damper Locations (355 model)

070.650-IOM (AUG 2015)
Page 18
SGC ROTARY SCREW COMPRESSOR
INSTALLATION
In most cases, SGCH/SGXH 355 and 408 compressor models
require an active regulation of the oil pressure to SB-2. Bal-
ance Piston Regulation (BPR) is needed because the gas
force varies with the position of the slide valve. A low slide
valve position could reduce the load below the minimum
required for the axial bearings. Figure 16 shows a piping and
instrumentation diagram of a compressor with BPR. There
areseveralBPRcongurationsavailableanditisimportant
to select one that works well for the application.
SB3
Each line connects to the main header
1.5” 1” Min.
SM1 SB2
SB4
P
OIL
BPR
Figure 16. SGXH Compressor (355/408) with BPR
Figure17showsastandardcongurationforthe355com-
pressor.ThiscongurationlowersoilpressuretoSB-2tobe
55 psi below discharge pressure when SV < 65%. Contact
thefactoryformorespeciccongurationinformation.In
the case that application and/or operating conditions
change,theBPRsettingsneedreviewedandconguration
changes should be expected. In that case, contact engi-
neering.UsetheCompressorOperatingLogSheettollin
your nominal operating conditions.
Oil Feed
From Header
Restriction
Orifice
Solenoid
Valve
Pressure
Regulating
Valve
To Compressor
Discharge Line
To Inlet Bearing Oil
SB-2 Port
P
S
S
Figure 17. Example BPR Conguration
Note: On all SGX compressors except the 408 models, the
oil feed also lubricates the inlet bearings. For the 408 com-
pressor (MK 2 version) the bearings are lubricated from the
SB-4 connection — for low differential applications the SB-2
port will not need to be piped.
CAUTION
Operating with incorrect balance piston pressure
settings and selection signicantly increases the risk of
compressor breakdown and reduced compressor life.
CAUTION
Changes to application and operating conditions may
change oil pressure requirements to the SB-2 port and
Balance Piston Regulator conguration settings.
Compressors with Squeeze Film Damper (SFD) in the
blocking diameters.
Compressor models with an “X” as the third character have
Squeeze Film Dampers (SFD) built into the rotor blocking
diameters (Fig. 15). The SFDs provide dampening of the
rotor’s movement reducing impacts and lowering the total
vibration of the compressor. In order for the SFDs to work
properly they need to receive “solid” oil — oil free of bubbles
and foam.
Solid oil can be attained by either:
pumping the oil pressure to a minimum of 36 psi above
discharge, or
cooling the oil. With enough sub-cooling, bubbles are
prevented from forming inside the SFDs.*
Compressor ports SB-3 and SB-4 supply oil to the SFDs. As
theoilowcanbesignicant,thefeedlinesmusthavea
well dimensioned size to keep the pressure drop low. Each
line should be connected directly to the main oil header
(Fig. 17). Some applications with low power consumption
and a smaller motor may not have additional pressure and/
or temperature requirements.
Frick Coolware can calculate oil ows, pressure and
temperature required. All nominal operation conditions,
including SB-3 and SB-4 oil pressure requirements, should
be added to your operation log. In the case of application
and/oroperatingconditionchanges,oilowsandsettings
willneed tobe reviewed.Expect conguration orsetting
changes. Fill in the nominal operating conditions in your
Compressor Operating Log Sheet, and revise as needed
when the situation changes.
CAUTION
Operating with incorrect oil pressure to the SB-3 and
SB-4 ports will cause risk of high compressor vibration,
reduced compressor life and breakdown.
CAUTION
Changes to application and operating conditions may
change oil pressure and temperature requirements to
the SB-3 and SB-4 ports.
OIL COOLING REQUIREMENTS
Compressor oil needs to be cooled to control the discharge
temperature, maintain proper oil viscosity and to preserve
the life of the oil. Discharge temperature will be in the 170°
- 180°F range (see CoolWare™) for normal refrigeration ap-
plications.
One application that typically requires higher discharge
temperatures (as high as 280°F) is natural gas gathering at
the wellhead. Moisture is normally present in the gas and

070.650-IOM (AUG 2015)
Page 19
SGC ROTARY SCREW COMPRESSOR
INSTALLATION
it is imperative that the discharge temperature be at least
30°F higher than the discharge dew point temperature for
the gas. Run Coolware with the “Water Saturated” block
checked to get the discharge dew point temperature for
your application. Oil temperatures as high as 170°F can be
used to achieve the necessary discharge temperature to
prevent moisture from condensing in the oil separator. In
special applications, oil temperatures up to 250°F can be
possible with high dew point temperatures. Consult Frick
engineering to address these special applications or for ad-
ditional natural gas compression information.
The main oil injection line that is connected to port SM-1
must have a regulating valve to permit adjustment of the
oilowto maintainthedesireddischargetemperatureat
all times.
The use of a three-way mixing valve is recommended to
keep the oil temperature in the normal range of 120° -
140°F. The valve will provide warm oil to the compressor
quickly, reducing the pressure drop caused by cold, viscous
oil.Thisensuresproperoilowandtemperatureoverthe
full range of operating conditions.
OIL FILTER(S)
Use of lter elements other than Johnson Controls-Frick
must be approved in writing by Johnson Controls-Frick
engineeringor awarrantyclaim maybe denied.Oil lter
specicationshouldbenohigherthanβ10 = 75 with β6= 75
preferred. If the oil analysis shows particle counts exceed-
ingXX/XX/19perISO4406cleanlinesscode,alterchange
is required. If particle counts do not come down, an oil
change is required.
OIL HEATER(S)
Your package must be equipped with oil heaters that provide
sufcient heat to prevent condensation from occurring
during shutdown cycles.
COMPRESSOR OIL
WARNING
DO NOT MIX OILS of different brands, manufacturers,
or types. Mixing of oils can cause excessive oil foam-
ing, nuisance oil level cutouts, oil pressure loss, gas or
oil leakage and catastrophic compressor failure. Cool-
Ware will select a specic Frick oil for the refrigerant
being used. Depending on the application, a different
oil can be selected provided it is of the proper viscos-
ity and is compatible with the refrigerant and com-
pressor elastomers.
OIL PUMP
If your SGC compressor application requires an oil pump, it
is recommended that a strainer be mounted upstream to
protect it. Frick supplied pumps are a positive displacement
gear type that must have a safety relief valve to ensure the
oil pressure will not be more than 50 psi above compressor
discharge pressure for all models.
CAUTION
If oil pressure exceeds 55 PSI above compressor dis-
charge it could cause catastrophic compressor failure
due to male axial bearing failure. See CoolWare™for
your application’s requirements.
COMPRESSOR
COMPRESSOR ROTATION IS CLOCKWISE WHEN FACING
THE END OF THE COMPRESSOR SHAFT
Conrmmotorwillrotatethecompressorclockwisebefore
installing the coupling.
CAUTION
To prevent injury or damage to components, and for
complete details regarding pressurized refrigerant vapor
transfer and recovery, see the current Installation-
Operation-Maintenance Manual for your unit.
MOTOR MOUNTING USING TUNNEL
For specic instruction about motor mounting using a
tunnel use publication 070.660-SM - Bare Rotary Screw
Compressor Replacement.
NOTICE
Refer to the Bare Rotary Screw Compressor Replacment
manual, Frick publication 070.660-SM for motor
mounting instructions.
Table 4. Motor Tunnel Bolt Torque
Compressor
Model Screw Size Torque
ft-lb NM
SGC 19XX M12 X 1.75 58 79
SGC 23XX M12 X 1.75 58 79
SGC 28XX M16 X 2.0 144 195
SGC 35XX M20 X 2.5 260 353
SGX 40XX Not Applicable
MOTOR MOUNTING (FOOT MOUNTED ONLY)
1. Thoroughly clean the motor feet and mounting pads of
grease,burrs,andotherforeignmattertoensurerm
seating of the motor.
2. Attach the motor to the base using bolts and motor
raising blocks, if required.
3. Weld the four kick bolts (not included with compressor)
into place so that they are positioned to allow
movement of the motor feet.
4. After the motor has been set, check to see that the
shafts are properly spaced for the coupling being used.
Check the appropriate Dimensional Outline drawing
for the minimum clearance required between the shaft
ends to change the shaft seal.
COMPRESSOR/MOTOR COUPLING REQUIREMENTS.
SGC/SGX compressors are arranged for direct motor
driveandrequirea exibledrivecouplingtoconnectthe
compressor to the motor.
If you are using the Johnson Controls – Frick motor mount,
the mount is machined to ensure that motor to compressor

070.650-IOM (AUG 2015)
Page 20
SGC ROTARY SCREW COMPRESSOR
OPERATION
is important to achieve the most efcient compressor
operation. Connect to +/- and signal as shown in the wiring
diagram in Figure 19. Refer to Frick compressor panel
instructions 090.040-O for calibration procedure.
Figure 18. Slide Stop Transmitter
Figure 19. Wiring Diagram for Slide Stop Transmitter
CAPACITY SLIDE VALVE TRANSMITTER
The slide valve transmitter (Figure 20) measures the
position of the slide valve (SV) and sends a 4 to 20mA
signal to your control system. The controller will adjust the
position of the SV according to the motor load set point.
The correct position is important to properly load the
compressor and motor. It is important not to overload the
compressor and motor. Observe the maximum power input
and ensure design limitations are not exceeded. Connect to
+/- and signal as shown in the wiring diagram, Figure 21.
Refer to Frick compressor panel instructions for calibration
procedure 090.040-O.
ENDVIEW
DIN CONNECTOR
STAINLESS STEEL WELL
HEAT ISOLATOR
CAST ALUMINUM HOUSING
COMPRESSOR UNLOAD CYLINDER
SHADED AREA SHOWS
CAPACITY LINEAR TRANSMITTER
Figure 20. Capacity Slide Valve Transmitter
alignment is in specication (see the above “MOTOR
MOUNTING” section for mounting details).
If you are using a foot mounted motor, it is essential that
the coupling be properly aligned to ensure proper bearing
and seal performance.
1. Coupling must be selected and installed so that it
doesn’t transmit any axial load to the compressor
shaft. Assure magnetic center is set correctly on sleeve
bearing motors.
2. Set up the minimum distance between compressor
shaft and motor shaft to allow for seal removal (see
Outline drawings).
3. Coupling must be able to take up any misalignment
between motor and compressor. It is critical to the
life of the shaft seal that misalignment is kept to the
minimum possible value. Be sure to follow the coupling
manufacturer’s guidelines for checking and correcting
any misalignment. See the next section for Johnson
Controls–Frick requirements.
COUPLING ALIGNMENT REQUIREMENTS
(FOOT MOUNTED ONLY)
Coupling alignment must be performed prior to start-
up. After the compressor has been installed on the job
site, alignment must be checked again and if necessary
corrected prior to start-up. After a few hours of operation,
the alignment must be checked while the package is still
hot. Correct hot alignment is critical to ensure the life of the
shaft seal and compressor bearings.
Maximum radial runout is .004” total indicator reading.
Maximum axial runout is .004” total indicator reading.
A dial indicator or another appropriate measuring device is
to be used to determine the Total Indicator Runout.
Indicator bracket sag must be checked as all brackets have
someexibility.Thebestwaytomeasurethisistoattach
the dial indicator and bracket on a pipe at the coupling span
distance. Zero the indicator in the 12:00 position, and rotate
the pipe so the indicator is in the 6:00 position. The reading
on the indicator in the 6:00 position is the bracket sag. This
value must be included in the dial indicator readings when
afxedtothecouplingforanaccuratealignment.
DEHYDRATION / EVACUATION TEST
Evacuate the system to 1000 microns. Valve off the vacuum
pump and hold vacuum for several minutes.
Pass – Vacuum cannot rise more than 500 microns during
the hold period.
Fail – Vacuum rise is more than 500 microns during the
hold period. Identify and repair any system leaks. Repeat
vacuum test until requirements are met.
ELECTRICAL INSTALLATION
SLIDE STOP TRANSMITTER
The slide stop transmitter (Figure 18) measures the position
of the slide stop (SS) using a 20 to 4 mA signal to cover
the range of minimum to maximum Vi. The signal is sent
to your control system so that it can adjust the position of
SS according to system pressures. The correct SS position
Other manuals for SGC 1913
1
This manual suits for next models
10
Table of contents
Other Frick Air Compressor manuals

Frick
Frick XJS 95 User manual

Frick
Frick RWB II 60 Owner's manual

Frick
Frick HPS 2709 Owner's manual

Frick
Frick TDS Series Owner's manual

Frick
Frick RWB II User manual

Frick
Frick RWF Series Owner's manual

Frick
Frick RWB II 496 Owner's manual

Frick
Frick HPS 36 User manual

Frick
Frick XJS 95M Owner's manual

Frick
Frick SBTP 355 Series Owner's manual