FriFri Eco 4 User manual

Spécificationstechniques
Technische Daten
Dati tecnici
Technical data
Caracterίsticas técnicas

176
5
Fig 1
2
3
8
10
11

Filtrieren von Oel oder Fett
Das Oel/Fett soll täglich wie folgt filtriert werden:
1. Oeltemperatur 100-130°C
2. Korb (2) entfernen
3. Steuerkasten (5) herausheben
4. Oelbehälter (3) entfernen
Achtung: Behälter ist heiss! Oel/Fett bei 100-130°C filtrieren.
5. Oel/Fett in Behälter (3) zurückgiessen und falls nötig bis auf "MAX" nachfüllen.
6. Steuerkasten (5) einhängen
Wichtig:
Altes Oel

ENGLISH
KEEP THIS MANUAL FOR FUTURE REFERENCE
Warning
This appliance must be earthed.
If the supply cord is damaged, it must be replaced by the manufacturer, its service agent or a similarly qualified
person.
Supply cords shall be oil resistant, sheathed flexible cable not lighter than ordinary polychloroprene or equivalent
elastomer sheathed cord (code 60245 IEC 57).
If replacing the plug connect the terminals as follows:
Green and Yellow cable Earth E
Blue cable Neutral N
Brown cable Live L
Ensure that the plug/socket is accessible at all times.
During operation parts may become hot –avoid accidental contact.
Always disconnect the appliance before servicing, maintenance or cleaning.
Do not attempt to move the fryer when it is full of hot oil.
Install the appliance on a level surface beneath an extraction canopy.
Installation of the appliance
1. Never place the appliance on a combustible surface or against combustible walls.
2. It is not necessary to observe clearances behind or at the sides of the appliance.
3. Noise emission of the fryer: <70db (A).
Electrical connection
This appliance must be installed, commissioned and serviced by a qualified person in accordance with national and
local regulations in force in the country of installation.
Check if voltage and frequency information on the rating plate (rear of the appliance) –Fig 1 (12) corresponds to
power supply.
The fryer has no main switch.
Check that the supply cable - Fig 1 (11) is equipped with a suitable plug.
Operation
Only qualified or trained personnel should use this appliance.
Note:
When using fat for the first time, melt it beforehand in a separate saucepan. The next time you use the fryer, proceed
as follows:
1. Make a few holes in the solidified fat down to the level of the heating elements.
2. Turn the thermostat knob to a maximum of 100°C, heat for 1 minute, then turn the knob back to 0.
Repeat this operation until the fat has become liquid.
To fill the container with oil or melt the fat
(See Figure 1)
1. Remove the lid (1) of the appliance - never cook with the lid in place.
2. Remove the basket (2)
3. Fill the container (3) up to the MAX mark with oil or liquid fat.
Selecting the temperature
Turn the thermostat knob (6) to the temperature required. The amber neon (7) will illuminate. When the neon
extinguishes, the fryer is ready for use.
Stand-by temperature
During long breaks in frying, reduce the temperature to 100°C to save energy and preserve the quality of the oil or fat.

Frying
Put the food into the basket. When using frozen products, shake them well first (not over the fryer) to remove ice
crystals etc.
Place the basket into the oil
As soon as the food is sufficiently fried, raise the basket and hook it over the tank to drain.
During long breaks between frying, switch off at the mains supply and remove the plug.
Note:
Only half-fill the basket. ECO4 = 500 g, ECO6 = 750 g
Be aware that both overfilling and the use of wet products (e.g. frozen food coated with ice) will make the oil foam and
reduce the quality of frying –treat batch sizes accordingly.
Precaution
As a precaution against fire caused by inflamed fat, suitable safeguards such as extinguishers (Halon) or an anti-fire
blanket, should be kept at hand. Never use water to extinguish the flames.
Note that dirty oil will catch fire more quickly and can also cause foam to overflow.
Important:
- The fryer should be constantly supervised.
- Do not switch on the fryer if the oil container is empty.
- After use, switch off the fryer and wait for the oil or fat to cool down before replacing the lid.
- To transport the fryer:
Switch off and allow to cool. Remove the plug, grasp both sides of the fryer - Fig 1 (4) firmly and raise it carefully.
Maintenance
Before carrying out maintenance tasks, unplug the fryer and allow it to cool.
Filtering oil or fat
The oil or fat should be filtered daily as follows:
1. Cool the oil temperature to a maximum of 50°C.
2. Remove basket.
3. Remove the control box- Fig 1 (5).
4. Remove the oil tank.
5. Filter, and then pour the oil or fat back into its container and, if necessary, fill up to the MAX level.
6. Refit the control box.
Important:
Used oil should be disposed of according to the local regulations and should on no account be poured down the drain.
Cleaning
Regular cleaning will make your fryer last longer and improve the quality of the fried food. The fryer should therefore
be cleaned daily as follows:
1. Isolate the appliance from the mains. Remove the basket. Take out the control box with the heating elements,
remove the oil tank and empty it.
2. Clean the heating elements –Fig 1 (8) with warm water and a mild detergent.
Important:
Never use a water jet or steam cleaner and do not immerse this appliance.
Clean the heating elements with à normal soft brush. Take care to avoid damaging the thermostat probes.
After-sales service
Should you have any problems with your fryer, contact your supplier. Before doing so, firstly check the following
points:
1. Has the mains fuse blown ?
2. Is the mains plug plugged in ?
3. Is the mains cable in good order ?
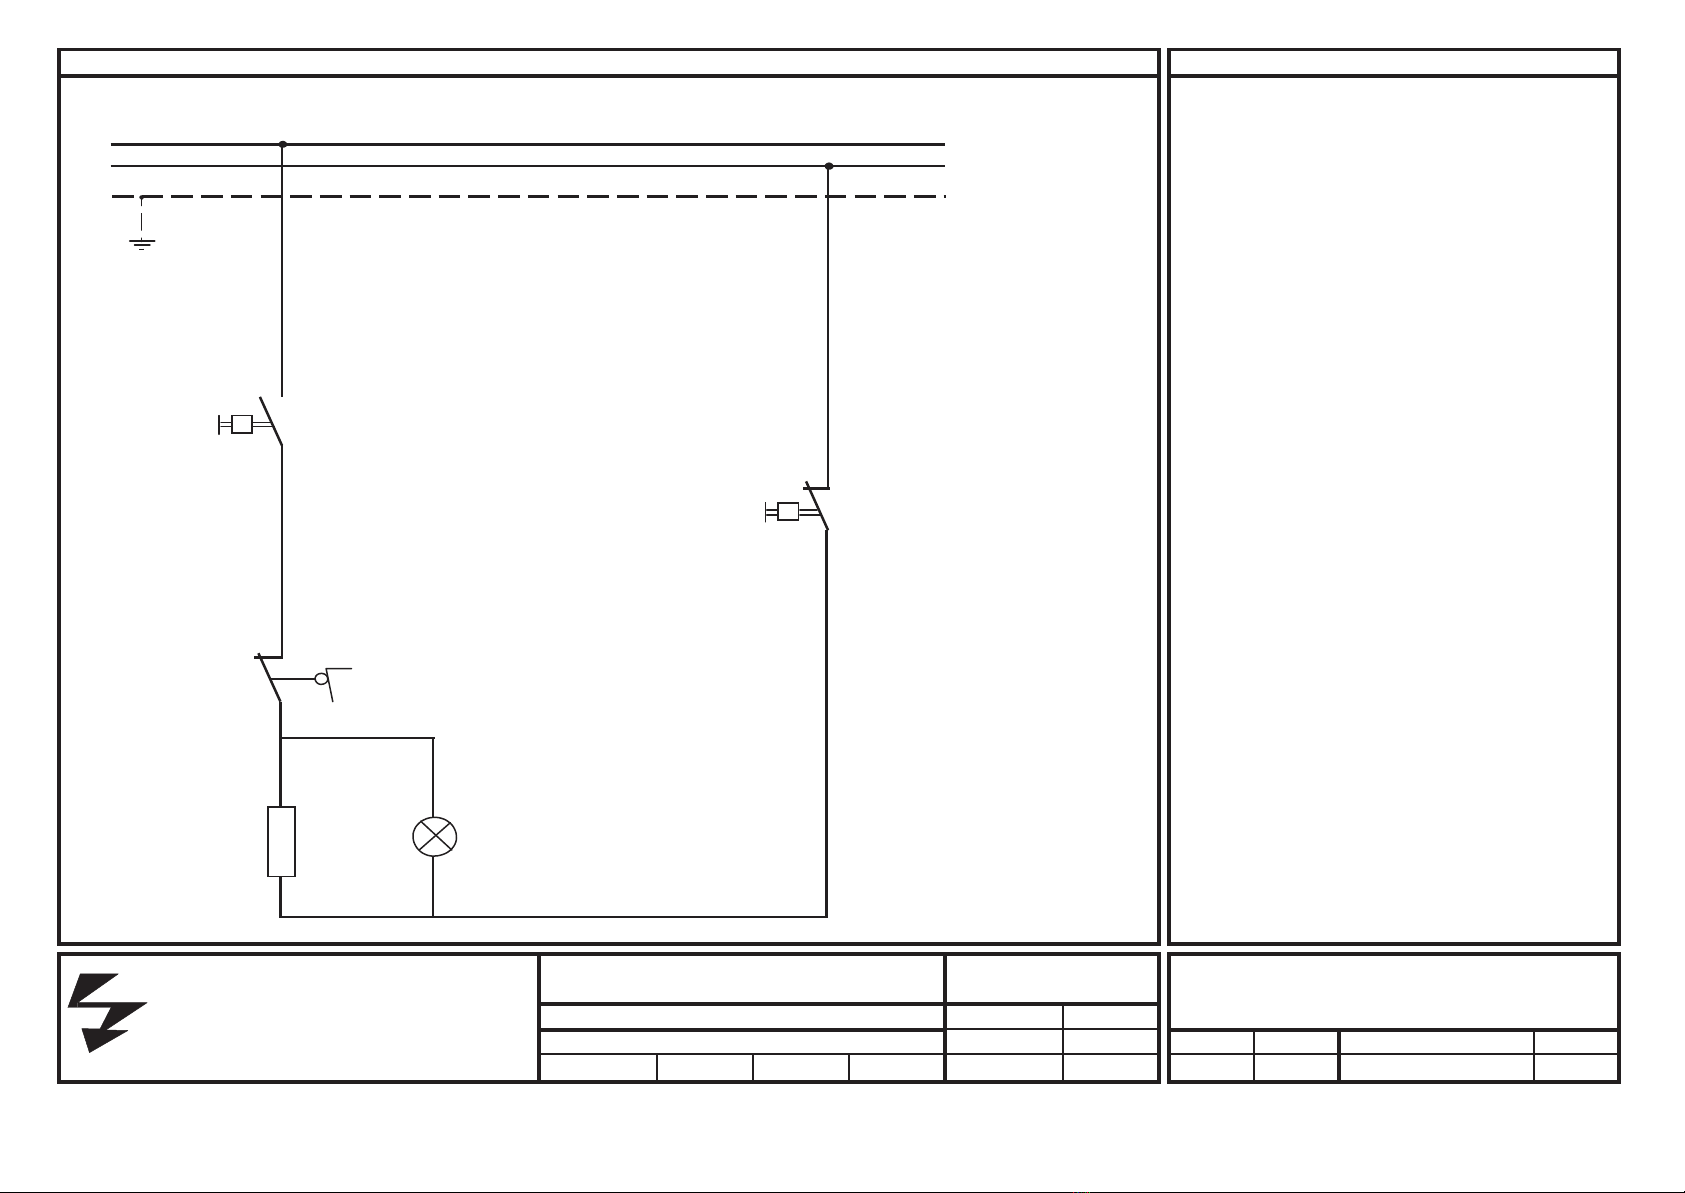
4. Check the safety thermostat at the rear of the appliance –Fig 1 (9). This can cut out for the following reasons:
- Not enough oil or fat in the container.
- The heating elements were switched on for too long when melting fat.
To re-set the safety thermostat:
- Let the oil or fat cool down to about 170°C.(Note: The safety thermostat will not
re-set unless the oil has cooled to this temperature).
- Press the red button in as far as the stop.
5. Is the control box seated correctly so that the safety switch is engaged –Fig 1 (10)?

ESPANOL
Utilización del aparato
Llenar la cuba de aceite o hacer derretir la grasa (ver ilustración)
1. Retirar la tapadera (1) del aparato
2. Sacar el cesto (2)
3. Llenar la cuba (3) hasta el nivel MAX con aceite o grasa líquida.
Observación:
La primera vez que se emplea grasa, ésta debe ser derretida previamente en un recipiente separado. Para las
utilizaciones siguientes, proceder como a continuación se indica:
1. Hacer algunos agujeros en la grasa cuajada, hasta el nivel de la superficie de caldeo.
2. Ajustar el termostato en 100° C como máximo, calentar durante un minuto, y seguidamente volver a poner el
termostato en la posición 0. Repetir esta operación hasta que la grasa se haya licuado.
Selección de la temperatura
Girar el termostato de ajuste (6) hasta alcanzar la temperatura deseada. La lámpara indicadora de color naranja (7)
se enciende y cuando se apaga la freidora está lista para ser empleada.
Temperatura de espera
Durante las paradas prolongadas de utilización, reducir la temperatura a 100° C para economizar la energía y no
malgastar el aceite o la grasa.
La cocción
1. Poner los alimentos en el cesto (2) Sacudir debidamente los productos congelados (fuera de la freidora)
2. Poner el cesto (2) en el aceite
3. En cuanto los alimentos estén dorados como se desee, levantar el cesto (2)
y suspenderlo en el gancho de la cuba para que escurra la fritura.
Observación:
Llenar el cesto (2) sólo hasta la mitad: FT4eco 50 g, FT6eco 750 g
Un llenado demasiado importante o con alimentos mojados (por ejemplo, congelados cubiertos de hielo) hace
espumar el aceite. La calidad de la fritura es peor. Si el aceite o la grasa llegaran a inflamarse, poner
inmediatamente la tapadera de la freidora sobre la cuba para extinguir el incendio. Retirar el enchufe eléctrico.
¡No utilizar nunca agua para apagar las llamas!
Para combatir un incendio producido por materias grasas que se inflaman, los medios apropiados, tales como los
extintores específicos (Halon) o una manta contra incendios, deben ser puestos a disposición inmediatamente.
Un aceite sucio se inflama con mayor rapidez y favorece el desbordamiento de la espuma.
Importante:
- La freidora debe permanecer bajo vigilancia constante.
- No poner en marcha la freidora si no contienen materia grasa.
- Después de haberla utilizado, desconectar la freidora y esperar hasta que el aceite o la grasa se haya enfriado
antes de poner la tapadera.
-Transporte de la freidora: Quitar el enchufe. Empuñar fuertemente ambos lados (4) y levantar con precaución.
¡Atención!
Aceite hirviendo: ¡peligro de quemaduras! Esperar hasta que la freidora se haya enfriado antes de desplazarla o
transportarla. La freidora debe ser utilizada sin la tapadera.
Mantenimiento
Antes de dar comienzo a los trabajos de mantenimiento, retirar el enchufe. Se aconseja ponerse guantes para evitar
las quemaduras producidas por el aceite, las partes metálicas o las empuñaduras ardientes.

Filtrado del aceite o de la grasa
El aceite o la grasa deben ser filtrados a diario como a continuación se indica:
1. Ajustar la temperatura del aceite a 100-130° C
2. Retirar el cesto (2)
3. Levantar la caja de mando (5)
4. Retirar la cuba (3). Atención: la cuba está caliente. Filtrar el aceite a 100-130° C
5. Volver a verter el aceite o la grasa en la cuba (3) y, si es necesario, completar hasta el nivel MAX)
6. Volver a poner la caja de mando (5) en su sitio.
Importante:
El aceite usado debe ser recuperado de conformidad con las prescripciones locales y no debe ser vertido en ningún
caso en las cañerías.
Limpieza
Una limpieza regular aumenta la vida útil de la freidora y mejora la calidad de la fritura. En consecuencia, se
recomienda limpiarla a diario como se indica a continuación:
1. Retirar el cesto (2), sacar la caja de mando (5) con la superficie de caldeo, retirar la cuba (3) y vaciarla.
2. Limpiar la superficie de caldeo y la cuba con agua caliente adicionada con un detergente suave.
Importante:
- No salpicar la caja de mando para limpiarla
- Limpiar los elementos de caldeo (8) con un cepillo normal (no un cepillo metálico).
No causar daños a la sonda del termostato.
- Evitar dar golpes a las superficies de caldeo.
Servicio de posventa
En caso de avería, diríjase a su revendedor.
Antes de solicitar la presencia de un montador, sírvase controlar los puntos siguientes:
1. ¿Está defectuoso el fusible del sector?
2. ¿Está conectado el enchufe del sector (11) ?
3. ¿Está bien el cable de conexión (11) ?
4. ¿El termostato de seguridad (9)?
Este puede desconectar por las razones siguientes:
- Falta de aceite o de grasa en la cuba
- Superficies de caldeo conectadas durante demasiado tiempo al derretir la grasa.
Nueva conexión del termostato de seguridad:
Dejar enfriar la materia grasa hasta 170° C aprox.; eventualmente agregar. Atención: el termostato de seguridad
no puede volver a ser conectado más que a partir de esta temperatura. Para volverlo a conectar hundir a fondo el
botón rojo (ver ilustración)
5. Está la caja de mando (5) correctamente colocada en las guias ?
Está el micro-interruptor (10) de la caja de mando conectado ?
Posicionamiento del aparato
1. No instalar el aparato sobre una superficie o contra un muro inflamables.
2. No es necesario dejar un espacio libre alrededor del aparato.
3. Emisión de ruido del aparato: <70 db (A).
Conexión eléctrica
La conexión y la puesta en servicio deben ser hechas por una persona competente. Debe realizarse como a
continuación se indica:
1. Verificar que las características de la red (voltaje y frecuencia) correspondan
a las indicaciones de la placa (12) descriptiva del aparato.
2. La freidora no tiene un interruptor principal. El cable de conexión va provisto de un enchufe europeo. En caso de
no utilización prolongada de la freidora, retirar el enchufe (11) de la toma de corriente.

SCHEMA
LEGENDE
L1
N
PE
1
F21 21
190°C
F11 2
220°C
2
S21 2
ECO4 / 2.3Kw
ECO4,6 / 3.2Kw H12
R1
F11
Sicherheitsthermostat (Eigenbruchs.)
Thermostat desécurité
Safetythermostat
F21 Arbeitsthermostat
Thermostatdetravai
Controlthermostat
S21
Sicherheits- Endschalter
Switchsécurité
Safetyswitch
R1 Heizkörper
Corps de chauffe
Heatingelement
H12 Signallampeorange:Heizung
Lampe témoin orange: Chauffage
Amber neon:Heate
SCHEMA ELECTRIQUE
ELEKTROSCHEMA
ELECTRICAL DIAGRAM
FRITA ECO 4,6
ECO4 / 2,3Kw 3x1mm2
ECO4,ECO6/3,2Kw3x1.5mm2
Date
Visa
No.schéma
Index
AC 230V
50/60Hz
L+N+PE
30.11.1999
OB
500535
C

ECN4285
USE OF SOLID FATS
English:
This unit is designed to be used with oils and fats in a liquid form.
Oils and fats that become solid at lower temperatures must be liquefied prior
to dispensing into the fryer tank.
This instruction applies to both filling from empty and topping up during use.
On units with filtration the oil or fat used must also be liquid prior to operating
the pump.
Italian: Utilizzo di grassi solidi
Questo apparecchio è progettato per essere utilizzato con oli e grassi in forma
liquida.
Oli e grassi che diventano solidi a basse temperature devono essere liquefatti prima
di venire immessi nella vasca della friggitrice.
Queste istruzioni sono valide sia per riempire la vasca quando è vuota, sia per
reintegrare durante l’utilizzo.
Per quanto concerne i modelli con il filtraggio dell’olio, l’olio o il grasso deve essere
liquido prima di attivare la pompa.
French : Utilisation degraisses solides
Ce produit est conçu pour être utilisé avec des huiles et des graisses sous forme
liquide. Les huiles et les graisses qui deviennent solides à des températures plus
basses doivent être liquéfiées avant d'être distribuées dans la cuve de la friteuse.
Cette notice s'applique à la fois au remplissage à vide et au remplissage pendant
l'utilisation.
Sur les produits avec filtration, l'huile ou la graisse utilisée doit également être liquide
avant de faire fonctionner la pompe.
German: Verwendung von festen Fetten
Dieses Gerät ist für den Gebrauch mit Ölen und Fetten in flüssiger Form bestimmt.
Öle und Fette, die bei niedrigeren Temperaturen fest werden, müssen vor der
Ausgabe in den Fritierbehälter verflüssigt werden.
Diese Anweisung gilt sowohl für das Befüllen von leeren als auch das Auffüllen
während des Gebrauchs.
Bei Geräten mit Filterung muss das verwendete Öl oder Fett vor dem Betrieb der
Pumpe, ebenfalls flüssig sein.
Other manuals for Eco 4
2
This manual suits for next models
3
Table of contents
Languages:
Other FriFri Fryer manuals

FriFri
FriFri Eco 4 User manual

FriFri
FriFri Basic Series User manual

FriFri
FriFri 1948 Duofil User manual

FriFri
FriFri RETRO FRI0802015BLP User manual

FriFri
FriFri SIMPLYFRY SF34C Series User manual

FriFri
FriFri EASY 411 User manual

FriFri
FriFri SUPER EASY 211 User manual

FriFri
FriFri Profi 6 User manual

FriFri
FriFri Basic+ User manual

FriFri
FriFri 1905 DuoFil User manual