FriFri SIMPLYFRY SF34C Series User manual

NL HANDLEIDING
Gelieve alle belangrijke opmerkingen,
waarschuwingen en bedieningsinstructies
aandachtig te lezen en na te leven voordat
u het toestel gebruikt.
FR MODE D’EMPLOI
Avant utilisation, veuillez tout lire et suivre.
Avertissement, consignes de sécurité,
précautions et instructions
de fonctionnement importants.
EN INSTRUCTION MANUAL
Before use, please read and follow all
important instructions
Safeguards, warnings, cautions and
operating instructions.
SIMPLYFRY SF34C SERIE
Fri_FSF34C_ME_V2.indd 1 27/11/17 16:17

NL
2
ALGEMENE BESCHRIJVING
Met uw nieuwe SimplyFry kunt u uw favoriete ingrediënten en snacks op een gezondere manier bereiden. Het toestel maakt gebruik van warme lucht in combinatie met snel circulerende
lucht en een grill bovenaan waarmee u heel uiteenlopende gerechten op een gezonde, snelle en veilige manier kunt bereiden. Hierbij worden al uw ingrediënten gelijktijdig en gelijkmatig
opgewarmd. In de meeste gevallen hoeft u zelfs geen olie toe te voegen.
1
1 1
7
8
2
2
2
3
3
6
5
4
1Mand
2Vrijgaveknop mand
3Pan
4Digitale display
5Luchtinlaat
6Luchtafvoeropeningen (achterkant)
7Stroomsnoer (achterkant)
8Resetknop (onderaan naast het typeplaatje)
Programma’s
Frieten Kip Cake
Lam Rood vlees
Schelpdier Vis
4
Fri_FSF34C_ME_V2.indd 2 27/11/17 16:17

NL
3
BELANGRIJKE OPMERKING
LEES DEZE HANDLEIDING AANDACHTIG VOORDAT U HET TOESTEL GEBRUIKT EN BEWAAR
ZE, ZODAT U ZE LATER INDIEN NODIG GEMAKKELIJK OPNIEUW KUNT RAADPLEGEN.
GEVAAR
- Dompel de behuizing, waarin elektrische componenten en de verwarmingselementen ingebouwd zijn,
niet onder in water en spoel ze ook niet onder de kraan. zodat u elk risico op een elektrische schok kunt
voorkomen.
- Leg de ingrediënten die moeten worden gefrituurd altijd in de mand, zodat ze niet in contact komen met
de verwarmingselementen.
- Dek de luchttoevoe -en de luchtafvoeropeningen niet af terwijl het toestel werkt.
- Vul de pan niet met olie, wegens brandrisico.
- Raak nooit de binnenkant van het toestel aan terwijl het in werking is.
WAARSCHUWING
- Dit toestel is niet bedoeld om te worden gebruikt door personen (inclusief kinderen onder de 8 jaar) met
een beperkt fysiek, zintuiglijk of mentaal vermogen of een gebrek aan ervaring of kennis, tenzij ze het
toestel onder toezicht gebruiken of ze instructies hebben ontvangen over het gebruik van het toestel van
een persoon die verantwoordelijk is voor hun veiligheid. Voorzie toezicht op kinderen zodat ze niet met het
toestel spelen.
- Controleer of de spanning die op het toestel wordt vermeld, overeenstemt met de spanning van het
plaatselijke elektriciteitsnet voordat u de stekker van het toestel in het stopcontact steekt.
- Gebruik het toestel niet als de stekker, het stroomsnoer of het toestel zelf beschadigd is.
- Als het snoer beschadigd is, moet u het laten vervangen door de fabrikant, zijn hersteldienst of gelijkaardig
gekwaliceerde personen om gevaar te vermijden.
- Voorzie toezicht op kinderen, zodat ze niet met het toestel spelen. Kinderen mogen het toestel niet
schoonmaken of onderhouden tenzij ze onder toezicht staan en ouder zijn dan 8 jaar.
- Houd het stroomsnoer uit de buurt van hete oppervlakken.
- Steek de stekker van het toestel niet in het stopcontact en gebruik ook het bedieningspaneel niet wanneer
uw handen nat zijn.
- Sluit het toestel alleen aan op een geaard stopcontact. Controleer altijd of de stekker behoorlijk in het
stopcontact zit.
- Sluit dit toestel nooit aan op een externe timerschakelaar of een afzonderlijke afstandsbediening, om
gevaarlijke situaties te voorkomen.
- Plaats het toestel niet op of in de nabijheid van brandbare materialen (bv. tafelkleed of gordijn).
- Plaats het toestel niet tegen een muur of tegen andere toestellen. Laat minstens 10 cm ruimte vrij aan de
achterkant en de zijkanten en even veel boven het toestel. Plaats niets op het toestel.
- Gebruik het toestel alleen voor het doeleinde dat in deze handleiding wordt beschreven.
- Laat het toestel nooit werken zonder dat iemand in de buurt blijft.
- Tijdens het frituren met hete lucht ontsnapt hete stoom via de luchtafvoeropeningen. Houd uw handen en
uw gezicht op een veilige afstand van de stoom en van de luchtafvoeropeningen. Houd ook rekening met
het gevaar van hete stoom en lucht wanneer u de pan uit het toestel haalt.
- Het is mogelijk dat de toegankelijke vlakken tijdens het gebruik heet worden.
- Trek onmiddellijk de stekker van het toestel uit het stopcontact als u zwarte rook uit het toestel ziet komen.
Haal de pan pas uit het toestel als er geen rook meer uit het toestel ontsnapt.
OPGELET
- Plaats het toestel op een horizontaal, effen en stabiel oppervlak.
- Dit toestel is alleen geschikt voor huishoudelijk gebruik bij particulieren.
- Als het toestel op een verkeerde manier of voor professionele of semi-professionele doeleinden wordt
gebruikt of als het niet wordt gebruikt conform de instructies in de handleiding, vervalt de garantie en kun-
nen we niet aansprakelijk worden gesteld voor eventuele schade die door dat gebruik wordt veroorzaakt.
- Trek altijd de stekker uit het stopcontact nadat u het toestel hebt gebruikt.
- Laat het toestel ongeveer 30 minuten afkoelen voordat u het hanteert of reinigt.
- Zorg ervoor dat de ingrediënten die in het toestel worden bereid, goudgeel zijn als ze er worden uitgehaald
- en niet donker of bruin. Verwijder verbrande resten.
- Het toestel is aan de binnenkant voorzien van een microschakelaar: wanneer de pan tijdens het gebruik
wordt verwijderd, wordt het toestel automatisch uitgeschakeld.
OVERVERHITTINGSBEVEILIGING
- Het toestel is met een beveiliging tegen oververhitting uitgerust. Als het regelsysteem voor de binnentem-
peratuur niet meer werkt, wordt de beveiliging automatisch ingeschakeld en kan het toestel niet meer
worden gebruikt. Trek in dat geval de stekker uit het stopcontact.
- Alleen wanneer het toestel volledig afgekoeld is, mag u de RESET-toets onderaan het toestel (naast het
typeplaatje) indrukken om de SimplyFry opnieuw te gebruiken. Gebruik hiervoor een scherp voorwerp (zie
de afbeeldingen hierna).
- De RESET-toets (kleine gaatje) bevindt zich centraal aan de onderkant van het toestel. Om het toestel te
resetten hoeft U door middel van een puntig voorwerp de RESET-toets in te drukken
AUTOMATISCHE UITSCHAKELING
Dit toestel is met een timer uitgerust. Wanneer die timer naar nul heeft teruggeteld, weerklinkt een geluids-
signaal en wordt het toestel automatisch uitgeschakeld. indien u het toestel handmatig wenst uit te schak-
kelen, druk op de «-»-toets onder de thermometer.
Opmerking: Ook als u de pan tijdens het gebruik uit het toestel haalt,wordt het toestel automatisch uitgeschakeld.
ELEKTROMAGNETISCHE VELDEN (EMV)
Dit toestel beantwoordt aan alle normen met betrekking tot elektromagnetische velden (EMV). Als het op
een behoorlijke manier en volgens de instructies in deze handleiding wordt gebruikt, is het toestel veilig
volgens de wetenschappelijke kennis die vandaag voorhanden is.
TESTSPECIFICATIES/NORM
IEC 60335-2-9 : 2002 + A1 : 2004 + A2 : 2008
IEC 60335-1 : 2001 + A1 : 2004 + A2 : 2010
EN 60335-2-9 : 2003 + A1 : 2004 + A2 : 2006 + A12 : 2007 + A13 : 2010
EN 60335-1 : 2002 + A11 : 2004 + A1 : 2004 + A12 : 2006 + A2 : 2006 + A13 : 2012
Fri_FSF34C_ME_V2.indd 3 27/11/17 16:17

NL
4
a. Het ventilatie-icoontje begint te branden en duidt aan dat het toestel werkt.
b. De timer begint vanaf de ingestelde bereidingstijd af te tellen.
c. Overtollige olie uit de ingrediënten wordt onderin de pan opgevangen.
8. Sommige ingrediënten moeten halverwege de bereidingstijd worden opgeschud (zie hiervoor de rubriek
‘Instellingen’ in dit hoofdstuk). Haal hiervoor de pan met de handgreep uit het toestel en schud de
ingrediënten op. Schuif de pan daarna terug in de SimplyFry en blijf frituren.
Opgelet: Druk tijdens het opschudden niet op de knop van de hendel.
Tip: U kunt ook de mand uit de pan halen en alleen de mand opschudden, zodat u het gewicht van de
pan niet hoeft te dragen. Trek daarvoor de pan uit het toestel, plaats ze op een hittebestendig oppervlak
en druk op de knop van de hendel.
Tip: Als u de timer op de helft van de bereidingstijd hebt ingesteld, kunt u de ingrediënten opschudden
zodra de timer een geluidsignaal laat horen. In dat geval moet u de timer natuurlijk opnieuw instellen,
zodat de ingrediënten na het opschudden de volledige bereidingstijd doorlopen.
Tip: Als u de timer op de volledige bereidingstijd instelt, hoort u tijdens het koken geen geluidsignaal. U
kunt de pan op elk moment uit het toestel halen om de toestand van de ingrediënten te controleren. Op
dat moment wordt de stroomtoevoer automatisch onderbroken. Zodra u de pan weer in het toestel hebt
geschoven, wordt de stroomtoevoer naar het toestel hersteld (zolang de timer nog loopt).
9. Zodra de timer een geluidsignaal laat horen, is de vooraf ingestelde bereidingstijd verlopen. Trek de pan
uit het toestel en plaats ze op een hittebestendig oppervlak.
Opmerking: U kunt het toestel ook handmatig uitschakelen. Raak daarvoor de OFF-knop aan, stel de
TIMER-knop op 0 of trek de pan rechtstreeks uit het toestel.
10. Controleer of de ingrediënten klaar zijn.
Als dat nog niet het geval is, kunt u de pan terug in het toestel schuiven en enkele minuten extra op
de timer instellen.
11. Als u kleine ingrediënten (bv. frieten) wilt uitnemen, moet u op de vrijgaveknop van de mand drukken
en daarna de mand uit de pan nemen.
Draai de mand niet om terwijl ze nog aan de pan vast zit, want op die manier komt de overtollige olie
die zich onderin de pan heeft verzameld, op de ingrediënten terecht.
De pan en de ingrediënten zijn nog zeer warm na de bereiding. Afhankelijk van het soort ingrediënten
die in het toestel worden bereid, is het mogelijk dat er stoom uit de pan ontsnapt.
12. Maak de mand leeg in een schaal of op een bord.
Tip: Gebruik een tang om grote of breekbare ingrediënten uit de mand te halen.
13. Wanneer een deel van de ingrediënten klaar is, kunt u de SimplyFry meteen opnieuw gebruiken voor
een volgende bakbeurt.
INSTELLINGEN
In de tabel hieronder vindt u de basisinstellingen voor de ingrediënten die u wilt bereiden.
Opmerking: Houd er rekening mee dat deze instelwaarden louter indicatief zijn. Aangezien ingrediënten
verschillen in herkomst, grootte, vorm en merk, kunnen we de beste instelling voor uw specieke ingre-
diënten niet adviseren.
Doordat de technologie van de snel circulerende hete lucht de lucht binnen het toestel onmiddellijk
opwarmt, wordt het proces nauwelijks verstoord wanneer de pan tijdens het frituren kortstondig uit het
toestel wordt gehaald.
Tips
- Voor kleinere ingrediënten geldt meestal een iets kortere bereidingstijd dan voor grotere ingrediënten.
VÓÓR HET EERSTE GEBRUIK
VOORBEREIDING VÓÓR GEBRUIK
GEBRUIK VAN HET TOESTEL
1. Verwijder al het verpakkingsmateriaal.
2. Verwijder eventuele stickers of labels van het toestel.
3. Reinig de mand en de pan grondig met warm water, een beetje afwasmiddel en een niet-schurende
spons.
Opmerking: U kunt deze onderdelen in een vaatwasser reinigen.
4. Wrijf de binnenkant en de buitenkant van het toestel met een vochtige doek schoon.
Dit is een SimplyFry die met warme lucht werkt. Vul de pan niet met olie of frituurvet.
1. Plaats het toestel op een horizontaal, effen en stabiel oppervlak.
Plaats het toestel niet op een oppervlak dat niet hittebestendig is.
2. Plaats de mand op de juiste manier in de pan.
Opgelet: de mand MOET op de juiste manier in het toestel worden geplaatst, want anders werkt het
toestel niet!
3. Trek het stroomsnoer uit het toestel en steek de stekker in een geaard stopcontact.
Vul de pan niet met olie of een andere vloeistof.
Plaats niets op het toestel.
Plaats niets op de luchttoevoeropeningen aan de twee kanten van het toestel. Op die manier
wordt immers de luchtstroom verstoord en kan geen goed frituurresultaat worden bereikt.
De SimplyFry kan een hele reeks ingrediënten bereiden. Bekijk hiervoor de tabel in de rubriek‘Instellingen’ hierna.
FRITUREN MET HETE LUCHT
1. Steek de stekker in een geaard stopcontact.
2. Haal de pan voorzichtig uit de SimplyFry.
3. Leg de ingrediënten in de mand.
Opmerking: Leg de mand nooit helemaal vol en respecteer ook altijd de aanbevolen hoeveelheid
(zie de rubriek ‘Instellingen’ in dit hoofdstuk). Anders kunt u niet op een optimaal eindresultaat rekenen.
4. Schuif de pan opnieuw op de juiste manier in de SimplyFry
Gebruik de pan nooit terwijl de mand er niet in zit.
Als de pan niet op de correcte manier in de SimplyFry is bevestigd, zal het toestel niet
werken!
Opgelet: Raak de pan pas aan nadat ze voldoende is afgekoeld, want tijdens het gebruik
wordt ze zeer heet. Houd de pan alleen bij de handgreep vast.
5.Schakel het toestel in door op de -toets te drukken en schakel het uit door op de -toets te drukken.
U kunt het toestel ook uitschakelen door de tijd met de «-»-toets onder de horloge op 00 in te stellen.
6. Kies door middel van de «M»-toets het gewenste programma in.
U kunt de tijd en de temperatuur instellen volgens de hoeveelheden
7. Druk op de -toets om het programma te starten
Fri_FSF34C_ME_V2.indd 4 27/11/17 16:17

NL
5
- Voor een grotere hoeveelheid ingrediënten geldt een iets langere bereidingstijd; voor een kleinere hoeveel-
heid ingrediënten geldt een iets kortere bereidingstijd.
- Als u kleinere ingrediënten halverwege de bereidingstijd eens opschudt, kunt u het eindresultaat optimali-
seren en kunt u vermijden dat sommige ingrediënten ongelijkmatig worden gebakken.
- U krijgt een knapperig resultaat als u een beetje olie bij verse aardappelen voegt. Wacht hoogstens enkele
minuten om uw ingrediënten te frituren nadat u olie hebt toegevoegd.
- Snacks die in een oven kunnen worden bereid, kunnen ook in de SimplyFry worden bereid.
- Gebruik kant-en-klaar deeg om gevulde snacks op een snelle en gemakkelijke manier te bereiden. Kant-
en-klaar deeg vereist ook een kortere bereidingstijd dan zelfgemaakt deeg.
- Plaats een bakvorm of een ovenschaal in de mand van de SimplyFry als u een cake of een quiche wilt
bakken of als u delicate of gevulde ingrediënten wilt bereiden.
- U kunt de SimplyFry ook gebruiken om ingrediënten opnieuw op te warmen. Stel in dat geval de tempe-
ratuur op 150 °C in (tot 10 minuten).
Min.-max. Hoeveelheid (g) Temperatuur (°C) Tijd (min.) Opschudden Extra informatie
AARDAPPELEN EN FRIETEN Dunne diepvriesfrieten 300-700 200 9-16
Dikke diepvriesfrieten 300-700 200 11-20
Zelfgebakken frieten (8×8 mm) 300-800 200 16-10 Voeg 1/2 lepel olie toe
Zelfgebakken aardappelpartjes 300-800 180 18-22 Voeg 1/2 lepel olie toe
Zelfgebakken aardappelblokjes 300-750 180 12-18 Voeg 1/2 lepel olie toe
Rosti 250 180 15-18
Aardappelgratin 500 200 15-18
VLEES EN GEVOGELTE Steak 100-500 180 8-12
Varkenskarbonade 100-500 180 10-14
Hamburger 100-500 180 7-14
Worst 100-500 200 13-15
Drumsticks 100-500 180 18-22
Kiplet 100-500 180 10-15
SNACKS Loempia 100-400 200 8-10
Kipnuggets 100-400 200 6-10
Fish stick 100-400 200 6-10
Kaaskroketten 100-400 180 8-10
Gevulde groenten 100-400 160 10
BAKKEN Cake 300 160 20-25 Gebruik bakvorm
Quiche 400 180 20-22 Gebruik bakvorm/ovenschaal
Mufns 300 200 15-18 Gebruik bakvorm
Zoete snacks 400 160 20 Gebruik bakvorm/ovenschaal
Opmerking: verwarm de SimplyFry 3 minuten voor alvorens diepgevroren/te frituren voeding te gerbuiken
Fri_FSF34C_ME_V2.indd 5 27/11/17 16:17

NL
6
REINIGING
OPSLAG
MILIEU
GARANTIE EN SERVICE
Reinig het toestel telkens nadat u het hebt gebruikt.
Gebruik geen metalen keukengerei of schurende reinigingsproducten om de pan en de
mand te reinigen, want op die manier zou u de anti-aanbaklaag kunnen beschadigen.
1. Trek de stekker van het toestel uit het stopcontact en laat het toestel afkoelen.
Opmerking: Haal de pan uit het toestel, zodat de SimplyFry sneller kan afkoelen.
2. Wrijf de buitenkant van het toestel met een vochtige doek schoon.
3. Reinig de pan en de mand met heet water, wat afwasmiddel en een niet-schurende spons.
U kunt resterend vuil met een ontvettingsmiddel verwijderen.
Opmerking: De pan en de mand kunnen zonder probleem in de vaatwasmachine worden gereinigd.
Tip: Vul de pan met heet water en wat afwasmiddel als er vuil aan de mand of op de onderkant van
de pan blijft hangen. Plaats de mand in de pan en laat beide onderdelen ongeveer 10 minuten weken.
4. Maak de binnenkant van het toestel schoon met heet water en een niet-schurende spons.
5. Maak het verwarmingselement met een borstel schoon om eventuele etensresten te verwijderen.
1. Trek de stekker van het toestel uit het stopcontact en laat het toestel afkoelen.
2. Controleer of alle onderdelen schoon en droog zijn.
3. Plaats de SimplyFry op een schone en droge plaats.
Verwijder het toestel op het einde van zijn levensduur niet samen met het huishoudafval, maar
bezorg het aan een ofcieel ophaalcentrum, waar het kan worden gerecycleerd. Op die manier
helpt u het milieu te beschermen.
Als u service of informatie nodig hebt of als u een probleem hebt, kunt u naar onze website surfen of contact
opnemen met uw verdeler.
ZELFGEBAKKEN FRIETEN MAKEN
Ga als volgt te werk om zelfgebakken frieten te maken.
1. Schil de aardappelen en snijd ze in frieten.
2. Was de frieten grondig en droog ze met keukenpapier.
3. Giet een halve eetlepel olijfolie in een schaal, leg er de frieten op en meng ze tot alle frieten onder
de olie zitten.
4. Haal de frieten met uw vingers of met keukengerei uit de schaal, zodat de overtollige olie in de
schaal achterblijft. Leg de frieten in de mand.
Opmerking: Kantel de schaal niet zodat de frieten in één keer in de mand vallen, want dan komt
er overtollige olie onderin de pan terecht.
5. Bak de frieten volgens de instructies die in dit hoofdstuk worden beschreven.
www.frifri.be
Uw verdeler:
Fri_FSF34C_ME_V2.indd 6 27/11/17 16:17

NL
7
OPLOSSEN VAN PROBLEMEN
PROBLEEM MOGELIJKE OORZAAK OPLOSSING
De SimplyFry werkt niet De stekker van het toestel zit niet in het stopcontact. Steek de stekker in een geaard stopcontact.
U hebt de timer niet ingesteld. Druk de «+» en «-» toets in bij de horloge om de gewenste bereidingstijd
in te schakelen.
De pan zit niet juist in het toestel. Schuif de pan op een correcte manier in het toestel.
De oververhittingsbeveiliging is ingeschakeld. Druk met een scherp voorwerp de RESET-knop onderaan het toestel in.
De ingrediënten die met de SimplyFry werden bereid zijn
niet gaar.
Er liggen te veel ingrediënten in de mand. Leg minder ingrediënten in de mand. Kleinere hoeveelheden worden
gelijkmatiger gebakken.
De temperatuur is te laag ingesteld. Druk de «+» en «-» toets in bij de thermometer op de gewenste berei-
dingstijd
De bereidingstijd is te kort Druk de «+» en «-» toets in bij de thermometer op de gewenste berei-
dingstijd
De ingrediënten worden in de SimplyFry niet gelijkmatig
gebakken.
Sommige ingrediënten moeten halverwege de bereidingstijd
worden opgeschud. Ingrediënten die boven of door elkaar liggen (bv. frieten) moeten
halverwege de bereidingstijd worden opgeschud. Bekijk hiervoor de
rubriek ‘Instellingen’ in het hoofdstuk ‘Gebruik van het toestel’.
De gebakken snacks zijn niet knapperig wanneer ze uit de
SimplyFry worden gehaald.
U hebt een type snacks gebruikt dat in een traditionele friteuse
had moeten worden bereid Gebruik ovensnacks of breng met een borstel wat olie op de snacks aan
als u een knapperiger resultaat wilt.
Ik kan de pan niet op de juiste manier in het toestel schuiven Er liggen te veel ingrediënten in de mand. Vul de mand niet tot boven de MAX-aanduiding.
De mand is niet correct in de pan geplaatst. Duw de mand naar beneden in de pan tot u een klik hoort.
Er komt witte rook uit het toestel. U bereidt vettige ingrediënten. Wanneer u vettige ingrediënten in de SimplyFry bakt, lekt heel wat olie in
de pan. Die olie brengt een witte rook voort. Bovendien is het mogelijk dat
de pan in die omstandigheden heter wordt dan normaal. Dit heeft geen
invloed op het toestel of op het eindresultaat.
Er zitten in de pan nog vetresten van het vorige gebruik. Witte rook wordt veroorzaakt door vet dat in de pan wordt verhit. Reinig
de pan grondig na elk gebruik.
Verse frieten worden in de SimplyFry niet gelijkmatig gebak-
ken.
U hebt niet het juiste aardappeltype gebruikt. Gebruik verse aardappelen en controleer of ze tijdens het bakken niet
uiteenvallen.
U hebt de gesneden frieten niet grondig genoeg gereinigd voor-
dat u ze hebt gebakken Spoel de frieten grondig om het zetmeel aan de buitenkant te verwijderen.
De verse frieten zijn niet knapperig wanneer ze uit de
SimplyFry worden gehaald.
De knapperigheid van de frieten wordt bepaald door hun olie
-en watergehalte. Droog de frieten grondig voordat u de olie toevoegt.
Snijd de frieten kleiner als u een knapperiger resultaat wilt verkrijgen.
Voeg iets meer olie toe voor een knapperiger resultaat.
Fri_FSF34C_ME_V2.indd 7 27/11/17 16:17

FR
8
DESCRIPTION GÉNÉRALE
Votre nouvelle friteuse à air chaud vous permet de préparer plus sainement vos ingrédients et en-cas préférés. La friteuse à air chaud combine l’utilisation d’air chaud avec une circulation
d’air à grande vitesse (air chaud rapide) et une grille supérieure an de cuire, de façon saine, rapide et facile, différents plats délicieux. Vos ingrédients sont saisis intégralement et, pour la
plupart d’entre eux, il n’est pas nécessaire d’ajouter de l’huile.
1
1 1
9
22
2
3
3
4
1Panier
2Bouton de déverrouillage du panier
3Cuve
4Panneau digital de commandel
5Entrée d’air
6Conduits de sortie d’air (à l’arrière)
7Câble d’alimentation (à l’arrière)
8Bouton Reset (en dessous, à côté de l’étiquette)
7
6
5
Programmes
Frites Poulet Cake
Agneau Viande rouge
Crustacés Poisson
4
Fri_FSF34C_ME_V2.indd 8 27/11/17 16:17

FR
9
IMPORTANT
LISEZ ATTENTIVEMENT CE MODE D’EMPLOI AVANT D’UTILISER L’APPAREIL.CONSERVEZ
LE MODE D’EMPLOI POUR POUVOIR LE CONSULTER ULTÉRIEUREMENT.
DANGER
- N’immergez jamais l’appareil complet, ni dans l’eau ni en le passant sous le robinet, car il contient des
composants électroniques et des résistances.Risque de choc électrique !
- Mettez toujours les ingrédients à frire dans le panier pour éviter qu’ils n’entrent en contact avec les
résistances.
- Ne couvrez pas l’entrée ou la sortie d’air lorsque l’appareil est en marche.
- Ne remplissez pas la cuve d’huile, car cela pourrait provoquer un incendie.
- Ne touchez pas l’intérieur de la friteuse lorsque l’appareil est en marche.
AVERTISSEMENT
- Cet appareil ne convient pas aux personnes (enfants de moins de 8 ans y compris) ayant des capacités
physiques, sensorielles ou mentales réduites ou un manque d’expérience et de connaissances, à moins
qu’elles n’aient reçu des instructions sur l’utilisation de l’appareil de la part de personnes responsables de
leur sécurité. Les enfants doivent être surveillés an qu’ils ne jouent pas avec l’appareil.
- Vériez que la tension indiquée sur l’appareil correspond à la tension de votre installation avant de le brancher.
- N’utilisez pas l’appareil si la prise, le cordon d’alimentation ou l’appareil lui-même est endommagé.
- Si le câble d’alimentation est endommagé, faites-le remplacer par le fabricant, son service après-vente ou
toute personne équivalente qualiée, dans le but d’éviter tout danger.
- Gardez le cordon d’alimentation loin des surfaces chaudes.
- Ne branchez pas l’appareil ou ne manipulez pas le tableau de bord avec des mains mouillées.
- Ne connectez l’appareil qu’à une prise de courant murale. Assurez-vous que l’appareil est correctement
branché dans votre prise de courant murale.
- Ne connectez jamais cet appareil à une minuterie extérieure ou à un système télécommandé séparé, an
d’éviter tout danger.
- Ne placez pas l’appareil sur ou à proximité de matières inammables, comme une nappe ou un rideau.
- Ne placez pas l’appareil contre le mur ou contre d’autres appareils. Laissez une distance d’au moins 10
cm à l’arrière et sur les côtés et un espace libre de 10 cm au-dessus de l’appareil. Ne placez aucun
objet sur l’appareil.
- N’utilisez pas l’appareil à d’autres ns que celles décrites dans ce mode d’emploi.
- Ne laissez pas l’appareil fonctionner sans surveillance.
- Pendant la cuisson, de la vapeur chaude s’échappe à travers les conduits de sortie d’air. Gardez les mains
et le visage assez loin des émanations de vapeur et des conduits de sortie d’air. Faites également attention
à la vapeur chaude et aux températures élevées lorsque vous retirez la cuve de l’appareil.
- Lors de l’utilisation, les surfaces accessibles de l’appareil peuvent devenir très chaudes.
- Débranchez immédiatement l’appareil si vous voyez de la fumée noire en sortir. Attendre l’arrêt d’émission
de fumée avant de retirer la cuve de l’appareil.
ATTENTION
- Placez l’appareil sur un plan horizontal ou une surface stable.
- Cet appareil est exclusivement réservé à l’usage domestique, pour particuliers. Il n’est pas destiné à
l’usage professionnel
- Si l’appareil est utilisé incorrectement ou à des ns professionnelles ou semi-professionnelles ou s’il n’est
pas utilisé selon les instructions du mode d’emploi, la garantie s’annule et nous serions en droit de décliner
toute responsabilité pour les dommages causés.
- Débranchez toujours l’appareil après utilisation.
- Laissez l’appareil refroidir pendant environ 30 minutes avant de le prendre en main ou de le nettoyer.
- Assurez-vous que les ingrédients préparés dans cet appareil en ressortent dorés-jaunes et non noirs ou
marrons. Retirez les parties brûlées.
- Grâce au micro-interrupteur à l’intérieur, l’appareil s’éteindra automatiquement lorsque sera retirée la cuve
durant la cuisson.
PROTECTION CONTRE LA SURCHAUFFE
- L’appareil est équipé d’un système de protection anti-surchauffe. Si le système de contrôle de la tempéra-
ture interne n’est pas valide, la protection anti-surchauffe s’enclenchera automatiquement et l’appareil ne
pourra ainsi plus être utilisé. Débranchez le câble d’alimentation.
- Le bouton RESET sous la machine (à côté de l’étiquette) peut être pressé an d’utiliser la friteuse à
nouveau, mais seulement après le refroidissement complet de l’appareil.
- Le bouton RESET se situe sous la machine, près du centre et est présent sous forme de petit trou.
Enfoncer un ustensile pointu dans le trou an de réinitialiser l’appareil..
ARRÊT AUTOMATIQUE
Cet appareil est équipé d’une minuterie. Lorsque le décompte de la minuterie atteint ‘’0’’, l’appareil sonne et
s’éteint automatiquement. Pour l’éteindre manuellement, diminuer le temps de préparation à 0 (en pressant
sur «-» sous le thermomètre).
Remarque : Si la cuve est retirée pendant la cuisson, l’appareil s’éteint aussi.
CHAMPS ÉLECTROMAGNÉTIQUES
Cet appareil est conforme à toutes les normes concernant les champs électromagnétiques. Si l’appareil
est manié correctement et selon les instructions de ce mode d’emploi, il est alors sûr d’utilisation, selon les
données scientiques actuellement disponibles.
CARACTÉRISTIQUES TECHNIQUES/NORMES
IEC 60335-2-9 : 2002 + A1 : 2004 + A2 : 2008
IEC 60335-1 : 2001 + A1 : 2004 + A2 : 2010
EN 60335-2-9 : 2003 + A1 : 2004 + A2 : 2006 + A12 : 2007 + A13 : 2010
EN 60335-1 : 2002 + A11 : 2004 + A1 : 2004 + A12 : 2006 + A2 : 2006 + A13 : 2012
Fri_FSF34C_ME_V2.indd 9 27/11/17 16:17

FR
10
6. Vous pouvez adapter le temps et la température selon les quantités.
7. Pressez sur pour lancer le programme.
a. Le ventilateur s’illumine et clignote indiquant que la machine est en fonction
b. Le décompte du temps de cuisson programmé se lance.
c. L’excès d’huile venant des ingrédients est récupéré au fond de la cuve.
8. Certains ingrédients nécessitent d’être remués à la moitié du temps de cuisson (voir la section «Para-
mètres» de ce chapitre). Pour cela, retirez la cuve de l’appareil à l’aide de la poignée et secouez-la. Puis,
remettez-la dans la friteuse à air et continuez la cuisson.
Attention : N’appuyez pas sur le bouton de la poignée lorsque vous remuez.
Conseil : An de réduire le poids, retirez le panier de la cuve et ne secouez que le panier. Pour cela, tirez la
cuve hors de l’appareil, placez-la sur une surface résistante à la chaleur et pressez le bouton de la poignée.
Conseil : Si vous réglez la minuterie sur la moitié du temps de cuisson, la sonnerie retentira pour vous
indiquer que vous devez remuer vos ingrédients. Cependant, n’oubliez pas de reprogrammer le temps
de cuisson restant après avoir remué.
Conseil : Si vous réglez la minuterie sur le temps de cuisson complet, il n’y aura pas de sonnerie avant
la n de la cuisson. Vous pouvez retirer la cuve à tout moment pour vérier la cuisson de vos ingrédients.
L’appareil s’éteindra automatiquement et se rallumera après avoir remis la cuve dans celui-ci.
9. Lorsque vous entendez la sonnerie, vous savez alors que le temps de cuisson imparti est écoulé. Retirez
la cuve de l’appareil et placez-la sur une surface résistante à la chaleur.
Remarque : Vous pouvez aussi éteindre l’appareil manuellement. Pour cela, pressez la touche . ou
diminuez le temps jusqu’à 0 ou bien retirez la cuve directement ;
10. Vériez que les ingrédients sont cuits. S’ils ne le sont pas, remettez simplement la cuve dans l’appareil
et réglez la minuterie pour quelques minutes supplémentaires.
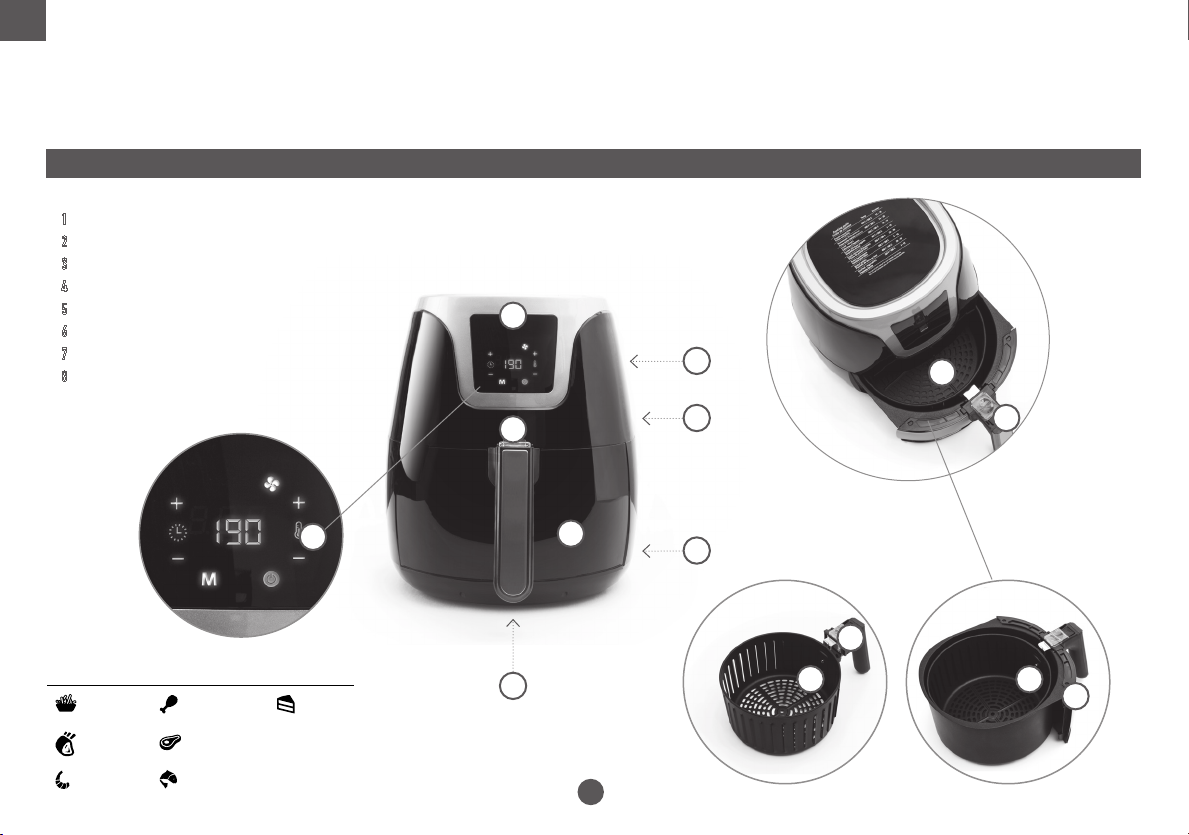
11. Pour retirer de petits ingrédients (comme les frites), pressez le bouton de déverrouillage du panier et
sortez ce dernier de la cuve.
Ne retournez pas le panier lorsqu’il est encore encore attaché à la cuve, ce qui risquerait de faire couler
l’excès d’huile recueilli au fond de la cuve sur les ingrédients.
Après la friture, la cuve et les ingrédients sont encore chauds. En fonction des différents ingrédients, de
la vapeur chaude peut s’échapper de la cuve.
12. Videz les ingrédients du panier dans un bol ou dans une assiette.
Conseil : Vous pouvez utiliser des pinces pour enlever du panier les ingrédients fragiles ou de grande taille.
13. Ces premiers aliments cuits, la friteuse à air est prête à cuire à nouveau.
PARAMÈTRES
Le tableau ci-dessous vous aide à sélectionner les réglages de base pour les ingrédients que vous voulez
faire cuire.
Remarque : N’oubliez pas que ces réglages ne sont donnés qu’à titre indicatif. Nous ne pouvons pas
garantir le meilleur réglage pour chaque ingrédient en raison des différences d’origine, de taille, de forme
et de marque des ingrédients.
Parce que la technologie à air chaud rapide réchauffe instantanément l’air à l’intérieur de l’appareil, le fait de
retirer rapidement la cuve pendant la friture ne perturbe qu’à peine le processus.
Conseils
- Les petits ingrédients, souvent, requièrent un temps de cuisson un peu plus court que celui des gros
ingrédients.
AVANT LA PREMIÈRE UTILISATION
PRÉPARATION DE L’APPAREIL
UTILISATION DE L’APPAREIL
1. Retirez l’appareil de son emballage.
2. Enlevez les autocollants et les étiquettes de l’appareil.
3. Nettoyez soigneusement le panier et la cuve avec de l’eau chaude, du produit vaisselle et une éponge
non abrasive.
Remarque : Ces pièces peuvent être passées au lave-vaisselle.
4. Essuyez l’intérieur et l’extérieur de l’appareil avec un chiffon humide.
Cette friteuse à air fonctionne avec de l’air chaud. Ne remplissez pas la cuve avec de l’huile
ou de la graisse de friture.
1. Placez l’appareil sur un plan horizontal ou une surface stable.
Ne mettez pas l’appareil sur une surface ne résistant pas à la chaleur.
2. Placez correctement le panier dans la cuve.
Remarque : le panier DOIT IMPÉRATIVEMENT être placé correctement dans l’appareil, sinon celui-ci
ne fonctionne pas !
3. Prenez le câble d’alimentation et branchez-le dans une prise murale.
Ne remplissez pas la cuve d’huile ou de tout autre liquide.
Ne recouvrez pas l’appareil.
Ne recouvrez pas l’entrée d’air située sur les deux côtés de l’appareil, cela perturbe le pas-
sage de l’air et affecte le résultat de la friture à air chaud.
La friteuse à air chaud peut cuire un large éventail d’ingrédients. Veuillez vous référer à la section «Para-
mètres» ci-dessous.
FRITURE À AIR CHAUD
1. Branchez le câble d’alimentation dans une prise murale.
2. Retirez prudemment la cuve de la friteuse.
3. Mettez les ingrédients dans le panier.
Remarque : Ne remplissez jamais le panier complètement ou n’excédez pas la quantité recommandée
(voir la section «Paramètres» de ce chapitre), car cela pourrait affecter la qualité du résultat nal.
4. Replacez correctement la cuve dans la friteuse.
N’utilisez jamais la cuve sans que le panier ne soit dedans.
Si la cuve ne se xe pas correctement dans la friteuse, l’appareil ne marchera pas !
Attention : Ne touchez pas la cuve pendant et un certain temps après l’utilisation, car elle
devient très chaude. Ne tenez la cuve que par la poignée.
5. Pour allumer l’appareil, pressez sur la touche . Pour éteindre l’appareil, pressez à nouveau sur la
touche .ou ou pressez sur la touche «-» sous l’horloge pour diminuer le temps à 0.
6. Pressez sur la touche M (modes) pour sélectionner le programme préenregistré de votre choix selon le
type d’aliment.
Fri_FSF34C_ME_V2.indd 10 27/11/17 16:17

FR
11
Min-max Quantité (g) Température (°C) Temps (min.) Remuez Informations supplémentaires
POMMES DE TERRE ET FRITES Frites nes surgelées 300-700 200 9-16
Frites épaisses surgelées 300-700 200 11-20
Frites maison (8×8 mm) 300-800 200 16-10 Ajoutez une 1/2 cuillère à soupe d’huile
Pommes de terre en morceaux maison 300-800 180 18-22 Ajoutez une 1/2 cuillère à soupe d’huile
Pommes de terre en cubes maison 300-750 180 12-18 Ajoutez une 1/2 cuillère à soupe d’huile
Galettes de pommes de terre 250 180 15-18
Gratin de pommes de terre 500 200 15-18
VIANDES ET VOLAILLES Steak 100-500 180 8-12
Côtelettes de porc 100-500 180 10-14
Hamburger 100-500 180 7-14
Saucisses 100-500 200 13-15
Pilons de poulet 100-500 180 18-22
Blanc de poulet 100-500 180 10-15
SNACKS Rouleaux de printemps 100-400 200 8-10
Nuggets de poulet surgelés 100-400 200 6-10
Bâtonnets de poisson surgelés 100-400 200 6-10
Chapelure surgelée / Bouchées au fromage 100-400 180 8-10
Légumes farcis 100-400 160 10
PÂTISSERIES Gâteau 300 160 20-25 Utilisez un moule
Quiche 400 180 20-22 Utilisez un plat ou une plaque de cuisson
Mufns 300 200 15-18 Utilisez un moule
Snacks sucrés 400 160 20 Utilisez un plat ou une plaque de cuisson
Remarque : Préchauffez l’Airfryer en faisant tourner l’appareil à vide pendant 3 minutes pour tous les aliments congelés et/ou à frire
- Une plus grande quantité d’ingrédients nécessite seulement un temps de cuisson légèrement plus long.
Une plus petite quantité d’ingrédients nécessite seulement un temps de cuisson légèrement plus court.
- Remuer les ingrédients plus petits à la moitié du temps de cuisson optimise le résultat nal et peut aider
à éviter que les ingrédients ne soient pas tous frits de manière égale.
- Ajoutez un peu d’huile à des pommes de terre fraîches pour un résultat croustillant. Après avoir ajouté
l’huile, faites frire vos ingrédients dans la friteuse pendant quelques minutes.
- Les snacks qui peuvent être cuits au four peuvent aussi être préparés dans la friteuse.
- Utilisez de la pâte préfaite pour cuire des snacks fourrés de façon simple et efcace. La pâte préfaite
requiert aussi un temps de cuisson plus court que celui d’une pâte faite maison.
- Placez un moule ou une plaque de cuisson dans la friteuse pour cuire un gâteau ou une quiche ou bien
pour cuire des ingrédients fragiles ou fourrés.
- Vous pouvez également utiliser la friteuse pour réchauffer les ingrédients. Pour réchauffer les ingrédients,
mettez la température à 150°C jusqu’à 10 minutes.
Fri_FSF34C_ME_V2.indd 11 27/11/17 16:17

FR
12
NETTOYAGE
RANGEMENT
ENVIRONNEMENT
GARANTIE ET ASSISTANCE
Nettoyez l’appareil après chaque utilisation.
Lors du nettoyage de la cuve et du panier, n’utilisez pas d’ustensiles de cuisine métalliques
ou de produits nettoyants abrasifs an d’éviter d’endommager le revêtement antiadhésif.
1. Débranchez le cordon d’alimentation et laissez l’appareil refroidir.
Remarque : Sortez la cuve de l’appareil pour qu’elle refroidisse plus rapidement.
2. Nettoyez l’extérieur de l’appareil avec un chiffon humide.
3. Nettoyez la cuve et le panier avec de l’eau chaude, du produit vaisselle et une éponge non abrasive.
Vous pouvez utiliser un produit dégraissant pour éliminer toute saleté restante.
Remarque : La cuve et le panier peuvent être lavés au lave-vaisselle.
Conseil : Si de la saleté est coincée dans le panier ou au fond de la cuve, remplissez cette dernière
d’eau chaude avec un peu de produit vaisselle. Mettez le panier dans la cuve et laissez-les tremper
pendant environ 10 minutes.
4. Nettoyez l’intérieur de l’appareil avec de l’eau chaude et une éponge non abrasive.
5. Nettoyez l’élément chauffant avec une brosse nettoyante an de retirer tout résidu alimentaire.
1. Débranchez l’appareil et laissez-le refroidir.
2. Assurez-vous que toutes les pièces sont propres et sèches.
3. Rangez la friteuse dans un endroit propre et sec.
Ne jetez pas l’appareil avec les déchets ménagers normaux à la n de sa vie, mais apportez-le
à un centre de collecte ofciel pour le recyclage. Ainsi, vous contribuez à la préservation de
l’environnement.
Si vous avez besoin d’assistance ou d’informations supplémentaires ou si vous avez un souci, consultez
notre site web ou contactez votre vendeur.
RÉALISER DES FRITES MAISON
Pour réaliser des frites maison, suivez les étapes ci-dessous :
1. Épluchez les pommes de terre et découpez-les en bâtonnets.
2. Lavez les bâtonnets soigneusement et séchez-les avec du papier cuisson.
3. Versez 1/2 cuillère à soupe d’huile d’olive dans un bol, mettez les bâtonnets au-dessus et mélangez
le tout jusqu’à ce que les bâtonnets soient complètement recouverts d’huile.
4. Retirez les bâtonnets du bol avec vos doigts ou avec un ustensile de cuisine an que l’excès d’huile
reste dans le bol. Mettez-les dans le panier.
Remarque : Ne penchez pas le bol pour mettre tous les bâtonnets dans le panier en une fois,sinon
l’excédent d’huile coulera au fond de la cuve.
5. Faites frire les bâtonnets de pommes de terre selon les instructions de ce chapitre.
www.frifri.be
Votre vendeur :
Fri_FSF34C_ME_V2.indd 12 27/11/17 16:17

FR
13
DÉPANNAGE
PROBLÈME CAUSE POSSIBLE SOLUTION
La friteuse ne fonctionne pas L’appareil n’est pas branché. Branchez le câble d’alimentation dans une prise murale.
Vous n’avez pas programmé le minuteur. Pressez sur les touches "+"ou "-" entourant l'horloge pour programmer le
temps
La cuve n’est pas placée correctement dans l’appareil. Mettez la cuve correctement dans l’appareil.
Le système de protection de surchauffe est enclenché. Utilisez un objet pointu pour appuyer sur le bouton RESET au-dessous de
l’appareil.
Les ingrédients frits avec la friteuse à air ne sont pas
prêts.
La quantité d’ingrédients dans le panier est trop importante. Mettez une plus petite quantité d’ingrédients dans le panier. Les petites quanti-
tés sont cuites de façon plus uniforme.
La température programmée est trop basse. Pressez sur les touches «+»ou «-» entourant le thermomètre pour programmer
la température
Le temps de cuisson est trop court. Pressez sur les touches «+»ou «-» entourant l’horloge pour programmer la
température
Les ingrédients ne sont pas tous cuits de la même
façon dans la friteuse.
Certains types d’ingrédients doivent être remués à la moitié du
temps de cuisson. Les ingrédients qui reposent sur le dessus ou qui s’entrecroisent (comme les
frites) ont besoin d’être remués à la moitié du temps de cuisson. Voir la section
«Paramètres» du chapitre «Utilisation de l’appareil».
Les snacks frits ne sont pas croustillants lorsqu’ils sont
retirés de la friteuse.
Vous avez utilisé un type de snacks qui devaient être cuits dans
une friteuse traditionnelle. Utilisez des snacks à faire cuire au four ou enduisez-les d’un peu d’huile pour
un résultat croustillant.
Je ne peux pas mettre la cuve correctement dans
l’appareil.
Il y a trop d’ingrédients dans le panier. Ne remplissez pas le panier au-delà de l’indication «MAX».
Le panier n’est pas correctement mis dans la cuve. Enfoncez le panier dans la cuve jusqu’à entendre un clic.
De la fumée blanche sort de l’appareil. Vous faites frire des aliments riches en matières grasses. Lorsque vous faites frire des aliments gras dans la friteuse, une quantité impor-
tante d’huile coule dans la cuve. L’huile produit de la fumée blanche et la cuve
peut chauffer plus que d’ordinaire. Cela n’affecte cependant pas l’appareil ni
le résultat nal.
La cuve contient des résidus de graisse de l’utilisation précé-
dente. La fumée blanche est causée par la cuisson de résidus de graisse dans la cuve.
Nettoyez soigneusement la cuve et le panier après chaque utilisation.
Les frites fraîches ne sont pas cuites de la même façon
dans la friteuse.
Vous n’avez pas utilisé la bonne variété de pommes de terre. Utilisez des pommes de terre fraîches et assurez-vous qu’elles restent fermes
durant la cuisson.
Vous n’avez pas bien rincé les bâtonnets de pommes de terre
avant de les faire frire. Rincez bien les bâtonnets de pommes de terre an d’enlever l’amidon sur
l’extérieur des bâtonnets.
Les frites fraîches ne sont pas croustillantes lorsqu’elles
sont retirées de la friteuse.
Le côté croustillant des frites dépend de la quantité d’huile et
d’eau dans les frites. Assurez-vous de sécher les bâtonnets de pommes de terre avant d’ajouter
de l’huile.
Faites les bâtonnets plus petits pour un résultat plus croustillant.
Ajoutez un peu plus d’huile pour un résultat plus croustillant.
Fri_FSF34C_ME_V2.indd 13 27/11/17 16:17

EN
14
GENERAL DESCRIPTION
Your new air fryer allows you to prepare your favorite ingredients and snacks in a healthier way. The air fryer uses hot air in combination with high-speed air circulation (rapid hot air) and
a top grill to prepare a variety of tasty dishes in a healthy, fast and easy way. Your ingredients are heated from all sides at once and there is no need to add oil to most of the ingredients.
1
1 1
8
22
2
3
3
4
4
1Basket
2Basket release button
3Pan
4Digital display
5Air inlet
6Air outlet openings (at the back)
7Mains cord (at the back)
8Reset Button (at the bottom beside the Rating Label)
7
6
5
Programmes
Fries Chicken Cake
Lamb Red meat
Shrimps Fish
Fri_FSF34C_ME_V2.indd 14 27/11/17 16:17

EN
15
IMPORTANT
READ THIS USER MANUAL CAREFULLY BEFORE YOU USE THE APPLIANCE AND SAVE IT
FOR FUTURE REFERENCE.
DANGER
- Never immerse the housing, which contains electrical components and the heating elements, in water nor
rinse under the tap. Risk of electric shock.
- Always put the ingredients to be fried in the basket, to prevent it from coming into contact with the heating
elements.
- Do not cover the air inlet and the air outlet openings while the appliance is operating.
- Do not ll the pan with oil as this may cause a re hazard.
- Never touch the inside of the appliance while it is operating.
WARNING
- This appliance is not intended for use by persons (including children under 8 ) with reduced physical, sen-
sory or mental capabilities, or lack of experience and knowledge, unless they have been given supervision
or instruction concerning the use of appliance by a person responsible for their safety. Children should be
supervised to ensure that they do not play with the appliance.
- Check if the voltage indicated on the appliance corresponds to the local mains voltage before you connect
the appliance.
- Do not use the appliance if the plug, the mains cord or the appliance itself is damaged.
- If the mains cord is damaged, you must have it replaced by the manufacturer, its service agent or similarly
qualied persons in order to avoid a hazard.
- Keep the mains cord away from hot surfaces.
- Do not plug in the appliance or operate the control panel with wet hands.
- Only connect the appliance to an earthed wall socket. Always make sure that the plug is inserted into the
wall socket properly.
- Never connect this appliance to an external timer switch or separate remote-control system in order to
avoid a hazardous situation.
- Do not place the appliance on or near combustible materials such as a tablecloth or curtain.
- Do not place the appliance against a wall or against other appliances. Leave at least 10cm free space
on the back and sides and 10cm free space above the appliance. Do not place anything on top of the
appliance.
- Do not use the appliance for any other purpose than described in this manual.
- Do not let the appliance operate unattended.
- During hot air frying, hot steam is released through the air outlet openings. Keep your hands and face at a
safe distance from the steam and from the air outlet openings. Also be careful of hot steam and air when
you remove the pan from the appliance.
- The accessible surfaces may become hot during use.
- Immediately unplug the appliance if you see dark smoke coming out of the appliance. Wait for the smoke
emission to stop before you remove the pan from the appliance.
CAUTION
- Place the appliance on a horizontal, even and stable surface.
- This appliance is intended for normal household use only for private individuals
- If the appliance is used improperly or for professional or semi-professional purposes or if it is not used
according to the instructions in the user manual, the guarantee becomes invalid and we could refuse any
liability for damage caused.
- Always unplug the appliance after use.
- Let the appliance cool down for approx. 30 minutes before you handle or clean it.
- Make sure the ingredients prepared in this appliance come out golden-yellow instead of dark or brown.
Remove burnt remnants.
- Thanks to the micro switch inside, when pull out the pan during cooking, the appliance will be shut-off
power automatically.
OVERHEATING PROTECTION
- The appliance is equipped with an overheating protection system: if the inner temperature control system
invalid, the overheating protection is automatically turned on, the appliance is no longer ready to be used.
Unplug the mains cord.
- Only after the appliance has been left to cool down completely should the RESET button at the bottom of
the machine (beside the rating label) be operated in order to use the air fryer again.
- The RESET button is a little hole located under the machine in the center. to RESET the machine, you can
introduce a pointed and thin object into the hole.
AUTOMATIC SWITCH-OFF
This appliance is equipped with a timer. When the timer has counted down to 0, the appliance produces a
bell sound and switches off automatically. To switch off the appliance manually, press the «-» touch nearby
the timer to reduce the time at «0»
Note: If pull out the pan during cooking, the appliance will be switched off automatically, too.
ELECTROMAGNETIC FIELDS (EMF)
This appliance is compliant with all standards regarding electromagnetic elds (EMF). If handled properly and
according to the instructions in this user manual, the appliance is safe to use based on scientic evidence
available today.
TEST SPECIFICATIONS/STANDARD
IEC 60335-2-9 : 2002 + A1 : 2004 + A2 : 2008
IEC 60335-1 : 2001 + A1 : 2004 + A2 : 2010
EN 60335-2-9 : 2003 + A1 : 2004 + A2 : 2006 + A12 : 2007 + A13 : 2010
EN 60335-1 : 2002 + A11 : 2004 + A1 : 2004 + A12 : 2006 + A2 : 2006 + A13 : 2012
Fri_FSF34C_ME_V2.indd 15 27/11/17 16:17

EN
16
8. Some ingredients require shaking halfway through the preparation time (see section ’Settings’).To shake
the ingredients, pull the pan out of the appliance by the handle and shake it. Then slide the pan back into
the air fryer and continue to cook.
Caution: Do not press the button of the handle during shaking.
Tip: To reduce the weight, you can remove the basket from the pan and shake the basket only. To do so,
pull the pan out of the appliance, place it on a heat-resistant surface and press the button of the handle.
Tip: If you set the timer to half the preparation time, you hear the timer bell when you have to shake
the ingredients. However, this means that you have to set the timer again to the remaining preparation
time after shaking.
Tip: If you set the timer to full preparation time, there is no timer bell during cooking before nishing, you
can pull out the pan at any time to check the ingredients cooking condition, the power will shut down
automatically and resume after slide the pan back into the appliance.
9.When you hear the bell, the set preparation time has elapsed. Pull the pan out of the appliance and place
it on a heat-resistant surface.
Note: You can also switch off the appliance manually. To do this, press the touch, or press the
«-»touch nearby the timer to reduce the time to 0, or pull out the pan directly.
10. Check if the ingredients are ready.
If the ingredients are not ready yet, simply slide the pan back into the appliance and set the timer to a
few extra minutes.
11. To remove small ingredients (e.g. fries), press the basket release button and lift the basket out of the pan.
Do not turn the basket upside down with the pan still attached to it, as any excess oil that has collected
on the bottom of the pan will leak onto the ingredients.
After hot air frying, the pan and the ingredients are hot. Depending on the type of the ingredients in the
air fryer, steam may escape from the pan.
12. Empty the basket into a bowl or onto a plate.
Tip: To remove large or fragile ingredients, use a pair of tongs to lift the ingredients out of the basket
13. When a batch of ingredients is ready, the air fryer is instantly ready for preparing another batch.
SETTINGS
This table below helps you to select the basic settings for the ingredients you want to prepare.
Note: Keep in mind that these settings are indications. As ingredients differ in origin, size, shape as well as
brand, we cannot guarantee the best setting for your ingredients.
Because the rapid hot air technology instantly reheats the air inside the appliance, pulling the pan briey out
of the appliance during hot air frying barely disturbs the process.
BEFORE FIRST USE
PREPARING FOR USE
USING THE APPLIANCE
1. Remove all packaging material.
2. Remove any stickers or labels from the appliance.
3.Thoroughly clean the basket and pan with hot water, some washing-up liquid and a non-abrasive sponge.
Note: You can clean these parts in the dishwasher.
4. Wipe the inside and outside of the appliance with a moist cloth.
This is an air fryer that works on hot air. Do not ll the pan with oil or frying fat.
1. Place the appliance on a stable, horizontal and level surface.
Do not place the appliance on non-heat-resistant surfaces.
2. Place the basket in the pan properly
Note: the basket MUST be put into the appliance properly, otherwise the appliance doesn’t work!
3. Pull the mains cord and plug into the earthed wall socket.
Do not ll the pan with oil or any other liquid.
Do not put anything on top of the appliance.
Do not put anything on the air-inlet on the two sides of the appliance, this disrupts the
airow and affects the hot air frying result.
The SimplyFry can prepare a large range of ingredients. Please refer to the section “settings” hereinafter.
HOT AIR FRYING
1. Put the mains plug into an earthed wall socket.
2. Carefully pull the pan out of the air fryer.
3. Put the ingredients in the basket.
Note: Never ll the basket in full or exceed the recommended amount (see section ‘Settings’), as this
could affect the quality of the end result.
4. Slide the pan back into the air fryer properly.
Never use the pan without the basket in it.
If the pan doesn’t be xed into the air fryer properly, the appliance won’t work!
Caution: Do not touch the pan during and some time after use, as it gets very hot. Only
hold the pan by the handle.
5. Switch on the appliance, press the touch, to switch off the appliance, press the touch or press the
«-»-touch nearby the timer to reduce the time to 0.
6. Press the «M»touch to select the program of your choice according to your ingredients
7. Determine the required preparation time and temperature in accordance with the quantity-.Press the
touch to launch the program.
a. The fan icon light goes on and blinks. it means that the SimplyFry is working.
b. The timer starts counting down the set preparation time.
c. Excess oil from the ingredients is collected on the bottom of the pan.
Fri_FSF34C_ME_V2.indd 16 27/11/17 16:17

EN
17
Min-max Amount (g) Temperature (°C) Time (min.) Shake Extra
POTATOS & FRIES Thin frozen fries 300-700 200 9-16
Thick frozen fries 300-700 200 11-20
Home-made fries (8×8 mm) 300-800 200 16-10 Add 1/2 tbsp of oil
Home-made potato wedges 300-800 180 18-22 Add 1/2 tbsp of oil
Home-made potato cubes 300-750 180 12-18 Add 1/2 tbsp of oil
Rosti 250 180 15-18
Potato gratin 500 200 15-18
MEAT & POULTRY Steak 100-500 180 8-12
Pork chops 100-500 180 10-14
Hamburger 100-500 180 7-14
Sausage roll 100-500 200 13-15
Drumsticks 100-500 180 18-22
Chicken breast 100-500 180 10-15
SNACKS Spring rolls 100-400 200 8-10
Frozen chicken nuggets 100-400 200 6-10
Frozen sh ngers 100-400 200 6-10
Frozen breadcrumbed / cheese snacks 100-400 180 8-10
Stuffed vegetables 100-400 160 10
BAKING Cake 300 160 20-25 Use baking tin
Quiche 400 180 20-22 Use baking tin/oven dish
Mufns 300 200 15-18 Use baking tin
Sweet snacks 400 160 20 Use baking tin/oven dish
Note: Add 3 minutes of preheating for frying fresh or frozen ingredients.
Tips
- Smaller ingredients usually require a slightly shorter preparation time than larger ingredients.
- A larger amount of ingredients only requires a slightly longer preparation time, a smaller amount of ingre-
dients only requires a slightly shorter preparation time.
- Shaking smaller ingredients halfway through the preparation time optimizes the end result and can help
prevent unevenly fried ingredients.
- Add some oil to fresh potatoes for a crispy result. Fry your ingredients in the air fryer within a few minutes
after you added the oil.
- Snacks that can be prepared in a oven can also be prepared in the SimplyFry
- Use pre-made dough to prepare lled snacks quickly and easily. Pre-made dough also requires a shorter
preparation time than home-made dough.
- You can also use the air fryer to reheat ingredients. To reheat ingredients, set the temperature to 150°C
for up to 10 minutes.
Fri_FSF34C_ME_V2.indd 17 27/11/17 16:17

EN
18
CLEANING
STORAGE
ENVIRONMENT
GUARANTEE AND SERVICE
Clean the appliance after every use.
The pan and the basket, do not use metal kitchen utensils or abrasive cleaning materials to
clean them, as this may damage the non-stick coating.
1. Remove the mains plug from the wall socket and let the appliance cool down.
Note: Remove the pan to let the air fryer cool down more quickly.
2. Wipe the outside of the appliance with a moist cloth.
3. Clean the pan and the basket with hot water, some washing-up liquid and a non-abrasive sponge.
You can use a degreasing liquid to remove any remaining dirt.
Note: The pan and basket are dishwasher-proof.
4. Clean the inside of the appliance with hot water and non-abrasive sponge.
5. Clean the heating element with a cleaning brush to remove any food residues.
1. Unplug the appliance and let it cool down.
2. Make sure all parts are clean and dry.
3. Put the air fryer on the clean and dry place.
Do not throw away the appliance with the normal household waste at the end of its life, but
hand it in at an ofcial collection point for recycling. By doing this, you help to preserve the
environment.
If you need service or information or if you have a problem, please visit our website or contact your
distributor.
MAKING HOME-MADE FRIES
To make home-made fries, follow the steps below.
1. Peel the potatoes and cut them into sticks.
2. Wash the potato sticks thoroughly and dry them with kitchen paper.
3. Pour 1/2 tablespoon of olive oil in a bowl, put the sticks on top and mix until the sticks are coated
with oil.
4. Remove the sticks from the bowl with your ngers or a kitchen utensil so that excess oil stays behind
in the bowl. Put the sticks in the basket.
Note: Do not tilt the bowl to put all the sticks in the basket in one go, to prevent excess oil from
ending up on the bottom of the pan.
5. Fry the potato sticks according to the instructions in this chapter.
www.frifri.be
Your distributor:
Fri_FSF34C_ME_V2.indd 18 27/11/17 16:17

EN
19
TROUBLESHOOTING
PROBLEM POSSIBLE CAUSE SOLUTION
The air fryer does not work The appliance is not plugged in. Put the mains plug in an earthed wall socket.
You have not set the timer. Turn the timer knob to the required preparation time to switch on the appliance.
The pan is not put into the appliance properly. Slide the pan into the appliance properly.
The overheating protection is turned on. Use a pointed object to press the RESET button at the bottom of the appliance.
The ingredients fried with the air fryer are not done. The amount of ingredients in the basket is too big. Put smaller batches of ingredients in the basket. Smaller batches are fried more
evenly.
The set temperature is too low. Turn the temperature control knob to the required temperature setting (see
section ‘settings’ in chapter ‘Using the appliance’).
The preparation time is too short. Turn the timer knob to the required preparation time (see section ‘Settings’ in
chapter’ Using the appliance’).
The ingredients are fried unevenly in the air fryer. Certain types of ingredients need to be shaken halfway through
the preparation time. Ingredients that lie on top of or across each other (e.g.fries) need to be shaken
halfway through the preparation time. See section‘Settings’ in chapter ‘Using
the appliance’.
Fried snacks are not crispy when they come out of the
air fryer.
You used a type of snacks meant to be prepared in a traditional
deep fryer. Use oven snacks or lightly brush some oil onto the snacks for a crispier result.
I cannot slide the pan into the appliance properly. There are too much ingredients in the basket. Do not ll the basket beyond the MAX indication.
The basket is not placed in the pan correctly. Push the basket down into the pan until you hear a click.
White smoke comes out of the appliance. You are preparing greasy ingredients. When you fry greasy ingredients in the air fryer, a large amount of oil will leak
into the pan.The oil produces white smoke and the pan may heat up more than
usual. This does not affect the appliance or the end result.
The pan still contains grease residues from previous use. White smoke is caused by grease heating up in the pan . make sure you clean
the pan properly after each use.
Fresh fries are fried unevenly in the air fryer. You did not use the right potato type. Use fresh potatoes and make sure they stay rm during frying
You did not rinse the potato sticks properly before you fried them. Rinse the potato sticks properly to remove starch from the outside of the sticks.
Fresh fries are not crispy when they come out of the
air fryer.
The crispiness of the fries depends on the amount of oil and
water in the fries. Make sure you dry the potato sticks properly before you add the oil.
Cut the potato sticks smaller for a crispier result.
Add slightly more oil for a crispier result.
Fri_FSF34C_ME_V2.indd 19 27/11/17 16:17

ME_SimplyFry_1707
www.frifri.be
Fri_FSF34C_ME_V2.indd 20 27/11/17 16:17
Table of contents
Languages:
Other FriFri Fryer manuals

FriFri
FriFri Profi 6 User manual

FriFri
FriFri Eco 4 User manual

FriFri
FriFri Basic Series User manual

FriFri
FriFri Profi 6 User manual

FriFri
FriFri Eco 4 User manual

FriFri
FriFri RETRO FRI0802015BLP User manual

FriFri
FriFri 1948 Duofil User manual

FriFri
FriFri EASY 411 User manual

FriFri
FriFri Basic+ User manual

FriFri
FriFri 1905 DuoFil User manual