3
PRODUKTZEICHNUNGEN | PRODUCT’S VIEW | RYSUNKI PRODUKTU | NÁKRESY PRODUKTU | SCHÉMAS DU PRODUIT
LE ILLUSTRAZIONI DI PRODOTTO | LAS ILUSTRACIONES DE PRODUCTO
22.10.2019
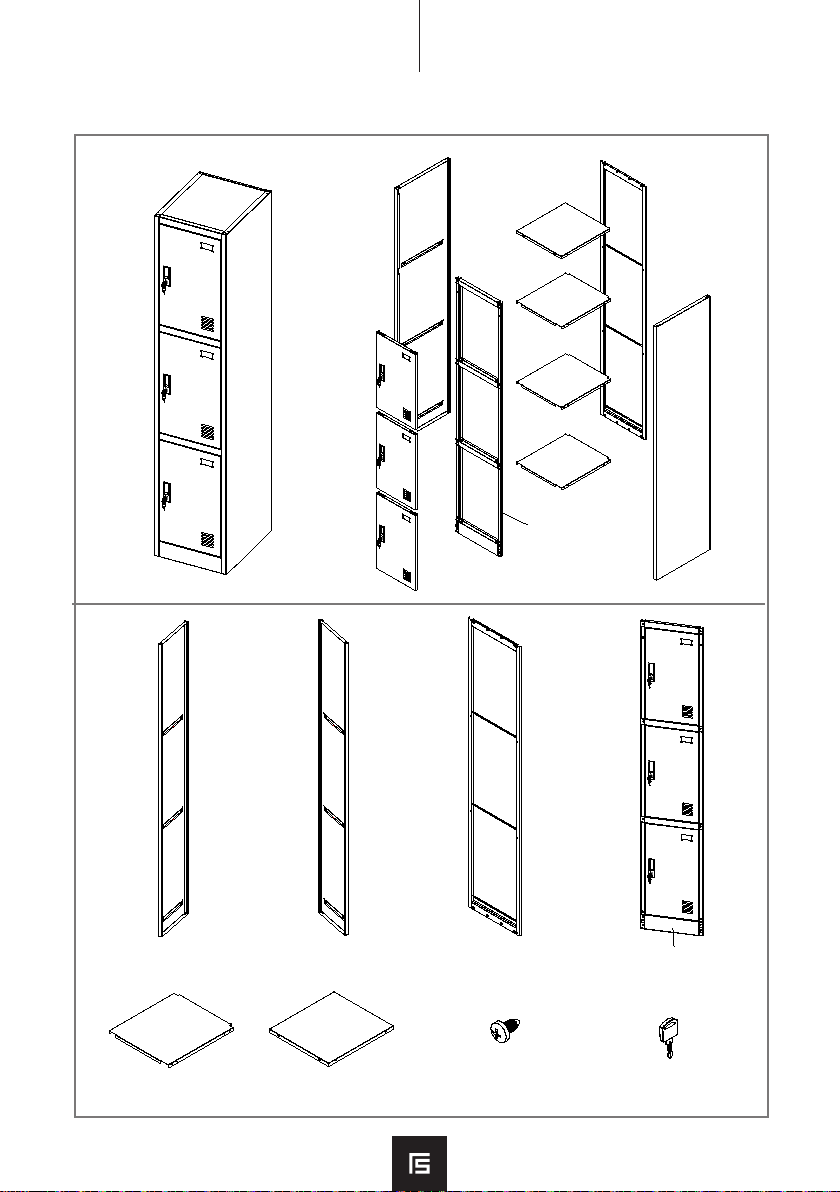
Parts list
Page 1
Assembly Instruction
General View
Required Tools
-
Rubber Mallet
-Small Slotted screwdriver
-Small Philips screwdriver
(handle assembly)
1.It is recommended that the cabinets are assembled
by more than one person.
2.The use of a raised flat surface during assembly is
highly recommended.
3.During shipping and handing,some of the tabs that
are used for assembly may have closed together.
Use a small slotted screwdriver to either pry up or
push from behind the tab to re-open.
4.Make sure that the unit is placed on a level surface,
as this may effect the performance of the unit.
A
8pcs
Accessories list
B C D
F
E
left side 1pc right side 1pc door 3pcs
frame 1pc
back 1pc
down 3pcs top 1pc
6pcs
B
AC
F
E
E
E
D
G
G
G
G
G
G
Parts list
Page 1
Assembly Instruction
General View
Required Tools
-
Rubber Mallet
-Small Slotted screwdriver
-Small Philips screwdriver
(handle assembly)
1.It is recommended that the cabinets are assembled
by more than one person.
2.The use of a raised flat surface during assembly is
highly recommended.
3.During shipping and handing,some of the tabs that
are used for assembly may have closed together.
Use a small slotted screwdriver to either pry up or
push from behind the tab to re-open.
4.Make sure that the unit is placed on a level surface,
as this may effect the performance of the unit.
A
8pcs
Accessories list
B C D
F
E
left side 1pc right side 1pc door 3pcs
frame 1pc
back 1pc
down 3pcs top 1pc
6pcs
B
AC
F
E
E
E
D
G
G
G
G
G
G
Ax1
Parts list
Page 1
Assembly Instruction
General View
Required Tools
-
Rubber Mallet
-Small Slotted screwdriver
-Small Philips screwdriver
(handle assembly)
1.It is recommended that the cabinets are assembled
by more than one person.
2.The use of a raised flat surface during assembly is
highly recommended.
3.During shipping and handing,some of the tabs that
are used for assembly may have closed together.
Use a small slotted screwdriver to either pry up or
push from behind the tab to re-open.
4.Make sure that the unit is placed on a level surface,
as this may effect the performance of the unit.
A
8pcs
Accessories list
B C D
F
E
left side 1pc right side 1pc door 3pcs
frame 1pc
back 1pc
down 3pcs top 1pc
6pcs
B
AC
F
E
E
E
D
G
G
G
G
G
G
Bx1 Cx1 Dx1
Ex3 Fx1 x8 x6
G
G
G